How to make epoxy resin jewelry. Epoxy resin jewelry: how to make extraordinary jewelry. Master class on making jewelry. Photos of crafts made from epoxy resin
Read also
Designers and craftswomen have learned to preserve entire worlds frozen in glass. In fact, all these shells, tiny buds, leaves and insects are forever frozen not in glass or amber, but in simple epoxy resin that is accessible to everyone. And you don’t need to have a laboratory or a separate room to create it yourself. Today we will learn how to create epoxy resin with your own hands, and then use it to make your own masterpiece.
Advantages of epoxy resin and its differences from epoxy glue
Despite the fact that the name contains the word “resin”, you will not find natural components in its composition, because it is a completely synthetic product created in laboratories for many areas - from construction to handicrafts.

Epoxy resin is a mixture of two components: a hardener and the resin itself. Depending on the ratio of the parts of the hardener and resin included in it, it can be thick, liquid or even dense. Therefore, it is very important to follow the label instructions when mixing epoxy resin at home.
Properties of epoxy resin
Epoxy resin is great for creating jewelry, decorative items, and even coating large surfaces. It has the following properties:
- it is very durable
- not subject to abrasive wear,
- transparent,
- well waterproofed,
- absolutely non-toxic after hardening.
Don’t forget that you can also find epoxy glue on store shelves, which is completely unsuitable for us. Let's start with the fact that the glue itself is a derivative product of resin. It contains not only epoxy resin, but also a solvent, plasticizer, hardener and filler. Therefore, it is also durable, not subject to wear and holds the parts being glued tightly.
Differences between resin and glue
There are significant differences between resin and glue, which reveal disadvantages that are unacceptable for our purposes:
- Glue has a certain curing time that cannot be controlled, while resin curing can be accelerated.
- The resin remains transparent for a long time, while the glue quickly begins to turn yellow.
- Epoxy glue is less elastic and hardens faster, while resin is more pliable and allows you to work with it with more precision.
- Glue can only be used to join parts together, while resin is suitable for making beads and other shapes of a given shape.
- Depending on the proportion used when mixing the resin and hardener, we can get the desired consistency that suits our needs; the glue is sold as a ready-made mixture.
Safety rules when working with resin
In order to avoid harm from the vapors that are formed when mixing the hardener and resin (the polymerization process entails significant heat generation), it is necessary to follow some safety rules.
- Arm yourself with gloves.
- Wear a protective mask or respirator to prevent harm to yourself.
- Ventilate the room while working.
- Warn your household not to enter the room while you are busy, or be sure to wear a mask.
- Before you start work, organize your workspace so that you won’t be distracted afterwards.
If you don’t have a special surface to work on, you can use film or a simple file so you don’t have to worry about the table and what might happen to it during work.
How to make your own epoxy resin
After reading the instructions, preparing all the materials and work area, and following safety precautions, you can begin creating epoxy resin for your ideas.
So, to create epoxy resin with your own hands we will need:
- resin and hardener,
- disposable syringes or measuring cups,
- stirring stick (toothpick, skewer or other piece of wood of suitable length).

Carefully read the instructions for the components of the epoxy resin
First, mix the components in one small container.
Mixing components must be maintained at a temperature no higher than +25°C.
It is most convenient to measure the required amount of resin and hardener with disposable syringes, so you will know the exact proportion and will not lose a drop when pouring them into a common vessel. Or use measuring cups, bearing in mind that from now on they cannot be used for anything else.

Do not try to make reserves, because once the mixture polymerizes, it becomes unsuitable for further use.
Gently mix the resulting composition in a circle to reduce the likelihood of bubbles appearing, because they can ruin the appearance of the epoxy resin craft.

If bubbles cannot be avoided, then they can be dealt with. To do this, you first need to let the mixture settle and then heat it up. The bubbles will definitely rise to the surface, which will allow us to carefully remove them. After this, the mixture can be used for your ideas.
Treatment of resin after hardening
Once the resin has cured, it may need to be treated as the composition may appear cloudy or uneven. Thanks to the elasticity of the composition, we can bring it to mind, and not throw it away in disappointment, thinking that nothing worked out for us.

The resin became cloudy after hardening
For sanding the product, sandpaper or even a milling cutter for polishing nails is suitable.
Since there will be a lot of dust during sanding, it is worth wearing a respirator, and it is best to moisten the sandpaper with water.

In this tutorial from DreamWorkshop, you'll find step-by-step photos of the resin creation process and some great tips on how to make cured resin clear and smooth using very simple tools.
DIY epoxy resin crafts
So, we learned how to make epoxy resin ourselves, talked about precautions and organization of the workplace. It's time to try your hand further. After all, creating crafts from epoxy resin with your own hands is not as difficult as it might seem at first glance.
To begin with, it is worth noting that a material such as epoxy resin is quite versatile and can be used in needlework in different ways. It is used to create both individual jewelry and fittings, which complement works made using other techniques. It is great for figurines, cabochons and even stained glass.
Creating crafts using pouring molds - molds
The most common form of using resin is to fill silicone molds with it. The resulting blanks can be used in the future as pendants, beads, pendants, key rings, etc. The variety of molds allows you to create even rings and bracelets from epoxy resin.

Such molds should be made of high-quality platinum silicone, which will be resistant to the solution being poured and will allow the frozen product to be easily removed from it.

Advantages of molds
The advantages of such filling forms are precisely that:
- Currently you can buy them at any handicraft store
- they are plastic
- do not react with resin
- don't stick to it

What decor to use when creating crafts
Molds are great for pouring dried flowers, foliage, moss or shells into them - any three-dimensional element. To do this, you only need epoxy resin, a suitable silicone mold, as well as pre-prepared decorative elements.
Be sure to pay attention to preparation! Leaves, flowers and buds must be thoroughly dried so that over time they do not turn black, spoiling the appearance of the finished product. It is best to degrease shells, crystals and stones with alcohol or solvent, and then dry them too.
You can add not only dense decorative elements to the resin, but also gold leaf, glitter and even stained glass paint, but not much (so as not to spoil the ratio of the main components and not to violate the specified consistency).

Crafts made from epoxy resin can be decorated with plants...

...sparkles...

With this method of filling, decorative elements are most often unevenly distributed over the shape of the product. This is clearly seen in the example with the bracelet:

In the case when the decorative elements are small, heavy and/or you just want to place them in the center of the mold, it is first recommended to fill the mold with resin, and then immerse the necessary decor into it - leaves, small shells, dried berries - whatever your heart desires!

Method 2. When the resin has settled, pour it into the mold in a thin stream, distribute it evenly throughout the entire mold, and then immerse the selected decorative elements into it, helping yourself with a toothpick.

If you are limited in time or are afraid of bubbles, you can put the pan in the oven, preheated to 80°C (switched off and ventilated) for 15-20 minutes. After this, let the workpiece stand in the mold for at least a day so as not to damage the surface of the resin. Carefully remove the bracelet, sand it on the top side and varnish it for better preservation.


First, prepare the clay - roll out or twist strips of the desired length using a paste machine, rolling pin or extruder. Then wrap the resulting blank around the shape you like to make a frame, and send it to the oven, following the instructions on the clay pack.
When the frame for your future decoration has cooled, free it from the mold and you can start filling it with epoxy resin.

More details on the technology of making frames from polymer clay can be found in the master class by the author Rusalina.
Method 2: wire frame
If you are familiar with the basics of the Wire Wrap technique, then wire will come to your aid, which can be twisted into any frame or base to surprise others with your author’s vision of jewelry.

Method 3: working with wood
Working with homemade poured molds allows you to go beyond the boundaries imagined by hardware manufacturers. But still, such a combination of techniques requires more perseverance, accuracy and time, since now you create frames and frames yourself, which is a labor-intensive, but at the same time very interesting process.

Natural wood means naturalness...

…beauty…

…and style
However, such products are not so easy to make, and they also require a whole arsenal of special tools, since the wood itself needs to be fully processed and cleaned so that the result does not disappoint.
But if difficulties and painstaking work are your passion, and you already have tools for woodworking in the house, then be sure to try yourself in the unique technique of creating crafts from epoxy resin of different sizes and purposes.


Is decoration all epoxy resin can do?
And yet, despite the fact that these days we most often see epoxy resin only as decoration, it continues to be popular in other areas. So it is used to fill knife handles, to decorate flash drives, key rings and even pens.

And experienced craftsmen have gone even further, using epoxy resin to fill large surfaces. Tables with an incredible imitation of water in the middle or a simple and smooth surface from which an original image emerges, more resistant to fading - this is a reality created by those who love to challenge their talent.

Wooden tabletop with transparent epoxy resin insert

The table top is completely filled with epoxy resin
Those who remain faithful to small forms have also found their own signature style: pocket mirrors and even articulated dolls! It turns out that resin can realize any of our ideas.


As you can see, epoxy resin is capable of a lot and is limited only by the imagination of those who are seriously interested in working with it. Try and go from your first cabochons and beads to masterpieces worthy of the world’s museums of crafts made from epoxy resin!
Jewelry created using epoxy resin and mold amazes with its original appearance. This master class will provide step-by-step instructions, complemented by photographs and a detailed description of each stage. By repeating all the steps of the master, you can independently create a unique decoration that will attract the attention of others.
So, for work we will need:

- epoxy resin;
- silicone molds that are combined with epoxy resin;
- disposable gloves, plastic cups, syringes, sticks for mixing ingredients;
- decorative elements: shells, colored pebbles, dried flowers;
- powder, stained glass paints and gold leaf;
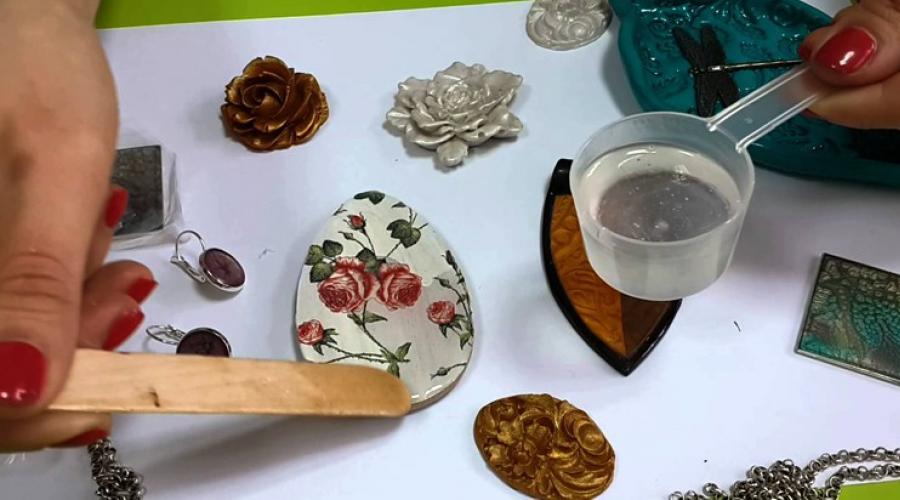
In order not to stain the table surface, it is better to do the work on a regular file. A hemispherical pendant will look beautiful if you add dandelions to it. For work, we will need two dandelions, so that later we can compare how they look in the finished version.

Before work, carefully rinse all molds prepared in advance and wipe them dry with a cloth. Wear disposable gloves to protect your skin from unwanted damage. After this, pour resin and hardener into plastic cups. In the future, it will be convenient to draw them into a syringe. Carry out all jewelry making steps in a well-ventilated room.

Measure out the required amount of epoxy resin and pour it into a clean plastic cup. Using a syringe, draw up the hardener and add it to the resin cup. Different manufacturers indicate different proportions required to obtain the result. Therefore, please read the instructions on the package first. It is important to carefully follow all manufacturers' recommendations for work. The quality and beauty of the finished craft directly depends on the accuracy of the calculations. If you mixed epoxy resin and hardener, but the mixture does not harden, then the proportions are off. This can also happen due to insufficient thorough mixing of the ingredients.
If the syringe has a rubber insert, the hardener will not splash. The resulting mixture is mixed with previously prepared wooden sticks. You can use kebabs skewers. The solution should be stirred for ten minutes in a circular motion.

The dandelion fits very neatly into the mold. Parachutes that interfere with work can be removed using tweezers.

After mixing the ingredients, leave the resin for half an hour. This time is enough for all chemical processes to take place. You can see that a chemical reaction is taking place by the state of the glass. It will heat up. It is not recommended to work with epoxy resin in hot weather, as the reaction proceeds quite violently and the resin completely hardens within half an hour. Although, different manufacturers offer epoxy resins of different quality.
Carefully, in a thin stream, pour epoxy resin over the dandelion placed in the mold.

After hardening, the resin will settle a little. Therefore, it should be poured into the mold with a small margin (convexity).

Now let's try to make beautiful rings from glass washed by the sea.

So, take some resin, lay out the pebbles and fill them with the mixture in the same way as when working with a hemisphere. A small bulge should form.


You can make earrings with dandelion parachutes. Pour a small amount of resin and spread it carefully using a stick. This step will thicken the resin slightly. This will help the parachutes stay in the position in which they were stowed.

Make a bouquet.

Pour some resin on top to create a bulge. If you work very carefully, then minimal sanding of the product will be required in the future.

A truncated ball is created in a similar way. Fill half of the mold with resin.

Using a toothpick or needle, place the required number of parachutes.

Pour epoxy resin into the mold.

Now let's try to make a beautiful bracelet decorated with shells. Pour resin into a special bracelet mold. At this point, the epoxy resin became even thicker. This is what we need. Add pebbles and shells to the mold. The crushed shells will stick to the walls, giving the impression of being suspended.

About half an hour ago a new batch of resin was prepared. It should be poured into the mold from above. This must be done with extreme care to avoid the formation of bubbles. What to do if bubbles appear? Preheat the oven to 80 degrees and place the mold with resin there. Leave in the oven until the temperature increases to 204 degrees. After this, the bubbles will come out.

Make sure that the mold is in a level position during operation. Otherwise, the resin will harden at an angle. Remember that the more carefully you work with epoxy resin, the less sanding you will have to do on the finished product.

Now leave the mold for a day until it dries completely. To prevent debris from getting onto the surface of the future product, cover the mold with a box or lid.
While the bracelet is drying, you can make a pendant. Let's start by creating the main background. To do this, liquid plastic is applied to the workpiece. Cover it with polymer clay, rolled out into a thin layer. The resulting composition is baked in the oven. After cooling, you can start working.

Pour a couple of drops of resin onto the surface. Using tweezers, a composition is made from dried leaves or flowers. In this case, the resin is the glue. She will not allow the composition to budge. Fresh flowers should not be used to create the composition. Over time, they will turn black and lose their appearance.

There is a holder on the back surface of the pendant. It should also be placed in a mold to create a flat surface. It is not necessary to think through the composition in advance. You can create masterpieces by improvising.

The result is a unique picture. The craft needs to be dried. When it dries, a second layer of resin is poured, forming a bulge.

After a day, the bracelet hardened and can be taken out of the mold. This is the top part of the product.

Rings, earrings and pendants are created in a similar way.

Beautiful hemisphere decorated with dandelion.


Unusual truncated transparent balls with parachutes.

You can also make small decorative hemispheres.


Previously made rings decorated with sea glass.

In order to give the epoxy resin a bright shade, you can add a little powder or stained glass paints. If you decide to use stained glass paints, add very little to the resin. Otherwise, the proportions between the resin and hardener may be disrupted. The finished product will not harden, but will become sticky.

If you add gold leaf, you get very unusual jewelry.

And these are beautiful lenses decorated with dandelion parachutes.

The reverse side after drying remained flush with the edges.

This is the reverse side of the pendant, which was obtained after the resin hardened.

It should be sanded carefully. To avoid breathing dust, you can use a respirator.

After grinding, this is the back part of the hemisphere.

All sharp and uneven edges must be carefully sanded after the resin has cured.

We do the same with the bracelet. You can use a special manicure machine.

If you work carefully, then minimal sanding will be required in the future.

Sanded edges can be varnished. The varnish layer should be very thin.

After it dries, you can enjoy the result of the work done.

A very beautiful frame was chosen for the pendant, which is decorated with a miniature steel butterfly.

Transparent epoxy resin can be used to make various products: decorations, flooring, decorative elements, countertops or tables. This material is used to make earrings, rings, pendants, original surfaces with a 3D effect, beautiful figurines or other decorations.
Preparation of resin for products
Epoxy resin floors have many layers, one of which contains a design, usually a color print. The final coating is a transparent epoxy resin through which the design is clearly visible.
To make products, you must use epoxy resin and a hardener. During the process, you need to take into account that if you prepare a large amount of material, it will generate heat.
There are types of resin that harden immediately after the hardener is added. When performing work, it is necessary to follow the correct technology, otherwise the resin may boil and smoke, which will make it impossible to manufacture the product. After hardening, a transparent solid material is obtained.
To make bulk products, a plasticizer is added to the resin, but first the material must be heated. In this case, the viscosity of the resin decreases; to heat the resin, a water bath is used. This heating method helps increase the setting time of the material. The resin should not be allowed to boil, otherwise it will become cloudy and you will not be able to make a transparent product.
The main condition is that there are no drops of moisture on the resin or hardener, otherwise the material will deteriorate and become cloudy. A plasticizer is added to the resin and heating is performed gradually. After the plasticizer is thoroughly mixed with the resin, a hardener is added, and the mixture is pre-cooled to 30 degrees. The hardener is introduced very slowly and the composition is thoroughly stirred; an excessive amount of material will render the resin unusable.
Making a countertop from epoxy resin
You can decorate the tabletop using coins and epoxy resin. To do this, you need to prepare pliers, pliers, glue, autogen, water-based varnish, coins, and epoxy resin with a hardener.
When working with a wooden surface, it must be thoroughly washed, dried, primed, and painted in the chosen color. To restore an old tabletop, the previous coating is removed and the surface is painted.
The most difficult action is bending the coins and cutting them; this can be done using pliers and pliers. If it is not possible to cope with such work, then it is better not to finish the end sections, and place only whole coins.
First, wash the coins so that they shine, then the surface of the tabletop will be bright and original; for this, the coins must be boiled in Cola. You can use another method by putting a container of water on the fire, adding coins to it, adding vinegar and soda. It is necessary to take into account that foam will rise, so there should not be too much water. Instead of folk remedies, you can use special compositions for cleaning metal products.
When all the coins are cleaned, they are thoroughly washed with plain water and dried on a cloth. The process of making a tabletop involves laying coins on the surface and filling the elements with epoxy resin. All work is done sequentially so as not to make mistakes.
- Polyethylene is placed under the surface being manufactured so as not to smear the floor or other interior items. Then the resin is poured, but after adding the hardener, the mixture is left for a while so that it thickens a little and does not spill over the edges.
- The resin will flow down a little, so it must be periodically picked up with a spatula and applied to those places where there is the least amount of material. You don’t have to do this, and after it has completely hardened, just throw away the polyethylene.
- First, the surface is edged from a wooden material, then the coins are beautifully laid out and filled with resin.
- If bubbles appear on the surface from air, they can be removed using an autogen. And then the product is left to dry completely, this will take about two days. Dust and other debris should not settle on the surface.
- When the tabletop is dry, it is coated with water-based varnish, dried again, and only then the product is considered completely finished.
Instead of coins, you can use any original decoration, for example, dried flowers or a color print with a beautiful design. The tabletop can be made original, it all depends on ideas and imagination.


Making a bracelet
To make an unusual bracelet from epoxy resin, you need to stock up on the following materials: resin with a hardener, a toothpick, a plastic glass, dried flowers, scissors, an ice cream stick or skewer, a disposable syringe, and a mold for a silicone bracelet.
Part of the thickener and two resins are poured into a plastic glass. To ensure that the amount of hardener and resin is accurate, use a disposable syringe. The components must be stirred slowly and thoroughly to prevent air bubbles from forming. If they appear, then the composition should be left for a few minutes so that the air is completely released, but the mixture should not thicken too much.
Then the prepared bracelet mold is filled with a viscous composition, dried flowers are placed in the resin, using a toothpick, you can use it to pierce the air bubbles. Then the bracelet is left to harden for about a day, after which it is removed from the mold and used for its intended purpose. Instead of dried flowers, you can take beautiful buttons, rhinestones or beads.


How to make a brooch yourself?
A brooch can be made in the shape of a butterfly; for this you need to take the following materials: A dry butterfly, which is purchased in the store, two toothpicks, resin with a hardener, gloves, scissors, aqua varnish, a special clasp for the brooch.
The butterfly must be divided into several parts; to do this, the wings are cut off from the body and coated with aqua varnish on both sides. Then all parts are laid on a work surface, which is previously covered with polyethylene. First, coat the back side of the wings, lay them on the surface, and then process the front part. While the varnish is drying, it is necessary to make an epoxy composition by gradually adding a hardener to the resin.
The composition must be placed in a dark place to thicken so that it does not flow from the edges of the product during operation. Then all parts are coated with a small layer of resin, and it is carefully smeared on the surface using a toothpick.
Then leave all the parts to dry completely, cover them with epoxy on the back side, and wait for it to harden again. After this, using a plastic solution, all individual parts are glued to the body, creating the required angle. The metal clasp is attached to the resin on the back of the brooch and is left to dry completely. After this, the product is ready for use.
Making a pendant, option No. 1
You can make a pendant from epoxy resin yourself; for this you need to take: a metal mold, a tangerine, scissors, stained glass paint, a mount for the pendant, a silicone compound, sandpaper, a plastic glass, a spoon, and the epoxy itself.
The tangerine must be peeled and the neatest slice selected; using scissors, the skin is removed from one side. On the other hand, you can attach a pin to the workpiece to make a brooch, or attach an eyelet for a chain on top to make a pendant.
The slice is placed in a metal mold, filled with prepared silicone compound, and left to harden. After this, the slices must be removed and discarded, and the mold must be rinsed thoroughly with cold water. The edges can be carefully aligned using scissors.
After a day, the silicone material can be used as a mold for pouring epoxy resin. After the workpiece has completely dried, it must be thoroughly processed with sandpaper. Then the necessary clasp or eyelet for the pendant is attached, the product is painted with stained glass type paint in two layers, and varnished.


Making a round pendant, option No. 2
You can make a round pendant; for this you need to prepare: dried flowers, thickener, sandpaper, polishing paste, scissors, special molds that serve as a mold for pouring. Then you use resin, a plastic glass, tweezers, a felt tip, and an eyelet for hanging.
If there are no molds, you can use a plastic ball, which is cut into two parts, greased with Vaseline from the inside, and after filling with resin, the cut is sealed with plasticine.
You can make gems yourself, from thin twigs, dried flowers from bouquets or small leaves. In this case, the workpieces must be properly dried so that the elements inside the product do not rot in the future. To prevent dried flowers from changing color, use a resin that is resistant to ultraviolet rays.
You can make a small composition from thin twigs and flowers, build a neat bouquet, all elements can be connected using epoxy. After hardening, it is placed in round molds and filled with the prepared solution. After preparation, the mixture is left for several minutes to allow air to escape so that bubbles do not form on the product. After this, the product is left to harden.
When the ball hardens, it may not have a very even shape; all defects can be removed using coarse sandpaper. And then sanding is done with fine grain sandpaper. Usually this work is done in water, this makes it possible to do everything quickly and without dust.
The next step is polishing the product; for this you can use a special product for plastic, that is, polish. The product is applied to a felt nozzle, after which they begin to process the finished ball.
Then an eye is glued to the ball, into which the chain will be threaded; usually such a blank has an extension at the end; epoxy resin is applied to it. After this, the ear is tightly applied to the ball with the expanding end.
A lot of products are made from wood and epoxy resin, and it is also necessary to follow a certain technology. If you follow consistency in your work, you can avoid mistakes and make original jewelry for yourself and your home. You can make many objects from epoxy resin, it all depends on your imagination.
To work you need:
- epoxy resin;
— silicone molds (for epoxy resin);
— disposable gloves, syringes, cups, stirring stick;
— various natural materials (dried flowers, shells, pebbles, etc.);
- gold leaf, stained glass paints, Perlex powder.
I work on a regular file so as not to stain the table.
To create the hemisphere pendant, I selected two different dandelions so that I could compare how they would look in the final version.
Before starting work, thoroughly rinse all molds that we plan to use and wipe them dry. Wearing gloves, pour resin and hardener into disposable cups (it’s more convenient to fill them with a syringe). We work in a well-ventilated area.

Having measured out the required amount of resin, pour it into a clean, dry glass, use another syringe to measure out the required amount of hardener and add it to the resin. Different manufacturers have their own proportions, so carefully read what is written on the packaging and follow all recommendations for work. The final result depends on accuracy; if the resin has not hardened, it means the proportions have been violated, or the mixture is not mixed well enough.
If you take a syringe with a rubber insert inside, the hardener will not splash when you pour it into the epoxy. Using a wooden stick (you can use skewers for kebabs), mix the resulting mixture thoroughly. I time it for 10 minutes and stir it in a circular motion to prevent air from getting in.

We carefully place the dandelion in the mold (I removed the lower parachutes with tweezers)

After mixing, I leave the resin for about half an hour so that the chemical reaction takes place: you can judge that the reaction is taking place by the heated glass of resin. I found experimentally that you should not work in very hot weather, the reaction will begin to proceed very violently and the resin will harden completely within half an hour. This applies to the resin I use; different manufacturers have different criteria.
Gently pour the resin into the mold in a thin stream, onto the dandelion.

Because After it hardens, it will settle a little, pour it so that you get a small convex lens.

Now I will show you how you can make beautiful rings from pieces of glass washed and polished by the sea.

Pour a little resin, place the pebbles, carefully add on top, as when working with a hemisphere, to create a convex surface.


I'm making earrings with dandelion parachutes. Pour some resin and spread it with a stick. At this stage, the resin begins to gradually thicken, this is exactly what is needed so that the parachutes remain in the position in which they were placed.

We arrange the bouquet.

Top it up with resin with a small bulge. If you do this carefully, you will end up needing minimal sanding.

A truncated ball is obtained in exactly the same way. Pour resin halfway into the mold.

We place the required number of parachutes with a toothpick or, as I did, with a large needle (it’s good to wipe it off the resin).

Add resin to the mold with dandelion.

Now we’ll make a bracelet with shells from the Black and Azov Seas. In the same way, pour epoxy resin into a clean, dry bracelet mold. By this time it has become even thicker, so some of it remains on the walls, which is what I need. Add shells, pebbles, starfish, anything interesting to the mold) Pour out the crushed shells, which stick to the walls, creating the effect of a suspended state.

Half an hour before this, I prepared a new portion of resin, very carefully pour it on top to avoid the appearance of unnecessary bubbles. If there are still bubbles, you can preheat the oven to 80 degrees, ventilate, place a mold with resin there (molds can withstand temperatures up to + 204 C). The bubbles will come out.

It is important that the mold stands on a flat surface, otherwise the resin will harden in an inclined position. The more carefully you pour the epoxy, the less sanding you will need to do later. I poured resin as much as possible to the very top, with a slight bulge.

Now we wait a day until the resin dries completely. To prevent debris/dust from getting on the surface of the products, you need to cover them with something, a box, a lid.
At this time we will make a pendant. We prepare the main background - apply liquid plastic to the workpiece. Cover with polymer clay, rolled into a thin layer, distribute and bake in the oven. Let it cool and you can start working.

We pour a few drops of resin so that it can be distributed on the surface and, using tweezers and a needle, we make a composition from completely dried leaves - flowers. The resin acts as a glue that prevents the light dried flowers from moving from their place. You should not use live or poorly dried flowers for filling with resin; over time they will deteriorate and turn black.

Because There is a holder on the back of the pendant, I had to put it in a mold so that the surface was horizontal. I never think in advance what the composition should be, so I lay out all the suitable flowers and herbs and with inspiration begin to assemble a small living picture.

The end result is such a small world. We leave it to dry, after the resin has hardened, you can fill it with a second layer, forming a convex beautiful lens.

A day passed, the resin was completely cured and I took out all the resulting blanks. This is a bracelet, its upper part.

Using the same principle, you can make a pendant, earrings, ring, etc.

This is a hemisphere with a dandelion, next to it is a second one, orange, for comparison.


These are the resulting truncated balls with parachutes:

I also filled in small hemispheres:


Rings made from sea glass; for comparison, I used the ones I made earlier.

If you add a drop of stained glass paint or Perlex powder to the resin, you can get different shades of resin. When painting with stained glass paint, you should add just a drop, because... The proportions between the resin and hardener may be disrupted by coloring, and as a result the product may not harden or may become sticky when touched.

You can add gold leaf and get interesting decorations.

And these lenses with parachutes, as you can see, lie beautifully. Just as it was intended.

The reverse side remained flush with the edges of the lenses.

After complete hardening, it is necessary to sand down uneven and sharp edges.
Tweet
Cool
One of the large-scale fashion trends in the fashion and beauty industry is the creation of hand-made jewelry. Therefore, I bring to your attention a trendy technique for creating original jewelry from epoxy resin.
To create epoxy resin jewelry you will need:
Silicone forms (molds),
A variety of natural materials (dried flowers, shells, etc.),
Epoxy resin,
- container for stirring, toothpicks, disposable gloves.
So, epoxy resin - what is it? This is a product that consists of two components: the resin itself and the hardener. When they are mixed, the material hardens and then polymerizes. The hardener is a significant component in the working mixture, so it is added 1:1 in relation to the resin or more (depending on the type of resin). After hardening, epoxy resin turns into a transparent and very hard plastic, externally imitating plexiglass or even real glass, only unbreakable.
Epoxy resin has high strength (much higher than conventional glue), it resists wear better, and its ability to take the desired shape during polymerization even at low temperatures is what is required when making jewelry at home.
Dried flowers, pebbles, shells, beads are original decor that is used in epoxy resin jewelry. These natural materials add variety and set the color scheme for the decoration.
Master class on making a bracelet from epoxy resin
And now I bring to your attention a simple master class on making a bracelet from epoxy resin from needlewoman Ekaterina, known under the nickname Devona Sun Design.
Materials:
Bracelet mold (can be purchased at craft stores or online stores that stock epoxy resin)
Disposable resin mixing cup
Mixing stick
Dry leaves
Toothpick, scissors

So, first, wash and dry the silicone mold. Mix the resin with the hardener (in this case in a ratio of 1:3, but each manufacturer has its own proportions, so you need to carefully read the instructions for the resin). Stir well until smooth and set aside to release any bubbles.
Prepare the dry leaves by cutting off the excess with scissors so that they do not protrude from the mold.
After 10 minutes, when the resin has settled, pour it into the mold. The more carefully you pour the resin into the mold, the less you will need to sand the finished product later.

Then use a toothpick to place the leaves into the resin. Spread them out carefully. In order for the remaining bubbles to come out of the resin and for faster hardening, place the mold with the bracelet in the oven for 10-15 minutes, heated to 80 degrees and turned off. Then you should remove the mold from the oven and leave it to harden for a day. When the bracelet has completely hardened, carefully remove it from the mold.

The sharp edges of the bracelet should be sanded with fine sandpaper. Then the bracelet needs to be opened with varnish (any acrylic will do). The bracelet is ready!
Bracelets made using the same technique.


In addition to natural materials, you can use photographs


and other materials.
Master class on making pendants, rings and earrings with rose buds from epoxy resin
You can make not only bracelets from epoxy resin, but anything you want, any unique jewelry. I offer you a master class on making pendants, rings and earrings with rose buds from epoxy resin from the wonderful craftswoman Rusalina.
Materials:
Silicone forms
Two-component epoxy resin (with hardener)
Dried rose buds
Metal fittings
Hot glue gun

Prepare silicone molds: wash with soap and dry well. Rose buds should be taken with a color transition or with inclusions - they will not change their color after complete drying. They should be dried with their heads down.
The epoxy resin must be diluted with the hardener according to the instructions using a wooden stick to a uniform transparent consistency. To avoid bubbles in the resin, you need to put it in an oven preheated to 60 degrees for 5 minutes.
Then, using a syringe or using a wooden stick, fill the silicone molds halfway with resin, place the rose buds in them head down and top up with the remaining resin.
Then you need to leave the mold until completely dry in a warm, dry place for a period of 24 to 72 hours (depending on the depth of the mold).

After complete drying, you can remove the product from the mold; this is easiest to do under running water. The edges of the product, where there was open space that was not hidden in the mold, need to be sanded using sandpaper. Then take the hardware you want and use a hot glue gun to glue the epoxy resin product to it.


Master class on making jewelry from epoxy resin with dandelions
And another interesting master class from craftswoman Anastasia Parfyonova, known under the nickname NikaLiza. This time there will be dandelion parachutes in epoxy resin. Dandelions in jewelry evoke associations with lightness and serenity.
Materials:
Two-component epoxy resin (with hardener)
Silicone forms (molds)
Dandelion parachutes
Disposable gloves, cups, syringes, mixing stick

First you need to wash and dry the molds. Then, wearing gloves, pour the resin and hardener into the cups. Having measured out the required amount of resin and hardener using syringes, pour them into another glass and mix together with a wooden stick. You need to knead thoroughly, in a circular motion, so that all the air comes out - this will take about 10 minutes. After this, you should leave the epoxy resin for half an hour.

Then place the dandelion in the mold and carefully fill it with resin on top. For complete hardening, wait exactly one day and remove the product from the mold. If necessary, sand a little with fine sandpaper.


You can also make similar decorations with sea pebbles, shells, pieces of glass, gold leaf, etc. And if you add a little stained glass paint to the resin, you can get products with a variety of colors.

Jewelry made using the same technique.


