How to make a bath - a barrel of boards. Do-it-yourself step-by-step instructions for assembling a barrel bath with your own hands, practical tips How to install a barrel bath
A capital bath made of logs or timber on a slab or strip foundation is quite expensive and takes a long time to build. Bath-barrel is a quickly erected structure, it does not require a serious foundation and capital costs. A few days of carpentry - and the owner can enjoy the Russian steam room, Finnish sauna or Japanese ofuro. Such a bath can be built with your own hands, having only average building skills.
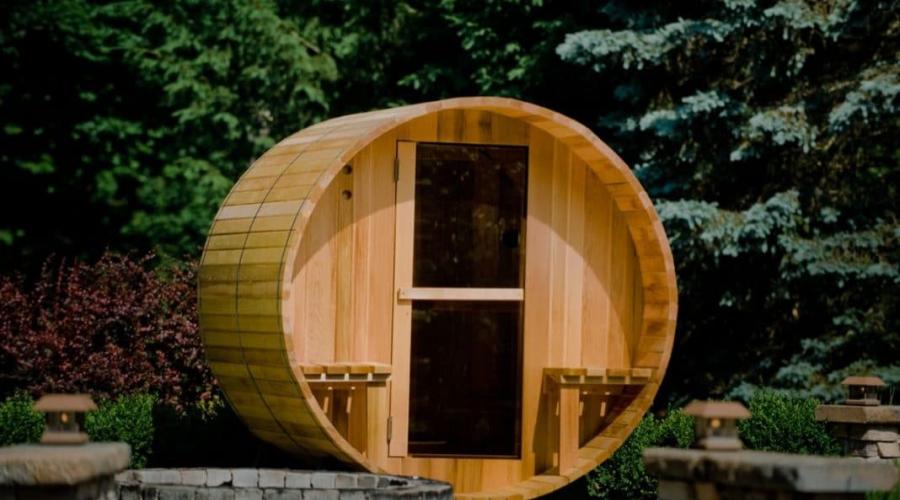
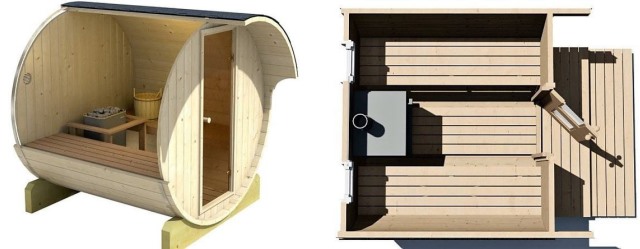
The main feature of the bath-barrel is its barrel-shaped, or cylindrical shape. Two round end shields with a diameter of 2.5-3 meters are sheathed with boards, forming a cylindrical body. The boards are pulled together with a bandage tape. Minimal ground contact ensures good thermal insulation. Inside the barrel, the floor is laid, benches, a sauna stove, and, if necessary, partitions are placed.
The light country option is limited to this, in a 2-meter barrel with minimal amenities, 1-2 people can steam. More advanced structures up to 12 meters long are connected to electricity, water supply and drainage, have a steam room, soap room, shower room, forced ventilation and a relaxation area. They can accommodate up to 5-6 people.
Doors in partitions are made of wood, in expensive models - of tinted or frosted glass. Sometimes, instead of a small window in the end shield, it is entirely or completely made of tempered glass or a double-glazed window.
Miniature single fonts from a semi-barrel standing vertically can also be attributed to barrel baths. Ofuro, or Japanese heated bath, is gaining popularity outside of its native country.
Types and sizes
In such a bath, you can equip the following types of wellness procedures:
- Traditional Russian steam room with a bathing area. The steam room is filled with wet steam at a temperature of up to 85 ° C. It is a special pleasure to whip yourself or a friend with a birch or oak broom. After the steam room in the washing area, you must definitely douse yourself with a bucket of cold water. Such a bath consumes a lot of water, you should consider a way to divert it to the drain.
- Finnish sauna. Dry and very hot steam is used here - up to 120 ° C. It is necessary to think over the ventilation and thermal insulation system in order to quickly heat the room to the required high temperature. If space allows, then install a font for dipping. Otherwise, a dousing font is equipped - a bucket of water suspended from the ceiling.
- Ofuro. Single heated mini-bath from Japan. The half-shell is placed vertically, a seat and a water heating system are installed in it. Ofuro is often placed outdoors, in which case the barrel is closed on top with a lid with a cutout for the head.
Its capacity and the possibility of placing additional amenities and facilities depend on the size of the structure. The steam room itself occupies 2 m, and this is the length of the minimum module.
- Mini - from 2 to 2.5 m, 2 (lying on the shelves) to 4 (sitting) people of average build fit into the steam room. Such a bath weighs up to half a ton.
- Standard - up to 3.5 meters long. In addition to the steam room, a modest dressing room is placed to help place clothes and keep warm. This design weighs about a ton.
- Maxi - up to 6 meters long, has a full-fledged soap compartment and a dressing room of increased length, which can be used as a resting place.
- Mega - two six-meter modules are joined, between them there is a vestibule. On the one hand, a bathhouse with a steam room, washing and shower rooms, on the other, a relaxation room
Despite the large size of individual models, they do not require strong foundations and can be installed on lightweight support structures the size of a railway sleeper.
Advantages and disadvantages
Baths in the form of a barrel have a number of advantages. Among them:
- small dimensions, the bath is placed even on the smallest plot in gardening between the garden bed and the greenhouse;
- mobility, the design is transported in the back of any truck, and the Mini version - and in the trailer of a car;
- installed on any flat area with an organized drain without a capital foundation;
- speed of construction, assembly takes a day or two;
- the absence of corners ensures quick heating up to 80 ° C (up to an hour) and long-term heat retention;
- sufficient comfort, despite the small size, rounded walls serve as natural backrests;
- original and aesthetic appearance;
- easy care, lack of corners facilitates cleaning;
- economy during construction and operation.

The disadvantages include:
- problems with additional thermal insulation;
- tightness in small models;
- the impossibility of impregnating the sheathing boards with potent agents that prevent rotting and fungal attack;
- the difficulty of replacing worn-out planks, especially on the floor.
The advantages of the design far outweigh its disadvantages when an inexpensive, compact, prefabricated and mobile bath is required.
Features of self-manufacturing technology
Despite the apparent simplicity of the design, building a bath-barrel with your own hands will require certain skills from the owner. Among them:
- work with drawings;
- engineering and construction calculations;
- earthworks for site preparation;
- carpentry and joinery for the assembly and arrangement of the bath;
- installation work for the installation of the furnace and chimney, connection to communications.
In addition, you need time. Assembling a bath from a prepared kit by forces An experienced team can assemble a bath from a prepared kit in a day, but you yourself will have to tinker, including with the selection and preparation of materials.
Preparation of material and tools
The vast majority of do-it-yourself baths are made of wood. when choosing a material, they usually stop at hardwoods, such as oak, beech, larch, cedar or linden. The use of coniferous wood is not recommended, because when heated, they release resin abundantly. They can only be used for load-bearing structures and outer cladding, provided that sufficient thermal insulation is provided.
To connect the structural elements, metal parts are used, such as self-tapping screws, corners, bandage tapes for tightening the sauna-barrel. Care must be taken to ensure that they do not protrude above the surface of the tree. Touching it can cause severe burns. The upper part of the cylinder-barrels is covered with a soft roof or a metal profile to protect it from precipitation.
A stove-heater in such a bath is installed metal, with a built-in tank for heating water. For the most compact versions of barrels, where every square centimeter counts, choose the option with a tank located on the chimney.
All electrical equipment must be adapted to work in wet areas, it is mandatory to install charge cut-off devices (RCD) to protect against electric shock.
To assemble the bath you will need:
- tongue-and-groove boards 25-30mm thick, 80-90mm wide;
- beam 100 * 100 for the installation of supporting structures;
- boards up to 2 meters long for bath furniture;
- doors and windows;
- fittings and fasteners;
- metal tape with bandage fasteners;
- roofing materials;
- plumbing equipment: plums, taps, pipes, fittings; shells, etc.;
- wires and wiring elements: lamps, switches, etc.

Assembly requires the following tools and accessories
- cordless or mains screwdriver;
- a circular saw;
- jigsaw;
- manual carpentry tools: chisel, axe, mallet, hacksaw, etc.;
- measuring tool: tape measure, corner, level;
- excavation tools: shovel, wheelbarrow, buckets.
- painting tool.
A grating is usually arranged on the floor, it facilitates walking on a concave floor and provides ventilation for its boards.
The bath is installed with a slight slope to ensure the drainage of water. At the end of the slope, a drain grate is equipped, a drainage pipe is connected to it from the outside, leading to a separate sewer well or to a common sewer. Baths of the minimum size without running water are allowed not to be connected to the sewerage system, a small amount of drains can be dispersed in the gravel and sand half of the site. But in this case, in the bath it will be possible only to bathe and douse with water, soap and shampoos can damage the plantings.
Particular care must be taken to monitor the quality of thermal insulation near the stove and chimney - violation of the rules can lead to a fire.
Drawings and material calculation
Before you start to select and purchase material for the construction of a bath - barrels with your own hands, you will need drawings of the object in three projections. You can also build a 3D parametric model of it in one of the free home building design programs available online. Such programs also contain a module for calculating the amount of material required and save a lot of time.

For those who decide to act the old fashioned way and draw and count by hand, experienced craftsmen offer a number of recommendations:
- Choice of building length. Timber is supplied in a standard length of 6 meters, so the most efficient use of the material will be obtained with a length of 2 or 3 meters, so that the board is sawn into 2 or 3 parts. Intermediate values will result in a large number of residuals. The rest of the boards will go to the end walls. Finished boards are also available in lengths of 3, 2.2 and 2 meters, this must be taken into account when designing interior finishes and furniture.
- Choice of diameter. The average height is about 175 cm, the height of a standard bath door is 170 cm, so the minimum diameter is 2 meters. With an increase in diameter, both comfort and the cost of materials and heating increase. Barrel baths with a diameter of more than 2.5 m are rare.
- Space planning. All doors must open outwards. If someone passes out from heat or humidity, their body should not block the door and prevent them from getting help. Doors in internal partitions are placed in the center so that the roundness of the ceiling does not interfere with their full opening.
- The stove is usually installed at the end, so that you do not have to walk past it. If the stove is located near the internal partition for the firebox from the outside, a protective wooden grate-fence should be provided.
The number of boards for sheathing is calculated based on the circumference
where D is the barrel diameter. The circumference must be divided by the width of the board and get their number.
Step by step construction steps
Experienced craftsmen described how to build a barrel bath with their own hands. Construction is divided into the following stages:
- Site device. The barrel can be installed on any flat surface - asphalt, concrete slab, paving slabs. You can also arrange a sand and gravel cushion. You should choose a pit with a depth of 0.2 m, a length equal to the length of the barrel and a width equal to the diameter plus 0.5 m. The recess is covered with sand by 10 cm and rammed, on top with large gravel. A drain pit or connection to a public sewer is equipped.
- Installing stands. They are made from a board 150 * 50mm or a bar 100 * 150. A cutout with a radius equal to the radius of the barrel is sawn in the supports. I fasten the supports to each other with longitudinal lags.
- Floor boards are installed until the recess in the supports is filled. It is necessary to achieve full entry of the tongue of the tongue and groove into the groove along the entire length of the board.
- Installation of end walls and internal partitions. Usually, shields are first knocked down on the ground, and then they are sawn off with a jigsaw around the circumference. Openings for doors are left in advance, openings for windows are cut out in place after assembly.
- The frame of the barrel is sheathed with boards to the top. With steel banding tapes, passing no further than 0.5 m from the end or inner walls, the entire structure is finally fastened.
- Doors and windows are installed, the joints of the end walls are sealed with a sealant. A heat-resistant sealant should be used near the stove.
- The soft roof is being installed.
- Mounted stove, chimney and bath furniture.
- Installed plumbing and electrical equipment.

This completes the construction of a bath-barrel with your own hands, you can proceed to the details of the internal arrangement.
Arrangement nuances
The internal arrangement of the sauna-barrel is determined by the needs and capabilities of its owner. If the bath is planned to be used only in the warm season, insulation is not required. Otherwise, it is necessary to insulate the walls with basalt wool, and in the lower part it is better to use foam that is not afraid of moisture.
In addition to the shelves in the steam room, it is necessary to make benches and a table in the dressing room. If there is a rest room, it is also better to equip it with wooden furniture that is not afraid of moisture.
The surfaces of walls and furniture can be impregnated with linseed oil or special compositions for baths.
Be sure to equip the oven with protective gratings - fences, excluding burns.
For recreation in the summer, a canopy-veranda is equipped at the entrance. To do this, the roof and wall boards are released above the entrance end wall.
Caring for a bath-barrel is quite simple. The most important thing is to thoroughly ventilate the premises after each use. Residual moisture in stagnant air can lead to mold and mildew.
From time to time, the impregnation of surfaces with linseed oil should be renewed. This will help extend their lifespan.
It is necessary to carefully monitor the formation of soot and soot in the chimney, especially when using resinous firewood. The chimney should be cleaned once a season.
Also, once a season, you should check the condition of electrical equipment with measurement of insulation resistance.
Making a bath-barrel with your own hands is a serious test of the construction and installation skills of a home master. Erected quickly and inexpensively, besides, a do-it-yourself bathhouse will be able to please family and friends for a long time with a pleasant stay and healthy procedures.
It is unlikely that Diogenes could have imagined that a wooden barrel - a place of solitude for philosophical reflection - would be used by his descendants for bath procedures.
Paying tribute to Greek wisdom, Russians today are guided by the Roman principle "a healthy mind in a healthy body." Its embodiment is a bath in the form of a barrel. — the best place to restore strength and health. Despite the novelty, this unusual building is gaining popularity among the townspeople and residents of the rural hinterland.
Taking care of the health of our readers, we consider it our duty to tell you about what barrel baths are. This article will consider their device, original design options, advantages and disadvantages, as well as the possibility of self-assembly.
Barrel bath. Design whim or practical construction?
The first thing that attracts the eye in this design is an unusual appearance. A huge wooden barrel, laid on its side, looks great on any site. A simple association will tell you about its purpose: “barrel-water-steam room”.

In addition to the original design, a barrel-shaped bath has important practical advantages:
- The cylindrical shape of the surface minimizes heat loss. To fully warm up such a bath, 8-9 logs are enough.
- In terms of the rate of temperature rise, the barrel-bath surpasses rectangular structures. In it, you do not have to wait long for the “first pair”. In just 30 minutes, the air heats up to the comfortable temperature of a Finnish sauna (+90 C).
- Light weight allows you to put such a design on any flat and solid base (concrete site, asphalt, dense soil).
- In the warmed bath you can bathe all year round. Due to the small volume and operation of the compact stove-heater, the temperature in the steam room does not decrease even in severe frost.
- A barrel bath is cheaper than a regular bath.
The main disadvantage of budget structures is relative constraint. Two people can hardly pass each other in the central aisle.

The internal layout of the structure depends on its length. The smallest mobile bath-barrel 2 meters long consists of one steam room. Here you have to undress and dress under a canopy-visor (if provided), crowning the front door.
Two-meter sauna barrel - an option for the summer season
The absence of a washing department inside implies the installation of such a bath next to a pool or a wooden font.

In a three-meter barrel, in addition to the steam room, there is a small dressing room 1 meter long.

In a 4-meter bath, the layout does not change. The length of the benches in the locker room is increased to 2 meters.

Four-meter bath-barrel with an open porch
The maximum size of wooden barrel-shaped structures is 6 meters. It is enough to accommodate a steam room, a washing department and a rest room.


"Royal format" - bath-barrel 6 meters long
The height of a standard barrel bath is 2.2 meters. Thanks to this, even a very tall person feels comfortable inside her.
In addition to the traditional round shape, manufacturers offer oval and square designs.

Oval sauna barrel. Rare, looks beautiful

Interesting square design with rounded corners
In addition to the end location of the doors, there are baths with a side entrance.

This solution divides the room into two functional areas: a sauna and a relaxation room. The space behind the front door is reserved for the dressing room.

Bituminous tiles are used to cover bath-barrels. This material is durable and beautiful. Its main advantage is that it fits perfectly on any curved surfaces.

Some manufacturers cover their structures with OSB pitched roofs. Such a decision is debatable. Rain water drains quickly from the round surface and there is no need for an additional canopy. However, some customers consider the pitched coating option to be the most attractive.
The stove-heater is the "heart" of any bath. In a barrel-shaped design, one of three modifications is implemented:
- Electric heater;
- Wood stove with chimney;
- Wood burning stove with hot water tank.
The chimney is brought to the roof or passed through the end wall.

This arrangement of the chimney eliminates leakage through the roof
The barrel bath board is made of coniferous wood (pine, cedar, spruce, fir, larch). Linden, aspen, alder, oak or cedar are used for interior decoration. To increase water resistance, they are impregnated with linseed oil.

The interiors of the steam rooms

Some manufacturers offer buyers a combined case manufacturing option. They assemble the lower part of the barrel from decay-resistant larch, and the upper part is made from pine.

Estimated prices
The cost of a barrel sauna directly depends on its size and configuration. The price of a turnkey construction of 2 meters in length (diameter 2.1 meters, material pine) in the basic configuration starts on average from 130,000 rubles.
If the hull is made of cedar, then the total amount will increase noticeably and add up to 25%. If you want the bathhouse to have an open mini-veranda with a visor, be prepared to pay another 15-20 thousand rubles. The insulated version will cost 20-25% more than the standard one.
Those who like to take a steam bath in the bosom of nature are offered a sauna on a trailer. The cost of such a trailer starts from 50,000 rubles.

Mobile mini-bath
The average price of bath-barrels 3 meters long with 2 compartments (steam room and dressing room), built of spruce, is 160 thousand rubles. A six-meter pine "maxi-bath" with a washing department can be bought from 300 thousand rubles.
Features of assembling a bath-barrel with your own hands
It is not easy to make a kit for self-assembly of a bath-barrel with your own hands. The reason is not the complexity of the design, but the need to use a milling machine. With its help, a semicircular profile is cut on the joined boards.


Docking profile of boards and cutters for their processing
It is unprofitable to buy a machine and cutters “at one time”. Better to save on assembly. Depending on the size of the bath, manufacturers charge from 10,000 to 40,000 rubles for this work.
Using the factory instructions, you can make a barrel bath with your own hands quickly and efficiently.

Bath assembly kit
The first stage of work is the preparation of the foundation. It is made of crushed stone or a concrete screed 10 cm thick is poured over the leveled ground.
The second step is the installation on the site of wooden supports with semicircular cutouts (supplied in an assembly kit).

Having installed the supports, they lay out the bottom of the bath from grooved boards. Having collected the lower sector of the circle, the end walls are mounted. They are inserted into the grooves made in the side boards. In a vertical position, the walls are fixed with the help of temporary ties, using the sidewall boards as this.

Having assembled the body, it is pulled together with steel strips-hoops. At their ends are threaded adjusting connections.
The next stage is the installation of a stove-heater and the laying of engineering communications (electrical wiring, lighting, sewerage). The installation is completed by the installation of woodwork (doors, benches, ladders, tables) and the laying of bituminous tiles on the roof.

Using the factory instructions and a minimum set of tools (screwdriver, jigsaw, planer), you can assemble such a structure in 1-2 days.
What are the owners saying?
Positive emotions of those who bought a bath-barrel, as they say, "pour over the edge." The original appearance, beautiful interior, pleasant aroma of wood, a hot steam room and the pleasure of bathing procedures are the main advantages of such an acquisition.

However, as is often the case with wooden structures, after 2-3 years in the reviews of the owners there are complaints about the drying of the boards and the appearance of cracks. An additional tightening of the hoops does not always eliminate them. The reason for this lies in the poor-quality preparation of lumber before processing it. A poorly dried board shrinks more than allowed.

Another typical problem is rotting boards in the sewer drain area. It occurs due to a violation of the wood preservative technology. It is possible to avoid these unpleasant moments. To do this, before buying, you need to pay attention not only to the price tags of manufacturers. It is much more important to communicate with the real owners of their products. The information received from them will be objective and unbiased.

Those who want to use the sauna all year round often worry about the suitability of such a building in the winter. The way out of this situation is additional internal insulation. However, the reviews of some owners indicate that a well-built bathhouse copes well with its tasks in winter and without insulation.
Building a bathhouse in a small area is a troublesome business: you need to build a foundation, put up a log house, equip the roof. Much simpler and more economical is the invention of our northern neighbors, the Finns - a barrel bath. You can build it with your own hands, without extra costs for the wages of builders.
Benefits of a barrel bath
- It does not require a massive capital foundation, a fairly flat platform with a hard surface is required for installation;
- Due to its compact size, the barrel bath can be placed in a small area;
- The barrel bath has a collapsible design, so installation and dismantling, as well as replacement of elements, can be carried out without the involvement of heavy equipment;
- The mobility of the design and low weight allows you to transport the bath and install it in places of temporary residence: in the camp, in the summer cottage;
- Optimal use of interior space is achieved by eliminating corners from the design. The bath heats up very quickly;
- Design versatility - in the barrel bath, you can install both a wood-burning stove and an electric heater, which allows you to get wet or dry steam to choose from.
- The original design will allow the bath to become a decoration of any site.

The bath-barrel has its drawbacks. The main one is the need to insulate the structure for its use in winter. Roll materials are used as insulation: they do not rot, have good thermal insulation, but increase the cost of the bath and increase labor intensity.
Barrel bath construction
Bath-barrel is a room in the form of a cylinder, laid on its side. The diameter, and hence the height of the bath is from 2 to 3 meters, and the length can be any, usually from 3 to 6 meters according to the standard length of the board. A barrel bath may consist of one steam room or include an additional washing compartment or shower room, a relaxation room and a veranda. The design of the bath at the same time changes only due to the number of internal partitions. Water and sewerage can be connected to the washroom and steam room.

Materials and tools
To install a bath-barrel on the site you will need:
- Profiled grooved board 45 mm thick and 90 mm wide. The length depends on the size of the bath. It is not recommended to take a grooved board with a larger width - it will be difficult to join it when laying in a circle;
- Edged board 50 mm wide 200 mm;
- Metal hoops-ties;
- Door and window blocks;
- Canopy;
- Stove-heater, wood-burning or electric.
Lumber manufacturers offer ready-made kits for the construction of barrel baths in various sizes. To save material, time and effort, you can buy a ready-made kit and install it yourself.
Of the types of wood for a bath-barrel, both conifers are suitable: spruce, pine, larch, and hardwoods. At the same time, it is better to make a frame from coniferous wood, and use hardwood varieties for finishing baths - they do not tar and do not cause burns.

The device of the foundation or platform for the bath
The foundation for a bath-barrel is not required. It can be installed on any level ground, excluding the contact of wood with the soil. This may be a site lined with paving slabs, filled with concrete or covered with gravel. In the absence of such a platform, a concrete base can be made: remove the soil layer to a depth of 15-20 cm, install the formwork, make a ten-centimeter sand cushion, lay reinforcement and pour concrete. After the concrete has hardened, which lasts up to 3 weeks, you can assemble the sauna.
Assembling a barrel bath
If you purchased a ready-made kit, you only need to assemble it in accordance with the instructions. Otherwise, you will need to pre-process the lumber.

Manufacturing technology
- It is necessary to prepare the base of the bath. A board of 50x200 mm is sawn into pieces equal to the diameter of the bath. Support boards must be installed at a distance of no more than 1.5 meters, so their number will depend on the length of the bath. A groove is cut in the upper part of the boards, repeating the shape of the bath circle. The width of the remaining part of the board must be at least 10 cm.
- The end walls and internal partitions are assembled from a grooved board, fastening them with transverse bars. The bars must be fixed so that they subsequently do not interfere with the installation of door and window openings. In ready-made kits, the end parts are supplied glued as an assembly.
- The grooved board is cut along the length of the bath, the ends are polished. Treat the boards with an antiseptic for a bath.
- Install the support boards at an equal distance from each other. They lay out the bottom of the bath-barrel from several boards on them, connecting them in a “thorn-to-groove” way. When the boards form a sector of the circle, sufficient to install the end walls, put them in the appropriate place and continue to lay the boards around them, completing the circle.
- After assembling the bath, they fasten it with metal hoops and install door and window blocks.
- The roof of the bath-barrel can be made both on the rafter system and covered with a layer of waterproofing and soft roofing material. For the device of the rafter system, a bar of 50 mm is used, and as a roofing, you can use metal tiles or corrugated board laid on a crate of boards.
- If the barrel bath will be used only in summer, it is not necessary to insulate it. Thanks to the ergonomic design, it warms up in half an hour and keeps the heat for two to three hours, which is quite enough to take a steam bath with a small company.
- The assembled bath from the outside is treated with a fire-retardant composition, and from the inside - with natural linseed oil.
Stove installation
In the bath-barrel, you can install both an electric heater and an ordinary metal wood-burning stove. The stove model must match the volume of the steam room. During installation, fire safety measures must be observed: wooden structures should be isolated from heating elements using special sheets, and pipe penetration should be carried out using basalt insulating mats.

Floors and interior finishes
The inner lining of the bath and the floors are best made of hardwood boards: they do not heat up so much and make the steam in the bath light and the air fragrant. The floor is made with a slope towards the flow of water, while a slope of 1 degree per meter of floor length is sufficient. To improve circulation, a grate of boards is placed on the floor with gaps between them of at least 1 cm. This will ensure floor heating. Canopy and benches are installed along the walls. Electrical wiring is carried out during the assembly of the bath, while using a cable in non-combustible insulation and sealed lighting fixtures.
Building a full-fledged steam room in a small summer cottage is not always advisable. When the owners come there only in the summer or even less often on weekends, then such a building is unprofitable. But what to do if you want to take a steam bath? The answer is simple! It is necessary to build a bath-barrel. It's cheap, easy and fast! How to build it with your own hands and from what materials is described below.
What is a barrel bath?
It often happens that a person loves a bath, but there is not enough money, time, place, or all together to build a full-fledged structure. It is in such cases that a barrel bath is built. This design is inexpensive, compact, interesting, original, and in terms of functions it can be the same as a full-fledged one.
It is not known exactly who invented this structure. On this account, there is only an assumption that the roots of its origin come from Japan. There people go to a place called sento. They don't really fit in there. They rather bathe in a hot bath, which maintains a strict temperature of 55 ° C. They go there with a group. Visually, sento resembles a large deep basin or barrel. Before climbing into this font, the Japanese wash themselves in the usual way, and then they climb in there, relax and talk. Those who do not always have the opportunity to visit a public sento build a smaller analogue at home - furo. The Finns, seeing such a structure, decided to build something similar. They turned the barrel to a horizontal position and enlarged it several times. This is how a barrel-bath turned out, in which there is a steam room, a vestibule and a relaxation area.
Pros and cons of the structure (table)
| + | - |
| Compact size and light weight. It follows from this that the building no capital foundation is needed. | The outer covering of the boards requires periodic repair. |
| Easy and quick to mount. For the construction of a small bath three days is enough. | There will not be enough space for a large company to relax in it. |
| No need to attract special equipment for construction work. | In order to use such a bath in winter, it is necessary warm thoroughly. |
| The bath is mobile due to the fact that it has a rigid structure and small mass. If you put it on a trailer, you can carry it with yourself anywhere. | |
| Heats up quickly. | |
| Originality of design. |
Choosing materials
To make spending time in the barrel bath as convenient as possible, pay special attention to the choice of wood from which it will be built. A stationary bath can be built from almost any material, because inside it you can build a lining from more suitable raw materials. With a barrel bath, this option is not suitable. For her, you need to immediately select good material.
For example, coniferous trees are completely unsuitable material for the construction of such a structure due to the release of resinous substances when heated, which can burn the skin. The exception is cedar. Numerous healing and aromatherapy properties with which it is endowed are great for a bath. The technical qualities of this type of wood are also high: the material is not subject to deformation, cracks do not appear on it from temperature changes, it does not shrink, it is moisture resistant and is not afraid of microorganisms. The variety of color shades and textured patterns of cedar is impressive.
Another great option for building such a bath is oak. It has a strong and solid structure, due to which the structure will be durable. Moisture acts on oak not destructively, but, on the contrary, tempering. The tree becomes more durable. Oak is famous for its deep rich dark shades, has excellent textured patterns and healing properties. The disadvantage of oak wood is its high price. Because of this, it is very rare to find a bath-barrel made entirely of oak. More often, separate parts are constructed from this breed.
The traditional material from which the baths are built is linden wood. Creating a soft and healing microclimate in the bath is its main advantage. Since ancient times, with the help of a linden bath, they tried to treat the respiratory system, liver and kidneys. Linden wood vapors have a positive effect on the skin: they rejuvenate and cleanse it. This material does not shrink, it is easy to process. A bathhouse built from this type of wood will heat up quickly and retain heat well.
Aspen wood is also used for the construction of the barrel bath. By properties, it is almost the same as linden. They have the same advantages and disadvantages. True, linden is much less susceptible to the destructive effects of moisture, does not deform, and a much smaller number of cracks appear on it. Due to the relatively low price, this tree can be called the most popular in the construction of baths.
In addition to the above species, alder, fir, birch wood is also used to build an ordinary bath. But for the construction of a bath-barrel, these rocks are not entirely suitable.
Species (table)
| Name | Description |
| Ordinary Russian bath | It features hot and humid steam. You can steam with brooms in it. Usually consists of 2 rooms: a steam room and a washing room. After sitting a little in the steam room and sweating, you can go to wash in the shower. In this design option, it is imperative to consider a water drain system. So that it does not stagnate, the bath-barrel is placed under a slight slope. The stove in it is installed between two rooms. It is equipped with a tank for heating water. This tank should go into the shower room. In the steam room there is a grid with stones on which water is poured. They are heated from the firebox. The furnace part of the furnace is located in the washing room. It is better to fence it off so as not to get burned during bath procedures. There is not much space in such a ben, so the stove should be as small as possible. The walls near the furnace are insulated with refractory material. |
| Sauna | It differs in that the air in it is dry. It may consist of one room. Often such a design is equipped with a font into which cold water is poured. If there is not enough space, then sometimes they use a bucket for dousing with water. It is considered a tradition to plunge into cold water after the sauna. It is easier to arrange than the previous one. The room must be airtight: the doors close tightly, there are no gaps in the floor and walls. The sauna has only a small hole in the roof or wall with a special valve that can be closed partially or completely. The water in the sauna is not used, so there is no need for a drain in it. Comfortable benches and a stove with a heated heater are installed in it. Do not pour water on the stones in the sauna. You can drip a few drops of essential oil or tincture of medicinal herbs. Thus, a therapeutic and prophylactic aromatherapy is created. The sauna can be installed both vertically and horizontally. |
| Ofuro | Similar to Japanese sento. Visually resembles a font. Heated by built-in stove. It does not have a roof, but it is used all year round. They put it on a wooden floor. From the inside, it is equipped with a wooden bench and a stove, which is surrounded by a wooden partition so that no one gets burned during the bath procedures. According to Japanese wisdom, bath-ofura combines all four elements: earth, fire, water and air. The tree from which it is made acts as the earth, the fire is the stove. And the creation of complete harmony is due to the water and air surrounding a person in this bath. In it, he relaxes and heals. Visually, it can resemble a simple barrel or be elongated. The stove does not have to be installed inside the structure. Sometimes they put it next to it and conduct pipes from it that heat the water inside. This is the safer option. True, so, it takes a much longer amount of time to heat up, and, consequently, fuel consumption increases. Usually 10-20 minutes are spent in it, and then the steamed body must be wiped with a hard mitten. |
Photo gallery: types of barrel baths
Bath-barrel sauna from the inside  Another version of the bath-barrel
  Bath-barrel ofuro elongated
  Bath-barrel ofuro
  Russian bath-barrel
Cooking material
Choosing the right quality material is the key to building a bath-barrel.
- If you plan to process the boards yourself, then purchase them in the following sizes - thickness 4.5–5 centimeters, width 9–9.5 centimeters.
- If you do not have special equipment for processing wood, you will have to order boards from qualified specialists. In order for you to prepare the boards of the correct sizes, you must first create a detailed drawing plan, which will indicate all the dimensions. To create all the blanks that will ideally fit together, the master will have to try, because this process is quite time-consuming.
- With the help of the plan, you can understand not only the forms of the necessary elements, but also their number.
- It is necessary to prepare boards that will lie around the circumference of the bath, close the “bottoms” of the barrel, that is, those places where the door and back wall will be located, as well as wooden stands for the bath. As the last bars act.
- Along the circumference, the bath-barrel is pulled together with iron strips. They become a kind of hoops, like on a simple barrel.
- The door and windows must be perfectly fitted so that the tightness of the structure is not violated.
- Purchase in advance boards for indoor improvement - floor, benches and more.
- The stove must be isolated from wooden structural elements. Take care of the presence of heat-resistant material.
- During design, find a place to build a small ventilation window.
- Consider how and from what material the chimney will be built.
- If you are planning to build a Russian bath, then provide for a water outlet and a tank for heating water.
- The material of the roof is chosen depending on the structure of the roof. You can build a gable roof and cover it with a hard roof, or lay a soft roof on top of the bath-barrel.
- Purchase fasteners: screws and nails.
- Sometimes such a bath is equipped with a small veranda. If you are planning it, then purchase building materials for its construction.
How to organize water drainage
Such a need exists for the design in which a lot of water will be used.
Of course, if the bath is used infrequently, then it is enough to make holes in the floor through which the liquid will flow out and go into the soil. But if frequent use of the facility is planned, then the water drainage system must be thought out in more detail. Otherwise, the water may stagnate under the bath, which will have a bad effect on the bath. The first call will be the appearance of an unpleasant odor. This means that a fungus has appeared under knowledge, and it begins to rot. After that, the floor begins to collapse, become unreliable and, in the end, may fail.
To build the correct water drainage, the bath-barrel is placed under a slight slope. Thus, the water will drain towards the end of the wash. There, it is necessary to make a hole in the floor and attach a pipe to it, which will go into the drain hole. So that this pipe does not crack in winter due to temperature changes, it must be insulated.
Inside the bath itself, the floor is made in the form of a lattice. This is necessary not only to make it more convenient to walk. Thus, water will not linger on the surface and the floor will dry out from all sides.
Do-it-yourself technology and stages of construction
When all the elements are prepared, they must be treated with antiseptics, dried, and assembly can begin.
We collect the base
For a barrel bath, you do not need to prepare a powerful foundation. It is enough to put the barrel itself on a special wooden base. For the structure to be reliable, this base must be strong and, it must be installed on a flat surface. It supports the bath above the ground and it bears all the load.
- The base is two, three or four wooden elements made of boards 30–35 centimeters wide and 3.5–4 centimeters thick. Their number depends on how long the structure will be. On each element, it is necessary to mark and cut out a recess, which in shape will repeat the arc of the barrel. The lower boards of the bath will subsequently be fixed on them.
- Then these supports must be placed with equal spacing from each other. One of the stands is located under the entrance to the bath, the other under the back wall. If necessary, build additional stands.
- Then, the stands are fastened to each other so that a rigid and even structure is obtained.
Front and back walls
These elements of the bath should be perfectly even in shape. In the back wall, provide a place where a pair of windows will be located. There should be a door in the front wall. The location of the bars where the boards should be fixed depends on where the windows and the door will be. The bars are attached across the structure.
Assemble a square with equal sides using boards and bars. From the middle of this square, draw a circle and carefully cut it out with a jigsaw.
On the resulting circles, mark the places where the windows and the door will be. Cut holes for them. If necessary, strengthen the holes made around the perimeter using additional bars.
We prepare boards for the walls
Now place and prepare the boards with which you will sheathe the walls of the bath-barrel. Cut grooves in each board at the level where the front and back walls will be installed. Their width should be equal to the thickness of the boards from which the front and rear walls are made. The depth of the groove is 0.8–1 centimeter. They will need to install round "bottoms" of the bath-barrel.
In the event that there are two rooms in the future bath, then the grooves must be cut in 3 places. The third groove is made for room partitions.
Windows and door
As mentioned earlier, doors and windows should be tightly closed. Therefore, their manufacture is not an easy task. In order not to spoil all the work, experts advise ordering them from the masters. Otherwise, bath procedures will not have the desired effect.
We collect a bath-barrel
- First of all, it is necessary to establish the basis for the future design. It should stand on a solid prepared area with a slight slope. Lead the drain pipe to it in advance. In the future, you will connect a drain to it, which will be installed in the bath.
- Mark the middle on the arcs of the base. The first board is attached exactly here.
- Along the entire length of the arc, install boards on both sides of the first. The grooves made in the boards should become a single recess. So the floor of the bath closes
- Now you need to install the front and rear walls in the grooves of the floor. They should enter tightly and be held without support. With the help of these walls, the shape of the future structure is formed.
- Next, the boards are attached to the front and back walls. They need to be fixed in parallel on both sides of the bath-barrel.
- When the circumference of the bath is completely covered with boards, the structure must be pulled together with a metal tape. This should be done not in one place, but in several (from 2 to 4, depending on the length of the bath). At the ends of the tapes, it is necessary to make holes, pass a bolt through them and tighten them by tightening the nut.
- Now install the windows and door.
- The next step is the construction of the roof. To do this, you can use a soft roof, such as shingles. And you can cover it with metal sheets that are laid on top, after laying the waterproofing material. Some build a gable roof. As a roofing material, metal tile or corrugated board is used.
- Then comes the construction of the veranda, if it is provided for by the plan.
We equip the bath inside
Coat the walls and all wooden elements of the bath with linseed oil. It will protect the tree from the damaging effects of moisture.
Arrangement is the final stage in the construction of a bath. Now it is necessary to place in it those elements due to which it will be called a bath.
- Make a hole in the floor for water to drain and connect it to the pipe.
- Install hard flooring. To make cleaning the room more convenient, make it removable.
- Make and fix the shelves.
- Finish the walls, ceiling and floor with thermal insulation material where the stove will be installed.
- Install the stove and remove the chimney. The place where the chimney pipe exits to the outside must be insulated with a heat-resistant material.
- Attach the water tank.
- If you wish, you can supply water.
- Install a shower tray and shower if planned.
- If there is enough space, then you can build a small table.
- Make electrical wiring, not forgetting to properly waterproof its cable part and electrical fittings.
- Install a font near the bath, if you wish. You can plunge into it after the body has steamed out.
- If you plan to use the bath all year round, then build thermal insulation on the outside so that the heat remains in it longer. This must be done with steam and waterproofing.
Video: construction of a barrel bath
The construction of a bath-barrel has many nuances, having studied which, you can build this beautiful structure, which in terms of functionality is practically no worse than a stationary bath. It will cost you much less and you can build it in a matter of days. Good luck!
The craving for comfort and the possibilities of new technologies have led to the fact that housing is being built with a full range of amenities. Almost every home has a bathroom or a shower, but they do not provide a real opportunity to relax. A holiday of soul and body - a bath. The fastest way to build a do-it-yourself barrel bath.
What is a barrel bath made of?
Design features
The model of a bath, built in the form of a barrel, is not a tribute to fashion trends. With an interesting design, it fully meets all the standards of a real bath. Outside, it seems smaller than inside. The unusual shape allows not only to save space, but also to use it most rationally.
It consists of separate modules, which are assembled according to the principle of the designer. On the condition of a completely ready-made configuration, installation on site will take a little time - even one person can handle it within one to two days.
The material for the construction of such a bath is boards with a thickness of at least 45, preferably 50 mm, with their width up to 90-100 mm. The smaller width allows to achieve the most snug fit of the wall modules to the partitions. The length of the boards is chosen from the desired size of the building, and their number - from the radius of the circumference of the end walls and partitions, which are made in the form of a circle. To move freely inside the "barrel", a diameter of 2200-2500 mm is enough. The larger size significantly increases the weight of the structure and the consumption of materials.
The bath, which looks like a large beer barrel from the outside, can be arranged on the inside according to the principle of a sauna or a Russian bath. Here everyone is free to choose for himself.
Advantages and disadvantages of a barrel bath
Positive points:
- Installation does not require the construction of a foundation;
- Takes up little space on the site;
- Interesting bright design that will fit into any landscape;
- Mobility. If desired, it is easy to transport to another place. Sometimes such a bath is immediately mounted on skids or a mobile platform;
- Possibility of fast erection;
- The absence of corners allows you to get fast heating;
- Affordable cost.
Disadvantages: for use in harsh climatic conditions, an additional device for thermal insulation and interior cladding of the room will be required.
Stages of construction of a bath-barrel
Weigh your financial options and start drawing up a project. To meet the budget, divide the work into stages:
- Take the time to study the proposed building materials - compare prices, quality, delivery options. The wood for the bath-barrel must be dried according to a special technology, the edge part is processed according to the type of groove - spike or oval-concave profile. The best materials are cedar, larch, oak or hornbeam. Budget option - pine, spruce. For interior decoration, it is better to use hardwood. In this regard, linden or aspen is beyond competition.
- Make schematic drawings to make it easier to calculate the required amount of materials.
- Prepare the instrument. You will need a saw, a planer, a screwdriver, a drill, a hammer, an ax. To impregnate the boards with protective compounds, stock up on brushes.
- Pick up a sauna stove. There are two options here - electric or wood.
For those who have chosen the do-it-yourself barrel bath option, the drawings will be the starting point for construction.
We prepare materials
The construction itself from ready-made modules does not require much time. But the process of manufacturing wall and partition modules is a responsible and complex process. It will require a lot of patience and careful execution of each operation.

Preparing boards for sheathing
It is better to purchase a sheathing board with ready-made edge connecting elements, oval-concave or a groove into a tenon. Now, according to the drawings, it is necessary to cut them into blanks of the desired length. In each of them, according to the scheme, we make grooves for inserting partitions and end walls of the building. The width of the groove must be equal to the thickness of the partition and have an arcuate contour - according to the drawings. The final touch is impregnation with special means of wood protection against fungus. It is not recommended to use any varnishes for decorative finishing.
Production of end walls and partitions
A square-shaped shield is assembled from the boards and fastened with bars. Draw a circle of the desired diameter and carefully cut out the workpiece. Mark the location of the door frame and window openings, cut out and, if necessary, strengthen the structure with additional bars.
Production of supports for the installation of the finished bath
The round shape of the bath requires the manufacture of a special supporting structure. It's not difficult at all. The distance between the supports should not exceed one and a half meters, so calculate their number, starting from the total length of the structure. Usually 3-4 support elements are sufficient.
The most reliable material for the manufacture of base plates is a hardwood board, the thickness of which is 40-50 mm, and the width is not less than 200 mm.
On the workpiece, we mark the contour of the cut, which should repeat the shape of the end wall and cut it out. When marking out, it is necessary to ensure that an untouched area about 10 cm wide remains in the lower part of the board. There should also be free sections at least 100 mm long along the edges of the board.
On a flat platform, we expose the supporting boards and, using longitudinal bars or boards, we connect them into a solid frame.
Doors and windows
The specifics of the bath room requires the presence of reliable doors and windows that exclude swelling and shrinkage. It is best to order ready-made doors and windows according to the desired dimensions.

Furnace in the bath, lighting and wiring
For lovers of the Russian bath, it is better to choose a wood-burning stove, which you can make yourself or buy in a store. The "sauna" mode is easier to maintain with the help of electricity - the choice of proposed heaters is large.
For lighting, select special lamps and wiring with reinforced insulation.
Well, everything seems to be ready. It remains to prepare a place for the installation of the bath and proceed with the assembly.
Assembling a barrel bath
Preparation of the site for the bath-barrel
To install a bath-barrel, any flat area with a hard surface and the possibility of arranging a drain is suitable. If the site is uneven, preference for placing a bath should be given to its more elevated part. This makes it easier to ensure a good flow of water. On level ground, you can dig a shallow hole, slightly larger than the size of the supporting frame, and fill it with drainage material, compact and level.
Sometimes, to increase mobility, the bath is installed on special metal frames with skids. If necessary, it is easy to change its location inside the site or take it with you on vacation, for example, on winter fishing.
Yulia Petrichenko, expert

final assembly
The time has come for the final assembly. Installation starts from the bottom. The center is marked on the supporting frame and the first board is laid strictly according to the markup. On both sides of the central board tightly, lock to lock, wall blanks are laid until end walls and partitions can be installed on them.
When laying, it is necessary to carefully monitor the alignment of the groove cuts.
Carefully insert the end walls and partitions into the prepared grooves. Now, sequentially, as in the constructor, we assemble the walls of our barrel. When assembling, it is necessary to achieve a tight entry of the spikes into the groove along the entire length of the board. When everything is assembled, we tighten our entire structure with metal hoops with an adjustable clamp. Such a clamp will allow us to further seal or loosen our barrel if necessary. We insert doors, windows - the room is ready. It will help to understand how a do-it-yourself barrel bath is assembled, video.

Interior decoration
Indoors, gratings should be laid on the floor, providing a smooth and comfortable surface for walking and not retaining water. We make benches and benches from hardwood, preferably from linden or aspen. The space around the oven must be properly insulated to prevent fire.
With proper care, the bath-barrel will delight its owners for many years. One of the moments of proper care is the ventilation system of the room. For a barrel bath, it is best to provide a multi-level ventilation device - holes in the lower part of the door, in the middle part of the wall and on the ceiling.
Do you have a hot tub in your country house? Share your impressions and practical tips for improving the design.