How to assemble a house from sip panels yourself. Do-it-yourself house made of vulture panels: all the subtleties of construction. Vacuum press - guarantee of strength
Read also
Canadian construction technology is one of the most in demand today. Along with it, the so-called SIP technology, which is based on the assembly of a house based on panels, is popular. It is noteworthy that today it is not at all difficult to assemble SIP panels with your own hands. The main thing is to follow the technology.
Features of the technology
It is worth remembering that simply knowing how to cut and join panels to build a house will not be enough. Firstly, the material must be durable. Secondly, reliable. Thirdly, close attention must be paid to compliance with construction technology. Well, the most important thing is that before making SIP panels with your own hands, make sure you understand the basic requirements for building housing based on wooden frame. This will save not only money, but also nerves.
How to build?

So if you want to build energy efficient house, SIP panels are perfect for this. Firstly, they have Not heavy weight, which means that the assembly can be easily handled by two people. Secondly, the construction itself from SIP panels is simple, provided that technological features process. This means that there will be no particular difficulties in the construction of a residential building. At the same time, the walls turn out to be durable, and if you additionally finish them with plasterboard, you can forget about the noise from outside. It is important to make the number of joints as small as possible; accordingly, you need to think about this first and only then about the amount of waste.
What are SIP panels made of?

Before you make SIP panels with your own hands, you need to have an idea of what it is. SIP in English sounds like Structural insulated panel, which means “three-layer panel.” To create the outer layer, a durable sheet of material is used, for example OSB, fiberboard, a wooden board, a magnesite plate with a thickness of either 9 mm or 12. Insulation is located in the middle - most often it is polystyrene foam, mineral wool or polyurethane foam. The thickness can be very different - it depends on the wishes of the customer. Outer layer securely adheres to the middle one. Thus, a new one is obtained composite material, characterized by high strength.
We make SIP panels with our own hands

Create future bearing structures for your home, you can do it in the garage, so as not to rent a special room for this. Of course there is big number people who will say that the production of SIP - DIY panels are almost impossible under such conditions. However, it is noteworthy that the technology itself originated in garage conditions. So it’s not entirely true to talk about the complexity of the process.
So, to make SIP panels with our own hands, we first need big table, on which oriented strand board (OSB) will easily fit. We lay a sheet of OSB on it, which should be even, and apply glue to it. This can be done using a spray bottle, rubber spatula with teeth or other homemade devices. Adhesives for panels, by the way, are made in a wide variety today, so there is plenty to choose from. For one SIP panel we will need approximately 2 kg of this substance, it all depends on how the composition will be applied.
After applying the glue to the surface of the drywall, lay a sheet of expanded polystyrene (foam) as far as possible best quality. We again apply glue to it, on which we now place a sheet of OSB on top. The main thing in this generally easy process is precision and accuracy in the design of the edges.
Vacuum press - guarantee of strength

Glue SIP - Panels with your own hands need to be done quickly before the glue dries. According to the above diagram, you need to lay out about five panels, and then press them tightly. This can be done using a press or vacuum pressing, which you can do yourself. So, the simplest option is to use an awning to create a vacuum. You need to pump out the air from under it vacuum pump. It will take about an hour for the glue to dry, and the panels are ready for further use. In general, in 8 hours of work you can create about thirty products with your own hands.
Why are SIP panels so popular?
Recently, this material has been used more and more often in the construction of houses. The advantages of building housing based on SIP panels include the following:
SIP assembly - panels are simple and efficient;
The construction process can be carried out at any time of the year and at any temperature;
The walls will be thin, and therefore there will be more effective area space;
Walls based on SIP panels are characterized by excellent thermal insulation;
Houses made from such material will not shrink, so exterior decoration You can start almost immediately after construction is completed.
On the other hand, this material also has disadvantages. Firstly, it is fragile; at most, your house will last up to 30 years. Secondly, the strength indicators are not very high. Thirdly, the composition of OSB - the basis of the SIP panel - includes resins and other additives that are not environmentally friendly.
Installation of SIP panels: what to consider?
As already mentioned, this material is easy to use because it can be cut. For example, if a modular design needs to be given a certain form, you can use manual electric saw. With its help, it is easy to cut the element as needed according to the drawing.
SIP panels are fastened using lumber, which is first subjected to antiseptic treatment. Self-tapping screws are also used, which are fastened according to the tongue-and-groove principle. This device ensures that the connection is airtight, and the voids that may form between the materials can be filled with foam.
Many experts advise installing from SIP panels not only walls, but also internal partitions, and even roofs. For example, if based on this material one collects zero or greater thermal insulation can be achieved. SIP panels can also be used for flooring. Wherein flooring material can be laid directly on this rough coating.
It is worth remembering that for assembling walls it is best to use material 50 mm thick, but as a connecting beam for floors and roofs it is better to choose a more reliable one - panels up to 100 mm.

What to build on SIP?
As you can see, making SIP panels with your own hands and further installation of housing is not difficult. As a rule, when self-construction building requires the most lightweight design, for example, for a small country house. This means that most jobs can be completed with the help of two or three people.
As a rule, such houses are built on one floor, and instead of the second, an attic is erected. This solution is not only good in decorative terms, but will also improve thermal insulation characteristics future housing. It is quite possible to build a roof based on SIP panels, however, it is best to choose the simplest structures with one or two slopes. But more complex roofing systems are best left to professionals. We should not forget that wood is a material subject to many influences. Accordingly, care must be taken to process it as best as possible. This way you can extend the life of a future residential property.
More recently, it has become very popular to build houses with a wooden frame. Nowadays there is a constant search for new and improvement existing technologies frame construction. The article will describe the stages of construction frame house comparatively new technology from sip panels.
What is a SIP panel - manufacturing process
Sip panel or, as it is also called, sandwich panel - multifunctional construction material. It can be used in almost any conditions. The cost of the panels is low, and the potential for their application is practically unlimited.
Wall sandwich panels are a three-layer material. Let's see how they are made.
How the manufacturing process of sip panels occurs - step-by-step diagram
Step 1: Selection of materials
For outer layers use durable material: fibreboards, oriented strand boards, wooden boards, magnesite plates, galvanized steel. The thickness of the slabs is 9 or 12 mm.
For sip panels, it is better to exclude the use of wood, since it is highly flammable, short-lived, and also the most labor-intensive to process. Most often, OSB boards are used in SIP panels for building houses. Recommended thickness 12 mm. For load-bearing structures they can be adapted for use at high humidity.
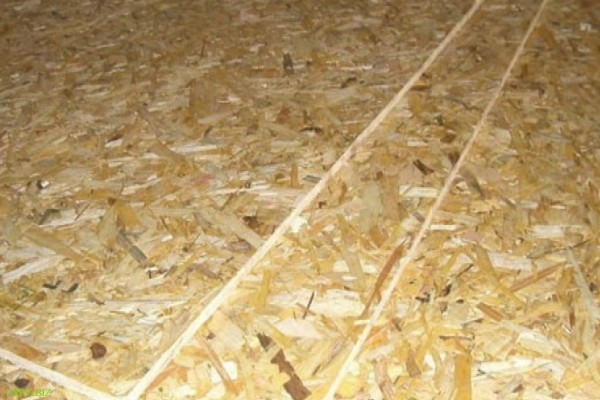
OSB is made from wood chips, the diameter of which does not exceed 0.6 mm. The length, as a rule, is no more than 140 mm. Such shavings are laid perpendicular to each other in three layers. During the manufacturing process, an adhesive waterproof resin is added. In the future from high pressure and temperature, this material is compressed. The result is a plate with increased strength and at the same time high elasticity. The outer layer of OSB boards is also waterproof. Using wood cutting tools, the slabs are very easy to saw. OSB holds fasteners due to the method of laying wood chips, therefore it is significantly different from other similar materials, where resin provides retention of fasteners.
The insulation is placed between two rigid protective layers material. For this layer, polystyrene foam, polyurethane foam, or mineral wool are used. The last two insulation materials are non-flammable. When selecting a brand of polystyrene foam, you need to pay attention to its flammability and flame decay time. The thickness of the material, depending on the thermophysical properties of the frame house, can vary from 50 to 250 mm. If mineral wool is given greater preference, then it is necessary to lay between it and internal plate parabarrier film.
When used in SIP panels mineral wool a material is used that has a density of 100–120 kg/m³. This product does not burn and cannot spread fire. When heated, binding elements may release unpleasant odors, but, nevertheless, such warm insulating material much more environmentally friendly than polystyrene foam. But mineral wool increases the weight of the sandwich panel. If compared with expanded polystyrene, the weight will be 2 times more. Therefore, this type of insulation is rarely used in sip panels. Also negatively affects the choice of this material high price. The use of mineral wool as insulation in a house made of sandwich panels can cost 1.5–2 times more.
For mass production, polystyrene foam with a density of 25 kg/m³ (PSB-S-25 or PSB-25) is used in sip panels. Due to its lightness and low cost, this insulation is very popular. It is 98% composed of carbon dioxide. Due to this, it has low thermal conductivity and, accordingly, high thermal insulation properties.
This material has fairly high strength and is resistant to fungus and moisture. But mice love to gnaw out nests in polystyrene foam, in which they then settle. The purpose of this material is, first of all, external insulation walls The thickness of the insulation depends on what kind of house will be built. For permanent residence The heat insulator should be no thinner than 50 mm. For construction summer cottage A maximum of 20 mm of such insulation is sufficient. We should not forget that polystyrene foam burns; when exposed to open flame, it melts and emits acrid black smoke. The fire safety of the structure is partially ensured by the fact that the foam in SIP panels is covered with OSB boards.
Step 2: Choosing the Right Glue
To connect all layers of a sandwich panel, the glue must retain its properties as long as the house stands. Therefore, such material must withstand different humidity, temperature changes and others unfavourable conditions. The toxicity of the adhesive after polymerization must be completely eliminated. When assembling sip panels in Canada, the USA and the EU, the following brands have proven themselves with best side: Macroplast UR 7229, Macroplast UR 7228 and Kleiberit 502.8.
Step 3: Production of sip panels
The OSB board must be evenly coated with glue over the entire surface. Then you need to lay a sheet of polystyrene foam on top of the slab. After which you will need to apply the polymer composition again and cover it with a second OSB board.
The adhesive must be applied within no more than 10 minutes. When you find of this material In air beyond the specified time, polymerization begins. The glue foams strongly and increases in volume. In this case, it is necessary to press the glued elements within 18 tons. This is realized using a powerful press. Glued wall sandwich panels must be kept for 2–3 hours. The glue dries completely in 15–30 hours. After which the protruding edges of the insulation must be cut off.
What will the foundation be like?
Prefabricated frame houses sip panels They are quite light in weight, so a reinforced foundation is not needed. For similar buildings It is advisable to use a shallow foundation. In addition to this option, the pile, columnar or slab type of frame house base is also used in construction practice. Eg, pile foundation can be done in any season of the year, in any weather. Its installation can be done in as soon as possible, large financial expenses will not be required. There is no need to carry out painstaking land work.
For a frame house where wall panels are used, we recommend using one of the most popular and classic options supports – strip foundation. To do this, you will need to mark the construction site. Then dig a trench 50–60 cm deep. The width can be made 40–50 cm. In the next step, you will need to make a sand and crushed stone cushion of 20 cm, which must be compacted.
Then you can begin installing the formwork. Boards 10–15 cm wide are suitable for this. As an alternative, moisture-resistant plywood can be used. It is imperative to make the formwork 50 cm above the soil level.
Next, the reinforcement frame is connected. For this, rods 10–15 mm in diameter are most often used. After this, a concrete solution is prepared. A concrete mixer will significantly speed up this process. It is necessary to regularly tamp the mortar poured into the formwork using a vibrator. This action will remove air bubbles from concrete mixture, making the created foundation stronger. When all filling work has been completed, concrete mortar you need to let it brew and gain strength. Experts recommend that the foundation stand for 3-4 weeks before the walls are erected.
Installation of frame and floor - what you need to know
This process begins with attaching a wooden frame belt to the foundation. The cross-section for such timber is most often used 250x150 mm. In the corners, the wall boards are connected to each other using grooves. Anchors, as a rule, are used 10–12 mm in diameter, and their length should be 35 cm. They need to be installed at a distance of 1.5–2 m from each other. In the corners it is better to use two anchors. The bolt heads must be recessed.
Tricks of building walls
Wall elements are installed after securing the guide boards to the strapping beam. Their size depends on the thickness of the wall panel. Such boards must be laid taking into account a distance of 10–12 mm from the edge of the beam. It is imperative to maintain strict horizontality. In order to fasten them, you will need 70x5 mm self-tapping screws. It is better to make space between them 35–40 cm.

In the corners there are two wall frame panels are installed by placing them on guide boards. The grooves must first be foamed. Using a level you need to perform vertical and horizontal alignment. After this, you need to screw the sandwich panels with self-tapping screws to the guide boards. The fastening step is required to be 150 mm. The panels also need to be fastened together. For this you will need boards with a cross section of 50–200 mm. They are installed between two panels. To make a reliable fixation, you will need 12x200 mm self-tapping screws.
How are panel-frame buildings heated?
Assembling vulture houses
Buy a house from SIP panels
Do-it-yourself construction of houses from sip panels, video, instructions, step-by-step guide
Step-by-step video instructions - how to build a house from sandwich - SIP panels yourself
How to assemble a vulture at home. Video
Every instruction is very detailed guide, study everything carefully, carefully, pay attention to all the nuances and details!!! Be sure to read and study both documents, as this is the only way you will gain a complete understanding of the entire construction process yourself! Remember that SIP at home is just one option among types of prefabricated buildings.
In the documents, you will learn EVERYTHING about how to make a panel-frame building with your own hands, what materials are used for this, what you need to know, and, of course, you will find and get acquainted with practical skills in the construction of prefabricated buildings.
Stages of building a frame house from SIP panels - step-by-step sequence of actions
Any construction of a panel-frame structure is step by step process, which assumes the sequence construction work. When we build a house from sip panels with our own hands, we not only have to pour the foundation ourselves, but also install windows, doors, and also carry out interior wall decoration, conduct electrical networks and communications, not forgetting construction of an attic floor And facade finishing.
Construction – manufacturing, pouring the foundation
Building a foundation - This is the foundation of your future home. The most common foundation options are shallow strip foundations and foundations on screw piles. It's no secret that prefabricated houses have a relatively light weight, good environmental friendliness and do not require massive foundations.

Foundation on screw piles with piping for a vulture house. Photo
Do-it-yourself screw pile foundation, on our own. Video
This significantly reduces construction costs and increases its speed. From this link you can learn in detail about all types of foundations for houses made of SIP panels.
Planning and choosing a house foundation will depend on the type of soil, slope on your plot of land, as well as directly from the area of the building itself. If the foundation is from monolithic concrete. Then you definitely need to make a waterproofing layer. Details at the link above. It happens that if the soil is loose and sandy, then it makes sense to use a monolithic slab as a foundation.

Foundation for a vulture house – monolithic slab. Photo
Strapping beam - floor base
The next stage of construction of a vulture house with my own hands, is the arrangement of the base floor and walls of the first floor. If the building is two storeys. As a rule, a dry strapping beam is used for this, which is pre-treated with antiseptic compounds - this significantly improves fire safety.
Laying the strapping beam on the foundation. Photo
Laying is carried out around the perimeter of the house and along the contours of load-bearing internal partitions. If the foundation is on screw piles, then you should first arrange the base from a steel channel.
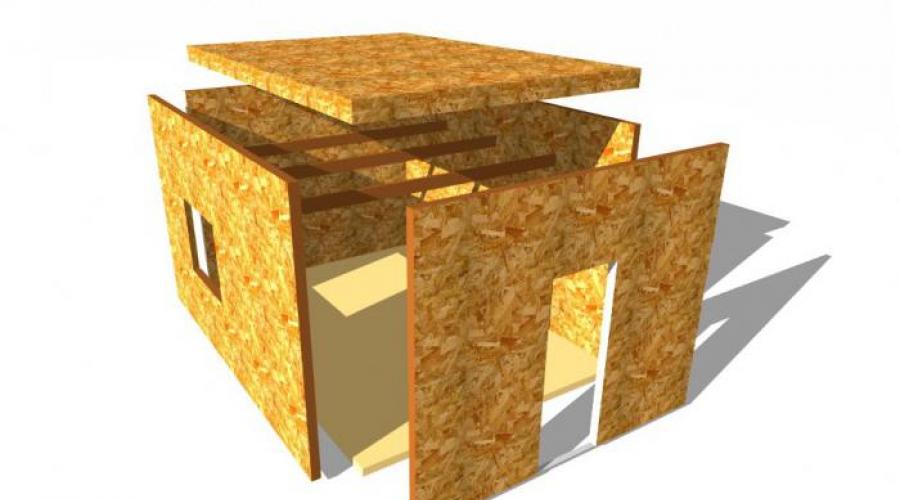
Installation of SIP panels - assembly of a house kit
So you bought SIP panels and your next action is theirs self installation. Assembling a house from SIP panels– this is a process that requires special attention! If you are a beginner, then it is best for you to install the walls of the house according to the instructions, which you can download at the beginning of the article. It should be understood that making a kit at home occurs individually for each project.
Assembling a house from sip panels yourself, using your own resources. Video

Preparing a house set from sip panels for assembly. Photo
When a house kit is delivered to you, you need to pay attention to the assembly sequence. All panels must be numbered, and the numbering must clearly correspond to the assembly diagram of the house kit. Your task is to lay out all SIP panels according to numbering along the perimeter of the foundation. If the building consists of two floors, then the first floor set is laid out first.
Installing sip panels with your own hands. Video
SIP panels have quite a large weight, which ensures good sound insulation. You will definitely need help, at least two people, be sure to take care of this. The panels are installed by splicing them together, as well as by tying the lower base to the strapping beam.

Installing SIP panels yourself. Photo from idealfoundations.com.au
The connecting element between SIP panels is the frame elements - this is a wooden antiseptic beam. Also used to enhance fastening properties assembly sealant is a one-component material based on polyurethane foam, commonly known as polyurethane foam.
This connection scheme is called “tongue and groove”; it is reliable enough to provide long-term service life of prefabricated buildings. After connecting the panels using a wooden beam, it is necessary to screw in self-tapping screws on both sides, which significantly increases the rigidity of the entire structure.
Installation wall panels occurs only when it is completely done bottom harness. First, the corner components of the house kit are installed, and only then the remaining load-bearing posts and the panels themselves are attached (installation is carried out from the first corner panel and is simultaneously carried out in both directions, to the second corner sandwich panel).
Correct installation of a house kit made of sip panels. Video
After installation, each panel must be adjusted using a building level. This approach allows you to correctly position all the walls of the set in space independently. During detection of deviations and adjustments are the key to correct installation.

Assembly of house walls from SIP panels. Photo
Strictly adhere to the SIP panel assembly diagram and carefully monitor the sequence of actions. Remember that all joints and gaps between SIP panels must be processed polyurethane foam!
Assembly, installation, installation of floors
There are the following types of floors- zero overlap, interfloor overlap and attic overlap.

Zero overlap made of sip panels. Photo from the site stavimsteni.ru
Any of these ceilings can be organized either from SIP panels or using a wooden frame made of T-bars or two T-beams. Just as it is pros and cons of sip panels, and each type of flooring has its own advantages and disadvantages.

Between the floors the ceiling is made of sip panels. Photo from the site sipdom.ucoz.ru
If you decide to assemble floors from sandwich panels, then this is done by analogy with assembling walls. This is a completely acceptable approach, since the heat-insulating properties justify the laboriousness of the process. Of the minuses, if the house area is large. You may need heavy equipment.

Assembly frame floor at home in a vulture house. Photo
Assembling floors using T-beams or two T-beams (depending on the load-bearing loads) is reliable, inexpensive and efficient. This approach is also justified from the point of view of laying utility networks – ventilation,sewerage systems, water supply And heating system.
Top frame with wooden beam
Upper harness a siding around the perimeter of the house is required. It serves to securely fix the entire structure and increase the overall seismic resistance of the building. Strapping wooden beam, which is laid on top, is also at the same time the basis for the ceiling, either between floors or under the roof.

The upper frame of the walls is made of SIP panels. Photo
Construction of the roof of a SIP house - do-it-yourself roof
Arrangement and construction of the roof is final stage installation of a set of SIP panels. Yours further actions will depend on what type of roofing is included in the house kit.

Roofing a house from sip panels with your own hands. Photo from achfoam.com
In most cases, the roof is built directly from SIP panels. With this approach, the organization of a rafter-transom system is not required. The performance qualities of sandwich panels are quite sufficient for them to withstand all load-bearing loads with a reserve. The roof from SIP panels is assembled on the same principle as the wall panels, according to the drawing of the house kit.
You will also be interested in: Return to the main SIP Electrical equipment in SIP houses Finishing in houses made from SIP panels Pros and cons of construction from SIP Fire safety Service life of SIP houses Heating in houses made from SIP panels Go to the main siteFor more detailed advice on the issue you are interested in, please send us a message.
A sandwich panel is a structure that consists of insulation and a few words roofing material and is used as the main building material for the construction of buildings of varying complexity design. For the manufacture of sandwich panels, only proven materials that meet the standards are used. The main material for the covering layer is usually “corrugated sheeting” (galvanized steel coated with polymer).
Insulation materials

When choosing sip panels, it is better to seek help from specialists. But if this is not possible, it is worth studying the main types of insulation and their characteristics.
There are three main types of insulation:
- polystyrene foam (expanded polystyrene);
- mineral wool ( basalt insulation);
- polyurethane foam.
And each of these insulation materials has its own advantages and disadvantages.
 Styrofoam filling in the panel
 Polystyrene foam is positioned as insulation, distinguished by its durability. In addition, it is an environmentally friendly material. It has waterproof properties and is not afraid of the sun. But at the same time, such material is very flammable and burns quickly.
Mineral wool practically does not burn and is also harmless to health.

This insulation also withstands biological and chemical influences well. But when typing so important advantages, basalt insulation has very low resistance to moisture.
Polyurethane foam conducts heat poorly and is highly flammable, but it has a high insulation threshold.
 Polyurethane foam as a starting point for a sandwich panel
 The thickness of the building material, and therefore the price, directly depends on the thickness of the insulation itself.
The price of the SIP panel is 1,300 rubles per square meter. Its thickness is 174 mm, width - 1250 mm, height - 2500 mm.
In our country and the CIS countries, sandwich panels of the following sizes are used:
12+100+12=124 mm;
12+150+12=174 mm;
12+200+12=224 mm.
OSB (OSB)
 OSB for SIP board
 Introduction to the concept OSB boards should start with general classification. There are four main types of OSB. Each of them differs from the others only in its indicators of moisture resistance and strength.
- OSB 1 is a board with the lowest moisture resistance strength. This type of plate is often used in the installation of light weight parts. The advantage of these plates is their low price.
- OSB 2 – has a low moisture resistance threshold and at the same time high strength. Such boards are used mainly for furniture production, sometimes for load-bearing elements. OSB 2 is used less frequently in the construction industry, and then only for internal structures.
- OSB 3 is one of the most popular types of boards. These boards combine strength and moisture resistance at an attractive price. They are used more often in construction for the construction of both facade and interior finishes. Sometimes OSB 3 acts as a roofing material or ceiling.
- OSB 4 - these OSB boards have the highest threshold of strength and moisture resistance. They are used for the construction of structures with high level loads and in areas with high humidity.
Construction of houses from sandwich panels: advantages and disadvantages
Like any material, using sandwich panels has both its advantages and disadvantages.
First, about the pleasant things. The main advantage of this building material is the consistency of its quality, which is evidenced by the high strength of the material, relative to the price. This factor plays a very important role when calculating construction estimate. After all, the use of this material significantly reduces costs. Due to the lightness of the panels, the weight is reduced general design, which means there is no need for a reinforced foundation.
See more house projects in the “House Projects” section on our website.
DIY sandwich panel house
 Build a house from SIP panels - how to assemble a construction set
 The first thing you will need in this matter is a design for the future building. Should be given Special attention to its construction, not forgetting the requirements and wishes. If it is not possible to build it yourself based on the complexity of the calculations, then there are a lot of companies ready to help in this matter. We will try to show you all stages of construction in a photo report, with step by step instructions. But, all houses are individual, our photo can only be considered as an information guide.
By the way, SIP panels can be used to build not only houses, but also extensions to residential buildings. They can accommodate verandas or kitchens.
The next step is to order SIP panels or produce them yourself. You can order them directly from the company that produces them. Here you can look at catalogs and select everything you need for subsequent installation. When choosing panels, do not forget about the base - the foundation. For a structure made of such material, the foundation is usually installed on screw piles.
Water supply, heating and electricity for the future house must be installed before pouring the foundation.
To avoid curvature of corners or height mismatches, all panels must be checked for integrity and dimensional conformity before installation. If inaccuracies are noticed, contact the supplier to replace the material.
After the foundation is poured, you need to tie it with a wooden beam. Then the angles are set and using percussion instrument holes are made. Using these holes, the timber is fastened to the concrete with 12 mm anchors. Recommended distance 2.5 m. Next, on established foundation the building itself is being assembled. The assembly begins with zero overlap and the first SIP panels are laid on the timber.
Wall frames are assembled from timber. The embedded board is secured along its perimeter with special nails. The main thing here is to maintain the vertical calibration and frame angles. After all, if you miss even 1 mm somewhere, the wall will turn out crooked and there will be no way to correct it. After installing the frame, panels are placed on it.
After the construction of the general structure, the filling of holes begins. Joints and corners of panels are filled using edged boards size 25 * 100 mm. All cracks are sealed with foam.
It is better to make the ceilings between floors and all supporting structures wooden. You can use both timber and boards. Photos of the construction stages are below.
Foundation for a house made of SIP panels

The foundation is, first of all, the basis of the building. It transfers the entire load of the building to the underlying soil layers. In addition to the strength of the foundation itself, you need to consider:
- total area of support on the soil;
- the supporting capacity of the soil itself;
- groundwater levels.
Experts believe that the most common mistake when pouring a foundation is the excessive abundance of concrete and metal in it.
The most popular types of foundation are:
- pile (pile-tape);
- columnar (columnar-ribbon);
- shallow monolithic slabs;
- tape deepening;
- tape recess with a plinth.
But it is worth noting that among this variety, for frame panel houses the best option would be shallow burial.
Laying the strapping (crown) beam

For laying, take a beam measuring 2.5 * 1.5 cm. Laying should begin from the middle of the foundation, while measuring its horizontal calibration. Next, the timber needs to be connected at the corners using a notch. After this, the parts are secured. For proper fastening, holes 1–1.5 cm long with a diameter of 2 cm are drilled in the timber and a dowel is driven in.
The timber is secured to the foundation using recessed anchor bolts. The fastening distance is about 1.5–2 m. The size of the bolts should be 35 cm in length with a diameter of 1–1.2 cm.
Arranging the floor in a house using SIP panels

Another proof distinctive property Canadian technology construction, the flooring technology serves.
Floors and ceilings are also built from SIP panels.
Although many contractors recommend laying a regular wooden floor in such houses with insulation between the joists and beams. These floors are reliable and more durable. In addition, this floor will be easier to disassemble or repair.
Construction of walls from SIP panels


When building walls, you need to carefully choose source material, because the quality of the future home largely depends on its quality. The best option for external work there will be a beam with a diameter of 15 cm. As for the height, the minimum is 1.5 m. For the inside, 10 * 15 cm is suitable. These are acceptable sizes that will help you save on consumables, will allow you to minimize the number of seams and joints and achieve ideal smoothness of future walls. Assembling walls is not easy, you need experience.
Before laying the timber in the crowns, all materials must be adjusted in accordance with the height and given the required form. For corner connections It is better to use the “half-tree” or “tied with a root thorn” method. It is better to make connections between the outer parts by cutting or using veneers. And it is better to connect the internal sections of both joints and corners with a half frame.
You need to begin direct installation by laying a crown beam treated with an antiseptic into the foundation.
Installation of a roof in a house made of SIP panels


The roof for a house built using this technique can be a very ordinary rafter roof. This type of roof is characterized by support in the form of grooves or Mauerlat, which are cut into the beams on attic floor. The rafters are installed on supports, sheathing is stuffed onto them and roofing material is laid.

As for insulation, it is not necessary for a cold attic. But if you plan to install an attic, then you should put insulation between the rafters and cover it with a vapor barrier film.
In addition to the rafter roof, no less popular is the roof made of SIP panels. For this type, first of all, the starting rafters are installed, which are bolted to the Mauerlat. And only after this the panels are laid. The panels are mounted on one side of the roof, gradually increasing in height along with the ridge. Once the first skate is finished, you can move on to the next one.

This installation method is more painstaking than the traditional one, but no less reliable.
Facade finishing
Finishing the facade is the final step of construction. Each owner makes it according to his own taste and financial capabilities. Among the finishing options that are now very popular: facing brick, siding, decorative plaster.
Video
Look interesting video about the construction of a house from SIP panels.
Construction from sip panels (SIP) can be considered the fastest that currently exists in this market. It’s quite possible to build a one-story cottage in a week or a week and a half. The technology came to us from Canada. It is also extremely popular now in European countries.
Buildings made from sip panels are very warm and quite reliable. In our conditions, the material is ideal for construction country cottages And country houses. In this regard, many who want to become owners of such temporary or permanent housing are interested in how to build a house from sip panels with their own hands in record time due to technology.
What are sip panels?
Sip panel is a three-layer building material. Interior – thick layer expanded polystyrene, which acts as an insulating and insulating material. On both sides, 2 layers of chipboard OSB are attached to it. It is made from wood chips, multi-directional and glued under pressure.

Expanded polystyrene provides excellent sound and heat insulation. OSB boards and high-quality glue, produced using special technology, reliably fix the insulating material. During construction, the sip panels are connected to each other with polyurethane foam, and wooden beams give rigidity to all structural components.

Advantages of this building material:
1. Durability - 100 years or more.
2. Fast construction using the joining method of SIP panels.
3. You can build in any season, since there are no solutions that require special conditions for hardening.
4. Very simple design roofs.
5. Thanks to the small thickness of the panels, the usable area inside the house increases.
6. A building built using this technology is very light and does not shrink.
7. Excellent thermal insulation, allowing you to save energy even during the heating season.
8. Easy installation of doorways.
9. Perfectly smooth and Smooth surface panels allows you to use any finishing without pre-leveling walls
10. Expanded polystyrene and OSB boards do not rot; Rodents do not live in them.
11. The material is absolutely clean and environmentally safe.
12. Construction from it is quite simple and does not require the involvement of heavy construction equipment (cranes, etc.) in the process.
13. Low prices SIP panels make construction with them the most cost-effective option.
Flaws:
1. The panels do not allow water vapor to pass through, so buildings made from them need high-quality ventilation.
2. The material cannot boast of high fire resistance. In this regard, special attention must be paid to the issue of electrical wiring insulation. It is recommended to install a fire alarm.
3. The material is not resistant to moisture, so the foundation must be made wide enough to protect the structure from dampness.
4. The technology for constructing houses from sip panels does not allow for much diversification of standard projects.
Construction from sip panels (video)
You should always start with design. And although you cannot expect much variety in this matter, it is important to correctly calculate the size of the rooms, the placement of communications, etc. The complete assembly of the building is shown in the video.
A building made of sip panels is very light weight and does not require a powerful foundation. Under one or two-storey house you can build a strip or pile-screw. During the construction of the foundation, it is very important to properly waterproof it. This will require bitumen mastic and 2 layers of roofing felt, the sheets of which need to be overlapped.

Then you can begin laying the subfloor, which we also build from the same SIP panels (video). The photo shows how the floor is attached to the foundation. The panels are connected to each other and immediately fixed using polyurethane sealant and self-tapping screws.
Building walls (video)
You can see what the assembly of building walls from SIP panels looks like in the video.
It is assembled literally like a large construction set. First, the lower trim is installed. As is the case with many modern building materials, construction from sip panels begins from the corners of the house. The following ones are attached to the corner panels, joint to joint, in both directions, up to next angles. A wooden beam is laid between the panels, fixed with sealant and self-tapping screws.

To build any building, you must use building level. IN in this case This is also true, despite the fact that the sip panels are perfectly smooth. Using a level will help prevent walls from deviating from the ideal vertical. The ends of the walls and the upper sections are covered with sealant, after which we begin to make the upper trim.

To create floors between floors, the same sip panels are used. They have sufficient strength for this and can withstand very significant weight (furniture, the residents themselves, etc.). After installing the floors, we continue to build walls - now on the second floor. The ceilings are reinforced with wooden beams.

Door/window openings are made very simply: they can simply be cut using a regular hacksaw. The material lends itself perfectly to processing and requires almost no effort during this process. All this can be done with your own hands.
How to build a roof
The technology for constructing a roof on such a building is extremely simple. To build it, we again use the same SIP panels. The slabs are mounted according to the same principle as walls, and interfloor ceilings. It is not necessary to use rafters. How the roof and wall panels are connected is shown in diagrams 1 and 2.


Please note that a support column is installed in the center. For this you can use a 50x70 mm beam. All mount roofing elements made using self-tapping screws, sealant and connecting bars. When the roof is assembled, you can immediately begin finishing coating. The roof can be covered with almost any material (metal tiles, corrugated sheets, soft tiles etc.). The choice of material depends on preference and material opportunities home owner.

Finishing
The outside of the building can be clad plastic lining, siding and any similar material that will protect the walls from moisture. Interior decoration even more simple. Since the walls made of sip panels are absolutely flat, there is no need to install any leveling frame.
The walls inside the building can be covered with wallpaper, plastered, even tiled or mosaiced (bathroom, kitchen, etc.). Flooring Almost any will also work. You can lay laminate, linoleum on the floor, floorboard and even parquet, if there is such a desire. Even including all the finishing touches, the construction of a 3-4-room mansion from sip panels in the worst weather can take a maximum of a month and a half.
The technology is simple and low-cost; the cost of all materials is also minimal. Everything is done simply and very quickly. If you need the most inexpensive country house with excellent heat and sound insulation, construction from sip panels is just the thing. In next video We posted a review from the owner of such a house. It will help to better understand what such a structure is like.