How to make your own small bench vise. Making a vice for a drilling machine with your own hands. Tools and materials
A vice is one of the most important tools in any workshop. It allows you to expand the range of work and increase efficiency: thanks to them, the master’s hands are free, and parts are processed at a high level, and without outside help. Few people know that high-quality vices can be made with their own hands. You just need to show some ingenuity, skills and attentiveness. Next, about the intricacies of the process of creating a tool.
Vices are widely used in construction work as a tool for holding elements of various parts. The product in question is presented in the form of a base (body) with two clamping tubes, which allow you to firmly hold the part during milling, planing or drilling.
A vice is considered one of the main metalworking tools, because the quality of their final processing will depend on the strength of fastening of parts. In addition, such a product frees both hands, thus allowing you to carry out certain processes as accurately as possible.
Depending on the operational features, vices are divided into two categories: carpentry and metalworking. The latter, in turn, are divided into rotary and static. Static bench vices come in chair and parallel vices. The former do not have elements for permanent fastening and are easier to install/dismantle. The second ones are distinguished by larger dimensions and are firmly attached to the working surface.
Bench vices are designed primarily for working with fairly soft materials: plastic, wood, etc. They have high clamping jaws that are either statically fixed or rotated on the base.
Machine tools are designed to work with hard materials, for example, metal. Their clamping jaws are less high for greater convenience and efficiency.
Making an instrument at home
To make a vice with your own hands, you need to prepare a certain set of materials and tools:
- Metal plates;
- Pins;
- Boards;
- Metal rod with a diameter of about 2 mm;
- Fasteners.
The minimum tools you will need are an electric drill, a sledgehammer, a file and a hacksaw. The easiest way to make a bench vise with your own hands is to make a bench vise, so below are step-by-step instructions for creating just such a tool:

Advice. Vises made at home can be more effective and convenient due to the fact that it is quite possible to adapt them to carry out any specific operations.
If you plan to make a vice with your own hands, you should take into account some nuances that will determine the strength and service life of the tool:
- Material. Steel is most often used to create the product. It is advisable to choose a quality one, since the reliability and durability of the product, as well as its ability to firmly hold the part during processing, largely depend on this.
- Product size. If you plan to work primarily with small parts, it is better to give preference to a compact model: it will be more convenient and easier to work with.
- Thread pitch. An important point that many people often miss. The thread must be clear and small if spot work is planned.
- Sponges. It is important to pay attention to the size and shape of this element. The first indicator depends on the type of products that will be processed, the second - on the materials of the workpieces. If you plan to work only (mostly) with soft materials, it is better to make the jaws flat.
Advice. Since you're making your own vise, you can go beyond the standard model to make the best tool for your needs. Remember that with the help of an additional option you can make the vice more efficient in operation. For example, the presence of a rotating mechanism in the product will allow you to work with small parts.
That's all the subtleties that you should know about creating such a tool as a vice with your own hands. As you can see, this process is quite simple, and the result of the work will please even an experienced craftsman. Good luck!
How to make a vice with your own hands: video
A bench vise is a necessary piece of equipment in any man’s workshop, and it is difficult to do without in any type of work.
It is not at all necessary to place them in the garage; you can set up a corner for a vice at home, for example, using a table or an ordinary stool.

Review Contents:
- Why do you need a bench vise?
- Main types of bench vices
- Work on making a bench vice at home
- Classic homemade vice
- DIY vise photo
Why do you need a bench vise?
When processing or sharpening any part, it is necessary to fix it firmly and reliably, that is, to hold it in a certain position. The photo of the vice shows the operating principle of this equipment.


The parameters and dimensions of the vice are determined depending on what type of tool needs to be firmly held.

The design of a carpenter's vice includes:
- chassis screw;
- handle;
- movable and fixed sponge;
- base plate.

Main types of bench vices
Before making a vice with your own hands, you need to decide on the choice of work associated with it.

All types of vices are divided into two types:
- non-rotating ones have a simpler design and are easiest to make yourself. The part is fixed strictly in one position.
- Rotary vices are most often adapted for drilling on a machine. During operation, it is possible to rotate the workpiece without unclenching it.

The body material of the vice is most often made of durable cast iron. It is important to know that cast iron is not intended to be exposed to high temperatures; steel metal is suitable for these purposes.


If the work will be carried out with small-sized parts, you should not increase financial costs and make compact small vices.

A small vice with a ball joint base is useful on the farm for processing very small parts that can be secured individually. These are mini-vises with suction cups, mounted on a glass or well-polished surface. But they are suitable for rare non-serious work.

Please note that it is wise to install soft attachments on the fastening part for working with soft parts, so as not to cause damage to them. A vice with the least amount of play when the jaws are fully extended is the ideal option.

A vice without a rotating mechanism will save a lot of money, unless, of course, it is needed in the work.

Work on making a bench vice at home
Carpenter's vices, made independently at home, will save the family budget significantly more than their store-bought ready-made “brothers”. And a huge plus is that the product can be made according to personal preferences and for certain individual types of work. 


It is absolutely not difficult to find material for the structure; it could be: a piece of technical pipe, a used jack, old lathes, presses, etc.

And if you go to a metal collection point, there will undoubtedly be a suitable part for a vice that will cost you a penny.

Classic homemade vice
There are many types of vices, but the most popular and traditional is the type with steel material. Such a vice will be much more reliable than a factory-made one.

The design consists of: Please note!

- a steel plate of at least 3 mm, but it can be much thicker;
- external and internal channel (120 and 100 mm);
- steel lugs;
- turning cutters 2 pieces;
- a small piece of reinforcement (rod for a gate);
- a nut (2 pieces), a pin or a screw of a certain diameter that corresponds to the rod;
- washer (2 pieces) of the same diameter with the lead screw;
- screw pair 335 mm;
- To secure the propeller chassis, a thick plate is needed.

It is necessary to separate the lead screw with washers on both sides of the plate. One of the two washers must be secured with a cotter pin or a locking ring, so that the part is completely removable; you must first weld the screw thread to it.

The handle should also be collapsible on one side, and welded on the other side using a nut. It is necessary to weld a nut with a channel from the screws flush to the plate. To make the channel inside with the screw move easier while moving, it is recommended to lightly process it with a file.

Sponges are welded to the so-called ears, made from turning cutters. They are placed in the right place when the lead screw is screwed in, so the ears stand at the ideal distance from each other.

But you can also connect them with wire for greater convenience, so in the future it will be more convenient to fix uneven parts, the shape of which is expanded towards the bottom.

These homemade vices allow you to process larger parts. Note!


To perform work in a home workshop, it is recommended to choose the simplest fixed vice for the machine.

It’s not at all difficult to make them yourself; you just have to watch the videos and recommendations, which can be easily found on the Internet and first draw up the drawings correctly.

DIY vise photo


To secure parts during processing, special clamps are needed. It is not difficult to make a vice with your own hands in different sizes; you will need drawings with dimensions, as well as a technological sequence for performing the work.
A home handyman usually has many different tools in his arsenal. However, it is difficult to overestimate the role of the vice. They are used to install parts of different sizes, so one workshop may have fixing devices of various types and designs. In metalworking, metal products are mainly used, and wooden devices are widely used for wood processing. Some craftsmen equip their work tables with homemade bench vices. It happens that you need a special fastening tool.
Vise elements
The clamping fixture must have several basic elements:
- the sponge is motionless;
- movable sponge;
- screw mechanism;
- transverse corner;
- movable jaw bracket;
- slider;
- main support (longitudinal angle).
Diagram of a homemade vice
The design of the clamp may be different. Sometimes even ordinary pliers are used as starting materials.

The simplest designs
It is customary to determine the following types of vices based on the characteristics of the device:
- massive stationary. These are usually placed on one of the corners of the workbench. In forges it is customary to install it on a separate support mounted on a strong foundation;
- swivel can be used from several sides. If necessary, the location of the jaws is oriented in different directions;
- machine ones are intended for use on drilling machines. Such products can be placed on milling tables, planing or slotting equipment, as well as on welding lines;
- wedge ones differ in that the design has a unique appearance. Such clamps make it possible to develop fairly large pressing forces on the parts being fastened;
- Moxon's parallel designs. Their peculiarity is the use of not one, but several screw clamps. Long parts in different parts are fixed at different points;
- vertical ones are used for processing products that have a large height. The support of such a vice can be located at the bottom, and the processing area is located at the top.
Vice design development

Drawing of a homemade vice
If you want to make your own design yourself, you need to prepare drawings (sketches). You can take rolled angles, channels, and I-beams as a basis. In industrial devices, cast iron is used. Small ones can be made from channel bars.
DIYers use different types of wood or rolled metal.

Metal elements are used in wood products:
- screw. Use studs with standard threads. If a jack is available, then the product being developed will use a rectangular thread;
- screw. It is selected to match the existing clamping screw;
- fasteners are used to provide rigidity.

According to the design of the device, it can be:
- stationary vices, placed constantly in one place;
- portable (easily removable) vice. They can be quickly removed and placed in the vehicle for work at the repair site.
Step-by-step technologies for making wooden vices at home
Workbench design
At home, a workbench vice is made in the following sequence.
 | Wide parallel vise made of wood. The width of the jaws is 600 mm. |
 | The end part is lined with steel plates 4 mm thick. |
 | Blanks are cut from birch boards. The choice of birch is explained by the fact that this wood is characterized by high strength and hardness. |
 | The surface of the boards must be brought to perfection. Grinding tools are used. Finishing is carried out using skins with grain size 120…180 units. |
 | A board is glued to the end, which will serve as a stationary sponge. |
 | Additionally, the board is secured with M5 screws and washers with a diameter of 20 mm. |
 | Guide bushings for the rods will be made from birch bars 100x150x50 mm. |
 | Holes with a diameter of 20 mm are drilled into them. The rods themselves will be made from Ø 20 tubes. |
 | M24 lead screw and guide rods. The length of the screw is 450 mm. |
 | Pre-assembly of guide units. |
 | To ensure that the movement is carried out strictly in a straight line, you need a long nut. But you can look for something like this for a long time. It's easier to do it differently. 1 – take a strip 180 mm long (width 33 mm, thickness 5 mm); 2 – screw two nuts onto the screw; 3 – set the distance between the nuts to 140 mm; 4 – weld two nuts to the strip. You will get a long support that will reliably move the moving part of the vice. |
 | During installation, the screw and guides are located under the table. In the photo you can see how the design of such a vice is assembled. |
 | The movable jaw rests on a metal support. |
 | In order for movement along the screw to occur, the washer must be welded. It will not allow the moving part to move along the screw surface. |
 | The handwheel is turned from a piece of wood. |
 | After turning, a fairly comfortable handle is obtained. |
 | A nut is pressed inside the flywheel. |
 | To fix the nut, it is filled with epoxy resin. |
 | To fix large parts, dowels with a diameter of 20 mm are machined. They can be installed on sponges as well as on a table. |
 | A Ø 16 mm hole is drilled in the handwheel. A wooden rod is inserted into it. This makes it more convenient to rotate and fix the parts. |
 | Finished design of a wooden vice. Several rows of holes for dowels are visible on the table. By rearranging the counter stops, you can fix workpieces of quite large width. |
Making a wooden benchtop vice
Another design is used in carpentry. This type of fastener is installed on the table. They can be further strengthened using clamps.
 | Solid oak is used. It must be dried in a special mode, which includes more than just drying. The modes alternate with humidification. This will prevent the appearance of cracks. In this design, the upper part of the jaws is small in width (only 60 mm). |
 | The block is placed on the table and then marked. |
 | The block is planed. |
 | Individual parts are cut out. The best type of fastening is considered to be a dovetail. |
 | The fixed part is turned separately. |
 | A working screw is turned on a lathe. |
 | A rectangular thread is cut. |
 | A hole is drilled at the end into which the rod is inserted. It helps the screw rotate. |
 | A support plate is cut from a 6 mm thick strip. |
 | Large diameter holes are drilled, securing the part in the four-jaw chuck of the lathe. |
 | Finished plate with a hole Ø 20 mm. |
 | Making additional cuts. |
 | The finished product is used for fixing blanks when making small sculptures from soft wood. |
Simple wooden vice
 | Apple wood bars are used. |
 | The base is a board 30 mm thick, 100 mm wide and 200 mm long. |
 | Additionally, three more elements were sawn. They will serve as sponges and intermediate support. Their dimensions: width 100 mm; thickness 30 mm; height 40 mm. |
 | An eye bolt with M10 thread is used as a screw. |
 | Additionally, you will need M8x70 bolts with nuts. |
 | Holes for M8 bolts are drilled on two bars. |
 | Additionally, two bars are drilled for M10 threads. |
 | The nut is pressed in. Additionally, a plate is used to fix the screw. |
 | All that remains is to assemble the elements on the support board. |
 | M8 bolts are used to install bars. |
 | The fixed jaw can be installed in several positions. Therefore, parts of different widths can be fixed in a vice. |
 | The vice is ready. They can be used to work with wooden workpieces. |
Making metal vices
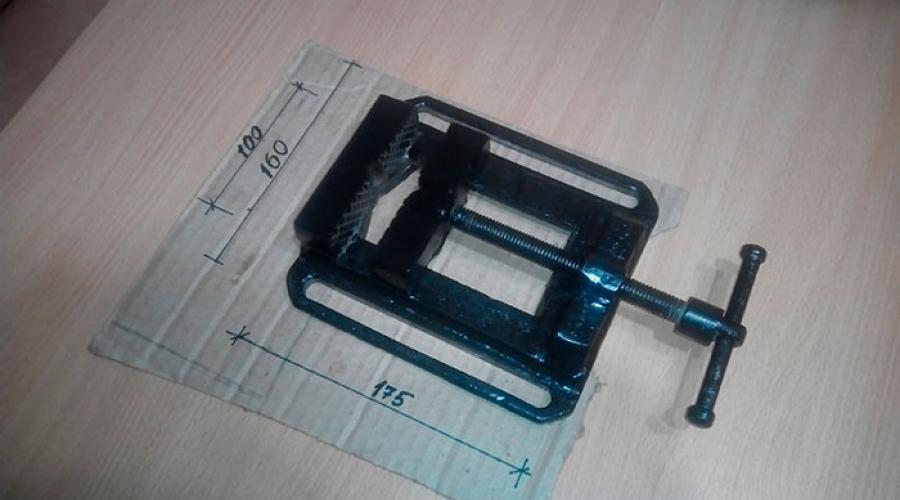
Small Machine Vise
 | For manufacturing you need: a plate 8 mm thick. Its width is 80 mm and its length is 120 mm; 2 solid squares 20x20 mm; 2 isosceles corners with a shelf 20 mm; profile pipe 20X20x1.5 mm. |
 | The parts used are tried on the plate. |
 | The angles will serve as guides for the pusher in the vise. |
 | The length of the corners is 60 mm. The pipe has a length of 45 mm. |
 | An M10 nut must be installed inside the profile pipe. You will need to saw through the window; a nut will be installed in this window; the nut must be welded in place. |
 | To make wine, a Ø 10 mm rod was used, with an M10 thread cut into it. |
 | Having secured the profile pipe in a vice, make a cut for the nut. |
 | The nut is tried on in place. |
 | You need to file two corners of the nut, then it will fit into the formed groove. |
 | The nut is installed in place. It needs to be boiled. A hole is pre-drilled on the reverse side; the reverse side of the nut will be welded through it. |
 | Welding is done from above. |
 | Then the reverse side is also boiled. |
 | The surface of all parts is sanded. |
 | A Ø 10 mm hole is drilled in a plate 50x30x6 mm. |
 | A notch is cut into the squares. It will fix the parts secured in a vice. |
 | The prepared parts are laid out on the workbench. The device will be assembled. |
 | The fixed jaw is welded. Having installed the profile pipe as the determining direction, the corners are welded. The stroke of the movable jaw will be 30 mm. |
 | A plate 20 mm wide needs to be welded on top. It will limit vertical movement. You will need to attach the profile pipe to the movable jaw. |
 | Part of the welding work has been completed. The movement of moving elements is checked. |
 | A nut is welded to the screw. It will not allow it to move along the axis. The plate is located at the back. It also must be rigidly fixed to the supporting surface of the vice. |
 | The parts are adjusted according to location. |
 | By welding the plate, you get a small vice. |
 | You can carry out a trial use by securing the vice on the table. |
 | The parts are secured securely. |
You can make your own vice from scrap materials. For this, screws with a 20 mm thread and a length of 150 mm are used. They can be removed from the sports corner. The threads of such screws are designed to withstand significant loads.
Homemade carpentry vices can be made from scrap materials.
Design features
It is recommended to make a carpenter's vice with your own hands using long screws. The distance between the jaws of the tool depends on this indicator. The studs are replaced with other fasteners. To secure the handle in the screw, you will need to make a slot. If necessary, expand the hole with a file.

A homemade tool must be equipped with a screw and a ring. A fixed sponge is made from a board. She is nailed to the table. To make the movable part of the workbench, you will need a board 20 mm thick and 18 mm wide. The length of the sponge should be 50 cm.
To make a hole for the screw, use a feather drill. It is recommended to first adjust it to a diameter of 21 mm. To make a hole for the studs, you will need a drill with a diameter of 10 mm. Screws and studs are inserted into the holes.
In order for a homemade vice to process short workpieces, the pins are rearranged. 2 additional holes are made in the board. To work with long boards, a drilling machine with long screws is made.
Application of pressed nuts
Carpentry tools with a pressed nut are made from metal staples. To prevent the key from breaking off the nut when clamping the workpiece, it must be pressed in. To do this, you will need to heat the key jaws over a fire.
Carpentry tools can be made from shock absorbers and M18 nuts. Holes are made in the corners of 1 elements. To fix them together, bolts with a countersunk head are used. To make your own vice, you can use the following materials:
- metallic profile;
- hairpin;
- nuts;
- welding;
- corners.
First, 2 sections are cut from the profile. The third strip is cut lengthwise at an angle. The bottom is cut out of a long strip using magnetic corners. The workpieces are tried on and cleaned to ensure good adhesion with the welding machine. The vice support is aligned with magnetic angles. The next stage involves welding the last elements and support. To give the tool greater strength, metal strips are used.
Additional work

Diagram of a carpenter's vice.
The front lip of the vise is then welded to the guide. It is first placed with the cutout facing down. The next step is to manufacture the frame. A metal strip is welded to the last element. Its tasks include limiting the travel of the guide and holding the threaded fastener.
The nuts are welded to the frame. The stud is screwed in first. The hole for the rod is marked and drilled in the plate. The last part is welded on. The steel fastening element is screwed to the frame. The nut is screwed onto the 1st element.
The rod is inserted onto the frame so that the pin passes through the hole. 2 nuts are screwed on top. The pipe is passed through it. Excess pieces of metal tape are cut off. The rear lip is welded to the workpiece and to the bed. If necessary, a homemade instrument is painted. To do this, you will need to clean them with a felt circle, the rod is lubricated with a special lubricant. The vice is being assembled.
Conclusion on the topic
At home, you can make metalworking and carpentry vices. To make 2 tools, water and gas pipes are used. It is necessary to select pipes with different diameters. A product with a smaller diameter is inserted into a larger analogue and fixed by electric welding.
The smaller product is equipped with a flange with an M18 nut. The threaded rod is inserted into the small pipe so that the pre-fixed nut rests against the flange with a large hole. Another fastener is screwed onto the protruding end of the stud. A welding machine is used to fix the 1st element.
The end of the threaded rod is screwed into the nut of a pipe with a large diameter. The next step is to install the pressure plate and support plate on the vice. The jaws are made from a square pipe, and the paws are made from a corner.
For ease of use, a nut is welded to the protruding end of the stud. In this case, the possibility of installing a metal rod in it is taken into account. This technology will allow you to rotate the axis while easily controlling the vice.
Homemade vices may have some negative characteristics:
- simultaneous rotation of the inner pipe with the pin;
- the pipe must be in the appropriate position (this will require installing a clamp).
When making a homemade vice from 2 scraps in the shape of squares, you should adhere to the technology described above.
If necessary, it is not difficult to make a suitable vice with your own hands. The point is not only that the tools offered by manufacturers are expensive, bulky and heavy: they often do not meet the needs of a home craftsman. This is especially true when you need high precision of parts, strict parallelism or perpendicularity of their surfaces, the ability to easily move the vice from one place to another, etc.

Figure 1. Mechanic's vice V. Legostaev.
It is very difficult, and often simply impossible, to accurately drill holes and process workpieces efficiently, holding them with your hands or pliers. Need a bench vise. Convenient work with wooden products; wood carving is impossible without a carpenter's vice. Both of them do not have to be bought in a store - if you have the appropriate skills, they are not difficult to make yourself.
Homemade bench vise

This simple, lightweight, but at the same time very effective design was developed by the famous home craftsman V. Legostaev. The operation of the proposed model is based on the fact that water and gas pipes are produced in such a way that a sample of a given diameter fits tightly into a product of the next standard size.
In Fig. 1 shows its device. The individual structural elements are indicated there by the following numbers:
- The inner (moving) part of the vice is a section of water pipe.
- The outer (fixed) part of the vice is a piece of pipe of the following standard size.
- Running nut (M16).
- Lead screw (M16).
- Collar.
- Front support.
- Rear support.
- Pressing jaws are pieces of rectangular pipe.
- Fixing nut (M16).
A flange with a nut having an M16 thread (3) is welded to the end of the pipe section (2), which is the outer, stationary part of the vice. The same flange with a larger nut (M18) is welded to the end of a pipe section (1), which is the internal (moving) part of the vice. This nut on the inner surface of the flange serves as a kind of bearing for the stud (4) with M16 thread.

Metal vice design elements.
A locking nut (9) is screwed onto the left end of the threaded rod and fixed in this position by welding. Washers are installed between these nuts and the flange to reduce friction. The right, long end of the stud screws into the nut of the large (outer) pipe. A thick washer or nut of suitable size is welded to the left end of the stud, into the hole of which a knob (5) is inserted. It allows you to conveniently rotate the axis to control the vice. As a result, the main working unit of the proposed design will be obtained.
Jaws (8), made from sections of rectangular pipes, are attached to the inner and outer pipes by welding. To obtain a complete structure, supports (6 and 7) are attached to the outer pipe. They can be made from metal angle and rectangular pipes. Homemade vice is ready.
To prevent the inner pipe from rotating, you can make a longitudinal slot in the outer pipe and screw a locking screw through it into the inner part. This will not be necessary if you use sections of two similar-sized pipes of square or rectangular cross-section as the outer and inner parts of the main assembly.
Return to contents
Homemade carpentry vice
In a home workshop, there is always a place for a workbench on which you can process wooden products. Doing this by laying the workpieces on a workbench or securing them with clamps is not always convenient, and sometimes even impossible. This is especially true for processing the ends of workpieces, since metal spoils the surface of wooden parts, leaving marks on them.

Figure 2. Homemade carpentry vice made from timber.
This means that you can’t do without a carpenter’s vice, and in order not to waste money, you can also make them yourself. An example of such a design is shown in Fig. 2. The body (1) is usually attached to the workbench tabletop, and the movable plate (2) moves along guides (3). The movable plate moves due to the rotation of the screw pin (4), which is screwed into a fixed nut fixed on the back side of the vice body.
A carpenter's vice is attached to the workbench with long screws or bolts and nuts. Overlays - wooden, plastic or metal - can be attached to the jaws of the vice. Without them, workpieces may be damaged during processing. This is especially important when working with soft woods.
One of the main components is a screw pin (4) with an M20 thread. You can order it from a workshop or look for it in a sports store. The longer it is, the wider the sponges can be spread. With a cutting length of 15 cm, they can be separated by a distance of about 8 cm. To attach the handle, a hole of a suitable diameter is drilled at the end of the screw. You can try to find blanks for making guides (3) in a hardware store among the fasteners or at a flea market.
Sponges (1 and 2) are made from two pine boards. A hole is drilled in each of them for a screw and guides. For accuracy, before drilling them, it is better to connect the boards, for example, with nails, which are then carefully removed. For processing long workpieces, you can make a vise with longer jaws and two clamping screws.
Thus, making a bench or carpenter's vice with your own hands at home is really not difficult.
And having become familiar with the operating principle and structure of the proposed clamping devices, it is quite possible to develop your own design.