How to disassemble a straight hammer drill. How to properly repair a hammer drill on your own. The drill does not stay in the chuck
Read also
For work it is important to use quality tool: This is more pleasant to work with, and malfunctions occur much less frequently. But still, when breakdowns occur, it is useful to know how you can fix them yourself.
A hammer drill is a tool that is always useful on the farm. It is used for drilling and drilling holes, indispensable for owners of housing made of iron concrete structures, since a drill may be useless in such conditions.
Hammer design
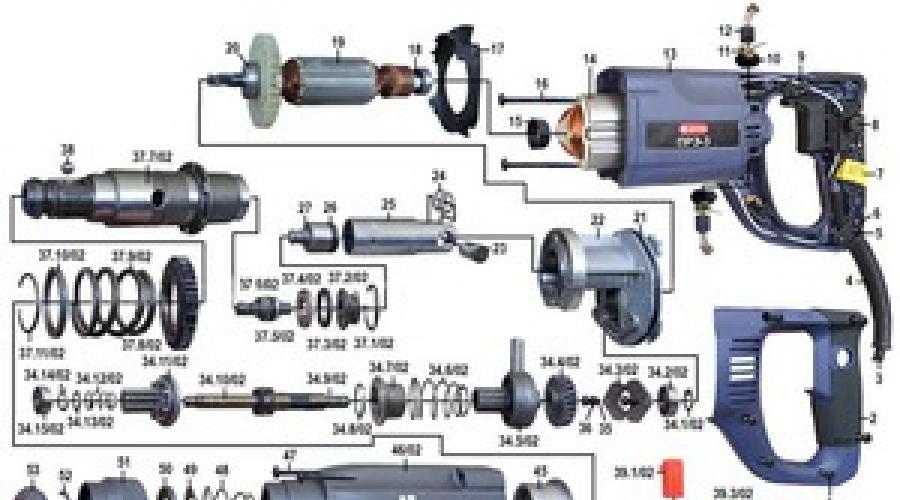
In order to repair a hammer drill yourself if it breaks, you need to know its structure. And although there are several types of hammer drills, different models may differ in functionality or power, but they are similar in design and principle of operation.
The hammer drill consists of:
- Electric motor.
- Reduction gear. Responsible for increasing the torque of the working axis and reducing the rotation speed.
- Impact mechanism. The presence of this part distinguishes a hammer drill from a drill.
- Patrona. Acts as a fastening for attachments.
You need to choose the type and brand of hammer drill based on where and how often the tool will be used. In any case, it is better that it is of high quality, then breakdowns can be avoided. However, it is important to know the signs by which you can determine that an electrical appliance will soon fail or has already failed. These signs are as follows:

Disassembly and repair of the cartridge
One of the frequent breakdowns that owners of rotary hammers encounter is this is a cartridge failure. In order to disassemble it, you will need the following equipment: a screwdriver, a hammer, pliers and an open-end wrench.
First, you need to find the rubber coupling at the end and remove it and the retaining ring. After this, access will open to the working coupling, which needs to be moved and another retaining ring removed. You can use a flathead screwdriver to loosen the rings. The next step is to remove the spring and retaining balls. Now you need to remove the cartridge; to do this, you can use a vice and hold the cartridge in it, take an open-end wrench and rotate the spindle by the flats.
If a cartridge falls off while working with a hammer drill, this may mean that the cartridge body at the attachment point has become unusable. To eliminate this problem, simply replace the retaining ring with a new one.
There are times when during use the drill flies out of the chuck. Then you need to disassemble the cartridge and determine what could have caused it. The following parts should be paid attention to: balls, restrictor ring and retaining spring. If any of them is damaged, then you need to replace it, then the problem will be solved.
If, when disassembling the cartridge, it becomes clear that the inner cylinder has become unusable, then the cartridge must be replaced completely, since it cannot be restored. In this case, you can remove from the old one all the parts that have not yet worn out; they may be useful in the future if any of these components wear out in the new cartridge.
After repair, it is important not to apply heavy loads during the first time in order to check the functionality of the tool.
 If the hammer drill malfunction is not related to the chuck, and with its mechanical or electrical part, you will need to completely disassemble the instrument to determine the cause of the breakdown.
For disassembly, you can read the instructions or technical documentation to a specific model, however, you should know that the standard mechanical part is located behind the chuck, and the electrical part follows the mechanical part. First, you will need to use a screwdriver or screwdriver and unscrew the screws that hold the plastic case in place. The number of screws depends on the model. The wires that are available are carefully disconnected. When disassembling, it is important to remember or write down the sequence of connecting the parts so that there are no problems with assembly in the future. Be sure to read the instructions to know where the parts are located and their correct names.
Repair of the most common faults
One of the most common malfunctions the brushes sometimes spark. This often happens due to wear and tear on the part itself, so to fix this problem they need to be replaced with new ones.
It may also be necessary to remove the operating mode switch; to do this, you need to set it in the “impact” position (so that the arrow points to the hammer image) and turn it further by about one centimeter. Next, the lever is released from the socket and pulled towards itself.
If the body of the hammer drill gets very hot during operation, then perhaps, firstly, the operating mode was not followed, and secondly, the reason may lie in a malfunction of the electric motor.
Disassembling the electric motor
 If it has been determined that the breakdown is related to the electric motor, you should start disassembling it. To do this, you need to follow the instructions to determine where the electric motor is located and disconnect its housing from the gearbox. You will need to unscrew the screws holding them together. Remove the motor rotor from the guide bushing, after which a full inspection of the electric motor parts will be possible.
Armed with a multimeter, you can check the windings of the copper conductor, and if it is determined turn-to-turn short circuit, then you will have to replace the anchor with a new one. It would be useful to check whether the insulation is damaged, and if such a problem is identified, then fix it.
Changing bearings and start buttons
Sometimes it occurs need to change bearings. During inspection, you will notice that if you turn it manually, it can make strange sounds such as crackling or crunching. This means the bearing needs to be replaced. To do this, you can use a special puller; it consists of a screw part and a part that is adapted to grip the bearing sleeve. After dismantling, a new bearing must be installed; for this, a hammer made of rubber or wood is usually used, with light blows to put the bearing in its place. It is important not to use excessive force to prevent the bearing axis from moving relative to the shaft axis.
It may also be necessary to replace the start button; to do this, first remove the cover, which is a housing to protect the internal parts of the hammer drill. After this, the contacts of the conductors that are connected to the button are disconnected, and the button itself is pulled out of seat. Now all that remains is to take new button and perform all the above steps in reverse order.
As you can see, repairing a rotary hammer with your own hands is a task that anyone can handle; the main thing is to understand the structure of this useful tool for household use and follow the instructions. A to reduce the likelihood of breakdown to a minimum, you need to follow some rules:
- Before you start working with the tool, inspect it for chips or cracks in the body. If they are found, carry out repairs.
- Read the instructions and technical passport product and follow all recommendations for working with it.
- Use high-quality drill bits that are suitable for the specific type of material.
- If the amount of work that needs to be done is large, then it is necessary to take breaks to avoid overheating.
- After working with the tool, clean its surface from dirt and dust; you can also use a vacuum cleaner to blow it out.
- Observe storage conditions. The hammer drill must be located in a special place where moisture does not penetrate, as it can damage electrical parts.
- Conduct full analysis, cleaning and lubricating the tool on a regular basis once or twice a year.
 By the way, the absence or lack of lubrication is quite common cause hammer drill failure. The instructions for the device should indicate which places and parts need to be lubricated and which not. It is important to know that for gearboxes liquid lubricant must be used, which must be poured into a hole specially designed for this; for other parts, a thicker lubricant can be used.
By complying with these simple rules the tool will last a long time, and the risk of malfunctions will be kept to a minimum. But if any malfunction does appear, then, following the recommendations above, you can eliminate it without difficulty.
Repair of a rotary hammer is complicated due to the layout of the units with mechanical interface and energy block. All parts have micron tolerances and a proven sequence of actions. Therefore, it is necessary to ensure proper care and technical operation tool in accordance with the requirements of the instructions, thereby extending the overhaul period.
Perforator device
There are few tool users who have studied not only the order of pressing levers and buttons, but also understand what happens in the mechanism as a result of the command received. Without knowing the interaction of the components, it is impossible to perform even the smallest repairs on a rotary hammer.
There are signs of problems that relate to the power part, and sometimes mechanical wear or breakdown of parts occurs.
 Electrical circuits and equipment are concentrated in one part and are presented in cross-section in the photo.
Signs of a malfunction that require replacement of parts or repair of the rotary hammer in the power section may be the following:
- when the device is turned on, the mains fuses trip;
- the device does not turn on;
- During operation, smoke with a pungent odor appears;
- the device sparks during operation;
- speed is not adjustable.
You can find the reason why the device does not turn on using a tester. You need to look for a gap in the scheme, from simple to complex. Check connections, clean contacts. The most complex and expensive part that fails may be the hammer drill armature. This is the heart of the engine, made up of copper coils interconnected and fastened with lamellas. In the event of an insulation breakdown between the wires anywhere, short circuit, and the entire manifold needs to be rewinded or replaced. 
You can determine that the armature on a rotary hammer is faulty visually by a burnt winding, traces of smoke on the lamellas, or by testing for a short circuit. Damage can be avoided timely care, cleaning parts from dust, which is the root cause of all troubles. If sparking comes from the engine, the armature must be cleaned with an alcohol swab or a regular school eraser to remove graphite deposits from the collector.
The second important part of the engine is carbon or graphite brushes. It is through the moving contacts that the electric charge on the core, creating an induced EMF torque. The rotary hammer brushes are the contact that connects the rotating commutator to the power source.

The two elements always work in tandem. A carbon or graphite plate is pressed against the collector. As a result of constant friction against the rotating collector, the plates wear out and contact is broken. A sign of a malfunction will be sparking in the manifold; perhaps the engine does not develop speed. Regardless of the state of wear, both plates are replaced at the same time. Most tool models have brush wear indicators that warn the user in advance.
The revolutions of the rotary hammer may not be regulated due to a malfunction of the control unit, then it needs to be replaced; the device cannot be repaired.
Mechanical faults and their elimination
 To find a particular malfunction, you need to get to the desired node. Any of the sequentially removed parts is carefully inspected for the presence of:
- cracks;
- chips;
- burrs or scratches.
In most models, they are disassembled into two halves, but each of the hammer drills has its own characteristics. How to properly repair a rotary hammer with your own hands, watch the video:
A sign of a breakdown may be:
- refusal to perform a function;
- extraneous sounds inside the mechanism and excessive heating of the case;
- modes do not switch;
- grease is leaking.
Each of the symptoms may be the result of a breakdown of any of the parts that are removed in the sequence indicated in the diagram. Reassemble the tool in reverse order. Spare parts should be purchased according to the specifications in the service instructions. 
One of the causes of mechanical breakdowns is often insufficient Maintenance unit operating in difficult conditions. Preventive actions are not complicated, and the life of the instrument will be significantly extended. According to the operating rules it is necessary:
- renew the gearbox lubrication every six months;
- after 6 months, inspect and clean the brushes and the adjacent part of the commutator;
- at the end of the working day, clean the rotary hammer with a vacuum cleaner;
- Don’t forget to apply lubricant to the shanks of the slotting equipment to seal against dust and prevent wear of the socket.
Do not exert any physical effort when working with a hammer drill; the hammer and seals will wear out, causing fatigue and irritation for the operator.
Goals and objectives of tool lubrication
 Often the cause of tool failure is the absence, deficiency or inappropriate lubrication. Abrasive wear is reduced if all gaps and cavities are covered with a layer of antifreeze, and cleaning is carried out in a timely manner.
The type of gear lubricant differs from the composition for the shanks. Each manufacturer recommends using a specific hammer drill lubricant specified in the instructions at the required frequency.
Available general recommendations concerning all rotary hammers. Gearboxes must receive oil of liquid consistency, poured into a special hole. For all units, you can undoubtedly use Bosh and Makita lubricant intended for gearboxes, which is what they do in service centers.
Incorrectly selected or overfilled lubricant can lead to overheating of the gearbox.
To lubricate the shanks of the working equipment before inserting it into the chuck, a lubricant of a thicker consistency from the same manufacturers is used. In this case, the attachment point of the shank in the chuck and the firing pin are protected from wear. Filling all gaps with lubricant protects the assembly from dust.
It is necessary to lubricate the places indicated in the instructions. And it is certainly harmful to add lubricant to the clutch. In case of sudden detection of a lack of lubricant in the gearbox, you can use the domestic composition, Litol-24 Lux, but lubricant is not suitable for battery-powered hammer drills, even temporarily.
Design of the working unit and equipment of the hammer drill
 The hammer drill has a chuck into which the working tools are secured. For professional heavy hammer drills, SDS max chucks accept only 18 mm diameter shanks with five longitudinal grooves, which are installed in the chuck socket of the corresponding profile.
The light and medium tool is equipped with an SDS plus chuck, which allows the use of a slotting tool with four longitudinal grooves and a cross-section of 10 mm. The hammer drill chuck is designed so that it can only accept tools intended for it. If you insert the wrong equipment, it will not fit into the socket, or it will be installed sideways. If you try to work, the fastening unit will be destroyed. But drills do not have a fluted shank. An attached cartridge is used, which is installed in the SDS profile. But at the same time the tool lengthens. The drill chuck for a hammer drill can be a quick-release chuck or a key chuck. The adapter is used only with an SDS+ chuck, since a more powerful hammer drill does not have the function of drilling without impact.
A hammer drill is a multifunctional tool. It can use modes:
- shock;
- impact with drilling;
- drilling, if there is a special chuck.
To work in shock mode, there are many devices used to facilitate manual labor. 
Drilling impact is performed only with the use of hammer drill attachments:
- hollow crown;
- paddle for scoring.
They call it a tool that has a special profile shank, a working part that is a screw and a tip made of special steel with a centering tip. The destruction of the material occurs not by scraping, but by chipping the rock. At the same time, an impact with rotation occurs, as a result of which the chipped pieces are removed along the screw surface of the working part.
Drills for hammer drills are installed when working in non-impact mode. With this tool, a lightweight hammer drill can work like a regular wood drill. If necessary, the device can be used to tighten fasteners if a reverse function is provided.
A hollow crown is needed for making through passages for cable wiring or for creating recesses in the body of a structure for installing devices. The crown creates a circular passage, leaving a post in the middle. Since the nozzle has a special toothed profile, metal fittings in concrete will render the cutters unusable.
Recesses in the wall can be made with a special spatula for grooves, but the holes will not look as neat as those made with a crown.
The bushard has long been considered a sculptor's tool. The craftsmen used forging and cross bush hammers. This percussion instrument, resembling a hammer, the head of which is serrated. The sculptor cut off the block of stone everything was superfluous, and the cross gave shape to the stone.
 When using one impact mode, use with attachments:
- spatula or flat chisel;
- peak;
- channel chisel;
- bush hammer
The hammer drill blade is designed to level the surface of hard material. Using this equipment, you can remove tiles from walls and remove uneven surfaces from hardened concrete. Correction of some flaws when installing openings in multi-storey construction conducted using this tool. A hammer drill chisel used for concrete can have different widths, depending on the task being performed. Suitable for all rotary hammers. Specially created, narrowly targeted attachments are also used - a chisel, a tamping plate or a mortar cutter.
When dismantling building structures it is necessary to create a breaking force. To destroy a wall or partition, concentrated at one point, impact peaks are provided by the power of the hammer drill. 
Bucharda is a molded attachment, a very durable sledgehammer. The teeth on the bush hammer are carbide and can withstand heavy shock loads. Removing a layer of concrete from a wall, knocking off a layer of rust from metal - this is the area of application for bush hammers. If you treat the walls with this tool before plastering, no reinforcement will be required. You cannot use a bush hammer for a rotary hammer in the mode of rotating the tool. The inevitable consequence will be jamming.
Rules to follow
During operation, the hammer drill heats up quickly. In order to maintain the functionality of the tool for a long time, it is necessary to take a break of at least 10 minutes after 20-30 minutes of work.
In the process of work, when turning the tool idle, you need to remove crumbs and dust, clean the hole being punched in order to make the tool easier to work with. When drilling holes with a large cross-section, first drill with a thin drill, then with a medium one, making the hole in three steps. Long through passages must be drilled first with short nozzles, gradually replacing them with longer ones.
After work, it is necessary to put the punch and used nozzles in order. Tools must be cleaned of dust and placed dry in a container.
Video about self-repair of a rotary hammer
Any tool, including a hammer drill, requires special care for yourself and careful use. Therefore, every owner of such electric tool must regularly inspect the unit and know how to disassemble the hammer drill. It is quite possible to disassemble and repair the device at home without spending a penny on the services of a specialist.
A hammer drill is a must-have tool on any construction site, but due to careless use, it wears out very quickly and fails. This happens due to heavy loads on the tool. As we know, a rotary hammer often works on full power in the most difficult conditions. Due to such loads, even branded models are susceptible to breakdowns. Therefore, every owner of this device should know how to repair a rotary hammer with his own hands.
Like any other technical device, the hammer drill can be repaired; for this it is not necessary to take it to a specialized workshop. Although not every man knows how to repair a rotary hammer, but it doesn’t matter! This article will help you make repairs yourself without outside help.
The most common cause of tool failure is a loose wire. Due to simple inattention, people pay significant money for a mere trifle in hammer drill repair services. A basic inspection is often enough to understand that the instrument is broken conditionally and that you can easily fix it yourself without outside help.
Is DIY repair possible?
Not always visual inspection will help identify the cause of the breakdown. In this case, the next step will be to disassemble the hammer drill. If the device has served for many years and is not of significant value, you can try to find the cause of the breakdown by disassembling the instrument individual parts. Feel free to proceed with autonomous repairs if the cause of the tool malfunction is visually visible and you already have an idea of the filling of rotary hammers. If the device was purchased relatively recently, and the model itself is more modern and costs a lot of money, then it is best to contact service center, after all do-it-yourself repair may not so much repair the device as cause harm. If inspection of the unit does not reveal a breakdown, then repairing the hammer drill should be postponed. In the latter case, it would be a good idea to consult an experienced specialist.
Signs of hardware problems
Any malfunctions in the operation of the instrument have their own reasons that should be discovered. A person who has purchased an instrument, for example, from Bosch or Sparky, expects the corresponding high results work, as from every foreign, high-quality product. To eliminate the risk of serious damage, you need to know the operating principle of the device. According to some characteristic features You can identify the cause of the breakdown and prevent a larger problem from occurring.
Signs:
- Burning smell from the device.
- During operation, pauses occur or small short circuits occur.
- The device does not turn on the first time or works intermittently.
- The appearance of extraneous noise when working with the device. However, such noises had not been noticed before.
Any of the above signs should not be ignored. Proceed to find out the cause of the unit failure. To ensure trouble-free operation over a long period of time, you should carefully monitor and care for the tool. To repair the device, you should study the components of the hammer drill and learn how to disassemble and assemble it.

Disassembling and assembling the tool + (Video)
A damaged wire on a device, like other minor mechanical damage, can be easily noticed. If you carefully inspect the parts of the instrument, it is not difficult to see other minor faults that led to the breakdown of the device. With more serious problems The drill needs to be disassembled. And upon completion repair work– also assembling the hammer drill. The second operation in some cases can be more difficult than the first - the appearance of unnecessary parts after assembly will indicate repair failures. To prevent this from happening, you need to not only know how to properly repair a hammer drill, but also how to assemble it. It is important to be attentive and careful when repairing a tool, then in 99% of cases the repair will be successful!
To begin repairing a rotary hammer, including a barrel type, you should properly disassemble the device:
- Removing the rubber tip and ring spring. After this, we proceed to removing the drill coupling casing itself.
- Carefully pull out the steel ball that acts as a fixation.
- Removing the switch handle, having previously positioned the operating mode lever to the maximum position. Press the position fixing button.
- Removing the cover (rear) on the handle.
- Removing the motor brush.
- Removing the front part, for which you need to unscrew the 4 screws located near the drill.
- We take out the rotor. To do this, unscrew the fasteners located on the stator, after which we disconnect 4 terminals from the stator contacts.
- We take out the remaining parts.
In some cases, if the problem lies in the gearbox or impact mechanism, we additionally unscrew the end of the gearbox housing, and then carefully remove the casing made of plastic. To ensure that the parts remain in place, it is best to carry out this entire process with the tool on its side.
Do-it-yourself repairs + (Video)
In most cases, repairs involve replacing broken or faulty parts. But there are other problems with the tool:
- Winding breakdown. To solve the problem, rewind the armature and stator.
- Brush wear. In this case, they resort to disassembling the hammer drill and replacing worn parts.
- Wear of the hammer drill boot. It cannot be repaired, only replaced.
- Hammer chuck. The problem will be noticeable if its rim begins to constantly slow down its rotation. To be replaced.
- Poor lubrication. Check the oil level in the pan periodically. Some parts of the tool should also be lubricated: the intermediate shaft, the gearbox.
- Bearing wear. Bearings gradually collect dust and dirt during operation, the lubricant thickens, they begin to overheat and, as a result, fail. To be replaced.
If the breakdown is serious and you have no repair experience, the best option for you – an appeal to experienced craftsmen. Do not start repairs if you are not sure that you can independently identify the cause of the breakdown and are not able to solve it!
Household hammer drill - universal and useful tool, with the help of which they solve the most complex problems of removing and drilling concrete walls and ceilings, drilling stones, road surface etc. It is used under constant loads, and over time, individual parts of the mechanism or electrics may fail. Quality product is expensive, so some breakdowns can be fixed with your own hands; the main thing is to know the structure and operating principle of this indispensable tool in construction.
Features and design of a construction hammer
Regardless of the type of tool, its power and scope of application, the majority modern models, including such popular brands as Makita, Bosh, Stihl, Stern, Metabo, Interskol, etc., have a similar design and consist of basic elements: cartridge, impact mechanism, gearbox, motor, power button, mode switch and connecting cord.
Some options are equipped with additional functions such as an anti-vibration system, shock frequency regulator and drilling depth limiter. Unlike a classic drill, a rotary hammer has a reinforced impact option, which allows you to use it to work with complex and durable materials, including concrete, natural stone, brick, etc.
The device engine creates rotational movement, which is converted into a powerful and progressive vibration of the impact mechanism (drill, blade or chisel) due to the principle of compression between the active pistons of the tool.

Some models, in addition to the main functions of drilling and jackhammer mode, can also have a drilling role. Such tools are considered universal, but they are the ones that often fail due to more complex mechanical system.

For drilling work, it is better to use a reliable drill, and use a hammer drill only for its intended purpose. To avoid premature breakdowns of various parts, they also follow the rules for working with this tool and carry out preventive treatment (lubrication and cleaning of its individual elements).
Types and troubleshooting
All hammer drill breakdowns that occur are usually divided into 2 categories depending on the nature of the damage:
- mechanical;
- electric.
The former usually manifest themselves in additional noise, uncharacteristic grinding sounds, increased vibration, etc. The most common faults mechanical type include:
- failure of the operating mode switch;
- wear of rubber elements and seals on the striker;
- damage to the impact mechanism of the tool;
- wear of the main barrel during long-term operation;
- malfunction of gears and breakdown of the drill chuck or blade.
Such problems most often arise when the operating conditions of the tool are violated or when it is used for a long time under high loads. Repairing a rotary hammer for each of the above breakdowns can be done with your own hands, but sometimes you still need the help of specialists.

Appearance electrical faults understood by the smell of burning from the device body, sparking when turned on and in operation, rapid overheating of the engine, uncharacteristic “humming” inside the mechanism, formation of smoke, etc. Electrical breakdowns include the following:
- problems with turning the hammer on/off;
- brush wear or clogged commutator on the motor;
- poor circuit contact;
- problems with the motor rotor and stator;
- failure battery(on pneumatic models).
Most electrical breakdowns can be resolved independently only if you have electrical knowledge. In other cases, it is better to contact a specialist in this field so as not to permanently damage the working device.
Disassembling the chuck and tool body for repair
To eliminate one or more malfunctions that have arisen, you should know how to properly disassemble and reassemble a rotary hammer. The main thing is to follow the algorithm of actions and safety precautions and have them on hand necessary tools. If there is a complex process of disassembly and repair, then it is better to photograph each stage, so that later it will be easier to put it back together.

Dismantling the cartridge begins with removing the rubber boot (1). Then use a flat screwdriver to carefully pry up the retaining ring (2) and remove a similar plastic part(3). Next, they begin to remove the main washer (4), at this stage it is important not to lose the small metal ball (or several pieces, depending on the model), which is located under the washer. Now the remaining elements are removed sequentially - the spring (6) and the plate (5).

Wear of one of the above parts leads to the drill getting stuck in the chuck, causing normal operation tool is not possible. The damaged element should be replaced, and all other components should be thoroughly cleaned, lubricated and everything put back in the reverse order.

To remove and disassemble the main body above the mechanical part of the hammer drill, it is necessary to remove the operating mode switch. The roller with the sensor is installed in working position"jackhammer" with a corresponding icon in the form of the letter "T". Next, press the button on the right side of the indicator and gently pull it down until a click appears.

Now use a flat screwdriver to pry the switch and pull it towards you. On some types of instruments, it can be screwed to the body with screws that are simply unscrewed.
Disassembling the housing in case of electrical damage
If everything is in order with the mechanical part of the device, and during operation signs appear that indicate an electrical breakdown, it is necessary to remove the plastic casing and, if necessary, disassemble the engine and its accompanying parts.

The back cover on almost all models is secured with screws; after removing the switch, they are unscrewed around the perimeter and the plastic case is carefully removed so as not to break the casing elements. Now they're twisting it fastener network cable, next remove the wiring from the fasteners and remove the start button.

All wires going to the stator are also removed, after which the motor brushes, which are attached to several bolts, are removed. If the problem with the rotor is in the gearbox, then it is dismantled, after which the damaged bearings in it are replaced using special tool. If necessary, remove the air intake and remove the stator from the casing by gently tapping it wooden object.
Replacing motor brushes yourself
The need for new brushes appears when there is a characteristic burning smell from the rotary hammer body, strong engine heating during operation and sparking in the commutator area. In the normal condition of this part, a spark sometimes occurs directly under the brushes, but if sparking occurs throughout the entire commutator area, then the problem lies in the rotor bearings or burnt out plates.

In this situation, it is quite difficult to repair the instrument with your own hands. To identify malfunctions of the stator or rotor, alternate resistance on them is measured using an electrical tester; it must be the same and consistent on both windings. Otherwise, it is better to contact a service center, but they can solve the problem with the brushes on their own.

To replace them, remove the back cover and the motor mount inside the device. After this, the parts are removed from the holding boxes along with the springs. There are 2 types of brushes in hammer drills:
- Graphite. They are more durable and practical, but due to the hardness of the material they do not fit tightly to the stator, which leads to wear during long-term use.
- Coal. They wear out faster than the former, but have a better fit, which has a positive effect on stator performance.

On more expensive and powerful models of rotary hammers, combined options parts, with graphite and coal in equal proportions. Experts recommend inspecting the motor brushes every year of operation of the tool so as not to wait until they are completely worn out and the motor sparks. They are changed when worn 1/3 of the initial volume (8-10 mm).
Pay attention to the condition of the springs that are installed on these parts and on the contact mounts. If the iron comes off during operation, it will cause serious damage to the engine, and loose contacts will reduce the performance of the tool. Before installing new brushes, the main engine parts are cleaned of carbon or graphite dust and other contaminants using medical alcohol.
Construction and repair of the impact mechanism on “barrel” hammer drills
Impact mechanisms are distinguished depending on the type and purpose of a particular hammer drill. Barrel or vertical options Bosch or Makita, on which the engine is mounted vertically, mostly have impact blocks based on a connecting rod mechanism (CPM).

Most often, a special rolling bearing fails, which is installed either at the base of the main connecting rod or on the cam of the wheel with an eccentric. On some models, this part is replaced with a plain bearing, which must be constantly and generously lubricated.
Another common problem is a broken firing pin. This is evidenced by the weak impact properties of the hammer drill or their absence at all. To replace this part, you need to disassemble the mechanical barrel of the tool according to the following diagram.
First, the barrel is disconnected from the hammer body. To do this, remove the cartridge using the technology described above, then tap the barrel on the tabletop until the piston comes out of it, and then knock the body with a hammer and remove required part.

Now remove the retaining ring that holds the piston in in the right position. Next, the bearing itself is removed, from which the metal balls are also removed.

This allows you to get to the raster sleeve, from which the balls are also removed. It is important not to confuse them with those that were in the bearing; they are smaller in diameter. The final stage insert a flathead screwdriver into the bushing and push out the broken firing pin.

In addition to this part, the sealing gaskets and seals in the barrel body are additionally inspected. If they are worn out, they are replaced with new ones.
Repair of the impact mechanism on horizontal instruments
When the engine is mounted horizontally (on many models from Bosch, Hitachi, Energomash, etc.), another shock block system is implemented. Instead of a connecting rod, a swinging bearing is installed on the piston, which sets it in motion. This is also a common reason for the failure of a rotary hammer, namely the loss of impact qualities when the device simply does not hammer as it should.

Remove the worn part using a flat screwdriver, which is used to pry the bracket on the gearbox housing and remove it. After this, the bearing is easily separated from the main body, and the gearbox itself is thoroughly washed, since fragments of the old part may remain inside. And after installing a new bearing, re-lubricate it with a thick layer suitable material.

If the reason lies in the firing pin, then to remove it from the barrel, remove the locking ring using a screwdriver, which is inserted into the hole and moves it towards the gears on both sides. Using the same screwdriver, press the body and remove the broken firing pin from it. When reassembling the impact mechanism, be sure to apply a layer of lubricant to all metal parts.
Elimination of other mechanical breakdowns
If a special mode switch fails, which occurs due to contamination with dirt and construction dust, it is removed according to the instructions described above, cleaned and installed back or replaced with a new one if it is broken.
If the drilling properties are lost and the hammer is used for a long time, the gear teeth on the rotor shaft may wear out. The problem often occurs if the tool is used incorrectly (too heavy loads) or due to malfunction and interruption in the operation of the clutch.

If a drill, drill, or spade simply does not stay in the chuck, you will need to disassemble it and replace the ball, retaining ring, or retaining spring. If the drill gets stuck inside the chuck, the reason lies either in insufficient lubrication on the shank (this can be solved by additionally injecting WD-40 under sealing gum), or the holder has been riveted.

In this case, apply additional lubricant and after some time manually pull out the drill, loosening it in different sides. If this does not help, then disassemble the cartridge and mechanically knock out the equipment with a hammer.
To avoid large quantity problems with the hammer drill, you must follow the rules for its operation:
- upon completion of all work, be sure to remove all debris, dust and dirt accumulated in the cartridge;
- when drilling concrete structures, observe the frequency of work (every 2-3 cm the drill is removed from the wall and allowed to cool slightly);
- carry out preventive lubrication of the external and internal parts of the tool, especially during long-term use;
- follow the rules for storing the hammer drill in a plastic packaging box, in a room with low humidity.

Normal operation of a high-quality hammer drill will avoid technical breakdowns during long period time. Buy only models from trusted manufacturers and use the tool strictly for its intended purpose. If you are not sure where and what type of failure your device has, you should not experiment with it. It is better to contact specialists or a service center if it is covered by a factory warranty.