How to calculate the amount of wood for a hipped roof. How to calculate the hip roof of a house. Calculation of the geometry of the elements of a hip hip roof
The most popular and most common roof design for a house, without a doubt, is the gable roof. But recently, the hip roof has also become widespread. It is distinguished by the fact that it is hipped, the two slopes of which (called hips - hence the name) replace the gables of a traditional gable roof. It has a number of undoubted advantages and has several varieties. In addition, the hip roof has a relatively complex design and manufacturing technology, which makes preliminary calculations of the main parameters of the roof and the need for materials an important stage in preparation for actual construction.
Types of hip roofs
Before performing the calculation, you need to clearly understand what should happen in the end. There are the following types of roof structures under consideration.
Classic hip roof
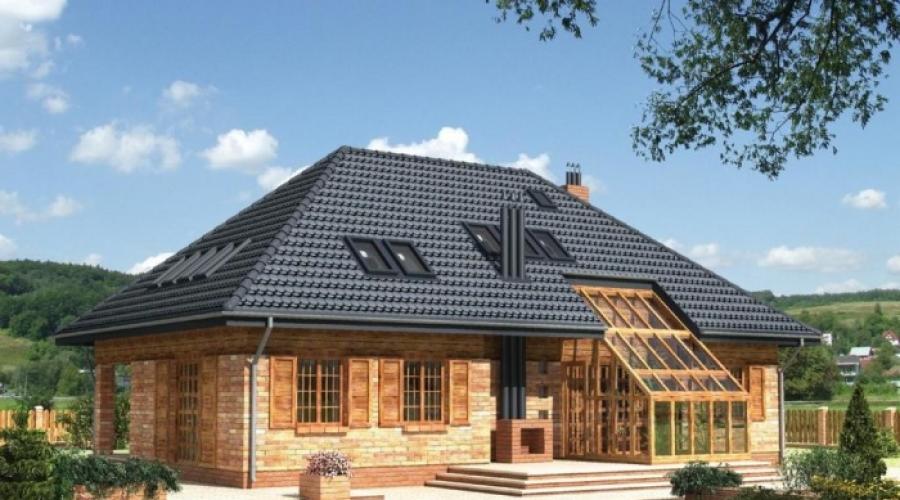
The classic hip roof of the house has 4 slopes, two of which are trapezoidal, and the other two are triangular in shape. As mentioned above, triangular slopes, otherwise called hips, were the reason for the origin of the name of the type of roof in question. The main advantages of this design are its high reliability, functionality, as well as an original and attractive appearance. The disadvantages include the relative design and technological complexity, as well as the high cost of construction.

Half hip roof
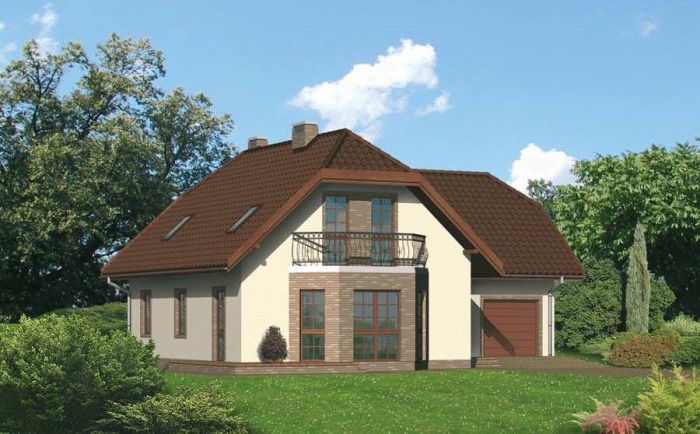
It differs from the classic variety in that the hips, that is, triangular slopes, have a truncated shape. The half-hip roof is characterized by excellent performance and an attractive and very interesting appearance. However, this type of roofing is one of the most structurally and technologically complex, and expensive.
Hip roof
A fairly popular variation of the traditional hip roof, which differs from it in that all four or more slopes are triangular, converging at one point. The structure is crowned not by a horizontal ridge, but by a ridge assembly located at the top point of the pyramid, which is formed by the slopes. As a rule, it is used in the case of a square building, or a structure in the shape of an equilateral polygon.

broken roof
Another extremely attractive type of house roof. It is characterized by the fact that all slopes have different sizes and shapes. The disadvantage is similar to the half-hip design - the complexity of the design and manufacturing technology, as well as the high cost, even compared to other expensive varieties of the type of roof in question.

Hip roof design
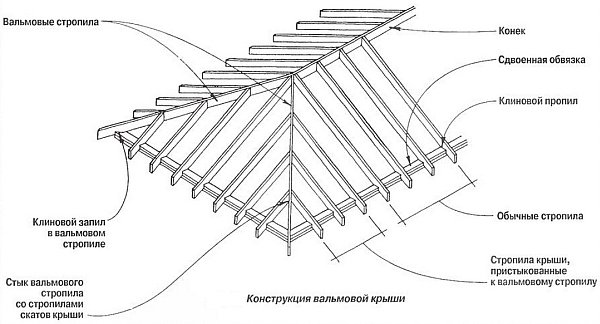
Another important issue that needs to be clarified before starting to calculate the area and the need for materials is the design features of the roof, that is, the composition of the elements that will need to be calculated. Main design elements:
- ridge (ridge beam). It is located on top of the structure in the center of the roof. It is one of the main load-bearing elements on which most of the rafter system rests and is adjacent;
- corner (sloping) rafters. They are positioned in such a way that one end is attached to the edge of the building (or extends beyond it), and the other to the ridge. They take up most of the roof load, being, together with the ridge, the main type of load-bearing roofing structures;
- central rafters. They form a rafter system stretching along the entire length and height of the slopes from the ridge;
- hip (short) rafters. They form a rafter system of hips. Usually only one rafter leg rests on the ridge, the rest are attached to the corner rafters.
Basic rules for calculating a hip roof
As noted above, the design of a hip roof is quite complex. Therefore, it is necessary to develop a project and involve specialists to perform the necessary calculations. Many years of experience of a variety of builders have repeatedly proven that the desire to save minor funds on design and preliminary calculations usually leads to significantly larger losses at the construction stage.
But in the most extreme case, if savings are extremely necessary, some of the drawings and elements can be completed and calculated independently. In particular, with your own hands it is quite possible to calculate the location for the subsequent installation of the ridge and other elements of the roof rafter system.

Determining the location of the ridge and rafters
To do this, you need to perform the following operations:
- mark the line of the central axis from the ends of the house at the level of the top of the eaves. This way the location of the ridge is determined;
- using a measuring ruler, one end located on the marked line of the ridge beam, and the other on the line of the side wall, the installation location of conventional rafters is determined;
- then the length of the overhang is also determined using a measuring ruler, only one end of the ruler extends beyond the boundary of the outer wall;
- a similar procedure is performed along the entire length of the wall in question, and then for the three remaining walls.
Thus, the locations for subsequent installation of the ridge and all rafters will be obtained.

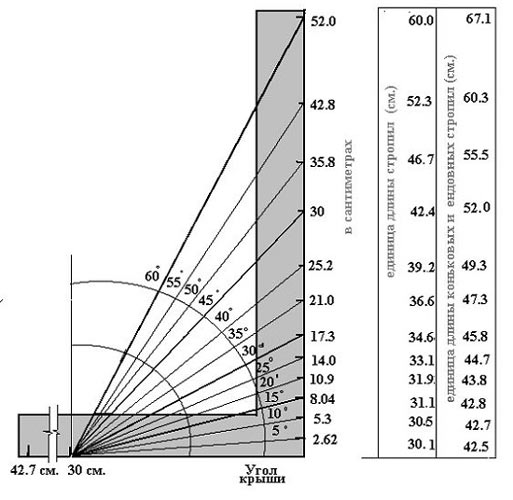
A table of coefficients, which shows the ratios of the following indicators: roof slope/length of the intermediate rafter/length of the corner rafter, can significantly simplify the calculations of the length of the elements of the rafter system.

Calculation of hip roof area
Once the location and dimensions of the rafter system have been determined, it is not particularly difficult to calculate the coverage area of the hip roof. To do this, it is divided into its constituent elements - slopes, for each of which its area is calculated, taking into account overhangs. The formulas used in this case are known from school and are quite simple.
Then the obtained data is summarized. The result of the addition will be the total area of the hip roof with one significant clarification. From the resulting figure, it is necessary to subtract the area of the chimney pipes and windows located on the roof.
Calculation of the angle of inclination of a hip roof
When calculating the angle of inclination of a hip roof, a fairly large number of indicators are taken into account, in particular, the amount of precipitation, the level of wind and snow load, the purpose of the attic space, the roofing material, etc. Therefore, it is better to carry out such calculations using specialized programs with the involvement of professional designers.
It should be noted that the angle ranges from 5 to 60 degrees.
All of the above applies to the simplest type of hip roof. The task of calculating elements and material requirements becomes seriously complicated when additional architectural elements appear, for example, if there is a desire to decorate the house with a bay window. An example of calculating a roof with a bay window is shown in the video:
By analogy with the calculation of a roof with a bay window, calculations of other architectural elements are also performed. It must be remembered that the example with a bay window is one of the simplest.
The following needs to be added. To simplify calculations, they often resort to using online calculators to help perform some of the calculations. For example, like in this case:
Conclusion
The hip roof has a rather complex design. Therefore, the best calculation option is to invite professional designers to prepare a full-fledged project containing all the necessary dimensions, specification of material requirements, etc. If you want to save money, you can do some of the calculations yourself.
Hip-slope roofs made of metal tiles are the most popular option for those who build a country house, cottage or cottage with their own hands. However, not all developers know how to do it correctly. But without this there can be no question of correctly determining the amount of material for the roof, insulation and waterproofing.
Profiled metal sheets may require a much larger overlap than natural tiles.
Today, calculations can be made using special computer software, which is designed for all types of roofs. Such programs have their advantages: the ability to select various design options, high accuracy, convenience, and so on. However, many builders, especially older people, like to do everything without the use of computer programs. How to calculate the area of a hipped roof yourself?
Before you begin, you will need detailed instructions that will take into account all dimensions. Not a single element of the roof should be overlooked! At the design stage, it is necessary to decide on the choice of material, because the slope of the roof will depend on this. The sharper the slope, the longer the roof slope and the greater the material consumption.
Each roofing material is individual. For example, profiled metal sheets may require a much larger overlap than natural tiles.

Before directly calculating the roof area, you will need detailed instructions that will take into account all dimensions. Not a single element of the roof should be overlooked!
When developing a drawing for a hipped roof, it is worth taking into account climatic conditions. If there are strong winds in the region in which the dacha is located, the slope of the roof should be more gentle.
If an accurate calculation of the roof area of the house is made, then it will be possible to select the roofing material as profitably as possible, as well as steam and waterproofing and sealing.
Hip roofs can have different shapes:
- directly hipped (hatched);
- hip;
- half-hip;
- hipped gable.
However, today in construction quite often hip roofs are erected, having a large number of slopes, the surface of which consists not only of trapezoids and triangles, but of rectangles, rhombuses and other geometric shapes. Therefore, before starting to calculate the area of a hipped roof, it is advisable to refresh your own knowledge of the school geometry course.
The process of independently calculating the area of a hipped roof

To calculate, you may only need an angle and a tape measure. Using such tools, you will need to measure all roof lines, from the floors to the ridge.
As mentioned above, first of all you will need to draw up a detailed plan. If there is no house design or the rafter system has already been installed, the plan must be drawn up based on the frame that is currently available. All you need for this is an angle and a tape measure. Using such tools, you will need to measure all roof lines, from the floors to the ridge.
If there is a multi-level structure and it consists of different heights, the drawing will need to show their differences. After this, you also need to draw up a plan in projection. This can provide an opportunity to visualize the picture. However, drawing up a projection is only relevant if you have drawing skills.
After this, it will be possible to easily decompose the roof into its individual constituent geometric elements. The calculation will be the most accurate. The dimensions of the roof do not need to be limited by its perimeter. You will need to add the length of the roof overhangs in the places where they are expected.
Rules for calculating a hip roof
Rules that will need to be followed when calculating a hipped structure:
- Break the drawing into different geometric shapes. Each of them is shown in a separate drawing. Next, all sizes are transferred. The simpler the figures are and the more parameters are known, the easier the calculation will be.
- The length of one slope is determined by measuring the distance from the extreme line of the eaves to the ridge.
- Each of the slopes should be calculated as follows: the area of the figure is multiplied by the cosine of the angle at which this roofing element is located.
- If any slope is an irregular rectangle, it will need to be divided into geometric regular shapes. Next, each of the figures is calculated separately.
- After calculating each element, the resulting values must be summed.
Example of roof area calculation
Let's assume that the existing roof will consist of 2 regular trapezoids and 2 isosceles triangles. The slopes will be located at an angle of 30 degrees. In this case, the cosine of this angle is equal to 0.87.
Trapezoidal slopes can have parameters: one side is 7 m, the other is 10 m, while the height is 3 m.
Triangular slopes: two sides are 3.34 m, one side is 7 m. The height of the triangle is 4.8 m.
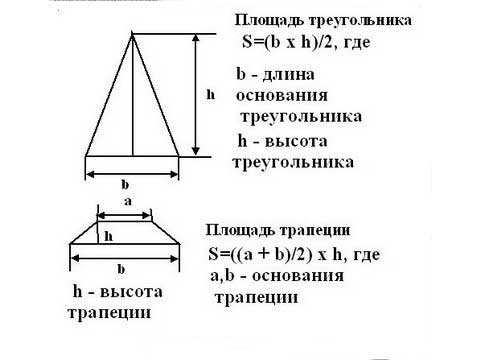
We find the area of the trapezoid: the length of the horizontal sides is summed, all this is divided by 2 and multiplied by the height. Therefore, in this case it will be: S = (10 + 7) / 2 x 3 = 25.5.
Do not forget that the resulting number will need to be multiplied by the cosine of the angle. In this case, it is multiplied by 0.87. The area of the trapezoidal slope will ultimately be equal to 22.185. It is worth rounding up - up to 22.5 m.
In conclusion, it is worth summing up all the resulting areas: S = 22.5 x 2 + 14.7 x 2 = 74/4. The resulting number should be rounded to 75.
Roofing covering and necessary materials
You can begin to calculate the footage of the roof frame. The opinion that the area of the required material and the area of the drawing coincide is erroneous. All elements will need to be overlapped. Each roofing material has its own technical indicators for the amount of overlap. Roofing materials costs will increase significantly.
When calculating the amount of roofing material for a multi-level roof, it is recommended to seek help from computer software. It can make all calculations much faster and more accurately.
You can calculate the amount of material that will be needed for an ordinary metal tile roof yourself.
X - 15%, where X is the margin, which is equal to 15%, and S is the roof area.
After calculating X, you will need to add the resulting number to the area S. As a result, the area of the amount of material can be obtained.
In this case, the proportion will look like this:
X = 15 x 75 / 100 = 11.25, should be rounded to 11.5.
11.5 + 75 = 86.25 sq.m - the required area of the roofing material.
When calculating the amount of roofing materials, you need to remember that another 20% of the material will be needed for waste. When constructing a complex roof made of metal tiles, the margin is not 15%, but 20%.
Go for it! After all, a house created on its own will become double pride for the owners and an object of admiration for guests. Let your calculation of materials be correct, the roof reliable, and your future home beautiful and cozy.
A hip roof has high performance characteristics and a complex design, but thanks to the online calculator, every homeowner can calculate it. Our calculator will reliably calculate the design of a hip hip roof. Based on the calculation results, a 2D roof drawing is generated and 3D visualization is performed.
The hip roof has four slopes - the end ones in the shape of triangles and the side ones in the form of a trapezoid. The slopes are located at the same angle to the base. Their sides are connected by hips (sloping ribs), and their tops are connected by a ridge. A mauelrat is laid around the perimeter of the house, on which the rafters rest. The hip hip roof has a cornice overhang, depending on your preferences
Advantages and disadvantages of a hip roof
Although the calculation of a hip roof is complex, it is one of the most popular designs for a private home. It has a number of advantages:
- Streamlining of the roof covering;
- Structural rigidity;
- No gables
The hip roof also has a number of disadvantages:
- The complexity of calculations and installation of the roof;
- Large waste of material (especially MP).
Thus, there are more advantages, and an online calculator with roof drawings in detail will help in its calculation.
Specifics of the hip roof calculator
Our calculator will make an instant calculation of the rafter system of a hip roof - the length and number of rafters (including diagonal ones), and the length of the ridge. The homeowner is required to enter only the initial parameters: the length and width of the house, roof slope, height. I would like to note that the width of the rafter boards must be selected based on the loads, both from wind and snow, and on the weight of the roofing material itself. If you are making a warm roof, then the distance between the rafters should correspond to the width of the insulation in order to get rid of undercuts and not waste material.
Lathing
Sheathing boards are usually used with a thickness of 30 mm. The width can be different, for metal tiles with a pitch of 35 cm in accordance with the length of the longitudinal axis of the Monterrey MCH module, the optimal width of the board is 100 mm; for other types of coatings, the pitch and width of the board can be different. Do not forget that on the sheathing for a soft roof, OSB or plywood will be placed on top as a continuous carpet.
When installing a warm roof you need:
- The insulation is 100 mm thick, but 150-200 mm is better.
- Waterproofing, vapor barrier;
- Counter grille with a thickness of at least 30 mm.
As you already understand, it is very easy to calculate a hip roof using an online calculator, even with very little knowledge in construction. The main design features of a hip roof are similar to the geometry of the school curriculum, so let's count together.
Building a house is a very responsible and expensive project, and one of the most difficult and costly stages is building the roof. Correct calculation of its area can significantly reduce the costs of its construction. In this regard, it is necessary to clearly understand the procedure and methodology for calculating the roof area. The first step is to determine the type of roof for which the calculation will be performed. Anyone who is looking for an answer to the question of how to calculate a hipped roof will find our article useful.
Today there are the following types of roofing, which differ in their design:
- single slope;
- gable;
- hipped;
- half-hip;
- attic type;
- hip roof;
- 4-slope spire-shaped.

Regardless of the type of roof, when purchasing building materials, the correctness of the calculations made is crucial. Considering the trend towards a constant increase in prices for all building materials, accurately determining the roof area will be an effective way to save money. But the calculation method itself is not so complicated; it requires attentiveness, knowledge of a school geometry course, knowledge of the geometric parameters of the building and the ridge, as well as the correct names of the roof structural elements.
Hip roof area
The most popular roofing option today is the hipped roof, which involves the presence of 4 slopes located at an angle to the base. To calculate the area of a hipped roof we need:
- calculate this value for each slope;
- add the resulting values together.

It is very important to check the results of your calculations several times, otherwise you may end up with a surplus or shortage of building material.
In most cases, all construction and design companies have as initial data the projection of the roof, that is, the area of the base under it. Before starting the calculation work, we will divide the projection zone into simple component figures: trapezoids, triangles, rectangles and squares. The formula for calculating the area of each of these figures is well known to every schoolchild, so it will take a little time to get the result using a calculator. Taking into account that each element of the projection is at an angle, its area should be multiplied by the accepted cosine of the angle of inclination of the slopes. After adding up all the results obtained, we obtain the area of the hipped roof. As can be seen from the description, calculating this value will not cause any particular difficulties for people with an average level of knowledge of a school geometry course. For this reason, many builders assign the functions of performing such important tasks to their production workers: foremen, technical supervision workers and other engineering and technical workers.

One of the important conditions is to make calculations based on the eaves overhang, and not the edge of the building, otherwise the result will be incorrect.
The area of a hipped roof is calculated in compliance with the following rules:
- it is necessary to take into account the area of the following elements: ventilation ducts, chimneys, the attic and its windows;
- the length of the slope is measured from the bottom of the ridge to the top of the cornice;
- for parapets, overhangs and firewalls, add 5% of the length;
- in order to calculate the required consumption of building material, you need to know the type of roofing, since each of them has its own consumption rates;
- when covered with bitumen shingles or rolled materials, the length of the slopes will decrease by at least seventy centimeters.
You should know that roll materials are the most economical option for covering roofs with complex shapes. They fit perfectly on almost any surface, their installation is not difficult and takes place in the shortest possible time.
Calculation of roofing materials
The purchase of roofing materials is accompanied by significant financial expenses, the optimization of which can save huge amounts of money. For this reason, when calculating the area of a 4-pitch roof for the purchase of roofing material, the following features must be taken into account.
Hip roofs have a lot of significant advantages. These include aesthetic qualities and a significant reduction in wind load. By eliminating gable walls, the final cost of the structure is reduced. However, from a technological point of view, hip structures are one of the most complex options, requiring careful selection of proportions and mandatory design.
It is imperative to make a calculation of the hipped roof, which is required for an impeccable construction result. We will discuss how to do this correctly in this article.
Typical representatives of the class of hipped roofs are hip and hip varieties with a corresponding number of pitched planes. The main feature is the absence of end walls, which creates a kind of “streamlined” shape.
This configuration is very popular in regions characterized by high wind loads, and is actively in demand in areas with sparse vegetation and in mountainous areas.
The spectacular contours of hip roofs served as the basis for a significant expansion of the scope of use. The above schemes are used not only to reduce the effect of gusty winds, but also for purely architectural and design reasons.
In addition, roofs with four slopes help drain rainwater, and with proper selection of slopes, they also prevent the accumulation of snow deposits.
Roof elements with four slopes
Due to the inclined position of the end planes, the shape of the slopes of this type of structure is far from rectangular. According to geometric parameters in hip roofs, they are divided into two symmetrical pairs of isosceles triangles and trapezoids. The triangles, called hips, formed the basis of the technical term. Hip roofs with a square base have only hips.
Let us analyze the structure of the main hip version as the most striking representative of the class of hipped roofs. If we consider their central part without the inclined end sections, it is difficult not to notice the similarity with a standard gable roof.

Construct the central part by analogy with gable structures, using. The priorities are the layered type, according to which the rafters rest on a purlin located at the top of the roof. It defines a ridge break or otherwise an edge. The purlin itself is installed on a purlin frame consisting of racks and a horizontally laid bed. The frame's rigidity is provided by several wind braces.
The purlin frame of the hip roof must be supported on a reliable foundation. The optimal base is a load-bearing wall located in the center of the box being equipped. Instead of one central purlin, multi-span hip rafter systems can have two parallel counterparts supported by two load-bearing walls.
In the absence of load-bearing walls suitable for installing a purlin frame on them, the basis for installing a hip frame must be a strong ceiling. It must withstand the pressure of the rafter system along with the components of the roofing pie and with all types of atmospheric loads.

When using concrete slabs as a floor, you can build a roof of any degree of complexity. The concrete foundation will easily withstand the installation of numerous structural parts, the weight of the material, and thick snow deposits in the grooves. There is no need to specifically calculate the details of the hipped roof of a house with such an upper floor if it has been tested for concentrated impact.
When constructing a beamed wooden floor, the purlin frame is installed on a thick beam 100×200 mm or 150×200 mm, from which it is constructed. The purlin itself and the support are made from a similar material if it is used in roof construction. The supports for the purlin frame posts are placed in a cross with the floor beams. They, wind braces and struts of the racks are made of 100x150 mm timber.
The entire complexity of the four-slope structure lies in the arrangement of support for the hips and the associated areas of the main slopes. To do this, the corners of the box are connected to the ridge girder with diagonal rafters, otherwise called slanted rafter legs.

The plane of the slopes in the area where the hips are located is formed by spigots - shortened rafter legs installed with a step equal to the step of installing ordinary layered rafters. The diagonals in some way perform the function of a ridge run, because The short rafter legs are supported precisely on them. Therefore, they are most often made from double boards used to construct the rafter system.
Sewing two boards to create diagonal rafters allows you to solve several significant problems at the same time:
- Increases the load-bearing capacity, due to which the pump leg, without damage or displacement relative to the elements of the system, supports the weight of the roofing pie, precipitation and the maintenance worker if repairs are necessary.
- Allows you to form a conditionally uncut beam with the length required to span the span from the edge of the ridge girder to the corner. The standard length of the board used in the construction of the rafter system is usually not enough for this. Joining with a blended edge of the board allows for greater length and thickness.
- Provides the opportunity to use boards of the same height in the construction of systems, which eliminates the need for adjustment and additional calculations.
Simply put, it is much easier to work with material of the same size, simply pairing it where necessary, and using it without doubling where it is not necessary.

When a sloped rafter has to span a large span, additional supports are installed to ensure its rigidity. They are made in the form of racks made of timber or a pair of boards, a strut or a truss truss.
Additional supports are used in the following order:
- If the length of the diagonal rafter does not exceed 7.5 m, the rigidity of the structure is ensured by one strut. The bottom rests on the leg, the top on the rafter leg. The element is placed closer to the ridge girder and installed at an angle of 45–53° relative to the horizon.
- If the length of the slanted rafter leg is up to 9 m, in addition to the strut, another support is used. This is a rack or truss truss installed at a distance of a quarter of the span from the corner of the box.
- If the length of the diagonal element is more than 9 m, in addition to the listed supports, another post is inserted in the center of the span. On a reinforced concrete floor, it is installed through the waterproofing directly onto the base. A horizontal beam-stand is placed under it on a wooden floor.
The splicing of two boards of the sloping rafter is carried out so that the joining points do not fall on the support. You should retreat to a distance equal to 0.15×L, where L is the total length of the span covered by the diagonal.
Considering so many design nuances, before building a hip roof, everything needs to be thoroughly designed and calculated. In the process of creating a project, it will naturally be adjusted and changed so that ultimately the elements of the system can work interconnectedly.

The attic as a structural component
All elements of a hipped roof structure can be combined into an integral system, i.e. don't have an attic. These types of roofs are called combined. They are built above attics or over outbuildings, in which there is no point in separating the roof structure from the room with an upper ceiling. If they are separated by an attic, the roofs are called attic. This is the most common option in residential construction.
The attic space of hipped structures is rarely equipped for the purpose of operation. The fact is that the beveled position of all pitched planes significantly limits the usable area. A room with enough clearance to straighten up to its full height turns out to be too small, which is especially noticeable if the country estate does not have impressive dimensions.
If there are no prerequisites for arranging an attic, insulation is carried out along the upper floor. If you still plan to use the space, then thermal insulation is laid between the rafters. In view of the above reasons, it is necessary at the stage of developing your own project to decide on the purpose of the attic, because this decision will affect subsequent calculations.

Installation step of rafter legs
The pitch between the rafters is usually a relative value; it can be slightly increased or decreased within the limits specified by the roofing manufacturer. For example, footrails can be installed at equal distances, the values of which are in the range of 0.6 - 0.9 m.
The scatter is noticeable, but has virtually no effect on the load-bearing capacity of the rafter system. Because as the pitch increases, some weakening of the structure is leveled out by the sheathing, for the installation of which a larger size bar is taken. Do the same if you have to lay corrugated sheets. But under bitumen shingles, the pitch is allowed to reach values of 1.0 - 1.2 m, because the roof is laid on a continuous sheathing of sheet plywood.
The traditional algorithm for choosing a pitch for structures without insulation is to divide the wall into equal sections. When constructing an insulated roof, they are guided by the width of the thermal insulation slabs so that they can completely fill the space between the rafters without cut pieces.

Selection of slope angle
Determining the correct slope of the pitched planes will eliminate operational problems and greatly increase the service life of the roofing system. The specified angle specifies the height of the ridge and the geometric proportions of the structure. Therefore, before you start calculating the dimensions of the rafters for a hipped roof, you should thoroughly understand this parameter.
The hip structure can be almost flat, flat and quite steep. When choosing the angle of inclination of the slopes, there are a huge number of factors that require unconditional consideration, these are:
- Roofing weight. The greater the specific gravity of the material distributed per meter of roof in projection onto the base, the steeper the structure should be. In this way, the overall load on the rafter system is reduced.
- Size of coating elements. The smaller the parts of a piece roof, for example, ceramic tiles, the greater the likelihood of water leaking through its numerous joints. The fewer joints between large sheets, the lower the slope angle is allowed to be.
- Construction region. In areas with heavy snowfall in winter, roof slopes are usually placed at an angle of 45º, which completely eliminates the retention of precipitation on the roof surface. In areas with significant wind loads, the optimal roof slope is 4 – 7º.
- Chimney pipe height. Taken into account for solid fuel stoves and fireplaces. The total height of the smoke duct must be at least five meters, taking into account the section outside the roof. For a small one-story house with a flat roof, this option will not work; you will have to choose a different chimney and type of heating unit.
- Fire safety requirements. Must be observed for attic structures. The size of the attic must provide a through passage along the upper floor with a height of at least 1.6 m. The minimum passage width is 1.2 m.
For small attic compartments up to 2 m long, the passage dimensions in both directions can be reduced by 0.4 and 0.3 m, respectively.

All the above circumstances must be taken into account when designing the roof. Without a competent project, you cannot start making calculations. Do not be afraid of repeated alterations and adjustments to the actual material and specifics of the house box. Corrections are inevitable, but it is better to make them on paper or a monitor than to correct them on site.
In addition, at the design stage you need to choose a method for forming eaves overhangs. They can be provided by installing rafter legs with an outlet beyond the mauerlat and the wall. The second option is to fully support the lower heel of the rafter leg cut into the horizon on the mauerlat without extending beyond the wall.

Load calculation algorithm
The load-bearing capacity of structural elements is calculated based on the total load in winter, because It is at this time that the roof is loaded the most. The rafter system is subject to pressure from snow deposits, winds, and the weight of the roofing pie and internal cladding. When wet, the mass of insulation, for example, increases, which is why it is customary to use a safety factor in calculations.
To calculate the cross-section of rafter legs, the total pressure of snow, roofing pie and wind are added in a banal way, and the result is multiplied by a safety factor of 1.1. The resulting value is expressed in kg/m2, because distributed per conventional square meter of area.
Note that for accurate calculations, the obtained result must be converted into a linear value, which should be expressed in kg/m. After all, the rafters are not installed continuously, but with a given pitch, and the total load acts on the roof as a whole. And we need to determine the pressure acting along the axis of the longitudinal element of the system.
To convert into the units we need, the total load should be multiplied by the installation step of the rafters. If the result is not satisfactory, the distance between the rafters can be slightly expanded or reduced. By adjusting the load collection area, its value is reduced or increased.

How to find snow and wind loads
According to the rules, the load-bearing capacity of rafter system elements is calculated using two limit states:
- To destruction. This refers to the state of the rafter system when the limit of strength, endurance, and stability is completely exhausted. In another way, it is called the design load, which denotes the maximum possible limit, the excess of which leads to complete destruction of the structure.
- To deflect. This condition is characterized by the development of deformations, as a result of which connections are broken and nodes open. It is called the standard load, the result of exceeding which is significant deflections. As a result, the structure was not destroyed, but without repair its operation is not possible.
In construction organizations, load-bearing capacity calculations are carried out for both conditions in order to eliminate the possibility of sagging or destruction of the designed roof. To make your task easier, you can take the simplest route and find out the required values from them.

A private owner who intends to design, calculate and build a roof once does not have to delve into all the intricacies and formulas. It is enough to understand that to determine the limit state for destruction, a load from the mass of snow will be needed.
Let's denote it Q calculated. is the calculated value. This is the calculated value, to find which, in the absence of other sources, you should refer to the zoning map of the territory of the Russian Federation, compiled according to the average snow load.
The simplest way to obtain the standard load, which we denote as Q norm.sn. consists of multiplying the calculated value by a factor of 0.7.

Those. we proceed according to the following scheme:
- We found our locality on the map and found out which zone it belongs to.
- We determined from the table the average statistical value of the calculated value of the load from precipitation according to the type of region.
- We multiplied the calculated value by 0.7 to calculate the limit state for deflection.
A pitched roof can be easily compared to a hill or rock, rising above other points of the relief. It is clear that depending on the steepness and direction of the wind on such a hill, snow deposits will be distributed unevenly.
Therefore, for architecturally complex structures with several hip ribs and valleys, a correction factor µ is applied.

In these situations, both limit values are often influenced by the angle of the slopes and the direction of the prevailing winds. If there is increased wind activity and an abundance of precipitation in the construction area, then the coefficient should be included in the calculations.
Wind load is determined in a similar way. To calculate it, you need to use the appropriate zoning map dividing the Russian Federation into areas with equal wind pressure indicators. But on the map we will not find the calculated wind load Wr, but a value that should be multiplied by k (z) - the coefficient of dependence of the wind force on the height z and c - the tabulated aerodynamic coefficient.
We find the standard wind value using the already familiar scheme by multiplying by 0.7.

Determining the weight of the roof
The total weight of the roof consists of the weight of the roofing covering, the approximate value of which can be taken from the table above, the weight of the sheathing and insulation, if it is used in the construction of the roof.
The weight of the sheathing will need to be calculated based on its type, installation method and weight of the material. For example, the weight of a cubic meter of bar is 500 kg/m3. If a sparse lathing for metal tiles is arranged by installing 30x50 mm laths every 0.3 m, then per square meter of roof will have to.
Let's look at an example. For one square of roof there will be 3 elements of sparse sheathing, each of which is calculated as follows: 1 m long × 0.03 m height × 0.05 m width × 500 kg/m h. The result will be a lath weight of 0.75 kg, a sheathing weight of 2.25 kg.
And during construction you will simply need the specific gravity of the material, for OSB or plywood board it is 650 kg/m 3, multiplied by its thickness. The specific gravity of thermal insulation is usually indicated by the manufacturer; its mass per meter of area is the easiest to find.

The obtained weight values of the roof, thermal insulation and sheathing are summed up and converted into a linear value, the result of which should be checked with the requirements of SNiP 2.01.07-85. As a guide, the design load value usually does not exceed 450 kg/m2, the standard load is 315 kg/m2.
The principle of design and calculations before constructing a roof with four slopes:
Nuances of designing hipped roofs:
Introduction to software tools that facilitate calculations:
Instead of a conclusion. Many years of experience in constructing hip roofs in our mid-latitudes have shown that 50×100 or 50×150 mm boards are excellent for making rafters for metal roofing or bitumen shingles. For an insulated structure, it is recommended to prefer the second option, so that there is no need to build up additional counter-lattice and thereby unplannedly make the roof heavier.
For the supports, purlins and legs of the purlin frame, a material of 100×150 mm will be required; for the installation of struts, wind ties, and a wind board around the perimeter, a board of 25×100 or 25×150 mm is sufficient. Diagonal legs are sewn together from two boards.