How to properly make a corner of a ceiling plinth using a miter box and available tools. Description of the process with photos and videos. Attaching the ceiling plinth: the secrets of the correct angles without using a miter box How to make corners on ceiling plinths
Read also
Installing the plinth is the finishing touch of the renovation. And if the installation of the product on straight sections of the joints of walls and ceilings is quite easy, then facing the corners often causes problems. Many people, not knowing the technology for cutting skirting boards, damage more than a dozen planks in the hope of joining them in difficult places. We will tell you how to properly decorate external and internal corners so that they look neat and give the interior a finished look.
Types of ceiling plinths and scope of application
Before moving on to the question of cutting a product, let's consider its varieties. After all, the choice of this finishing element determines whether the room will receive the desired visual volume and whether it will become more comfortable and pleasing to the eye.
Pick up perfect option finishing ceiling joint, which will harmoniously combine with the design of the room, is not so difficult, because the range of products today is very wide. Ceiling plinths (fillets) made from different materials: plastic, polystyrene foam, polyurethane, polystyrene foam, wood and gypsum. Moreover, all planks can have different colors, textures, profile configurations, and dimensions. Let's consider the features of using fillets depending on what material they are made of.
Knowing what type of plinth is best to use in a place that needs finishing, it will be easier for you to navigate when choosing a product and pay maximum attention to creating your unique design interior
- Plastic products, in addition to their decorative function, can be used as a groove for fastening PVC wall panels. Such fillets are not glued to the surface, but are attached to a pre-assembled frame using staples or self-tapping screws.
- It is advisable to use foam strips for finishing suspended ceilings from plasterboard. They can also be installed on your own concrete base, pre-plastered. This is the most a budget option ceiling plinth, since the product has a rough surface that is susceptible to contamination. Therefore, it is advisable to apply a layer of paint to such fillets after installation.
- Polyurethane decorative elements are used for the final finishing of false ceilings made of polyvinyl chloride panels. The fillet is fixed using a special glue for PVC products.
- Ceiling plinth made of polystyrene foam is a universal finishing element, since it can be used for finishing primed surfaces, as well as ceilings lined with plastic panels. The plinth can be attached to special glue or gypsum putty.
- Products made from gypsum are often used to give the interior a certain pomp, characteristic, for example, of royal houses. Installation of such skirting boards is carried out on gypsum materials, that is, putty or alabaster.
- A fillet made of wood is classic version decorating ceiling-wall joints. This is the most expensive version of the plinth, but also the most durable.
Gallery of types of ceiling plinths
Tools for work
The first question asked by people who are planning to install the plinth themselves is how to cut it? The tool is selected depending on the material from which the fillet is made. For example, products made from polyvinyl chloride have a hollow structure. Therefore, to ensure that the cut edges are as smooth as possible when cutting them, you need to use a hacksaw with fine teeth. Otherwise, cracks and chips may form on the finish.
The best option is to use a metal saw - its teeth are small, and their opening width is suitable. However, the use of a hacksaw is limited to products with a rigid structure, that is, it is not suitable for thin-walled fillets. The fact is that the teeth can severely damage the surface of the baseboard.
Can also be used for cutting fillets manual jigsaw. When cutting products with this tool, the corners are as smooth as possible. But this device has several disadvantages. Due to the short length of the cutting blade, the use of a miter box ( special tool for cutting skirting boards) becomes very problematic. In addition, the cutting process is slow.
Helpful advice: If the fillet has thin walls, then use a stationery knife to cut it, namely its construction modification with a reinforced blade.
What is a miter box?
High-quality cutting of the product is possible only with strict adherence to geometric shapes. When installing a plinth, fulfilling this condition is extremely important, because to obtain a neat connecting seam between decorative elements, it is necessary to have an even cut. If you carry out this procedure “by eye”, then a gapless connection of two skirting boards will not be possible, because the ends will not correspond to each other.
The highest quality cut can be made using a special carpentry tools called a miter box. Its design may be different, but the principle of operation always remains the same. There are devices with manual adjustment cutting angle, however, builders often use a standard variation of the tool, which is a wooden or plastic tray with vertical grooves in the walls for inserting a saw. Thanks to the miter box, you can easily perform vertical trimming of skirting boards at an angle of 45 and 90 degrees.
Besides cutting tool and carpentry equipment, when installing the fillet you may need: a pencil, a protractor, a self-tapping screw, assembly adhesive and sealant.
Corner cutting technology
Cutting fillets for external corners performed in the opposite direction
You can cut the baseboard with or without a miter box. Let's consider each of the methods. It is very easy to cut a corner efficiently using a special tool. First, the required length of the fillet is measured. Then the first plinth is placed in the miter box, and a cutting tool is inserted into the vertical holes. The location of the hacksaw is selected based on the angle at which the product needs to be cut. Next, the cut is made. At the second stage, the second strip is trimmed, which will dock with the first. In this case, the hacksaw should be inserted into opposite grooves at a similar angle.
Important: When combining two planks, a right angle should be formed between them. Only in this case can you proceed to the next stage - fixing the product.
Cutting corners without using carpentry tools is done using markings at the installation site. The greatest inconvenience in this case is holding decorative element under the ceiling. First, measurements are taken here: the planks cut at right angles are applied one by one to the place of their installation and outlined with a pencil. The result is a connection point between the elements. Then a cut line is drawn on the planks from the joint point to the corner and the products are cut, followed by checking the accuracy of the connection.
Cutting instructions
To join the finishing element at internal corner you need to trim the left and right strips. Let's consider a cutting method using a miter box. The procedure here is as follows:
For ease of cutting, insert the right plinth into the tray on the left side, turning it over
- First, we mark the corner in order to eliminate the situation with a lack of length of the prepared product.
- We take the left bar in left hand and place it in a miter box at the side of the device farthest from you. In this case, we place the fillet at the angle at which it will be installed to the ceiling.
- Next, insert the saw into the near right and far left vertical holes of the miter box (at an angle of 45 degrees to the bar). We make cuts.
- We install the right bar in the same way as the left one. In this case, the product must be turned over so that its ceiling edge rests on the base of the miter box.
- This time we insert the hacksaw into the near left and far right grooves. We make the cut.
- We take both planks, join them on the floor and check the accuracy of their fit to each other.
As for external corners, they are rarely found indoors, but, unlike internal ones, their flaws are more noticeable. In this case, extremely precise docking is required. If the internal angle is 90 degrees, then the external angle is 270 degrees. Therefore, the fillets here are cut in the opposite direction.
To finish the outer corner, the left plinth strip is cut similarly to the right one for the inner corner, and the right one is cut similarly to the left one.
Stages of work:
- We measure the sides of the angle.
- We take the left bar in our left hand and place it in the miter box.
- We insert the hacksaw into the near left and far right grooves at an angle of 45 degrees to the baseboard and cut the product.
- We start the striker by turning it over. We place the saw in the near right and far left holes. We make cuts.
- We check on the floor the accuracy of the joint of the two planks. If everything is in order, then you can proceed to fixing the decorative element.
Video: How to cut the baseboard correctly
How to trim fillets correctly
If your home has rounded corners, finishing them will take more time and labor. Installation of skirting boards in this case requires certain skills. Such corners can be refined in two ways:
- We cut the fillet into pieces 5 cm wide. Depending on the length of the arc, a different number of parts may be required, but it is advisable to use at least four. Straight ends should only be at the outer parts that will be connected to the baseboard itself.
- Now we glue the outer pieces to the straight fillets installed earlier.
- We adjust the remaining pieces, trimming them as necessary. Glue all the parts end to end.
- We seal the gaps with sealant or putty. We tint and mask the joints, giving the finish a finished look.
Helpful Hint: Number all the pieces so you don't mix up the order in which they are installed.
The installation of plinths on columns and pillars located in the room is carried out in a similar way.
The use of a flexible fillet allows you to minimize the number of corner parts, because in some situations one strip is enough to finish a corner. Often, such a plinth is made of polyurethane, so it can be bent at any angle. By the way, the product is often used for cladding complex ceiling structures with rounded elements.
Video: Sawing down the corners of the fillets
Presence in the interior connecting parts not always appropriate. A more aesthetic approach to joining ceiling plinths is to form connecting seams. Careful cutting of the product is the key to a beautiful appearance of the entire finish.
How to cut corners of ceiling plinths. Photo 1
Probably everyone who has ever carried out repair work with their own hands has encountered the problem of cutting out the outer and inner corners of a ceiling plinth. Ceiling plinth, also called fillet, is used in renovations to hide the uneven boundary between the wall and the ceiling and give the interior completeness. How to cut a corner of a ceiling plinth without a miter box? We'll talk about this in our article.
How ceiling plinth cut in corners without a miter box? If you don't have a miter box on hand, it doesn't matter. You can cut out the outer and inner corners without a miter box.
Today there are fillets on the market different sizes, shapes and colors, with and without relief patterns. The material from which they are made is also different. These are mainly: polyurethane, expanded polystyrene, polystyrene and polyvinyl chloride. But lately the most popular in repair work became a wooden ceiling plinth. Its aesthetic appearance allows you to add elegance and rigor to the design of the room.
Which skirting board is better?
Before you can correctly cut the corners on the ceiling plinth, you need to select it correctly.
Advice: The ceiling plinth will look harmonious if its width is chosen correctly. The higher the walls, the wider the baseboard should be.
The most durable, moisture-resistant and elastic are polyurethane fillets and cutting a corner from such a ceiling plinth is not very easy. However, all these positive traits“covers” one significant drawback - they cannot withstand sudden temperature changes, which does not allow them to be used in all rooms.
For example, in a kitchen where there is gas or electric stove, polyurethane fillets will retain their original appearance for about a week. After this, with frequent cooking, when hot air will either rise to the ceiling or fall, they will begin to deform, spoiling the whole “picture”.
Skirting boards made from other materials also have their disadvantages.
For example, products made of polyvinyl chloride have increased electrostaticity and if dents appear on their surface during operation, it will be impossible to remove them. At the slightest mechanical impact, ceiling plinths made of expanded polystyrene and polystyrene break.
If we talk about which ceiling plinth for tension or ordinary ceilings better, then it’s probably not possible to give an exact answer here. Since each of them has its own positive and negative qualities. Therefore, you still have to make a choice, starting from financial resources, which you have, and on the conditions under which the fillet will be used.
How to cut corners without a miter box?
At first glance it seems that do not cut off the corner of the ceiling plinthdifficult - I cut the edges of the baseboards at an angle of 45 degrees and glued them. However, this is absolutely not true. Each corner of the room may differ in its parameters, for example, one is 90 degrees, another is 88 or 92.
This difference is normal, especially in buildings that are more than 30 years old. Therefore, if you simply cut the baseboard at an angle of 45 degrees and glue it at the border between the ceiling and the wall, a gap may form that should not exist. How to join the ceiling plinth so that there are no gaps? So, let's begin.
First you need to prepare a tool that will be used to trim the edges of the skirting boards. This could be a metal saw or a regular sharp knife.
How to cut the inner corner of a ceiling plinth without a miter box? The answer lies below the surface.
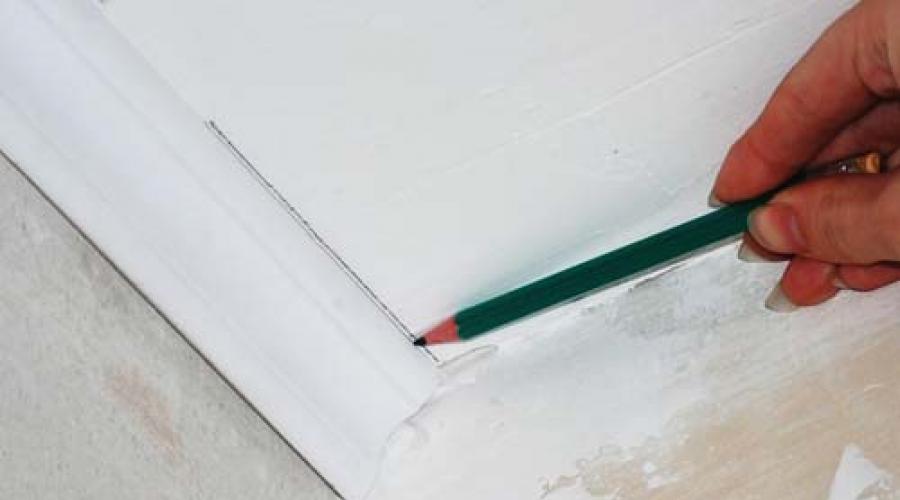
Step 1. Take the baseboard and place it on the corner in the same way as you will glue it. Using a pencil, draw a line on the ceiling along the baseboard. Remove the fillet.

Step 2. Place the second plinth on the other side of the corner where it meets the first. Follow the same procedure as with the first one. As a result, you should have markup.

Step 3. Take the plinth, lean it firmly against the place where you will glue it, and transfer to it the point of contact of the two straight lines drawn earlier on the ceiling. From this point, draw a line to the opposite edge of the baseboard. This line will be the cut point.

Step 4. Do the same procedure with the second baseboard.

Step 5. Cut the edges of the baseboards along the marked line.
Step 6. Place the cut baseboards against the corner. If the place where they meet has no gaps, you can start gluing the fillet. If there are gaps or irregularities, adjust the cut corners with a knife.
How to cut the outer corner of a ceiling plinth? When creating an external corner, the upper part should protrude above the lower, while the internal one should be the other way around.
Whatever ceiling you glue the plinth to, be it the ceiling in the bedroom or kitchen, do not rush, measure everything carefully. This will help you avoid damage to the material.
In many apartments and houses, the ceiling plinth (fillet) is the final design element, giving the interior of the room completeness. The main difference between a ceiling plinth and a floor plinth is that when cutting the latter, minor mistakes are allowed, because it can be puttied and painted. Cutting the corners of the ceiling plinth requires highest precision. In this article we will tell you how to correctly mark and cut the ceiling plinth so that after installation in place all the elements fit tightly together and there are no gaps.
What are ceiling plinths made of?
The most popular materials for making ceiling plinths are:
- foamed polyurethane;
- Styrofoam;
- expanded polystyrene.
All these materials are characterized by low mechanical strength and ease of processing. They can be cut either with a hacksaw for metal or with a reward, a special hacksaw for wood for fine work. Trimming with a knife is not recommended, because a correctly marked and cut corner does not need adjustment, and if the marking or cutting is done incorrectly, then it will not be possible to correct the situation with a knife, as on wooden floor skirting boards.
Angle marking

First, the baseboard needs to be marked. There are two ways. The first is suitable for external and internal 90 degree corners. The second method is suitable for any angles. The essence of the first method is that a standard miter box provides cutting of any material at angles of 90 and 45 degrees. Therefore, only the corner of the wall, that is, the short part of the corner of the plinth, is marked on the plinth. Then they are placed in a miter box and cut at an angle of 45 degrees. The second method is more complicated, but much more reliable. A plinth is applied to the junction of the wall and ceiling and the outer edge is marked. Then the plinth is also applied on the other side of the corner. The intersection of the marks is the outer edge of the joint of the baseboards, and the angle of the two walls forms the inner edge of the joint.

In this case, it is necessary to take into account the direction of the corner, because inexperienced finishers sometimes confuse it and the joint has to be redone. After this, the appropriate markings are applied to the plinth. This can be done either by measuring the marking distances on the ceiling or by placing a piece of plinth at the junction of the wall and ceiling and marking the outer and inner edges on it. After which the plinth is placed in a miter box with a variable angle and carefully cut off. If you don’t have such a tool, you can use a regular wooden miter box by cutting the appropriate grooves in it.
How to cut skirting boards - Video
There are several rules that will help you make an even cut on any baseboard:
- Be sure to use a miter box and never cut by eye, as this will lead to cracks.
- Position the plinth so that the main cutting force is directed towards the vertical wall to which the plinth is pressed.
- If you cut in the other direction, the baseboard will move, causing scratches and damage.
- To cut the baseboard, use a sharp tool - a hacksaw or a saw. If the blade becomes dull, replace it.
- Move the hacksaw in smooth movements without jerking, keeping the blade strictly parallel to the floor or table.
- Before cutting the plinth to size, practice on unnecessary pieces, this will help you get better at it.
At first glance, it seems that the installation procedure for a baguette is not particularly difficult. Indeed, this is true if you cut the cornice for the ceiling correctly. This is easy and simple to do using a device such as a miter box. But if the tool is not at hand, do not despair. There are techniques that allow you to cope perfectly with the task without it. We will teach you how to cut ceiling plinths without a miter box.
In most houses and apartments, a right angle is decorated with a ceiling plinth, so we will cut the baguette into 2 sectors of 45 degrees. And let's start with the method, which consists of creating markings on the wall:- Let's attach the product to the corner in place of the fastener.
- Along its edge we draw a line on the surface, which will act as a base for the mounting level.
- Let's do the same on the other side, attaching the baguette to the connecting wall.
- As a result, two lines are formed that intersect at one point. Transfer it to the baguette, since this point is the top cutting point.
- Next, you should again attach the plinth to the ceiling to draw lines between the edges of the cornice to indicate the cutting line.
- Place it against the corner of the room to trim.
- To cut the ceiling plinth, use a knife or hacksaw, depending on the material from which it is made.


Thus, the absence of a miter box when installing ceiling plinths is not a death sentence. On the contrary, this is an excellent opportunity to learn several new techniques that will help you cut your baguette just as well. And perhaps you will like some of them even more!
- This is the design of the corner. You need to join the planks in such places very carefully, otherwise the appearance of the decor will be hopelessly ruined. Of course, you can use quite aesthetic special corner elements.
However, naturally joined planks usually look more harmonious. And in this case you won’t have to spend money on additional parts. Therefore, later in the article we will look at how to cut the corner of the ceiling plinth correctly and how to process the seam.
Cutting ceiling plinth
Ceiling plinths are made from a variety of materials - polystyrene foam, polyurethane foam, plastic, wood. To trim them, tools available in every home can be used. Expanded polystyrene strips are cut with scissors or a knife. The wooden plinth is cut with a hacksaw. What to cut plastic skirting board- also not a question. You can cut it with a regular hacksaw.
Trimming wooden plinths is done with a regular hacksaw.
What is a miter box?
For accurate and most precise cutting of ceiling plinths, a special tool is usually used - a miter box. It is a tray made of three boards. There are slots in its walls located at a certain angle to the axis (45, 60 and 90 degrees, etc.). They are designed to guide the hacksaw blade when cutting. You can purchase a miter box for the ceiling plinth at a hardware store.

Trimming the planks at an angle of 45 degrees is done in a miter box
Trimming ceiling plinth in a miter box
Trimming in a miter box is performed as follows:
- The right strip is placed in the tray from left to right with the wrong side on the bottom (the part that will subsequently adjoin the ceiling). The part of the connection to the wall should be leaning against the side board of the tray (closest to you);
- The bar is pressed tightly against the tool and cut through the slot.

How to make a corner of a ceiling plinth
Important: When trimming, you should remember that when decorating an internal corner, the edge of the plinth adjacent to the wall should be longer than that adjacent to the ceiling. When finishing the exterior, it’s the other way around.- A second ceiling strip is inserted into the tray from right to left and cut;
- The finished planks are placed at the corner and the joint is adjusted using a knife;

The planks are placed on the corner and adjustments are made
- How to join the corners of a ceiling plinth? You can do this from a stepladder directly on the wall. But this is not very convenient, so experts advise combining polyurethane and foam elements and gluing them together on the floor special glue for joints.

It is best to glue the corner before installing the plinth on the walls
How to cut baseboard:
What to do if there is no miter box?
Thus, we figured out how to cut down a ceiling plinth (the video above may help someone figure this out better) using a miter box. But what to do if this tool is not at hand? In fact, it is possible to adjust the slats evenly without using it. There are two main ways to solve this problem: marking directly on the wall and making an imitation miter box.
In the first case, the procedure is as follows:
- The left strip is pressed tightly against the ceiling;
- With a pencil, line 1 is drawn directly on the ceiling along its upper edge;

How to properly cut a ceiling plinth without a miter box. Drawing the first line
- Next, the right ceiling element is placed on the ceiling and line 2 is drawn;
- A mark is placed at the intersection of the edge of the right bar with line 1;

A second line is drawn and a mark is placed on the plinth
- Next, the left element is again attached to the ceiling;
- A mark is also placed at the intersection of its upper edge with line 2;
- Now on each strip you need to connect the marks with the end of the lower edge of the plinth;
Then, along the resulting line, the actual cutting of the plinth is carried out at an angle.

Without using a tray, the planks can be mounted in the corner quite neatly
In order to cut out flat angle You can also use an imitation of a miter box:
- On smooth plywood sheet draw two strictly parallel lines;
- We put a point on one of them and, using a protractor, connect it to the second line at an angle of exactly 45 degrees (draw to the left);
- At a distance of 10 centimeters to the left of the first point we place the second;
- We connect it with the second line at an angle of 45 degrees (draw to the right).

How to cut a corner of a ceiling plinth using an imitation miter box
The improvised miter box is ready. Now all that remains is to attach the right ceiling element (wrong side) on the right with the lower edge to the line closest to you and cut it off. The same with the left bar (only you need to apply it to the left).
Advice: You can cut polystyrene foam strips with a knife. However, sharpen it properly. Otherwise, the material at the ends will simply crumble.How to cut ceiling plinth (video) without a miter box:
How to connect planks if the corner is uneven
In city apartments, and especially in old ones, the walls are rarely even. Therefore, the angles between them are often not right. How to properly cut down the ceiling plinth in this case?
In fact, it is not as difficult as it might seem at first glance. You just need to measure the angle. To do this, you can use a special malka tool or simply make a template out of paper and use a protractor.

An uneven angle can be measured using a small protractor
We divide the resulting angle by two, draw the corresponding miter box on the plywood and cut off the strips. Next, you just need to connect them with glue.
How to clean up corners
We found out how to cut the corner of the ceiling plinth. Now let's see how to do finishing joints. How to cover the joint in the corner? If there remains a small gap here, the seal can be done with ordinary putty to match the color of the baseboard. The joints can also be sealed with silicone sealant.

The gap between the slats in the inner corner can be filled with putty
Important: Only the inner corner can be sealed with putty or sealant. The outer one should be adjusted as carefully as possible. It will be simply impossible to remove even a small gap in the future unnoticed. Especially when the baseboard is wide.Corner elements for ceiling plinths
Trimming ceiling slats when in use corner elements(special connectors) is also usually performed in a miter box. How to file the planks in this case? Everything is very simple - the cutting is done at a right angle. If you don't have a tray, you can use a regular protractor or square. Corner elements (photo):

When using corner elements, strips are cut at right angles
How to properly trim floor plinths
Floor skirting boards can be made of PVC, polyurethane, wood or MDF. Just as in the case of ceiling plinths, they need to be cut, depending on the material, with a regular hacksaw (wooden) or a metal hacksaw (plastic).
You now know how to cut down a ceiling plinth. Next, let's see how to fit and trim the floor. How to use a miter box in this case? When trimming floor plinth The procedure is approximately the same as when making a ceiling image. For inside corner:
- We take the first strip and place it in the tray from right to left so that it lies in it the same way as on the floor. We lean it against the far wall of the instrument as if against a wall;

The strip is inserted into the tray and pressed tightly
- We trim the unnecessary piece from the left end at an angle through hole 1 (figure below);
- We insert the second strip from left to right in exactly the same position and cut it from the right end through hole 2.
How to cut a plinth in a corner if it is external:
- We insert the first strip into the tray in the same way as for the inner corner (from right to left);
- We cut it from the left end through hole 2;
- We insert the second strip from left to right and cut its right end through slot 1.

How to cut ceiling plinth for external and internal corners
Advice: The end at an angle of 45 degrees should be done not only to cut elements in the corners, but also to make joints on the wall itself. In this case, the connections will not be so noticeable.Thus, you and I are the most in detail We looked at how to cut baseboards in corners. The procedure is not as complicated as it might seem at first glance. Once you start pruning in a miter box or using its imitation, you will see this for yourself.