How to properly install a sewer system in a private house. Installation of internal and external sewerage systems in a private house. Internal sewerage: diagram and specifics
Read also
Sewage in the house must be collected and directed to the central sewer system or to.
This task is performed by a system of pipelines inside and outside the house - internal and external sewerage.
How to properly lay sewer pipes in a private house
The sewerage diagram shows two vertical pipes crossing the house from the basement to the roof - these are sewer risers, which collect wastewater from nearby sanitary fixtures.
Drains from sanitary fixtures move by gravity to sewer risers, and from there to horizontal sewer pipes and then to the outlet external sewerage.
Features of the movement of wastewater through sewer pipes
When developing a sewerage scheme, consider the following.
When water is discharged in one burst through the toilet, a portion of water fills the entire, or almost all, section of the sewer pipe, moving along the pipe and acts like a piston. Behind the flow of water in the pipe a vacuum is created, which, if there is no ventilation, sucks water from the siphons of sanitary fixtures connected to the pipe behind the flow.
A pressure is created ahead of the water flow, which pushes water out of the siphons of sanitary fixtures connected ahead along the flow.
The effect of increasing pressure in the pipe is usually less noticeable because the sewer pipe at the front end usually has open exit. Vacuum in the pipes due to improper sewerage in the house often leads to the suction of water from the siphons of sanitary appliances and the appearance of an odor in the house.
Similar processes in sewer pipes can occur:
- When emptying the bathtub or draining the washing machine under pressure generated by the pump.
- In very long pipes there are connections from sanitary fixtures to the riser.
- If there is a large difference in height between the beginning and end of the supply pipe.
Rules for laying sewerage in the house
When developing a sewerage scheme for a private house, the following rules are observed:
1. The toilet must have a separate connection to the riser. No other sanitary fixtures should be connected to the pipe between the toilet and the riser. Failure to comply with this rule can lead to the fact that when flushing the toilet, water will be sucked out of the siphons of other sanitary appliances along the full cross-section of the pipe.
2. The connection of other sanitary fixtures to the riser on the floor should not be lower than the connection point of the toilet. Otherwise, when flushing the toilet, waste water may appear in the drain hole of neighboring appliances.
Other sanitary fixtures, except the toilet, may have one common supply pipe to the riser.
3. When choosing the diameter of the pipes, they are guided by the rule - the diameter of the supply pipe to the riser should not be less than the diameter of the drain pipe of the sanitary fixture. If several devices are connected to one supply pipe, then the diameter of the pipe is taken according to the largest cross-section of the pipe of the connected devices.
The diameter of the riser pipe should not be less than the diameter of the toilet drain pipe - 100 mm.; or 50 mm.- for a riser without a toilet.
4. The length of the supply pipe to the riser from the toilet should be no more than 1 m. The length of pipes for connections from other sanitary fixtures is no more than 3 m. For longer lines (up to 5 meters), it is necessary to increase the pipe diameter to 70-75 mm. Eyeliners longer than 5 m made from pipes with a diameter of 100-110 mm. There is no need to increase the diameter of the supply pipes if the upper ends of the supply lines are ventilated using an aeration vacuum valve or by connecting the supply line to the ventilation pipe of the riser. The length of the toilet line can be increased provided that the end connected to the toilet is ventilated.
5. The slope of the pipes for effective self-cleaning should be within 2 - 15% (2 - 15 cm. per meter of length). The height difference between the beginning and end of the supply line to the toilet should not exceed 1 m. For other eyeliners - no more than 3 m. If the height difference is greater, then ventilation of the upper end of the liner is necessary.
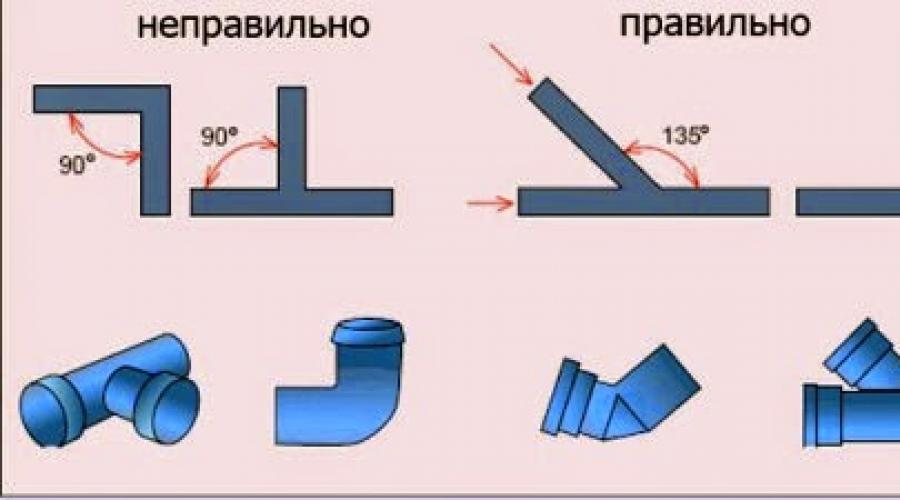
6. Installation of corner fittings with an angle of 90 degrees should be avoided at pipe bends. The angles of rotation and connection of pipes must be formed smoothly, from standard parts with an angle of 135 degrees along the flow of liquid.

7. Sewer pipes are laid with a socket in the direction opposite to the flow.
8. Be sure to ventilate the risers. To do this, the riser pipes are brought up, at least 0.5 m. above the roof surface. Lack of ventilation leads to the appearance of vacuum in the pipes when draining water, emptying of siphons of sanitary appliances and the appearance of a sewer smell in the house and on the site. Ventilation sewer riser should not be associated with channels natural ventilation premises.
9. To ventilate risers and connections, in the cases indicated above, an aeration pipe is installed at the upper end of the room. vacuum valve. The aeration valve allows air only into the pipe, but does not release gases outside. The operation of the valve prevents the occurrence of vacuum in the pipe, which leads to the emptying of siphons of sanitary appliances. If an aeration valve is installed, such a riser does not need to be ventilated. But ventilation of at least one riser in the house should be done.
10. It is necessary to provide sound insulation of sewer risers. To do this, it is better to place the risers in wall niches, cover them with a layer of mineral wool, and cover the niches with plasterboard.
11. The riser pipe at the ceiling level is fixed rigidly. On the floor, between the floors, the pipes are connected and secured in such a way as to ensure movement during temperature deformations. On ground floor At home, in an accessible place, a hatch is installed in the riser - an inspection.
12. Horizontal pipes connecting the risers and the outlet of the external sewerage system are laid in the basement of the house along the walls, in the ground under the floor. Every 15 m. and at each turn an inspection hatch is installed in the pipes.
13. The diameter of the horizontal pipes must be no less than the diameter of the riser pipes. The angles of rotation and connection of pipes are made at an angle of no more than 60 degrees. Pipes laid in the unheated part of the house are insulated.
 It's dangerous to do this! A horizontal groove in the wall for sewer pipes reduces the strength of the walls. The possibility of installing a horizontal groove in the wall must be confirmed by the designer's calculations.
 A device for laying sewer pipes in a vertical niche in the wall, to the entire height of the floor, or in a horizontal groove, leads to a weakening of the strength of the wall. You should not make niches and grooves anywhere, at your own peril and risk. Niches and grooves with a depth of more than 3 cm. for laying communications in the walls must be provided for in the house design.
It is allowed, without agreement with the designer, to install vertical grooves in the lower part of the wall to a height of no more than 1/3 of the floor height.
External sewer outlet
Sewer outlet - outdoor area pipes from the house, connected to the well central sewer village (if any), or to a drainless storage septic tank for removal of wastewater by a sewage truck, or to a septic tank of local treatment facilities on the site.
It is recommended to install an inspection well on the exhaust pipe outside, directly next to the house. In a well, it is recommended to install in a pipe check valve. The valve will prevent flooding of the underground part of the building (for example, when a septic tank overflows) and prevent rodents from entering the house through sewer pipes.
The external pipe at the exit from the inspection well is connected to the central sewerage system or to the septic tank of an autonomous sewerage system of a private house.
The outer pipe to the septic tank is laid with a slope of 2.5 - 3%, at a depth of about 0.4 m. If the release length is more than 5 m., then the pipe along its entire length is insulated with a shell made of polystyrene foam or extruded polystyrene foam.
The outlet pipe should not be buried- otherwise, this will lead to the need to install a septic tank at great depth, which will cost more and complicate the operation of the septic tank.
Siphon in the sewer
The drain pipe of each sanitary fixture is connected to the supply pipe through a siphon. The siphon is a U-shaped elbow, in the lower part of which there is always a layer of drained liquid.
Some sanitary fixtures, such as toilets, have a built-in siphon. The layer of water in the siphon serves as a barrier for gases, preventing them from escaping from the sewer pipe into the room.
The siphon of a sanitary fixture may not be filled with water and allow gases to enter the room in the following cases:
- If the sanitary appliance is not used for a long time, the water in the siphon dries out. For periods of inactivity (more than two weeks) drain holes It is recommended to close sanitary appliances.
- When water is sucked out of a siphon as a result of the vacuum created in the pipes. The risk of water being sucked out of siphons increases with increasing length and decreasing diameter of the supply pipe, as well as in the absence of ventilation of risers and long supply pipes.
Sewage pumps with grinder for home
Effluent moves in sewer pipes by gravity, due to the laying of pipes with a slope.
However, situations sometimes arise in the house when it is difficult to create the necessary slope of pipes from sanitary fixtures. For example, if sanitary room installed in the basement of the house. Or it is necessary to move the drains a considerable distance (from the bathhouse), but it is not possible to create the required slope of the pipes.
 Fecal pump with a grinder attached to the toilet. The pump also takes wastewater from the washbasin.
 To receive and forcefully move wastewater, special electric sewage pumps are installed. The fecal pump has a device for grinding the contents of wastewater and pumping it into higher-lying pipes of the sewer system.
A pump for forced movement of wastewater is installed after each sanitary fixture or for pumping wastewater from a group of closely located sanitary fixtures.
A fecal pump can lift wastewater to a height of up to 10 meters and move it several tens of meters.
Air flow into sewer pipes for ventilation occurs through the open end of the pipe in the septic tank or the receiving well of the central sewer system. The outlet of the sewer pipe through which wastewater flows from the house to the septic tank, should always be above the level of wastewater in it.
About the processes that occur during the movement of wastewater through sewer pipes, about the structure and correct use aeration valve watch this video:
Sewage options - drainage of wastewater from a private home
What to do with wastewater in a private house if there is no central sewerage system nearby?!
There are two sewer options- drainage of wastewater from a private house:
- Drain water into a drainless storage septic tank (reservoir, cesspool) with periodic, as it fills, pumping and removal of wastewater by a sewage disposal truck to wastewater treatment plants the nearest populated area.
- Construction of local treatment facilities on the site and discharge of treated water into natural environment- into the ground or onto the terrain.
The first method provides minimum cost construction sewerage, but the annual operating costs (removal of wastewater) can be significant.
The sewerage option with local treatment facilities is more expensive to construct, but can provide lower ongoing costs for maintaining the system.
Methods for cleaning sewer drains from a private home
In local treatment plants they use biological method cleaning wastewater from contaminants. Wastewater treatment is carried out by microorganisms capable of decomposing organic pollutants. the main task biological treatment- removal of organic substances from wastewater. Biochemical reactions occurring during biological treatment are partially removed from wastewater and many chemical elements, reducing their concentration in wastewater.
Distinguish anaerobic(bacteria without oxygen access) and aerobic(bacteria in the presence of oxygen) biological treatment processes.
Two types of local sewage treatment facilities for a private home
To treat wastewater from a private home, use:
- Anaerobic septic tanks, supplemented by ground treatment facilities with filter drainage through the soil layer. In soil filters, the process of post-treatment of wastewater occurs using aerobic bacteria.
- Active septic tanks- treatment devices in which the process of intensive biological wastewater treatment using aerobic bacteria is established. Treated wastewater from an active septic tank is usually discharged into the ground or onto the terrain.
First option, anaerobic septic tank with drainage into the ground, as a rule, cheaper to set up and operate. Here, in treatment facilities, conditions close to natural are created for the life of microorganisms. A simple device ensures long-term and reliable operation of the sewer system.
The second option with an active septic tank- more expensive and difficult to operate. An active septic tank is a high-tech factory-made apparatus in which artificial conditions for the vital activity of aerobic microorganisms, which can significantly speed up the cleaning process.
Sewage of a private house with an active septic tank provides the most high degree wastewater treatment. Treated wastewater from an active septic tank is directed into the ground through drainage system. If the soils on the site are impermeable, wastewater is discharged onto the terrain, into a ditch.
An active septic tank requires connection to the electrical network, does not tolerate long interruptions in the supply of wastewater, is sensitive to power outages, and requires constant monitoring of operation, as well as timely repairs and maintenance.
Advantages - small dimensions, quick installation, independence from soil conditions on the site. For an economy-class house, it makes sense to use an active septic tank if there is not enough space on the site to accommodate ground filter drainage or when high level groundwater.
Cleaning sewer drains from a private house in an active septic tank Topas
 Autonomous sewage system Topas - efficient and rational decision for the private sector, country and country estates, where there is a connection to central system sewerage is impossible. Many consumers have already managed to evaluate the presented system and characterize it with the best side, but what is it?
The Topas septic tank is a system for accumulating and treating wastewater, resulting in the cleanest water being brought to the surface. process water. The range of such devices is very wide - each buyer can choose the optimal product that can serve as a separate a private house, and a small cottage village.
The essence of autonomous sewage system Topas
In the production of Topas septic tanks, foamed polypropylene is used; additionally, storage chambers are equipped with stiffeners. This production technology makes it possible to achieve the following device parameters:
- High strength characteristics.
- Installation of the system in any weather conditions.
- The system works even in winter.
- Independence of soil type and groundwater level.
Let's note some advantages of autonomous sewerage:
- high level of water purification;
- there is no need to develop additional aeration areas;
- long service life;
- compact size, which allows you to install a septic tank in a minimum space;
- environmental friendliness;
- ease of maintenance with a minimum of labor and financial costs and does not require calling out special equipment;
- secondary processing products can be used as fertilizer, and purified water for watering plantings;
- no foreign odors or noise;
- absolute tightness of the structure.
It is worth noting cons of the system, although it’s hard to call it a disadvantage:
- dependence on electricity;
- high cost of the product, but over time the costs will pay off;
- For installation, you will need to call a team of specialists, although self-installation is possible.
The principle of operation of an active septic tank
 The operating principle of an autonomous sewage system can be divided into several stages:
- Wastewater enters the receiving chamber, where it is purified from impurities and heavy pollution. The filling level of the chamber is regulated; after filling, the wastewater enters the aeration tank.
- An aeration process occurs, as a result of which the sewage is treated with oxygen and special bacteria.
- Treated wastewater accumulates in a settling tank, from where the sludge that settles at the bottom is subsequently pumped out.
- Process water goes into a stabilizer, from where it can be disposed of in the ground or used, for example, for irrigation.
Rules for operating an active septic tank Topas
Any Topas septic tank model is equipped with detailed instructions manual, but we will highlight a few rules that must be followed:
- During a power outage, try to limit the flow of wastewater into the collection chamber to avoid overflow.
- Do not allow aggressive agents to enter the system. chemical substances, alkalis, acids, etc. – they will destroy the beneficial microorganisms of the device.
- Do not throw garbage that is not intended for it into the sewer - leftover food, bags, plastic, etc. solid household waste.
- Sludge cleaning takes place twice a year.
- Some parts of the device must be replaced, for example, Air Mac compressor membranes - once every 2 years, aeration elements - once every 12 years.
Installation of an active septic tank Topas
 Installing an autonomous sewer system will not cause any particular difficulties; the whole process is divided into several stages:
- Finding a place where the septic tank will be installed - a distance of at least 5 meters must be maintained from the foundation of the buildings, while it is worth remembering about the trenches, pit, and drainage area that need to be dug.
- Digging a pit, the dimensions of which vary depending on the size of the station. If the soil type is unstable, formwork will have to be installed.
- Laying a sand or concrete cushion to prevent the station from floating. For small models, a cushion is made of sand, and for stations designed to serve a large number of users, a cushion is made of concrete.
- Installation of the station in a pit - manual or automatic method.
- Laying sewer pipes.
- Sealing sewer pipes at their connection to the device. A special polypropylene cord is used, which is included with the station.
- Connecting the power cord that runs underground in a corrugated pipe.
- Backfilling with soil is the last stage, in which water is simultaneously poured into the pit to a depth of 35 cm and covered with sand. The station must be completely immersed in the ground, otherwise there will be no normalization of external pressure.
Selecting an autonomous station model
When choosing a Topas septic tank, you should consider the following factors:
- number of future users;
- depth of the sewer pipe;
- Method of release of treated wastewater - forced or free.
Any Topas septic tank model will last for a long time subject to the rules of operation and installation. It is worth turning to professionals who will not only quickly and competently provide all services for the selection and installation of an autonomous station, but also provide warranty obligations for all installation work.
How to make an anaerobic septic tank and ground treatment facilities for autonomous sewerage in a private house with your own hands
More articles on this topic:
Where to direct sewer drains in a private house
It is increasingly rare to hear the phrase “outdoor amenities” in the private sector. This is not surprising - after all, every person strives for comfort. However, it is out of the question if on a frosty night, waking up, you have to get dressed and run through the snow to a cabin located 15 meters from your home. So home craftsmen equip latrines directly in the house. But in order for them to function normally, it is necessary to properly install a sewage disposal system into a septic tank located on the street. Today we will look at how to install a sewer system in a private house with our own hands. We will also consider the diagram of its structure, and along the way we will find out the cost of such work when performed by specialists.
Read in the article:
How to correctly draw up a diagram of a sewerage system in a private house with your own hands
When starting to draw up a sewerage diagram for a private house, you need to decide on the number of drain points. It should be understood that if there are two floors in a residential building, the circuit of each is mounted, as planned, separately, with subsequent output to a common riser leading to the septic tank.
Having only one riser is unacceptable only in the case of installing a swimming pool or sauna - a separate drain will need to be installed for them.
Important! Its performance and ease of installation will depend on the completeness and correctness of the do-it-yourself sewerage diagram for a private house. The plan must indicate the length of all pipes - this will help to correctly calculate the amount of material.

Problems you may encounter during design
The main difficulty in drawing up a project may be the introduction of a sewer pipe into the house. To do this, you will have to break through the foundation or install special pumps. Their installation will also be necessary when installing a bathroom in the basement or basement. At the same time, it won’t hurt special installation, capable of crushing organic matter. The sewage pump together with the blade assembly is called a multi-lift.

Expert opinion
VK design engineer (water supply and sewerage) LLC "ASP North-West"
Ask a specialist“If the house is under construction, then regardless of whether a toilet is planned inside the house or not, it is worth installing a sewer pipe into the foundation. To begin with, you can simply turn it off. If you need to install sewerage, it will be very useful.”
When designing, the number of residents must be taken into account. This indicator will directly affect both the volume of the septic tank and the diameter of the sewer pipes that will be used when installing the system. Do not forget about the depth of soil freezing - the system must be in the ground below this mark.

What types of sewerage systems exist?
The main types can be called:
- Dry toilets. This format is not very common in private homes. It is more suitable for a summer residence where there is no need for a constantly functioning sewer system.
- cesspool– the easiest to install and does not require high costs option. Its inconvenience is that it requires periodic pumping using special equipment, and this is not a cheap pleasure.
- Septic tank- the most common version of the sewerage system. Waste products are processed using living bacteria and microorganisms or by adding chemicals to the container that decompose organic waste.
The construction of a septic tank cannot be called cheap, but it allows you to do without pumping for a long time. The main task is to add the necessary substances in time. As for the sewerage system itself for a private house, it will be the same as for cesspool, and for a septic tank.

Do-it-yourself sewerage in a private house: diagram and its main components
When drawing up a project for laying a sewer system in a private house, you should mark on the diagram the location of plumbing fixtures, such as a sink or. All pipes are also taken into account (their length and diameter are indicated in the plan), connections, corners and branches. Data is entered on the location of the riser and its outlet to the septic tank.
If you describe all the parameters in detail, you can install the entire system much faster and with better quality. The plan, after installing the sewer system, must be saved. It can help in case of blockages or other emergency situations.
When drawing up a sewerage diagram for a private one-story house (as well as buildings with several floors), it is important to think about the installation locations for cleaning systems - special branches with plugs that will help get rid of blockages. Do not forget about calculating the slope of the highway. If the slope is weak, the drain will be ineffective, and if it is excessive, grease and dirt will settle on the walls, which will eventually lead to emergency situation. Let's try to figure out how to correctly draw up a diagram of the sewer system.

Drawing up a sewer system diagram
The first thing you need to do is draw a floor plan of all the premises of the building. It is more convenient if such a diagram is available - quite often during construction, just such diagrams are drawn up. In this case, it can be copied and sewer routes can be “laid” along it. Having indicated the installation points of plumbing fixtures, we begin measurements. Every millimeter can play a role here.
Important! When installing thinner pipes (for example, from a sink), if they are longer than necessary, there is a danger of them being bent. In this case, the water will stagnate, which will lead to a build-up of grease and dirt and clog.
If possible, it is better to place all plumbing fixtures in close proximity to the riser - this will allow sewerage to be carried out with the greatest efficiency. All tie-ins into the riser are indicated. A prerequisite is to connect the toilet flush directly to the main pipe, without additional connections. Bathroom and sink drains can be combined - this will save material and get rid of extra pipes and tie-ins into the main riser.

What diameter should the pipes be?
The diameter of the pipe is selected based on the number of residents and the planned intensity of use of the system. However, there are generally accepted norms. So the diameter of the main riser directly to the septic tank is usually 100-110 mm. The toilet flush has the same diameter. But from the sinks and the bathroom there are thinner pipes. Most often, a diameter of 50 mm is used for such purposes. This thickness will be quite sufficient.
All connections and taps must be made at an angle of 450. If the angle of the sewer pipe is even, it is this point that will periodically become clogged.
When installing a sewer system, it should be understood that the riser must go to the roof, from where air will enter. Let's consider what will happen if there is no air access and the upper part of the riser is plugged, using the example of a two-story house. Everyone knows that there is a hydraulic lock in the toilet that prevents the smell from the system from entering the room. If there is no free access to air, we flush the water in the toilet on the first floor. Due to rarefaction, water is “pulled out” from plumbing fixture second floor. The hydraulic lock is open, all the smell from the sewer system rushes into the living quarters.

How can you improve sewer efficiency?
The quality of operation of an autonomous sewer system can be improved both by installing additional equipment and purely by installation parameters. To do this, you just need to correctly distribute the slope of the highways. A slope of 3 cm/m is considered the most effective. But for greater efficiency of the sewer system, you can increase this parameter to 4-5 cm/m. This will be quite enough for efficient work system and is not enough for fast education grease or dirt deposits on internal walls pipes
Very effectively fights deposits on the walls modern means. But you shouldn’t expect a miracle from them if a serious blockage occurs. Advertising may claim that the product can easily cope with any of them, but this is not entirely true. In fact, such products are good for periodic prevention. If the pipe is already thoroughly clogged, then there is nothing better than a good old cable.

Talking about additional equipment one cannot fail to note the benefits in preventing clogs of equipment such as a shredder household waste under the sink. It prevents large scraps and other debris from getting into sewer pipe. Everything that goes down the drain after grinding has the consistency of liquid porridge, which is not capable of clogging the main line.
How to properly install a sewer system in a private house: stages of work
All work on arranging the sewer system of a private house is carried out in several stages. There is no need to perform them without interruption, which means that installation can be carried out in free time During a long time. However, according to professionals, such work rarely drags on - as soon as the arrangement begins, House master tries to complete everything as quickly as possible. Let's look at the steps that need to be completed step by step. The algorithm of actions should be like this:
- We calculate the required volume of the septic tank;
- install and equip the tank;
- we lay a line from the septic tank to the house;
- We carry out internal wiring of sewer pipes and connect them into a system;
- We connect plumbing equipment.

By following this procedure and simple rules for carrying out work, you can be sure that the system will work flawlessly. Let's look at each step in more detail.
How to calculate the required volume of a septic tank for a private house
The calculation can be made empirically: To do this, you need to sum up the entire water consumption of the family living in the house. However, if the sewerage system is installed during the construction of a residential building, this method is unacceptable. Then you can take the average values recommended by SanPiN. However, it is much easier to use the specially designed calculator below:
Construction of a drainage system– important stage in the construction of a private house. To equip an autonomous drainage system, a network is laid that delivers sewage to the drainage well. Installing a sewer system in a private house is a labor-intensive task, but independent execution the work should not cause any major difficulties. You will need to seek the help of specialists to difficult areas sewerage.
Sewerage- This engineering system, the creation of which begins at the design stage of the house. By the time sewer installation begins, its design must be ready, and the locations of plumbing fixtures must be determined.
And also must be collected technical documentation on their connection and operation.
General information
The sewerage system in a private house includes internal And external sewerage, as well as prefabricated well. In houses consisting of two floors or more, each floor having its own bathrooms, sewer system additionally equipped fan pipe.
Laying a sewer network involves the following steps:
- Preparation of a pipeline project, taking into account all connected devices, and calculation of the amount of building materials.
- Purchase of pipes, connecting elements and fittings.
- Cutting pipes into sections following the design.
- Carrying out internal wiring and bringing the sewer pipe outside.
- Installation fan pipe.
- Laying external sewerage.
- Arrangement of a prefabricated well and connection to it.
Rules
Rules for performing internal wiring:
- For each device and functional section of the sewerage system, pipes of different diameters are required: for the riser and toilet - 11 cm, for shower cabins, bathtubs, kitchen sink– 5 cm, for others 3.2 cm is enough. The diameter of the pipe to which several devices are connected at the same time should be from 7.5 cm.
- The pipeline is made at an angle of 2-3 cm.
- The pipes must be connected tightly and not interfere with the free movement of liquid. They are connected in the direction of the flow. There should be no roughness, irregularities or burrs at the junction of the pipes.
It is better to exclude right angles, since this is where blockages appear. To perform a turn, several pipes with smaller angles are used.
- To prevent backflow from the sewer and the penetration of unpleasant odors into the house, an S-shaped bent pipe is attached to the pipe of each device, which acts as a water seal.
- If the house consists of several floors, and each floor has plumbing fixtures, it will have a common riser.
- Toilets are installed closer to the riser than other household and plumbing fixtures.
- Sewage units are not installed in walls or ceilings.
- When leading pipes through walls and ceilings, sleeves are used to insert or cut wider pipes.
- At the points of connection to the riser and at pipeline turns, tees with inspection windows closed with plugs are installed. Through these windows, pipes are cleaned in case of blockage.
- The riser is located as close as possible to the place where the sewer drains to the outside.
Removing pipes from the house is done as follows:
- a hole with a diameter of 13-16 cm is made in the foundation or basement of the house or left during construction.
- a sleeve is inserted into the hole, along the walls of which insulation is laid.
- a pipe is pulled through the insulated sleeve connecting the house with the rest of the internal sewerage system.
In a house that has several bathrooms or a swimming pool, the pipeline is equipped with a drain pipe. A vent pipe is a special sewer ventilation system. It is responsible for removing gases from the sewer and, in the event of rarefaction of gases in the pipes, air intake.
The riser is extended upward and placed 30 cm above the roof. The part of the sewer pipe that runs outside is installed vertically upward so that gases from the sewer network escape into the atmosphere. The top of the fan pipe is covered with an umbrella nozzle.
Important!!! The fan pipe is not led into the ventilation system. Since sewer odors will penetrate through the ventilation into the house.
Wastewater is collected in a collector or septic tank - a well into which sewage also flows from the sewer network. It is positioned so that it is at the very bottom of the drainage system.
The well must be located at a certain distance from other objects that are located on the site.. To non-residential outbuildings not less than 1 m, up to residential buildings– at least 5-7 m, up to water well- at least 50 m, to the fence between areas - at least 2 m, to open reservoirs - at least 15 meters.
One of three well options will be installed for your home:
- storage well - a sealed container in which water accumulates wastewater. When the well is full, the water is removed;
- well with post-treatment – a container made of combined chambers. Sewage is filtered in it, the sediment is processed by microorganisms, and water enters the last chamber and from there goes into the soil;
- wastewater biotreatment station – well with filters and bioreactor. Here wastewater is purified from dangerous microorganisms and released safe ones. Purified water goes into the ground, and separated organic compounds used as fertilizer.
Installation of sewerage in the house

PVC sewer pipes when installing a drainage system:
- Easy to connect. The entire system is assembled like a construction set;
- The materials are light in weight;
- The mounting method is simple, even on a vertical surface.
- The disadvantage is that maximum length 6 m.
7034 0 0
Internal sewerage with your own hands in a private house: regulatory requirements and practical recommendations
Normative documents
These building regulations are an updated version of an older document - SNiP 2.04.01-85.
Let's take a look at the basic requirements of a joint venture related to private construction. Let me comment on some points based on my own experience:
- To drain wastewater into general sewerage closed gravity pipelines should be used;
Sometimes the terrain makes it necessary to use sewage pumps.
In this case, the pump must be installed in a buffer tank, allowing the sewerage system to be operated for a limited time in the absence of power supply.

- Pipes are laid in a straight line, without bends. The direction of the laying can only be changed using connecting parts;
This fully applies to pipes made of cast iron, PVC and polypropylene.
Polyethylene allows laying with some bending (up to approximately 10 angular degrees).
It retains elasticity even when negative temperatures, so there is no need to worry about cracks and destruction of pipes.

- The slope of the gasket must be constant;
This instruction is due to the fact that when the slope changes, solid fractions of wastewater will be retained in areas where it is minimal.
As a result, the likelihood of blockages will increase.
- To connect the horizontal section with the riser, it is strongly recommended to use oblique crosses and angles. The exception is crosses, the bends of which are located in two different planes;
This will greatly simplify cleaning if clogged.
A cable or wire, resting against the opposite wall of a straight tee, can fold or move in the direction opposite to the blockage.
An oblique tee will guide the cleaning tool in the direction of the drain.

- Two baths on the same floor can be connected to a common riser only through an oblique cross;
This is necessary so that during a volley discharge of water from one bath, water does not flow into another.
If the bathtub piping is not hermetically sealed, overflowing of the sewer can lead to flooding of the bathroom.

- For sewerage, it is recommended to use pipes and fittings with a service life of at least 25 years and hydraulic characteristics that remain unchanged throughout their service life. Preferred polymer pipes(PVC, polypropylene, polyethylene, etc.);
- In the basement, the internal sewage system is laid openly. In residential premises it is allowed to embed it in the floor, walls, ducts and shafts;

If possible, it is better to leave pipes accessible for inspection and repair. In my practice, I have encountered blockages that could only be cleared by cutting out a section of the riser.
The most typical case is a large fragment of thick glass stuck between the walls of a cast iron pipe.
- The place where the risers pass through the ceiling is sealed to its entire thickness with cement mortar;
IN wooden floor Polyurethane foam is used for the same purpose.
The goal is to reduce the spread of sounds between floors, including through the sewer pipe itself, which in certain conditions serves as an excellent resonator.
- It is not allowed to embed pipes into ceilings living rooms and kitchens;
- The internal sewage system in a private house should include ventilation risers(fan pipes), which are connected to the highest points of the system. The drain pipe is installed 20 cm above the roof at a distance of at least 4 meters from the nearest opening window. In this case, the exhaust part of the riser should not be thinner than its waste part;

- Installation of deflectors on the drain pipe is prohibited;
With all due respect to the authors of the joint venture, this requirement is not always worth fulfilling.
The deflector will indeed limit draft in calm weather, but it will protect the sewer from wind-borne debris and prevent precipitation from getting into it during a rainstorm.
For cesspool owners who pay for waste removal, the latter is quite important.
- On a roof in use, the exhaust riser rises above its level by at least three meters;
- The design of the in-house sewage system must provide for the possibility of its mechanical cleaning in case of blockages. For this purpose, revisions or tees with plugs are provided. In a private house, they are located at the bottom and top of each riser, at the beginning of each straight section with three or more plumbing fixtures, as well as at turns;

- On long straight sections, revisions or tees for cleaning are located in increments depending on the diameter of the pipeline:
| Diameter, mm | Pitch, m |
| 50 | 8-12 |
| 100 — 150 | 10-15 |
- If the level of the sides of the plumbing fixture is lower than the hatch of the nearest yard sewerage well (for example, when located in the basement or basement), the corresponding section of the sewerage system is equipped with a sewer seal or an automatic sewage pump;
- All hydraulic devices are equipped with water seals that prevent sewer gases from entering the premises;

The connections of elbows and siphons with the sewerage system are carefully sealed with rubber sealing couplings. Otherwise, gases will enter the room through the sockets.
- Several washbasins (up to 6 pieces) and several shower cabins or trays can be equipped with a common siphon with a diameter of 50 m, equipped with an inspection or hatch (lid) for cleaning;
- The recommended installation height for plumbing fixtures in the general case (in the absence of people with mobility limitations in the family) is:
Practice
Diameters
For bathtubs, washbasins, sinks, shower cabins, urinals, washing and dishwashers The diameter of the connected sewerage is 50 mm. For toilets - 110 mm.

These diameters are sufficient for any reasonable number of plumbing fixtures connected in parallel to the sewer, including two bathtubs in one room, subject to simultaneous volley discharge.
Noise
The sound of water flowing in pipes is unlikely to give you much pleasure. A number of simple recommendations will help you avoid it.
- If possible, lay horizontal sections of sewerage in the subfloor, basement or behind false walls. It is better to place risers in technical or utility rooms;

- Where the riser passes through the living space, cover it with a plasterboard box or wall panels . It is advisable to fill the box sound-absorbing material(usually used in this capacity mineral wool); as an option, the riser can be wrapped with foam roll insulation;
- Instead of thin-walled PVC or polypropylene pipes, it is advisable to use polyethylene pipes or the so-called silent sewer. Thanks to the mineral filler and variable layer density, it effectively absorbs acoustic vibrations. The price of such pipes, however, is 2 - 4 times higher than that of conventional PVC, in addition, some manufacturers use their own diameter system, which is incompatible with conventional vinyl fittings;
- Use sound-absorbing clamps to secure the riser equipped with porous rubber gaskets.

Installation
How to properly assemble a sewer system from plastic pipes with your own hands? Here are the basic installation rules:
- The pipeline is laid with a constant slope of 2 cm/m for a pipe with a diameter of 110 mm and 3.5 cm/m for a diameter of 50 mm. Any counter-slope will become a place of constant blockages: it will collect silt and fatty deposits;
- Attachment points horizontal pipe should be separated from each other by no more than 8 - 10 pipe diameters. If you increase the pitch between the clamps, the loose sections will sag in a year or two, forming sections with a counter-slope;
- Vertical pipes are secured with clamps under the necks of the sockets. This fastening will prevent them from moving under their own weight.

Pipe sockets and fittings must be directed against the direction of flow of drains. In this case, inside the pipe there will be minimal amount irregularities on which large-sized debris (papers, rags, etc.) can get caught.
The easiest way to cut a pipe is with a grinder. Any abrasive wheel can be used for cutting. When working indoors, do not forget to protect your lungs with a gauze bandage: breathing plastic dust is a less than average pleasure.
Be sure to clean it after cutting. inner surface deburr pipes and chamfer the outside. The burrs will begin to collect sewage-borne hair, fabric fibers, and other debris. The chamfer will significantly facilitate the assembly of the connection.

If the pipe enters the socket with great force, lubricate it liquid soap or any other lubricant water based. Do not use for lubrication machine oil and other fuels and lubricants: they will cause the seals to crack.
At hidden gasket(in boxes and false walls) it is better to assemble connections using silicone sealant. Even if the seals lose their elasticity, it will not allow the socket to leak.

Ventilation
It really is necessary. Instead of lengthy discussions about the movement of sewer gases in pipes, I will simply share my own experience.
During the construction of the second floor, I brought the sewer system to the septic tank without installation, based on the fact that with the height of the system being only 4 meters, significant draft would not arise in it. In addition, all connections between plumbing fixtures and sockets were carefully sealed.
No such luck: after some time, a characteristic sewer smell appeared in the attic toilet. As it turned out, the following happened:

- When flushing the toilet, a stream of water rushed down the riser, at some point blocking the entire lumen of the pipe;
- The vacuum that arose in the upper part of the riser sucked water out of the bathtub siphon, disrupting the operation of the water seal;
- The lack of water in the siphon opened the way for septic tank aromas to enter the bathroom.
The problem was quite predictably solved by installing a drain pipe at the top point of the sewer system.


Heating
Often practiced in warm climates open gasket sewer sections. So, in Crimea with its average temperature January at +3C you can often find sewer pipes laid between the house and the well along the surface of the ground. Laying pipes that provide drainage from the second floor along the facade is also practiced.
Having looked at other people’s buildings, I also laid a section of internal sewerage to the septic tank along the facade: I didn’t want to spoil the ceiling and the renovated first floor with a riser.

Alas, and in the warm climatic zone there are frosts. In the very first winter, the operation of the in-house sewage system showed that it was impossible to do without insulation at all: already at -10C, the drains began to freeze.
The problem was solved by installing a self-regulating one. It is a conductive matrix that increases resistance when heated and decreases when cooled. As a result, the lower the temperature, the greater the heat transfer, the more the pipe on which the cable is attached heats up.
The installation was done like this:
- The cable is glued to the bottom of the pipe with aluminum tape. Reflecting infrared radiation, it significantly reduces non-target heat loss;
- Because the aluminum tape extremely fragile, the cable had to be additionally secured with polyethylene ties.

Several turns of cable are also used to heat the open septic tank.
The main requirement for installation is to leave the end sleeve and heat shrink between the cable and the cold end outside the drain container.
They are aggressive and destructive heat shrink tube for a year or two of operation, but vinyl cable insulation perfectly tolerates long-term contact with a chemically active environment.

Conclusion
As you can see, sewer installation is not extremely complicated. You can learn more about it by watching the video in this article. Please share your own experiences in the comments. Good luck, comrades!
July 14, 2016If you want to express gratitude, add a clarification or objection, or ask the author something - add a comment or say thank you!
Laying a sewer system is an important stage in the construction of a private house. If there is no public sewerage system, then in order to equip it completely autonomous system drainage, it is necessary to lay a network delivering wastewater from sanitary and household appliances to the collection well. Installing a sewer system for a private home is not a quick task, but if you do the work yourself, no serious difficulties should arise. The help of specialists may be required only in the most difficult sections of the pipeline.
The drainage system of a private house consists of internal and external sewerage and a collection well. In cottages with more than two floors with their own bathrooms, the sewer network is additionally equipped with a drain pipe.
Water supply and sewerage systems are usually designed and installed simultaneously, since the same plumbing and household equipment are connected to them.
The procedure for laying the sewer network:
- Prepare a pipeline project taking into account all the devices connected to it, a slope of 2-3 cm per linear meter, and calculate the amount of building materials required.
- Purchase pipes, connecting elements and fittings.
- Cut the pipes into lengths in accordance with the project.
- Carry out internal wiring and bring the sewer pipe outside.
- Install the drain pipe.
- Lay external drainage.
- Build a collection well and connect a pipeline to it.
Internal wiring
The indoor sewage system is assembled in such a way that its lowest point is where the pipeline exits to the outside. In order not to make a mistake with the angle of inclination, you can start assembly from this point.
If you have a project, the connection order is not important, but you must strictly follow the rules for performing internal wiring:
- Each device and functional area pipeline requires a pipe of the appropriate diameter: for the riser and toilet - 11 cm, for showers, bathtubs, kitchen sink - 5 cm, for everything else 3.2 cm is enough, but if several devices are connected to one pipe at the same time, its diameter must be not less than 7.5 cm.
- Since wastewater moves through the pipes by gravity, a pipeline slope of 2-3 cm per linear meter is required.
- The connection of the pipes must be sealed and not impede the free flow of liquid: the pipes are connected along the flow, and there should be no roughness or burrs at the junction.
- Right angles should be avoided, as this is where blockages most often form. To perform a turn, it is better to use several elbows with smaller angles.
- It is necessary to prevent backflow from the sewer and the penetration of unpleasant odors into the house. To do this, a siphon or an S-shaped bent pipe is installed on the pipe of each plumbing fixture, which acts as a water seal.
- If the house has several floors and each of them has plumbing, a common riser should be installed.
- Toilets are installed closer to other household and plumbing fixtures to the riser.
- Pipeline units cannot be installed in areas where walls or ceilings pass through.
- Holes for passing pipes through walls and ceilings are cut with a margin; it is advisable to insert special sleeves or sections of wider pipes into them.
- The connection points to the riser and pipeline turns are equipped with a tee with an inspection window closed with a plug. Through these windows, pipes will be cleaned in the future if they become clogged.
- The riser is located as close as possible to the place where the sewage system is discharged to the outside.