How to correctly calculate the distance between floor joists? Joists in floor construction Permissible distance between floor joists
Wooden floors on joists are one of the oldest methods of flooring and the only one used in northern regions our country. Modern materials just improved ancient technology, due to which the scope of application has significantly expanded and performance indicators have improved. Before proceeding directly to consideration various options, you should familiarize yourself a little with the engineering requirements for calculations.
Logs are distinguished from beams by their smaller size and mobility. If beams cannot be moved after installation, and repairs are very long and labor-intensive, then logs are a mobile architectural element. They are much easier to install and, if necessary, repairs are carried out faster.
Before you start building a floor, you need to study the requirements regulatory documents to the size of the joists and the distance between them, taking into account the thickness of the floorboards.
Table of lag sections at a pitch of 70 cm
Table of distance between joists depending on the thickness of the board
In order to learn how to independently make calculations based on tables, it will be useful to consider simplest example. Initial data: room length 10 m, take floorboard 30 mm thick.
Calculation method
According to the table, with such a thickness of the board, the distance between the logs is 50 cm; with a room length of 10 m, 20 logs will be needed. The distance between the logs and the walls cannot exceed 30 cm. This means that we will have to increase their number by one piece, the distance between the others will decrease to 45 centimeters.
Important note. During calculations, all roundings should be done only downwards, thus creating an additional margin of safety.
There is no need to calculate dimensions and distances accurate to the millimeter; no one takes such measurements. By the way, during construction the absolute majority architectural elements and structures are measured in centimeters, the greatest accuracy is half a centimeter. Millimeters are almost never used during measurements.
Floor subfloor options
These types of floors can be installed on a wooden or concrete base or on the ground. Each option has its own technological features, which must be kept in mind during work. As for the specific purpose of the premises, taking this parameter into account, the base of the floor and its performance characteristics. The technology of the device itself remains almost unchanged. There are, of course, options for warm and cold floors, but these features also have general algorithm construction.
Installation of a wooden floor on joists on wooden bases
Such floors can be made in both wooden and brick buildings and can have several varieties. The features of flooring need to be considered at the building design stage. Not only the purpose of each room and its dimensions are taken into account, but also climate zone accommodation, microclimate requirements and financial capabilities of the developer. Below are given step-by-step recommendations construction of this type of flooring.
Depending on specific conditions, the algorithm can be slightly modified, but all main construction operations must be completed. The base can be moisture-resistant OSB boards or sheets of plywood. The design of the floor coverings provides for the possibility of laying insulation; the use of rolled and pressed glass wool or polystyrene foam is allowed. If there are insulation materials, then you should definitely install hydro- and vapor barriers.
Step 1. Take the dimensions of the room and calculate the number of joists, taking into account the above recommendations. Prepare materials and tools, make markings. Do the work slowly; mistakes made at this stage are extremely Negative consequences. Eliminating them will take a lot of time.
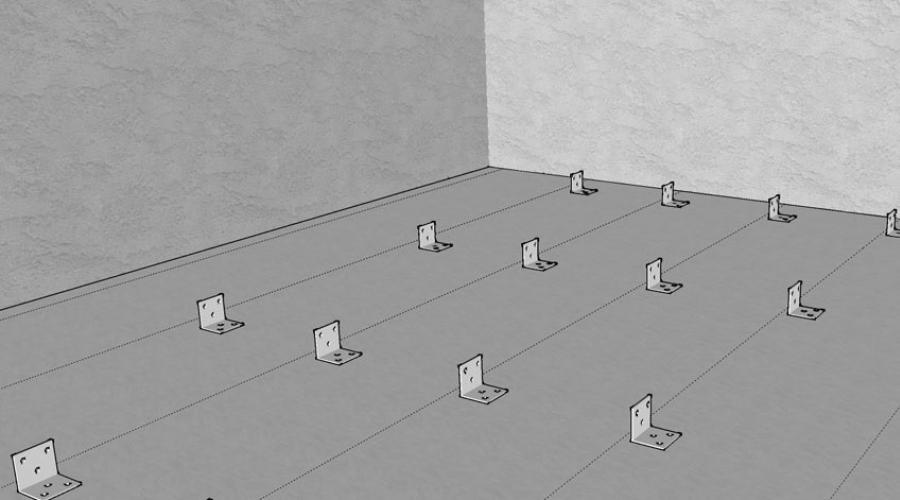
Step 2. Start installing the logs from the outer wall ones. If the room has subfloors, then the logs can be fixed directly to them. To make work easier, it is better to use metal squares with perforations; such elements significantly speed up work and increase the stability of the joists. Using the mark on the wall, taking into account the thickness of the floorboards, align one end of the joist and fix its position.
Practical advice. When installing the outer joists, do not fix them immediately; first, you should only tighten the screws. This will allow you to make final fine adjustments.
Do the same actions at the second end of the log, constantly monitor its level position. Once the lag lays down normally, you can firmly fasten the ends and begin installing intermediate fasteners. The distance between them depends on the thickness of the boards that are used for the logs; it is approximately 70 centimeters.
Step 3. You need to stretch the ropes between the outermost joists; place all the remaining joists along this line. Constantly check with a level; installation accuracy should be ±1–2 mm. There is no point anymore, it takes a lot of extra time. A small difference in height will be removed during finishing front surface floorboards.
Step 4. If the floors are warm, then you need to lay thermal insulation between the joists; waterproofing and vapor barriers are used to prevent moisture from entering. The distances between the logs must be adjusted taking into account the length and width of the insulation. It could be like mineral wool or foam plastic, or bulk species insulation materials. If all preparatory work completed, you can begin laying the floorboards.
There are options for installing joists on floor beams. These are so-called ventilated floors and are most often used for non-residential premises. There is no need to be particularly precise; size alignment is done using lags. The logs are attached to the beams with nails or self-tapping screws from the side. The algorithm of work is the same. First, the extreme ones are placed, a rope is pulled between them and all the others are fixed along it.
Ventilation is carried out through special vents in the foundations; the distance between the ground and the floor must be at least fifty centimeters. Otherwise, the air exchange rate does not meet the required indicators, and this causes damage to wooden structures.
Installation of floors on wooden joists on concrete
Such floors are considered more complex, labor-intensive and expensive; all wooden structures must be reliably protected from direct contact with concrete. Otherwise, the structures will quickly become unusable and will have to be replaced prematurely. Eat chemical method protecting lags from rotting processes using various impregnations. They are quite effective and actually prevent the process of wood deterioration. But unfortunately, impregnated wooden structures can no longer be considered environmentally friendly, and it is for this indicator that most developers install natural wooden floors.
If the logs are laid over the entire area on concrete, then waterproofing is required between them.
But they can also be secured using metal squares, which allows you to create a gap between the base and the joist. It must be borne in mind that at the same time load-bearing characteristics the floors are slightly reduced.

This fixation method has its advantages. Firstly, direct contact of wooden structures with concrete ones is completely excluded. Secondly, logs can also be installed on a black screed. Using corners, you can eliminate irregularities of several centimeters; there is no need to make a finishing screed. This saves a lot of time and money.
The second method of laying on a concrete screed is to lay the logs directly on it; a material based on modified bitumen is used for insulation.
Laying logs on the ground
The method is used for outbuildings, baths, gazebos, verandas, etc. Wood must be treated with antiseptics. It is better to have a columnar foundation; if you want to make a more durable strip foundation, then it is necessary to provide vents for natural ventilation in advance.
How is this floor made?
Step 1. Remove fertile layer soil. You can use it to fill the beds or level the area in front of the house.
Step 2. Mark the columns. The distance between them is selected taking into account the load and size of the logs. The posts can be made of concrete, block or prefabricated. The dimensions of the supports are approximately 40x40 cm, the burial depth is within 30 cm. A layer of sand ≈ 10 cm thick should be poured onto the bottom and compacted.
Step 3. Fill the supports with concrete. To prepare concrete, you should use two parts crushed stone and three parts sand for one part of cement. Water is added as needed. There is no need to make formwork in the ground; formwork from boards or OSB scraps is installed above the ground level. During the manufacture of formwork, you need to use a level; all edges must be strictly vertical.
Practical advice. It is much easier to make columns from ready-made blocks. Horizontal alignment must be done along the rope. After the outer ones are aligned with the hydraulic level, a rope is pulled between them. Deviations should not exceed ± 1 cm. This variation is eliminated during installation of the log.
Step 4. Proceed to fixing the lags; you also need to start work from the outermost ones. For precise horizontal alignment, you can use shims. It is not advisable to take wedges made of wood; over time, they will dry out and wobble will appear: the floor will begin to creak unpleasantly when walking. Between wooden structures And concrete surfaces It is imperative to lay two layers of roofing felt for reliable waterproofing.
Step 5. After the outermost logs are laid, a rope is stretched between them and all the remaining ones are laid under it. The logs are fixed with metal squares on dowels and screws. To increase stability, it is recommended to install them on both sides. Floor boards can be laid directly on the joists or a subfloor can be laid first. The final choice depends on the characteristics of the operation and purpose of the room.
Always select joists with a safety margin, especially in cases where the installation method involves bending loads. It must be remembered that correcting mistakes made during the construction of floor coverings is always much more expensive than carrying out the work quality materials and in compliance with recommended technologies.
Choose your joist boards carefully. They must be absolutely healthy without signs of rot. The presence of through cracks and rotten knots is completely prohibited. If there are large healthy through knots, then you need to install the joists in such a way that there is a stop under them.
When attaching the lags, do not allow the possibility of wobbling.
Most lag oscillations cause very unpleasant squeaks floor coverings while walking. To eliminate such phenomena, you will have to remove floor coverings; this is time-consuming and expensive; it is not always possible to keep the dismantled materials in a suitable condition. reuse condition.
Video - Installation of wooden floors along joists
Calculation building materials for installing a wooden floor: quantity of floorboards and joist materials, floor area. The dotted line shows the lags. Floorboards and “subfloor boards” are positioned horizontally.
Subfloor- This is a “lining” under the main coating. It is needed to level the surface and distribute the load on the floor covering. Usually the subfloor is laid on lags(frame bars) with a certain distance from each other. If necessary, insulation and waterproofing are laid between the joists.
It is better to fix the subfloor and main floor boards using screws of the required size. Laying with small gaps is allowed, as the wood can shrink and expand.
Step between joists depends on the thickness of the boards of the future covering:
Thickness - step (both values in centimeters):
2 – 30; 2,4 – 40; 3 – 50; 3,5 – 60; 4 – 70; 4,5 – 80; 5 – 100.
Floor area= floor length * floor width.
S = a*b.
Length of lags equal to the length of the floor.
Number of lags= 1 + floor width / distance between joists.
nl = 1 + b/S3.
Volume of log materials= lag width * lag thickness * lag length * number of lags.
V = S1*S2*a*nl.
Volume between joists= distance between lags / lag width * lag thickness * lag length * (number of lags - 1).
V1 = S3/ S1*S2*a*(nл-1).
Number of rows of floorboards= room length / floorboard width.
nп = a/O1.
Floorboard volume= width of floorboard * thickness of floorboard * width of floor * number of rows of floorboard.
Vp = O1*O2*b*np.
Number of rows of subfloor boards= 1 + floor length / (width of subfloor boards + distance between boards).
nch = 1 + a/(O3+R).
Board volume= board width * floor length * board thickness * number of boards.
V = O3*a*O4*nh.
One of important issues In the construction of a house is laying the floor. Modern tendencies in interior design bring us back to using natural materials. Wood is the most environmentally friendly and practical of them. This coating adds not only comfort and aesthetics. It is durable, highly durable, and retains heat well.
This floor is ideal for both a summer house and country house, and for a city apartment. Renew paint or varnish coating maybe once every 4-5 years. The tree will serve you for many decades. However, it is necessary to seriously approach the issue of preparing the base for its installation. Among the many methods, laying on logs is considered the most proven.
What are lags for?
Floor joists are floors made of wood, metal, plastic or reinforced concrete. As a rule, they have the form of beams that are laid across the future finishing surface. This is a kind of lathing that serves as the base of the floor.
Most often they are made of wood in the form of bars certain parameters. It is more accessible, cheaper and is not inferior in quality to other materials. This method of installation is used to securely secure the floor to avoid sagging under heavy furniture, so that it does not vibrate or creak. According to statistics, it is used in 90% of cases.
The main advantages of the log:
- noise absorption;
- floor ventilation;
- increase in thermal conductivity;
- the ability to use empty space for various utilities;
- floor leveling;
- increasing the strength of the coating to several tons per square meter;
- ease of installation and replacement;
- low cost.
The material for logs is most often pine, spruce or fir. Larch is more expensive, so it is not so popular. Since they serve as a base for the floorboard, grades 2 or 3 are quite suitable. They may not be as neat as grade 1. The presence of knots and smudges of resin will not affect the reliability of the structure.
As a rule, wood is stored under certain conditions. The humidity of the material ready for use should be about 15-20%, but no more. Before starting work, the wood must be treated with special impregnations.
They are harmless to human health and often require simple dilution with water in certain proportions. This prevents the appearance of fungus and mold on the tree, protects against bugs and rodents. The procedure is quite simple, but requires reapplication after 3 or 5 hours.
Floor joists do a lot useful functions. It is worth keeping in mind that incorrect installation can lead to dire consequences in the future. The shape of the beam must be rectangular.
They best withstand heavy loads in a ratio where the height is one and a half or two times greater than the width. The beam is always placed only on the edge. The table shows the size of the lag section for certain spans. The step between them is in this case is 70 cm:
The size of the section depends on the strength of the material used and the expected load on the floor. For residential premises it is established that it does not exceed 300 kg per m2. These values are recognized by experts. However, they can be made thicker depending on the situation. For example, it is necessary to increase the space for thick insulation. Or an increased load on the coating is expected. The stronger the material, the smaller its size can be. This applies, for example, to iron.
The length of the logs must correspond to the length (width) of the room minus 2.5-3 cm. This margin is necessary to maintain the strength of the structure in case of fluctuations in temperature and humidity. It is recommended to use long logs. It’s good if their size matches the length of the room.
If it is necessary to join them, then the joints should be shifted relative to the neighboring ones by about half a meter, or better yet, by a meter. A support is made at the splice site. It is usually done in column form. Splicing occurs using galvanized plates, but more often - half-timber.
Be sure to take into account the distance between the floor joists. Professionals call it a “step.” It is determined depending on the parameters of the floorboards. The thicker the floor covering, the larger the pitch can be. Accordingly, the thinner it is, the smaller the step we take.
A pattern can be deduced from the table. If the thickness of the board increases by 0.5 cm, then the pitch increases by 10 cm. For more durable coating(for example, plywood and OSB) calculations may be different.
Since these materials are more resistant to deflection, the pitch increases. With a thickness of 18 mm, the pitch will be up to 40 cm. With 25 mm, it will be up to 60 cm. We attach each sheet to three different lags. Be sure to fasten the center and edges, going halfway up the joist.
The logs are laid on wood, soil and concrete. First you need to know what tools are required for this. So, in addition to the bars themselves, you must have a level, a jigsaw or a handsaw. We stock up on screws, screws, anchors and nails. Be sure to have a hammer drill with you (when laying on concrete), usually an axe, a screwdriver or drill, a hammer and a nail puller.
If the joist is attached to wooden floors it is necessary to fasten them to the sides of the beams. This is done based on the fact that beams are usually not level. In addition, this method helps not to raise the floor too high, saving precious centimeters in rooms with low ceilings.
If the height allows, then, as an option, the timber is laid on top across the beams. We secure them with 6 mm screws, having previously drilled a hole 2.5 mm smaller in diameter. This will prevent the wood from splitting. The length of the screw should be 2.5 times longer than width lag
When laying logs on the ground, it is necessary to clean and compact it in advance. Next, measurements are taken to install the pillars. They will serve as a support. The distance from the wall to the first log should be from three to twenty centimeters. Holes 10 cm deep are dug along the intended distance, filled with sand and filled with water for greater strength. This will be the foundation for the pillars.
It is recommended to make its size at least 40 by 40 cm. Then polyethylene is laid, and a column of two or three bricks secured with cement is erected on top of it. Then they are covered with roofing felt, and timber is laid on top. The logs are attached with galvanized corners to the walls or to the crown of the log house.
Joists are often laid on concrete base. Waterproofing in this case is extremely necessary, otherwise the floor will constantly become damp. A regular one will do just fine here. polyethylene film. However, experts are increasingly beginning to use foil insulation - this is foamed polyethylene with a layer of foil, which is laid towards the living space, reducing heat loss.
The beam is attached to the concrete using anchors. Insulation is laid between the joists, but not under them. Concrete screed, as a rule, eliminates the hassle of leveling joists before laying floor boards.
Make sure the wood is dried and treated with antiseptic or bitumen. This will significantly extend the service life of the structure. When the humidity is more than 20%, the tree can become warped, compromising the integrity of the structure. Boards brought from the warehouse must lie in room temperature a few days. This is especially true during the winter season. It is not recommended to lay the floor when the air humidity is less than 60%.
You should not saw or plan boards in the room where the floor is being installed. Sawdust can cause rot.
Don't forget to use waterproofing. For sound insulation, as a rule, fiberboard, rubber, polyethylene foam, slag or sand are used. The warmth in the house will remain longer if you fill the voids under the floor with mineral wool, expanded clay, expanded polystyrene or isospan.
Use the rule after installation. Lay it across the beams, remove gaps, leveling the height. This is easy to do with the help of special modern adjustable mounts appeared on construction market. The floor is laid only after all leveling procedures.
The smaller the pitch, the longer the floor will last. However, the main indicator of durability is the material of the coating and base. The most durable wood is larch.
The installation of beams is usually carried out along the window, i.e. across the room. The floorboards are then placed along the length of the room, i.e. from the window. However, this is just a recommendation and a matter of taste.
The floor is laid from the corner, placing the boards perpendicular to the joists. The distance from the walls should be about 1 cm. This is left in case the wood deforms depending on temperature and humidity environment. This distance is covered by the baseboard. If the boards lie close to the wall, the floor may swell.
A board is attached to each beam. Holes for screws should be drilled in advance to avoid delamination.
The most common option for the space between the joists is from 50 to 56 cm. As a rule, it does not exceed a distance of 69 cm.
Removing joists and wooden floors is quite simple. It is necessary to remove all the furniture from the room, remove the baseboards, and open the boards or sheets of chipboard. After inspection, the old boards are replaced with new ones. The logs themselves can be partially replaced. Simply cut out a piece of rotten wood and install a new one.
Don't forget to use a protective impregnation on new boards. Check the ends of the beams for rot, and inspect the base insulation, if any. Repairing the floor can be a reason to insulate your home.
Joists are deservedly the simplest and most popular way to create a reliable foundation for our floor. If desired, anyone can take up this interesting business and step achieve your goal step by step. The most pleasant reward for your efforts will be warmth and cozy atmosphere for many years.
In order for the floor covering to serve for a long time and be durable, the floorboards not to creak or bend underfoot, you must first correctly calculate all the design parameters, including at what distance to lay the floor joists. Not only durability will depend on the correctness of this calculation flooring, but also the amount of material used for it, and therefore the cost of the work.
- What determines the choice of lag?
- What should be taken into account when making calculations?
- An example of calculating the distance between floor joists
- Lag pitch depending on floor covering
- What can an error in calculations lead to?
What determines the choice of lag?
The size of the selected logs will depend on the installation location. So, in apartment buildings with finished wooden or concrete floors a thin beam on which the floorboards will rest can easily serve as a joist. At the same time in frame building logs are usually at the same time elements of the house frame, they take a significant load, that is, they have load-bearing functions, so they must have a much larger cross-section.
What should be taken into account when making calculations?

When performing the calculation, the following factors are taken into account:
- thickness of the flooring material (chipboard, boards, etc.);
- approximate step between floor joists;
- estimated specific maximum load on the floor.
All these parameters will determine the cross-section of boards, timber and other lumber used to construct the floor.
When calculating what distance should be between the floor joists, it should be remembered that the outermost joists cannot be placed further than 30 millimeters from the walls; an allowance must be made for this in the calculations.
As a result of calculations, the result is usually not a whole number, but it should always be rounded up so that the actual number of lags does not turn out to be less than the calculated one. Otherwise, the strength of the floor structure may not be sufficient, especially considering that such savings will be completely insignificant compared to the likely risk.
The cheapest floor joists can be found at sawmills, followed by online construction stores.
When it comes to floor installation, it is not recommended to save too much. The logs must have not only a suitable cross-section, but also sufficient density. If you make the lag step for a floor made of boards too large, the boards will begin to sag and “play.” Likewise, if the distance between the joists for an OSB floor is made greater than acceptable, then the slabs will begin to crumble and crack.
An example of calculating the distance between floor joists
The distance between the floor joists under the board can be relatively large, since a thick board is more durable material than, for example, thin plywood. Accordingly, for thinner finishing materials More frequent placement of lags will be required.
For clarity, consider an example of floor arrangement with the following data:
- room 12 meters long;
- use of 100x180 mm timber for logs;
- using 30mm boards as a finishing coating.
Table of distance between floor joists under the board:

According to the table above, for 30mm board optimal distance between floor joists should be 50 cm.
Let's denote total beams with the letter “k”.
Then the total width of all lags will be ( 100 mm * k).
The distance between the wall and the outer beams will be 30 mm.
Accordingly, the step between adjacent lags will be ( k - 1).
The distance between all elements will be ( 0.5 * (k - 1)).
Calculating the distance between floor joists begins by determining the pitch between the beams using the following equation:
length of the room = total width of the beams + sum of the distances between the beams + distances from the walls
12 m = 100 mm * k + 0.5 * (k - 1) m + 30 mm * 2
It is important to bring the equation to unified system calculus. As a result we get:
12 m = 0.1 m * k + 0.5 * (k - 1) + 0.03 * 2
Remembering school course algebra, solve the equation:
12 = 0.1 * k + 0.5 * k - 0.5 + 0.06;
12 + 0.5 - 0.06 = 0.1 * k + 0.5 * k;
12.44 = 0.6 * k;
k = 20.7 pcs.
Since the number of beams can only be an integer, it is rounded up, that is, it is required 21 bars.
The sum of all the gaps between the lags will be:
12 - 21 * 0.1 - 0.06 = 9.84 m
You need to divide the resulting amount by the number of gaps, and we get the distance between adjacent lags:
9.84 / (21 - 1) = 0.492 m
Thus, we were able to establish at what distance to lay the floor joists in this example - 0.492 m or 49.2 cm.
Lag pitch depending on floor covering
Exists linear dependence between the thickness of the laid covering and the pitch of the lag: the thicker the flooring, the larger the step can be.
Here is the distance between the floor joists if the flooring is carried out with boards of different thicknesses:
- with a thickness of flooring boards of 20 mm, the lag pitch should not exceed 30 centimeters;
- for boards 25 mm thick, the pitch requires 40 cm;
- for “thirty” – 50 cm;
- for 35 mm – 60 cm;
- for “magpies” – 70 cm;
- for 45 mm – 80 cm;
- for “fifty” – 1 m.

The distance between floor joists under plywood or OSB is determined somewhat differently. On the one hand, these materials are thinner, but on the other hand, they have greater bending resistance.
- If the flooring has a thickness of 15-18 mm, then the lag pitch for a plywood floor will be 40 cm.
- With thicker flooring (22-24 mm), the step can reach 60 cm.

What can an error in calculations lead to?
What could be the consequences of incorrectly selecting the cross-section of the lags and calculating the distance between them? If the floors are laid on a concrete base, then the most important thing in this case will be the size of the step between the lags, which directly affects the behavior of the floor covering. If you attach too sparsely mounted logs chipboard board, then it may sag and even break. If placed on top ceramic tile, it will crack or fall out. The boards will simply “walk” and sag. Any of these options will require rework.
It will be much more serious to make a mistake at what distance the floor joists are placed, which at the same time serve as elements of interfloor ceilings. If in this case we establish an insufficient number of such load-bearing elements, then the strength of the building structure itself will decrease, which is fraught with the most serious consequences - from irreversible deformations to complete destruction of the floors.
Do you have experience installing joists? Do you do calculations or just use tables? Write about it in the comments.
There are many DIY solutions for leveling your floor. An exception is laying the floor using wooden logs. This method of floor installation is very popular due to its environmental friendliness and practicality, and the naturalness of the materials creates warmth, comfort and a welcoming atmosphere. Wooden floors have always been valued for furnishing country houses, and in apartments. And if you have chosen a wooden floor on joists, you should decide what kind of wood to choose, how exactly to install floor joists in a particular room, their size, amount of material, etc.
 Scheme of installing a wooden floor on the ground on logs (with heaving soil)
The main purpose of the log is to obtain flat surface for subsequent finishing works in the house. In addition, they help maintain full-fledged ventilation mode the bottom of the floor, thereby preventing the wood from rotting. This is especially important if the floor is laid on soil that causes dampness. The space between the subfloor and the flooring prevents dampness and improves sound insulation. In addition, there are other functions:
- In this space you can place communications that spoil the view if they remain on the floor;
- The logs ensure uniform load on the foundation;
- An opportunity arises, of which there are many types. Expanded clay, sawdust, mineral wool, etc. can serve as insulation;
- It is possible to adjust the floor height;
- The timber allows you to get a durable floor due to the support points;
- Installation on joists guarantees quick and simple installation, which even a beginner can do.
The logs represent wooden beam, which is laid on any foundation or directly on the ground. Most often you have to use timber with an aspect ratio of 1:1.5 and 1:2, but there are other section sizes. It all depends on the characteristics of the overlap and load.
 Pine timber and the applied section for the floor joists
 Better buy already finished timber, but making it yourself is also not excluded, the main thing is to choose the right wood. Its ideal humidity levels are 18-20%. At higher values, the finished floor will deform after drying.
The most popular material is pine. You can also use spruce and fir. No to the quality of the wood itself special requirements, the timber can be made from material of the second or third grade.
Possible options for making logs from simple boards, which are connected with self-tapping screws and installed on the edge. If very long beams are needed, they are spliced together by creating a locking connection or joint to joint. And at the joints a support is installed, for example, pillars made of bricks.

Choosing material for logs
When choosing a material for the base, you should remember that it must be strong, smooth and have a low deformation rate under load. It can be plastic, metal, reinforced concrete, etc. But the most popular material remains wooden beams.
Since there is no need for high-quality wood for timber, the choice usually falls on spruce and pine, which are very popular due to their low price. But when installing such a tree in a house, it is better to consider a waterproofing system.
Larch and aspen are more expensive, but are irreplaceable if we're talking about O high humidity. Larch is considered the best option, if you need strength and resistance to rotting of the floor in the house.
 Joists on brick pillars and a full floor pie on the ground
 If the timber is installed on a reinforced concrete base, then a layer of foamed polyethylene is first laid. And if the logs are installed on brick support posts, then polyethylene is placed between the beam and the post, as well as between the post and the ground. Roofing material is suitable for laying between wood and brick.
Before installation, logs must be treated with an antiseptic to protect themselves from various pests. This is especially true for wooden houses, where wood-boring beetles can be found.
Determination of cross-section and dimensions
How reliable the design will be depends not only on what material is used, but also on correct calculations. Before purchasing a beam, you need to determine its length and thickness. The length must match the length and width of the house in which the floor is installed. But it’s better to leave a gap and choose a beam 20-30 mm smaller. This is done in order to prevent deformation in case of changes in temperature and humidity.

Determining the cross-sectional dimensions of a beam is much more complicated. The thickness depends on the material of the log and on the design characteristics of the future floor. The basis is the maximum possible load on the floor and the size of the spans between the support points of the joists. IN residential buildings It is customary to take the maximum load as 300 kg per square meter. m.
There is a table that displays the relationship between the thickness of the beam and the length of the span between its supports. Typically, for a length of 2 m, a beam with a cross-section of 110x60 mm is used, for a length of 3 m - 150x80 mm, and for a four-meter span, a beam with a cross-section of 180x100 mm is used. You can follow a pattern: the larger the span, the thicker the timber.
 The dimensions of the log section depending on the span of the room
 The shape of the section itself is usually rectangular. The beam is installed on the edge so that the logs can withstand high pressure. This achieves maximum rigidity of the timber.
But you shouldn’t get hung up on the ratio table, since the thickness of the lags can be greater if necessary. For example, if you plan to lay a thick layer of insulation.
It should be taken into account that for non-residential premises the load level is more than 300 kg per square meter. m. And you will have to first calculate it and only then select suitable lags, based on the data obtained.
If the beams are not made of wood, but of metal or reinforced concrete, a smaller thickness is allowed. This is due to the fact that such materials are more resistant to loads and bend less.
The distance between the lags is selected depending on the thickness of the coating that will be used for the flooring. After all, the thicker the flooring, the larger the pitch between the joists, since a thick covering is less susceptible to deflection when exposed to loads. There is also a special table to establish such a ratio. With a board thickness of 20 mm, the step is 30 cm; 25 mm – 40 cm; 30 mm – 50 cm, etc. Or you can use the following formula: when the thickness of the timber increases by 5 mm, the step length increases by 100 mm.
 Distance between joists depending on the thickness of the floorboard
 When used or the calculations are slightly different. This is due to greater bending rigidity. Here, for timber 1.5-1.8 cm thick, you can allow a distance between the logs of up to 40 cm. And such materials are attached to the logs in several places. The logs are arranged in such a way that the flooring can be fixed at the edges and in the middle. In this case, the edge of the sheet is laid only up to half of the beam, and not across its entire width.
Laying lags
Wooden logs can be installed on any base, subject to the installation rules. For the sheathing you will need:
- Bars,
- Level,
- Screwdriver,
- Jigsaw,
- Fasteners.
When installing the floor on joists, it can be used as simple design, so and . IN adjustable design screws can align the joists. The beams do not need to be attached to the base of the floor, but there is a risk of destruction of the entire structure due to displacement of the joists.

In addition to these tools, you may need others. To install logs on concrete or soil, you need a manual hammer drill. First, supports are installed, for which holes up to 10 cm deep are made, filled with sand and filled with water. A film is placed on the sand, and a brick support is placed on the film, which is covered with roofing felt. You can install beams on these supports, fixing them to the walls using galvanized corners.
If the basis is wooden beams, it is important to determine the direction of the beam. If the timber is laid across the beams, it is better to fasten the logs with self-tapping screws, treat the beams with an antiseptic, and drill holes to avoid splitting. With parallel fastening of the timber relative to the beams, the logs are installed both on top and on the sides.

For concrete floors, foamed polyethylene with a foil layer is used, which creates waterproofing and reduces heat loss. The timber is distributed over the entire surface with a certain step. Next, the base is leveled and the logs are fixed. You can also install the timber using stands. First, stands are fixed to the ceiling, and then the logs are attached to them using self-tapping screws.
The floor in the house plays a huge role. And in order for it to be smooth and beautiful, you should take preparation seriously before installation. When installing a floor on joists, it is important to correctly calculate their size, the amount of material, the distance between the beams and the parameters of the house itself. If you strictly follow the instructions for laying the floor along the joists, the surface will not sag or creak, but will only bring joy and comfort to the residents of the house. Indeed, despite the ease of installation, the process of installing such a floor is very responsible. And it is better to constantly monitor all actions to avoid mistakes. If you have anything to add or want to leave your opinion on the article, write in the comments!