How to properly plaster a gas silicate house on the outside. What are the differences between plaster compositions for aerated concrete? Dependence of internal plastering technology on external finishing
Read also
Aerated concrete as a material appeared about a hundred years ago. However, on our construction market Aerated concrete was introduced into mass availability much later.
This is a lighter and easier to process material from which you can assemble load-bearing structures and build low-rise buildings.
However, aerated concrete has several features that should be taken into account during its processing. In particular, this applies to the choice of material that will be used for plastering aerated concrete walls. Below we will take a closer look at how to plaster aerated concrete and all the nuances of such work.
Features and purpose
First, let’s figure out what aerated concrete actually is. The structure of aerated concrete is very similar to standard concrete. It is poured in the same way using binder, filler and water.
However, the filling technology is slightly different due to the fact that aluminum powder or powder is also added to the mixture. When reacting with water, aluminum begins to release excess amounts carbon dioxide, which fills the entire cavity of the mold and makes the solution bubbly.
As a result, the concrete hardens, having many small cells ranging in size from 1 to 3 mm inside. When the technology for creating aerated concrete for the home was invented, everyone thought that it would defeat conventional concrete in all respects and become more popular for work, taking over the entire building materials market.
However, such thoughts were premature. Of course, if you compare what type of material better in terms of ease or ease of processing, then cellular concrete will win. It is better finished and processed, as it has a specific structure. It is also worth understanding that properly created aerated concrete will better withstand temperature drops.
It is also well characterized by its vapor-permeable structure. That is, concrete essentially forms breathable walls. Unlike ordinary cement mortar, which is no different in these parameters.
But aerated concrete also has its disadvantages. In particular, an indicator of strength. If we compare solely on this indicator, then standard concrete will win here.

Construction technology makes it possible to construct buildings of any height from it, while in most cases it is possible to construct buildings up to 10 meters high from aerated concrete. Of course he's 4 or 5 storey houses It will probably survive, but it’s better not to take the risk.
Aerated concrete also absorbs moisture more strongly. Moreover, when you hold it, negative processes begin inside the block. This affects what mixture composition the plaster for aerated concrete should have.
The surface of the aerated block from which the houses are assembled also has an influence. The fact is that initially it has rather weak adhesion to individual solutions. Thin-layer gypsum plaster on walls made of aerated concrete, if you do not select mixtures special purpose, may completely collapse in a matter of months. Well, or get really cracked, which is also unacceptable.
It follows from this that mixtures for performing plastering work on aerated concrete must be special and meet several requirements at once.
1.1 Requirements for plaster
So, the plaster for aerated concrete should be slightly different from the standard one. Moreover, we immediately note that to use ordinary plaster when performing work on finishing a house made of aerated concrete, it is completely prohibited.
This is explained by the fact that standard sand solutions are too dense. They do not fit well on such surfaces and quickly crack. An even more unacceptable property is their weak vapor permeability or its absence. This leads to quite negative consequences.
If you plaster standard concrete or brick houses, then no problems arise. But at home from gas block Ytong - that's a completely different conversation.
Here, plaster with a vapor-permeable base will definitely win the popularity race. Otherwise, the steam that escapes from the house will be blocked by a layer of finishing on the outside, and will get stuck inside the walls. The dew point in the house will move towards their center, which will lead to moisture accumulation.
Nothing bad will happen in one year. It won't happen in a couple of years. But 5 years of such operation can already lead to the beginning of the destruction process load-bearing structures Houses.

Now let’s note the specific requirements that plaster on aerated block must satisfy. She must be:
- Vapor permeable.
- Moderately dense.
- Protect the wall from external influences.
- Moisture resistant.
- Improve the thermal insulation of walls.
- It fits well on aerated concrete.
- Be easy to process.
As you can see, there is nothing extraordinary in such a list, but it is better not to ignore any of these indicators.
2 Types and differences
Now let's turn to the main types of plasters for aerated concrete blocks. If you are going to make the right choice, then you will have to figure out which mixtures are best suited for which jobs. Fortunately, in most cases there are no serious differences.
According to the type of application, there are plaster:
- external;
- internal.
External plaster, as you yourself understand, is intended for finishing facades. Outside the house she must perform protective functions, therefore, the mixture is characterized by higher strength, water resistance and improved thermal insulation. The cost of compositions for finishing aerated concrete blocks on the outside will also be higher.
Internal samples are intended for indoor work. They no longer need water-repellent properties, unless we are talking about mixtures that are intended for finishing the bathroom.

This naturally reduces their cost. However, if you compare plasters according to the main parameters, then, of course, the first option will win.
2.1 Popular plaster compositions
According to the type of composition they are divided into:
- lime-cement;
- acrylic;
- silicate;
- silicone.
In the first option, the main element is lime. She replaces sand mortar, making the final composition of the mixture quite durable, but at the same time with the possibility of vapor permeability.
Acrylic plaster will win if you need to choose a composition for decorative finishing. It is the most durable and reliable, capable of forming an extremely tenacious finished surface.
The problem with acrylic is its low vapor permeability. Outside the house, such mixtures can only be used after thorough work on insulating the walls from the inside of the building. Inside, plaster is not so dangerous, but it will prevent the passage of vapors through the walls, and therefore the self-regulation of the microclimate in the room.
Silicate compounds are much better than the first two. If you use them correctly, you will not have any problems in your work. They are vapor permeable, have high density and are easy to process. The problem with silicates is quite small choice of color prices and dust settling on the plaster layer, what not in the best possible way affects its appearance.
As for silicone samples, they are the undisputed leaders when it comes to the specific qualities of plaster mixtures. They have all the advantages of silicate compounds, but at the same time they are very durable and look great. The only negative, as you probably guessed, is the high price.
The choice of plaster must be approached with great responsibility. It is the choice that influences the final results you get. Remember that there is always a trade-off between cost and performance. But at the same time, it is better not to go too far and buy the cheapest option.

If you are going to finish the walls inside the house, then in extreme cases ordinary lime-cement compositions will do. Of course, in terms of their characteristics they will be inferior to all others, but the interior decoration does not require plaster mixture something extraordinary. And you will be able to save a decent amount.
Acrylic plasters are best used only for decorative finishing inside or outside the house. Moreover, if you are going to use it outside, then you already need to take care of high-quality vapor barrier inside the house, as well as arranging properly functioning ventilation.
Silicate compounds are perfect for any type of work, but after plastering, they must be finished with another layer of putty in order to level out the problem with colors and dust release.
With silicone substances everything is even simpler. It is difficult to name a method of their use that would be considered unacceptable. In any situation, such mixtures will perfectly fulfill their purpose. The only barrier is the price. It's up to you to decide.
As for specific manufacturers, the most popular on this moment are the companies Profit, Ceresit Atlas, etc. Their products are especially well known on the market:
- Ceresit CT 24;
- ATLAS KB-TYNK;
- Profit Contact MN;
- Sh-36 Decor.
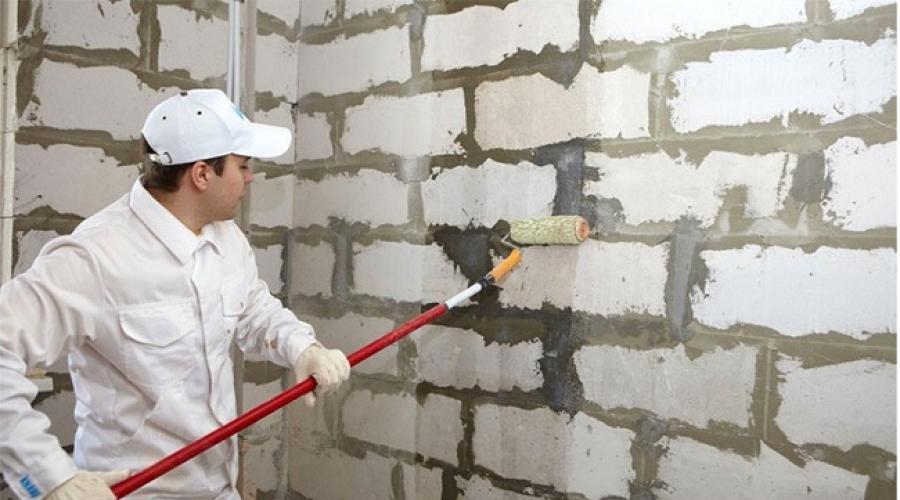
2.3 Technology for finishing walls made of aerated block
As an acceptable and simplest technology for plastering walls, we choose to work using beacons.
Our grandfathers also used lighthouses, although they adapted them for these purposes wooden planks, not small ones aluminum profiles. However, this technology has proven itself with the best side, and for a reason.

Before starting work, it is necessary to prime the aerated block walls. For this purpose, special primers are used, which can themselves slightly reduce the water absorption of the material and improve it thermal insulation properties and adhesion.
Then you can apply beacons. Beacons are mounted on small bubbles of solution. They are laid in increments of 1-1.5 meters. Each lighthouse is set to its own level, and the next lighthouse.
But it differs from them in the composition of the air bubbles inside.
Aerated concrete blocks are made from cement with a mass fraction of at least 50%.
Aerated concrete walls require external and internal finishing due to porosity and high level moisture absorption.
Features of aerated concrete
This construction material has a cellular structure, which gives it special properties:
- good thermal insulation - the characteristics of aerated concrete are comparable to wood;
- low mechanical stability, which leads to the appearance of cracks and chips over time;
- porous material is blown air currents, which is why houses made from it without finishing are considered quite cold;
- unaesthetic appearance;
- high absorbency leads to corrosion of the material in winter, during frosts.
The special structure of aerated concrete blocks requires careful processing with finishing materials to improve its quality characteristics. External plastering is carried out using special solutions that are selected for certain exposure conditions environment. Proper plaster walls made of aerated concrete provides reliable protection of the base and its durability, and also allows you to give a more aesthetic appearance to the room.
How and with what to plaster aerated concrete indoors?
Regardless of the choice of type of plaster, finishing work must begin indoors. Changing the order and plastering the facade of the building will lead to excess humidity in the room. The fact is that when steam leaves the room, especially in winter, condensation accumulates between the blocks and finishing, creating places with excess moisture. This is the main cause of cracks on the surface and crumbling of the plaster. To avoid such troubles, you should first start plastering the walls made of aerated concrete blocks indoors. Experienced craftsmen There are two types of technology for plastering aerated concrete walls in a house:
- ensuring complete vapor barrier;
- maintaining and increasing the vapor permeability of the material.
The main element of plastering aerated concrete using the first technology is polyethylene film. It is fixed between layers of mortar, and the vapor permeability of the walls is reduced several times. Also used for vapor barrier oil paints, which are applied as finishing, and priming the base with special compounds.
Dependence of internal plastering technology on external finishing
For precise definition When approaching interior work, you need to decide on exterior plastering. Plastering aerated concrete walls outside the room affects the method and sequence of actions for finishing the room:
- When the outer wall already has some kind of coating or is insulated with dense and vapor-proof materials, moisture will accumulate in the walls. In this situation, interior finishing is carried out using materials with low vapor permeability. You also need to take care of reliable system ventilation so that moisture does not accumulate in the corners of the room and on the windows.
- When a facade made of aerated concrete is not covered with anything, or is treated with porous insulation, such as mineral wool, then its vapor permeability is not impaired. In this case, it is necessary to first carry out work on the interior decoration of the room, and then move on to the exterior.
Preparing the base

The technology for plastering walls made of aerated concrete is practically no different from working with any other surface. First of all, you need to make sure that the walls are smooth, and if they are not, sand them with a plane or aerated concrete float. Many craftsmen skip this stage, but as a result, the costs of plaster, which is also used to smooth out defects, increase. Before applying the primer, aerated concrete walls are wetted with water. For drier rooms it is recommended to choose universal composition, and for the kitchen and bathroom - deep penetration soil. \
Construction beacons are mounted on the dried surface, which will serve as a guide for successful plastering of the room. After installing the beacons interior plaster walls made of aerated concrete will lie flat, and work will move faster.
The technology for finishing the façade of a building differs slightly from standards. First, the walls are cleaned of dust and leveled. The cracks and cracks are filled special glue for aerated concrete. After drying, it is necessary to apply a layer of primer for cellular materials. An important step preparatory work for plastering the facades of buildings made of aerated concrete is to reinforce the surface using a mesh. When choosing the type of reinforcing mesh, you must pay attention to the fact that under the influence of an alkaline environment, the material from which it is made can dissolve. Experts recommend choosing fiberglass types.
Plastering aerated concrete (video)
How to plaster aerated concrete surfaces
To repair aerated concrete house served long years It is necessary to competently approach the choice of material for finishing the walls inside and outside. Masters distinguish four options for processing walls made of cellular material:
- Gypsum plaster.
- Cement-sand mortar.
- Facade mixtures.
- Drywall.
The last option is the so-called dry plaster. What better than drywall or plaster on walls made of aerated concrete is a controversial issue. Plastering the surface is a costly and labor-intensive process. Working with plasterboard takes less time and, as a result, you get smooth walls. Procedure:
- vapor barrier of surfaces using polyethylene film, membrane or glassine;
- installation of lathing for fastening gypsum boards;
- fastening drywall to the frame;
- filling joints between sheets using serpyanka tape.
Any type of decorative finish can be applied to an aerated concrete wall leveled in this way. What plaster is best for plastering aerated concrete walls? To answer this question, it is necessary to know the specifics of solutions and their interaction with the base material.
Disadvantages of different types of plasters
| Name | Flaws |
|---|---|
|
Cement |
Low level of adhesion in relation to aerated block |
| High moisture content | |
| The vapor permeability index is lower than that of an aerated block, so cement mortar can only be used when used for interior decoration vapor-proof materials (polyethylene film, etc.) | |
|
Plaster |
Collects moisture during snow and rain |
| The appearance of stains on the plaster | |
| Low vapor permeability | |
| Facade | The only drawback of this type of plasters is their high cost. |
Gypsum plaster
The main advantages of gypsum mortar for treating aerated concrete walls include:
- quick drying;
- high level of adhesion;
- there is no need to apply an additional smooth layer;
- Possibility of leveling the plaster for finishing.
Knauf Rotband, Bonolit and Pobedit Velvet are popular among craftsmen.
Cement-sand plaster

If this option was nevertheless chosen for finishing aerated concrete walls, then there are several ways to improve the composition for better interaction with the base. You can increase adhesion by adding more cement mortar to the standard mixture recipe (for 100 kg of concrete you will need 8-10 kg of lime). The second option, which is acceptable, but still not recommended by masters, is to add cement-sand plaster mixtures for processing aerated concrete (proportion 1:1). Among the leaders in sales of mixtures of this type are solutions of the Baumit brand and domestic Craps Extra-light.
Facade solutions
This type of mixture, in the case of aerated concrete, is suitable for both interior and exterior use. Basic positive points when working with special plasters for aerated concrete:
- high adhesion rate;
- resistance to deformation and cracking;
- vapor permeability is equal to that of aerated concrete;
- nice view;
- does not require additional finishing work.
Do-it-yourself plastering of walls on aerated concrete is demonstrated in the video below. With a competent approach to work and studying materials, even a novice master can cope with plastering a house made of aerated concrete blocks.
Gas silicate-based blocks are widely used as a building material for the construction of buildings. They provide increased thermal insulation of buildings, but due to their porous structure they absorb moisture. Form protective covering walls allow plaster mixture. First, rough plaster for gas silicate blocks is laid on the prepared surface. Then apply thin layer solution and grouting is performed. Covering the wall with aerated concrete, plastered with dry mixtures, helps prevent cracking of the material due to waterlogging.
Properties of gas silicate material and its protection using a plaster layer
Silicate blocks are a modern building material characterized by a cellular structure. They are made from a mixture quartz sand and cement, to which aluminum powder and lime are added. When mixing the ingredients, it occurs chemical reaction, as a result of which gas silicate solution increases its volume and then hardens in special forms.
Gas silicate based blocks are used as building materials for the construction of buildings.As a result of the gas formation reaction, the blocks acquire a porous structure, which determines the main performance characteristics material:
- reduced thermal conductivity. Gas silicate walls reduce thermal energy losses and reduce heating costs;
- ability to absorb noise. Cells unevenly distributed inside the blocks prevent extraneous noise from entering the room;
- increased vapor permeability. Air exchange occurs through the pores, improving the microclimate of the living space.
In addition, the blocks have energy-saving properties. They gradually accumulate thermal energy, which is then transferred to the room and increases its temperature.
- reduced weight;
- increased strength characteristics;
- increased volume;
- correct geometry;
- minimum tolerances on dimensions;
- good machinability;
- environmental cleanliness;
- frost resistance;
- fire safety.
 In the field of low-rise construction, silicate blocks have proven themselves positively
 The need to plaster the surface of porous blocks is associated with the following properties material:
- increased hygroscopicity. Porous gas silicate is prone to absorbing moisture, which causes gradual destruction of the material when negative temperature, and also promote the development of microorganisms. To prevent cracking of the blocks, they are plastered;
- reduced adhesion of the cellular surface of the blocks to finishing materials. Plaster mixtures based on sand and cement, as well as lime-based plasters, do not adhere well to porous gas silicate. Carrying out finishing measures allows you to increase adhesion;
- moisture condensation inside the gas silicate mass. As a result of intensive air exchange occurring under conditions of temperature changes, moisture accumulates inside the blocks. It makes it difficult for air vapor to escape from the room and negatively affects the microclimate.
To ensure adhesion of the gas silicate surface, the following work is carried out:
- cover the gas silicate with a special solution. The soil penetrating deep into the cellular gas silicate improves adhesive properties;
- reinforce the gas silicate surface with metal, nylon or fiberglass mesh. It allows you to apply an increased layer of plaster;
- Several layers of plaster are applied successively. Layer finishing allows you to create smooth surface with increased adhesive properties.
 The cellular structure determines the need to protect the surface of gas silicate blocks
 The need to protect the surface of gas silicate blocks and other products made of porous concrete is due to their cellular structure. Finishing gas silicate walls- a mandatory event.
Purpose of plastering:
- prevention of destruction of gas silicate walls as a result of temperature fluctuations;
- protection of gas silicate blocks from intense moisture absorption and development of microorganisms;
- improvement appearance various buildings whose walls are built from gas silicate blocks;
- reducing the volume of heat loss through the unprotected surface of gas silicate walls;
- security comfortable conditions indoors by providing increased sound insulation;
- leveling the surface of the walls after laying the blocks, allowing you to create a flat base for finishing;
- protection of block walls from the formation of cracks, allowing to increase the service life of the building.
Aerated concrete is susceptible to the influence of natural factors - the effects of precipitation, ultraviolet rays and weathering. In addition, porous gas silicate is destroyed as a result of mechanical damage. Plastering walls made of gas silicate blocks provides reliable protection throughout the period of operation.
 Reliable protection provides plastering of walls made of gas silicate blocks
 We prepare the necessary tools and building materials
Preliminary preparation of building materials and the necessary tools will speed up the finishing work and increase their productivity.
To plaster gas silicate walls you should prepare:
- a rule designed to stretch the plaster mixture along the beacons. The length of the rule is selected depending on the distance between the beacons;
- metal guides, called beacons, to ensure flatness. The beacons serve as a guide when working with the rule;
- drill with attachment or mixer. They are used to ensure accelerated and uniform mixing of the plaster mortar;
- trowel and spatulas with extended work surface. The tool is used for throwing and leveling the plaster mixture;
- plumb line, building level, roulette. They are used in the marking process and are used for control during plastering activities.
You will also need a wide brush or roller to apply the primer composition to the surface of the blocks. To perform the kneading, you need an appropriate container, and to fix the mesh you will need nails or dowels.
 Tool for plastering walls
 In addition to tools, you must purchase the following materials:
- adhesive mixture for priming. It provides increased adhesion of plaster to gas silicate blocks;
- mesh for surface reinforcement. Mesh reinforcement makes it difficult for cracks to form and strengthens the finishing layer;
- dry mix for plastering work. It is easy to purchase a ready-made composition for plaster in specialized stores.
Having prepared everything you need, proceed to work.
Plaster mixture for gas silicate blocks - choosing high-quality plaster
Novice finishers and home craftsmen often ask the question of what to plaster with. gas silicate blocks, as well as what requirements apply to the plaster mixture.
It is easy to purchase plaster compounds in construction supermarkets. famous manufacturers:
- Knauf companies;
- brand Ceresit;
- EuroMix company;
- brand PROFIT.
 Plaster compositions from well-known manufacturers can be easily purchased in construction supermarkets
 Along with imported plaster mixtures and primers, finishing mixtures produced by domestic manufacturers are also offered. The expanded range of plaster compositions makes it difficult to accept the right decision novice masters. You can consult with construction department salespeople on how to plaster gas silicate blocks inside. Professionals will offer best option plasters and will also advise how to plaster gas silicate blocks on the outside of the building.
By purchasing ready-made plaster To perform external and internal finishing work, a number of factors should be taken into account:
- area of use of plaster;
- adhesion properties of the mixture;
- resistance to negative temperatures;
- vapor permeability of plaster after hardening;
- moisture-proofing characteristics;
- environmental cleanliness finishing material;
- shelf life of the composition;
- manufacturer's image;
- duration of setting.
If you have the necessary ingredients, it’s easy to make your own plaster mortar. To do this, you should take equal ratios cement and lime, mix with three parts of sand and dilute the resulting mixture with water to the desired consistency. Adding chalk will increase the plasticity of the plaster composition and make it easier to apply.
 It’s easy to prepare your own plaster solution if you have the necessary components
 Internal plastering of walls made of gas silicate blocks - stages of work
According to technology, execution interior work for plastering gas silicate walls includes the following steps:
- Cleaning walls from dirt.
- Impregnation gas silicate material special soil.
- Installation of the mesh to the gas silicate surface.
- Layer-by-layer application of plaster mortar.
- Final finishing activities.
Let us dwell on the features of each stage of work.
We prepare the wall surface for treatment with a special primer
Preparing the surface of gas silicate is a critical step that ensures adhesion and affects the quality of plastering work.
 The critical stage is preparing the gas silicate surface
 Preparatory activities include:
- Dust removal of gas silicate.
- Removing old coating and dirt.
- Degreasing problem areas.
- Elimination of oily traces.
- Increasing the depth of gas silicate masonry joints.
It is not always possible to remove oil and grease stains that have penetrated into the gas block mass with a metal brush. In this case, they are cut out with a chisel.
Applying primer to aerated concrete of internal walls and partitions
Treatment of gas silicate with a primer solves the following problems:
- increases the adhesion of blocks with the finishing mixture;
- reliably seals internal cavities;
- gives the gas silicate surface additional roughness.
 Primer should be applied in an even layer
 Priming of blocks is carried out using various methods:
- manually, using paint brush or wide roller;
- using a spray bottle to cover a larger area.
The primer should be applied in an even layer, paying special attention to hard-to-reach places in the area of corners and openings. Plastering on gas silicate blocks is carried out after the soil has completely dried.
We attach the reinforcing mesh to the gas silicate blocks
Strengthening blocks plaster mesh provides improved adhesion of plaster. The mesh is attached in various ways:
- by fastening metal mesh to the gas silicate surface with dowels or nails;
- by pressing a fiberglass or nylon mesh into a pre-thrown layer of finishing composition.
Mesh reinforcement in combination with priming will achieve increased adhesion. After installing the mesh, you should secure the beacons, and also moisten the gas silicate surface with a spray bottle or brush. better penetration finishing composition.
 Reinforcement with mesh in combination with priming will allow you to achieve increased adhesion
 Plaster for aerated silicate blocks - the process of finishing aerated concrete material
Let's figure out how to properly plaster walls made of gas silicate blocks. Perform plastering in the following order:
- Using a trowel, spread a layer of plaster mixture onto the gas silicate masonry.
- Distribute by rule finishing composition along the guides.
- Remove hardened lumps of plaster after it has hardened.
There is no need to try to ensure perfect flatness. You just need to distribute the mixture over the wall area.
Applying the finishing layer after finishing rough work
At the final stage of finishing activities, the following work is performed:
- Rough plaster is covered with primer.
- Implemented finishing plaster gas silicate.
- Irregularities are removed and finishing putty is applied.
At the final stage, the internal plaster of walls made of gas silicate blocks acquires the necessary flatness during the process of grinding and grouting.
 Applying the finishing layer
 Plastering external walls with plaster compounds
For facade finishing structure is used, to which ingredients are added to increase water resistance.
This type of plaster of gas silicate blocks cement mortar is performed according to the following algorithm:
- The facade of the building is cleaned of dirt.
- The primer is applied to the surface of the gas silicate.
- The metal mesh is being installed.
- Facade plaster for gas silicate blocks is applied.
An improved aesthetic perception of the finish is achieved by coating the surface with paint.
 Plastering walls with cement-sand mortar is used for façade finishing of buildings
 External and internal plaster of gas silicate walls - useful tips
At independent execution plastering work should be guided by the advice and recommendations of professional finishers.
They focus on the following nuances:
- performing work at temperatures of 5-30 degrees Celsius. At this ambient temperature, normal drying of the plaster is ensured;
- the need for layer-by-layer application finishing mixture. In this case, the finishing layer of plaster is applied only after the main layer has dried;
- feasibility of surface wetting. At elevated temperature spraying liquid prevents the formation of cracks;
- ratio of thicknesses of external and internal finishing equal to 2:1. This allows you to shift the dew point and prevent moisture condensation inside the blocks.
Please also note that optimal thickness the internal finishing layer is 8-14 mm. Professionals pay attention to the fact that gas silicate finishing can be done a month after the completion of wall laying.
Conclusion
Do-it-yourself plastering of walls made of gas silicate blocks allows you to save significantly. High-quality plaster will reliably protect gas silicate blocks. Getting started finishing works for the first time, carefully study the technology requirements and take the choice of finishing material seriously. Adviсe experienced builders will help you avoid mistakes.
Gas silicate blocks are an excellent building material. Their designs are warm and reliable. But after construction, the question arises: how is plastering of gas silicate building blocks done from the inside? Eat special technology performance of work, which we will consider. This will help quickly and efficiently prepare walls made of gas silicate blocks for finishing from the inside.
Requirements for plaster
The range of products for the job is quite large, but not all of them are suitable for gas silicate plastering. The surface of the material is porous, which causes difficulties. Let's consider the requirements for the plaster mixture:
- vapor permeability, thanks to which a wall made of gas silicate blocks will breathe;
- if work is carried out outside, then the plaster chosen is moisture-resistant and frost-resistant in order to withstand atmospheric influences;
- high quality of adhesion (adhesion to the surface);
- good strength;
- elasticity, so that it can be easily applied, and the plaster does not crack during use;
- resistance to elevated temperatures to ensure fire safety.
All this is important to consider before plastering gas silicate blocks. Most of the modern mixtures meet almost all criteria. If we talk about finishing gas silicate blocks from the inside, then this is much simpler, since the composition does not have such an aggressive effect.
Which mixture to choose
The question arises, how to plaster gas silicate blocks inside? Some people prefer to use cement-sand mixtures for plaster. But it's not right. There are two good reasons for this:
- The quality of adhesion to the wall is low. Aerated concrete, due to its porous structure, will quickly absorb all the water from the mixture. As a result, the plaster will become covered with cracks when it dries. Even a primer does not always help get rid of this phenomenon.
- This plaster will significantly reduce the vapor permeability of a wall made of aerated concrete blocks. The microclimate will be disrupted, and condensation will form on the walls. For walls made of brick or foam concrete, this is not so important. And a house made of gas silicate must breathe.

Instead of cement-sand mixture, a specially developed plaster for gas silicate blocks is recommended. She has it all necessary properties that are needed for work. For specifics, we will provide a list of popular compositions: Ceresit ST 24, Atlas Silikat, Glims TS40 Velur, Mask +MSh, Sibit. Average consumption plaster – up to 9 kg/m2.
Note! It’s better to do the plastering yourself, as the price of a professional’s work can be steep. Plastering 1 m2 of wall will cost 300 rubles, priming and putty – another 300 rubles/m2, reinforcing the wall with mesh – 100 rubles/m2, finishing painting – from 120 rubles/m2.
The nuances of working with gas silicate blocks
You cannot compare ordinary brick or concrete with gas silicate. The material has special properties. Plastering walls made of gas silicate blocks has its own difficulties:

Considering all this, you can begin the process of plastering the walls. But first let's take care of necessary tools and materials.
Arsenal for plaster
Let's begin with plastering work will be carried out using beacons. This will make the surface perfectly flat and will simplify the task for beginners. Below is a list of tools that will be required for the job:
- Rule for stretching and leveling plaster between beacons.
- The lighthouses themselves are made of wood or metal. These are slats or profiles that serve as a guide.
- Tape measure, plumb line, marker, level, dowels and screws.
- The primer for gas silicate blocks under plaster is done using a roller and a paint brush.
- Throwing the plaster is done with a ladle or trowel.
- To prepare the mixture, use a bucket and construction mixer.
- Grater and grater.

As for materials, everything is simple: primer, selected plaster, fiberglass mesh, topcoat.
Preparatory stage
It all starts with preparation. It is very important, since the final result directly depends on it. The instructions are:
- To begin with, the surface is cleaned of all unnecessary things: dust, dirt, stains, old coating.
- After which a primer is applied. It's easier to do it with a roller, but hard to reach places handle with a brush.
- Alternatively, you can make notches on the wall instead of primer. They are made by a grinder.
- In the end, all that remains is to install the beacons. This is one of the difficult stages, without which gas silicate plaster will be problematic.
Installation of beacons begins with markings on the wall. To begin with, you need to retreat 30 cm from the corner of the wall, 15 cm from the floor and ceiling and draw a straight line. Do the same on the other side. At the points where the lines end, drill a hole, drive in dowels and tighten the screws. Align the resulting fasteners so that they have the same depth. Mark the rest of the wall too, maintaining a distance of 130-150 cm from the lines.
Note! The distance from the beacons should not exceed the length of the working rule.
Then they are connected horizontally with a thread, forming a rectangle on the wall. Markers mark the places where the thread intersects with the line drawn inside. A hole is drilled there, a dowel is inserted and a self-tapping screw is screwed in. It remains to pull the diagonal threads to check the evenness. All elements must be in the same plane.

All that remains is to install the beacons along the drawn lines. Installation is carried out using mortar or fasteners. If the walls are relatively smooth, you can get by with fixing it to a mortar, which is applied in small portions along the line at intervals of up to 20 cm. The profile is sunk into the mortar and aligned using screwed-in screws. Now you can apply the plaster.
Plastering walls
The work begins with preparing the solution. Usually the instructions are indicated on the product packaging. You will need a construction mixer and a mixing container. The consistency of the plaster should resemble a paste. If there is no primer layer, the wall is slightly moistened. Step by step instructions plastering of gas silicate blocks:
- Using a trowel or ladle, the composition is applied to the wall in a thick layer. The work is done from below, moving upward. You should not fill the entire wall, but only one section of the two beacons.
- Then, using the rule, the gas silicate plaster is stretched and the surface is leveled. In this case, the movements should be zigzag, starting from the bottom, moving up.
- Excess composition is thrown on top. Work continues until the entire section is filled and perfectly level. Advice! The thickness of the layer depends on the location of the beacons. If the thickness exceeds 3 mm, then a reinforcing mesh is needed. It is sunk into the solution. The surface should be smooth and without wrinkles.
- According to this principle, the entire surface of the wall made of gas silicate blocks is processed. Special attention should be given to the corners. They must be smooth and well reinforced.
- When the wall is processed and has dried a little, the beacons can be removed from the walls. After them, the grooves will remain without solution. They are also filled with the mixture and leveled.
- The evenness of the resulting wall is checked using a level.
- When the surface has dried, you can begin sanding the walls. It is done with a grater and a grater.
At this stage, the wall plastering stage is completed. Further manipulations depend on the finishing decorative layer. If you plan to wallpaper, paint or decorative plaster, then the surface is treated with starting and finishing putty. After this, you can paint it or wallpaper it. That's all, the work on plastering the gas silicate blocks is completed.
Let's sum it up
By doing all the work yourself, you can save tens of thousands of rubles. The money saved can be spent on furniture, high-quality finishing materials or something else. If this is your first time doing this work, it is better to study the entire process in detail and only then start plastering gas silicate blocks. Doing everything yourself is quite possible. All that remains is to put all this into practice.
Repairs inside or outside the premises will not be complete without plastering the walls and other surfaces. At the work design stage you need to familiarize yourself with the features of plaster, which are divided into types, they differ in characteristics and price. The right type of finishing material is half the battle, because characteristics of mixtures may differ significantly from each other, and what will be for one type of room ideal option, for another may be completely unacceptable.
Some features of plaster

Plaster is a mixture that is used to treat surfaces as a rough finish. What are the functions of the material? Using plaster, you can level walls, repair cracks and other defects. Herself the structure of this solution is a coarse mixture, so after drying the surface will have rough surface . These effects can be easily eliminated in the future.

You can plaster walls of almost any type, concrete and wooden structures will be protected from harmful effects environmental factors. Used for plastering aerated concrete walls various techniques and materials. Trends in the field of construction are developing in such a way that building materials such as aerated concrete are becoming increasingly popular. It has many advantages compared to concrete and brick construction.
A building constructed from aerated concrete has increased energy-saving properties. This material is much lighter than traditional analogues, due to this fact it is possible to reduce the cost of arranging the foundation and the construction time is significantly reduced. What plaster is better to plaster walls made of aerated concrete blocks?
How to plaster aerated concrete walls?
One of the ways to finish walls made of aerated concrete is plastering. For plastering walls made of cement-sand blocks, this is the best option. As for the process of applying the finishing layer itself, if desired, you can apply it directly to the wall. The same can be done with brick walls. However, some difficulties may arise.


The brick has no big sizes, That's why the seams between the bricks serve as a connecting element when applying plaster. In the case of aerated concrete, the situation is somewhat different, because aerated concrete itself is large in size. This problem can be solved in several ways. Let's look at the main ones, which are often used in practice.

You can plaster walls both indoors and outdoors. Both types of finishes have some features. When choosing a plaster, it is best to choose the one with the maximum adhesion coefficient. This ensures the quality of adhesion of materials.
Preparatory work

Before applying a layer of plaster, aerated concrete walls are first prepared; this is necessary in order to ensure adhesion of the materials. How is this done and what does this surface finishing stage include?

First, you need pay attention to the seams between aerated concrete, they need to be sealed well, approximately 4 – 5 mm. The wall is leveled, and all defects that may exist, dust and other microelements that reduce the quality of adhesion of materials are cleaned out. Can be used to clean the surface sandpaper, which will help polish the blocks more thoroughly.
How to properly use mesh when plastering walls?

If you decide to use the third method of surface finishing, then you need to know what is used galvanized mesh. It is more durable, reliable and does not rust. As for the size of the grid cells, you should pay attention to the one whose cells are small. After the preparatory work, it will be necessary to attach the mesh directly to the wall. This must be done using ordinary nails. They are driven into the wall first by one third, after which the nail is bent and secures the mesh.
Particular attention should be paid to the edges of such a split, they usually stick out; before applying the plaster, all the edges should be folded, then they will not stick out from under the plaster.

When the mesh is fixed, it is necessary to begin applying the first layer of plaster. This is done in a way known as "spray", it is mainly used to fill the mesh cells with solution. This will be followed by several more layers of plaster. This will necessarily be a primer layer that needs to be kneaded by adding slag sand to the solution. The final layer will be the finishing layer; to prepare a solution for it, you must use fine sand.
All layers of plaster can be Apply when the previous layer has not completely dried. This will reduce time without compromising the strength and quality of the finishing layer.


The solution for plastering walls can be purchased ready-made; it is sold in a dry state. To prepare the mixture you just need to add water. But, you can also prepare the cement-sand mortar yourself. In this case do not skimp on the quality of the cement itself, since as a result the water-repellent ability of the plaster will suffer. When plastering walls, a lot of problems and requirements are solved, such as thermal insulation characteristics surfaces, waterproofing, sound insulation and so on.