How to lay tiles on the floor correctly: video tutorial and advice from experts. Technology for laying ceramic tiles on the floor Laying ceramic tiles on the floor
Ceramic tiles for many areas of the apartment are the most advantageous option. No matter how diverse spoiled today's construction stores-salons, tile covering flooring for, for example, a bathroom, kitchen, toilet remains the most popular due to their specific operational features and, at the same time, wide possibilities design decorations.
Before laying tiles on the floor, be sure to carefully read the characteristics of the material and the rules for its selection. Not all ceramic tiles are suitable for these purposes, especially if they are intended to be installed in rooms with increased level humidity.
So, Firstly, choose tiles for the floor. It is better to consider this using the example of a bathroom or kitchen - it is in these rooms that the floor experiences the most extreme impacts, both in the form of traffic intensity and the influence of humidity and chemical reagents.
- No matter how attractive the tile may seem, you can only buy one that has an icon in the form of a boot print on a dark background on its markings - this is exactly the type intended for floors.
- In both the bathroom and kitchen, the floor can be wet and slippery due to accidental spills of water, greasy substances or detergents. That's why - Special attention on the surface friction coefficient (an icon in the form of a foot on an inclined plane). It would be optimal to purchase rough tiles with a coefficient of at least 0.75.
- Waterproofness of the material – for floors in rooms with high humidity the limit value should be no more than 3%.
- As already noted, floors can be inadvertently exposed to quite active chemical compositions. In addition, cleaning of premises is also most often done using detergents with active ingredients. The tile must successfully withstand such exposure. The icon on the label is a chemical flask, and the letter indicator required for such conditions is AA.
- Frost resistance indicators (snowflake sign) and wear resistance (“ a circular saw") for indoor apartments are not so significant. Although, for a hallway, especially in a private house, or for a closed veranda, this can also be very important.
- The thickness of floor tiles is always greater than that of wall tiles. Typically it is 8 mm and above. This is also necessarily indicated on the packaging with a special pictogram.
- The linear dimensions of the tiles are important. It is optimal to have as few seams on the floor as possible. On the other hand, very large tiles are more difficult to install and a lot of material will end up in the grooves.
To avoid problems directly when laying tiles, you should remember a few more points:
- If complete uniformity of the floor covering is required, then you should not purchase tiles with an icon indicating possible deviations in the shades of the tiles in the box.
- Tiles should be purchased at once for the entire room and always in one batch. You may encounter even slight differences in shade between two different batches, absolutely invisible upon purchase, they will appear on the laid floor.
- The same applies to linear dimensions - calibration at production is carried out specifically by batch. Yes, deviations in dimensions can be very insignificant, but on the scale of the entire floor in a fairly large room they will definitely make themselves felt.
Well, one more important parameter choice - of course design decoration, in accordance with own design project, so that the floor is in harmony with all other interior details.
Basic principles laying tiles on a concrete base
The base for laying tiles on the floor must undergo appropriate preparation; more details about this are described in the sections of the site dedicated to floors and furnishings. We can only briefly note:
- The concrete base should not have significant defects in the form of cracks, potholes, peeling, or unstable areas.
- The required horizontalness must be observed (or a slight slope if, for example, the bathroom or bathhouse is equipped with a drainage drain).
- Before laying tiles, the floor surface must be dust-free and primed deep penetration compounds that improve waterproofing and increasing the adhesion of tile adhesive.
The process begins, naturally, with marking the surface.
- Tiles can be laid in various ways (more about this -). But even with the simplest classic version It is very important to initially set the correct direction and laying pattern so that errors do not increase from row to row.
Particular attention is paid to markings. It’s better to try laying out 1-2 rows “dry”
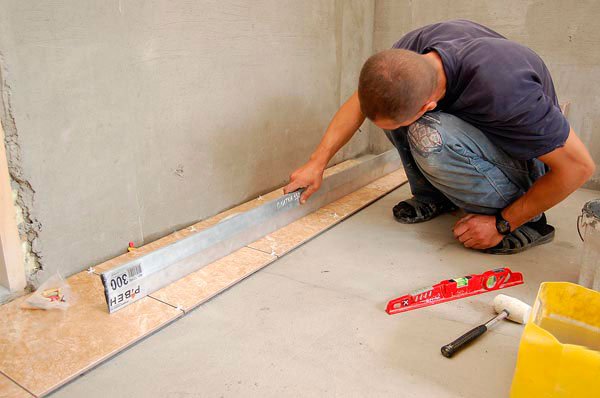
- Masters recommend that beginners, before starting to lay tiles with glue, try to lay out at least a couple of rows “dry” in order to clearly see the emerging picture. To facilitate laying the most important, starting row, you can attach a temporary guide made of a metal profile or wooden plank(glazing bead).
- Purely for aesthetic reasons, the installation should be planned so that a row of whole tiles is laid in a visible place along the wall, which emphasize the evenness of the lines. It is advisable to start from the entrance to the room with a whole tile - the cut fragments are “driven” into the far corners, under the future location of furniture or plumbing fixtures.
It hardly makes any sense to experiment with self-production tile adhesive - there are many varieties of it on sale for the most different options laying - open or particularly wet rooms, with or without floor heating, etc.
Beginners should immediately be warned against this common mistake. Having listened to some advice, some of them soak the tiles in water before laying them. This is completely unacceptable. Both modern tiles themselves and tile adhesive are adapted specifically for the installation of dry tiles, and disturbing the water balance will not provide any benefits, but can significantly reduce the performance of the coating.
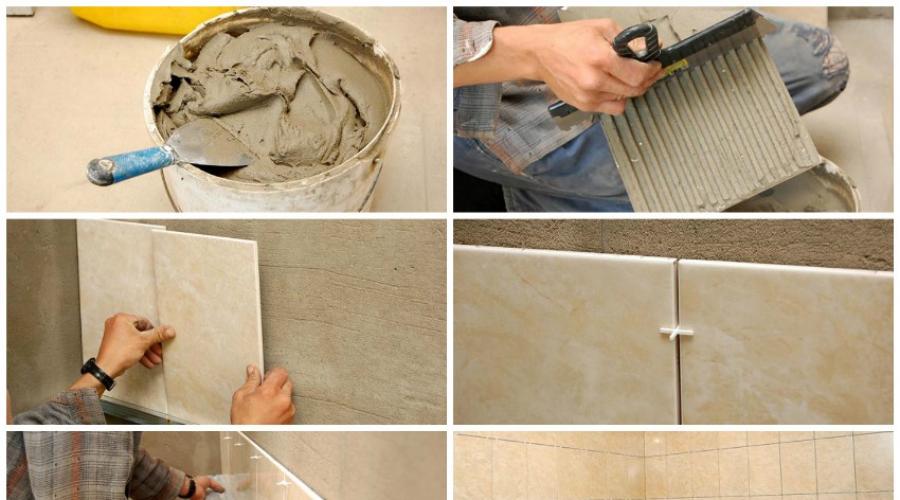
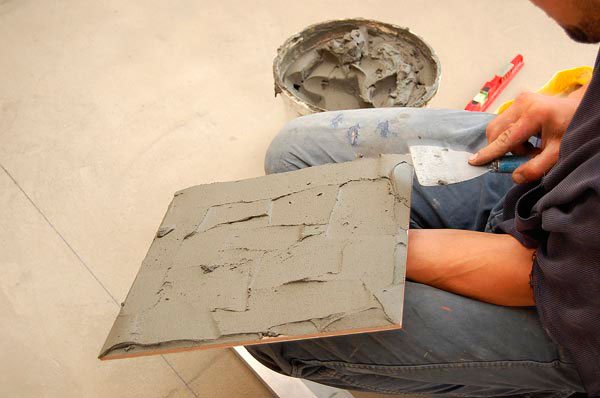
- When laying tiles on the floor, it is recommended to apply glue both to the surface of the base and to the tile itself. In both cases, the layer of glue is leveled with a notched trowel, and the direction of the stripes of the resulting ridges should be perpendicular - this way reliable adhesion will certainly be achieved without any air cavities under the surface of the tile.
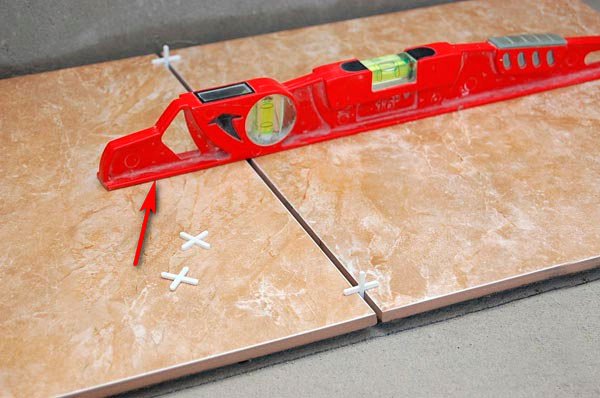
- A gap must be left between the laid tiles, the same width is maintained using special crosses of the required thickness.
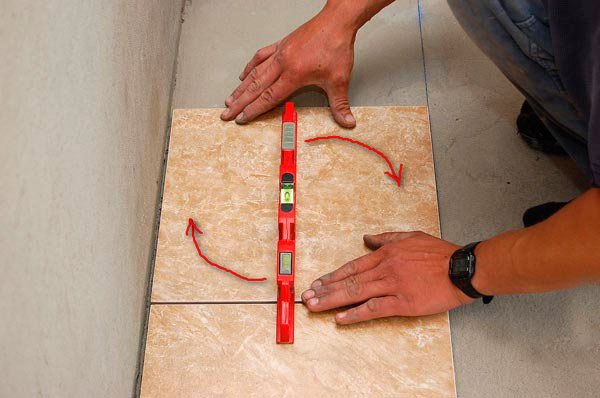
- The laying of each tile must be accompanied by careful monitoring of the evenness of the surface so that the required adjustments can be made immediately - add or subtract glue, place wedges, etc.
- The tiles are cut to the required size using a special tile cutter. You can also use a manual glass cutter, but not everyone can do this. Another option is a grinder - a grinder with a diamond or corundum disc. If holes are required, you will have to resort to using an electric drill with a special drill - a crown or an adjustable “ballerina”.
- When laying tiles, do not allow the seams to be completely filled with adhesive. They must be cleaned immediately, while simultaneously removing any remaining adhesive from the front surface of the tile. You should not leave such stains - they will be quite difficult to remove after the composition has completely hardened.
- After installation is complete and the spacer crosses are removed, the floor is given time to harden. The required period will be indicated in the instructions for use of the tile adhesive. But for approximately at least 2 days the floor should not experience mechanical stress.
- The final stage is grouting the joints between the tiles with a special compound - fugue. It is selected taking into account the characteristics of the room (moisture resistance, frost resistance, etc.) and the correspondence of the shade to the overall “picture” of the floor. Grouting is done with a rubber spatula, and the excess remaining on the surface is picked up with a rag.
Features of laying tiles on old tiles
Is it possible to avoid the procedure of dismantling old tiles if there is a need to update the tile covering? Why not - it's completely doable.
- If the previously laid tile covering is durable, then it itself will be a good reliable base with high level waterproofing.
- Sometimes this approach even seems to be the only possible one if there are any engineering or electrical communications, a heating system, etc. running under the layer of old tiles. - everything that can be damaged when dismantling the old coating.
However, factors that can make such installation impossible should also be taken into account:
- When old tile“plays”, falls out of its place, traces of decomposition of the old cement are visible - nothing can be done, you will have to start dismantling it. Laying tiles on an unstable base will simply ruin it.
- In a room, for example, a bathroom, the floor level should be slightly lower than in other rooms. So sometimes styling new tiles to the old one is impossible precisely for this reason. This situation should be assessed in advance.
- At home old building often do not have strictly horizontal floors. Quite often this occurs in “bathroom-bathroom” blocks. Once laid in them on cement mortar, the so-called metlakh tiles usually sits very firmly, but the floor surface can have quite large deviations from the horizontal. In any case, this will require leveling with a screed.
How it's done
The desire to avoid tedious dismantling procedures is not enough. It is imperative to carefully check and prepare the old tiled surface.
- All old masonry tiles need to be tapped. If the sound raises suspicions about the presence of a void, or the tile “plays” even a little, it should simply be removed. The resulting opening is sealed with repair concrete composition or tile adhesive, comparing with the general floor surface. It would probably be redundant to say that such repairs are possible if they are not of an extensive nature.
- Old tiles may be covered with a thin layer of grease that has accumulated during use. This means that the floor must be thoroughly degreased either using an organic solvent or by repeated washing. hot water with diluted caustic.
- When carrying out such cleaning, the tile seams must be cleaned of dirt. Particular attention should be paid to the condition of the old grout (fugue). If it crumbles, it should be removed as much as possible, the seams should be washed as indicated above, and after drying, sealed with diluted tile adhesive.
- Now - about covering the old tiles. Ideally, you would need to run a grinder with a diamond wheel to remove the glazed layer and get to clean ceramics. However, you can limit yourself to applying frequent notches or even drilling holes.
- After all “dirty” work has been completed, the entire floor surface is thoroughly cleaned of debris and dust using a vacuum cleaner.
- Surface required primed special compounds. So, for these purposes, “Betonkontakt” soil is widely used, and , Judging by According to some craftsmen, sometimes this is even enough to prepare the surface, without making notches. The compositions have similar qualities “
This primer will give even smooth tiles the required roughness.
- To improve the effect, some experts also recommend applying a 2-mm layer of tile adhesive, the one that will be used later in the installation process. Only after it hardens do they move on to further work.
- A few words about optimal choice glue just for such cases. Again, it is worth listening to the recommendations of experienced finishing professionals. They speak very highly of the “Ivsil Profit” composition, which was developed primarily for styling porcelain stoneware tiles, but even more so with ordinary tiles. No less reliable is considered " СerezitSM 17", perfect for the most difficult conditions operation and the most “problematic” floor surfaces. And the highest plasticity and ability to adhere to any base of Vetonit Renovation tile adhesive allow, according to the assurances of the craftsmen, to do without even roughening the old tile covering.
The installation process itself is not particularly different from the usual work. concrete base. If you strictly follow all recommended technological methods, the floor will be in no way inferior in strength to any other type of tile covering.
Video - Laying tiles over an old floor
Video - How to lay tiles on the floor yourself
The advantages of using tiles as a facing material have been discussed more than once. Ceramic is easy to care for, it is resistant to mechanical stress and can serve well for many years. However, ordering professional tile laying is not a cheap pleasure, which is why many spend installation work on one's own. The article will discuss how to properly prepare the surface and how to lay tiles on the wall.
How to properly lay tiles on a wall: surface preparation rules
In order to begin preparing the wall for laying tiles, you first need to decide what type of mortar will be used for tiling. There are two options: cement-sand mortar and special adhesive compositions. Depending on which option is preferred, the preparation of walls for tiles will differ.

Many people want to opt for glue, but in this case they will have to work hard to align the walls under the tiles. Typically, plaster is used for this purpose or the surface is covered with plasterboard. The smoother the surface, the better. If the decision was made to use cement-sand mortar, then it will take less effort to align the wall with the tiles. How to choose the best option? The first method is much simpler and is suitable even for beginners. But the “solution” method requires skills and experience.
When talking about how to prepare walls for tiles in the bathroom, do not forget about the presence of a large number of communications that may interfere with installation. The simplest solution to this problem is to hide all the pipes before gluing the bathroom tiles to the wall. The easiest way to do this is with plasterboard structures.
Important!Before you start leveling the walls before laying the tiles, you need to make sure that the old covering is completely removed. This also applies to paint. If there are residues that can crumble, the life of the new tile can be significantly reduced.

What tools are needed fortile laying work
Before you begin work on preparing the surface and laying the facing material, you need to make sure that you have all the necessary tools for this:
- trowel and spatulas (regular, serrated and rubber);
- building level;
- and wire cutters;
- grinder and diamond wheel for it;
- special crosses for laying tiles;
- foam sponge.
Additionally, you will need a tape measure, a hammer and other tools that are probably found in every home. In addition, it is worth thinking in advance about how the mixing will be done. adhesive solution. It is advisable to have a special drill attachment for this purpose, but this can also be done manually.

How to properly lay tiles on a wall
The first rule you need to know before laying tiles on the wall is that all places that are important for visual perception must be tiled with solid elements. You should try to hide the tiles that had to be cut behind pieces of furniture or in places where they will be least noticeable.
Calculation required quantity materials is carried out even before the start of work and, in particular, leveling the base. They do this because it provides the opportunity to make some changes, for example, applying a slightly larger layer of plaster. In this case, the result will be some loss of area, but this is not as problematic as having to look at an imperfectly installed pavement for many years.
Helpful advice! If all corners of the room fall equally into the field of view, then the best option will make the same trimming of all corner elements.

As for vertical cutting, the rule of the whole tile at the top applies here. Although it is important to pay attention to individual data. It is perfectly acceptable to break the rules if it objectively has a positive impact on the situation. It is also worth paying attention to the size between tile joints. On a surface small area in total they take up quite a lot of space.
The marking technique largely depends on which method of laying the tiles was chosen. The most popular the following types: “seam to seam”, staggered and diagonally. The first method is the most popular. Its main difficulty is that in no case should you violate the vertical and horizontal boundaries, as this will be very noticeable. The most difficult method proposed is the third. It requires a certain skill and experience. But the second one is universal. It imitates brickwork and is quite easy to install.
How to lay tiles on a wall: general rules
Typically, you need to lay tiles on the wall starting from the second or third row. This is due to the fact that the wall tiles must cover the floor tiles for a number of reasons:
- visually this solution looks better;

- water that will flow down the surface of the wall will not flow into the contour seams;
- Trimming wall ceramics is much easier.
Often you have to deal with situations where the flooring was laid in advance. In this case, you need to start laying wall tiles from the bottom row. But here another difficulty arises - it is not always possible to do without trimming and place a solid tile in the top row.
The first thing you need to do is decide on the beacon row and make marks for the top edge of the first row. It is important to use a level during the work so that the entire tile does not “float” in the future.
Important!At the marking stage, it is very important to pay attention to all the difficult aspects, such as laying tiles around the pipes. Some displacement of the marks is allowed if this avoids the need to make complex cuts.

After this, you need to pull the beacon cord or draw a solid line along the marks. It is better to use the first option, as this will make it possible to more accurately control the horizontal. To maintain vertical lines, use ordinary plumb lines.
Laying tiles correct: step-by-step instructions for work
It is important to understand that the installation procedure may differ significantly depending on what surface and with what composition the installation will be carried out. Therefore, if you know how to glue tiles to the floor, this does not at all guarantee that you can handle wall tiles without problems. Let's look at what the installation procedure looks like when using ordinary white tile adhesive for the job, and what is the order of work in this case:
- Initially, it is necessary to dilute the adhesive composition according to the instructions provided by the manufacturer. Best to use for this construction mixer, as this allows you to complete the task faster;
- using a spatula, apply a thin layer to the base, as well as to the back side of the tile. The excess is removed using a comb so that even grooves remain on the back side of the tile;

- After making sure that the layer of glue on the tile is evenly distributed, it must be carefully pressed to the surface.
Important! The choice of notched trowel should be based on the size of the tile. The larger the dimensions of the tile, the larger the teeth on the tool should be.
The first tile should be laid along horizontal and vertical marks. At the same time, if a cord was used as a guide during the work, it is better to start from the corner of the second row and only then remove the cord. Fixation is carried out using special wedges, which are inserted between the tile and the support strip.
First you need to lay out all the solid elements, maintaining an equal distance between them. It is to facilitate this task that small crosses are used, which serve as a guide for creating uniform tile joints. Each laid row must be thoroughly checked using a building level.

Helpful advice! If there is a pattern on the tile that is not clear enough to visually easily identify the top and bottom parts, then you should pay attention to the special arrows that the manufacturer places on the back of each element. With their help you can navigate the installation process.
As for laying tiles that require trimming, this task is best left for later. How exactly this procedure should be carried out will be discussed later in the article.
How to lay tiles on drywall
For some time there was controversy as to whether it was possible to use plasterboard structures as a basis for laying tiles. After all, the material itself is not very durable and heavy weight ceramic tiles may simply be overwhelming.

Practice has shown that, subject to certain rules, drywall can be a complete basis for laying tiles:
- you should not skimp on the adhesive composition, it must be of high quality and suitable for of this type works;
- before installation, the surface must be thoroughly primed and completely dry;
- Laying should be done gradually - no more than 5 rows at a time. After this, you need to take at least an hour break, after which you can continue working.
Related article:

Advantages and disadvantages of the material, design of products from catalogs and photos of interior decoration, prices for products.
Compliance with these simple rules will make the tile covering more durable and reliable, and will also reduce the risk that after a short period of time some tiles will fall off.
How to lay tiles on a wall: tile cutting technologies
Trying to understand in detail the question of how to glue tiles to the wall in the bathtub, many believe that the main difficulty that will have to be faced is the adjustment of the elements. This can indeed be a difficult task, but with the right approach, even a beginner can cope with it.

It is often possible to cope with cutting tiles using a regular tile cutter. A grinder is often required for flooring than for a wall-mounted one, due to the difference in the thickness of the material. But sometimes, for special difficult places, you still have to use this tool in the process of laying tiles on the wall.
Helpful advice! If you don’t have a glass cutter, you can get by with even less, using, for example, a tile cutter or a pobedit-tipped scriber. To cut off the right part, you need to draw a cutting line, and then run it over the fixed element several times with the available tool as many times as necessary.
In order to achieve the shaped trim that is necessary for laying tiles around pipes, it is better to use a grinder with a diamond wheel. But if it is not available, and there are not too many holes to be made, then it is quite possible to use a cheap alternative - a diamond-coated blade. True, in this case much more time will be spent.

How to grout seams on wall tiles
After all the tiles have been laid, the gaps between the elements must be filled using a special compound, which is called “”. This mixture is designed to fill the voids between the tiles and provide reliable protection from penetration of moisture under the coating. In order for this procedure to be as effective as possible, you must adhere to the following rules:
- The grout must be mixed in stages, usually done at the rate of 1-4 m² per approach. This way the mixture will not dry out before it is used;
- all excess must be removed with a foam sponge until the solution has completely dried;
- using the same sponge, the seams can be made smoother by evenly distributing the grout inside the seam;
- During operation, the spatula should be held at an angle of 15-30 degrees to ensure that the space is filled as densely as possible with the mixture.
Figuring out how to grout tile joints is not difficult. If you have any additional questions, you can always watch the video instructions or use step-by-step photos as a guide that demonstrate this process in as much detail as possible.

Another issue that is worthy of attention is the price of grouting tile joints. It should be noted here that you can find two options on sale - a ready-made mixture and a dry powder, which you will need to dilute with water to the desired consistency yourself. Their cost will be different, for example, 2 kg of the finished mixture will cost about 259 rubles, and 2 kg of dry powder – 175 rubles.
What you need to pay attention to beforehow to glue tiles to a wall
Just before laying tiles on the wall with your own hands, you need to once again pay attention to several important aspects:
- All tiles must be carefully inspected for damage, scratches and chips. It is also useful to sort items by size. This will allow you to get the most even seams;
- In order for laying tiles on the wall with your own hands to be of no less quality than if it had been done by a professional, you do not need to spare the primer and time for leveling and preparing the surface;

- If you have to deal with facing external corners, you should use plastic corners.
Often on specialized forums users discuss interesting questions, for example, is it possible to lay tiles on tiles or other old coverings without dismantling them. The answer to all such questions is clear - you shouldn’t do this, and before you start laying new tiles you need to remove old tiles from the bathroom walls. How exactly to do this - we will consider further.
How to remove tiles from a bathroom wall: rules and recommendations
How easy it will be to remove old tiles from the wall surface largely depends on the surface on which it was laid. For example, if the surface was previously plastered, then the tiles will be relatively easy to remove along with the plaster. But if it is attached directly to a concrete or brick base, then the task will become somewhat more complicated.
It is very difficult to work with drywall, since it itself does not have sufficient strength and in the process of removing the tiles it will receive so much damage that it will have to be replaced.

You need to start dismantling the coating by soaking it. To do this, you can use a shower or a spray bottle. After the surface is wetted, you need to walk the grinder disc over tile joints. The better the grout removal is done, the easier it will be to carry out all subsequent work. Water is again poured into the resulting grooves so that the glue softens a little, as a result of which some of the tiles themselves will begin to come off.
The top layer of tile is tapped using a mallet. In those places where a dull knock is heard, it is worth starting the process. Using a chisel or chisel and a hammer, carefully chip off the first tile. After this, water is added again and the dismantling of the following elements continues one by one.
Helpful advice! If there is a need to carefully remove one tile in a row, then this will require a drill with drill bits. Many holes are drilled in the direction from the center to the edges (about 10-20) and then the tile is carefully chipped.

The fastest way to complete the task is to use a hammer drill. However, in this case, one cannot count on the fact that at least some part of the old tile will be preserved. And the sound will probably be loud, so it’s better to warn your neighbors in advance about the upcoming repair work.
Having familiarized yourself with how to properly lay tiles on the walls in the bathroom, and also learned about all the options for dismantling the old coating, you can safely begin your own repairs. As for the choice suitable material, then the most important thing is that you like the characteristics, color and size of ceramic wall tiles, and that they fit harmoniously into the interior and meet the operating conditions.
In the minds of people far from the tile craft, there are two opposing opinions. Some consider tiling to be too complicated, while others are convinced that you can figure out how to lay tiles on the floor in a couple of days. The golden mean has never let anyone down; it works in this case too. Laying ceramics is not nuclear physics, but it shouldn’t be considered a piece of cake either. However, with the theoretical basis obtained from the article and with the help of practice, you will soon be able to improve the interior on your own.
Quick navigation through the article
Preparing the base
Laying floor tiles on glue is impossible without a prepared base. In order for cladding to be a pleasant and not a painful process, and in order to save material, the surface must be perfectly flat. To do this, the floor in the room is filled with screed or a self-leveling floor is made using self-leveling mixtures.
- Screed requires more qualifications, but is cheaper and suitable for leveling surfaces with huge differences.
- A self-leveling floor will be more expensive, but it will not require much skill. Considering that extremes with the horizontal are rarely found in a standard home, it is recommended to use it.
Self-leveling mixture
The mixture is a solution that easily spreads over the surface, forming a horizon. There are mixtures based on cement and gypsum base. The latter are only suitable for dry rooms with a difference of no more than a centimeter, and this goes against the “tile” goals. Cement ones are ready to level a rather uneven floor (up to 5 cm).
Before using the solution, you need to thoroughly clean the base of debris, remove obvious “high spots”, and caulk large cracks if necessary. Immediately before pouring, the surface should be treated with a primer.

The mixtures are usually sold in 25 kg bags. This amount requires approximately 7 liters of water (the exact dosage is indicated on the packaging). Since the finished mixture must be consumed within 30 minutes, calculate the strength.

Self-leveling floor requires compliance temperature regime– less than +5 degrees already has a negative effect on the final result.


Although you can walk on the finished base after 6–12 hours (depending on the layer), laying ceramic tiles on the floor is possible after three days.

It is correct to level the floor in a bathroom or shower with a slight slope. In the first case, the water that gets in should flow from the bathtub to the door, in the second - to drain hole(ladder). In this case, the floor level in the bathroom should be lower than in the corridor, or in doorway there must be a threshold. This is done to protect the entire apartment from flooding.
Layout types

The tiles can be laid “seam to seam”, “staggered” and diagonally. The first method is familiar and popular; the boundaries of the plates must match. The second is the simplest, reminiscent of brickwork; even if small deviations appear, they will not be very noticeable. Laying tiles on the floor diagonally is the most the hard way. It is difficult to do it correctly the first time. Is there some more exotic ways, and there are many, but it is better to use them as you master those described above.
Marking
Depending on the type of layout, the floor is also marked. If you decide to lay tiles using the first two methods, you will only need to calculate the number of tiles taking into account the seams. Laying floor tiles (and it is correct to lay wall tiles this way) always begins with the most visible area, and trimming goes to less relevant places. Therefore, the calculation of the entire tile must begin from the most “important” wall.


Most the right way get beautiful cuts on both sides - align the center of the first tile with the center of the floor. And then continue laying to the edges. On the bathroom floor, the center is calculated from the bathtub screen to the opposite wall. In some cases, it makes sense to deliberately move the center of the installation or change the size of the room by a couple of centimeters (due to the box) in order to avoid trimming altogether.
Floor seams and wall tiles do not necessarily have to match.
The best video on how to lay tiles on the floor correctly:
Marking for “diagonal”

Marking axes when laying tiles diagonally:
a - marking a diagonal in a rectangular room, b - laying tiles of the same color along the frieze with the correct markings, c - laying multi-colored tiles along the frieze with incorrect markings, d - laying tiles at an angle in the center to form a single-color row along the perimeter of the frieze.
Laying tiles this way is not easy for a beginner. This layout makes sense because it is more decorative and visually increases the space. The disadvantages include not only the complexity of the cladding, but also the increased consumption of slabs due to more waste.
There are several ways diagonal laying. All of them require a rectangular geometry of the site, which will be given over to this type of layout. If right angles in the room are not maintained, the outer tiles running along the perimeter along the walls will be cut unevenly. To avoid this, you can surround the central rectangular area with tiles arranged in the usual way (or a frieze). This will smooth out visual flaws. But this is a matter of taste.
The rectangle is cut out using cords and a tape measure. Opposite sides, like diagonals, must be equal. Having walked along the outer contour of the rectangle with tiles “seam to seam”, you can begin laying ceramics from the most visible place. The internal contour consists of alternating halves and whole slabs. Unlike the usual method, the cords should be pulled along two diagonals, forming a right angle.
Laying tiles

If the floor has not previously been waterproofed, you will need to install a liquid barrier. Let's say more: additional waterproofing won't hurt, you shouldn't rely on house builders. When it comes to tiling the bathroom floor, waterproofing is mandatory. Making it is not problematic; a dry mixture diluted with water is usually used. Mix according to the instructions and use a paintbrush to go over the floor surface, covering the walls by 10–15 cm.
When the waterproofing has completely hardened, you can begin laying the tiles.

The solution must be applied either to the tiles or to the base. If the room is large, the second option is more reasonable - the process goes faster. If the floor is small or it comes down to cutting tiles, it is better to coat the ceramics.

For floor tiles, trowels with 8-12 mm teeth are suitable, depending on the unevenness of the base and the size of the tiles.

Laying tiles on the floor begins from the most visible place - the entrance.


Some tips:
- Do not wet the base or tiles.
- Do not use glue that has been standing for more than 40 minutes.
- If you “glue” both the base and the tile, adhesion will increase. In this case, it is enough for one of the elements to apply the mixture “scraping” - apply it and immediately remove it with a spatula. Remaining the thinnest layer will strengthen the grip.
- To prevent the glue from sticking to the comb, keep it constantly in water.
Tile cutting

It is not enough to know how to glue tiles; you need to master the skill of trimming. The most popular profile tool is a tile cutter. There are many variations, usually a double-rail with bearings is used. But since floor tiles are much stronger than wall tiles, a tile cutter must be expensive. Cheap household models make a lot of defects. It’s easier to cut everything off with a grinder.
In addition to mechanical ones, there are also electric tile cutters. They are more versatile and allow you to work with thicker ceramics.
The figured cut is performed using a grinder. Sometimes the help of wire cutters is required.


Grouting joints
Laying tiles on the floor with your own hands is finished, all that remains is to seal the seams. This is done using a special grout and rubber spatula. If several colors are used, you need to use masking tape on the tonal boundaries.
Be sure to clean the seams before jointing.
Using a putty-applied spatula, apply the mixture to the seams in diagonal movements, immediately removing any remaining residue. As the fugue hardens, use a sponge to bring the gaps between the slabs to the desired condition.

Well, you have taken the first step in understanding how to lay tiles on the floor correctly and quickly. Do you know how to lay tiles? different ways, now it's time to start practicing. comments powered by HyperComments
In places such as the kitchen, toilet and bathroom, ceramic tiles are often used to decorate the walls. Tiles are one of the most popular building materials, and this is understandable. It is easy to clean and performs well in damp environments. But when using ceramic tiles, there is a drawback - the cost of its installation is high, and can reach (and sometimes exceed) the cost of the tile itself. There is a way out of this problem - laying tiles on the wall with your own hands. In this article we will talk about how to lay tiles on a wall, as well as all the necessary preparations.
Preparing the wall for laying tiles
Regardless of whether expensive or cheap tiles are laid on the wall, the quality finished surface will largely depend on how well the rough foundation is prepared. With a perfectly level base, the process of gluing tiles to walls occurs many times faster, which is why hired craftsmen often increase the price for their work if there are large irregularities on the walls. To save time and nerves, pay special attention to all stages preceding the installation of tiles.
So, preparing a wall for laying tiles begins with checking its evenness and, if necessary, leveling it. Using a long rule and a water level, the walls are checked in several places for the presence of large gaps, blockages and differences. Small unevenness on the wall surface (up to 1-2 cm) can be leveled with tile adhesive directly during installation, but you need to understand that this requires some experience. In addition, the time for tiling work with this approach increases significantly. Therefore, for a beginner the best option would be quality training reasons, since doing it yourself is much easier.

As a rule, leveling is carried out using plastering, but there is also a common method in which the walls are leveled using the construction of plasterboard structures, ideally flat surface which the tiles are installed.
We discussed the process of self-plastering a wall using beacons in, which is required reading before finishing. It is only worth noting that in wet areas It is not recommended to use gypsum-based compounds for plastering. This is due to the ability of gypsum to absorb water, which can lead to the formation of fungus on the walls.
If the surface of the wall is sufficiently smooth and does not require plaster, it must be cleaned. To do this, use a spatula to clean the wall down to the plaster layer, completely removing the remnants of old paint, whitewash, exfoliated pieces of plaster, and repairing all chips and cracks. All these defects are covered with ordinary tile adhesive until a smooth surface is obtained. Presence of crumbling areas or areas with old paint or whitewashing significantly worsens the contact of the tile adhesive with the wall.
After leveling the wall, it is primed. The primer, being absorbed into the plaster layer, improves the adhesion of the tile adhesive to the base, binds all dust, and also prevents the appearance of fungus on the wall surface. The primer is applied to the wall with a regular roller or wide brush in several layers, allowing it to be completely absorbed into the plaster.

For better contact wall tiles often use special compounds with the addition of coarse river sand or granite chips. This composition - concrete contact - creates a rough structure on the flat surface of the wall, which contributes to better adhesion of the coating to the base. If it is impossible to purchase concrete contact, it is necessary to make notches on the plaster so that the adhesive composition is better fixed to the wall.

Choosing ceramic tiles for walls
Selecting tiles is an important step not only from the point of view design approach. It so happens that the lower the price of the tile, the worse its geometric shape, which in turn leads to difficulties when laying it. When laying tiles irregular shape it is difficult to get identical seams and smooth surface no changes. This also leads to the fact that when using such a material it is difficult to achieve a thin seam at the joints of the tiles. Therefore, if the size of the joints is of great importance to you, choose either foreign samples or domestic tiles in the above-average price range. The photo below shows the differences in the shape of tiles from one pack:

Close attention should also be paid to the format of the tiles. Laying large-format tiles alone will be quite problematic. In addition, if there is a lack of experience, you may encounter overuse of material, which high cost such tiles will lead to unnecessary expenses. For beginner tilers, it will be most convenient to work with small and medium format tiles.
In addition to size, the shape of the ceramic is also important. When choosing its type, you need to rely on the design project of the future room and the need for trimming. For example, when using wide rectangular tiles in a narrow room, you may encounter either the need to glue small fragments in the corner, or the need to double the number of tiles to finish a given wall.

All these nuances are individual for each specific room and project, so there is no universal solution for all rooms.
When choosing tiles, it often happens that the option you like is intended for laying on the floor. It is not prohibited to lay floor tiles on a wall, however, such tiles are often made of porcelain stoneware, which is many times stronger than ordinary ceramic tiles and is more difficult to cut and drill. This must be taken into account, since when laying wall tiles, much more cutting is done than when laying.
The last piece of advice when choosing tiles is that when purchasing, you need to check the lot numbers on each pack of material and purchase tiles of only one article and lot number, as this will protect you from differences in color scheme one party or another.
Tile layout
An important point in laying any ceramic tile is its layout. IN modern renovation It is important to avoid the formation of narrow undercuts and tile residues along the edges. To do this, precise markings and layout are made in advance either on paper or in a computer program. The idea is that there should be equal parts of the tiles on all sides along the edges, and the solid elements should be in the center. This layout is considered the only correct one.
 Tools and materials for laying tiles
The main device needed to work with tiles is a tile cutter. The lack of a tile cutter is a barrier for many craftsmen who want to lay tiles with their own hands. A high-quality tool is usually expensive, but today there are many services and stores offering all necessary tool for rent.

To lay tiles on the wall, you can use either a manual or electric tile cutter. An electric tile cutter is convenient because it does not require any special skills to use - it works like a regular circular saw, only it has a diamond wheel instead of a saw blade. Dust in such a device settles in a water bath. Advantage electric tile cutter is the speed and quality of cutting even small pieces of tiles, as well as the ability to cut tiles at 45 degrees. The disadvantage is the need for maintenance, cleaning and washing after each working day.

In addition to the tile cutter, the main hand tools The tiler's tool is a notched trowel - a trowel, with which the adhesive is applied to the tiles and walls, and also distributed over its surface. The convenience lies in the fact that using the teeth on a spatula, a uniform thickness of the tile adhesive seam is achieved. There are teeth different sizes, so for everyone specific case choose your size. For convenience, we have compiled a table to help you quickly determine the size of the notched trowel for your needs:

In addition to the spatula, you will need the following tools:

Before direct installation tiles are sorted in order to identify defects, tiles of uneven shape, differing from others in size and shades of color. This procedure is carried out for both cheap and expensive tiles. High-quality, smooth tiles are used in places that are visible. Tiles with imperfections or minor defects are allowed to be trimmed or used in hidden places.

Cutting and trimming tiles
If available on premises smooth walls And correct sizes, experienced craftsmen tiles are cut for all walls at once in accordance with a pre-designed layout. This is done in order to save time and not have to cut the tiles after gluing each subsequent row.

If you are not sure that you will be able to get the dimensions, taking into account all the errors and the thickness of the seams, we recommend cutting locally to avoid mistakes.
Laying ceramic tiles on the wall
The process begins with marking the room. As for the horizontal layout, it is determined by a pre-prepared layout diagram. All you have to do is accurately cut the tiles according to the dimensions. When marking vertically, there may be several options.
As a rule, laying wall tiles begins not from the floor itself, but from the second row; this is done to obtain a perfectly even row, which is impossible to do when laying from an uneven floor. But often the layout is made so that the beginning of the tile is at the same level as the top edge of the bathtub, in which case the starting row is measured taking into account the size of the bathtub.

There can be many options for tile layouts, so in the most simple version The marking of the second row is done as follows: a distance equal to the thickness of the floor tiles and adhesive layer is set aside from the floor (6-8 mm if there is a flat floor) and this point is taken as the level of the future finished floor. A distance equal to the sum of the heights of the wall tiles and the seam between the floor and wall tiles is set aside from the finished floor level. At the resulting point, a line is drawn around the entire perimeter of the room. It will correspond to the bottom border of the seam between the tiles of the first and second rows.
The first row of tiles will be glued last after all the wall and floor tiles have been laid. In case of an error in the calculations, this row can be trimmed without damaging the appearance, since the joint at the bottom is filled with sealant and will be invisible.
Mounted on the wall along the border of the marked line metallic profile, on which the first working row of tiles will be installed, and which will prevent them from sliding down. After the glue has hardened, the profile can be dismantled.

After marking and preparation, begin mixing the tile adhesive. Here you need to pay attention to two points - consistency and quantity. The consistency of the glue is chosen so that the ridges, after spreading with a notched trowel, do not spread, but are not too thick. The composition should be elastic and easy to apply to the wall. The amount of solution is selected in such a way that its lifetime does not end before it is used. full use. The lifetime of the solution is indicated on the packaging; after this time, the glue loses its elasticity and dries out. If you do not have much experience in laying tiles, we recommend that you do not knead first. a large number of glue, then the required quantity will come with experience.

The tiles are laid, starting from the corner of the wall, on an even layer of adhesive, which is applied to the wall with a notched trowel. If there are smooth walls, the adhesive should only be applied to the wall. If there are uneven surfaces, apply the adhesive both to the wall and to the tile itself with a regular spatula and level it with a notched trowel. Modern technology The production of ceramic tiles does not require that they be wetted before laying. On the contrary, this can lead to a violation of its correct connection to the wall.

In order to maintain the parallelism of the planes of the tile and the wall in the horizontal direction (in the vertical this parameter is controlled bubble level) in the first row, you need to mount the so-called beacon tiles. To do this, a whole tile or any scrap is temporarily mounted on the opposite side of the wall. After that, a long rule is applied to the first and beacon tiles. If there are gaps between the rule and the plane of the tiles, then their position is adjusted until the gaps are completely eliminated. In parallel with this, the vertical installation of the tiles should be controlled.
After gluing the first ceramic element, the second one is mounted using the same principle, checking the correctness of its installation using the rule and level, not forgetting, in addition to parallelism, to control the horizontal level of gluing. After this, the beacon tile can be dismantled, and control can be carried out using two already installed tiles.

At the junction between two tiles it is necessary to install plastic crosses to adjust the gap between them. Crosses must also be installed under the tiles to simulate a seam between the current row and the first row, which will be installed at the very end. In addition to the seams, crosses are installed in the crosshairs between the tiles to form correct junctions. They should be removed immediately after the tile adhesive begins to set and dry. If you wait until completely dry glue, removing the plastic from the seams can be a challenge.

All further process laying is repeated in the same way. It is important at each stage to control the vertical and horizontal installation of the tiles and adjust its position if necessary.
After laying all the wall tiles and the glue has dried, they proceed to cleaning the seams and filling them with grout. To do this, it is convenient to use a small spatula. The grout is rubbed into the joint cavity, distributed evenly and allowed to dry a little. After a few minutes, the grout is carefully rubbed with a moistened sponge until a smooth, even seam is formed. After this, it is left to dry completely for about a day. After a day, all excess grout is wiped off the tiles with a wet cloth. It is important not to leave the grout on the tiles for several days, as it will become more and more difficult to scrub off every day.

The seam between the floor tiles and the wall is usually filled not with grout, but with sealant. To do this, choose either white sanitary sealant, or sealant in the color of the grout. This is done in order to compensate for the thermal expansion of the tiles and to avoid cracking of the grout in the joints. This is especially true when present in a screed. The video below shows how easy it is to create a neat seam between the wall and the floor using sealant.
As a rule, after laying tiles with their own hands, many admit that their fears were in vain, because the whole process is not particularly difficult. A good help in this matter would be to use quality instrument and good preparation of the rough surface.
Finally, we invite you to watch a video in which the master describes in detail the process of laying ceramic wall tiles:
Wondering how to lay tiles on the floor? This instructional article will help you do everything correctly, efficiently, beautifully, and most importantly, with your own hands. We will describe in detail all the laying processes, from surface preparation and marking, to the actual work of laying tiles and grouting. Video materials will help you understand what's what as clearly as possible.
- this is a task that absolutely any person can complete, provided that he puts in a sufficient amount of patience and diligence, and also first familiarizes himself with the procedure for performing this work.
Required tools and materials
Before you begin laying floor tiles, you must ensure that you have the following materials:
- Ceramic (porcelain) tiles. It must be said that porcelain stoneware, due to its high strength, is a more preferable material for flooring. However, special glue is required to install it;
- Tile adhesive, from which the adhesive solution will subsequently be prepared;
- Water;
- Crosses for tiles (dividers);
- Grout for seams.

As for the tools needed for laying tiles, these include:
- Container for preparing the solution;
- Hammer;
- Grinder with a diamond blade for cutting tiles. Instead, a tile cutter or an ordinary hacksaw can be used;
- Master OK;
- Drill with a nozzle for stirring the adhesive solution;
- Notched trowel with teeth from 0.6 to 10 cm;
- Rubber hammer;
- Rule;
- Level;
- Rubber spatula.

Preparing the floor surface
To achieve best result, it is necessary to lay the tiles on a perfectly flat floor surface. Otherwise, existing irregularities will be noticeable even after installation.
First, using a hammer drill or chisel and hammer, old tiles are removed from the floor surface, as well as remnants of tile adhesive, cement screed and waterproofing.

If there are small irregularities on the surface intended for laying tiles, then the following steps can be taken to eliminate them:
- Using tile adhesive, carefully seal all cracks and cracks in the floor (especially in the corners). This is necessary to ensure reliable waterproofing.
- Carefully remove all debris resulting from preparatory work.
It is possible to lay “tiles on tiles”, but only after making sure of the strength of the old coating and provided that it is even. But it is not recommended to lay it on uneven floors.
If the surface needs to be completely leveled, then for concrete floors you will have to make a screed, and on wooden floors a sheet of plywood or (chipboard) is laid. Is it possible to lay tiles on chipboard, plywood and other wooden substrates? - Can.
A little about waterproofing
After finishing work on leveling the floor surface, you can begin installing waterproofing. This is enough important stage in laying floor tiles, especially if such work is carried out in rooms with high humidity, such as showers, kitchens, baths, toilets, bathrooms, etc. Despite the fact that quite often, in order to save money when doing DIY repairs, owners skip this important step, experts still do not recommend laying tiles without first doing so. This is especially true for rooms in which pipes for water supply or heating systems are laid.
Waterproofing installation work is carried out in the following order:
- The floor surface is treated with a primer;
- Apply waterproofing coating on the floor and adjacent walls. It would be correct to “raise” the insulation on the walls to a height of 10-20 cm.

There are the following methods of applying waterproofing, the differences of which are mainly due to the type of insulating material:
- Pasting. This method is most convenient when you have to “raise” the waterproofing on the walls to a certain height.
- Smearing. If it is necessary to protect only the floor, then it is possible to apply waterproofing using a coating method, which involves applying its protective layer using a roller or brush, in corners or other hard to reach places a spatula is used. Protective layer applied in several layers with a time interval of 5-7 hours. To do this, you first need to prepare the required solution from the dry mixture and water.
- Coloring. For this method, a special waterproofing paint is used. The main disadvantage of this method is the fragility of the resulting insulation layer. The advantages, in turn, include its maximum simplicity.
Preparation of tile adhesive from a dry mixture
Today, construction stores have in their assortment an extremely large number of different mixtures for preparing tile adhesive. It is quite difficult to understand this abundance at first glance, however, if you look a little closer, you can see a clear classification of these materials.

First of all, a distinction is made between dry and ready-to-use mixtures. The first ones are made on a cement base, sold dry, and can be used for laying tiles on surfaces that have minor unevenness. In the same time ready-made mixtures, which are made on a polyurethane base, are designed for laying tiles on a perfectly flat surface. When using such mixtures, very high strength of fastening of the tiles to the surface is achieved, however, the cost of such materials is much higher than their dry counterparts.
More details: , what to look for, the most popular brands.
When choosing tile adhesive, you should pay attention to its characteristics, which should be indicated on the packaging. It is necessary to take into account the operating conditions of the floor covering, the size of the tiles, what material it is laid on, as well as the speed of hardening of the adhesive mixture; however, it is not recommended to choose a composition that dries too quickly.
How to lay tiles on the floor correctly
Before laying tiles on cement base a layer of primer is applied. This is done to ensure better adhesion of the tile adhesive to the surface.
Typically, ceramic tiles are used as flooring in apartments and private houses.

After priming the surface, the tiles are laid out on the floor. This is done in order to determine how much of the tiles located along the edges will have to be cut. You need to plan this in such a way that the rest of the drawing does not lose its aesthetic appeal. In addition, laying out tiles on the floor allows you to clearly understand whether enough material has been purchased to install the flooring of the selected room.
By the way, mosaic tiles laid using the same technology. The only difference is that it is usually sold in ready-made mats.

Laying begins from the corner of the room farthest from the entrance. To ensure even laying of rectangular tiles, you need to draw lines on the floor using a corner and a ruler. In this case, you should take into account the distances that the width of the seam between the tiles will occupy. Its recommended value is within 2-3 mm.
The adhesive mixture is applied to the floor using a special notched trowel. The thickness of the solution layer should be approximately 10-15 mm. You can apply the glue with a trowel, but after that you still need to make grooves in the resulting layer, using a notched trowel. After this, the tile is pressed tightly to the surface and lightly tapped for better fixation. rubber mallet. Under no circumstances should any cavities remain unfilled with mortar under the tiles.

When laying tiles with your own hands, you should pay attention to its back surface; there may be arrow-shaped indicators that show in which direction this tile should be laid. By following these tips, you can achieve the correct distribution of color shade, even if at the moment this is not noticeable under the existing lighting.
With a perfectly flat floor surface, the glue consumption will be the same everywhere. To form even seams, special crosses are inserted between the tiles.

After laying each individual tile, its correct installation must be checked using a level. Remains of tile adhesive are immediately removed without waiting for it to dry.
After laying the main (whole) slabs, they begin to install their cut pieces.
In the process of laying tiles, there is always a need to cut them to fit required size. The cut edges of the tiles can be hidden under the baseboard if you turn them towards the wall. The use of such parts will significantly save material.

Cutting tiles is a separate art, and on our website there is a separate article dedicated to this process:. The article describes in more detail the methods of using both improvised and professional tools.
Subject to availability special tool intended for cutting tiles, one of the following methods can be used:
- Trimming with a diamond glass cutter. To do this, place the tile on a flat surface, after which, using pre-applied marks, apply a ruler to it and draw a straight line with a glass cutter. After this, the tile can be broken into two parts. If the fracture site is not perfectly smooth, you can refine it with a file.
- You can also cut tiles using a hacksaw. However, using this method it is very difficult to obtain perfectly smooth edges of the tiles.
- If you have a mechanical tile cutter, the process of cutting tiles can be significantly accelerated. As a guideline, it may be advisable to briefly submerge the tiles in water before cutting.
- Another type of tool that can be used for cutting ceramic tiles is grinder with diamond wheel. Its disadvantage is some difficulty in ensuring reliable fastening of the cut parts of floor tiles, a large amount of dust generated during work, as well as an increased risk of injury to this tool. The advantage of using a grinder is the ability to easily cope with trimming even large species tiles

Grouting joints
The last step in laying floor tiles is grouting the joints. The overall appearance of the entire floor covering largely depends on the quality of this work.
You can start grouting when the tile adhesive is completely dry. The first step is to clean all the seams between the tiles from dirt, and also remove the crosses remaining during installation.

The choice of grout material is made based on operating conditions and tile design. In any case, it would be correct if the color of the grout is darker than the general background; first of all, this is necessary so that when dirt and dust accumulate in the recesses between the tiles, it will not be noticeable.
The process of applying grout itself is quite simple. You should first moisten the joints with a sponge, this will ensure better adhesion of the grout to the tile material. After diluting it with water, the resulting mass using rubber spatula rubbed into the joints between tiles. The stronger the pressure of the spatula on the surface, the more densely the space between the tile and the grout material is filled.

When working on the floor, it is customary to start grouting from the corner opposite the entrance and move towards the door. After all the seams have been processed, excess material is removed from the surface using a rubber spatula. To do this, it must be moved perpendicular to the seams. Approximately 30 minutes after completing this work, when the grout in the joints has dried a little, you can begin final stage cleaning floor tiles with a damp sponge.