How to hang a mirror without mounting. Installing large mirrors and frameless canvases on the wall with your own hands: ways to fix them without drilling, installation on a wall with wallpaper and plaster without nails. Attaching the mirror with tape
The completion of the renovation, after the dust has settled in the apartment or room, does not mean the end of the construction pains; there is still a lot to be corrected or even redone, but the first step is to adjust the lighting and operation of the lamps, adjust the operation of the window sashes and hang a mirror in the room. Only then does the room acquire a habitable appearance.
Is it easy or difficult to attach a mirror to a wall with wallpaper?
In fact, the solution to the problem of how to attach a mirror to a wall with wallpaper is not as obvious as it might seem at first glance. Often there is not much experience in this matter; usually objects, including mirrors, can be attached using a dowel driven into the wall of the room. But after the renovation, spring cleaning rooms from dust and remnants of wallpaper rolls to break fresh holes in clean and smooth walls to attach the mirror - somehow the hand does not rise. Moreover, the location of the mirror may change, you will have to attach it in a new place, and in the old place after fastening there will be holes from the dowels, which are not so easy to remove or disguise by repair.
Imagination and technical savvy tell us that you can attach a mirror to the wall in one of the following ways:
- Using double-sided construction tape;
- Any polyurethane adhesive composition;
- Using hidden plugs.
For your information! If the mirror has decorative elements and weighs more than two kilos, you should not try to attach it to the wallpaper on the wall using glue or any similar means.
Even if the wallpaper is “tightly” attached to the wall, surface layer the wallpaper will come off like a film, and the mirror will break.
Need for invention is tricky, attach the mirror “tightly”
All of the above methods are real and can be implemented for any wallpaper. Among the above methods, the first two are used for lungs not large mirrors, the last two, in fact, are universal, but much more complicated, and require increased accuracy and precision.
Advice ! It is better to attach the mirror in places away from drafts, which will save you from the need to regularly wipe dust from the glass surface.
It is quite easy to check and determine how protected a place on the wall is from dust. It is worth removing dust with a damp cloth from the planned place on the wall. After a couple of days, run your hand over it - if dust appears, it means the place is not suitable.
If the integrity of the wallpaper is not of great value, then the mirror can be attached to the wall using a fairly simple procedure - two dowels and a pair of brackets.
How to attach a mirror with glue
When the need arises to glue something during a renovation, people most often think of the widely advertised “Liquid Nails” adhesive. But in practice, the advertised composition was not always able to attach even small items on smooth surface. Therefore for relatively heavy object, such as a mirror, it is unlikely to fit. Any lime compositions popular in repairs are also unsuitable for such attempts.
More a good option There will be a solution to attach thin and heavy mirror glass using Moment adhesive compositions or mounting polyurethane foam. Last option more preferable due to highest adhesion, even on dusty surfaces.
If you decide to attach the mirror to the wallpaper using glue, you need to make and glue an intermediate screen to the back of the mirror. It can be made to fit the entire size of the mirror, in the form of a wide rectangular frame that fits tightly to the painted surface of the mirror. The composition that coats the back of the mirror adheres very poorly directly to the thin base of the wallpaper, so an intermediate layer in the form of a screen is used.

The best material for the screen will be a light and durable wood-fiber board, 3-5 mm thick. The frame should be glued using rubber or any other glue that provides an elastic seam. The fiberboard from which the screen frame is made consists of pressed paper. This will help to attach well to the surface of the wallpaper and compensate for the difference in thermal expansion of the materials.
Before attaching the mirror, you must perform a number of procedures:
- Determine and mark the selected place on the wallpaper for precise positioning of the mirror, more precisely, its top;
- Remove and thoroughly clean the surface from dust and wallpaper glue residues;
- According to the completed markings, apply glue to the wall surface, apply glue to the mirror screen in a similar way, wait for the applied layer to dry slightly;
- After 10-15 minutes, repeat the procedure, remove excess glue and carefully attach the mirror to the wallpaper;
- After a couple of hours, you can remove the fasteners and clean the glass surface from dust and fingerprints.

If you use for fastening polyurethane foam, you need to do it a little differently. At a point located 40-50cm from the top of the mirror, according to the markings made, we hammer in a needle-thin 30mm nail. Using a thin but strong thread attached to the top of the mirror screen, hang it. Apply a few drops of polyurethane foam from a foam container to the top of the screen. Slowly turn the object over and apply foam to the wallpaper according to the markings. We press and leave it hanging. If foam appears through the top of the frame, do not remove it. It is easier to cut it after drying by running a blade construction knife along the top of the mirror. Before gluing, it is necessary to remove dust from the surfaces to be glued, and first of all from the wallpaper.


How to Attach Using Mechanical Attachment
The heavier the mirror, the stronger the mount should be. An object with a diagonal of more than 40 cm can also be attached using glue, but there is no guarantee of a secure attachment. For heavy mirrors, you can use the old fashioned way - attach them using two small plugs and a pair of screws.
If the mirror on the back side does not have a base made of pressed cardboard or plastic, you will have to use the recipe from the previous paragraph and glue homemade screen or a bar. The larger the mirror, the stronger and thicker the transition frame should be. For glass surfaces with a diagonal of more than 50 cm, additional reinforcement from thin glass will be required. wooden slats, for which the frame can be attached to the wall. The rail is attached with glue at a distance of ¼ of the entire height of the glass from the top. After this, at a distance of 5-6 cm from the ends of the slats, you should attach one self-tapping screw, but do not wrap them completely into the body of the tree, leave a couple of millimeters.

Between the screws that are screwed in, it is necessary to fasten a strong nylon thread, possibly from the category of shoe threads. The length is approximately 10-12 cm greater than the width of the glass. The top of the tensioned thread should not peek out from behind the top of the mirror. Before fixing the plugs with self-tapping screws in the body of the wall, it is necessary to correctly mark the wallpaper. To do this, use two pencils to pull the thread from both sides towards the top so that the distance between the tension points is approximately ¾ of the width of the glass surface. After this, use a ruler to measure the distance from the top of the frame to the tensioned thread.
Next we find optimal location mirrors on the wall and with a simple pencil mark the position of the top of the frame on the wall. Using the marked points, we plot the measured distance, after which we determine the points for the plugs in the wall.
Next we use a little trick. We need to drill so as not to damage the wallpaper. To do this, at each of the selected points, use a sharp blade to make a cut in the form of a cross measuring 2x2 cm and carefully bend the edges of the wallpaper. At the bottom, before drilling holes, you need to attach a small cardboard shelf using plasticine or any other material. The shelf will help collect dust and sand from drilling and prevent debris from falling into the gap between the folded edge of the wallpaper and the wall.
At each of the two points we drill holes for plugs with a diameter of 10 mm. The greater the load weight, the larger the diameter and depth of the plug. After blowing off the dust, the plasticine and shelf can be removed, then the protruding parts of the plug are trimmed to the level with the wall. You can move on to the next operation - attach the mirror surface. The screws are not screwed into the plugs completely, leaving 1-2 mm.

Then you can attach the object to the thread without fear that the fastening will not support the weight of the object. In addition, this method of fastening makes it relatively easy to align mirror glass by level. In this way, paintings and large decorative panels are usually attached to wallpaper.
If after repair there is a need to attach the item in another place, traces of corks can be easily removed. To do this, unscrew the screws and remove the plugs. We cover the remaining holes with putty, after drying we bend the edges of the cross-shaped cut of the wallpaper and carefully glue it in place. If you do it carefully, even close up you can’t always see the place on the wallpaper where you once decided to attach a mirror or a picture.
You don't need to be an expert at all to hang a mirror on the wall. You just need to approach this issue responsibly and familiarize yourself with some installation features.
Which mirror to choose
Mirrors are used not only for practical purposes in interior design. Today they often play the role of effective design solution, allowing you to visually increase the space, add light and spaciousness to the room.
The choice depends on where the mirror will be installed. It should be in the hallway big size so that any family member can see themselves in full height. Hang this mirror on the wall or attach it to the closet door.
For the bathroom, it is better to purchase a mirror of a vertically elongated shape - oval or rectangular. It is advisable to place two mirrors in this room - the main one and the additional one. The second one is mounted on the opposite wall from the main one on a special bracket that allows you to adjust the position. With its help you can examine your hair from all sides. located in the bathroom, must be made of of stainless steel or resistant plastic, because in conditions high humidity other materials quickly deteriorate.
What to look for when choosing
A mirror is an interior item that is purchased for more than one year. Therefore, it is important not to make a mistake and purchase a really high-quality item. Special attention in this case, attention should be paid to the coating. It can be made of silver or aluminum. The first one is more expensive, but has very high reflective qualities and long term services. When purchasing a mirror for the wall, be sure to read the quality certificate in order to exclude the presence of harmful substances, for example, lead.

Blue or green tint the reverse wall of the mirror indicates its resistance to moisture. If the color of the coating is purple, then the quality of the product is low. The reflective surface of the mirror must be clean, smooth, without matte spots and air bubbles. The quality of a mirror can also be judged by its smooth edge. Chips and cracks are possible only on simply cut glass, without treatment. You should not choose a large wall mirror made of thin glass - over time it will begin to sag and distort the image.
Methods for attaching mirrors
There are several mounting options. The choice of the most suitable one depends on the type of wall, design, dimensions and weight of the mirror. It can be attached using special brackets, profiles, or simply glued to the wall using tape or glue. The last method is quite simple and very popular. The only exception for this is huge mirrors - it is better to mount them on the wall using a more reliable method.
How to glue a mirror
The first step is to prepare the wall surface for gluing. To do this, free up a space on it equal in area to the size of the mirror, removing a layer of wallpaper, tiles or other finishing material. If the thickness of this coating is greater than the thickness of the mirror, you will have to attach an additional base of plywood or plasterboard. The wall must be flat, so its surface must be puttied and treated sandpaper.

Gluing a mirror to a wall is done with special ones. If you use glue instead, it is important that it does not damage the amalgam in the future. Do not apply glue to the very edges of the mirror, otherwise it may come out. If this does happen, you must immediately remove excess glue with a soft cloth. The mirror is pressed quite tightly against the wall for 15 minutes, and the gluing process can be considered complete. The only drawback of this method is that it is no longer possible to move the mirror to another place.

Gluing a mirror with tape
First of all, it is recommended to cover the back side of the mirror with a layer water-based paint in order to protect the amalgam from possible destruction. The surface of the wall where the mirror will hang is cleaned and degreased with alcohol or acetone. Before hanging the mirror on the wall, strips of 7-10 cm in length are glued to it vertically every 15 cm. The gap between them is filled silicone sealant.
The mirror is applied to the wall so that it rests on the sealant. And only after it was leveled in in the right position, it is pressed tightly onto the tape and fixed. In the bathroom, only waterproof glue or tape can be used. This type of mounting is especially suitable when the question arises of how to hang a mirror without a frame on the wall. And also in cases where it is not possible to drill. This method is often used when installing mirrors on a plasterboard surface.
Mounting large mirrors
A large mirror gives a special charm to the room. Place it at some distance from the floor so that there is space for installing the plinth, and also to avoid possible damage. This mirror is attached using self-tapping screws and special decorative holders.

Before hanging a mirror on the wall, its surface needs to be leveled. Then markings are made. To do this, press the mirror tightly against the wall and use a pencil to mark the places for drilling through the holes in it. After which the mirror can be removed.
After the holes are ready, a dowel is inserted into each of them. An ordinary one will do. wooden stick. For a plasterboard wall, it is better to use a special dowel called a “butterfly”.
When deciding how to mount a mirror on the wall, using self-tapping screws is a very reliable option. Before screwing them in, you need to once again attach the mirror to the wall and make sure that all the holes match. To hide the attachment points and give the mirror a more aesthetic appearance, decorative metal caps are used that are screwed onto the base of the insert from above.
Drilling holes in the mirror
How to hang a mirror without a frame on the wall if you can’t use tape or glue? In this situation, self-tapping screws will help out. But not all mirrors are sold with ready-made holes. In some cases you have to drill them yourself. This task is quite difficult, so it is best to entrust this task to specialists. Almost everywhere today there are workshops that cut glass. Available there special equipment will allow you to make holes quickly and efficiently.
If you still decide to deal with this on your own, then a drill will help out. First, you need to determine the exact location of the future holes and degrease the surface with alcohol. During the drilling process, it is necessary to periodically cool the drill. To do this, it is recommended to use a bath of water molded from plasticine, placing it in the place where the hole will be.

You need to drill through it, adding water if necessary. Before fixing the mirror to the wall, the edges of the finished holes are carefully cleaned with fine-grained sandpaper. The whole process requires great care and precision.
Fastening mirrors using brackets
Today there are a huge number of different bracket holders for mirrors. They differ in the material from which they are made, construction and design. This is very convenient devices, which do not require drilling holes in the mirror.

You can also attach the mirror using homemade staples. To do this, a thin substrate is cut out of plexiglass or hardboard, to which galvanized steel plates are attached, protruding slightly beyond the edges. “Ears” are made on top for hanging future design. The mirror is then placed on this base and the plates are folded onto the mirror surface. All that remains is to hang the mirror by the “ears” on the wall.
Installing a mirror on the wall without drilling
If the mirror is not very heavy, it can be mounted without drilling holes in it. This needs to be done together. One person presses the mirror tightly against the wall, while the other is screwing in the screws. They need to be screwed in close to the top and bottom edges, and then put special decorative plugs on them. Due to them, the mirror will hold quite firmly.
All work on installing mirrors, no matter what method is used, must be done very carefully so as not to damage the amalgam.
Of course, every person has a mirror in their bathroom, and before it can be found there, it will need to be somehow hung on the wall.
Of course, if the mirror has a frame, then it is equipped special device on this frame with which you can easily hang this mirror on the wall.
How to hang a frameless mirror on the wall 
It's really complex issue although this can be done with your own hands.
Where can you hang a mirror?
First you will need to decide on a place where you can hang the mirror. The mirror should be hung only above the washbasin to make it convenient to use - approximately it should be located at a height of about 1.5 - 1.6 meters from the floor.
We hang a mirror on the wall. 
To hang a mirror on the wall, in the usual way You will need to use the following tools:
— Hacksaw for wood;
- Regular pencil;
— Roulette;
— Alcohol level;
— Reiki made of alcohol;
- The mirror itself;
— Painting tape;
— Double-sided tape for attaching the mirror. 
Once these materials have been collected, you can begin the process of installing the mirror on the wall:
1) In relation to the washbasin, the height should be approximately 20 centimeters, although this also depends on the exact size of the mirror;
2) then, using a pencil and tape measure, you will need to measure this distance on the wall;
3) Prepare two supports - it is best to use wood for them - these should be two small planks that can hold the mirror for some time;
4) then you will need to make the same supports according to the measurements that were made earlier. To do this you will need to use a hacksaw for wood; 
5) when the supports are ready, they will need to be installed in a vertical position, and they must be supported on two extreme points shells. You need to check whether they really stand perfectly vertically using a spirit level. Then, using masking tape, you will need to fix these supports.
6) Then you need to glue a special tape to the back of the mirror itself, which is glued on both sides. In this case, the strips of this tape should be glued exclusively in vertical position at a distance of approximately 15 centimeters from each other;
7) After this tape has been applied, the mirror will need to be carefully leaned against the right wall. Using the same spirit level, you can see how smoothly it is installed;
8) at the very end, you will need to very carefully walk over the entire area of the mirror and carefully press it against the wall to which it is attached.
What can you hang a mirror on other than this method? There are other ways in which you can hang a mirror without a frame on the wall.
Hanging a mirror using liquid nails or glue. To hang a mirror in this way, you will need to evenly distribute liquid nails or glue over the entire area of the mirror - special attention should be paid to the edges of the mirror. You need to apply at a distance of 5-8 centimeters from each other.
You can also watch a video on how to hang a mirror on the wall
Sometimes even seemingly simple tasks are baffling. For example: hang a mirror on the wall of the bathroom, hallway, dressing room, or on the closet door. What if there is no frame or any other fastening elements? In fact, attaching a mirror to the wall is not a difficult task. If you know the ways and methods.
Methods for attaching mirrors to the wall
When renovating or arranging an apartment or home, sometimes you need to fix a mirror that does not have a frame. Recently, this is the most popular design method. In general, there are five ways of fastening. They are selected depending on the type of base on which installation will be carried out and the area mirror surface. You can hang a mirror in the following ways:
- Glue to the surface using special glue or adhesive-sealant.
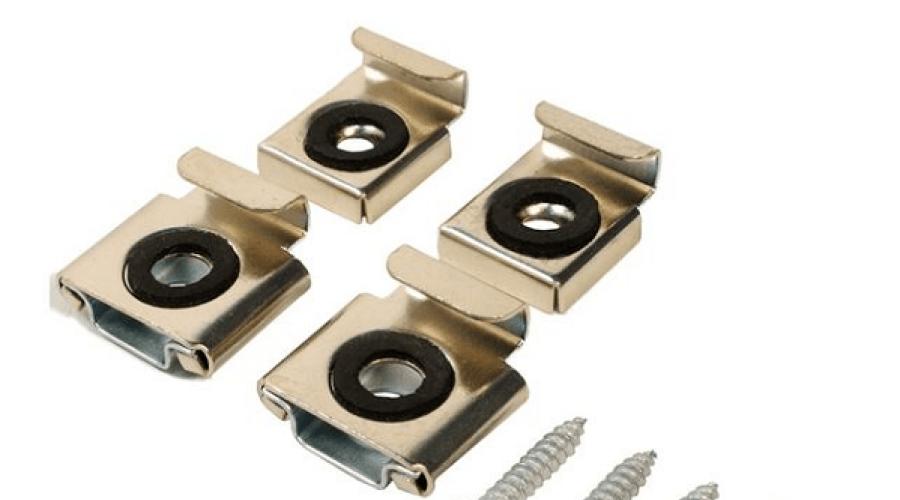
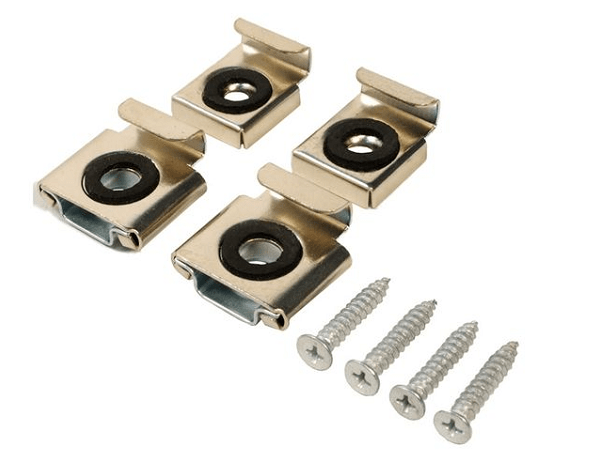
- Install special holders on the wall.
- Drill holes in the mirror and fasten them to the wall or furniture door. You can use ordinary self-tapping screws, but there are special fasteners With plastic expansion joints, which prevent the fasteners from being “tightened” and protect against the appearance of cracks.
- Install on the wall decorative profile, lower the bottom edge of the mirror into it, secure the top edge using one of the methods described above.
- Hanging on special tape ( mounting tape 3M).
- Attaching a mirror to a wall without drilling is possible only with glue or special double-sided tape. This may be required when installing on plasterboard wall, partitions made of foam blocks, other materials with low bearing capacity. This method is also useful if you don’t want to damage tiles, furniture doors, etc. All other methods involve drilling holes.
At what altitude
The installation height of mirrors depends on the installation location and its purpose. In the bathroom it is hung so that the middle of the mirror surface is at eye level. The height of residents may vary, but on average the center is at a height of 160-165 cm from the floor.

When hanging in the hallway, mirrors are usually installed long and narrow. In them, a person should be displayed in full height. To do this, its upper edge should be slightly above the head - 3-5 cm. When hanging on cabinet doors, use its upper edge as a guide. If the closet is tall, the mirror is also fixed a few centimeters above the head.
Mirror holders and installation methods
If after some time the mirror has to be removed/replaced, it is more convenient to install it on the holders. They are of two types:
- end-to-end;
- non-through (ordinary).
Blind-through mirror holders are installed on a wall or door. Then the edge of the mirror is inserted into them. They can be attached almost flush to the plane of the wall/door, or they can be remote-mounted. In the second option, a gap of 5 mm to several centimeters remains between the wall and the mirror. This saves you if you need to install it on uneven walls.

When using conventional holders, they are placed two at the bottom (if the mirror is small, you can place one at the bottom - in the center), two on the sides. When installing, you must carefully measure and set aside the dimensions. The lower holders are positioned strictly horizontally at an equal distance from the edge, and the side holders are placed so that the edge of the mirror fits easily into their grooves. Moreover, it should not fall out even with a maximum shift to one side. Typically, the installation distance of the holders should be 2-3 mm wider than the mirror, but there may be variations depending on the design of the holders.
Another option is two at the top and two at the bottom. In this case, the distance between the fasteners is also a couple of millimeters greater than the height of the mirror.
Through holders are used if the mirror surface has holes for fasteners. They can be made in a glass workshop. The holders themselves are ordinary self-tapping screws or dowel-nails with plastic linings and decorative caps different forms and diameters.
They are installed like regular dowels. First, holes for installation are marked (attach the mirror to the wall, make marks with a pencil or marker), holes are drilled, and plastic plugs are installed for the dowels. Then the fastener with the plastic plug in place is threaded through the hole in the mirror surface and installed in place. The final stage is the installation of decorative overlays.
Attaching a mirror to the wall with glue
Not every wall is easy to install fasteners. For example, to hang something on plasterboard partitions or walls, you must either install fasteners in the place where the profile passes, or use special butterfly dowels. Each such mount can support about 20 kg. This is enough to mount a mirror, but not everyone wants to make holes in the wall. If the walls are smooth or the mirror needs to be installed on the door of a cabinet or other piece of furniture, it can be glued.

Which glue to choose
For installation, a special glue is used, which is called “glue for mirrors”. They differ from ordinary ones in that they do not damage the amalgam coating. Important point is that the composition must have good adhesion(adhesion) with the surface on which you are going to glue the mirror.
Here are some names of popular compositions:

There may still be many compositions; the most common ones have been described. They "set" quickly, but final drying occurs only after 72 hours or more.
What else can you glue on?
Neutral silicone sealant is suitable for gluing mirrors. It has excellent adhesive ability and does not damage the amalgam. The cost of mirror glue and silicone sealant is approximately the same, and the setting time is also approximately the same. When choosing, be careful: acidic (acetic) silicone sealants destroy amalgam. Therefore, carefully read the composition and scope of application.

Any composition will do, but for attaching a mirror to the bathroom wall, it is better to use one with antifungal additives. This will prevent the development of fungi and mold. Also in wet areas You can use silicone for aquariums. It is always made on the basis of silicone, neutral, fungi and mold do not appear on it. The cost may be slightly more expensive than regular sanitary silicone.
Bonding technology
Attaching a mirror to a wall with glue is a simple procedure, but there are some points you need to know. Before gluing, the surface on which the mirror will be glued and its back side are cleaned of dirt, dust, and degreased (wipe with alcohol, wash with soapy water and dry). A strip of glue is applied to the mirror like a snake and pressed against the wall at the installation site. The adhesive composition can also be applied pointwise - in a checkerboard pattern over all surfaces. This way of fastening the mirror to the wall is reliable, but if replacement is necessary, it will need to be broken, the glue removed with a spatula, and a new one installed.
To hang it evenly, you can first draw a line on the wall along which to align the bottom or side edge.

When gluing mirrors large area The technology is changing a bit. Glue is applied to the leveled, primed and dried wall and spread over the entire surface with a spatula with a very fine tooth. Such spatulas are used for. They should not be confused with those used to apply adhesive to tiles. They have too long distance between the teeth. A mirror is glued to the prepared surface. It is carried and held using special handles with suction cups.
Gluing order
Attaching a mirror to a wall with glue is considered reliable. This method is used in the bathroom if it is necessary for all the finishing to be in one plane. In this case, first lay out the tiles, then install the mirror. In this case, when installing the lower edge on the tile, you need to put a gasket several millimeters thick. The same gap remains on the sides and bottom. After the glue has dried, it is filled with silicone sealant or grout, which was used for jointing. This gap will compensate for the difference in thermal expansion of materials - it is different for ceramics and glass. This gap will also prevent cracks from appearing during shrinkage and movement of the house.

Since the glue does not harden immediately, the mirror may begin to slide down the wall. I don’t really want to hold it for all 15-20 minutes, so they take measures to fix it in advance. To do this, before applying the glue, several pieces of double-sided tape are glued to the back side. It will hold the mirror until the glue dries.
Second option
The second option is to glue a strip to the wall that will serve as a stop. Choose a glue that can be easily cleaned from the surface. If possible, you can tighten several screws, etc. In general, any stop that will hold a heavy piece of glass (1 square meter 4 mm thick weighs 10 kg) in place.
How to glue a mirror with double-sided tape
Mirrors that are small in size and weight can be glued with special 3M double-sided tape. An adhesive composition is applied to the foamed polyethylene or polyurethane on both sides. The foam base compensates for some unevenness of the base and also serves to absorb movement of the base. The thickness of the base (adhesive tape) can be from 0.8 mm to 1.6 mm, the width of the tape is 6-25 mm.

Pieces of tape are glued onto a clean, grease-free base. It is distributed evenly over the entire surface. It is not worth gluing along the perimeter; it is better to glue all the pieces vertically in a checkerboard pattern at a distance of about 10-12 cm from each other. The tape consumption depends on the mirror area; experimental data are given in the table.
Consumption of double-sided foam tape for gluing mirrors
| Mirror area cm2 | Mirror 3 mm thick | Mirror 4 mm thick | Mirror 5 mm thick | |||
|---|---|---|---|---|---|---|
| tape width 19 mm | tape width 25 mm | tape width 19 mm | tape width 25 mm | tape width 19 mm | tape width 25 mm | |
| 600 | 14 cm | 11 cm | 19 cm | 14 cm | 24 cm | 18 cm |
| 800 | 19 cm | 14 cm | 25 cm | 19 cm | 32 cm | 24 cm |
| 1000 | 24 cm | 18 cm | 32 cm | 24 cm | 39 cm | 30 cm |
| 1200 | 28 cm | 22 cm | 38 cm | 29 cm | 47 cm | 36 cm |
| 1400 | 33 cm | 25 cm | 44 cm | 34 cm | 55 cm | 42 cm |
| 1600 | 38 cm | 29 cm | 51 cm | 38 cm | 63 cm | 48 cm |
| 1800 | 43 cm | 32 cm | 57 cm | 43 cm | 71 cm | 64 cm |
| 2000 | 47 cm | 36 cm | 63 cm | 48 cm | 79 cm | 60 cm |
| 2200 | 52 cm | 40 cm | 69 cm | 53 cm | 87 cm | 66 cm |
| 2400 | 57 cm | 43 cm | 76 cm | 58 cm | 95 cm | 72 cm |
| 2600 | 62 cm | 47 cm | 82 cm | 62 cm | 103 cm | 78 cm |
| 2800 | 66 cm | 50 cm | 88 cm | 67 cm | 111 cm | 84 cm |
| 3000 | 71 cm | 54 cm | 95 cm | 72 cm | 118 cm | 90 cm |
The final touch is to remove protective film from the glued pieces and place the mirror in the place intended for it. Manufacturers of this type of tape provide a guarantee for 10,000 adhesives, so if it is installed incorrectly, you can correct it.
Fastening the mirror to the wall using 3M adhesive tape is reliable - this material is used in industry for gluing smooth fragments. This compound is not afraid of ultraviolet radiation and has a wide temperature range of use (from -40°C to +90°C). The adhesive composition has excellent resistance to water. The only limitation is that this tape adheres much worse to porous surfaces. Nose ceramic tiles, laminated or adhesion is excellent. If in doubt, you can conduct an experiment - glue something heavy, then try to tear it off. Based on the results, you can draw your own conclusions.
According to archaeologists, people used mirrors back in the Stone Age, rubbing pieces of tin, gold or platinum until they shine. But the prototype of the modern glass mirror appeared only in 1240, when people learned to blow glass bottles. The inside of the bottle was covered with a layer of metal and broken. The fragments were used as a mirror. They learned to make a flat mirror only at the beginning of the 16th century in France.
A modern glass mirror is well known to everyone and is a sheet of polished glass, on one side of which it is sprayed thin layer metal called amalgam. Aluminum is used in the manufacture of budget mirrors, and silver – in expensive ones. The metal film is covered with a layer of varnish on top to protect it from external influences. Therefore, when attaching a mirror to the wall, you must work very carefully so as not to accidentally damage the delicate mirror coating and the glass itself.
Today, when creating the interior of premises, mirrors are widely used, thanks to which you can change the space by visually expanding the walls of the room or raising the ceiling. I also decided to visually enlarge my hallway and hung a large mirror on a column protruding from the wall. The mirror also serves its intended purpose, allowing you to see yourself in full height. Wife availability large mirror I really liked it in the hallway.
How to fix a mirror on a tiled wall
Experience in fixing mirrors small size I already had it on my walls. One mirror, measuring 60×90 cm, was mounted on tiled wall in the bathroom, above the glass shelf. When accepted water treatments, moisture usually condenses on the surface of the mirror, and it becomes covered with drops of water. That's why I chose a mirror with silver amalgam covered protective layer copper and double paint layer. Over twelve years of operation, the mirror has not changed its original appearance.

The mirror was made to order, and I included two large holes at the top. To hang the mirror on the wall, you just need to put it on the bases of two lamps. To prevent the mirror from moving on the plastic body of the lamps, shallow grooves were made in it with a width equal to the thickness of the mirror. Placing the lamps on the plane of the mirror made it possible to increase their efficiency, since the light from reverse side lampshades are reflected from the mirror and directed into the room.

To exclude mechanical damage amalgam and a protective varnish layer on the tile when installing and washing the mirror, several thin rubber plates were glued to the tile in the corners and center of the mirror.
How to fix a mirror on a brick wall
Another mirror measuring 35x110 cm was mounted on brick wall in the hallway above a low cabinet. Since the mirror practically stood on the cabinet, then special requirements there was no need to mount it; it was enough to support the mirror so that it could not fall to one side.

For beauty, the mirror was placed in a frame consisting of two strips of MDF. In the center of the sides of this baguette, a sample was made with a depth of 10 mm and a width of 5 mm. The sample was filled along its entire length with a small amount of silicone, the mirror was inserted into these grooves and, after the silicone hardened, it became one with the frame.

The mirror is fixed to the wall using two hangers, one of which you see in the photo. The mirror with holes in the hangers is mounted on self-tapping screws screwed into dowels that are installed in the brick wall.
How to fix a mirror on a plasterboard wall
The above methods of attaching a mirror did not present any difficulties, since the mirrors were small in size and therefore light. Questions arose when I was faced with the need to hang a large mirror on a plasterboard wall in the hallway (mirror size 66x170 cm, weight 12 kg). The difficulty was that in addition to its large size, the mirror was only 4 mm thick, therefore, it was necessary to install four dowels with high accuracy so that when attaching the mirror to the wall, it does not crack.
Choosing a mirror mounting method
on a plasterboard wall
Currently, there are three main methods of attaching a mirror to a wall: gluing with double sided tape or special glue and screwing with self-tapping screws through the holes in the mirror itself. Each method has its own advantages and disadvantages.
You can only stick with tape small mirrors area no more than one square meter, since the holding force of the tape is not great, and the reliability of this type of fastening for large mirrors will be low. The mirror may fall off over time. But the method is very simple and does not require high qualifications and tools. You need to cover almost the entire surface of the mirror with tape.
The adhesive method of fastening is very reliable, does not require high qualifications and tools, but, if necessary, it will be impossible to remove the mirror without damage, except perhaps together with a piece of the wall. Only glue intended for gluing mirrors is suitable for gluing, for example, “Soudal” polyurethane, the label of which should contain an inscription, including “for gluing mirrors.” You must be careful with the choice of glue, since unsuitable glue can damage the amalgam of the mirror.
Fastening with screws using special holders allows, if necessary, for example when renovating a room, to easily remove the mirror from the wall and then install it again without any problems. The only drawback of this method is the need to drill holes in the mirror.
My choice fell on the method of attaching the mirror using self-tapping screws, especially since the mirror was made to order and four holes in the mirror in the corners were drilled in the workshop. All that remained was to drill four holes in the wall for the dowels and tighten the screws.
Choosing accessories for mounting a mirror
To determine the diameter of the mounting holes in the mirror, fittings for mounting were selected in the workshop. One set of fasteners included a brass bushing with a plastic gasket, a decorative nut, a self-tapping screw and a dowel.

Upon closer examination, it turned out that the mirror is pressed against the wall by directly pressing the protrusion on the metal sleeve, and the decorative brass nut, when tightened, will also rest against the surface of the glass. Contact between glass and metal can lead to cracks, so the fastening had to be modified.

For this purpose, an additional gasket was made from polyethylene 0.5 mm thick. First, using a punch, a hole with a diameter of 5 mm was punched (this is the diameter of the end of the sleeve that fits into the mirror hole). The gasket can also be made of rubber or soft plastic.

The sheet with the punched hole was then placed over the sleeve and a decorative nut was screwed onto it. All that remains is to draw a line around the nut and cut along it with scissors. Installing a homemade additional gasket will completely eliminate metal contact with the mirror.

Four mounting kits of fittings have been modified to mount the mirror on brick or concrete wall. To attach mirrors to a plasterboard wall, you will have to replace the standard cylindrical dowels with special ones called “Butterfly”.
Large mirror mounting technology
Usually large mirrors are hung on the wall at some distance from the floor. This is done not only for aesthetic reasons, but also for the possibility of installation floor plinth so that the mirror does not get dirty when cleaning the floor, and to prevent accidental damage. The sample showed that optimal height from the floor to the edge of the mirror in my case is 10 cm.

To hold the mirror at a height when marking holes for drilling and when mounting it on the wall, I placed a stack of scraps on the floor near the wall chipboards. But since the mirror was beveled (this is when a transparent strip of glass is ground off along the edge of the glass of the mirror, forming obtuse angle with its outer plane, it is clearly visible in the photographs below), then it slipped into the gap between the stand and the wall. I had to additionally install a miter box, and put it on it to protect the bevel from damage. plastic corner. Thanks to the miter box, the mirror could not slide into the gap between the wall and the stand.
If the mirror is mounted on a brick or concrete wall, then with the help of a stand it is pressed against the wall at the installation site, and with the help of a pencil, places for further drilling holes for dowels are drawn through the holes in the mirror. The mirror is removed, and using the device described on the website page Drilling holes in walls, a drill with Pobedit drill- holes are drilled.

Marking holes when installing a mirror on a plasterboard wall can be eliminated by drilling holes in it with the mirror attached using a thin-walled tube of suitable diameter. The tube can be taken, for example, from a telescopic antenna by removing an elbow of suitable diameter from it. For better drilling, you need to make teeth on the end of the tube with a needle file.

With a tubular drill, if held in a hand vice, drywall can be drilled easily even by hand, but you can also use a drill, drilling holes at low speeds. The mirror itself will serve as a conductor. To make the mirror easy to hold in your hands and without gloves, I did not remove the wrapping paper from it, but only tore it at the corners to gain access to the mounting holes.

After receiving the first hole, you need to insert a dowel into it to prevent accidental displacement of the mirror when drilling subsequent holes. And then, after drilling the next hole, you also need to insert a dowel into it. As a retainer, instead of a dowel, you can use a wooden or plastic stick slightly smaller than the diameter of the hole in the mirror. The dowel should not be inserted completely so that it can be easily removed by hand.

For mounting on a plasterboard wall, special dowels are used, which are called Molly (Molly) or popularly “Butterfly”, because appearance resemble a butterfly. One Butterfly dowel is designed for a load of up to 10 kg, the mirror weighs 12 kg. The mirror is fastened using four such dowels, therefore, the load per dowel will be about 3 kg. The safety margin is more than sufficient.

When all the holes are drilled, the mirror is moved to the side and dowels are installed in the holes. The size of the base of the Butterfly dowel was slightly larger than the diameters of the drilled holes, so they had to be drilled out a little with an ordinary drill. I had PVA glue on hand, and for better adhesion of the dowel to the wall and to prevent coloring of the plaster, I smeared the holes with this glue before installation. It is not necessary to lubricate the holes with glue, but this will hold the dowel more securely.

Now all that remains is to squeeze the wings of the dowel with your fingers, insert it into the hole and hammer it in. Everything is ready to attach the mirror.

The mirror is placed back on the stand and secured to the wall with self-tapping screws using previously prepared bushings. Here it should be noted that the length of the self-tapping screw for guaranteed screwing into a “Butterfly” type dowel must be equal to the length of the dowel straightened in length, since the dowel behind the sheet of drywall may not return to the shape of the butterfly.

All that remains is to screw the decorative nuts onto the bushings, and the work of attaching the mirror to the wall can be considered complete. By the way, in this photo, the edges of the facet are clearly visible. Thanks to the facet, due to the refraction of the reflection in it, the mirror looks elegant.
How to make a beautiful frame for a mirror
A quick glance at the mirror mounted on the wall revealed that it did not harmonize with the surroundings in the hallway. The mirror hung like separate element and did not fit well into the interior. It was clearly missing framing it with a baguette. I had to do some modifications and figure out how to make a frame for the mirror.

When visiting a store building materials attracted attention decorative corner, intended for decorative protection external corners of walls. You see him in the photo. It consisted of two strips of cardboard covered with a film with a wood pattern. Distinctive feature This corner had the ability to take any angle. The width of the edge of the corner was 20 mm, the length of the corner was 2.5 m. Just along the entire perimeter of the mirror, a section of the wall 20 mm wide remained uncovered. My imagination suggested that this was exactly what could be used to make an excellent frame for a mirror.

The corner was cut lengthwise into two strips, and sections of the required length were sawn off with end angles of 45°. This can be done using a miter box and a hacksaw. The frame was glued to the wall liquid nails“Moment”, which I used when installing ceiling skirting boards.

After framing the mirror with a decorative frame, it harmoniously fits into the interior of the hallway. An evaluation of the result of the work after installing a large mirror in the hallway confirmed that the task of expanding the space and the ability to see oneself in full height was successfully solved.