How to install a door and install locks. Recommendations for installing a lock into a wooden door yourself. What to prepare for the master
Read also
It will not be difficult to mortise the lock yourself.
A lock installed on an interior door always significantly increases the functionality of the room. Its insertion is not difficult for a professional, but still has some points that need to be taken into account when working for beginners.
First of all, you need to prepare your tools. To installing a lock on an interior door was done in a short time, you will need the following tools and materials:
- Forstner or feather drill with a diameter of 22 or 23 mm;
- drill 2 mm;
- wood crown, diameter 50 or 54 mm;
- screwdriver or drill;
- chisel;
- roulette;
- masking tape;
- simple pencil.
The handle lock is installed approximately at a height of one meter from the floor if the door is made of MDF or chipboard. On a door made of solid wood, the handle can be installed higher or lower, as it will be more convenient to use it.
You should measure the distance from the floor and cover the door with masking tape at a given height. You can do without tape - it is only needed to make it easier to apply marks and not accidentally damage the canvas. An oilcloth is placed under the door, since some debris is generated when drilling. At this point the preparation is complete, you can begin marking and drilling the canvas.
Mortise the lock: procedure
Markup: how to make a template
The lock comes with instructions, in which you can find a diagram of the location of the holes. If necessary, make your own template yourself:
- a line is marked on a piece of paper the size of the width of the door leaf;
- a rectangle of a given width is drawn with the height of the locking tongue plate of the lock;
- On both sides of the rectangle, draw two symmetrically located circles, the diameter of which corresponds to the diameter of the locking mechanism of the door handle.
A template cut out of paper is applied to the end of the door and outlined with a pencil. The master for whom installing a lock on an interior door with your own hands – a familiar process, without a template. In this case, he simply measures the same distance from the floor and makes marks in the center of the end of the door and on both sides. In the latter case, the points are at the same distance from the edge of the door.
Making holes

The hole is drilled with a special nozzle.
A hole is drilled in the end. An interior door can consist of solid wood or be hollow. In any case, drilling is carried out to the depth of the locking mechanism.
To drill round holes on the canvas, an attachment - a crown - is installed on the drill. By placing a drill with a nozzle at the marked point, a hole is drilled on one side of the door leaf. The drilling depth is until the drill appears on the other side of the door. After that, in order to avoid chips on the canvas, you should stop and use a crown to drill a circle on the second side of the canvas.
As a result, we have a round through hole connected to a hole that has access to the end of the door.
Installation of lock parts
Drilling a hole for the end plate

A chisel is used to make a recess for installing the lock plate.
The next step will be to select the door leaf material from the end side to install and deepen the plate with the locking tongue. Here you will need a chisel prepared in advance and a stationery knife.
The plate is applied to the end, outlined with a pencil, and then an incision is made along this contour with a stationery knife. This is necessary in order to carefully cut off the film covering the door leaf. After which, using a chisel, select a layer with a thickness slightly less than the thickness of the lock’s overlay plate– when tightened with screws, it will be flush with the plane of the end. Holes for screws are drilled according to the markings.
You can begin installing the lock with a handle.
Assembly and installation of the handle

The mechanism is fixed with screws.
First of all, let's pay attention to the locking tab - if there is one, it should be located on the inside of the room. The lock set includes a key with which the decorative rosette is disconnected from the locking mechanism.
The lock consists of two handles: one is connected to pins, the other has holes for the pins. The handles are inserted from opposite sides of the canvas so that the pins fit into the holes provided for them. The cylinder mechanism is fixed to the door with screws. Before a click appears, decorative rosettes are installed.
A plate with a locking tongue is mounted at the end and secured with screws. This completes the installation of door handles. The next step is to cut a hole and install a plate under the entrance of the locking tab on the opposite doorway.
Installing the lock plate

The lock plate is installed on the door jamb and secured with screws.
The same distance from the floor is marked on the jamb as for installing the handle. You don't have to use a tape measure for this. It's easier to close the door and make marks on the jamb opposite the top and bottom corners of the lock plate at the end of the door. Then the marks are transferred to the plane of the opening using a ruler. A hole is drilled for the tongue and four holes for the screws. You can use one drill for the job. The size of the hole is not very important, the main thing is that it is no smaller than the size of the locking tab. The plate is installed and fixed with screws. At this point, the installation of the door lock can be considered complete.
- Describing the steps sometimes takes longer than installing the lock on the door itself. In reality, the work is not as difficult as it looks on paper. It is important to complete all marks carefully.
- Locks for interior doors are available with different handle configurations. The procedure for installing them, as a rule, does not differ from each other.
- As noted above, an interior door can be hollow inside. According to standards, a wooden beam is mounted inside a door made of MDF or chipboard at a height of one meter from the bottom edge of the door. The installed lock must be located directly in this place, otherwise it will not stand firmly and will damage the door leaf during operation. You can check the presence of a beam inside by tapping the door leaf.
We hope that this article will help the master, who is starting to work on inserting a lock for the first time, to complete the entire process efficiently and quickly.
Door designs are supplied to the market in different designs - in cheaper models the door leaves are not equipped with locks, and you have to solve this problem yourself. Knowing the nuances of such work, and having the simplest household tools at hand, installing a lock on an interior door will not create any difficulties.
What to prepare for the master
For interior door panels, handles complete with a locking mechanism are usually used. Therefore, apart from the tools and materials traditionally used for insertion (drill with a set of drills, chisels, hammer) and materials, there will not be enough.
Scotch. Door leaves installed inside the home have a surface coating. Even metal sheets, not to mention their wooden counterparts, are finished with veneer, solid wood or laminated. Since any work related to the installation of something always begins with markings, there is a risk of damage to the door surface at the stage of preparation for insertion. Therefore, you will definitely need tape.

Set of feather drills. When inserting, you cannot avoid the through passage of the blade, and you cannot do without such a cutting tool. A regular drill definitely won't work here. You can also use a crown, but purchasing it for a one-time job is not advisable; it costs much more. In addition, it is not a universal device, since it has a fixed diameter. But a set of feather drills is always useful in the house.
If the thickness of the sash is significant, then it is still better to work with a crown. This will greatly facilitate the drilling process, and the accuracy of the passage and the cleanliness of the “channel” will be maximum. But you should purchase it only after purchasing the lock, choosing a tool “for it.”
Procedure
All stages of inserting a lock into an interior door with your own hands are performed in a certain sequence.
Marking the canvas
At the handle installation level (which is usually 100±10 cm from the floor covering), strips of adhesive tape are glued to the door; from the end and sides. That is, in those areas where drilling will be carried out.

Locks from well-known manufacturers come with a template. Marking it is much easier. Even when purchasing a product, it is advisable to check its availability.
If there is no factory template, you will have to use a lock. It is partially disassembled, applied to the canvas, and traced along the contour. Drilling points for fasteners are also marked with a sharp object.

Making holes
Under the arm. To prevent the “feather” from moving to the side, in the place of the through passage you need to mark a shallow hole with a minimum diameter for the tip of the cutting tool. The peculiarity is that the interior doors are decorated, so the work is carried out in 2 stages. First drill from one side, but not all the way. As soon as the central tip of the “pen” appears from the reverse, it is reinstalled on it. Passing the material on both sides allows you to avoid chips on the veneer or damage to the laminating coating.
In this regard, magnetic locks are much easier. After marking, it is enough to drill out “channels” for fasteners, and you can install the elements fixing the canvas.

For fasteners. To ensure they hold securely, the diameter of the drill is chosen smaller than the thickness of the legs of the screws.
Under the latch. The work is not difficult; The main thing here is to maintain the direction of passage. The drill is selected according to the size of the “tongue”, and the hole is made until it exits into the “channel” for the handle with the opening mechanism.
Lock installation
Cleaning drilling sites. This applies to the holes into which the lock elements will be placed. Otherwise, during operation the mechanism will become jammed.

Installation of the tongue. After aligning the latch, a frame is placed on it, and both its outline and the attachment points are marked.
Wood sampling. If the decorative strip is not recessed, the interior door will not close completely. An incision is made along the contour (with a knife) so that the lamination or veneer of the canvas is completely cut off from the working area. After this, a small layer of wood is removed with a sharp chisel with a narrow tip. It's important not to overdo it here. It is better to make a shallow recess; subsequently the frame will simply be pressed into the wood with self-tapping screws.
Re-installation of the tongue. After this, a decorative strip is applied and lightly tightened with fasteners.

Installation of the handle. The operating procedure is specified in the product instructions. Each manufacturer has its own characteristics. Therefore, even at the preparation stage, you should clarify how to embed a lock into an interior door. Although usually everything is limited to placing cylinder mechanisms in the hole made (on both sides) and securely fixing them in place. At the last stage, they are covered with decorative rims.
- Please note that in the normal position of the door handle, the latch should be extended. Accordingly, when you press the handle, the “tongue” is retracted and the blade is released.
- The cylindrical elements of the lock should not be over-tightened with fasteners. Otherwise, their work will be difficult, and problems will arise with turning the key and the free movement of the latch.
Installation of the “reciprocal” part
This is the name given to the strip that is attached to the frame of the door block. The “tongue” of the lock extends and the door closes until it touches the opening. Next, its location in height is outlined with a pencil. All that remains is to correctly determine the centering of the bar.
You can focus on the position of the latch at the end of the door. It (after the “tongue” is retracted) closes tightly. It is not difficult to mark the cutting line of the canvas on the block. Everything else is simple. The distance of the latch from the outside of the door is measured, and the same distance is marked on the jamb.

Having lines in height and width, you can outline the contour of the “reciprocal” part on the frame. Everything else is the same as for the “tongue” overlay strip (marking + a small sample of wood). If there is a significant gap between the block and the canvas, the latter will not be needed.
All that remains is to check the tight fit of the door and the alignment of the slot in the “reciprocal” part with the latch. Miscalculations made are easy to level out.
All indicated technological operations are typical. Depending on the lock model, their list may increase, but basically such work is standard, and any man can do it.
Greetings, friends!
As you know, friends, I am not a supporter of overpaying and I believe that even the most desperate handymen can easily install a lock or latch on their own!
I will show the whole process using the example of MDF doors, which are the most fragile and delicate (and cheap:).
It is necessary to start installing the latch only after and, and of course after.
Necessary tool
- Hammer
- Screwdriver or drill
- Spade drill ∅ 20mm
- 20 mm chisel
- Pencil
- Square (although you can do without it)
As you can see, the tool is quite simple and should be present in almost every handyman! So, if everything is available, then you can get started!!!
How to properly install a lock on an interior door
The first step is to decide at what height our castle will be. The standard recommended height is 965mm, but I usually make the top edge of the lock 1005mm. The difference is insignificant, but it seems to me that it is more convenient. 
IT IS IMPORTANT TO KNOW!
When marking the lock, you should not go too far beyond the recommended dimensions, since MDF doors have a special additional beam for installing a lock. And if you deviate too much from the norm, you can ruin the door :(
After we have noted the height of the lock, we beat off the top edge of the lock with coal.
We attach the latch to the side of the door so that its upper part coincides with the mark and place a mark in the place where the handles will be attached.

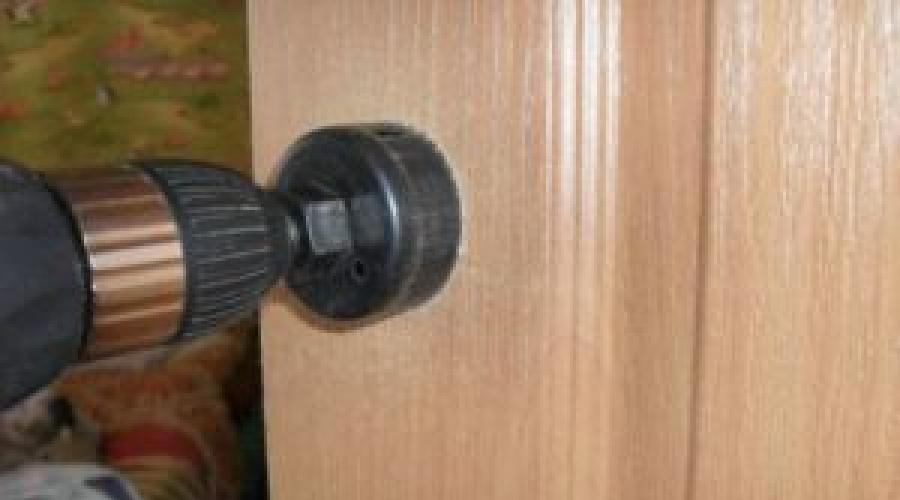
Next, use a drill bit to drill a through hole.

At first I tried to drill with a screwdriver, but it turned out that it was a little weak and I had to resort to using a drill.

IT IS IMPORTANT TO KNOW!
Friends, when you drill a hole for inserting locks into an interior door, under no circumstances press on the drill or crown (if you are installing a knob handle). The thing is that if you press hard, you risk tearing out a piece of the door on the exit side of the drill, so you need to drill slowly, adjusting the pressure.

In the next photo you can see that the drilled hole is a little small for the lock.

Use a chisel to widen the hole so as not to split the door. Slowly tapping with a hammer, we achieve the desired size.

We work hard and voila...

I am satisfied with the result - the lock moves freely to the end.

Having fixed the lock (you can immediately put it on the screws), you need to use a sharp wallpaper knife to very carefully trace the contour of the lock. If in doubt, you can simply use a well-sharpened pencil. The point of this whole operation is to recess the lock flush with the surface of the door as accurately as possible.

Friends, if you get a little hands-on, it’s okay. With each door there will be more and more experience! After you have outlined the outline, you need to use a chisel to select a piece of wood to the depth of the castle. When the lock is flush, it can be attached with self-tapping screws.

IT IS IMPORTANT TO KNOW!
When working with a chisel, always hold it as shown in the picture above. If you turn the chisel over, then when you hit the hammer you will probably select more material, which of course can be corrected by adding all sorts of wood chips, but this is already “jamming”, and we can’t “do that”!
Now you can proceed to installing the handles. By the way, the guide for door handles should be mounted with the groove down.

By the way, a few words about the castle. I used a EURO lock.

Not the most expensive, but not the cheapest either. As a result, the plastic latch did not work even for one day - it slammed shut and left my wife and my youngest locked. I had to climb into their room through the window (luckily it was a private house) and open the latch. The next day I purchased PALLIDUM locks - no problems.
We put the door handles on the guides and use a screwdriver to screw each one onto three self-tapping screws.

As we remember, the guide is installed with the groove down. This was done so that the pin that directly holds the handle itself would secure it well.
 Door handles are installed.

We screw decorative rings onto them and move on to inserting the striker plate.
How to properly install the strike plate of an interior door lock
We close the door and make marks at the point of contact between the lock tongue and the door frame.

We attach the striker plate and trace it just like the latch itself. Here I used a pencil.

We repeat all operations:
- Use a feather drill to drill a hole for the lock tongue.
- Use a chisel to make the hole perfect.
- Carefully remove the layer in order to recess the bar. Keep in mind that the MDF door frame is “crazy” cardboard and you will have to sweat a little so as not to “jam.”
And here is the result.

We fasten the bar and the lock is ready.

When closing/opening the lock, the door should close easily. If, when opening another door, a draft is created and the door seems to vibrate in the groove, then you need to tighten the tongue, which is located in the striker.

Well, that's all, friends. I hope I was able to answer the question: “How to fit a lock into an interior door.”
Now you can begin installing the slopes and the final step is installing the casings.
Thank you for your attention!
Sections of the article:
Quite often, doors do not have locks installed at the time of sale. Of course, you can order their installation additionally. However, the cost of a product with installed fittings is much higher, and for budget repairs such an expense will most likely be unjustified. Having basic knowledge of carpentry, you can embed a lock into an interior door yourself.
Selection of locking mechanism
Before starting work, decide on the type of lock to be installed, since different models have their own nuances in preparing holes in the door leaf. So, when selecting a lock, the main attention should be focused on the appearance of the product. In most cases, mortise locking mechanisms for interior doors are equipped with door handles or are integral with it.

If there are several doors in the room, the selected fittings should be as close as possible to the existing locks or be combined with them.
Since there are a huge number of mortise locks, they are classified conditionally into the following types:
- Push with straight shapes;
- Round or knobs.
Locks are also divided according to the type of fixation of the reed element. So there are roller, halyard and magnetic locks. Roller ones move with the help of a spring and roller elements. Bevel locks are the most common mechanisms and can secure the position of the latch if necessary. In the magnetic system, the tongue is attracted by a magnet, and the installed spring blocks the movement.

In addition to such mechanisms, cylinder, disk and lever locks are used to embed into interior doors. For sliding sliding doors, locking systems with an L-shaped crossbar are installed. This design makes it easy to grip the plate. Position adjustment is carried out using a rotary plate.
Tools and preparation for work
In order for the installation of a lock on an interior door to be faster and of higher quality, it is necessary to initially prepare all the tools necessary for the work. So, during the preparation and installation process you will need:
- Lock;
- Electric drill with a set of feather-type wood drills or crowns;
- A simple or construction pencil for marking. It is possible to use colored crayons with a contrasting shade for the canvas;
- Tape measure or centimeter, as well as a ruler, square;
- Chisel;
- Carpenter's knife;
- Hammer. It is better to take a light and small size for ease of use;
- File;
- Screwdriver Set;
- Bit.

Features of working with various materials
Before the process of cutting a hole in the door itself, it is necessary to carefully take all the necessary measurements. In addition, you should take into account the material from which the door leaf is made. This need arises due to the peculiarities of the filling of door structures.

The easiest door to work with is a door made of natural wood. However, such products are not very common nowadays. It is also not too difficult to cut a hole for a lock in sheets with a protective laminated layer applied. But for high-quality execution and to ensure the integrity of the door surface, it is necessary to use a drill with a special “crown” attachment.

One of the most difficult locking mechanisms to install is an interior door made of MDF. When working with it, it is necessary to take into account that almost always manufacturers place an additional wooden block inside such canvases at approximately a height of 90 to 110 cm.
Determining the optimal installation location
To install locks on interior doors, you need to determine the location of the handle that is comfortable for use. Undoubtedly, according to GOST, the height at which the lock is recommended to be installed is 100 ± 10 cm. However, such calculations were performed for people of average height.

To determine the comfortable height of the handle with a lock, you should focus on the level of your elbow. This height of the lock is the most convenient for a particular person.
If you want to insert a lock into an interior door not on the handle mechanism itself, but under it, you should opt for push products. To install such a lock, a fairly large section of the inside of the door is drilled from the end side. In addition, it is necessary to drill through holes for the keyhole and the rotary locking element, as well as square holes for mounting handles.

Installation of the push mechanism
Initially, it is necessary to determine the dimensions of the internal hole. To do this, the existing lock is applied to the side of the door so that the decorative strip lies in the same plane as the end of the door. The product is outlined with a simple pencil. After this, using a corner, the lines are connected on the end of the door.

Drilling a hole deep into the blade is done with a chisel drill. The hole of the required size is selected using a hammer and chisel. The place for the faceplate is selected using a chisel.
Using a square, mark the location of the square for the door handles and keyhole. After this, the holes are drilled. This procedure is performed alternately on both sides of the canvas to avoid damage to the coating.
After preparing and cleaning all mounting holes from sawdust, the lock is installed in the interior door and secured with a escutcheon using self-tapping screws. After installing the handles on the squares and securing them with self-tapping screws, a decorative ring is applied. Its installation is carried out through flange holes.
The final stage of installation is to install the strike plate by using a chisel to make a recess and drill a hole for the tongue.
Handle-lock knob
This castle is one of the most popular. This trend is explained by the original appearance of the product and ease of use. However, the knob handle is not always equipped with a lock. The product may have a rotary type latch with a latch tongue or a spring reed element without the possibility of fixation.

To carry out installation, it is necessary to drill a hole of the appropriate size using a “crown” attachment.
Knob installation
In most cases, installing a lock on an interior door is done on an already hung door leaf. Of course, this is permissible, however, to install the striker and cut out the hole for the tongue, measurements are required on the fixed blade. This will allow you to effectively compare all design elements.

It is worth knowing that the procedure for inserting a locking system of this type can be carried out at any convenient height of the door leaf. However, when working with frame doors, you should perform the insertion carefully in order to avoid damage to the door leaf. The task is made easier by the manufacturer's installed bar for inserting the handle and lock, located at a distance of 100 cm from the floor.
To install the lock, 2 holes are cut: in the end part for the latch and in the leaf to accommodate the rotary handle of the product. Initially, you need to do the marking. The distance from the bottom of the door is 96.5 cm. The distance from the end of the door leaf is based on the length of the lock latch. On average, this figure is 6-7 cm. The intersection point of these lines is the center of the hole for the knob handle.

Drilling a hole in the canvas is carried out in several stages. After installing a “crown” attachment of a suitable diameter into the drill, partial drilling is performed on one side of the door. Initially, you can insert the nozzle approximately halfway into the canvas. After this, drilling is done from the reverse side. This time a through hole is drilled. Such measures are necessary to ensure the integrity of the canvas and protection against chipping.

After this, a feather-type attachment for woodworking is installed in the electric drill. The hole for the latch is drilled from the end part of the blade after mandatory marking. Expanding the hole to the required size is done using a chisel.

A latch is inserted into the hole thus obtained. To select a place for mounting the strip, the part itself is first placed on the end and outlined with a pencil. When working with a veneered door, you must carefully cut through the required shaped layer of coating. In order to embed a lock into an interior door, a carpenter's knife is used. After sampling, the latch is secured using self-tapping screws.

To install the knob handle, you need to disassemble its upper part and remove the decorative ring. The outer part of the product, which has bushings for screws, is applied to the prepared hole. The inner part is applied to the opposite side of the canvas and both halves are connected with screws. After these procedures, a decorative ring is applied. The handle is installed by pressing until it clicks.
The strike plate is mounted where the tongue stops. A hole for it is drilled, and the place for the strip is prepared with a chisel. The plank is secured with self-tapping screws.
Additional accessories
When using a mortise lock, dust often collects in the hole in the strike plate, which is intended to hold the tongue, and chips also form in the hole. Such phenomena worsen the operation of the mechanism and the design of the interior door as a whole.
To avoid such consequences for the strike plate, there are special cell attachments for the reed element. In most cases, such a cell is made of durable plastic and is mounted under the strike plate.
Choosing a mortise lock for an entrance or interior door will be the best option of all possible. A mortise lock is installed inside the door leaf and is practically invisible; only the keyhole and latch handles are visible from the outside. According to their designs, all mortise locks are divided into locks with a latch, with a bolt mechanism, or both at the same time.
How to choose and how to insert a lock into a wooden door? The answer will depend on the type and functional type of the door itself. On interior doors It will be enough to install a lock with a halyard or magnetic latch. For your front door, you should choose a full-fledged door lock option.
What tools are needed to fit a lock into a wooden door?
Before you begin the work process of installing a lock on the door, you need to prepare the necessary tools for this: an electric drill, a set of drills of different diameters, a set of chisels, a pencil, a ruler, a tape measure, a hammer, a simple and Phillips screwdriver, round and flat files, a rasp, chalk.
Typically, sold mortise locks are equipped with the necessary materials and fittings for installation and operation: door trim strips, handles, screws and bolts, so there is no need to purchase them additionally.
The process of installing a mortise lock on a wooden door
We first determine the location of the lock installation. According to the standards, the lock is installed at a height of ninety to one hundred centimeters from the floor level. At this point in a standard door leaf there is a middle supporting beam or board.
In order to correctly embed the internal mechanism of the lock, you need to attach the back of its body to the end of the door leaf exactly in the middle from the edges and circle it with a pencil. Then, using a drill with a twisted or feather drill with a diameter slightly less than the thickness of the lock body, drill out the cavity marked at the end of the door leaf to the depth of the width of the body. Using a chisel and hammer, a rasp or a flat file with a large notch, the edges and walls of the cavity are leveled to a state in which the lock body fits freely and tightly into it.
Then, using a pencil, trace the lining of the lock inserted into the door. And also, using a hammer and chisel, wood is selected on the markings to the depth of the lining, which should be recessed into the door leaf flush, flush with the surface.
At the next stage, after precise markings using a ruler and pencil, technological holes are drilled for keyholes and for door handles. After this, the lock is finally inserted into its place and screwed with the supplied screws. The cylinder is inserted into it and secured with a special long bolt.
And at the end of the process, a hole for the lock tongue and latch tongue, if any, is drilled on the door jamb and processed with a chisel. At the location of the hole, a recess is cut out for the reverse lock plate, which is attached to the door frame using self-tapping screws.