How to use shutter speed and aperture in a camera. What is aperture, shutter speed and ISO
Diaphragm- a special mechanism that regulates the size of the hole in the lens.

The diaphragm works like the pupil of the human eye. After all, when we go out into the light, the pupil noticeably narrows, letting in less light. When we are in the dark, the pupil dilates to allow as much light as possible into the eye. With the diaphragm - everything is the same. When lighting is poor, the aperture usually needs to be opened to allow as much light as possible into the lens. When shooting in bright light, the aperture closes. It looks something like this.

The aperture value is measured in fractional values, showing the ratio of the diameter of the lens entrance hole to the focal length. Aperture values are usually written like this: F/2.8, F/5.6, F/11, or like this: F 2.8, F 5.6, F 11. The depth of field is directly related to the aperture value. And the rule is very simple: the further the lens is closed by the aperture, the greater the depth of field (it is often written as depth of field - depth of field in the imaged space). At the minimum aperture, the depth of field is very small, and this effect is used to create portraits or to highlight an object in the frame (not necessarily, by the way, in the foreground). For example, the aperture is fully open, the focus is on the central glass, and the rest of the glasses and the background are out of focus, creating the desired effect..

Another example of a sharp subject in the foreground and

blurred background

When shooting architecture, landscapes, multi-faceted compositions (for example, people located at different distances from the photographer), it is necessary to use large aperture values, for example F 5.6 - F 16, to obtain the desired depth of field. Here, for example, is a multi-plane photo from Monserat, where an aperture of F 8 was used to obtain the desired depth of field.  It should be borne in mind that the depth of field (at any aperture) is smaller, the closer the focusing object is to the camera. That is, if the object is very close to the lens, then even with large aperture values, the depth of field will be small. And if the focus is on a small object, then even with a fully open aperture the depth of field will be quite large. Some lenses (especially old ones) have markings that very clearly show the depth of field when using certain aperture values. This lens, for example, aperture F 22 depth of field will be approximately from 0.8 meters to infinity. And with aperture 11 - from 1.5 meters to infinity.

The type of blur in the background depends on the structure of the aperture (the number of blades) - photographers call this blur an unpronounceable word bokeh. Here's a photo I took on a Nikon DF with a 50mm/1.8 lens.  With lens aperture, you need to remember that “too much is good is also not good.” In the sense that although a very closed aperture gives a greater depth of field, due to various optical laws it can deteriorate the quality of the image, so it is best to use aperture values in the range from 5.6 to 16, no more. The next parameter, which is very important to obtain the desired result, is excerpt.

In modern cameras, shutter speeds are usually tenths, hundredths and even thousandths of a second, which allows you to take high-quality images without using a tripod. The further the aperture closes, the longer the shutter speed should be. And vice versa - the wider the aperture opens, the lower the shutter speed should be. When shooting handheld, the shutter speed should not exceed 1/80 of a second - otherwise the frame may be blurred due to hand shake. Also, the maximum handheld shutter speed depends on the focal length of the lens and is usually calculated as one divided by the focal length. That is, for a long-focus lens of 200 mm, the shutter speed should be no more than 1/200. (Well, there are several other factors at work here: the weight of the camera, the amplitude of hand shake, and so on.) If the camera or lens has a stabilizer, then without blur you can shoot at longer shutter speeds - 1/60, 1/30 and more. Image blur can be used as a special technique, especially when shooting at night: motionless standing objects will be sharp, and passing cars with their headlights will be blurred, creating an interesting effect. If the camera or subject is moving (shooting from a train, shooting sports competitions), then the shutter speed should be very small (short), and the faster the subject moves, the slower it becomes. In this shot, the shutter speed was set to 1/800 to avoid blurring the dolphins' figures.

If the shutter speed is chosen incorrectly, the photo can be ruined - as in the example below, where 1/30 is too long a shutter speed for movement in the frame.

If the lighting is bad and even with a fully open aperture you have to take a long shutter speed, then you need to use a tripod (of course, this only applies to static scenes). This shot was taken with a shutter speed of 3 seconds from a tripod.  And the last most important parameter when photographing is the photosensitivity of the matrix.
100, 200, 400, 800, 1600, 3200.
ISO 50 is occasionally found, and various high ISOs are also used - 6400, 12800, 24000, up to ISO 102400, although only very expensive cameras can shoot at such high ISOs. In film cameras, the light sensitivity depended on the film itself and for a particular film was a constant unit - the photographer selected the ratio of shutter speed and aperture to the sensitivity of the film, using for this a special device called an exposure meter, or simply the corresponding tables. For digital cameras, purely physically, increasing the photosensitivity value means increasing the signal received from each pixel of the matrix. As the signal increases, interference increases - extraneous signals that are not related to the subject being photographed. As a result, so-called “noise” appears on the final frame - artifacts in the form of dots. Here is a photo taken on a smartphone - with the light installed ISO sensitivity

2000. Even from the reduced image you can see how strong the “noise” and interference are.  Well, here is a piece cut out from the full frame on a scale of 1:1. The "noise" is just awful. But this is not surprising. The maximum operating ISO value depends on the physical size of the camera matrix and the pixel sizes of this matrix. We talked about matrix sizes in detail in this article, so understanding in this issue you should already have it. So, for tiny smartphone matrices, as a rule, the picture begins to “noise” already at ISO 400-800. The same applies to conventional digital point-and-shoot cameras, where the matrix is not much larger. Good mirrorless cameras and amateur DSLRs with matrices with a crop size of 1.5-2.7 produce quite decent results at ISO 3200 and even ISO 6400 (for a crop size of 1.5). Full Frame cameras usually give good quality

Specialized cameras like the Sony Alpha A7S, where the FullFrame matrix contains 12 million large pixels, seem to allow you to shoot at ISO 25600, ISO 51200 and even ISO 102400, but one camera without a lens costs about a hundred thousand rubles. All three parameters - aperture, shutter speed, ISO - are interconnected. To get good image quality, it is advisable to make the ISO as low as possible (there will be less “noise”). However, in poor lighting conditions, even with a wide aperture at low ISOs, you will have to use very slow shutter speeds, which will lead to blurry images when shooting handheld. As a result, you have to reduce the shutter speed to acceptable values, but at the same time increase the ISO. If the ISO is increased to an acceptable maximum and the photo still comes out very dark (many modern devices The aperture must be set to at least 5.6 to obtain the desired depth of field. And this despite the fact that you are essentially shooting a portrait, albeit a collective one. And, for example, landscape photography. You are filming an ancient castle located on the opposite bank of a pond. In the frame, reeds growing in a pond appear in the foreground on the left and right. If you stop the lens down enough, as is usually done when photographing a landscape, the reeds in the foreground will become quite sharp and will distract attention from the castle in the distance. If you open the aperture, as when shooting portraits, then the reeds in the foreground will be blurry, unsharp, and when viewing the photo your attention will be focused on the castle in the distance, which is what we need. So, as you can see, not in all scenes the camera’s automation will set the , what you need. It works normally only on primitive scenes. Most often, the photographer manually sets the parameter that is most important for a given scene, and allows the camera to set the remaining parameters. All cameras have the following modes: aperture priority, when the aperture is set manually and other parameters are selected; Shutter priority, when the shutter speed is set manually. Well, the photographer can set the ISO value manually if necessary. I usually shoot in aperture priority (A), and also often manually set the ISO value. You can also shoot in programmatic mode (P), if necessary, manually setting the desired parameters (the same ISO) and controlling the ratio of aperture and shutter speed (in P mode, this pair can be changed in one direction or another).
You know what relationship between aperture and shutter speed will help you unlock the potential of the camera and get all kinds of pleasure from the shooting process and the predictability of the result. and endurance are concepts that are certainly the basics, but when you're in last time remember what aperture is and what it characterizes? Let us remind you that this is the size of the lens aperture opening (and, in addition, its ability to collect light, the characteristics of the light beam at the input, but this is not the main thing now). The aperture can be seen by looking directly at the camera. The diameter of the hole (what is meant by size) is denoted by a series of sequentially changing F-number values. The setting is displayed on the digital screen of a DSLR camera, providing the photographer with information about the aperture size. The smaller the aperture number, the larger it itself, that is, the hole. And vice versa. Every time a photographer increases the value one step, for example, from F/5.6 to F/4, twice as much light hits the camera's sensor. “Going down” by one value we reduce its amount by half.
Photographer Joe Watson from lrcamera dot com shares illustrations of the process, as well as his thoughts on the classic theme of the interaction between shutter speed and aperture. The art of shooting for him - favorite hobby, the opportunity to learn something new and tell those interested about it. Joe has put together a little guide in the hopes that it will help the next newbie with a newly purchased digital camera understand, easily master, and successfully apply the technical foundation of photography fundamentals.

Equivalent Exposure
So, we know that aperture is the size of the hole to which the diaphragm opens. How can this knowledge help in shooting? Photography is very much a science of getting optimal quantity light for images in specific conditions. With a small opening (e.g. F/22), very little light reaches the sensors compared to a very large opening at F/1.4. It should be borne in mind that in both cases the shutter opens for the same amount of time.
In this case, you can get exactly the same exposure at both F/22 and F/1.4 - simply by lengthening the shutter speed. When the shutter is open longer, the camera receives more light. The combination of aperture and shutter speed settings makes it possible to accurately determine required quantity light that will be in the image, and by using different combinations of parameters, the photographer will maintain the same exposure results. For example, with a shutter speed of 1/30 at F/8 (that is, the aperture opens for 1/30 of a second), the exposure will be identical to that obtained with the aperture opened at F/16 (smaller aperture) at a shutter speed of 1/8 of a second . This ratio is known as equivalent exposure.
Think about the artistic side
The photographer, knowing that he has a single exposure value available to him, can combine F-values and shutter speeds in different ways. However, knowing in theory how to do something and being able to do it are two different things. Just because the settings will be close to identical does not mean the result will always be the same. It is at this point that photography begins as an art.
Do you want the image to be sharp or are you looking for dramatic blur? Do you want the entire frame to be in focus or central object? First you need to solve artistic issues, and then “adjust” the settings for aperture and shutter speed to your goals.

Depth of field
The relationship between shutter speed settings and the effects they "cause" is not difficult to understand. Having mastered the basics, you will be able to clearly imagine what result you will see in the image. The longer the shutter is open (slower the shutter speed), the greater the blur of objects moving in the frame. At the same time, you need to remember that you can get a blurry image without moving objects in the frame. If the photographer moves or his hand shakes during a long exposure, the photo will become blurry, so using a tripod is almost always good idea, and sometimes a prerequisite.
Aperture also affects depth of field (DOF). The depth of field decreases as F values decrease, that is, the lens opening expands. Therefore, the larger the aperture number, the more the hole diameter is reduced and the greater the depth of field - this means that objects in the field of view will be clearer over a larger area. As the depth decreases, the background and background will become blurred. Only the object in focus will remain sharp.

How to use relationships between parameters
Even when starting to experiment with shutter speed and aperture, it is not at all difficult to immediately obtain a high-quality result. And in DSLR cameras There is everything from the budget category necessary tools. For example, auto-tuning is relevant for beginning photographers. With it you can determine what type of images you like best.

A simple example: you want to get a bright, spectacular portrait, face close-up. It is intended to fill the entire frame and become the main focal point in the image. For achievement good result You need to set your camera to aperture priority mode. This setting will give you control over the hole diameter while the camera takes care of the shutter speed. Now that you have control of the aperture, continue the experiment and open it as wide as possible. Focus on the model's face and take a photo - you will see that the depth of field decreases until only it remains in focus, and the background blurs.
The next example is a landscape. These photos require maximum depth of field. You also need to set the camera to aperture priority mode, while closing it and narrowing it as much as possible. Now that the hole has become minimal, the camera itself will begin to compensate for this effect, “forcing” the shutter to stay open as long as possible in order to get the correct exposure. Using long shutter speeds it is easy to blur the image, so a tripod will be completely useful.

The last example is . Set your camera to shutter (shutter) priority. It allows you to set its speed yourself, while the camera “takes care” of the correct exposure and independently determines the aperture size. Tracking is a great way to capture running or jumping. The trick is to keep your camera on your subject while shooting at a slow shutter speed. Once you've practiced the technique, you'll end up with a photo where the main "target" is sharp in focus and the background objects are blurry. The picture will become dynamic; when looking at it, the viewing audience will almost feel the speed. The technique is not easy, and it will take practice to get it right, but the results are worth the effort.
Experiment as much as you can, and you'll be able to transition seamlessly from shooting in Auto mode to other settings. Once you become familiar with the basic capabilities of your photography tool and understand how aperture and shutter speed relate to each other, you will open the door to a world of amazing possibilities, for example, you can almost without thinking about making a photo silky smooth flowing water or a running river breaking up into myriads of small splashes. The full potential of technology will be at your service. Happy shooting!
People often purchase digital SLR cameras in pursuit of picture quality, but have no idea about technical points shooting. This mainly applies to those who, before the DSLR, held in their hands exclusively compact cameras and used automatic modes (which, by the way, are very advanced in modern cameras).As a result, some become frustrated with the camera and photography in general, while others are patient and try to master the intricacies of photography in order to unlock the full potential of a camera with a full (or almost full) sensor.
Initially, I planned to write one article, but along the way I realized that the volume was too large and decided to break it into several parts. In this chapter I will consider such concepts as shutter speed, aperture, depth of field and photosensitivity, how these parameters affect the shooting result. Next up is an article about the types and parameters of lenses, working with flashes and tips for shooting in different conditions.
Exposition
Exposure is the amount of illumination of the photosensitive sensor. It is formed by two parameters - shutter speed and aperture - which are also called “exposure pair”. The exposure must be of such magnitude as to ensure required amount light to form an image on a sensor with a given light sensitivity (which is designated ISO, for example, ISO 100, ISO 800, etc.).How more value sensitivity of the matrix, the lower the exposure should be. In automatic and semi-automatic operating modes, the camera calculates exposure using a special sensor and other system parameters.
To convey the entire light picture of the scene, it is necessary that the dynamic range (minimum and maximum perceived brightness) of the sensor be greater than the range of the scene being photographed. If this is not possible, the exposure is chosen based on the fact that the most important part of the frame is correctly processed.
Rice. 1. From left to right: underexposure, normal exposure, overexposure
Excerpt
Shutter speed is the time for which the camera shutter opens to expose the sensor to light. The shutter in its full form is not available in all devices, in most compact and various kinds in mobile phones, its role is played by electronics - the so-called “electronic shutter”, the shutter speed in this case is determined by the time between zeroing the matrix and reading information from it. There are also hybrid shutters.The most common type of shutter is a curtain-slot shutter, in which two curtains move. When cocked, the sensor is covered by the first curtain. When the shutter is released, this curtain opens the way for light to flow. After the required time has passed, the gap is closed with a second curtain. Starting from a certain shutter speed, the shutter speed is no longer sufficient and the frame begins to be illuminated by a gap formed by two curtains. The shorter the shutter speed, the smaller the gap. This feature creates two problems: distortion of fast-moving objects and problems when working with flash.
Since at short shutter speeds the exposure (exposure) of the sensor occurs unevenly, the shutter speed when working with flash can only reach the value at which the frame area is completely exposed at the time of shooting. This value is called flash sync speed. In principle, it is possible to work at a shorter shutter speed, while the flash generates a series of light pulses, but its power decreases.
Diaphragm
Generally speaking, aperture is not mandatory element camera, so in very simple soap dishes and mobile phones it is simply absent. Espopara in them is not a couple at all; it is formed by one single parameter - the shutter speed of the electronic shutter.The diaphragm in the direct sense is a partition; its value is inversely proportional to the amount of light transmitted and is denoted as a fraction 1/k, where k are standard coefficients. In practice, only the denominator of the fraction is usually indicated. For example, if we set the aperture f/2.8 on a lens with a relative aperture of 2.8, this will mean that the aperture on this lens will be completely open and will not participate in shooting.
It would seem that if both of these parameters are responsible for the same thing - the amount of light falling on the matrix - is it not possible to use one? Can! But the aperture affects another very important parameter: depth of field (or simply DOF).

Rice. 2. Aperture operation
DOF
Let's try to figure out what affects increasing or decreasing the aperture other than the amount of light transmitted. The larger the aperture value (smaller physical opening), the greater the depth of field, that is, the area of precise focus around the subject being photographed.When the aperture is open, the background blurs - this effect is most useful in shooting portraits to focus attention on the face. With a closed aperture, they shoot landscapes in which it is necessary to clearly display the entire area of the frame.
I won't go into technical details, provide graphs and formulas, just remember a few conditions that affect the depth of field:
1. Diaphragm. The larger its value (smaller physical hole), the greater the depth of field.
2. Lens focal length. The longer the focal length, the smaller the depth of field.
3. Distance to the subject. The closer the object, the smaller the depth of field.

Rice. 3. Aperture 2, shutter speed 800

Rice. 4. Aperture 4, shutter speed 200

Rice. 5. Aperture 8, shutter speed 50
The pictures clearly show that with an open aperture the depth of field is shallower than with a closed aperture. Also note that in order for the exposure value to remain unchanged, you also have to change the second parameter of the exposure pair - the shutter speed (when the aperture changes by two stops, the shutter speed changes 4 times).
CROP factor
There is a good one on the hub about the crop factor and how it affects the depth of field, I recommend reading it. In short, the Crop factor is how many times the sensor area is smaller than a standard 35mm frame.Precisely because small size sensor, it is almost impossible to achieve a small depth of field in compact digital cameras, except for macro photography. Therefore, photographs from point-and-shoot cameras look less voluminous, especially portraits. At the same time, sometimes it is impossible to see the difference in landscapes.
Light sensitivity and noise
Perhaps the most hotly debated issue in photographic circles is matrix noise. Sensor digital camera consists of many small sensors - pixels. They convert the amount of light that hits them into an electrical signal.The light sensitivity of the camera matrix can be considered as the amplification factor of this electrical signal. Since not only the useful signal is amplified, but also the matrix’s own noise, increasing the sensitivity of the matrix leads to an increase in the noise level. Noise is most noticeable in dark areas of the frame due to the lower signal-to-noise ratio of dimly lit pixels.
In practice, you should always strive to shoot at the lowest possible sensitivity from the main range of the device. It will be limited by the lighting of the scene and the maximum possible exposure time.
How larger area each individual pixel, the large quantity light hits it per unit time, you can’t fool physics. Therefore, I never tire of explaining to people that they are wrong when the main criterion for choosing a camera is the sensor resolution. In fact, increasing the resolution of the matrix while keeping its physical size unchanged is rather harmful! Is not more than marketing ploy manufacturers of photographic equipment.
All modern digital cameras perform some image processing before it reaches the user, including noise reduction. If this feature is used wisely, the result actually becomes better, but in the context of a megapixel race, such processing begins to introduce Negative consequences as a result of shooting, which manifests itself in “blurring” of the picture, lack of sufficient sharpness and detail.
Most low level noise today is provided by cameras with full-size sensors (35 mm or more), and this happens precisely because large area pixel.
Examples of using shutter speed for different subjects
Let's look at a few typical cases in which different shutter speeds are used.
Rice. 6. Short shutter speeds are used for shooting dynamic scenes; they allow you to “freeze” movement.

Rice. 7. Long shutter speeds, on the contrary, “smear” the movement, which sometimes allows you to achieve an interesting result
In general, if the plot is banal and does not require special conditions, when shooting handheld, you should try to keep the shutter speed no longer than 1/f (lens focal length). For example, for a 50 mm lens, you should try to use shutter speeds faster than 1/50 s.
Many modern lenses(and even some bodies) are equipped with image stabilizers, but, unfortunately, I did not have to use them, so I cannot say how effective they are. In theory, this opportunity allows you to shoot at longer shutter speeds without the appearance of characteristic image blur (popularly called “shaking”).

Rice. 8. Blurred images with long shutter speeds
To be continued...
Even though this word may seem unfamiliar and even scary to some, we are faced with exposure every time we photograph something. Because exposure is the total light flux that hits the matrix during the exposure time.
If the matrix has too small a volume luminous flux, then such a frame will turn out to be too dark, that is, underexposed or underexposed. Here is an example of such a frame:
Comments, as they say, are unnecessary. The first desire that arises when viewing this photo is that you want to lighten it up! But, trying to increase brightness, we will inevitably encounter a loss of quality. IN dark places(shadows) the matrix received such a small luminous flux that information about the color of these fragments is partially or completely absent.
When we try to brighten an underexposed photo, we will get a guaranteed distortion of shades in the shadows, as well as high level color noise.
On the contrary, if the matrix received too much light flux, then the photo turns out to be too light, that is, overexposed or overexposed. Overexposure is an even greater evil than underexposure. If an underexposed photo can somehow be corrected in Adobe Photoshop, then it is much more difficult to save an overexposed photo, and in many cases it is completely impossible. With under-lighting, we have a lack of information about dark areas. However, the information is there. There is simply no information about the color in the overexposed area - the processing program simply perceives it as a completely white area of the picture. And no matter how perfect the image processing algorithms are, none of them will be able to “invent” those details that were lost due to overexposure.
Below is an example of a blown-out photo.

The picture shows that the hull of the yacht has lost all its details and has become just a white speck. No matter how we try to darken it, the lost details will not come back.
These two examples show that when taking photographs, you need to somehow maintain a balance between overexposure and underexposure, that is, ensure the correct exposure. In this case, the photo will be balanced in light and shadow and will look its best.

How to ensure correct exposure?
Exposure is set by three parameters:
Excerpt
Diaphragm
ISO sensitivity
Excerpt- this is the time period when the camera shutter is open and the matrix receives light flux. The longer the shutter speed, the greater the luminous flux the matrix receives, the brighter the photo turns out.
Diaphragm- this is a mechanical “pupil” of the lens that can open and close, thereby changing the intensity of the light flux hitting the matrix. When the aperture is open (dilated pupil), the light flux is maximum, and when the aperture is closed (constricted pupil), it is minimal.
ISO sensitivity- degree of sensitivity of the matrix to light. Changing this parameter prevents the matrix from being “blinded” by daylight(for this you need to set low sensitivity) and not suffer from “night blindness” in dark room and take pictures in it without a flash (for this you need to increase the sensitivity).
These three parameters set the exposure.
If we draw a parallel between these seemingly complex things and our everyday life I highly recommend clear example. Suppose we have a glass and we need to fill it with tap water. This can be done in two ways - turn on the pressure more powerfully and fill the glass in 1 second, or draw water in a thin stream for a minute. In this case, the glass is a matrix cell, the water is the light flux, the faucet is the diaphragm (the wider the hole, the stronger the flux). And the time it takes to fill a glass is exposure. But if we are unable to fill the glass in the allotted time, the only way out to comply with all the “formalities” is to reduce the volume of the glass. A glass of 2 times smaller volume will fill 2 times faster. Thus, the volume of the glass is the inverse of sensitivity. Less volume (the glass fills faster) - higher sensitivity (you can shoot with a shorter shutter speed).
So, what needs to be done to ensure that the glass is filled to the brim, that is, the photograph is correctly exposed?
Exposure must be measured first
In modern cameras, all these three parameters can be set automatically. In most cases, automation works flawlessly, so many people don’t even think about setting anything up or changing anything. But in a number of cases, the automation does not work correctly and we begin to look for the reason... After reading the instructions for the camera, we find out that automatic exposure metering operates according to one of several algorithms. Each of them is "sharpened" for different conditions lighting. Here are the main types of exposure metering algorithm...
- Integral (matrix) metering
- Partial and spot metering
- Center-weighted metering
What is the difference between them and which mode is better to use? Let's look at the table...
| Integral (matrix) metering | Partial, spot metering | Center-weighted metering | |
|---|---|---|---|
| Metering area |  Exposure data is taken from the entire area of the sensor and averaged. Based on this “arithmetic average,” shutter speed and aperture are set. |  Exposure data is captured only from a small area in the center of the frame (with partial metering the area is larger, with spot metering the area is smaller). Illumination at the edges of the frame has no effect on exposure calculations |  Exposure data is taken from the entire frame, however heaviest weight has an area in the center. The closer a point is to the edge of the frame, the less influence it will have on the final exposure. |
| When is it best to use |  The main mode for shooting when the illumination in the frame is more or less uniform and there are no objects that strongly “stray” from the overall tone. |  When the key object in its illumination is very different from the general background and it must be well worked out. An example is a portrait of a man in dark clothes against a dark background. |  As a rule, the result differs little from the integral measurement. However, when shooting contrasting scenes, more attention is paid to the exposure of the central part of the frame. |
| When not to use |  If the brightness of a small object differs significantly from the background brightness, there is a risk that the object will be either overexposed or underexposed. In this case, it is better to use partial or spot metering. |  It is unknown what got into the small measuring area - White snow or dark branches. The result is an almost unpredictable level of exposure when shooting “variegated” scenes. | There are no obvious restrictions, you need to look at the situation. It is important to remember that sometimes it is impossible to work both light and dark areas at the same time. If the difference in illumination between objects is too large, then we use additional lighting (for a portrait) or shoot in HDR (landscape). |
After measuring the exposure, the device’s automation sets the exposure pair - shutter speed and aperture. Numbers appear in the camera viewfinder, for example:
![]()
This means that the shutter speed is 1/250 of a second, the aperture is 8. The device is ready to shoot, all we have to do is press the shutter button!
The exposure can be adjusted...
It happens that automatic exposure metering makes a mistake and the photo has slight overexposure or underexposure. In this case, you can make adjustments to the exposure metering and reshoot the scene so that the next frame is normally exposed. But here's the question - how to determine if there is an error in the exposure in the captured frame? After all, on a small LCD screen, often with less than ideal color reproduction, you can see little! And here a wonderful function comes to our aid - viewing a histogram.
A histogram is a graph showing the distribution of brightness in a photograph.
Here is an example of a photograph and its histogram:

In this case, you can see that the histogram “rests” on the left edge - this means that the photo contains under-exposed objects that look on the verge of blackness. At the same time, it is clear that to the right of the graph there is a little free space. To get rid of underexposure, let's try to adjust the exposure by +1/3EV (this is equivalent to increasing the shutter speed by "1 click of the wheel", that is, by 1/3 of a stop).
To enter exposure compensation, we need to find a button on the camera with the following icon:
While holding this button pressed, rotate the control wheel, or press the joystick (at different devices differently). The screen will display a slider that you can move left or right:

If you move the slider to the right, the photo will be lighter (positive exposure compensation); if you move it to the left, it will be darker (negative exposure compensation).
Here is a version of the previous photo taken with positive exposure compensation.

We see that the picture has brightened a little, the elaboration of shadows has improved. At the same time, the histogram shifted slightly to the right. If you make a larger correction, the shadows will be worked out even better, but the clouds will be overexposed, that is, they will lose shades and become white. In this case, the histogram will shift even more to the right and will be “cut off” from the highlights. Thus, we derive an important rule:
Ideally, the histogram should not appear cut off on either the left or right. If the histogram is cut off on the left, there are under-exposed areas in the photo and there is a loss of information in the shadows. If the histogram is cut off on the right, then the photo will lose shades in the light areas.
Sometimes a situation arises when the histogram leans both to the right and to the left - in this case, the image shows a simultaneous loss of detail in the shadows and highlights.

Questions and tasks for self-control
- What types of exposure metering does your camera have?
- Experiment with exposure metering modes. Which scenes are better obtained in the integral metering mode, and which in the spot or partial metering mode?
- Find out how your camera's exposure compensation function is activated.
- Take pictures of the same scene with positive and negative exposure compensation, watch the histogram changes.
Photo simulator
Practice setting up a “virtual” camera - set the shutter speed, aperture, ISO sensitivity and try to get clear photos.
If a person uses a camera to simply capture a picture, then he will not particularly understand the principle of creating creative photography. But over time, the desire comes to understand the mechanisms for obtaining an image in order to manage this process. And even if there is a lot in the camera automatic settings, then their application is not obvious and this may force photographers to learn the rules of creation themselves beautiful photos and manage these rules.
The main parameters in setting up a camera are aperture, shutter speed and ISO sensitivity.
The camera's shutter speed determines the amount of time it is exposed to light.(shutter opening time) to the matrix. By changing this time, you can change the amount of light reaching the matrix. Indicated in the camera in seconds and fractions of a second.
The aperture, located in the camera lens, regulates the size of the hole through which the light flux passes, and thereby changes the amount of light falling on the matrix.
Each separately, but these parameters simultaneously affect the flow of light, thus adjusting the exposure. In other words, shutter speed and aperture affect the brightness of the resulting image, whether it will be light or dark. With normal exposure (with the shutter speed and aperture set correctly), all the halftones will be visible in the resulting photo and the main subject will appear with the desired brightness.
Creative aperture settings
But the shutter speed and aperture settings of the camera also affect the artistic side of photography.
The main property of the aperture that affects the photograph itself is that it can be used to adjust the depth of field of the objects being photographed. Depth of field shows the distance between the boundaries in which objects are in focus and located deep in space at different distances from the lens. And here's to get good plans, especially at a distance, you need to increase the depth of field of the space used (DOF). SLR cameras may have an aperture repeater, which allows you to evaluate the quality of a future photo at different values without taking a photo.

Photos from different meanings apertures (different depth of field)
It is by adjusting the aperture that you can achieve a blurred background when shooting an object, or make everything sharp when shooting a landscape.
Setting the camera shutter speed
The shutter speed needs to be adjusted correctly when shooting moving objects. You have all seen photographs, for example, of water, when one photograph captures every drop, and in another the flow of a river or a waterfall is recorded as a single movement.

Different exposure and different type water
That is, the settings in these cases were used with different shutter speeds, in the first case a short shutter speed (several milliseconds), and in the second - long exposure(few seconds).
When shooting motion in situations such as sport competitions, children's games need to be exhibited short shutter speed. At such shutter speeds you need good lighting, a large aperture and a highly sensitive sensor.
Diaphragm device
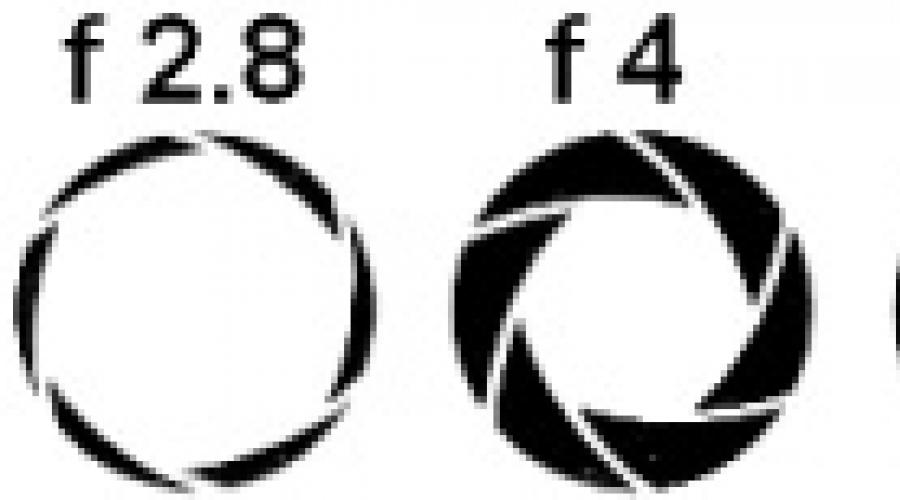
First we can talk about the iris diaphragm, consisting of several blades (3-20). Such a diaphragm, if fully open, forms a ring. And a not fully open aperture forms a polygon. Such a polygon can be seen in the picture in the form of glare from light sources that are not included in the depth of field.
DSLR cameras use a jumping aperture. After all the settings, the photographer presses the button, and the aperture abruptly closes to the set value.
The diaphragm is driven by a special drive.

How to adjust shutter speed and aperture
As a conclusion, we can briefly say that the aperture and shutter speed of the camera (exposure pair) affect the exposure, the value of which determines the brightness (illumination) of the object in the picture. You need to choose one exposure value and, based on this value, select the aperture and shutter speed of the camera.
The aperture affects the sharpness of the picture and, most importantly, the depth of field. And this value depends on what you want to see in the picture. Either one object will stand out in sharpness against the background of others, or good sharpness of all objects in the picture is needed. Then you adjust the shutter speed to the desired exposure.
But the shutter speed can also affect the quality of a photo of a moving subject. And if you want everyone to see, for example, the movement of a car, then the shutter speed will be longer, and if you need clarity, then the shutter speed will be low.

And if you need to remove hand shake, you also need to reduce the shutter speed. But if both the aperture and shutter speed are chosen to properly display the subject in the photo, then how to ensure exposure? You need to adjust the ISO sensitivity. Just remember that with high photosensitivity, noise may appear in the photograph, because noise in the form of grain will increase along with the signal. Such noises are especially visible in dark areas. It is by mutual adjustments of these parameters that you need to achieve optimal quality photos.
For ease of setup, cameras have modes “ shutter priority" And " aperture priority" In these modes, the user adjusts one of the parameters, according to the name of the mode, and the camera automatically adjusts another parameter to desired value exposition.