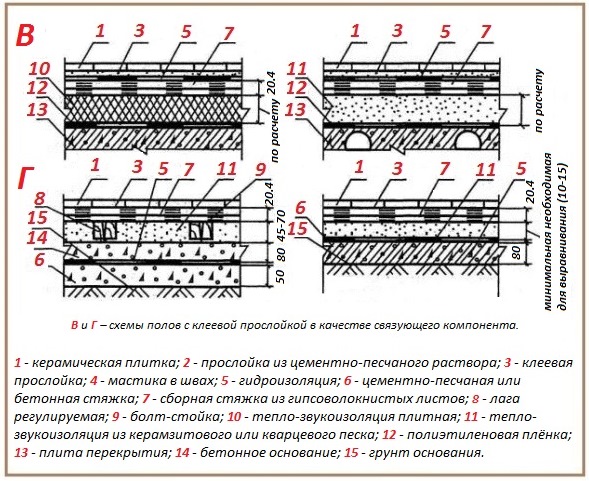
How to lay tiles on old tiles and is it possible to do so. Laying new tiles over old ones How to glue tiles onto old tiles

Saving is a philosophy, principle and engine of progress. Under economic slogans, new technologies are emerging, ingenious methods are being developed to reduce the costs of labor, money and an important factor - time. In the name of economy, the strictest requirements of building regulations are sometimes forgotten, prohibiting the gluing of floor ceramics onto a previous covering made of a similar material. However, it was she who made craftsmen think about the problem of “is it possible to lay tiles on tiles?” And since they had to “rack” their brains, a solution was found - a reliable way to build a new covering on top of the laid tiled floor.
Economic prerequisites for maintaining coverage
The idea that a hard, smooth, water-impervious ceramic floor could not be dismantled before changing the coating could not but arise among prudent craftsmen, since:
- dismantling will take a lot of effort and time;
- fragments of the cement-sand screed will probably break off along with the tiles. It will need to be refilled entirely or locally. with plywood or plasterboard flooring will also become completely unusable with the consequences of a complete remodel. And the polymer preparation also needs to be renewed;
- dust will be significant. Before renovation, it will be necessary to vacate not only the premises itself, but also the adjacent rooms. Even if you cover furniture and equipment in neighboring rooms with polyethylene, it is not a fact that the dirty finish will not be damaged;
- There will be garbage removal and cleaning;
- the construction of a new screed is coming with the purchase of materials, the consumption of labor and again time waiting for the hardening of solutions or binders.
It’s no wonder that the amount of complications persistently whispered the idea of refusing repairs. But if the old coating calls for alterations, means of minimizing costs had to be found. Those. get the opportunity to lay ceramic squares, hexagons and rectangles on probably not very presentable predecessors. The task was to remove purely technical obstacles that hindered the implementation of the plan.
Sometimes it becomes necessary to lay tiles on a wooden floor. Due to the fact that wood tends to change size due to instability of temperature and humidity, this may seem impossible. We'll tell you how to do it correctly and avoid trouble in the article: .
What are the difficulties?
There are good reasons for the slightly outdated technological decree, according to which ceramics should be unconditionally destroyed before laying a new coating:
- the rough foundation should be monolithic, and not made up of separate, insufficiently large elements;
- the rough surface must be characterized by porosity and roughness, which is required for reliable adhesion of the adhesive to it, which is not typical for ceramic products.
Solidity will not cause concern to owners of a floor with correctly laid previous tiles, which, as a rule, are quite new. If the ceramic coating with the underlying base really creates a single whole, it will adequately perform its load-bearing function. Otherwise, an excessively large load will fall on the connecting layer located between the old coating and its base. As a result, elements of both coatings will break off.
With porosity everything is more complicated. This is the main problem for those who are thinking about the question “is it possible to lay tiles on tiles?” The main advantage of building ceramics is their high density with a minimal number of pores that can absorb moisture.
Moisture absorption or scientifically its absorption coefficient is directly related to the number of pores. For tiles for interior decoration, it varies from 0.5 to 3.0%. Moreover, in the 3% case it is supplemented with a top glaze, leaving the back side porous to optimize adhesion. But the glue needs to penetrate through the miniature channels into the body of the base, gain a foothold in it and attract the finishing coating to itself. This means that the pores just need to be opened or created, and at the same time the roughness must be increased. How?
In order to increase porosity and provide the roughness necessary for gluing, three options were invented:
- Cleaning the top layer of the supporting ceramic floor with a grinder grinder.
- Formation of notches, preferably combined with the previous product.
- Use of Concrete Contact marked CERESIT ST-19, enriched with needle quartz, or its counterpart with ordinary sand. There are analogues with the brand Knauf, Bolars, etc. After applying these priming materials, the surface acquires the required roughness, thanks to which it will be possible to use ordinary tile adhesive, such as CERESIT CM-11.
It is best if all three effective methods are used together. Then the grip will definitely be excellent.
Even an impeccable tile installation will not look perfect if you do not pay enough attention to the tile joints at the final stage of finishing. You will learn how to choose a grout for tiles and the difference between cement and epoxy options in the following material:.

Contraindications to such work
Means have been invented, but their use is not always feasible, which must be taken into account at the stage of inception of the idea. The following contraindications determine whether tiles can be laid on tiles in a particular case:
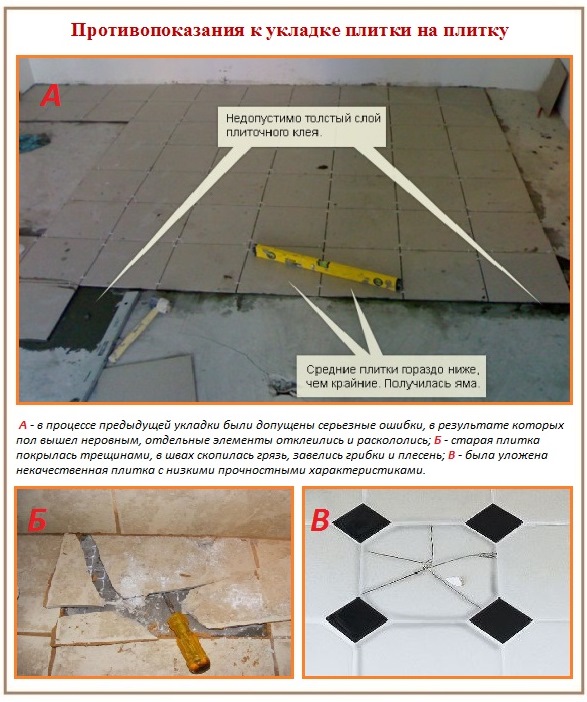
- The tiles were laid with low-quality glue, as a result of which the majority of the elements came off completely or partially from the base. The same could happen due to non-compliance with the glue manufacturer's instructions or if the proportions were incorrect. To identify this reason, a kind of diagnosis is carried out using the wooden handle of any of the instruments. By simply tapping, we find out whether each tile responds equally to it. We hear a ringing, which means there is emptiness inside, there is a rattling sound - it has completely come unglued. Only a dull sound will convince of its strength and reliability.
- The floor is uneven. In general, for laying tiles, differences of 4 mm per 2 m of the lath applied to the surface are acceptable, because the primer and binder will simultaneously play the role of a leveling layer. But if there are more violations, we take a hammer drill.
- The tile is very old and covered with a network of cracks, in which, no doubt, many years of dirt, indelible grease, and fungi have accumulated.
- Utilities run under the old ceramic coating, and they forgot to build inspection hatches for them last time. We dismantle such a floor “without waiting for peritonitis,” and arrange everything according to the rules.
- Afterwards, the floor in the room being equipped will be higher than the general floor level. Such an excess is extremely undesirable, because ceramics are mainly used in bathrooms, showers, and kitchens. In short, where floors are supposed to be made lower by 3-5 cm, so that accidentally spilled water does not have the opportunity to flow freely outside the room.
If the listed obstacles are not identified, you can begin preparing the floor and the subsequent installation. Work should begin if the floor temperature is not lower than +5ºС, and the overall room temperature is not less than +10ºС.
The process of constructing tiles on top of tiles
Fundamentally, the described scheme differs from the standards only in preparation. First, according to tradition, a small plan is drawn with all the design features of the room. Then a fitting is carried out with the layout of the material “dry” to see how the ceramic floor will look, in order to place the cut pieces of tile in places far from view. The tiles must be laid out so that the seams of the upper elements rest on solid tiles. Those. you need to move the upper seams relative to the lower ones or try to keep the number of matches to a minimum.
- We carry out a thorough inspection with detailed tapping of the elements in the center and corners. We carefully dismantle the identified unreliable tiles using a chisel and hammer, and fill the exposed area with cement mortar. We are waiting for it to harden. The hardening time of the solution is proportional to the thickness of the cement-sand fill. 10.0 mm will cure in 1 week.
- We clean the crumbled seams with a chisel and fill them with tile adhesive or the same solution that was used to fill the areas.
- We clean the glossy surface of the tile with a grinder, choosing a grinding wheel with medium grit. It is advisable to also make notches.
- We thoroughly wash the old ceramics, first with just water to remove dust, then with a soap solution. If there is old dirt and greasy stains, add soda to the water. Finally, rinse off several times with clean water.
- We treat the old ceramic floor with Concrete Contact Ceresit ST-19. Apply it evenly, distribute it with a brush or roller. The material is sold in finished form, packaged in 15 liter buckets. Approximately 300 grams are consumed. per m². Before applying to the floor, it is recommended to cover adjacent structures, pipes, and parts with polyethylene. Otherwise, random blots and pink smears will be difficult to remove. We wait 3-4 hours for drying. If we install the tiles with tile adhesive, there is no need to moisten them before laying.
- Apply glue at the thickness specified by the manufacturer to a small area of the floor. The glue quickly loses its elasticity, so we use it to treat an area of less than 1 m².
- Glue the first tile with force. Until the glue begins to set, its position can be adjusted. We arrange the elements surrounding it in the same way. An expansion joint must be left along the perimeter of each tile for linear expansion. Its size depends on the size of the elements, usually 1-4 mm. To form the seams we use plastic crosses.
- After a day, the grooves around the tiles will need to be filled with a polymer-cement composition that matches the tone or with a solution of equal parts of sand and cement.
Tile adhesive should harden naturally without artificial heating and ventilation. There is also no need to moisten the adhesive-mounted coating after installation.


It is extremely important to strictly follow the instructions of the material manufacturers, without deviating one iota from the instructions. If you carefully follow the rules, after 3 or 5 days you can safely walk on the finished surface. And to the questions of neighbors, colleagues, and acquaintances, “is it possible to lay tiles on tiles,” give an honest affirmative answer.
Video examples of installation

 Imagine a repair procedure that requires complete dismantling of existing finishing structures. Even an experienced craftsman, not to mention the average person, will shudder at such a volume of work - just removing old materials can take a week or two of continuous work.
Therefore, when remodeling a kitchen or bathroom, the question always arises: is it possible to lay tiles on tiles, or will you have to be content with the traditional method of resolving the issue.
The advantages of this method are obvious - it is much easier to lay the material on a ready-made, flat surface, and at the same time you do not have to pollute the house with a large amount of dust and fragments of ceramics.
However, you must also remember the disadvantages - you can only lay tiles on a very durable surface that is not subject to cracking and can withstand increased loads, otherwise after a while it will begin to collapse.
There are far fewer problems when working with tiles that you plan to lay on the floor than with a finishing product that is intended to organize the surface of the walls.
 The reason for this is quite simple - the force of gravity also acts on the wall tiles, as a result of which they pull themselves down on their own. It is possible to lay an additional layer of material, covering the old plane with it, but it is necessary to approach this issue with the utmost care and carry out thorough preparation.
This solution is most often used for the bathroom and kitchen - that is, those rooms where ceramic cladding is common, resistant to moisture and high temperatures.
Checking old coating
 First of all, you need to understand whether the builders followed the technology when laying the old tiles - to do this, it is better to take the smallest steel hammer and tap it on the entire surface, without missing a single square. If there are cavities inside, then the strength of the coating will be compromised - this will be reflected in a ringing echo that will come from under the ceramic layer.
As a working tool, you can also take a special hammer equipped with a copper head - it has better acoustic properties, which are important in this case. If there are small chips or open seams and ends, try to understand what base the tile was laid on.
The best option is a building mixture consisting of synthetic and  mineral components - most professionals recommend laying tiles using a similar product.
Synthetic mixtures hold tiles made of materials such as well:
- ceramics;
- tile;
- porcelain stoneware;
- composite ceramics.
Preparing for the second layer of tiles
Now it is necessary to ensure the necessary adhesion properties, because finishing tiles in the bathroom often have a smooth glossy surface that is not capable of properly holding a large surface layer.
 To do this, you need to remove the top layer using a grinder or grinder with a special brush consisting of steel wire. In addition, the old surface can also be treated with an abrasive disc, creating cross cuts on it that increase the adhesion efficiency of the adhesive composition.
As the base that needs to be laid under the new material, it is better to use a concrete contact composition containing various synthetic components that increase the strength of the connection. It is worth adding needle quartz to it, which replaces sand if it is necessary to create especially strong concrete structures.
Applying tiles to the wall
At the beginning of work, the seams should be additionally cleaned with a chisel to improve their filling with the building mixture. Using a trowel or spatula, we place the concrete contact on the old tile, not forgetting to level it to achieve the maximum quality of the created surface.
The material consumption should be about 300 grams per square meter - this means that it should not be applied in a very thick layer.
If this recommendation is not followed, the strength of the finish will be called into question. If you are working in a bathroom or kitchen, and not a utility room, then the floor and furniture should be covered with plastic film - otherwise, ugly pink and gray stains will appear on all interior items and structures, which are almost impossible to wash.
 After 5-7 hours, glue is applied over the concrete contact - it is best to select the most durable synthetic modification. It is worth remembering that, unlike the base, the glue hardens almost instantly, so further work is carried out in small parts of 1-2 square meters.
The tile must be pressed firmly against the surface and then released, checking the strength of its connection - in this way the entire treated area is laid out. While the glue has not yet hardened, you can correct the unevenness and adjust the depth - for this you should use a rubber mallet.
We must not forget that there should be a gap of 1-5 mm between the squares for expansion with temperature changes.
Floor installation
Features of flooring
 Unlike walls, tiles placed on the floor are not affected by gravity. However, another difficulty arises here - it is daily put under pressure by passing people, installed furniture and various fixtures, as well as transported equipment. Therefore, floor tiles need to be checked no less carefully than finishing wall tiles - for this, a similar method with a hammer is used.
In addition, you can find a heavy box or object with a flat base - you need to drag it across the entire floor and make sure that the tiles located on it do not fall inward even by a few millimeters. However, the latter method is unlikely to be applicable for a bathroom with its limited space.
 Once you have checked the old tiles, you can begin work, generally following all the recommendations described for walls. However, the floor will require the use of a mineral mixture with a small amount of synthetic additives - it will provide greater elasticity and the ability to withstand significant temperature fluctuations.
In addition, the old surface does not need to be treated so intensively - it will be enough to walk over it with a metal brush. Before laying the glue on the floor, it is worth moistening the base so that it adheres to it better - this is not required only when using ready-made solutions sold in large buckets.
Street work
A rather interesting question is whether this can be done if you are laying paving slabs to create outdoor structures - paths, platforms, terraces. The answer to this is much easier to find - you just need to check the quality of fit of the blocks and try to remove one of them using a solid, durable knife or pry bar.
If the paving slabs can be removed with considerable effort, then they are laid very firmly and tightly - otherwise they will move under the weight of the new surface, violating their integrity.
The process begins by pouring a new bed on top of the material, consisting of loose soil, gravel and sand - each of these layers must be compacted individually. On top you need to lay paving slabs, to increase the strength of which you should use a small vibrating machine or a mallet with a large striker.
One of the most economical methods - laying tiles on tiles - may not be applicable under certain circumstances. These include the following:- If there are worn out communications under the old coating and there is no way to access them;
- If cracks of various sizes are detected on old ceramics;
- If tapping the floor reveals voids;
- Small room dimensions: a new layer will make the room visually even smaller;
- If the tile is old and a “web” of cracks has formed on it, which indicates not only a large accumulation of dirt, but also the possible presence of fungus;
- Strong surface slope.
Surface inspection
If a decision is made to lay new ceramics on top of the old one, then it is imperative to carefully prepare the foundation for further work. Inspection of the condition of old tiles is carried out as follows:- Check how the floor in the bathroom is positioned in space using a building level. Leveling the surface with glue is not enough if there are strong slopes to the side or irregularities are found.
- Pay attention to fallen pieces of tiles on the floor, chips, cracks and any other imperfections.
- Tap the old coating using a hammer. The tile has peeled off from the base if ringing sounds are clearly audible. In this case, laying a new ceramic layer on top of the old one is impossible.
- Inspect all seams. They must be intact: not crumble or fall out.
- Check the floor for loose finishing elements.
Attention! If the inspection reveals more than 10% floor defects throughout the entire bathroom area, then the old covering should be dismantled, the surface should be cleaned and a new finish should be installed. Laying tiles on tiles on the floor in this case is not practical.
Preparatory steps
To ensure that, after laying ceramics on the old tile layer, the decorative coating does not slide off due to the lack of a solid base, it is necessary to achieve excellent adhesion of the layers to each other. In this case, the old tiles should be quite rough. At the stage of preparation for installation, it is imperative to clean the old surface from dirt. Even if at first glance it seems that the tile is clean, over the entire period of use a very thin grease deposit has formed on it, which can prevent the two tile layers from adhering. To ensure optimal ceramic roughness, you can use one of the following options:- Treat the top glossy ceramic layer with a primer;
- Remove no more than 60% of the layer using a grinder and make cuts every 3 cm.
Procedure of the process
The process of laying a new decorative ceramic layer on an old one is practically no different from the usual one, but there are certain differences between them. To ensure that the seams of the new ceramics do not coincide with the old ones, when laying out the first row, it is necessary to immediately provide for this nuance. The recommended height of the comb on the spatula is from 10 to 15 mm. The cleaned surface must be treated with glue intended for ceramics and left until completely dry. New ceramics should be wiped off dust, first with a damp cloth, then with a dry one. Apply a special primer using a roller if the appropriate surface preparation method is selected. The drying time for the concrete contact is at least two hours.When working with a grinder, you must use special glasses to remove glaze from the surface. This will protect your eyes from the smallest grains of ceramics and dust particles. The surface prepared by any of the above methods is coated with a special adhesive composition intended for your coating using a smooth spatula. Using a relief tool, the coating becomes rough. Laying new ceramics can occur in any convenient way. Experienced craftsmen advise grouting all seams after at least three days from the moment of installation, since the special glue for ceramics dries quite slowly. Adhesive compositions such as Eunice are in demand, guaranteeing a durable and reliable coating, which you can buy in our network of branded stores.
Attention! Laying new decorative ceramics on top of the old one raises the floor level by 3–4 cm. Therefore, the floor level should be less than the specified height. For practicality, it is recommended to install a small threshold at the entrance to the room, which in case of water leakage will protect the corridor from moisture.
If you follow the basic rules for preparing the surface, applying a new ceramic coating to an old tile will not be difficult. It is important to conduct a thorough inspection of the floor before starting work, identify all defects and only then begin cleaning the surface and laying it. In terms of time and finances, this method is considered the most optimal, and with the right approach, the coating will be reliable and durable.
Often, bathroom renovations involve dismantling old tiles. A large amount of dust and dirt, difficulty in carrying out work to remove old cladding - these factors hinder the start of the process. The solution in such a situation is to lay ceramics on top of the previous finish.
1. When should you not lay new tiles over existing ones?

Experts advise to refrain from this method of cladding if:
- The old tiles are in poor condition; there are chips and cracks on the surface. Such external signs will cause the destruction of the new cladding. With such installation, the service life of the finish is short;
- The bathroom area is small and the walls are uneven. The second level, as well as leveling plaster, will significantly reduce the size of a small room. Under such conditions, it is better to dismantle the old surface tiles;
- Ceramics close communications, and there is no possibility of inspection - there are no special hatches. In case of necessary repair of pipes or replacement of communications, it will be necessary to dismantle two layers of tiles;
- Air voids under the cladding are revealed when tapping (inhomogeneous sound). In this case, laying on the old cladding is not permissible, since the base may fall off when installing a new tile covering. It is better to replace old pipes and finishing materials;
- The floor is an uneven surface with a slope. For leveling, it is advisable to completely dismantle the covering elements and also remove the screed on the eve of repair.
2. Disadvantages of laying new tiles over old ones

For those who do not want to spend a lot of effort and money on a bathroom renovation, the question often arises: “Can I lay tile on tile?” Before starting repairs, you should study the disadvantages characteristic of this approach:
- Due to the second level of cladding on the floor, the height of the room is reduced. In the bathroom, the floor should be lower relative to the corridor, and a threshold of 15-20 mm is also necessary;

- If the old coating is in poor condition, the cost of a new layer will not be worthwhile - the tile will not last long;
- Often in those buildings where the cladding was originally done, the level of the floor and walls of the bathroom is not ideal.

3. Actions before cladding
In order for the tiles to last long, it is necessary to prepare the existing tiles for installation. Recommended sequence:
1) Assess the strength of the existing finish by tapping it and looking for voids. Apply pressure to individual elements to understand how the material behaves and whether chips appear. If the old layer of ceramics is in poor condition, elements with cracks and potholes should be replaced.
2) Check how evenly the first layer is laid using a special level. The installation depends on this characteristic. If there is a gap between the tool and the wall surface, significantly more glue will be required in this area. Protruding parts cause the tiles to bulge.

3) An important step before installation is to clean the existing base using special products; the seams should be treated with a hard-bristled brush. After complete drying, the surface is degreased and a layer of high adhesion primer is applied. This impact will ensure good adhesion of the first and second layers.


Please read the primer instructions carefully and follow the application instructions.
After complete drying, the primer layer should remain intact, even after mechanical impact. If deformation occurs, the composition must be reapplied. Next, you need to restore the base, eliminating defects in the form of potholes and chips on the tiles.
4) Installing a new tile on top of the old one.

The installation process takes place using a special spatula with teeth. In order for it to adhere well, it is necessary to use glue with high elastic properties. Thus, cracks will not appear on the surface of the finishing material.
Place the finishing material offset relative to the old ceramics; the seams should not coincide. If cracks appear on the first layer, the new one will remain intact.

If you use elastic adhesive for installation, the joints must also be grouted using products that are resistant to deformation of the elements.
Grouting joints
Grouting is carried out using a metal (or rubber) spatula, as well as a rag. For floor tiles, it is best to avoid light-colored grout as it turns dark very quickly. Remove auxiliary crosses from the seams and the remaining mortar, treat the surface with a rag. Prepare the grout following the instructions. The correct direction when spreading the product with a rubber spatula is: across the seam, then along. After carefully filling all the seams, you must wait the recommended time. We complete the process by wiping the surface with a rag.
It would seem, why put new tiles on old ones. However, there are cases when this simply cannot be avoided: sometimes the conditions of the construction site require it. It also happens that this approach turns out to be more budget-friendly.
Old tiles can still serve
Before deciding whether to dismantle the old one, think about whether it is advisable to remove the previous layer. Maybe the old cladding will save on preparatory work.
Justification of economic feasibility
If you cannot answer this question yourself, we offer you several significant “pros” of using old tiles:
- reduction of terms;
- savings on materials;
- labor costs are reduced;
- the amount of waste is reduced.

Contraindications for work
On the other hand, there are situations when it is impossible to do without dismantling the old coating. Let's name the main cases:
- the surface on which work is to be done has a slope;
- it is necessary to dismantle communications;
- voids under the old layer;
- the tiles are too thin and contain multiple cracks and chips;
Important! If the percentage of damaged coating is more than 10 - 15%, dismantling must be carried out without fail.

Is it possible to put tiles on tiles on the wall: technological nuances
Before you begin any preparatory work, examine the condition of the tiles on which you plan to lay a new layer of tiles.
The procedure for assessing the condition of the old coating
Make sure there are no visible defects or chips. Examine the coating for voids and dips. Indeed, in the absence of strong adhesion to the base, the bottom layer may simply crumble.
Advice! The presence of voids can be checked by simply tapping with a fist or a rubber mallet.
Pay attention to the quality, cracks may indicate a poor-quality building mixture, in addition, it is important to check for a slope, in this case it will not be possible to lay it evenly.
How to put new tiles on old wall tiles if the surface condition is considered satisfactory
And now from theory to practice. Let's look at the process step by step.
Roughening the old coating to ensure the desired level of adhesion
Before you start tiling, you should properly prepare the base:
| Illustration | Description of action |
 | The first stage is degreasing the surface. You can simply take soap and water and give the tile floor a good scrub. If you accidentally stain the surface with glue or mortar, you can clean the surface with a brush. In our case, we use a brush attachment on a drill. We pay special attention to the seams. Important! While working, do not forget to wear a mask and respirator! |
 | Using this, we level out those surface elements that had to be removed. Let's use the rule. We apply concrete contact to the washed and pre-dried surface with old tiles to improve adhesion. |
Installation using standard technology
Installation work should be performed in the following sequence:
| Illustration | Action Descriptions |
 | After our concrete contact has dried, we can begin laying a new one. Check the level in advance to see if there are any slopes. The floor must be perfectly level. Apply medium-thick glue with a comb, trying to avoid gaps. |
 | Place the tile and press it gently. If necessary, adjust the position. We remove the excess glue and place it in the place where the next tile will be laid. The arrow indicates the angle along which we remove excess glue. |
 | We continue to work, checking ourselves on the level. We control the joints of the plates with limiters - crosses. |
Is it possible to lay floor tiles on tiles: a professional answer to a pressing question
Professionals do not exclude the need for such finishing work. As we noted above, this is significant, making it less expensive and dusty.
Assessment of the condition of the old coating
In addition to the above points that we talked about earlier, it is not advisable to lay it on old tiles in the following cases:
- if your home does not have high ceilings, in this case an extra layer can visually reduce the space;
- sometimes there is a need to replace the old one.
Important! If the surface of the tile is smooth, its adhesive characteristics should be increased. You can clean the glossy surface with a special brush.

We suggest watching the video to understand in detail how to lay tiles on tiles:
Is it possible to lay tiles on old tiles on the street: let's figure it out together
Higher demands are placed on the performance characteristics of roofs laid outdoors. Only when the old foundation is strong enough can such work be carried out.

Checking the strength of the old coating
The first stage is to check the strong adhesion of the street tiles to the base; if it was not possible to move the tiles with a stick or pry bar, then they can serve as the basis for a new coating.
How to lay paving slabs on the street if the strength of the old coating is not satisfactory
How to properly lay tiles on tiles outdoors? This process has its own characteristics.

Construction of a new cushion of soil, gravel and sand
It is important to ensure a tight compaction of the layer. The thickness of the “pillow” should not exceed that which was laid in the old layer. The composition of the mixture in the base may vary depending on the thickness of the tile and the load that will act on the surface.