How to hang meter-wide wallpaper. How to stick meter-long wallpaper yourself (video). Pasting in hard-to-reach places

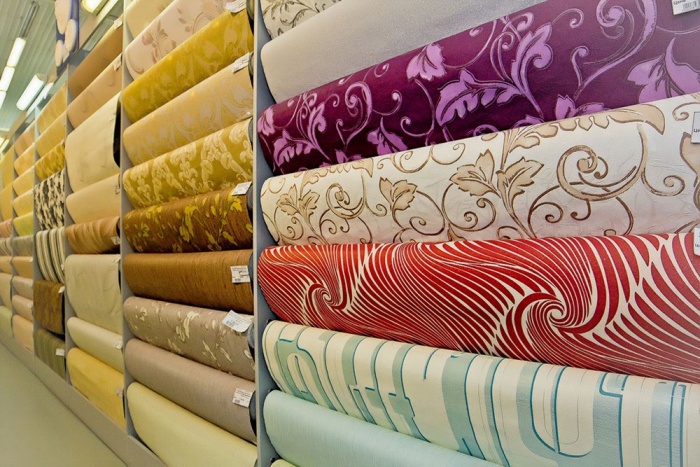
Wallpaper on a non-woven basis is not uncommon today; you won’t surprise anyone with it. But wide canvases are still a novelty for Russians. Meter wallpaper made from non-woven fabric or based on it is produced by European manufacturers; in Russia they are limited to the standard roll size - 53 cm. By the way, meter wallpaper is called conventionally, its actual width can be different - from 90 to 140 cm. The material, like others, has a range pros and cons. You need to familiarize yourself with the features before buying wide wallpaper.
Advantages and disadvantages of wide canvases
Here we will consider the characteristics of not only those coatings that consist entirely of non-woven fabric, but also vinyl coatings with a non-woven backing. These materials are very similar in performance; they are also installed using the same methods.
So, wide wallpapers are convenient because:
- they form fewer joints - thanks to their large size, more voluminous patterns are placed on the canvases, it becomes easier to select and combine fragments of the pattern, the canvases after installation are one whole - the seams between the strips are almost invisible.
- Installation is faster - instead of two standard strips, only one needs to be cut, applied, leveled and trimmed.
- Material costs are lower - the price of a meter roll is less than the cost of two standard ones from the same manufacturer.
All the disadvantages of meter-long canvases are associated with the peculiarities of their installation:
- They are difficult to glue alone, especially on the ceiling. But, if you couldn’t find a partner, you can still hang meter-long wallpaper yourself, you just need to be patient.
- It is more difficult to buy the optimal amount of material - there is a risk that a few centimeters of coating will not be enough or, on the contrary, almost a whole roll will remain. In this regard, it is easier with narrow canvases - if there is any surplus left, there will be little of it.
- It is very problematic to cover a small room with wide strips; they will often have to be trimmed and cut (in corners, on slopes).
- It is permissible to use non-standard widths in rooms with slight deviations in dimensions - if the ceiling, walls or corners are very crooked, it will not be easy to join meter-long panels without distortions.
Summarizing the above, we can conclude: it is optimal to glue wide wallpaper in large rooms with a minimum of additional elements (such as radiators, windows, doors, niches and arches) and with smooth walls. Rooms covered with plasterboard are ideal - all the corners there are correct and the surfaces are smooth.
Video on how to glue meter-long wallpaper together:
Installation of non-woven wallpaper on the ceiling
With the advent of non-woven finishing, the fashion for wallpapering ceilings returned. This happened thanks to the versatility of the material:
- it has a different surface (corrugated, smooth, plain or patterned);
- durable;
- easy to clean with a vacuum cleaner and a damp cloth;
- suitable for painting.
It is necessary to glue wide non-woven wallpaper onto the ceiling in the following sequence:
- Prepare the surface - remove the lighting fixtures, insulate the wires, clean the ceiling from the remnants of the old coating, putty and prime it.
- If this is provided for in the repair plan, stick rosettes, baseboards and borders to the ceiling.
- From the wall with the window at several points, measure a distance equal to the width of the roll. Connect the dots with a line.
- Coat the resulting strip with glue.
- Cut the fabric from the roll to a length slightly larger than the width of the room.
- Attach the strip to the ceiling, aligning the edge with a corner or border, while also focusing on the drawn strip.
- Use a roller to press the meter-long wallpaper, expelling air and excess glue in the direction from the center of the strip to the edges.
- Glue the following strips end to end.
It is quite difficult to glue heavy non-woven wallpaper to the ceiling. To make them stick more firmly, the glue needs to be made thicker than indicated in the instructions. A thick composition is also easier to apply to the ceiling; it will not run or drip.
The ceiling is often painted; it is important to remember that this can only be done on a dry surface. After wallpapering, at least 3 days must pass before painting.

The trick with which wide wallpaper can be glued to the ceiling alone is shown in the video:
Instructions for installing meter-long wallpaper on walls
In principle, working with wide canvases is no different from gluing standard wallpaper.
All actions are performed in the same sequence:
- Sockets and switches are removed from the walls, and the ends of the wires are insulated.
- Remove various fasteners (nails, brackets, screws, dowels).
- Clean the walls from the old coating (the paint is washed off, the wallpaper is moistened with water and scraped off with a spatula).
- The uneven surfaces are filled with putty and the dried putty is rubbed with fine-grained sandpaper. You can also watch the video to see how to properly prepare a room for wallpapering:
- Cover the walls with one or two layers of deep penetration soil. This must be done, especially on moisture-intensive materials (concrete, drywall, wood). The primer clogs the pores of the base, thereby preventing glue from penetrating into them. The adhesion of wallpaper and walls becomes an order of magnitude higher.
- After the walls have completely dried, they move on to wallpapering. Glue for non-woven fabrics is dissolved in water, do this according to the instructions on the glue packaging.
- Determine the starting point from which the meter-long non-woven wallpaper will be glued. Experts recommend starting from a corner - you need to step back 104-105 cm from it (with a roll width of 106 cm) and draw an even vertical line.
- Coat the wall with glue.
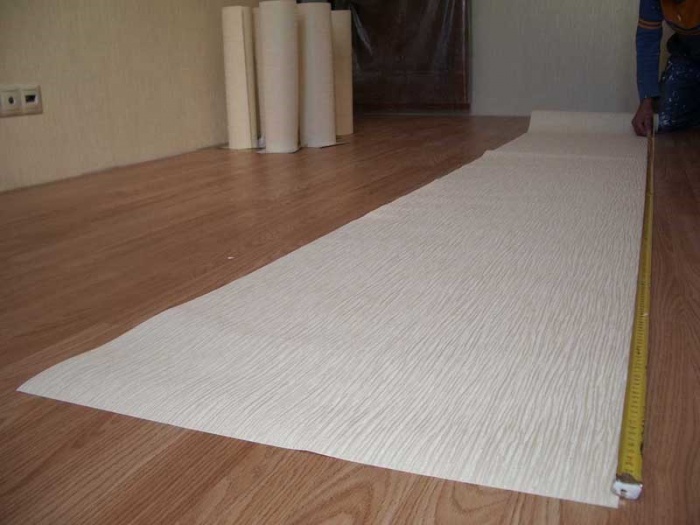
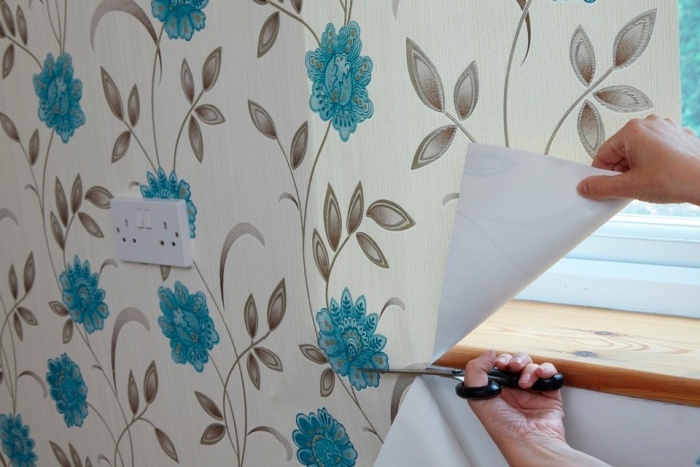
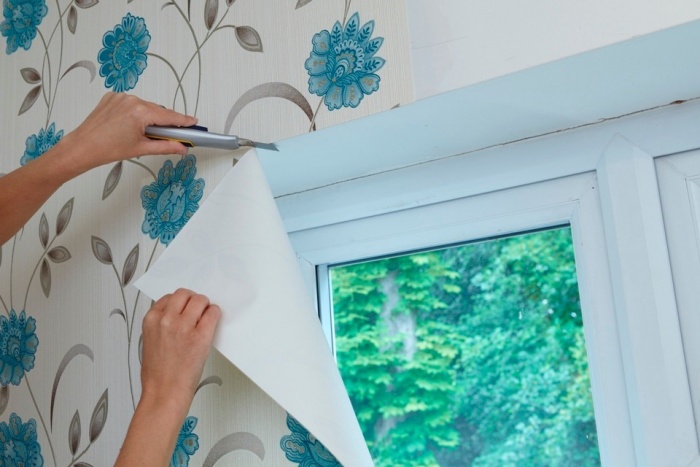
- Cut the first strip 5-10 cm longer than the height of the walls.
- Align the top edge of the wallpaper with the line of intersection of the ceiling and wall, while simultaneously aligning the vertical edge of the canvas with the line drawn on the wall.
- Press the canvas in the center and level it with movements in the form of a “herringbone” - from the center to the sides.
- Using a roller or spatula, remove excess air from under the wallpaper.
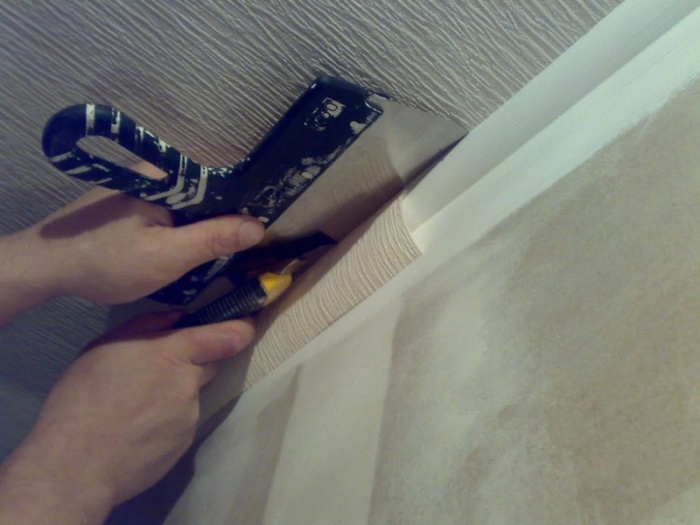
- Trim excess wallpaper from the bottom and top with a sharp knife.
- Continue gluing solid wide strips to the next corner.
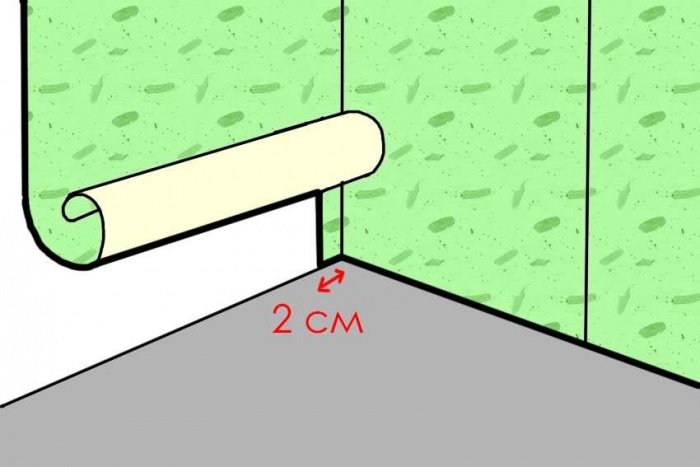
- You can’t glue a whole strip into a corner - it can lead and wrinkle. From the outermost strip, the tape measure is moved around the corner by 1.5-2 cm, and this size is recorded.
- A piece of the width of the resulting size is cut from the new strip.
- The cut strip is applied to the wall coated with glue, aligning it with the edge of the previous strip.
- If the second section of the same strip is more than 20-30 cm wide, it is used for pasting the adjacent wall. If there is too narrow a strip left, it is better to cut a new one from the roll.
- A vertical line is drawn on the adjacent wall, departing from the corner the width of the next strip of wallpaper.
- Apply wallpaper to the wall coated with glue, aligning its edge with the drawn strip.
- A vertical cut is made in the middle of the resulting overlap in the corner. Excess wallpaper is removed and the strips are glued end to end. The seam should be invisible.
- Continue working in the same sequence.

Important ! If the wide wallpaper is not too thick and the owner will not paint it, overlapping corners are allowed.
In this case, there will be no need to cut through the thickening; just roll the overlap well with a roller.
As you can see, there is nothing complicated in the process. More information can be found in the video:
Still, it’s better to work together - one person stands on a stepladder and aligns the canvas with the ceiling line, and the second aligns the wallpaper vertically.

Pasting difficult areas
Gluing wallpaper on flat walls is quite simple; it is a little more difficult to properly glue the corners. But the trickiest places are the areas behind the radiators, external corners and various decorative elements.
- Heating pipes are different, and depending on this, they decide on the method of covering the walls behind them. It’s not easy to do this job in any case, and with meter-wide wallpaper it’s doubly difficult. You can cut the canvas into small fragments and stick them separately. But this method is only suitable for plain wallpaper; you won’t be able to fold the pattern this way. An easier way, accessible even to a beginner, is to paint the space behind the radiator to match the wallpaper. This is done with a brush on a long curved handle; it is better to use acrylic paint.
- Wallpaper can be glued to external corners in several ways; they do not differ from the options for processing internal corners. These are the overlap method and the cutting method. In any case, you need to overlap not in the center of the corner, but 3-4 cm from it.
- If there are ceiling cornices or borders, it is better to secure them before gluing the wallpaper. This will reduce material consumption (no need to leave an upper allowance), and it will be easier to trim the wallpaper.
- On the contrary, it is better to remove floor skirting boards. They will subsequently hide unevenly cut or too short edges.
Tips from professionals on gluing difficult areas are shown in the video:
The process of installing wide wallpaper on a non-woven base is not much different from working with standard-width material. And small nuances and advice from experienced craftsmen can easily be found in photos or videos.
Today we will talk about several ways to glue meter-long wallpaper, namely how it will be easier for you to work.
At first glance, the process is labor-intensive, but you can cope with this if you know some tricks and secrets.
The new wallpapers have a width of 100 to 140 centimeters. This is, of course, not the size to which we are all accustomed. That’s why this type of wallpaper is called meter wallpaper.
Advantages and disadvantages
Meter wallpaper is most often produced in vinyl or on a non-woven base. You can also find more expensive options made of fabric and bamboo. Since it is more difficult to glue such wallpaper due to its weight after applying the glue, it is clear here that there is no meter-long paper-based wallpaper. Naturally, there is also silk-screen printing.
Old wallpaper needs to be removed, there are several ways. Remove switches and sockets, remove all dowels, nails and screws from the walls, if any.
If during the process of cleaning the walls your plaster has fallen off in places, then... It is advisable to go over all the walls with finishing putty. This will give them the greatest smoothness.
It is best to start gluing from the corner or from the left window and then go along the right hand. It is best to make some markings for the first strip of wallpaper. It is necessary to draw a strictly vertical line from floor to ceiling and glue the first strip along it. You definitely need to here. Since the meter-long wallpaper is wide, the slightest distortion will get worse the further you go.
If you have already laid new floors, cover them so as not to stain them with glue. We measure the height of your walls and cut off a strip of the required length according to this size. Then we turn it face down and apply glue. It will be better if you coat the walls rather than the canvas itself, since lifting a meter-long strip of wallpaper with glue is harder and the canvas may tear.
We start gluing from top to bottom and, using a brush or roller, smooth them along their entire length, carefully expelling air bubbles. If you are unable to disperse the bubbles, you can do this with a needle. We poke a hole and smooth out the bubble.
When you reach the corner, apply more glue to the walls, since it will take longer to align the strip of wallpaper that lies on the corner. And with meter-long wallpaper there is even more fuss. If you get an overlap, then the corner must be cut carefully. The seams are joined evenly and it is advisable to roll the joints with some kind of roller.
Video of hanging meter-long wallpaper
If previously classic wallpaper had one width, 53 cm, now there is an alternative - meter-wide rolls. There are other samples. These are mainly foreign products. Premium-class products especially vary in size, which can be 140 cm, 90 cm, or 70 cm. And if with the usual size there were few difficulties when gluing them yourself, then with a meter wide they are complemented by inconvenience for one person.
Such materials would have become very popular if not for this and some other shortcomings. Therefore, before choosing such a product, you should carefully weigh its pros and cons.
Advantages
- Of course, the main feature of the increased wallpaper width is the reduced number of seams. And this is especially true in large areas. In fact, such products were invented to achieve “seamlessness” of wallpaper for walls. After all, when gluing such wallpaper, there are half as many seams, which means they are less noticeable.
- Installation is also simplified. Since much less movement is required to hang wide wallpaper. Therefore, the savings in time and effort are significant.
- Thus, costs are also reduced. After all, the price of a roll of this width is slightly less than the cost of two 53 cm each.

Flaws
- More serious preparation of the base is required. If the wall or ceiling is uneven, it will be impossible to properly glue such products. The joints will turn out uneven.
- As a result, wallpaper consumption may be higher. For example, if you have another piece of 20 cm left to glue and you need to start a new piece. Thus, almost the entire meter roll will remain untouched.
- Of course, it is more difficult for one person to work with such material. This is especially true if you need to glue the ceiling.

First of all, you need to very carefully prepare the surface. The old finish needs to be removed. The surface must be cleaned with sandpaper or a grinder with an attachment. If there are significant irregularities, they will have to be removed using putty. Before using it, the surface is primed. After puttying, the walls are sanded again, this time with sandpaper or a finer-grit wheel.
Finally, you need to prime the surface several times to ensure proper adhesion.

When starting gluing, you should maintain the correct temperature conditions. Otherwise, it may cause problems during operation. Therefore, it is better to carry out gluing before the start of the heating season. After all, in the radiator area the temperature will be different from the rest. In this case, the surface will have to be glued more carefully.
Drafts should not be allowed in the room. Therefore, windows and doors must be closed.
It is worth cutting the canvas as you glue it, and not in advance.
It will be easier for one person to handle wide wallpapers, because they are usually non-woven. And they don’t need to be coated with glue. It is applied only to walls. For such wallpaper, special glue is used. Moreover, it is worth choosing products from a recognized manufacturer; this will simplify the task and also improve the quality of the result.

After applying the glue and cutting the wallpaper to size, take a strip and apply it to the junction of the wall and ceiling, grabbing a little more material towards the top, which will then be cut off. When gluing, you need to focus on a vertical mark made in advance using a plumb line. It is most convenient for one person to first glue the middle part so that the canvas is fixed to the surface. And then smooth it over the entire width. The other canvas is glued end-to-end - as close as possible to the first. If non-woven material is used, the position of the strip can still be adjusted for some time. However, this is only possible if quick-drying glue is not used.
For smoothing, it will be convenient to use a rubber roller when working with a wide canvas. This way, it will be easier to reach both edges, and uniform smoothing will be ensured.
Gluing hard-to-reach places with meter-long wallpaper is more difficult than usual. Therefore, they can be cut into pieces. For example, if you need to stick them on the area around the radiator.
Wallpaper even a meter wide can be hung alone
Even if wide wallpaper is used, this does not mean that one person cannot cope with the task of gluing it. It is only important to prepare everything, including tools, and then there should be no problems. Yes, physically it can be more difficult than working with standard-width wallpaper. However, you will have to make fewer movements.
Therefore, you can additionally watch the video instructions, which will allow you to better understand the issue.
Nowadays, meter-long non-woven wallpaper is gaining relevance every year. This is not surprising, since hanging such wallpaper will be at least 2 times faster than standard material. No special skills are required to hang such wallpaper. It is important to level the concrete walls very well, otherwise the joints will be uneven. As soon as the walls are leveled, you need to wait until the putty dries, prime it, and then stick the wallpaper.
After the wall is prepared according to the rules, you need to apply pre-prepared glue to it.
The advantages of this type of finishing material are obvious:
- Gluing takes little time;
- Doesn't leave much waste;
- After work, there are fewer joints.
All this cannot but affect the quality of work and appearance. But, despite the advantages of wide non-woven wallpaper, there are still suspicious people who buy ordinary wallpaper, believing that gluing it will be easier, faster and better. In fact, working with non-woven wallpaper is quite simple. The main thing is to properly prepare the walls and glue them with your own hands and it will turn out flawlessly.

It is important to remember that for this type of wallpaper a special glue is used, which can be purchased at a specialized store.
After the glue is applied, you must perform the following steps:
- Take a piece of wallpaper and adjust it to the height.
- Start gluing the canvas along the marked line on the wall surface.
- We turn the other side of the canvas at an angle.
- Immediately begin smoothing the wallpaper from top to bottom, expelling air bubbles.
For smoothing, tools such as a rubber spatula, a wallpaper roller or a piece of clean thick fabric are well suited. Once the smoothing is completed, it is necessary to trim off the excess wallpaper at the ceiling and at the lower baseboard. It is convenient to cut with a sharp stationery knife, and use a metal spatula as a guide. If wet wallpaper is difficult to cut, you can wait until the material dries.
For those who have decided to glue wallpaper themselves for the first time, we recommend reading the following material:
Self-gluing of non-woven wallpaper end-to-end
Pasting using butt technology will be completed fully if the walls have been carefully leveled. When the walls are perfectly smooth, the non-woven fabric is glued end-to-end to the second sheet to be glued, without overlap.

The butt gluing process is carried out as follows:
- Special glue is applied to the wall.
- The canvas is glued end to end.
- As soon as the joint is made, it is necessary to urgently expel the air.
- It is forbidden to achieve a joint by stretching the canvas; when the wallpaper is dry, there will be gaps between the canvases.
- The excess near the ceiling and floor is cut off with a stationery knife.
Experts recommend using one small trick. If you can’t glue them end-to-end, you can glue them with an overlap of about 3-4 cm, and after the wallpaper has dried, use a sharp utility knife to make a through cut in the place where the canvases intersect. In this case, both canvases are cut at once. After the cut is made, the trimmings must be removed, the joint should be lubricated with glue, and the blades should be straightened, resulting in a smooth, neat joint.
Even more useful tips to achieve the perfect result in wallpapering:
How to properly glue non-woven wallpaper in the corners of a room
The first method is used when covering a room with wallpaper with a pattern.

This method involves gluing the canvas strictly from the corner with an overlap of 2-3 cm over the previous canvas. This method allows you to hide defects in the case of a crooked corner. The second method is ideal for non-woven wallpaper of the same tone, a material without a pattern.
Step-by-step execution method
- The canvas is glued from the corner.
- Both canvases are cut with a stationery knife.
- The excess is removed.
- The joint is coated with glue.
- The canvases are carefully aligned.
This technique cannot be used when gluing wallpaper with a pattern, since cutting it will destroy the structure of the pattern. It is also important to apply the glue correctly; there should be no more or less of it, just enough so that the canvases can adhere to the wall. An equal amount of glue is applied to the concrete wall and drywall, but the composition is not applied to the canvas at all. As you can see, pasting wide wallpaper is very simple, just a little time, patience and the result will impress you. At least, gluing non-woven fabrics is much easier and faster than ordinary narrow wallpaper.
Is it possible to glue non-woven wallpaper onto old wallpaper: expert advice
If a person bought non-woven wallpaper and plans to carry out the repairs with his own hands, then he will be interested in learning a few nuances, for example, information about which surface is best for gluing the finishing material.
Non-woven wallpaper can be glued to different surfaces, including:
- Porous concrete;
- Plaster;
- Drywall, etc.

You should not glue non-woven wallpaper onto paint, as it will peel off, and you should also not glue canvas onto old wallpaper. Craftsmen say that old paper wallpaper has a tendency to bubble after re-pasting, which will not have a positive effect on the result of the work. It’s clear why you can’t paste wallpaper and paint over old wallpaper, so the best option is to remove the old coating, prepare the wall and paste it with good, high-quality non-woven wallpaper. When gluing this type of wallpaper, you should eliminate the possibility of a draft; in addition, you need to turn off the air conditioner and start gluing from a window or corner.
Is it possible to paste wallpaper on non-woven wallpaper: expert recommendations
As mentioned above, it is not recommended to glue non-woven wallpaper onto an old surface. The result may not be pleasing. Interior finishing specialists recommend working with a previously cleaned and prepared wall.
Craftsmen like to work with this material, and they note the following advantages of non-woven wallpaper:
- Long service life.
- The canvas does not stretch, does not dry out, and does not deform.
- Easy to stick, easy to remove.
- The canvas has different relief and patterns, which makes it possible to play with the design of the room.
- Wallpaper increases sound insulation.
- Improves fire resistance.
- The canvas allows air to pass through well.
- Environmentally friendly composition.

To make the repair easy, experts recommend that before starting work, you read the rules, which describe in detail what you should pay attention to and what you should not do. Knowing the rules, everyone can glue it correctly; no special skills are required in this case.
Home craftsman: rules for gluing non-woven wallpaper
Before unpacking the wallpaper, you need to check for defects. Next, experts recommend studying the icons and their descriptions located on the wallpaper. Carefully read the rules for preparing walls. If you plan to stick thin non-woven wallpaper, then you need to prepare the surface in the same way as when gluing vinyl wallpaper and thin paper wallpaper. Next, you need to correctly calculate the amount of material used. When cutting fabrics, you must follow the technique, then you will be able to avoid a lot of expense. You need to buy glue specifically for non-woven wallpaper and before diluting it, you should carefully read the instructions. The glue is applied not to the canvas, but to the wall; we must not forget about this nuance.

When working, you must use only a high-quality tool, a wallpaper spatula, which:
- Smoothes out wallpaper;
- Removes excess air;
- Removes excess glue.
You should only work during the daytime, when you don’t have to turn on the lights, this will avoid electric shocks while wallpapering near sockets. Cold air currents should also be avoided. To install the border, you need to use special glue. If the canvas is smooth, then you can glue the border onto the already glued canvas, but if it is embossed, then you should first glue the border, and then begin work on pasting the room.
A metal ruler and a sharp knife work well for trimming.
The room should be warm and dry, the optimal room temperature is 22 degrees. In order to glue the area around the socket, you must turn off the electricity, remove the socket, stick the cloth, cut out a cross inside and trim the corners. You need to work with glue as carefully as possible, you should not smear a lot of glue, and you should also avoid getting glue on the front side of the wallpaper. It is better to glue them end-to-end, since when gluing them overlapping, the result will be terrifying; the wallpaper is very dense. It is necessary to glue very quickly, as the glue dries quickly.
How to glue non-woven wallpaper (video)
Today, non-woven wallpaper is extremely popular among finishing materials. This is explained by the fact that they are reliable, comfortable, and have a variety of textures. There are 2 types of them: non-woven based and made from pure non-woven fabric. They also come with or without a pattern, intended for further painting.
Non-woven wallpaper is very easy to glue; it does not stretch, tear, or shrink.
The advantage of this wallpaper is that it is a fairly easy pasting process that does not require special skills; it does not stretch, tear or shrink.
They hide all the unevenness of the walls well and do not crack when cracks appear in them. All this is achieved thanks to the non-woven base; it glides easily over the surface, and all the work can be done even without assistants. An undoubted advantage is that wallpaper without a pattern can be painted quite often (up to 10 times), thereby updating the interior of the room.
Read also:
Right.
Manufacturing Features.
How to quickly and correctly assemble a bed - read.
How to glue non-woven wallpaper
Return to contents
Preliminary stage - surface preparation
First, count the rolls of wallpaper. To determine their number, measure the width and height of each wall. When calculating, add a few centimeters to the length of the sheets as a reserve. You can draw a plan on a piece of paper.
Please note that you need to buy rolls with the same lot number on each package. If the wallpaper has a pattern, make sure it is identical everywhere.
Wallpaper is carefully glued only to smooth walls.
- Be sure to level the walls. Wide wallpaper does not fit well on rough walls, this can affect the quality of the joints;
- remove all sockets. Insulate the wires to prevent moisture from penetrating into the boxes. Treat the surface of the walls well with a primer and dry.
For gluing you will need the following set of devices:
- roulette;
- level;
- roller with long pile;
- containers for diluting glue and water;
- a narrow metal spatula and a plastic spatula with a soft edge for rolling sheets;
- brush for smoothing glued panels;
- cutting knife;
- special mesh for removing glue from the roller;
- foam sponge;
- pencil;
- film.
Return to contents
Gluing non-woven wallpaper
Before gluing meter-long non-woven wallpaper, make markings. This wallpaper has a good edge, so they are glued end to end. You need to mark the walls from the corner. In them, the sheets are glued overlapping. If the width of the wallpaper is 1.06 m, leave 1 m on both sides of the corner.
Draw a vertical line at your height level. Mark 1.06 m from the drawn line with a tape measure. All walls should be marked in this way.
Place the film on the floor and lay the roll face down on it. If the sheets have a pattern, take it into account when cutting.
If the sheets are without patterns, measure the height in the place where you will glue the sheet, adding 10 cm. Bend the roll onto the rolled out part so that the edges coincide, then the bend will be even. Run your hand along the bend, then cut. Prepare wallpaper for all walls in the same way.
Wrap the wallpaper loosely in rolls, with the front side on the inside. Following the instructions on the package, dilute the glue in the required amount. You need to use glue intended for non-woven wallpaper. First, pour water into the container, and then add glue little by little, mix well so that lumps do not form, which will not work. Leave the glue to swell for a while. Use a special mesh to remove excess glue; it is inserted into the container.
Dip the roller, roll it over the mesh, and then apply it to the wall surface, designed for one panel. The peculiarity of non-woven wallpaper is that they are glued on top.
Take the wallpaper by the edge and apply it to the surface. Gradually lower the canvas down and smooth the wallpaper with a brush or roller, starting from the middle to the edges. If you use a plastic spatula, be very careful not to damage the canvas.
Make sure that the wallpaper is pressed well to the surface without forming bubbles or folds.
After gluing 2 or more sheets, roll each subsequent seam with a roller. Carefully cut off the part that remains below. It is advisable to do this when everything is dry. Please note that the baseboard will have to completely cover the wallpaper. You can install a border at the top to suit your taste.
Return to contents
How to glue wide (meter-long) non-woven wallpaper
Meter wallpaper is very popular due to several of its features. Compared to regular wallpaper, the advantages of meter-long wallpaper are easy gluing, a small number of seams, and reduced costs when purchasing them. In terms of price, meter-long wallpaper is cheaper than 2 small ones.
Return to contents
Pasting corners with non-woven wallpaper
First you need to prepare the corner. This is done during the putty process: the corners are equipped with plastic corners, they are attached to the walls with putty. When everything is dry, the surface of the walls will be ready for further gluing.
When gluing wallpaper to a corner, coat the wall and plastic corner well with glue.It is better not to glue the whole canvas into a corner, because the wallpaper will overlap. Most often, the corners are not ideal, so the wallpaper wrinkles there. To avoid this, try to make a slight overlap on the nearest wall. Best of all - up to 2 cm. The next panel is glued on the adjacent wall, gluing it to the corner with an overlap. Then cut off this “tail” with a knife, focusing on the vertical angle.
That is, up to 2 cm of strip from the adjacent wall will be glued under this strip, and this sheet will rest against the edge of the corner.


