How to connect heating. A choice for every taste and budget: diagrams for the most efficient connection of heating radiators. Selecting a battery connection diagram
Read also
The heating battery installation procedure itself comes down to two operations:
- installation of radiators in a specially selected location;
- connecting the battery to the heating system.
Installation of heating radiators
When choosing a place to place radiators, we proceed from the need not only to warm up the room, but also to create a kind of “thermal curtain”, a kind of protective heat shield from the piercing draft or frosty air blowing from the front door or windows. Therefore, radiators are mounted either on the “hallway” wall or under the window.
Radiator designs with legs are still very rare (mostly design radiators made of cast iron); the batteries are almost always mounted on the wall. To ensure maximum actual heat transfer, it is recommended to leave the distance from the inner wall to the sections no more than 5 cm, and from the floor - up to 12 cm. The radiator should be installed in such a way as to ensure free access to valves and taps.
Modern radiators are unified for any type of connection with a riser, having two upper and lower end connection points.
It is important! When installing the radiator on the mounting brackets, it is necessary to check the level for correct horizontal alignment in order to avoid the subsequent appearance of air pockets.
After installing the radiator, the connection diagram of the radiators to the central heating system is determined. However, it must be taken into account that in high-rise buildings a single-pipe serial connection of heating batteries is used, so it cannot be spontaneously replaced with a parallel one without consulting a specialist.
Before deciding on a connection to the heating riser at home, you need to pay some attention to the type of heating system in the house itself. Currently, there are one-pipe and two-pipe options for organizing heating of a residential building. How to connect the heating battery depends on which system is used.
Single pipe heating system
In a single-pipe system, the coolant is supplied through a vertical pipe to heating radiators connected in series, gradually losing its original operating temperature. In such designs there are no return pipelines for waste, that is, already cooled, coolant. At one time, Soviet builders were very happy with this, since a vertical system with only one pipe is easy to install, economical in material consumption (there are no connecting pipes, jumpers and return risers) and easy to maintain. But this simplicity did a disservice to the maintenance services and the residents themselves.
Serial connection of heating radiators is doomed to unequal temperatures on the upper and lower floors of the building and even inside each apartment. Another disadvantage of a single-pipe system is the need to pump in high coolant pressure to ensure uniform heating throughout the circulation circuit. This leads to frequent emergency leaks and wear of heating equipment.
 Two independent pipelines are used here, one for supplying hot coolant, the other for receiving cooled coolant. They are connected through the end device of the system. With such a two-pipe system, the question of how to connect two heating batteries is solved by connecting them in parallel. A two-pipe system does not require such high coolant pressure as a single-pipe system.
Methods for connecting heating batteries
There are serial and parallel methods of connecting batteries.
 When connected in series, radiators are built directly into the heating system, being, as it were, an integral part of it. Hot water under pressure passes through them, making it impossible to regulate the temperature of the battery. Repair and replacement of the battery can only be done by disconnecting and draining the water from the entire system. An emergency situation forces you to completely turn off the heating throughout the entire riser, and only then begin repairs.
To avoid strong cooling of the hot coolant in a system with one-sided serial connection of radiators, the inlet and outlet pipes are connected by a jumper at the closing section. Then part of the hot coolant with a temperature close to the initial one will pass by to the next heating device. Here you cannot miss the determination of pipeline diameters in all sections. Such calculated piping is often violated in high-rise buildings by spontaneous dismantling of the jumper, which is completely unacceptable.
When connected in parallel, the radiators are supplied with coolant through a pipe embedded in a common vertical riser. Water is drained from the battery in a similar way. Thanks to ball valves, you can shut off the flow of coolant for repair work without creating problems for yourself and your neighbors. The inconvenience of this scheme is that the heating radiators are not sufficiently heated in the event of low pressure in the system, since the main coolant flow will flow through the main pipeline.
Options for connecting batteries will depend on their type; for aluminum and bimetallic batteries, a parallel connection is used, and for cast iron and tubular batteries, a serial connection is optimal.
Heating radiator wiring
There is no clear criterion for how to properly connect a heating battery. The unified design of the radiators allows pipes to be supplied from the bottom, side and both ends of the battery. Currently, in addition to metal pipes, metal-plastic, polyethylene and polypropylene pipes are widely used. The most optimal combination of price/quality/ease of installation is connecting the heating radiator with polypropylene.
Lateral connection of radiators
This method consists of connecting the inlet branch (with hot coolant) to the upper radiator pipe, and the outlet branch to the lower one. This way ensures maximum heat transfer. If you use a side one-way connection for a radiator with a large number of sections, it is necessary to install a coolant flow extension, since the last sections do not heat up well. Lateral connection is the most common scheme for high-rise buildings with a central hot heating system.
Bottom connection
It is used in special cases when the heating system is located in the floor. A pipe with hot water and a pipe with cooled water are connected from opposite sides of the radiator to its lower pipes and go vertically to the floor. This scheme is inferior in efficiency to lateral and diagonal connections.
Diagonal connection
The wiring principle consists of connecting hot water to the upper pipe on one side of the radiator and connecting the return pipe to the lower pipe on the opposite side of the battery. The hot coolant is evenly distributed throughout the entire volume of the radiator. The circuit is excellent for multi-section heating radiators and provides nominal heat transfer.
Selecting a radiator connection kit
 If you want to make the decoupling yourself using polypropylene or metal-plastic pipes, you must remember that a standard thread (mostly half-inch) is used at the entrance to the radiator on both sides. Therefore, the pipes must be proportionate. The connection kits contain silicone or paranit gaskets, so no special winding is required during installation.
It is important! The abundance of information about how to connect heating batteries often provokes consumers to spontaneously transfer and connect their own batteries, without thinking about the consequences for neighbors in the riser. Without coordination with housing and communal services specialists, you can create a lot of problems for yourself and your neighbors.
The choice of installation method for radiators depends on the configuration of the heating system, which can be single-pipe, two-pipe, collector, with natural or forced circulation of coolant. Important parameters are also: the length of the system, the method of laying the coolant inlet and outlet pipes, the dimensions and number of radiator sections. The connection diagram for heating batteries should promote maximum heat transfer from the devices.
An example of a lower radiator connection when installing an autonomous heating system in a country house
Radiator connection: serial and parallel
In a single-pipe system, the coolant heated by the boiler passes sequentially through all radiators, therefore this connection of batteries to the heating system is called serial. The coolant cools down as it passes through the circuit, which leads to uneven heating of the heating devices (HE). In rooms located closer to the boiler it will be warm or hot, and in distant rooms it will be cool or completely cold.
In a two-pipe system, hot water flows into the OP through one pipe (supply), and through the other (discharge) the cooled coolant is returned back to the boiler. This pipe layout involves parallel connection of batteries, ensuring uniform heating of all rooms in the house, regardless of their distance from the boiler. To reduce the temperature in the room, any radiator can be closed with a valve that blocks the path to the hot flow, while the rest of the system will operate as usual.
Where and how are heating devices installed?
Regardless of the type of connection, radiators are usually installed under the windowsill to block the path of cold air with warm air. Warm air currents rise upward, forming an invisible protective screen. In order for the “thermal curtain” to work effectively, it is necessary to maintain the installation distances prescribed by building codes. A correctly located OP is located:
- 100 mm from the bottom of the window sill;
- 120 mm from the floor surface;
- 20 mm from the plane of the wall.
Important! These standards must not be violated, otherwise the installed equipment will not operate at full capacity.
Three ways to connect heating batteries
Method #1: one-way connection
The supply and discharge pipelines are connected to one side of the radiator. In this case, the coolant flows into the upper part of the battery, and the outflow goes through the return, which is connected to the OP from below. This installation method ensures uniform heating of all sections. This option for connecting accordion batteries is especially good for one-story houses.
Important! You should not use a one-way connection type if the number of sections exceeds 15. Ignoring this recommendation leads to significant heat losses.

Diagram of one-way connection of a heating device
Method #2: bottom connection
Suitable for pipelines hidden in the floor. The saddle type is included in the same group, but the pipes go above the floor surface. In this case, the inlet and outlet pipes are connected at the bottom of the battery: one on the left, the other on the right. Heating radiators with a bottom connection may warm up unevenly in the upper part, and up to 15% of the heat can be lost.

Diagram of the lower connection, which shows the direction of movement of the coolant in the device
Method #3: diagonal connection
Used when installing long heating devices with a large number of sections. The coolant supply pipe is connected to the top of the radiator, and the outlet pipe is connected to the lower outlet located on the opposite side of the device. Result: water or antifreeze heats the surface of the convector more evenly. The amount of heat loss is only a couple of percent.

How does coolant circulation affect equipment installation?
If a circulation pump is installed in the heating system of a private house, forcing water or antifreeze along the thermal circuit, you can choose any method of connecting radiators. The efficiency of the system in this case will not depend on the installation scheme of the OP to the pipeline. With natural coolant circulation, it is better to use a diagonal method of connecting batteries.
Incorrect activation of heating radiators - a factor that most often causes problems during operation.
Errors in the installation of other components and the wrong choice of the type of system also have a negative impact on the use of heating devices.
How to properly connect batteries in an apartment in an apartment building

Connection options depend on the number of pipes used to connect the boiler to the radiators. There are two methods:
- One pipe comes out of the boiler, makes a circle around the harness, simultaneously entering the batteries, and returns to the starting point. This installation method is easy to implement.
- The first half of the system leaves the heater, visits all radiators, connecting to them only once. At the extreme, most distant point, it stops and the second part begins. The latter also passes through all batteries, connecting on the other side. Its end point is the cauldron.
The choice will depend on the budget, since both options have advantages over the other. Single-pipe is easier to install and cheaper, which is why it is used in apartment buildings. The two-pipe system is more complex and more expensive, but more reliable, so it is recommended for private buildings.
Schemes for the correct connection of radiators to the heating system
Pipes lead to radiators in three ways:
- Diagonal option involves connecting the supply to the upper axis on one side of the battery, and the return to the lower axis on the other. This type is characterized by high operating efficiency and rapid heating of sections, regardless of their number and distance from the boiler.

Photo 1. Diagram of diagonal connection of a heating radiator. The supply circuit is from the top left, the return circuit is from the bottom right.
- Lower the connection is made along one axis. To do this, the supply is cut into one end of the radiator, and the return from the other. This method is used less often than others due to its low efficiency.

Photo 2. Diagram of the lower connection of batteries for a single-pipe system (left) and for a two-pipe system (right).
- Lateral also known as unilateral. The pipes are brought in from one side in a vertical plane. This method is in great demand in small rooms and apartments.
Each connection type can be used as they independent of the heating system. But there are nuances in the operation of different combinations that it is advisable to observe.
Reference. Single-pipe wiring works better with bottom and side connections, and two-pipe - with diagonal.
Incorrect connection methods
Radiators are usually installed without problems, but the same cannot be said about some system components.
Thermostat head
Errors during installation of the device lead to a decrease in operating efficiency. The most common problems are caused by:
- Vertical head placement make sure that it does not stick out to the side, interfering with walking or cleaning. This leads to heating of the bellows as the coolant rises upward from the valve. To correct it, you must stop operation, dismantle the device, then install it again, positioning it horizontally.

Photo 3. Incorrect vertical connection of the thermal head to the battery (left), correct horizontal placement (right).
- Placing the thermal head in a niche or similar confined spaces. This leads to a decrease in convection: heat settles in a closed volume, accumulates and is incorrectly reflected from the surrounding walls. This reduces the heating efficiency.
- Installing curtains so that they cover the thermal head. This factor leads to the device incorrectly determining the room temperature. The bellows stops working when necessary. Solution to this problem — placing the sensor on a wall that is not covered by unnecessary objects. Most thermal heads are allowed to be mounted at a distance of up to two meters from the pipes.
- High-quality setup of the device also plays an important role. It is recommended to invite a specialist to check the correct operation and, if necessary, change the characteristics.
You might also be interested in:
Bypass

Problems with the device usually arise when radiators are replaced by an unqualified person. This is especially true in cases in which cast iron is replaced with another material.
The two most common mistakes are:
- Installation on the bypass pipe of the ball valve, designed to let water into the system. The entire coolant should not pass through the device: only a small part, which is enough for operation.
- The bypass is connected to the piping through a mixer with a three-way tap. Theoretically, this allows you to regulate the heat transfer of the boiler, but in practice it leads to damage to the device.
Both errors can be easily corrected by changing the principle of connecting the bypass. There are also a few rules to note:
- It is forbidden to install a bypass on a free pipe in apartment buildings.
- Prohibited installation of shut-off valves and fittings.
- Allowed reducing pipes by one typical size.
- In a non-volatile gravitational system pump needed, and it is connected exclusively to the bypass.
Attention! The problems mentioned concern exclusively apartment buildings in which they lead to imbalance of the entire system. The consequence of such errors is a decrease in the amount of heat that neighbors along the highway receive.
Any heating system is a rather complex “organism” in which each of the “organs” performs a strictly assigned role. And one of the most important elements is heat exchange devices - they are entrusted with the final task of transferring thermal energy to the premises of the house. This role can be played by conventional radiators, convectors of open or hidden installation, and increasingly popular water floor heating systems - pipe circuits laid in accordance with certain rules.
You might be interested in information about what it is
This publication will focus on heating radiators. We will not be distracted by their diversity, design and technical characteristics: our portal contains enough comprehensive information on these topics. Now we are interested in another set of questions: connecting heating radiators, wiring diagrams, installation of batteries. Correct installation of heat exchange devices, rational use of the technical capabilities inherent in them is the key to the efficiency of the entire heating system. Even the most expensive modern radiator will have low returns if you do not listen to the recommendations for its installation.
What should you consider when choosing radiator piping schemes?
If you take a simplified look at most heating radiators, their hydraulic design is a fairly simple, understandable diagram. These are two horizontal collectors that are connected to each other by vertical jumper channels through which the coolant moves. This entire system is either made of metal, which provides the necessary high heat transfer (a striking example -), or is “clad” in a special casing, the design of which requires a maximum contact area with air (for example, bimetallic radiators).
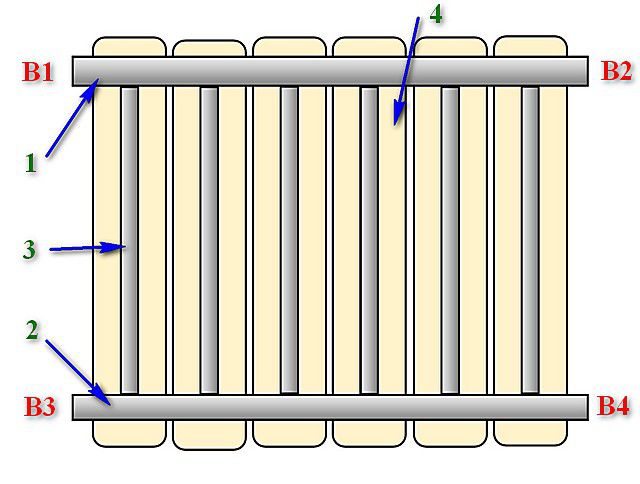
1 – Upper collector;
2 – Lower collector;
3 – Vertical channels in radiator sections;
4 – Heat exchange housing (casing) of the radiator.
Both collectors, upper and lower, have outputs on both sides (respectively, in the diagram, the upper pair B1-B2, and the lower pair B3-B4). It is clear that when connecting a radiator to the pipes of the heating circuit, only two of the four outputs are connected, and the remaining two are muted. And the efficiency of the installed battery largely depends on the connection diagram, that is, on the relative position of the coolant supply pipe and the return outlet.
And first of all, when planning the installation of radiators, the owner must understand exactly what kind of heating system is operating or will be created in his house or apartment. That is, he must clearly understand where the coolant is coming from and in which direction its flow is directed.
Single pipe heating system
In multi-storey buildings, a single-pipe system is most often used. In this scheme, each radiator is, as it were, inserted into a “gap” in a single pipe through which both the coolant is supplied and its discharge towards the “return” is carried out.

The coolant passes sequentially through all the radiators installed in the riser, gradually wasting heat. It is clear that in the initial section of the riser its temperature will always be higher - this must also be taken into account when planning the installation of radiators.
One more point is important here. Such a single-pipe system of an apartment building can be organized according to the principle of upper and lower supply.
- On the left (item 1) the top supply is shown - the coolant is transferred through a straight pipe to the top point of the riser, and then sequentially passes through all the radiators on the floors. This means that the flow direction is from top to bottom.
- In order to simplify the system and save consumables, another scheme is often organized - with bottom feed (item 2). In this case, radiators are installed in the same series on the pipe ascending to the upper floor as on the pipe going down. This means that the direction of coolant flow in these “branches” of one loop changes to the opposite. Obviously, the temperature difference in the first and last radiator of such a circuit will be even more noticeable.
It is important to understand this issue - on which pipe of such a single-pipe system is your radiator installed - the optimal insertion pattern depends on the direction of flow.
A mandatory condition for piping a radiator in a single-pipe riser is a bypass
The name “bypass,” which is not entirely clear to some, refers to a jumper connecting the pipes connecting the radiator to the riser in a single-pipe system. Why it is needed, what rules are followed when installing it - read in the special publication of our portal.
The single-pipe system is also widely used in private one-story houses, if only for reasons of saving materials for its installation. In this case, it is easier for the owner to figure out the direction of the coolant flow, that is, from which side it will flow into the radiator, and from which side it will exit.

Advantages and disadvantages of a single-pipe heating system
While attractive due to the simplicity of its design, such a system is still somewhat alarming due to the difficulty of ensuring uniform heating on different radiators in the house wiring. Read what is important to know about how to install it yourself in a separate publication on our portal.
Two-pipe system
Already based on the name, it becomes clear that each of the radiators in such a scheme “rests” on two pipes – separately on the supply and “return”.
If you look at the two-pipe wiring diagram in a multi-story building, you will immediately see the differences.

It is clear that the dependence of the heating temperature on the location of the radiator in the heating system is minimized. The direction of flow is determined only by the relative position of the pipes embedded in the risers. The only thing you need to know is which specific riser serves as the supply and which is the “return” - but this, as a rule, is easily determined even by the temperature of the pipe.
Some apartment residents may be misled by the presence of two risers, in which the system will not cease to be one-pipe. Look at the illustration below:

On the left, although there seem to be two risers, a single-pipe system is shown. The coolant is simply supplied from the top through one pipe. But on the right is a typical case of two different risers - supply and return.
Dependence of the efficiency of the radiator on the scheme of its insertion into the system
Why was all that said? what is posted in the previous sections of the article? But the fact is that the heat transfer of the heating radiator very seriously depends on the relative position of the supply and return pipes.
| Scheme of inserting a radiator into the circuit | Coolant flow direction |
|---|---|
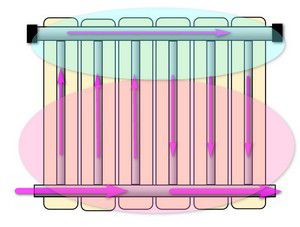
| Diagonal two-way radiator connection, with supply from above | |
 |  |
| This scheme is considered the most effective. In principle, it is this that is taken as the basis when calculating the heat transfer of a specific radiator model, that is, the power of the battery for such a connection is taken as one. The coolant, without encountering any resistance, completely passes through the upper collector, through all vertical channels, ensuring maximum heat transfer. The entire radiator heats up evenly over its entire area. | |
 |  |
| This type of scheme is one of the most common in heating systems of multi-storey buildings, as it is the most compact in conditions of vertical risers. It is used on risers with a top supply of coolant, as well as on return and downstream ones - with a bottom supply. Quite effective for small radiators. However, if the number of sections is large, then heating may be uneven. The kinetic energy of the flow becomes insufficient to distribute the coolant to the very end of the upper supply manifold - the liquid tends to pass along the path of least resistance, that is, through the vertical channels closest to the entrance. Thus, in the part of the battery farthest from the entrance, stagnant zones cannot be excluded, which will be much colder than the opposite ones. When calculating the system, it is usually assumed that even with the optimal length of the battery, its overall heat transfer efficiency is reduced by 3–5%. Well, with long radiators, such a scheme becomes ineffective or will require some optimization (this will be discussed below) / | |
| One-sided radiator connection with top supply | |
 |  |
| The scheme is similar to the previous one, and in many ways repeats and even enhances its inherent disadvantages. It is used in the same risers of single-pipe systems, but only in schemes with bottom supply - on the ascending pipe, so the coolant is supplied from below. Losses in total heat transfer with such a connection can be even higher - up to 20÷22%. This is due to the fact that the closure of the coolant movement through the nearby vertical channels will also be facilitated by the difference in density - the hot liquid tends upward, and therefore passes more difficultly to the remote edge of the lower supply manifold of the radiator. Sometimes this is the only connection option. The losses are compensated to some extent by the fact that in the rising pipe the overall temperature level of the coolant is always higher. The scheme can be optimized by installing special devices. | |
| Two-way connection with bottom connection of both connections | |
 |  |
| The bottom connection, or as it is often called the “saddle” connection, is extremely popular in autonomous systems of private houses due to the wide possibilities of hiding the heating circuit pipes under the decorative floor surface or making them as invisible as possible. However, in terms of heat transfer, such a scheme is far from optimal, and possible efficiency losses are estimated at 10–15%. The most accessible path for the coolant in this case is the lower collector, and distribution through vertical channels is largely due to the difference in density. As a result, the upper part of the heating battery can warm up significantly less than the lower part. There are certain methods and means to reduce this disadvantage to a minimum. | |
| Diagonal two-way radiator connection, with supply from below | |
 |  |
| Despite the apparent similarity with the first, most optimal scheme, the difference between them is very large. Efficiency losses with such a connection reach up to 20%. This is explained quite simply. The coolant has no incentive to freely penetrate into the far section of the lower supply manifold of the radiator - due to the difference in density, it selects the vertical channels closest to the entrance to the battery. As a result, with the top heated sufficiently evenly, stagnation very often forms in the lower corner opposite the one I enter, that is, the temperature of the battery surface in this area will be lower. Such a scheme is used extremely rarely in practice - it is even difficult to imagine a situation when it is absolutely necessary to resort to it, rejecting other, more optimal solutions. | |
The table deliberately does not mention the bottom one-way battery connection. This is a controversial issue, as many radiators that offer the possibility of such an insertion have special adapters that essentially turn the bottom connection into one of the options discussed in the table. In addition, even for ordinary radiators, you can purchase additional equipment, in which the lower one-sided connection will be structurally modified to another, more optimal option.
It must be said that there are also more “exotic” insertion schemes, for example, for vertical radiators of great height - some models from this series require a two-way connection with both connections from above. But the very design of such batteries is thought out in such a way that the heat transfer from them is maximum.
Dependence of the heat transfer efficiency of a radiator on its installation location in the room
In addition to the connection diagram of radiators to the heating circuit pipes, the efficiency of these heat exchange devices is seriously affected by the location of their installation.
First of all, certain rules for placing a radiator on the wall in relation to adjacent structures and interior elements of the room must be observed.
The most typical location of the radiator is under the window opening. In addition to the general heat transfer, the upward convection flow creates a kind of “thermal curtain” that prevents the free penetration of colder air from the windows.

- The radiator in this place will show maximum efficiency if its total length is about 75% of the width of the window opening. In this case, you must try to install the battery exactly in the center of the window, with a minimum deviation not exceeding 20 mm in one direction or another.
- The distance from the bottom plane of the window sill (or other obstacle located above - a shelf, horizontal wall of a niche, etc.) should be about 100 mm. In any case, it should never be less than 75% of the depth of the radiator itself. Otherwise, an insurmountable barrier to convection currents is created, and the battery efficiency drops sharply.
- The height of the lower edge of the radiator above the floor surface should also be about 100÷120 mm. With a clearance of less than 100 mm, firstly, considerable difficulties are artificially created in carrying out regular cleaning under the battery (and this is a traditional place for the accumulation of dust carried by convection air currents). And secondly, convection itself will be difficult. At the same time, “lifting” the radiator too high, with a clearance from the floor surface of 150 mm or more, is also completely useless, since this leads to uneven distribution of heat in the room: a pronounced cold layer may remain in the area bordering the floor surface air.
- Finally, the radiator must be positioned at least 20 mm away from the wall using brackets. Reducing this clearance is a violation of normal air convection, and in addition, clearly visible dust traces may soon appear on the wall.
These are guidelines that should be followed. However, for some radiators there are also manufacturer-developed recommendations for linear installation parameters - they are indicated in the product operating manuals.

It is probably unnecessary to explain that a radiator located openly on the wall will show much higher heat transfer than one that is completely or partially covered by certain interior items. Even a window sill that is too wide can already reduce heating efficiency by several percent. And if you consider that many owners cannot do without thick curtains on the windows, or, for the sake of interior design, try to cover up unsightly radiators with the help of facade decorative screens or even completely closed covers, then the calculated power of the batteries may not be enough to fully heat the room.

Heat transfer losses, depending on the specific installation of the heating radiator on the walls, are shown in the table below.
| Illustration | The influence of the shown placement on the heat transfer of the radiator |
|---|---|
 | The radiator is located completely open on the wall, or installed under the window sill, which covers no more than 75% of the depth of the battery. In this case, both main heat transfer paths – convection and thermal radiation – are completely preserved. Efficiency can be taken as one. |
 | A window sill or shelf completely covers the radiator from above. For infrared radiation this does not matter, but the convection flow already encounters a serious obstacle. Losses can be estimated at 3 ÷ 5% of the total thermal power of the battery. |
 | In this case, there is not a window sill or shelf on top, but the upper wall of a wall niche. At first glance, everything is the same, but the losses are already somewhat greater - up to 7 ÷ 8%, since part of the energy will be wasted on heating the very heat-intensive wall material. |
 | The radiator on the front part is covered with a decorative screen, but there is sufficient clearance for air convection. The loss is precisely in thermal infrared radiation, which especially affects the efficiency of cast iron and bimetallic batteries. Heat transfer losses with this installation reach 10÷12%. |
 | The heating radiator is completely covered with a decorative casing on all sides. It is clear that in such a casing there are grilles or slot-like openings for air circulation, but both convection and direct thermal radiation are sharply reduced. Losses can reach up to 20 - 25% of the calculated battery power. |
So, it is obvious that owners are free to change some of the nuances of installing heating radiators in order to increase the efficiency of heat transfer. However, sometimes space is so limited that you have to put up with existing conditions regarding both the location of the heating circuit pipes and the free space on the surface of the walls. Another option is that the desire to hide the batteries from view prevails over common sense, and installing screens or decorative covers is a done deal. This means, in any case, you will have to make adjustments to the total power of the radiators in order to guarantee that the required level of heating is achieved in the room. The calculator below will help you make the appropriate adjustments correctly.
The pipes are installed simultaneously with gas boilers.
This determines how the connection diagram for heating radiators in a private house will be arranged later.
It is better to get acquainted with the current ones before making a choice in favor of certain devices. This will help you spend as little effort and time as possible on setting up a working system:
- Minimum 2 cm distance between the wall and the back walls on the panels.
- The gap should be 8-10 centimeters, starting from the top of the radiator and ending with the window sill.
- 10-12 centimeters is the minimum distance from the bottom of the battery to the floor.
Heat transfer in devices becomes less if the specified standards are not followed. The likelihood that operations will run smoothly is reduced. And the very scheme for connecting heating batteries in a private house from a gas boiler ceases to be effective.
Radiators must have an adjustment function. It can be automatic or . Therefore, the kits are equipped with heat regulators. Thanks to which it is easier to maintain an optimal temperature level indoors.
What type of pipe layout is there?
When connecting, use two-pipe or one-pipe circuits.
Single-pipe option
In addition, heating is not complete without such additional elements.
- Thermostat. It helps save fuel and maintain the temperature in the rooms at the same level.
- Air vents. Needed to bleed oxygen. It periodically accumulates in pipes, which is why it becomes a destructive element.
- Shut-off valves. Maintenance and repair are easier for those systems that have a large number of taps installed.
Expansion tanks are indispensable assistants when building systems of any type. It is produced in closed and open.
Only closed varieties are used in conjunction with circulation pumps. They try to place open tanks as high as possible. For example, in the attic of a house.
What to do with chimneys
And in this case there are mandatory conditions. The outlet pipe of the boiler must exactly match the diameter. There are other subtleties:
- If the pipe goes to an unheated room, insulation is required in these places.
- It is unacceptable to have connections where pipes pass through roofs or walls.
- Three bends is the maximum number for a chimney from the boiler to the head.
Installation of heating batteries: main steps
Installation rules remain the same for each battery type. It doesn’t matter which one played the main role, how the connections are made. The procedure will always look like this.
- First, shut off the entire heating system and drain the water.
- Dismantle the battery along with other elements of the old circuit.
- The use of dowels for marking and fixing brackets on the wall surface. A cement solution is needed for rubbing places with fasteners to level the surface.
- After this, the plugs begin to be installed. There are entry holes for each pipe on both sides. Plugs for organizing the passage, on which the correct thread is applied, are screwed into the places where the connections are located. Strips with linen with additional sealing add tightness to the entire structure. At the top there is a valve mechanism that releases excess air.
- Radiators are hung on supports prepared in advance. Special water instruments will help you check whether the levels are set correctly.
- Installation of a shut-off valve inside the passage plugs.
- The batteries are connected to the pipeline.
- The entire heating network is tested.
Don't get carried away with decorative protective screens. They look like this, but at the right time they can block access to thermostats. Because of this, the heating turns off when there is insufficient heating.
For more information about the home heating system, watch the video: