How to restore an old wardrobe. What can be done from an old closet. Set of tools and materials
The opportunity to update old furniture is not only a practical activity, but also very creative. It's nice when your favorite decorating technique and creative impulses can be translated into something as useful as possible, for example, giving a second life to a closet. Reanimating it with your own hands is enough simple task despite its impressive scale. Photo examples resulting from innovative transformations will set you in the right mood. The advice will adjust the scope of work, and the video will dispel any remaining doubts and set you up for the success of the event.
New or very old?
The most important thing is to decide on the theme and style of the future transformation. There are initially two concepts in the update:
- Give modern look standard sample“Soviet” furnishings or a younger specimen that has lost its decent appearance. Result: bright accent for modern, avant-garde interiors and other modern design projects.
- From especially interesting models through not an obvious update, but competent, even greater aging, to obtain a unique exclusive sample. Effect: a worthy representative of shabby chic, any vintage style.
There are renovation techniques that require at least a little experience or minimal skill as an artist. But there are very simple ones that even an amateur can handle. For different types furniture they will also be different.
We glue
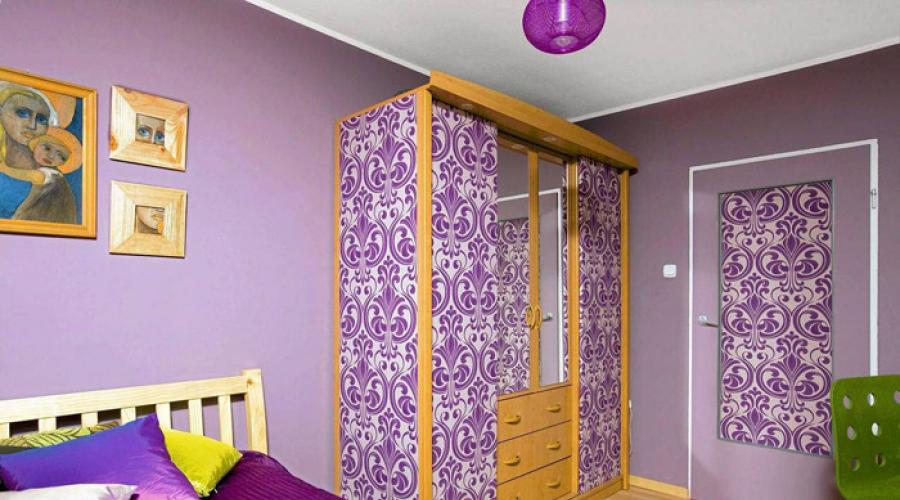
Wardrobe or other simple model may not be very old in age, but it is the facades that weak spots Such products quickly lose all the charm of novelty. Pasting external surfaces Photo wallpaper or photo printing cannot be called a creative process, but visual transformation is guaranteed. Even old wardrobe, decorated with a well-chosen pattern, can take its rightful place, for example, in a nursery.

Wallpapering a closet
Stained glass film will add elegance and presentability to a cabinet located in the hallway or corridor. Another plus is that it will prevent damage, for example when Entrance door opens into the apartment, touching the surface of the wardrobe.
Advice. Self-adhesive films are not long-lasting creations, but this has its obvious advantage for people who love change.
Wallpapering can work if you choose a wall that matches the design of the wall where the updated version of the furniture will be located. Typical techniques:
- same color scheme, but different pattern;
- dismantle the doors and cover the back wall.
All methods of wallpapering look especially impressive in combination with an indispensable method of restoration - painting. Only the central part of the drawers and doors is covered with wallpaper; the edges and ends (the most vulnerable places) are painted with contrasting, suitable paint. By the way, such a combined method, especially with daily use, will allow you to preserve the original condition for as long as possible. fresh look.
We paint
An alternative option with its own advantages:
- low cost and ease of execution;
- variety of colors and painting methods;
- lasting result.
Some experts give special preference to acrylic paint for the ability to independently choose the desired color scheme by simply mixing it. With the addition of white paint, you can get as many shades as you like and even use the ombre technique.

Cabinet Painting
An aerosol modification of the paint you like will be relevant for beginners. But in general, you need to take care of purchasing a high-quality roller and brushes different formats, other painting attributes, especially if you don’t plan to stop renovating old things.
Advice. Pay attention to paint with existing special effects in the composition - metallic, mother-of-pearl.
Add varnish and volume
Varnishes are used to give furniture an “antique” feel. And the use of ready-made stencils will allow you to make a painting no worse than a professional artist. Even a simple masking tape used as a stencil for elementary patterns can turn a nondescript cabinet into a bright accent for a modern, high-tech interior.
It is worth noting that the style features are also emphasized by the fittings. Even a bulky, slightly awkward brown giant turns into an exquisite luxurious piece. This is achieved by simply painting the door handles in a light color (for example, ice blue) in the color of aged, darkened gold or brass. Handles with enamel inserts are not a cheap pleasure, but the result of the transformation will benefit significantly from such fittings.
When simple painting becomes an uninteresting process, we complicate the task. A technique such as stenciling with plaster can turn a cabinet that suits the style into a museum exhibit, especially if gilding is used at the end of the work. Decorative plaster allows you to create three-dimensional images, and subsequent painting fixes and emphasizes the result.
All kinds of decorative slats, corners, stuffed or glued with a slight indentation around the perimeter of the doors, in a special way transform a banal polished double-leaf wardrobe into a worthy representative of the Provence or country style. You just have to pick it up suitable paint. The added special effects - patina - look good.
Attention! Professionals advise testing the behavior of unfamiliar paint on a specific surface in an inconspicuous area.
Restoration and preparatory stage
Sometimes furniture is in such a state that it seems easier to throw it away than to try to revive it. It's not all that sad. A few secrets for specimens in poor condition and general tips before decorating:

Applying patina
- decayed areas will not be taken up sandpaper– you will need a metal brush;
- It wouldn’t hurt to dry the furniture before starting work;
- putty and rubber spatula– working duo against surface defects;
- pre-treatment with a special antiseptic for wooden surfaces- reasonable precaution.
There are many ways to update your closet. It all depends on the time and money you are willing to invest in this enterprise. There are more painstaking types of beauty, such as covering with fabric and then decorating with carnations. Nowadays there are a lot of stencils available that allow you to easily repaint a cabinet “like Gzhel”. It all depends on your imagination and desire to try new things, because there are still so many pieces of furniture...
Restoration of an old cabinet: video
Cabinet update: photo


“Dear esteemed closet!” – this is exactly how the Russian classic Anton Pavlovich Chekhov addressed this piece of furniture, present in various variations in every apartment. Once upon a time, the presence of a massive wardrobe was evidence of a family’s social status and wealth. Today, it doesn’t matter at all what kind of large-sized object with surfaces that require a new life you have in stock - a buffet, a three-leaf wardrobe, a storage cabinet, a chest or a sideboard. The main thing is that there is a desire to decorate the cabinet with your own hands, to make it an individual, accent detail of the interior, emphasizing the mood and character of the owner.
Preliminary preparation
To begin implementing a plan for decorating an old cabinet, you must first meet several conditions:
- decide what style the “new” furniture object should correspond to;
- choose the room that he will decorate after the update;
- determine the decoration method;
- prepare the surface of the furniture for further work.
In most options, wooden surfaces are decorated.
Preparation includes the following mandatory steps:
- Removing cabinet doors from their hinges (it is more convenient to work with them in a horizontal position);
- Dismantling metal parts (handles, hinges, keyholes) or carefully sealing them with masking tape;
- Cleaning the entire surface from grease stains and dirt with special compounds;
- Application of materials that loosen old paintwork;
- Removing layers of coating with a spatula, brush or different numbers of sandpaper;
- If necessary, restore chips and scratches with hardening mastic or wood putty;
- Final grinding of surfaces;
- Dust removal;
- Applying a layer of primer.
The next steps in the process of creating a “standout” piece of furniture vary depending on the type of decor chosen.
These may include:
- painting in several layers;
- varnishing;
- coating with craquelure compositions;
- replacement of the main panel in paneled doors;
- drying;
- pasting;
- applying ornaments and patterns;
- picturesque painting;
- creating a patinated coating;
- finishing with metal “suitcase” corners;
- final painting with a semi-dry brush.
Having given the cabinet a different look, do not forget to change the fittings to something more impressive. New handles made of plastic, earthenware, metal, combined, double or single - the variety is huge. If the doors had a handle secured with one screw, then when replacing it with a model with double fastening, it is necessary to cover the hole with putty, sand it, paint it in the same tone, and then drill the necessary holes in other places.
Methods of decorating furniture
If you see an exclusive piece of furniture in an antique or luxury store, think about how you can create a worthy competitor for it with your own hands. In order for a massive wardrobe to home interior did not irritate with its old-fashioned ugliness and did not awaken in the owners the desire to call a team of movers and take the junk to a landfill; you just need to arm yourself with knowledge, be patient, apply diligence and spend a little time.
Even the modest can handle materials for decoration family budget, because it’s not a matter of high cost, but of your imagination. But you will become the owner of a dimensional item of genuine author’s design.
To understand what materials will be needed for a particular type of decoration, you need to study the process from beginning to end.
| Type of decor | Application of ornaments | Wallpapering | Fabric upholstery | Glass painting | |
| Tools used | scissors, brush, sponge | brush, stencils, sponge | scissors, knife cutter, ruler | sewing needle, hammer, screwdriver | brushes, pencil for marking the drawing |
| Necessary materials | pencil, decoupage napkins or cards, PVA glue, water-based paint | pencil, masking tape, acrylic paints, fixing compound, furniture varnish | wallpaper, pencil, wallpaper glue, water-based varnish | fabric, thick foam rubber, threads, wallpaper nails with beautiful heads, self-tapping screws | paints for glass, contours for glass, solvent |
By drawing up a clear action plan, collecting necessary materials, you can start decorating. 
Choosing a style
The very first step is to imagine what should happen in the end. Imagine a picture or find it in an interior magazine, and then, based on the visualization, choose a method of implementation.
- The Provence style will be supported by furniture decorated using the decoupage technique, hand-painted, decorated with hand-embroidered fabrics, or partially covered with companion wallpaper that supports the overall tone of the room.
- The Russian direction (folk, Old Russian, popular print versions) is the application of ornaments and patterns on wood or glass facades. In a nursery or kitchen, a painted large item for storing dishes, table linen, children's clothes or toys will become a real treasure.
- The belonging of simple-shaped objects to the chinoiserie, colonial or eclectic styles will be emphasized by painting with Chinese motifs followed by varnish coating.
- The soft classics of the bedroom can be set off by voluminous quilted wardrobe doors, echoing the manufacturing method, chosen material, color high headboard beds.
- Even in simple and strict minimalism there is a place for the designer’s “joke”, which makes the interior special. Using a craquelure coating on one item painted in the same color color scheme with other furniture is a way to create an accent, a “zest” of the space being decorated.
When decorating furniture using decoupage technique for the first time, select white paint for the base. It is easier to choose the necessary decoupage napkins for this tone, and PVA glue will remain invisible. The product will look professionally made due to the overall light finish. It is more difficult to decorate a dark surface neatly.
Features of each type of decor
You don't have to be a pro at any craft or art to decorate an old cabinet. All that is required is the desire and ability to scrupulously carry out a certain sequence of actions.
Decoration glass doors A buffet or sideboard using a technique that imitates historical stained glass or Tiffany will require great care, the correct selection of paints and the preliminary drawing up of a diagram indicating the dye numbers. But irises and poppies, magical Art Nouveau ornaments, Gothic diamonds, and whimsical eclectic compositions will be the subject of admiration for everyone around.
If there is a craftsman in the house who knows how to carefully work with wood, then you can instruct him to remove an ordinary wooden panel from the door. The resulting “empty” window can be easily covered with embroidered fabric, canvas with lace inserts, or rattan weaving. By simplifying the option and leaving the panel, you can use the upholstery as decoration interesting fabric, or a quilted version, giving the item unexpected volume.
If your dream is a cabinet in the shabby chic style, then you can create the necessary “scuffs” that give the item a touch of antiquity by first painting the surfaces with a darker paint, then applying a lighter tone and, without waiting for it to dry completely, go over it with a sponge or dry brush, performing “erasing” movements. From under the white layer a softened dark tone, which will create the desired effect.
Don't despair that everything old furniture Before repairs, it was sent to a landfill, and it will not be possible to create a miracle with your own hands. Even if you purchased a new set, it is faceless, similar to thousands of others, and by decorating it yourself, you will get something that no one else will have. You will be able to create and present to your guests a nursery, bedroom or kitchen from an outstanding designer - yourself.
Step-by-step instructions for decorating an old cabinet with wallpaper
Wallpapering furniture is the fastest, easiest and inexpensive way get a familiar item in a new way. In this type of decoration, a significant advantage is savings - you can partially use wallpaper scraps left after renovation.

6540 0 0
Antique wardrobe - ideas for restoration and decoration with your own hands
Are you planning to replace your old, unsightly wardrobe with a modern wardrobe? Do not rush to do this, since most old furniture is not inferior to new cabinets in terms of workmanship and durability. As for the unsightly appearance, this is not difficult to fix, because almost any furniture can be updated.
Is every cabinet suitable for updating?

Furniture restoration is a labor-intensive, painstaking and at the same time fascinating creative process. When deciding to restore a particular element of the surroundings, you are guaranteed to receive a new one useful experience, which will come in handy many times later. But before you start updating your furniture, you need to make sure that the planned work is appropriate.
To accept correct solution, pay attention to the materials from which the furniture is made and to general state closet

Materials from which furniture is made. It makes no sense to restore a cabinet made of chipboard, MDF and others particle boards, since these materials are inherently short-lived. However, if you need to restore a wardrobe from the 80s, why not, but be prepared for the fact that you will have to update not only the artificial veneer covering, but also restore the geometry of the case, plus update the fittings.
The easiest way to restore products is made of solid wood and veneered plywood. Chips, cracks and other defects on the surface of the wood can be puttied. After this, the entire facade is painted, varnished and looks like new.

General condition of the furniture. Significant damage load-bearing frame, housings and fittings will require replacement of defective parts. This is not at all a reason to refuse restoration, however, you need to understand that such an undertaking will require experience and will result in a significant waste of time and money.
Ideas for restoring an old cabinet with your own hands


Decor options
Let's consider interesting options decor that are used in cabinet restoration.
| Illustrations | Original ideas and their description |
 |
Application of three-dimensional drawings. To make the cabinet façade unusual and at the same time attractive, apply textured images. For this you can use various materials, which will be at hand, starting with putty and ending with fabric or braided rope, as shown in the photo. |
 |
Stained glass film and vinyl stickers
. Pasting surfaces with vinyl film or vinyl applications is a common solution that allows you to quickly hide cosmetic surface defects.
|
 |
Pasting with paper applications (decoupage). Decoupage is the most common technique for decorating old furniture. The instructions are simple, special napkins are divided into layers. The layer with the image is glued directly to the surface to be finished and fixed on top with a protective layer of varnish. If there are no napkins, you can use wallpaper or photo wallpaper. |
 |
Matting glass or mirror. If the cabinet doors are assembled with transparent glass inserts, the glass can be made frosted. As a result, the dishes and other contents of the buffet will be less noticeable. Glass can be frosted sandblaster. If you don’t have a special apparatus, you can apply an aqueous solution of starch to the inside of the glass or, as an option, stick a translucent vinyl self-adhesive. |
 |
Painting polished furniture. An equally common decorative option is removing the old paint coating to wood with subsequent painting. This is a labor-intensive way to restore furniture externally, but the updated wardrobe will look like new. |
 |
Stencil painting. This method of decoration involves using a paper stencil applied to the surface of the furniture, on top of which certain patterns are drawn. As an alternative to a stencil, you can use leaves and flowers. But in this case, you will have to paint the facade not with a brush, but with a spray gun. |
Budget restoration of products
How to restore furniture inexpensively, but with high quality? The simplest and at the same time affordable option- This is a complete painting or repainting of furniture.

This method allows you to completely hide wood defects. That is, the relief on the wood is leveled with a layer of putty, on top of which a primer and a layer of paint are applied. At the right approach By the way, restored furniture will look no worse than new.

Another point that needs to be taken into account when restoring a wardrobe on a budget is the repair of fittings. Modern high-quality fittings are not cheap, and therefore their purchase may not fit into the planned budget. To save money, try restoring old fittings, provided, of course, that they are not broken.
How to Update Kitchen Cabinets

To update kitchen furniture There are two requirements - firstly, the decor must be aesthetically attractive, and secondly, it must be practical. There shouldn’t be any problems with aesthetic appeal, since it’s enough to choose handsome guy finishing. How to make the decor practical?

The solution is making the right choice decorative materials- they must be resistant to humidity and temperature changes. In the kitchen, even with a working hood, the furniture is exposed to damp warm air, and therefore not every material is suitable for decorating cabinets.
The best material for lining kitchen cabinets is vinyl. As an option, you can try painting the cabinets with a continuous layer of glossy enamel. Gloss is necessary so that as it gets dirty furniture facade it was easier to clean the soot.
Decorative plaster master class
What to do if the closet in the room is made of plasterboard? The best option is to use decorative plastering.

There are many varieties decorative plaster, but if finishing is being done for the first time, I recommend bark beetle plaster. The advantage of bark beetle is ease of application combined with a guaranteed successful result.
The mixture is applied to the previously prepared surface in a layer specified in the instructions. Next, the applied mixture is spread over the entire surface with a foam grater. This is done with vertical, horizontal or circular movements.

As an option, instead of ordinary decorative plaster, you can use liquid wallpaper. Liquid obori is a fibrous mixture with an adhesive binder. The mixture can be applied to various surfaces.
Decoupage cabinet decor master class

Decoupage is a design trend whose popularity is explained by its ease of execution. It is enough to prepare the furniture, cover it with napkins and the inimitable cabinet is ready for use!

On preparatory stage The surface of the furniture is leveled, primed and painted. After completely dry paint coating, paper decor is glued using a special transparent glue. To prevent the glued paper from coming off over time, the surface is covered with a continuous layer of acrylic varnish.
Restoration and painting

Painting is the easiest and at the same time the most effective way to update furniture.
The painting result largely depends on how thoroughly the surface is prepared. Preparing furniture for painting involves leveling it using sanding and putty, and applying a primer. You can start painting only after the soil has completely dried.
The easiest way to apply paint evenly to a properly prepared surface is with an aerosol spray. The paint is applied a little worse with a foam roller, and the most difficult thing is to paint with a regular brush.
Stencils for decoration

It’s easy to make a decorative stencil by hand using thick paper and nail scissors. A more durable stencil is cut from polyethylene film. When using, the stencil is applied to the surface and paint is sprayed on top, as shown in the photo.


Let's sum it up
Now you know how to update your wardrobe or Kitchen Cabinet. If you still have questions about the proposed instructions, ask them in the comments to the article.
June 22, 2018If you want to express gratitude, add a clarification or objection, or ask the author something - add a comment or say thank you!
It happens that old furniture becomes unusable. You can use it, but appearance does not evoke positive emotions. To extend the service life of the product, it is necessary to restore it. Before you restore an old cabinet, you need to decide on a set of tools, as well as the equipment that will be used.
The components that will be used during the restoration of the product depend on the chosen work method. If you don’t have specific decorating skills, don’t despair – we recommend paying attention to the following types of work:
- painting the cabinet;
- use of craquelure varnish;
- Decoupage technique.


Painting

Craquelure
Even a teenager can carry out these methods of repairing a product. Restoring a cabinet with your own hands requires having an idea or choosing the style of the future masterpiece. To do this, you should turn to the existing interior: if it is made in vintage style– the craquelure varnishing technique is suitable. If the interior is made in classic style– choose painting followed by applying an image. When the design of a room requires elements of romance - good decision will become decoupage.
Restoring a chipboard cabinet begins with repairing visible defects. To move on to decorating the facades and ends, you should carefully inspect the hinges of the product and check the integrity of the fittings. Open the cabinet and look around retractable mechanisms boxes, and also check inner space for chips and holes. All noticed defects must be eliminated. This can be easily done with a hammer and nails, as well as by replacing faulty mechanisms with new analogues.
A universal list of tools for restoring an old cabinet with your own hands looks like this:
- sandpaper or sanding machine - to make the surface smooth and smooth surface;
- a screwdriver or screwdrivers along the diameter of all bolts - for possible adjustment of the product and removal of fittings before cleaning;
- spatula - for covering holes and chips;
- a paint roller and a narrow brush - in order to renew the coating;
- wood glue or PVA;
- set of screws for replacement.
Directly for the decoupage technique you will need napkins with a pattern or ornament, acrylic varnish, and a special thin synthetic brush with fan-shaped bristles. Also, restoration of an old cabinet requires the presence of a primer, wood putty, paint for painting, and masking tape. To use craquelure you will need a varnish of the same name.
It is necessary to immediately decide on the idea of restoration, because without an idea it will not be possible to make a beautiful product. Consult with your household and find out about their wishes.

Tools and materials for decoupage
Stages of restoration using painting
Before studying the master class on dyeing items for storing clothes, it is recommended to carry out preparatory work on wood. These include cleaning and sanding the old coating. It is important to achieve a smooth surface so that when painting the brush applies the composition evenly.
To work on small areas, use sandpaper; to work on a large area, use grinder. The final stage of preparation always involves using the finest grain sandpaper.
As soon as work with defects is completed, decorators advise moving on to primer. This stage is no less important than the painting itself. It is necessary to restore an old cabinet with your own hands with high quality, so the soil will great solution: it will hide all the cracks and fill the pores. In addition, the coating treated with primer will absorb less of the coloring composition.
After waiting for the product to dry completely, we restore the cabinet using paint:
- unscrew all the fittings that will prevent the brush from penetrating into narrow spaces;
- those elements that cannot be removed are sealed with masking tape to preserve their original appearance;
- for painting wood it is better to use special acrylic compositions– they fit better on a plane and create protective layer films. Pour the paint into the roller container and get to work;
- First we process all the internal elements: shelves, compartments, mezzanines. After this, we proceed to painting the facades, as shown in the photo;
- After the first layer has dried, apply a second, and if necessary, a third layer of paint. This is necessary to achieve color brightness and complete coverage of all gaps;
- The dried cabinet must be opened with varnish in several stages.
Restoration experts advise you to use your imagination and make the cabinet not in a single color, but add several colors to the facades. The simplest option is geometric figures. To do this, use masking tape to cover some part of the facade and paint the remaining area a different color. For originality, you can decorate the cabinet in a contrasting design.

Removing old coating

Sanding parts

Chips are repaired with putty

Surface primer

Painting parts


Using craquelure
Coating technique wooden products A special varnish consisting of 2 components will allow you to transform an out-of-fashion cabinet. With its help, it is possible to create an old wardrobe that grandmothers used. To complete the work you will need PVA glue, craquelure, acrylic paint and varnish, and a wide brush.
The technique also does not require specialized talent; all manipulations are similar to conventional coloring. The algorithm of actions looks like this:
- preparation - the old product is sanded, if necessary, putty is used to seal large holes. The final stage of preparation will be a primer in several layers;
- coloring - for work you will need compositions of 2 colors: dark and light. They don't have to be in harmony - dark version is used to decorate cracks, and light color is used for basic coloring. Apply with a brush dark color, evenly distributing it over the surface of the product;
- craquelure - once the paint layer has dried, you can apply craquelure. This must be done quickly and preferably in several layers - the thicker the varnish, the more visible the cracks will be. Dry the product until your fingers stick slightly;
- second color - master class on craquelure on at this stage offers to apply light color and wait for it to dry gradually. As soon as the coating dries, a characteristic mesh will become visible;
- applying varnish - a completely dried restored cabinet is coated with acrylic varnish to consolidate the effect.
When choosing craquelure, it is worth considering that if there is an image on the cabinet, you should not touch it. For this, a two-phase composition is used, the work with which is characterized by application in 2 stages.
This technique is suitable for restoring cabinet facades, but similar manipulations can be performed inside the product. This beautiful antique wardrobe will appeal to all lovers of vintage interiors.


Decoupage
Modern art stores will surprise any novice craftsman or amateur with an abundance of assortment of napkins and paper for decoupage. Napkins have a small format and are often used to decorate small items. In the case of a cabinet, they can be considered as elements for the design of drawers or mezzanines. Decoupage paper is available in large sizes, therefore it will be optimal for this type of work.
Before restoring the cabinet, select a theme for the product. These can be floral motifs, historical ornaments, images of people, heroes, or just vintage pictures. Decoupage consists of several stages:
- The surface prepared for repair is sanded and primed in several layers. After this, apply light acrylic paint to give a background;
- at this stage apply paper materials to the surface of the cabinet, mentally coming up with the plot and location of each detail;
- Transferring a picture to a surface is considered one of the most difficult tasks. You can use the "file method" to do this. Prepare a regular office file, remove the top 2 layers from the napkin and place it face down on the file. Next, take a spray bottle of water and gradually wet the entire napkin. As soon as it gets wet, gently use your fingers to try to push out all the bubbles. If this is not done, wrinkles will be visible on the product. As soon as the napkin has become even and smooth, we apply it along with the file to the surface of the cabinet. Carefully delete the file and move on to the next step;
- using a thin synthetic brush and special glue treat the surface of a napkin or paper in 1 layer;
- As soon as the napkin sticks and dries, you need to treat the surface with acrylic varnish. The photo shows options for decoupage of old cabinets.
Restored furniture gives the room a fresh look - it looks original, non-standard. Such products will delight all guests, positioning the owner as a budding master of decor.

Elements that do not require restoration are covered with masking tape

Painting furniture elements

Glue the napkin

Applying clear varnish
Video
Photo


In our article we will tell you how to perform restoration of an old cabinet with your own hands, we will present photos and drawings. During the renovation, you will gain an irreplaceable experience, and you will have an exclusive designer decorative element in your home.
Almost everyone in the household has a polished cabinet that has lost its former appearance, but has retained its functionality. You can easily give it absolutely new image, and fit it perfectly into the interior. You will need a few tools, finishing materials from any building materials store, imagination and a few hours for creativity.
You need to start by determining the style of the future cabinet and making sketches on paper. The creative plan will greatly depend on the scope of the restoration, either radically change the cabinet or simply update the facade (correct the punctuation).
Classmates
We update the cabinet in the most common way: painting
You can easily and quickly update your cabinet by simply replacing the covering - even a beginner can do this. You will need to completely clean the cabinet from the coating, and then cover it with a new one and change the fittings. If there are deep damages on the surface, they can be covered with a mixture of glue (PVA) and sawdust (the consistency is selected “by eye”).
Tools that may be useful in your work:
- skin;
- Sander;
- paint brush and rollers;
- screws and bolts;
- accessories;
- screwdriver.
Materials required for work:
- solvent;
- Galosha gasoline (petroleum-based solvent);
- primer;
- putty;
- paint (nitroenamel NTs-132, NTs-25);
Basic steps:

Having collected necessary tools and materials, restoration can begin. It takes place in several stages:
1. Analysis. Use a screwdriver to unscrew all handles, shelves and doors. Consider whether old elements and fasteners will be used, or only new ones.
2. Cleaning. It is necessary to clean the furniture from dirt and dust, and then from unnecessary coating. The paint layer from the surface and fittings is wiped off with a solvent, and then degreased with Galosh gasoline and left to dry completely.
3. Using grinder, in other words, give the surface of the cabinet a smooth shape. If there is damage, you need to use putty to disguise it. Then thoroughly coat the entire surface with primer and let dry. When choosing a primer, pay attention to its compatibility with the future paint color. After complete drying, sand all surfaces with fine sandpaper.
4. Painting.
Good to know: best choice The cabinet surfaces will be painted with wear-resistant grades. You should start painting from the most distant areas ( back wall, bases, shelves), thin layer. Depending on the author’s idea, the cabinet can be covered in one general tone, and then details, patterns can be glued on, or it can be made multi-colored (each element of the cabinet can be painted in its own color and shade).
5. Assembly. The final step is assembling the “new” cabinet and attaching the fittings. We carefully attach all the elements of the cabinet back to their places: handles, locks, hinges. The best option For the cabinet there will be handles that were decorated by hand according to the author's idea.
The fastest and cheapest method: self-adhesive film

Another inexpensive and quick way cabinet updates are self-adhesive film. The first step is to find a quality self-adhesive film on vinyl based. It's easy to find on construction markets or construction supermarkets.
The design can be anything you choose, the main thing is that the end result has a decent appearance. Vinyl films are well tolerated high temperatures, do not allow water to pass through. To work, you will need a minimum of tools, film and a little patience.
We will need the following tools for our work:
- roulette;
- stationery knife;
- scissors;
- ruler;
- scraper;
- film.<
Take note: Treat large and smooth cabinet surfaces with a roller, and corners and irregularities with thin brushes. After the paint has completely dried, apply a clear varnish.
Basic steps:

The entire process of updating the cabinet with film is carried out in several operations:
1. We take measurements from all surfaces of the cabinet: facades, sides and drawers. For convenience, you need to unfasten the facades and place them on a horizontal plane, unscrew the handles and fasteners.
2. We completely wash all dirt from all parts, paying close attention to greasy stains. The surfaces should be perfectly flat, clean and smooth. If these conditions are not met, then in the near future the film will peel off and swell.
3. The film has a protective layer on which centimeter markings are printed. It makes cutting it much easier. It is better to transfer the dimensions onto film with a margin of one or two centimeters (the excess can be easily removed with a knife). Please note if your pattern on the film is repeated so that it matches the adjacent surfaces. We cut the film onto flat surfaces with a knife and a ruler, and into shaped areas and corners with sharp scissors according to a pre-prepared template.
4. Peel off two centimeters of the film and apply it to the part. Do not glue the film with glue all at once, but gradually section by section, leveling it with a scraper and removing air. If small bubbles form, do not panic; you can simply prick it with a sewing needle and expel the air.
5. After gluing all surfaces, the cabinet is assembled. For a deeper remodel, you can replace the old fittings with new ones.
In this way, you can partially restore cabinets by adding a couple of bright inserts only to the facades, or completely cover all visible surfaces. Vinyl films can easily withstand wet cleaning with detergents.
Creative ideas

You shouldn’t stop at just the above methods. Creative people have long come up with inexpensive options for alterations and willingly or share.
- you can change the color of the cabinet surface not only with paint and a special film, but also with the help of fabrics, leather, ceramic tiles;
- plastic, glass, and patterns of contrasting colors can be used for decoration, as a bright accent on the cabinet;
- for a more artistic image of the cabinet, you can use photo printing, hand painting or.
As you probably already understood, the process of updating a cabinet is applicable to both kitchen and sliding wardrobes. The process is simple and fun, and the result is a unique piece of furniture to suit your taste and color. Any updated item made on your own will add comfort and positivity to your home.
We invite you to watch an interesting video on how to give an old cabinet a new life:
See inaccuracies, incomplete or incorrect information? Do you know how to make an article better?
Would you like to suggest photos on the topic for publication?
Please help us make the site better! Leave a message and your contacts in the comments - we will contact you and together we will make the publication better!