How to restore a bathtub cover. Do-it-yourself restoration of a cast-iron bathtub: choice of material for coating and principle of application Restoration of an old bathtub with enamel at home
Read also
It’s nice when inexpensive but neat repairs are made at home, and especially when everything is done with your own hands. Anyone who gets down to business first evaluates their capabilities, selects material, time and finances. But it’s one thing to change the tiles in the bathroom, and another thing to change a bathtub that has turned yellow from time to time.
However, there is no need to rush to change it, since the enamel coating can be restored. You can learn how to make an inexpensive and high-quality restoration of a cast-iron bathtub at home from this article.
Despite the large selection of bathtubs of different shapes, sizes and materials, all are also in demand on the market. After all, such a cast base is practically eternal and can last for several generations.
What does that require? Just periodic restoration of the enamel coating of a cast iron bathtub is not as difficult as it might seem at first glance. To carry out restoration work correctly, you need to learn a little more about the types of damage.
Type #1 – yellowness and plaque
Roughly speaking, these are the remains of metal oxides found in water. Over the years, more and more oxides are deposited, they saturate the top layer of paint. And the moment comes when the yellowness can no longer be washed off, the top layer becomes yellow.
Yellowness on the surface of the enamel occurs with prolonged contact with water. The most typical causes for this type of damage are a leaking faucet, drops of water from the shower head, improper installation of the drain.
Type #2 – mechanical damage
Scratches or other damage to the factory enamel layer. Enamel coating is thermosetting components baked at high temperatures in several layers, which when dry become very hard, but brittle.
Any sharp blow to the surface with a hard object often leads to cracks and even chipping of part of the coating.

Damage to the gloss occurs when using products containing corundum or glass abrasives. The use of such pastes damages the gloss over time, which leads to moisture retention on the surface and the entry of various contaminants into micropores.
Coverage restoration options
To restore the internal surface of bathtubs, three types of restoration are common:
- applying enamel coating using a brush or spray gun;
- treating the bathtub bowl with a polymer compound – acrylic;
Dye– the service life of the enamel coating largely depends on the experience of the craftsman and the thoroughness of the preparation of the base of the bathtub/bowl. As a rule, even with careful handling of the restored coating, its service life does not exceed 1-1.5 years.
Liquid acrylic used to restore bathtubs of non-standard shape. The technology allows you to update the bowl yourself, without involving a team of craftsmen. True, you need to buy a high-quality polymer from a trusted manufacturer.
Installing the liner– this option is quite problematic, since they are cast in a certain shape and it can be very difficult to choose the right size for your bathtub. And quite often it is impossible - if you have a bowl of non-standard shape.

The choice of method for restoring it will depend on the shape and size of the bathtub. For example, in a situation with products of non-standard shapes, it is better to opt for an acrylic coating
We will not give advice on what type of restoration is better - you will figure it out on your own, assessing the condition of your bath and your own strength.
Step-by-step instructions for enamel restoration
Enamel, intended for restoring the surface of a cast iron bathtub, is a material that contains a base and a hardener.
Simply put, enamel is not exactly paint in the usual sense, but polymer composites that meet numerous requirements. Therefore, it is necessary to treat it as a complex chemical composition, which is manufactured and mixed using a special technology.
The main color is white, and various fillers and dyes are used to prepare colored shades.
It’s worth mentioning right away that the enameling does not in any way pretend to be of factory quality, so it should be treated as if it were a routine repair. This is just a coating with a thin layer of film that hardens in air without special ovens.
The technology of coating a bathtub with enamel is divided into four stages:
- Putty, or, as it can also be called, leveling out all irregularities, if any.
- Preparing the base for coating, which involves cleaning and removing the surface layer of existing enamel.
- Enamel preparation and application to the surface.
- Proper drying or drying.
All stages of work are very important, nothing should be missed here. Even a small inaccuracy can lead to a decrease in the service life of the coating, but let’s look at everything in order. First of all, you need to remove chips or scratches.
Step #1 – surface preparation
To properly prepare the interior surface, it is best to remove the completely damaged layer of paint. For this, the best option is if the layer is protected before priming.
Cleaning can be done manually or using electrical devices: angle grinder (angle grinder), drill, grinder.
The surface is processed manually using an abrasive method; for this, two types of working material are used: sandpaper and metal mesh, which is used to level the plaster during construction and repair.

The abrasive cloth has a paper or fabric base. Fabric ones are available in moisture-resistant and regular types. The grain size is measured in microns, so the higher the number, the finer the grain. The abrasive blade can be used for manual work in holders or with power tools
When using sandpaper, you need to select the base to which it will be attached. For this, there are special graters with screw or spring clamps at the edges. You can also make the base yourself from a block of wood.
Sandpaper There are several types: paper and fabric based. Fabric ones are more durable and can be washed, paper-based ones are not. Fabric ones impregnated with a special composition are more resistant to abrasion. Suitable grain size for work P120-P180.
Metal grid more practical because it does not wear out or lose grain, and if it becomes clogged with dust, you can wash it and continue working. The mesh is attached to the holders.
A standard holder for an abrasive mesh or sandpaper should have a flat and rigid surface. Clamps for the blade can be screw or spring.
When purchasing, be sure to pay attention to the handle, which must be cast with a base. If the handle is attached with glue, then there is a chance that it will break in the midst of work. Professional meshes can be made from tungsten filaments, but they are much more expensive.
The mesh markings are the same as sandpaper. Widespread brands: R-120, R-150, R-180, R-240. For removing the surface layer of paint from the bathtub, P120 - P180 is better suited.
Surface preparation is carried out until all defects are completely removed, or until the ground layer is reached.
Step #2 – preparation and application of the composite
If the surface has unevenness, chips, or deep scratches, then it is better to use special putties to level the surface.

To putty cracks, chips, and deep scratches, putty is selected that contains fiberglass in its structure. Such composites are best suited for repairing chips and irregularities
In order to prepare the place for repairing the chip, you need to:
- thoroughly degrease the defect with bleach, denatured alcohol or acetone;
- rinse the area with running water and dry with a hairdryer;
- clean thoroughly with sandpaper;
- rinse again with clean water and dry with a hairdryer;
- prepare the composite.
According to practicing craftsmen, putty containing fiberglass is better suited - this composition is the most durable.
So, among suitable putties, we can recommend a polyester company Novol or Body. These materials, after hardening, have high ductility, which is important in conditions of constantly changing temperatures when using a bathroom.
Finishing putty cannot be used to seal chips in bathtubs. Since it has a large linear temperature expansion.
You must first decide on the volume of material needed. You only need a little putty, so it’s best to buy a small jar. High-quality putties are two-component, one of which is a hardener.
The ratio of mixed components is determined according to the instructions for use, but if there is none, then general standard 1:10. After combining the 2 components, you need to mix them thoroughly and quickly until smooth, the start time for hardening is 2 minutes.

Once the components are ready, you can begin sealing. It is best to repair uneven areas with a soft nylon spatula. This will allow you to clearly repeat the shape of the curves of the bathtub body. Yes, and you won’t mind throwing away such a spatula later, saving valuable time for work
After the composite is ready, all defects are repaired with a plastic spatula. Having finished sealing the unevenness, it is necessary to clean all the working tools, because after 10-15 minutes the putty will turn into “stone”.
Step #3 – painting the cast iron bowl
Painting of the accessible part of the surface is done manually using a velor roller; inaccessible areas are painted with a brush.
To apply paint with a roller, the prepared paint is poured into a special ditch. After immersing the roller in the paint, it must be rolled one or two turns along the ribbed edge of the ditch.
Then paint with intense movements from the bottom of the bathtub to the edge of the top, while the movements should be directed from bottom to top. Inaccessible places for the roller are painted with a flute brush.
Step #4 – drying after painting
Drying after painting occurs only under natural conditions: drying of one layer of paint should last at least 3 days. Each repeated layer adds another day. Thus, drying with a three-layer coating will be at least 6 days.
It is not recommended to speed up this process with artificial ventilation, because uneven drying is possible, which will lead to internal tension of the film, and as a consequence, its subsequent peeling.

There is no need to rush into drying the enamel or acrylic coating of a bathtub, as this can lead to many troubles, ranging from a reduction in the service life of the coating to its peeling.
Having decided to go it alone, it is important to adhere to a number of rules and perform all actions consistently. Only in this case can a positive result be guaranteed.
If the shower is not dismantled, it must be removed to eliminate even the theoretical possibility of water drops falling while the paint is drying.
Secondly, degrease the prepared surface. The best solution for degreasing is denatured alcohol, solvent 646, or, in extreme cases, acetone.
Solvents are good for processing, but do not remove residual corundum particles or debris, so after cleaning it is best to rinse and vacuum the surface.
Third, you should prepare the paint correctly. It must be mixed according to the attached instructions. It is worth remembering that the time for painting after mixing the components is 15-20 minutes.
The viscosity of the paint should not be too thick, otherwise it will be very difficult to apply, but not liquid, so that drips do not form.
Almost all paints are diluted with 646 solvent or acetone. The acrylic-based composition is incompatible with domestic solvents.
Fourth, you need to take time to prepare the brush flutes. Which consists of combing out loose hairs with a fine comb so that they do not fall out during the coloring process.
Then you need to run it over coarse sandpaper several times to give the bristles a pointed appearance.
Fifthly To speed up the surface preparation process, you can use a power tool. If you don’t find what you need, you can borrow it from a good-natured neighbor or friend.
A home craftsman who does his own repairs must have electrical appliances in his arsenal: a drill, screwdriver A number of surface grinding machines consist of a sandpaper belt moving like a conveyor. The width of the tape can vary greatly. And the machines themselves - of varying power and belt speed
You can also use a screwdriver to prepare the surface, clamping a backing material for the abrasive material into the chuck instead of a drill. Or use special attachments for angle grinder typewriter
When using electrical appliances to paint surfaces, you should pay attention to some of their features:
- Not all power tools have dust protection in the ventilation holes; to prevent paint particles from getting inside the device, you can cover the ventilation holes with several layers of gauze.
- Electrical appliances with commutator motors during operation create a spark between the electric brush and the commutator plates. If they are used continuously, paint will accumulate inside, which can cause a fire.
When using power tools, it is better to give preference to devices with rechargeable batteries - they are more mobile and safer.
Conclusions and useful video on the topic
This is how you putty a chipped bathroom:
The most common mistakes when restoring coverage:
Detailed instructions for restoring the bathtub cover:
As you can see, it is not so difficult to do it at home; the main thing is to clearly understand the sequence of operations and do everything without errors. But if you doubt your own abilities, entrust this work to professionals.
Have you ever renovated a bathtub yourself? Please tell visitors to our site which method you used and why you chose it. Leave your comments in the block below. There you can ask questions about the topic of the article.
10/16/2017 1 9 191 views
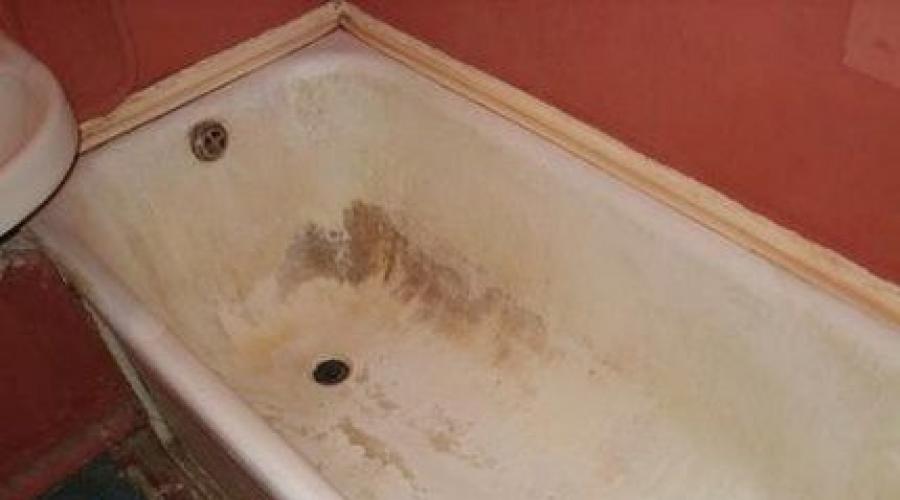
Many people are interested in how to restore the enamel on a cast iron bathtub with their own hands, because after 5-10 years the initially snow-white container becomes different from when purchased. Almost everyone, after a long period of use, notices the appearance of rusty smudges, stains that cannot be washed off, yellowness and cracking enamel. But is it possible to restore the previous attractive appearance and make the bath smooth again on your own? It will not be possible to correct defects with household chemicals, so you should resort to the procedure of restoring or replacing the protective surface. The actions are performed at home and without special financial costs.
Properties of cast iron as a bathroom material
Cast iron bathtubs are popular among consumers today, as they combine a considerable number of useful qualities and excellent characteristics, and the price is appropriate. However, they also need proper care, but in most cases, restoration of the enamel will be the only way to return it to a presentable appearance.
The main features of cast iron baths
- An undeniable advantage is that the containers can withstand a considerable service life. For more than 50 years, the original strength and quality of the product has been maintained. The enamel coating is susceptible to frequent exposure to external negative factors, so it deteriorates much earlier. This can be avoided with timely repairs.
- The minimal noise level will definitely be an advantage. Due to the fact that the walls of the product reach 8 mm in width, sound is well insulated, and when the container is filled with water, no discomfort is created for the user.
- It is easy to restore the enamel of a bathtub yourself, without resorting to the help of specialists and the purchase of expensive products or repair equipment. Everyone can restore the original appearance with their own hands, using different techniques, such as the enameling method, pouring acrylic or installing an acrylic liner.
- Cast iron has a minimal level of thermal conductivity, and thanks to this, the water with which the enamel container is filled remains warm for a long time.
Causes of damage to enamel on a cast iron bathtub
Despite the fact that the enameled surface is considered the most durable and reliable for the consumer, over the years it loses its properties due to active use. Even if you follow the necessary operating recommendations from the manufacturer, it is difficult to leave the appearance of the container without defects.
Enameling a bathtub will be the best option for completely restoring the surface cast iron coating, and the main advantage of the procedure is that you can do all the steps yourself.
So what could be the reasons for the appearance of various irregularities and defects?
- due to the fact that the container comes into daily contact with water, which contains a large amount of iron, a disgusting yellowness appears. This interaction has a bad effect on the appearance of the coating.;
- frequent use of all kinds of chemicals and brushes made of hard bristles leads to the fact that the surface of the bathtub becomes scuffed, which looks unattractive and creates discomfort for the user;
- even accidental falls of small objects into the container lead to some damage to the enamel, as a result of which the material gradually peels off from the cast iron;
- Due to frequent temperature changes and mechanical loads, cracks appear.
Features of restoration of a cast iron bathtub
Most people think about restoring a bathtub under the following most common circumstances:
- Financial opportunities. The bathtub has been holding strong for many years, but has lost its original snow-white appearance, and buying new plumbing fixtures is currently unaffordable.
- Rented or temporary place of residence. Naturally, under circumstances where a person lives in a rented apartment for a short period of time, there is no point in spending money on purchasing a bathtub.
- Complex room layout. It also happens that dismantling old plumbing is simply impossible due to the special layout of the bathroom. Of course, the container can be crushed, but it is more profitable to carry out repair work.
How to properly prepare a bathtub for enamel restoration?
Before restoration, it is necessary to properly prepare the surface, since without preliminary preparation the desired result cannot be achieved.
Preparatory stages:
- removing rust. It is better to carry out actions using gentle solutions of oxalic or acetic acid. Apply one of the liquids to the surface and then leave for half an hour. Make sure that after thorough washing there is no rust left, otherwise you will have to carry out mechanical cleaning;
- grinding. Once the rust has been successfully removed, the surface must be sanded. This is done using a drill, grinder or sandpaper;
- repairing cracks and deep chips. Damaged areas are rubbed with car putty, after which they are additionally sanded;
- degreasing. For this process, baking soda or special substances are used, which must be washed off with high-temperature water after all actions.
Now you should wait for the bath to dry completely, after which:
- remove the drain and overflow, then place a container under the drain where the paint will ooze;
- remove remaining dust and sand with a vacuum cleaner;
- tape the surfaces of the bathtub with tape;
- apply primer.
Recovery process
There are several effective ways to restore a bathtub that can be done at home. But it is worth remembering that the restoration itself using one of the methods can only be done after the repair is completed, in order to preserve the renewed layer. Each technique will require a certain repair kit and patience.
Enamelling
This method is the most affordable and quite easy to use. For painting, either classic epoxy enamel or more expensive but effective paint is used.
How the process works:
- The substance is applied exclusively with a brush made of natural bristles or a terry roller.
- Apply a uniform and thin layer of paint from the sides to the deep part.
- When the process reaches the deep part, care should be taken to ensure that the layer is not too thick. If the paint does not apply completely evenly, you should carefully spread the substance.
- Epoxy enamel is applied in three layers. After 15 minutes, be sure to check for leaks and other irregularities.
- The bath will usually dry completely after a few days, but it is recommended to wait five days.
- When the container is dry, polish the surface using a flannel flap with the addition of one drop of polishing paste.
This type of restoration requires little cost and effort for dismantling work. But there are also certain disadvantages:
- the renewed enamel will become yellow again after some time;
- the paint will not last more than 5 years;
- You can use the bathtub after repair only after a week;
- enamel will not hide the unevenness that was in the factory coating.
Restoration with liquid acrylic
- To avoid the reappearance of cracks and chips on the restored surface, they must be puttied immediately before priming.
- After opening the bucket of acrylic liquid, the component is thoroughly mixed with a drill with a special nozzle.
- The drain is covered with a disposable cup, and the bucket is placed at the bottom of the bath.
- The working mixture is poured into an oversized bowl.
- Next, acrylic is poured over the surface, starting from the sides. Using a spatula, distribute the liquid evenly.
- After the mixture has flowed to the bottom, the acrylic should be lifted with a spatula to the unfilled areas.
- When the surface part is filled, the drain opens. The remaining acrylic liquid will flow into the previously placed bucket.
- It will take no more than one day for the bath to dry.
This technology is quite complex and requires experience and a certain set of skills.
Restoration with acrylic liner
Restoring an aged bathtub with an acrylic insert occurs without removing the old enamel and is not a complicated process. A plastic bowl is glued into the inside, which follows the shape of the old one. The main feature is also that there is no need to sand and clean the bathtub.
A cast iron bathtub is a high-quality, durable plumbing fixture with virtually inexhaustible repairability potential. If a small crack or chip appears on the surface of the enamel, it is not at all necessary to buy a new product, which costs at least 10-12 thousand rubles; it is quite possible to restore the appearance and functionality of the bowl by repairing the cast-iron bathtub yourself. In this article we will talk about 3 effective ways to restore cast iron plumbing fixtures.
Preparation for repair
If the enamel is cracked, chipped, scuffed, and the bathtub itself has turned yellow and rough, there is no need to put off repairs. In order for the restoration result to last longer and withstand mechanical loads, contact with water and temperature changes, it is necessary to carefully prepare the surface for work. The preparatory stage, as a rule, takes up more than half the time and effort spent on restoring enamel with your own hands. It consists of the following operations:

Important! Before starting work on repairing plumbing equipment, you need to assess the feasibility of the event. If the damage is isolated, then you can repair the bathtub yourself. In case of extensive damage and the presence of through holes, it is better to contact a professional.
Repairing chips
A small chip with a diameter of up to 2 cm or a crack is the result of mechanical impacts or pinpoint impacts; they are the most common damage and can be easily repaired locally with your own hands. It is better to repair such damage immediately after its discovery using special putty and enamel. The technology for repairing chips is as follows:

Please note that local repair of chips on the enamel surface gives a temporary effect, only postponing the time for more global measures. Aerosol enamels do not hold up as well, but they are much easier to use.
Painting
If there are quite a lot of chips and cracks on the surface of the enamel, and rusty and limescale deposits are added to them, it will not be possible to repair the bathtub with your own hands using a patch. To restore the original appearance of an old, heavily damaged one, staining is used. Before applying dyes, the bowl is cleaned of dirt, the enamel coating is removed, degreased, and then thoroughly dried. The following products are used for painting:

Note! To paint a bathtub with your own hands, it is better to use liquid acrylic, since it is applied much easier and smoother than epoxy enamel. The disadvantage of this method is the high cost and long drying time.
Installation of acrylic liner
If the surface of an old bathtub has not one small crack, but multiple chips and deformations, it can be repaired using a special acrylic insert. The acrylic liner is shaped exactly like the geometry of the old bowl; it is inserted inside it and then fixed with adhesive foam and sealant. The disadvantages of this method are considered.
– a durable, wear-resistant and impact-resistant sanitary ware that has been used as a washing container for hundreds of years. Previously, bowls made from this difficult-to-process heavy alloy had no worthy alternative. But even now, when construction stores are full of more modern and varied steel and acrylic models, they continue to be in demand.
The popularity of a cast iron bathtub is explained by the fact that despite its fairly high cost, it has a long service life and repairability. After 10-15 years of use, when the enamel turns yellow or becomes cracked, to restore the original appearance of the product with your own hands, it is enough to cover the bowl with a new layer of paint.
Features of cast iron baths
Cast iron bathtubs are considered the most popular, as they have a long service life, wear resistance and impact resistance, and do not require special care. These sanitary products are produced using the casting method.

Cast iron is a material that is very difficult to process, since for all its hardness and great weight it has increased fragility. The greatest difficulties are caused by giving the alloy a round, curved shape, so the size and model range of bowls made from it is not so diverse. The advantages of a cast iron bathtub are:
- Wear resistance. Wash containers made of cast iron can withstand more than 50 years of intensive use, and the strength of the product does not decrease. The enamel fails a little earlier, however, if you repair the bathtub yourself in time, you can completely restore the appearance of the coating.
- Low noise. The thickness of the walls of a cast iron bath reaches 8 mm, so they have a low resonating ability. Therefore, when drawing water, there is no strong noise, unlike steel models.
- Maintainability. The enamel of a cast iron bathtub, generated during operation, can be restored with your own hands. Repairs are carried out by enameling, pouring acrylic or installing an acrylic liner.
- Slow cooling. Cast iron is characterized by a low thermal conductivity coefficient, due to which water drawn into a bathtub made of this alloy retains heat for a long time.
Important! Modern models of cast iron washing containers are coated with enamel using the electrostatic method. In production conditions, powder paint is applied to the bathtub, which is melted under high temperature and then baked. High-quality factory enamel lasts at least 10 years if you follow the recommendations for the care and use of the product. When chips appear on the old coating, you can repair the enamel yourself.
Damage to enamel
The enamel applied to the surface of a cast-iron bathtub in a factory is considered to be quite wear-resistant and reliable; after 10-15 years of use, even if all the manufacturer’s recommendations are followed, it will lose its original appearance.
To restore the top coating, you can repair the bowl yourself by applying new paint. Over time, the following defects appear on the inner surface of the bath:

Note! If minor defects appear on the surface of the enamel coating, then it is better to immediately carry out an inexpensive but effective repair - enameling the bathtub at home. Restoration performed on time allows you to delay a more global method of restoration using an acrylic liner.
Enameling technology
The technology for enameling a cast-iron bathtub at home differs from the factory one, since special equipment is used in production. Coating the inner surface of a sanitary bowl consists of 4 main stages: preparing the container, mixing the compound, applying paint and drying.
Each of these processes is important; the stability and durability of the result depends on the correct execution of operations. To repair the bathtub cover yourself, you need to:


Please note that it is better to repair the bowl using special enamel designed for restoring bathtubs. Some craftsmen recommend using cheaper paint for yachts and sailboats, however, it will not last as long.
Features of the technology
Repairing a cast iron bathtub using the enameling method with your own hands is a simple and effective way to restore the appearance of the product. With minimal financial investment, it allows you to avoid replacing the old washing container, reducing the cost of bathroom renovations.
This operation can be successfully performed with your own hands if you follow the technology for applying enamel. Enameling technology at home has the following features:

Experienced craftsmen claim that this method of restoring a cast-iron bathtub has only one drawback - the drying time. However, this small minus is compensated by the inexpensive price, ease of application and durability of the result.
Video instruction
Ecology of knowledge. Estate: Restoring a cast-iron bathtub can give an effect no less high-quality than would be the case when replacing an old bathtub with a new one. Let's take a closer look at how to update an old bathtub and why it's worth doing it.
After using the plumbing fixtures for a long time, the question arises: “how to update the bathtub so that it becomes beautiful, clean and durable again?”
The simplest solution to the problem is to purchase new equipment. Naturally, this option will save effort, but its implementation will have a negative impact on the budget. A worthy alternative would be to independently update the surface of the bathtub.
To do this, it is enough to understand the basic methods of carrying out the procedure and purchase the necessary material for repairs.
Choosing a restoration method
How to update an old bathtub with your own hands? To do this, you can use one of the following methods: enamel restoration, installation of an acrylic liner, or filling with liquid acrylic.
Before giving preference to one of the restoration methods and getting to work, you should assess the condition of the product itself. The choice of method for updating it depends on the degree and type of damage.
The main reasons for bathtub restoration:
- The enamel lost its shine, became dull, rough, dark spots appeared, and the paint peeled off. Re-enamelling the surface will help solve this problem.
- The product has rust that cannot be removed; cracks and chips have formed. An acrylic liner or restoration using the “fill-in bath” technique can repair the damage.
- The steel bathtub began to cool quickly, and a loud noise of water being poured was heard. Such a product can only be updated by installing an acrylic liner.
- Severe deformation of the bathtub body, large chips and cracks, new pipes not matching the drain holes. In such a situation, there is only one way out - replacing the equipment.
No restoration technique can restore the aesthetics and functionality of a bathtub.
Of course, the choice of method is also based on the material from which the product is made. Acrylic bathtubs are perfectly refurbishable.
Using a special polish you can remove scratches and minor defects. And liquid acrylic and special repair compounds can repair even such serious damage as chips and through holes.
Renewal of steel and cast iron bathtubs is carried out using one of the above-mentioned methods, depending on the extent of the damage. Repair is especially important for cast iron structures, as they have a long service life while remaining very durable.
Bathtub enamel
The enameling process is a fairly simple procedure that allows you to update the appearance of the product. From a financial point of view, this method is considered the cheapest.
In addition, during restoration you can significantly save on the services of craftsmen, since even a person who has not done this before can enamel a bathtub himself.
Preparation for enameling
Before directly covering the bathtub with a new layer of enamel, it is necessary to carry out preparatory work. Their goal is to create a surface that provides the best adhesion between two materials.
Initially, you need to clean the bathtub of old enamel. To do this, its surface should be thoroughly cleaned with an abrasive stone, sandpaper or a grinding machine using cleaning powder.
Then the abrasive chips and soap film should be washed off with water. It is important to widen all cracks and chips with a working tool. After this, the surface must be degreased.
To remove the degreasing layer, you can pour hot water into the bath and leave for 5-10 minutes, then drain and wipe with a cloth. The result of the preparatory work should be a dry, smooth and slightly matte surface.
Before updating the bathtub by applying enamel, you need to unscrew the drain and overflow, remove the gaskets, and clean the product from dust using a vacuum cleaner.
Enameling process
You need to dilute the enamel in a container by mixing the base with the hardener. Apply the composition with a brush from the edges to the bottom of the bath. The first layer is a primer, it is important to carefully level it with alternating vertical and horizontal movements.
The second layer, and, if necessary, subsequent ones, are applied after 10-15 minutes in a similar way.
Surface painting work should be carried out as carefully as possible. Its service life depends on the quality of enamel application.
If bubbles form on the surface during the restoration process, they must be removed with a brush. Otherwise, in this place the new layer will come off immediately after drying.
Having completed the enameling procedure, you should check the condition of the product after 15 minutes. Smudges formed on the coating can be easily removed with a brush from bottom to top. After the new enamel has completely dried, which will take at least 4 days, the product can be safely used.
An updated bathtub can last about 5 years if the operating rules are strictly followed.
Caring for a renovated bathroom
After restoring the product, you should follow the recommendations for caring for it, since updating the bathtub is only half the battle. If you ignore the rules, the new coating will very quickly fail and lose its original appearance.
After enameling, the bathtub cannot be cleaned with products containing acid or aggressive chemical compounds. For this purpose, you can use soap solutions and dishwashing detergents.
You should not wash in a bathtub using bleach; it is highly undesirable to soak colored laundry in it.
Bathtub restoration with liquid acrylic
Liquid acrylic is a modern restoration material that allows not only to eliminate aesthetic defects, but also serious damage. This technology has a number of significant advantages.
In order to update an old bathtub with acrylic, you do not need any special skills; just follow the instructions. The newly created coating is very durable and can withstand even mechanical stress.
The water in the updated bathtub will cool more slowly than in a cast-iron structure.
Acrylic does not change its appearance over time, the coating does not darken, and remains resistant to detergents containing aggressive chemical compounds.
The service life of a refurbished product can reach 10 years or more. At the same time, aesthetic and practical qualities are fully preserved.
Preparing to create a new coating
Updating a bathtub with acrylic with your own hands must begin with its preparation. It is necessary to remove stubborn dirt and limescale by thoroughly washing the product with cleaning agents. 
To degrease the surface, you can clean it with soda.
After this, you will need to twist the linings on the drain hole and on the overflow and clean the bathtub covering with sandpaper.
This will help remove rust and loose old enamel.
If the bathtub has already been restored using the enameling method, you will have to remove the old coating.
After this, the surface must be thoroughly washed. It is recommended to heat the material to be restored by running hot water into the bath. After 5-10 minutes, you can dry the surface; this can be done easily using a hair dryer.
To work, you will need a small container with a volume of 1.5 liters, from which acrylic will be poured onto the bathtub. You also need to prepare a wooden stick, which will be needed for mixing the components of the solution, rubber gloves and a spatula.
It is necessary to place a container under the drain hole, the remaining acrylic will flow into it, and the tiles at the edges of the bathtub must be sealed with masking tape.
Acrylic pouring process
After completing the preparatory stage of work, it is necessary to prepare liquid acrylic by thoroughly mixing the hardener with the polymer base. It is very important to strictly follow the instructions to get high-quality results.
It is quite possible to cover a bathroom with acrylic yourself. The process itself involves uniformly pouring the finished mixture onto the surface of the product. For convenience, you need to use a small pre-prepared container.
Having completed the first circle, you need to start the second, starting from the middle of the sides of the bath. The result should be a thick layer at the bottom, which will need to be leveled with a spatula towards the drain hole. Excess acrylic will be removed in this way.
It is highly undesirable to touch the sides of the bathtub with a spatula. If sagging has formed on the surface, it will remove itself. Any impact on the new coating will damage its integrity.
After finishing the work, the bath should be left so that the surface is completely dry. This will take at least a day, the exact time is indicated on the acrylic packaging. The final stage is installing a drain siphon and overflow, removing masking tape from the walls.
To get a snow-white, smooth and durable surface, it is enough to update the bathtub with liquid acrylic. The new coating will have excellent adhesion and a long service life.
Acrylic liner
How to update your bathroom quickly and easily? An excellent way is restoration using an acrylic liner. The main disadvantage of this method is its price, which will be higher than repairing equipment using other methods.
First you need to take the dimensions of your bathtub and purchase a ready-made liner in a specialized store. The inserts have standard parameters, but are also made to order.
The advantageous characteristics of acrylic are its strength, tightness, resistance to high temperatures, and environmental friendliness.
It is easy to clean, does not lose its aesthetic properties during use, does not turn yellow, and does not rust.
If a cast iron bathtub is restored, the result will be an excellent design that combines the advantages of cast iron and acrylic.
Work procedure
How to update your bathtub yourself by installing an acrylic liner? Main stages of work:
- Cleaning the surface of the bathtub.
- Preparing the liner, applying markings, determining the location of the drain holes.
- Checking the connection of holes.
- Aligning the liner, trimming the edges along the wall tiles.
- Application of a special adhesive composition to the surface of the bathtub and to the liner.
- Installing the liner in the bathtub.
- Pouring water into the product. The filled bath should be left for a day to ensure maximum adhesion of the materials.
How to update an old bathtub with your own hands in order to not only eliminate defects, but also make it beautiful? An acrylic liner will help achieve the desired result.
The insert itself is thin, so the usable space will decrease very slightly. The updated bathtub is ready to serve its owner for at least another 20 years.
Thus, having decided on the restoration method, strictly following the recommendations and performing the work efficiently, you are quite capable of updating your bathtub yourself. published If you have any questions on this topic, ask them to the experts and readers of our project.