How to repair an old kitchen wall with your own hands. How to update an old kitchen set with your own hands: a review of ideas, photos of successful solutions. Decoupage is very easy to do
Kitchen furniture is designed for a certain period of use. Moreover, your appearance it usually loses functionality sooner.
A complete restoration of a set is usually an expensive undertaking, but you can update furniture with self-adhesive film at any time.
Self-adhesive film: just the facts
The main advantage of this solution is its affordable price. A family with the most modest budget can afford to update their kitchen or bathroom in this way. The second advantage is the ability to glue the film to literally any surface - tiles, plastic panel, chipboard and so on.
The material is produced in a wide variety of different prices. So before purchasing film for furniture restoration, you should familiarize yourself with the classification.
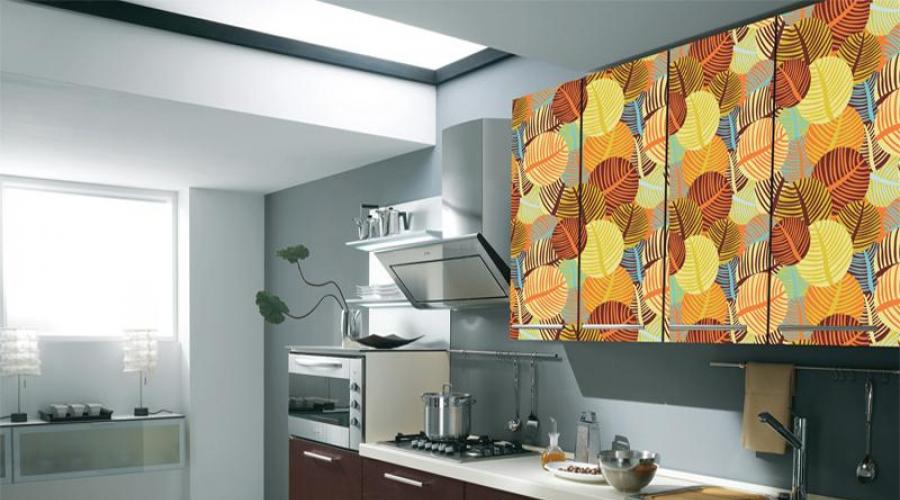
 The photo shows a kitchen cabinet finished with PVC film.
 Material of manufacture
In fact, the material includes several components, but film for cabinets or walls is distinguished by the material of the main composition. It could be:
- polyvinyl chloride– vinyl film is one of the most popular options, since it is the most affordable and at the same time relatively durable;
- polyester– often has a structure that imitates fabric. With its help you can “drag” furniture;
- propylene– the most durable and wear-resistant material.

Classification by structure
Self-adhesive films may have slightly different structures.
- Single layer– film material is made from various organic matter with the addition of plasticizers, pigments and stabilizers. On its back side there is glue, covered with paper on top. To update the facade with its help, just peel off the paper and apply the film with the adhesive side to the surface.
- Double layer– in this case, the base and cover are made separately. The base is paper or fabric, and the cover is polyvinyl chloride resin with various additional components. The cover is made by several different ways, which provide varying degrees of resistance to certain factors, as well as decorative look material for updating old cabinets. The price of this material is higher than that of the previous type.

Surface types
They can be very diverse - matte, imitating wood (for example, like MDF) or made of wood. During restoration there is not always a desire to preserve the existing appearance. Self-adhesive film solves this problem. Moreover, almost all options are the same in price.
There are several interesting solutions.

The following video demonstrates different types self-adhesive film.
Design solutions
Decorative self-adhesive film is available in so many solutions that it is simply impossible to describe them. The most common catalog includes at least 1000 samples. Very roughly, the appearance of the material can be divided into 2 large groups.
- Standard– that is, the most common and most common when decorating a kitchen or bathroom:
- plain– a more than popular option for a modern kitchen;
- wood pattern film– perfect for updating an MDF set;
- with stone pattern– very effective solution, especially for the bathroom;
- ceramic tile– imitation tiles are suitable for any non-residential premises;
- canvas– a rare but effective option;
- textile- chintz, silk, tapestry and so on. “Inserts” made of film in combination with an MDF frame look very interesting;
- Children's drawings– a cute and original decorative touch.

2. Decorative material special purpose It is much less common, since it does not suit every interior, and its price is higher:

How to update furniture with film?
The replacement technology is very simple: in fact, you just need to remove the film from the paper and apply it to either the body of a floor or wall cabinet. In fact, there are also some nuances here that should be taken into account.
Most often for updating kitchen cabinets They use vinyl film because it not only is not afraid of moisture, but also does not fade in the sun, and this is important for the kitchen. It is very easy to work with, it can be made from chipboard, MDF, wood and even. It should be taken into account that the self-adhesive film will mask stains or abrasions on the facade, but unevenness or deep scratches she can't hide it.

- The first stage of cabinet restoration is removing uneven surfaces. To do this, the facades are removed, the sashes and frame are inspected, and all detected irregularities are puttied and sanded. If the pasting is done with veneer, which is already coming off in places, then the old finish must be completely removed.
- Then measure the parameters of all parts that need to be pasted over. When making calculations, it is worth leaving a margin of 1 cm around the perimeter. If vinyl film is accidentally applied at the wrong angle, then the stock will correct the problem. Excess decorative film is simply cut off with a breadboard knife.
- The film is marked by size and cut. As a rule, there is a centimeter grid on the back side of the material, which makes marking easier.
- When cutting, you need to take into account that material with a pattern or image must be cut from the front side, so that later you can combine the fragments. The decorative film that reproduces tiles must be cut at the seams.
- The surfaces to be pasted are degreased so that the film does not peel off later. For MDF or chipboard, regular glass cleaner is quite suitable. Metal or glass surfaces are moistened with a soap solution, otherwise the film will not hold.
- After the sash has dried, the material is glued. To do this, remove a layer of protective paper from the top edge of the fragment - about 5 cm and glue it to the edge of the facade. Then the next 5–10 cm are released and glued again. In this case, hold the film with one hand, and smooth the pasted film with a soft towel with the other.
- The completely glued material is smoothed again with a soft cloth from the middle to the edges. If air bubbles appear, you can pierce them with a needle. If necessary, you can iron the cabinet door through a layer of fabric.
When finishing with trimming, that is, gluing the end, it is necessary to use construction hair dryer. When cutting, take into account the tolerance on the ends and cut the workpiece at the corners. First, the material is laid on the surface and then glued to the ends.
On next videos The renovation of an MDF kitchen unit using decorative film is demonstrated.
Pasting with film is the simplest and most affordable way update the furniture in the kitchen. The durability of this solution is, of course, lower than when facing with acrylic panels, but it is much more varied and lower in price.
To refresh and update your kitchen beyond recognition, you don’t have to buy new headset and re-glue the wallpaper. Today there are many budget ways make cosmetic repairs in just an hour. Self-adhesive film is one of the most affordable and popular ways to completely change the appearance of furniture and other surfaces in the kitchen, without “ little blood“—without wasting time and serious financial investments.
Advantages of using self-adhesive film
What is self-adhesive film? This flexible material, which is usually sold in roll form. A thin, uniform layer of adhesive is applied to the back of the film, protected by wax paper. Before gluing the film, it must be carefully removed, after which the material is ready for application to the prepared surface.The advantages of using film for the kitchen leave no doubt:
- this is the most economical type finishing material, which can be changed as often as you like without damaging the family budget;
- the time that needs to be spent on gluing the film is minimal;
- not required either special means– in some cases it may be necessary basic training surfaces using a primer;
- Using a film you can reliably protect surfaces from various negative impacts– moisture, high temperatures, detergents and cleaning agents, grease, etc.;
- a film with a pattern for the kitchen can completely change, update and restore an old and unpresentable kitchen set.
What is good about self-adhesive film for the kitchen? In mind high temperature and humidity, furniture and other surfaces, especially near the work area, are subject to rapid wear.
This is especially true for furniture made of chipboard and other artificial materials. And natural solid wood is also vulnerable to external influences.
As for plastic, it is least susceptible to thermal damage, but can still deteriorate under other conditions. negative factors. By protecting the surface of the furniture with self-adhesive film, you can significantly extend the life of the set.


How to use the material?
Where should you use self-adhesive film in the kitchen? IN work area– near the hob, sink and cutting board It is best to stick a film made of a special heat- and moisture-resistant polymer (ask the seller about this type of material).With the help of such a film, you can avoid such troubles as peeling of veneer on laminated chipboard furniture, swelling and cracking of the surface of facades and cabinets.
Especially if one of the kitchen modules is located directly above hob, then it is simply necessary to protect it with film: this way you will not have to wipe the furniture from drops of grease every time, but simply replace the film with a new one after time.
Do not think that covering the kitchen with film is the choice of poor people without taste. If, for example, you want to protect your furniture, but do not want to change its appearance, you can use transparent self-adhesive film. By correctly applying it to the surface of the furniture, you will make it almost invisible, and at the same time significantly extend the life of the set.
There are also decorative self-adhesive films for kitchens, with which you can change the design of the room beyond recognition. It’s no wonder that film that imitates texture is in great demand among buyers. natural wood: with the help of such material you can update and even completely restore an old set that has fallen into disrepair or is simply obsolete.
It is enough to simply stick the film on the facades to hide any defects: scratches, cracks, chips on the surface of wood or veneer, plastic or acrylic. You can do this even without visible defects, just wanting to update your kitchen design.
For example, if you are bored with your old set made of wood, you can turn it from classic to modern by choosing a film of bright (light green, yellow, purple) color with a gloss effect. And vice versa: if you want to get a calmer design, you can top acrylic facade stick a film that imitates wood in light or muted shades.

Decor using self-adhesive film
Adhesive film with a design, pattern or print is another good way decorate your kitchen without straining your budget. In stores you can find hundreds and thousands of types of designs, textures and patterns on film: floral, plant, geometric, animal.Popular the following types films:
- with painted tiles or mosaics - a good way to “deceive” guests by pasting it over an apron near the work area;
- with flowers and plants is a good option to refresh your kitchen renovation with the onset of the new warm season;
- with various shapes - triangles, circles, squares - an excellent choice for lovers of abstraction in kitchen design, which is suitable for interiors in a modern style.
You can also find various macro photographs on film: photos of fruits, flowers, animals, various urban images (Paris, New York, London) and others.
You need to be careful with them so that instead of decorating the kitchen, you don’t make it garishly tasteless. It is advisable to choose good quality thick film, because cheap material a millimeter thick will make the kitchen design look cheap.
Before updating your kitchen using self-adhesive film, it is advisable to carefully consider what kind of design you want to see. It is important that the color and texture of the film be combined with other surfaces and objects.
Be careful with materials that have various optical effects: holographic, pearlescent, glitter, rhinestones, etc. They look attractive only in the catalogue, but in practice they can make the furniture look cheap and tasteless.


How to stick the film correctly?
It is advisable to think in advance where you want to update the surfaces. In addition to film for furniture, there is also film for walls, with which you can make an apron or update dining area in the kitchen. As for the tabletop, it is not advisable to stick film on it, because... Constant contact with moisture and detergents will quickly render it unusable.Before covering surfaces (furniture, walls) with film, you need to properly prepare it:
- clean from dirt, especially grease (with furniture you need to be careful when using special degreasers - it’s better to use simple non-abrasive detergents);
- dry thoroughly;
- If the wall surface is uneven or rough, it is advisable to apply a wall primer to it and wait until it dries.

Don't use too much thin film in places with obvious defects (chips, depressions), because After applying the film, they will be visible through its surface. To disguise imperfections, choose a thicker film.
The film is applied very simply: just peel it off protective layer on the back side of the material 5 cm wide and attach the film to the edge work surface. Proceed carefully and without haste, otherwise the material will stick crookedly.
Next, carefully remove the remaining protective layer of paper and carefully stick the film onto the surface of the facade or wall. Use a towel or soft cloth, smoothing and pressing lightly to remove air.
If air bubbles form on the surface of the film after gluing, they can be pierced with a needle and smoothed with a towel. If you are using a film with a pattern, then, if necessary, cut it into fragments using scissors or a knife along the seam line so as not to spoil the appearance of the material.
Video: covering the kitchen facade with vinyl film
Updating kitchen facades - right choice when the budget is small, but you need a high-quality result. If your kitchen furniture is intact, but is already pretty tired, then do not rush to spend money and buy a new set. You can do it easier - update the kitchen facade with your own hands. At first glance, this may seem like a very complicated procedure. But, following all the rules and showing all its accuracy, restoration kitchen facades will happen quickly and as efficiently as possible.
- Accessories for facades
- Materials for replacing facades
- Facade replacement process
- Pasting with film
- Rattan façade finishing
Preparation for renovation of facades

To replace facades suitable for kitchens standard set a tool that, as a rule, is in every home
Before you start updating kitchen facades with your own hands, you need to prepare all necessary tool and materials. In order for the work to be successful, you will need:
Important to consider: Even if you don’t use some tools while working, they should be ready so that you don’t have to waste time looking for them later.
Accessories for facades
No kitchen furniture is complete without fittings, the quality of which determines the life of the furniture. That is why you should not save on accessories. And if you are planning to update your kitchen facades, then you will need:

High-quality fittings mean pleasure from using new furniture facades, and this pleasure is as important as aesthetic
Carrying out repairs or renovations kitchen furniture, try to select fittings so that all elements match the same style.
Materials for replacing facades

Facades are the face of the kitchen. That is why, as a rule, after replacement old kitchen difficult to find out
If you don't have the skills carpentry work, and you don’t know how to update kitchen facades with your own hands, then you can purchase finished goods or made by custom sizes in special workshops. It is important to remove accurate measurements with old furniture, and having previously purchased the material.
Best to use:
Wood is considered the most preferred material for those purposes when it is necessary to update kitchen facades with your own hands. This material is distinguished by its strength, durability, environmental friendliness, and has a solid appearance.
MDF is a board made from wood fibers coniferous trees, obtained by pressing under high pressure and temperature. When repairing a kitchen unit and trying to update its facades with your own hands, MDF can become indispensable assistants. In progress this material unpretentious, and its quality is always at its best.
Facade replacement process
The process of replacing wooden or MDF facades consists of several stages:
Updating facades with paint

Painting the facades is easy, and the result is a completely updated look for the kitchen. 
After painting the facades, you can try to update the apron in the same style
You can update the facades of kitchen furniture using a method such as painting. This method of repairing old kitchen furniture can be called the simplest, but radical.
It is important to remember that painting facades is only suitable if wood covering or the MDF coating is kept in good condition.
When repairing old furniture in the kitchen, using painting, you cannot do without the following materials:
Before repairing facades using a method such as painting, you must:

Using paint and a stencil, you can add new details to the facades that will refresh the kitchen design
After the façade repair is completed and the paint has dried, you can begin decorating. You can use a stencil to apply the pattern. You can also use plant leaves by first opening them with varnish. Such accessories, by the way, will look great on furniture made of wood or MDF.
After all work on updating the facade is completed, you can screw the fittings into place and install the doors in place.
Pasting with film

To prevent the kitchen set from being monochromatic and boring, you can cover only its lower part or the upper part with film. 
Films for facades come not only in different shades, but also with imitation wood or metal
If you are planning to update the facade of your kitchen, you can use self-adhesive film. Such material is available, has good characteristics, and its range is amazing.
Stages of work:
- Before you start gluing, remove the facades and lay them on a horizontal surface;
- Remove all fittings;
- Next, you should wash the facades well with soda or soap;
- Wipe dry and degrease;
- After this you can start cutting necessary elements from self-adhesive film, having previously decided on its color;
- The cut out elements are laid face up on the facade and lifted from one edge;
- The paper backing must be peeled off and applied to the surface of the facade, gradually removing the paper from underneath;
- The film must be leveled using a spatula or a simple clean cloth, moving it from the center to the sides;
If small bubbles form during the process of gluing the facades, they can be pierced with a needle. If they are large, it is better to cut them with a cutter and smooth them out.
Rattan façade finishing
Rattan can add a feeling of warmth and comfort to your kitchen interior. The most important thing in the process of decorating facades with rattan is to choose the right color that will match the rest of the style.

Rattan is ideal for kitchens in retro, country style and their varieties. Do-it-yourself finishing of kitchen facades with rattan involves the following steps:
Inexpensive renovation of the kitchen facade (video)
Updating or replacing facades has recently become increasingly popular. People understand that the appearance of their kitchen largely depends on the facades. And by using some techniques for updating kitchen facades, they have a great opportunity to show all their imagination and independently make changes to the interior of their kitchen.
Man is designed in such a way that he needs to periodically update his environment. If finances allow, this can be done by purchasing new furniture. But if it doesn’t allow you to make such expenses family budget, then simply update the façade of the old set using self-adhesive film.
With its help you can give furniture new look and eliminate defects that appear during its operation.

Recently, self-adhesive film intended for various furniture has become increasingly popular.
To give your furniture an unforgettable look, you need to choose the right self-adhesive decorative film. Modern industry offers various options this material. From cheap polypropylene and polyethylene models, to practical polyvinyl chloride cladding.

Every potential buyer can count on a variety of textures and colors.

Strength and durability, maximum safety in use, and a variety of design options can be noted.
In addition to the material that forms the basis of the furniture film, you need to pay attention to the presence of a protective layer. In the kitchen, such a layer is important to protect against elevated temperature and high humidity. If self-adhesive film is used to cover children's cabinets and tables, then the protective layer plays an important role here too.

It will help protect furniture from careless handling by a child.
If direct hits fall on the headset Sun rays, then cover it with a cladding that has a layer that protects from ultraviolet radiation. Today you can buy transparent models with such a layer.

Without hiding the facades, it will protect them from fading.
The presence of a protective layer adds additional cost to this material. But it’s impossible without him. If you are going to use cladding in the bathroom, be sure to make sure it has high degree moisture resistance.

The coating can be matte or glossy, imitating various materials.
Pasting of objects located near heaters, kitchen stove and other similar devices are produced using self-adhesive film based on a thermally stable polymer.

The modern assortment is amazingly diverse, so you are sure to find suitable option for myself.
The decorative layer can be made to resemble stone, ceramics, fabric and wood. For furniture, “wooden” cladding or marbled material are suitable. Photo wallpapers have become popular lately.

Especially if they are used for pasting wardrobes.
In addition to furniture, old doors, glass and even walls are suitable for processing with this material. Surfaces covered in this way can be easily washed.

Even a material that is not protected from moisture easily tolerates short-term contact with a wet sponge.
How to cover furniture with self-adhesive film
One of the advantages of this material is the ability to work with it yourself. There is no need to look for specialists and pay for the service. You can easily cope with this task yourself.

You can successfully use self-adhesive film to protect tables, window sills in any room, countertops and furniture in the kitchen.
The most important stage facade treatment is preliminary preparation surfaces.

After cleaning the surface from contaminants, it must be degreased. Thanks to this procedure, you can avoid the appearance of wrinkles during pasting.

Any surface degreasing agent can be used. detergents or alkaline solution.
After preparing the surface, we proceed to cutting the material. Sheets need to be cut with a margin. This makes them easier to stick to the surface. If you need to take into account the pattern, then a margin of 2-3 cm is required. Without it, it will not be possible to accurately adjust the drawing. Excess pieces are carefully cut off after pasting the furniture.

For ease of cutting the material into its back side Manufacturers print a centimeter scale (grid).
Sticking the self-adhesive film is not difficult.

If it is not possible to eliminate bubbles, they can be easily removed by piercing the lining with a thin needle. After gluing, the puncture site will not be visible.
Nuances that may appear when using self-adhesive film
Pasting smooth surfaces will not cause problems for those who are encountering such work for the first time. Difficulty may arise when gluing corners. And here you can use a trick.

To make it easier to bend the corners of the sheets, you need to take a regular hand-held hair dryer and heat the material with it.
It also causes difficulty for a person who first encounters self-adhesive film, compiling sheets of material. To prevent a gap from forming, the sheets must be glued so that the next sheet overlaps the previous one by 1.5 cm. Then we apply a ruler to the central part of the allowance along the entire length. And along it, with the help sharp knife, make an incision.

Remove the unnecessary strip. The joint will be perfect.
Lighting is important when working with this material. If it is not enough, then it is easy to overlook minor flaws. They will become visible against the general background or in bright light.

Using film you can create unique interior and decorative solutions.
If you purchased a self-adhesive film that sticks to the surface too quickly and is difficult to work with, use powder or talcum powder.

Sprinkle the surface with powder over the entire area and you will not experience any difficulties when adjusting the sheets.
How to remove self-adhesive film from furniture
Sometimes the problem becomes removing old cladding from furniture. If the material is of high quality, then removing it will not be difficult. But, if you are unlucky and it is very difficult to remove, then heat the surface. Use the same hairdryer.

Warm up the material with it, and it will come off without much difficulty.
Adhesive tape- it's inexpensive modern material, which will help update the appearance of furniture and protect it from moisture and ultraviolet radiation. It's not difficult to stick on. The main thing is to do everything carefully and follow the tips described in this article.

Now you know how to decorate and protect furniture and various surfaces with self-adhesive film.
VIDEO: How to stick film on a table with your own hands.
If the kitchen set has lost its original appearance, there is no need to change it. There are many ways to update it and secrets that will help not only refresh the furniture, but also literally give it a second life.
How to choose an update method?
Before you begin any active actions, you need to choose suitable way updates. Please keep the following important points in mind:
- Condition of the furniture. Examine the item carefully. If it looks more or less decent, then radical measures will not be required. Enough with the minor changes. If there is significant damage, then cosmetic repairs there won't be enough.
- Your wishes and preferences. For example, if you just want to freshen up and decorate an old set a little, then this will probably be easy. If you plan to change the furniture beyond recognition, you will have to work a little.
- What resources do you have at your disposal? If the budget is limited, then you will have to take this into account when choosing the materials used. If you are willing to spend money, you can afford something original and expensive.
Let's start updating
So, how can you update your kitchen set yourself? There are several ways, and each of them is worth dwelling on in more detail.
Façade renovation
There are several ways to update the facades of an old set:
- The simplest, most effective and affordable way to update old furniture is to use self-adhesive film. To make the item more attractive, take the film itself, scissors, a ruler, alcohol, and a rubber roller or plastic spatula. First prepare the surface. If necessary, treat it with sandpaper, then degrease with alcohol. Next, take measurements and transfer them to film. Now cut out the parts and gradually glue them to the facades. Be careful and attentive to get a perfect surface. As you stick, remove air bubbles from under the film with a plastic spatula or rubber roller.
- Painting. Furniture made from any materials can be painted. Looking to freshen up and brighten up your kitchen? Then select juicy shade. Want something unusual? Mix several tones or combine them. You can also create creative images; you don’t need to know how to draw.
- Varnishing. Wooden item Furniture can be varnished to give it an attractive and well-groomed appearance. If the surface is painted, you must first remove the old coating. Next, level the facades using fine-grained sandpaper. Next, coat the piece of furniture with a special primer that will prepare and strengthen the wood. Now you can proceed to applying varnish.
- Planks and moldings. Such details will make the set more stylish, especially if you choose a bright and contrasting color. You can glue moldings using super-resistant furniture glue or universal glue. As for the mounting location, you can place convex parts along the edge or in the center of the facade in the form of some kind of geometric figure.
- Rattan will look especially harmonious on wooden furniture. And working with it at home is quite easy, because it is attached using a stapler (the staples are covered with frames, for example, the same moldings).
Replacement of facades
Replacing facades is an extreme measure, but in fact the process is not as complicated as it might seem at first glance, especially if the set is not very old and is also modular.
Facades can be made of different materials, but the most practical and affordable is MDF. Modern panels have the most different textures and colors, which will allow you not only to update a piece of furniture, but also to completely change it.

For the work you will need a drill, new fittings, MDF panels, a screwdriver and screws. First, remove the old doors and replace them with new ones, not forgetting to install hinges and handles. The body does not need to be changed, but just pasted over with panels (you can also secure them on the sides using self-tapping screws).
Replacement of accessories
Replacing handles will help transform furniture inexpensively and quickly and make it more modern and stylish. Go to a specialty store and purchase new fittings. If it is unusual and bright, then this will only benefit the set and the entire kitchen design as a whole.
Interesting techniques

To give your headset originality and change its appearance, you can use interesting techniques decor. Here are the two most common and popular:
- Decoupage. This method involves transferring an image to the surface of the facade. To decorate the set you will need: the image itself (this could be an interesting paper napkin, a piece of wallpaper, a postcard, black and white or color photo or something else), sandpaper (fine-grained), alcohol or acetone, rag, special glue for decoupage, a brush and sponge, a transparent primer or clear varnish, sealant or putty to repair damage, and water. First you need to prepare the surface. Remove the old coating, seal all cracks and scratches with putty or sealant, and also treat the piece of furniture with sandpaper and degrease it using acetone or alcohol. Now apply decoupage glue with a brush. Moisten the material with the image in water and apply it to the surface. Gently blot it with a sponge. Cover the entire set in this way and leave it to dry for a day. Next, cover the entire surface with acrylic varnish or primer in several layers (each should dry for an hour). Ready!
- The craquelure technique will allow you to create cracks on the headset and turn it into an antique, as if aged. To achieve this, prepare: paint, a brush and a special craquelure varnish. First, you need to completely remove the old coating from the piece of furniture. It is also advisable to level the surface using sandpaper. Next, apply one coat of paint. You should only use matte, as glossy will not allow you to achieve an aging effect and get noticeable cracks. After completely dry apply craquelure varnish. It is better to do this in several layers (each previous one must dry before applying the next one), then the cracks will be deeper. Now apply the final finishing coat of paint. The strokes must be careful; you cannot brush over the same place twice.

You can decorate an old set in different ways.
Interesting ideas:
Choose the appropriate decoration method and enjoy your transformed kitchen set.