How to renovate an old house with your own hands. What you need to know for those who are starting a major renovation of a private home Home renovation interior layout
Are you planning to renovate your home? Where to start, how to finish, how to carry out the work so that one does not interfere with the other and does not spoil it? First of all, it is necessary to draw up at least an approximate plan for all the work, and derive an estimate of costs. It should cover all planned activities, including dismantling old elements– batteries, window sills, switches.
A series is executed in parallel works related to drilling, chiselling, making recesses, grooves and boles. This also includes other work, during which it is necessary to “disfigure” the ceiling, walls and floor, resulting in the formation of a large amount of various construction waste: dust, plaster fragments, etc.
When all this the garbage has been removed, you can begin to prepare the base for the floor.
There are different options:
- preparation for flooring with;
- installation from edged boards;
- leveling with concrete screed.
Home renovation sequence: activities with windows
The next stage of work concerns the windows. If necessary, they are replaced.
And at this stage, the prepared base is protected with film, cardboard or several layers of newspapers. This will greatly facilitate its subsequent cleaning and cleaning.
Even before moving on to plastering work, all proposed activities with drywall should be completed. Niches, additional partitions, functional and decorative details are finally completed before moving on to the next stage of finishing work - "wet". It is advisable to complete all work of this kind within one work cycle, so as not to return to them again later.
The procedure for repairing a residential building: installing doors or flooring?
Then you can prevent errors when installing them, and also get a minimum gap between the floor plane or threshold and the door leaves.
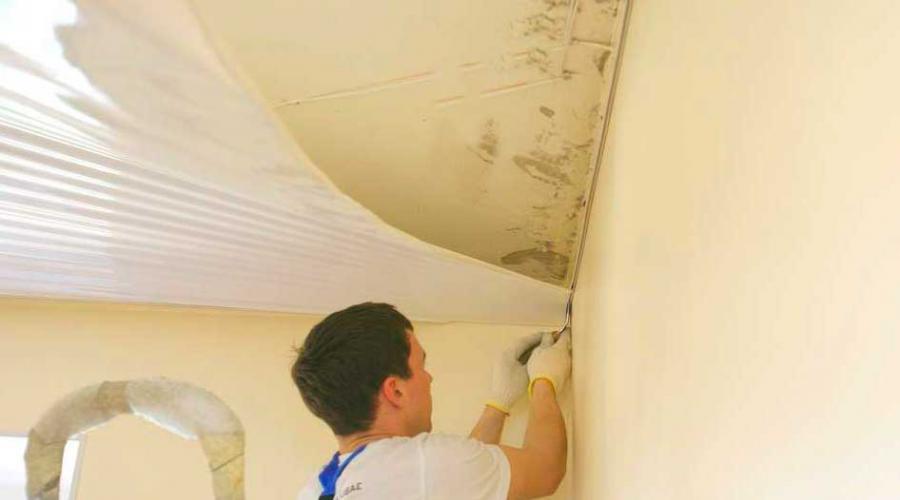
 This element, which has become familiar, enjoys steady popularity. The specific design of such ceilings allows their installation at the final stage of all activities, after wallpapering or painting wall surfaces. Installing a ceiling can be considered a finishing task that does not pose a threat to damage to the floor or wall covering.
The “top-down” ordering principle does not apply to this case. It applies mainly to routine repair work. The emergence of new technologies has brought some changes to their course. Even teams involved in installing suspended ceilings offer to invite them to actually complete the repair.
Let's try to make a short list of the order of work in any single room of the house. So:

All specialists choose their own algorithm of actions, which is convenient for them in each specific case. But the approximate sequence of events may be exactly this.
Have you bought a new home or is your existing home in need of renovation? Each of us knows that repair is a useful, but very lengthy procedure. It must be approached responsibly and conscientiously. And you definitely can’t rush in this matter, because any defect can lead to irreversible consequences, which may, over time, force you to carry out the repair again. But you want the repair to be done quickly, efficiently and painlessly. Everything will be so only if you take the time and approach this issue with all seriousness, choose the desired design and carefully make all the calculations.
DIY renovation of a private house
Where to begin DIY renovation of a private house? First of all, you need to decide what kind of repairs your home needs. And this can only be determined after a high-quality inspection of the premises has been carried out.
As for private houses, it is imperative to look at the foundation of the premises at the very beginning. After all, the fate of your future home depends on its condition. In case of the slightest damage, it is necessary to DIY house foundation repair. This may be superficial reinforcement of the foundation, or it may require its complete replacement. It all depends on his condition. The cost will depend on the type of work. Only after the foundation has been inspected and brought into proper condition can you move on to other types of work.

If you are interested in the question: “?”, then carefully read our article, in which we will reveal the sequence of work in a private house. After repairing the foundation, you need to carefully inspect the walls and roof of your private home. If the walls and roof leak, all internal repairs will be in vain, the wallpaper may come off, and stains will remain on the walls or ceiling. And these are just the best variations of the consequences after a building gets wet. If necessary, you need to strengthen the walls and replace the tiles.

Private houses are usually colder than apartments in multi-storey buildings. Therefore, it is impossible to do without additional insulation of the building. First of all, it is necessary. Insulation in this case will not only prevent cold from entering the house, but will also serve as additional strengthening. As we know, the roof of any house bears the greatest load and, accordingly, the greatest impact from the environment, therefore it is through the roof that the most cold air enters the house. This suggests that the ceiling and roof need insulation the most.

In addition to roof insulation, you will also need. In private houses and apartments on the first floor, moisture and cold come out from the ground and foundation. It will be very cold to walk on such a floor, and in the cold season there may also be a feeling of dampness. But frozen feet can cause a wide variety of diseases. Therefore, you should not delay insulating the floor, especially if there are small children living in the house who love to crawl and lie on the floor.

You shouldn't give up either. Insulation can be carried out both from the inside and from the outside. It is very difficult to judge which option is better. The only plus in the direction of external insulation is that it is performed on the outside of the building and, accordingly, does not eat up the usable area of the house. Therefore, it is better to focus on insulation from the outside of the building, especially if your house is not large. In this case, it is better to save square meters.
With the general renovation of the house, the issue has been resolved, all internal work has been completed, and now you can safely carry out do-it-yourself private house renovation from the inside. The issue of repair is not an easy one, especially when a lot of effort, time and material resources have already been spent on the previous stages. But, most often, internal repairs cannot be done without. Where to start renovating a building?
First you need to decide what type of repair you will need: major or cosmetic? The choice of type of repair will determine not only the total cost of the work, but also the time it takes to carry it out. Cosmetic repairs are much simpler in the type and amount of work required, and accordingly they are cheaper. This type of repair is a complete replacement of interior decoration. That is, the old wallpaper, paint, etc. are removed, the walls are plastered, and prepared for a new finish. At the next stage, new wallpaper is pasted, the walls are painted, tiles are glued, and so on. If necessary, the floor covering may also be replaced.

In the case of a major overhaul, everything is much more complicated. Here you may need to replace electrical wiring, air conditioning and ventilation systems, as well as sewerage. Agree, the task is not an easy one, and it’s also quite expensive. In addition, replacing all equipment for normal life will take a lot of time and nerves. Therefore, when thinking about a major overhaul, immediately set yourself up for a lot of problems. Unfortunately, they cannot be avoided. Therefore, if you are just about to purchase a new home for your family, carefully review the condition of the house. Believe me, if the wallpaper has peeled off the walls, it’s not as bad as if the sewerage system in the house has worn out over time.
When starting a renovation, almost all of us try to save money. But, as they say: the miser pays twice. This applies to several stages of repair, which are definitely not worth saving on. In some cases, the savings will not affect the condition of the house and interior decoration, but in others it will result in irreversible consequences. So what should you not save on when performing repair work?

Let's start with the fact that there is no need to save on basic building materials, which bear the main responsibility. Among such materials, it is worth noting paint, putty, plaster and primer. Agree, it’s much easier to replace wallpaper than to do a complete interior decoration if the plaster or putty starts to peel off? Therefore, we suggest that you better save on wallpaper by choosing not too expensive models. Wallpaper that is simpler and cheaper does not always last less or look less bright. If you have taste, then you can use fairly cheap wallpaper to do interior decoration that will look much better than decorating the room with expensive and higher quality wallpaper.

It is extremely important to purchase only expensive and high-quality plumbing elements, which include pipes and all possible connections. This is especially true for those who plan to hide pipes inside the walls. If a pipe bursts due to high pressure and poor quality, you will have to break the wall to find the problem, fix it, and then redo the finishing work. But you can immediately choose high-quality pipes, the condition of which you won’t have to worry about for a long time.
Wiring is also not a component of the house on which you could save money. Many people often use aluminum wires for wiring. But in reality they are not so high quality and durable. Copper wires are considered much better, although they are much more expensive. But it’s definitely not worth saving on them. In addition to the wires, it would not hurt to purchase good quality protective devices that protect the building from voltage surges, as well as on the number of circuit breakers installed in the distribution panel.

DIY home renovation video includes not only repair work of the foundation, roof, walls, replacement of wiring and pipes, as well as strengthening of floors. Repair also means high-quality interior decoration of the premises, which is assigned a task no less important than the building itself. Your home should bring you pleasure from being in it, give you positive emotions and lift your spirits. Having spent a lot of money and time on repairs once, you should not think about it for many more years.
The interior space of the house should be cozy and comfortable for household members. Each room should be decorated in accordance with the purpose of the room, location and wishes of the person who will constantly be in it. There have been even more design options lately. There are so many modern styles that it is very difficult to single out among them the one that is most suitable for decorating the rooms of a private house. Each is good in its own way, has its own advantages and disadvantages. Therefore, you should choose only according to your personal considerations and preferences. If you are more attracted to homeliness, warmth and comfort, then you should opt for a classic or country style. These two directions will bring into the atmosphere of the room all those components that you have long dreamed of. The classics have been loved by everyone for centuries, and will remain popular for the same period. Therefore, if you choose a classic style, you definitely won’t go wrong.

Country music attracts with its sweet, homely atmosphere. Many people attribute this style to rural areas. The thing is that Country includes many handmade elements in its design, including various blankets, chair covers, candles, vases and so on. And all this is done with your own hands. The interior is dominated by a lot of textiles in warm colors, soft toys and a lot of decor. Agree, such an interior will look very nice and comfortable.

In recent years, styles such as Minimalism and Art Nouveau have become especially popular. Of course, they are very fashionable and ultra-modern, but at the same time they cannot be called cute and homely. The fact is that they are quite strict, there is practically no decor, everything is stylish, strict and laconic.
Do-it-yourself house renovation photo– this is not an easy task and you need to approach it conscientiously so as not to make mistakes and not perform the same work several times.

And here DIY wooden house repair a little more complicated than a brick one, but if you try, there won’t be any problems. Never rush, and then you can create a warm and cozy nest for yourself and your family. All your efforts will always pay off. The main thing is to take into account all our recommendations and carry out repairs in good faith. And if you don’t have special skills in performing repairs, and even more so, complex work, it is better to seek help from specialists than to do it yourself, but not correctly.
This is how it looked before the renovation... Rotten wooden frames, covered on the outside with double film, from the cold and wind... On the left is an old veranda with a sagging porch canopy...

For those who are about to make repairs in their home, it seems...
These were the windows and window sills.

We started putting the house in order from the foundation.

We open the corners of the house one by one, remove the rotten crown logs using a chainsaw, install the formwork, lay large stones and crushed stone, lay the reinforcement so that its ends remain open (for subsequent fastening it to the poured foundation), wrap the crown log with roofing felt and fill it with concrete. There you have it. finished cabinet.

And so on all four corners of the house and its middle, around the perimeter. Total - 8 cabinets. The process is labor-intensive and difficult, but the result is worth it... When the cabinets were finished, we made a pile around the entire perimeter. The continuation of external work was postponed until next summer. We started renovating the house internally...
This is a large room and let's start there. This is what it looked like before the renovation:

This is her right corner... and this, in the photo below, is the left corner. In the process of writing the topic, I will stick to these two corners...


First, we completely tore off all the layers of old wallpaper. The windows were still old, but we were already waiting for specialists to install plastic windows.
The old stove was dismantled...and the stove maker put together a new one.


AND THE RESULT DID NOT KEEP MYSELF WAITING LONG...I decided to close one window completely and make one big one - there will be a dining room there.


After installing the windows, the men began to dismantle the old floor, level the joists and place brick cabinets under them...

Then they laid the floors with old boards (they will last for a very long time, since they are thick and dry), and in places where there were rotten ones, they replaced them with new boards.

I installed a metal profile frame for the walls and ceiling... my mistake was that first you need to do the ceiling, and then the walls, and not vice versa. I found the technique for performing this work on the Internet, I won’t go into detail on it. If you If you have any questions, I will be happy to answer what I know...

Attaching the frame to the ceiling is much more difficult, my neck hurts...

When the metal frame is completely ready, you can sew gypsum boards onto it, preferably in a checkerboard pattern, starting from the ceiling! Don’t forget to spread out the electrical wiring and hide it in the corrugated channel, behind the profile, and install the distributor boxes in a place convenient for you.

In this photo you see wooden blocks, I screwed them on for later mounting of bookshelves. I attach exactly the same ones, only thinner, under the ceiling above the windows (for attaching cornices).
When all the walls and ceiling are covered with gypsum board, we putty with a putty knife and level all the joints between the sheets and the places where the screws are screwed in with this compound...

We lay reinforced mesh along the corners and seams to strengthen the joints, and after everything is dry, we sand it and apply a primer to the walls and ceiling.
And now the most interesting moment - wallpapering. I took white vinyl for the ceiling and with delicate roses for the walls...

When the wallpaper was dry, I mutually agreed
I invited a team of craftsmen to finish their work in this room on the windows (slopes and window sills).

After that, I glued the ceiling plinth, hung the shelves on the wall, put my flowers on the window sills, which the guys from the company had already installed for us...


The carpenter helped install the interior door, only later did I find out that it was upside down... (what difference does it make!) as long as it functions normally...

I pasted over the doorways with a white corner using liquid nails. On the right side there is a new stove that heats all the rooms at once.
The firebox itself is located in the bathroom...

I laid underlayment on the subfloor, then fiberboard and linoleum. Then I screwed the floor skirting boards with self-tapping screws and voila, beauty!!!

Here's the thing about this big room...
Some of you wanted to see more details about the concrete cabinets, so I added the details... So, the slab windows were inserted, the outside of the house was sheathed with flat slate and a heap was made around the house, until next summer...
Now let's continue with exterior work, after the cold winter and spring...next summer.
When all the cabinets are ready, gradually, opening each side of the house from the rubble, we remove the rotten logs of the lower crown, wrap the dry ones with waterproofing,

we install the formwork, lay the reinforcement, connecting it to the ends of the reinforcement of the corner pedestals and fill it with concrete...


Most city residents dream of owning a country house, but buying a good new property requires a lot of money, and building a house from scratch is even more expensive. This is why many people prefer the “secondary market” and buy old houses. It is rare that an old house does not require renovation, and this article is devoted to this very topic. What should you pay attention to first, and how can you renovate an old house with your own hands as economically as possible?
The Germans say: “Only a very stupid or a very rich person can afford to buy an old house.” But the nature of the Russian mentality and the peculiarities of pricing in the real estate market are such that sometimes, indeed, it is more profitable to purchase used housing.
In addition to financial savings, there is another advantage of old houses - they are usually built in places with developed infrastructure, while progress has not yet reached new buildings. If you buy a plot and build a house yourself, you will have to lay communications to it, which will take additional money and time. And everything would be fine, but no one has canceled the natural wear and tear of structures, and very often old houses require major repairs. Where to start, and what should you pay attention to first?
The disadvantages of used houses are primarily related to the specifics of construction in Russia, more precisely, in the Soviet Union, since old houses were built precisely at that time. In the past, most private houses in rural areas were built of wood, and one has to think that after 50 years or more such structures need to be restored and strengthened. Colonies of wood-boring beetles probably live inside the walls and floors, and rot and fungus are noticeable in some places. If you are “lucky” to become the owner of such a Soviet-built home, repairing an old wooden house will require a lot of money, and sometimes it’s even easier to demolish the box, strengthen the foundation and build everything anew.
In the 90s, there was a sharp BOOM in private housing construction, and brick replaced wood. It would seem that a more durable material should retain its performance qualities much longer, but the lack of qualified architects, the use of fragile building mixtures, and sometimes outright sloppiness during construction have led to the fact that today most of these houses require large investments.
Most often in such houses there is a discrepancy between the design of the foundation and the nature of the soil - brick buildings weigh quite a lot, so there must be a strong foundation and stable soil under them.
If you had to work with an “unfinished” house - the frame of a house without interior decoration, then, most likely, the unprotected brick walls have already cracked and began to crumble, so you will have to strengthen them or even replace heavily damaged areas.
Typical damage in old houses
Before you begin repairs and purchase building materials, you should develop an action plan. To do this, it is necessary to carefully inspect the home and assess its condition. So, what should you pay attention to first when renovating an old house?
The weakest points in old houses:

Many of the above problems are eliminated by themselves during repairs; for example, unsuitable wall coverings will be dismantled if you decide to increase thermal insulation. Replacing sockets and switches is also not difficult; you can replace old plumbing fixtures in a fairly short time. But if we are talking about a faulty roof or a cracked foundation, resolving such issues will be difficult and expensive.
Repair planning
It is necessary to begin a major renovation of an old house with thorough planning. When you have inspected the property and noted down all the serious defects, you can begin to implement the project, for now - on paper. If you do not have artistic abilities, design computer programs (3DMax, Autodesk Homestyler, Ashampoo Home Designer, SketchUp Make, Sweet Home 3D) will help you cope with visualization.

Why do you need a plan:
- You will know what to do and in what order.
- You will be able to see in advance what the house will look like and compare the real result with the virtual one.
- You can calculate the exact amount of building materials needed.
If you have planned to demolish or move walls (partitions), plumbing equipment, gas or heating appliances, or replace an electric stove with a gas one, such actions require documentary permission. To do this, you should contact the relevant organizations in the area. To correct the technical passport of a house, you need to provide a written application and a package of documents, including a detailed description of the upcoming work. To determine whether you need to obtain permission to repair anything in the house, look at the technical passport - all structures in the plan can be repaired. But to add additional space, for example, a summer kitchen, you need permission. Otherwise, the extension may be considered illegal and demolished.
Renovation inside
The modern rhythm of life forces people to constantly work or spend time on the road, but even the busiest person in the world spends a third of his life at home, what can we say about housewives, children or pensioners. Therefore, it is extremely important to create a favorable atmosphere inside, and we are talking not only about beautiful decoration, but about warmth, ventilation lighting and other important points. The physical and psychological health of residents depends on this.
Daylight
Natural lighting must be present, and the more, the better. According to standards, windows should occupy 10% of the house's area. Imagine how much discomfort a person will feel if he is in a constantly shaded room - it will damage his vision, it is impossible to grow indoor plants, ventilate and fully clean in such a room. Moreover, the absence or lack of windows will lead to unnecessary waste of electricity, and today even the most affluent homeowners save on electricity.
Interesting: previously, small windows and small doorways were made in wooden houses in order to minimize heat loss. Then they used ordinary glass, which did not protect against the cold very well. 
But, unfortunately, no one will allow you to just cut a beach window in the wall. For the transfer, expansion or replacement of windows, appropriate standards are provided, which can be found in the document “Natural lighting of residential and public buildings”. Please note that each region of Russia has its own standards, since the coefficient of natural illumination is different everywhere.
The degree of illumination of a home depends not only on the size of the window, but also on what kind of glass is inserted there. It is known that ordinary glass or double glazing does not transmit UV radiation, so it will not be possible to create a solarium or a luxurious greenhouse. Quartz glasses are used for this, but they are quite expensive, so they are bought for specific needs.
How to properly place windows in the house:
- The windows in the kitchen and bedroom should face southeast, so that there is natural bright light in the morning, and in the evening the sunset does not blind the eyes.
- It is better to place the living room windows to the west so that you can admire the sunset and not turn on the lights during the evening rest for as long as possible.
- The windows of the utility rooms should be oriented to the north, since they usually contain tools, equipment, products and materials that do not need excessive natural light.
- If the room has several windows on different sides, then the large ones should be oriented to the south, and the small ones to the north.
- Windows facing west and south should be shaded naturally using structural elements of the building (balconies or protruding roofs), trees growing nearby, shutters or awnings.
Insulation of the house
A comfortable indoor microclimate depends on air temperature and humidity. These factors, in turn, are ensured by proper heat and vapor insulation, as well as ventilation of the space.

The temperature in the house consists of two components - the temperature of the air and surfaces (floor, walls and ceiling). The optimal air temperature is +20C, surface temperature is about 17C. In this case, the individual characteristics of the residents should be taken into account. Thus, for older people, housing should be made warmer, so ideally it is recommended to install a heating regulator for each room so that everyone can set the optimal temperature for themselves.
In old-type houses, as a rule, there is insufficient thermal insulation of the walls, or there is no insulation at all, so there may be a difference between the temperature outside and inside the building. As a result, condensation forms, humidity rises, and residents feel uncomfortable due to constant stuffiness. If it is impossible to disassemble the wall, it is recommended to insulate the walls from the outside or inside.
Roof of the house
The roof not only serves as protection from rain and cold, but also determines the appearance of the building. Depending on the design, the exterior and “mood” of the house changes. If previously gable tile structures were in fashion, today the time is coming for “European” straight roofs. They create a stylish and laconic image, are much easier to use and can be used as additional usable space (we are talking about used flat roofs). All information about flat roofs is presented in the article “”.

The microclimate and heat retention inside the room depend on the condition and integrity of the roofing pie. The most common problems with the roofs of old houses include impaired density or damage to the coating, damaged waterproofing, rotten rafter system, leaky or completely absent thermal insulation. If the roof is covered with slate, then most likely it has turned green from time and humidity.
For practical reasons, the old roof covering should be completely replaced to eliminate the possibility of leaks, especially if you bought the house in the summer and do not know what to expect when the rainy season arrives. The article “” will help you navigate the situation.
It is absolutely impossible to tell exactly how to repair an old house, since the volume and specifics of the work depend on the nature of the damage. In this article we have mentioned the most common faults. If you are just going to purchase used real estate outside the city, pay attention to the above points, especially the condition of the foundation, load-bearing walls and roof, then perhaps you will be able to avoid expensive major repairs and get away with “little loss.” But the fact that repairs in an old house need to be done is an irrefutable fact.
Renovation of old houses: photos
We invite you to familiarize yourself with a small photo selection that demonstrates how you can transform an old house, making it beautiful and cozy.


Has the time come when you need to repair the walls in a private house? There is no need to waste time studying information from different sites. We will walk you through this process in detail.
Each home has a unique charm, which is achieved through the selection of finishing materials. But before you start decorating the walls and processing them, you should carry out all the preliminary rough work. Any wall repair in a private house begins with dismantling the old covering. This is not difficult to do if you listen to the advice of experts and acquire the necessary tools.
Depending on the condition of the walls in the house, the following procedures may be necessary:
- removing wall coverings in the form of wallpaper;
- dismantling ceramic tiles;
- cleaning various surfaces from oil paint;
- dismantling the wall, its new construction;
- opening cutout for doors or windows;
- knocking down plaster from walls;
- Repairing the walls of a private house may also require dismantling plumbing and electrical appliances.
The walls must be strong and fully prepared for subsequent work. For example, we wrote about earlier. It will take a lot of time to collect and remove construction waste. You can do this yourself or with the support of a company that provides such services.
What else is needed to repair the walls of a private house?
After dismantling, it is very important to carry out all the rough work correctly. First you need to start leveling the surfaces. Repair of the walls of a private house will be of high quality only if the finishing is applied to the prepared surface.
 Leveling is considered an important stage of repair work. It is important to consider what finishing material such a base is prepared for, since its properties may change. Cosmetic, major or European-quality repairs have their own small error tolerances, which are calculated per square meter of wall area.
The most commonly used type of surface leveling is wet. In order to perform them, you do not need complex skills, it is enough to have the skills to use a spatula. You can buy leveling mixture at a building supply store.
It is necessary to measure differences along the entire length of the wall using a special tool - a building level. Sometimes a rope is stretched along the wall for these purposes.
Is it necessary to insulate walls in a private house?
Many home owners resort to tricks by adding internal insulation of wall structures to the list of repair work. In fact, experienced experts recommend abandoning such actions, since external insulation is more practical and justified.
With internal insulation, the walls remain cold from the outside, so such savings can result in the appearance of condensation and mold in the room.
Repairing walls in a private house: how is finishing done?
After the surface has become smooth and the solution has completely dried, you can begin finishing work. The choice of finish is quite difficult for many buyers. There are these main types:

In wooden private houses, finishing often ends with proper processing and painting of the log house. If it has a beautiful appearance, there is no point in hiding it behind PVC panels.