How to repair a screwdriver battery at home. Correct repair of a screwdriver battery. Prices for batteries for screwdrivers
Read also
Into one wonderful moment, after taking my screwdriver out of the closet, I discovered that it did not work. The batteries were dead, the first thing I thought was and put the screwdriver on charge. But as soon as I connected the charger to the battery, it immediately showed the full charge of the battery. I connected a tester to check charging and it turned out that the batteries had high resistance, which meant they were failing.
After browsing the forums, I found out that the problem of failure of nickel-cadmium batteries used in screwdrivers is by no means new, but rather very common. In general, in addition to being cheap, these batteries are a plus for the manufacturer; they have a lot of shortcomings that become apparent during operation. This is small life cycle, and low capacity, and short battery life.
All forum members who are faced with a similar problem without hesitation boldly change nickel-cadmium batteries to lithium-ion ones, which is what I will do as well. They may be more expensive, but the screwdriver will work much longer and harder.
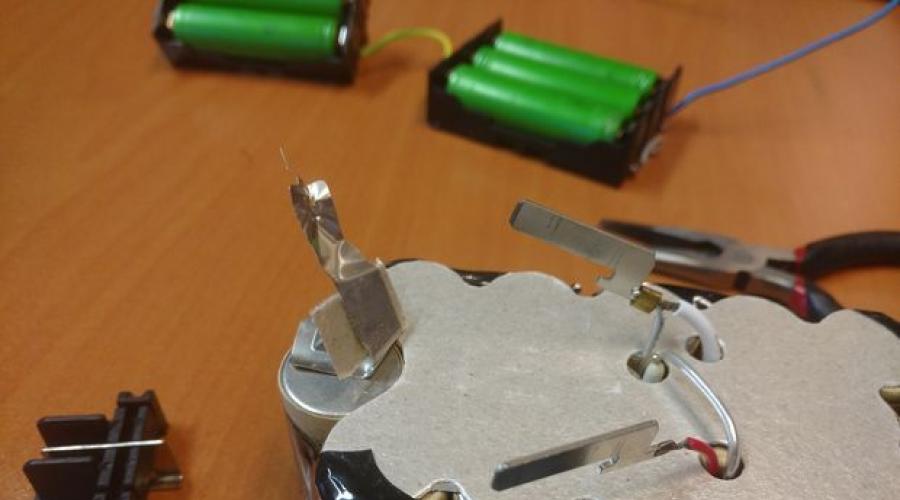
Without hesitation, I purchased. Since my screwdriver is 18-volt, and one battery produces 3.7 V, therefore, I needed 5 pieces. 5x3.7=18.5 V is what you need.
I also bought battery compartments, one for two batteries, the other for three. I connected everything in series. I took out the old batteries and replaced them with new ones.


This could be the conclusion, but as it turns out, I made a terrible mistake. The fact is that lithium-ion batteries cannot under any circumstances be charged in the same way as old batteries! This is even dangerous, as they can simply explode.
How then? It's not that complicated - you need a charging controller for lithium-ion batteries.
Lithium-ion batteries are very sensitive to overcharging and being discharged below normal - all these factors quickly damage them. This is perhaps their main disadvantage. But it’s easy to get rid of it by using a controller that will take over all the functions of monitoring and limiting dangerous modes and make the operation of the battery at a high-quality level.
Purchase links:
- or specifically - .
Charging controller connection diagram

The batteries are also connected in series, except that each connection between the batteries is connected to the controller. As a result of this, the controller monitors the condition of each battery and prevents it from overcharging in the circuit.
I put together a diagram. Everything works perfectly.


Check video
Screwdriver battery assembly
Since the controller was added, the battery compartments had to be abandoned, since there was a catastrophic lack of space. Well, this is for the better, since the screwdriver is subject to vibration, and not tight contact could not have a very good effect in the future...I decided to solder the batteries together. In general, lithium-ion batteries are very afraid of overheating and need to be connected resistance welding. But I don't have it. So I soldered everything with a soldering iron. If you do this, then teach: use only a powerful soldering iron of 40-60 watts. Solder with acid or active flux. And under no circumstances solder one connection for more than a second. If it doesn’t work the first time, it’s better to wait five minutes and try again.
In the end I did this:

I soldered the circuit.
Lifetime battery relatively short, on average 5 years. After the set period has expired, the battery suddenly stops working. In such a situation, it is not always possible to quickly acquire new source nutrition, therefore home handyman I have to solve the problem of how to restore the battery of a screwdriver, at least for a short time. In some cases, after a successful recovery, the batteries work normally for quite a long time.
Structural elements of a screwdriver
A screwdriver is rightfully considered indispensable universal tool. Modern market screwdrivers are represented by a large number of models equipped with a battery. Despite the variety of brands and modifications, all batteries have the same structure and only differ slightly from each other.
Each of them includes individual elements, connected in series to each other. All of them are made to standard sizes and have the same voltage level. Selected species elements differ only in capacity, measured in A/h and indicated in the labeling.
There are 4 contacts in the tool body that perform various functions. Including two are power ones, designed for charging and discharging. In addition, in the upper part there is a control contact included in the circuit along with a special temperature sensor. It protects the battery, cuts off the charging current and limits it to a set value by changing the temperature regime.
The fourth contact is located separately, connected together with a resistance. It is required when using charging stations increased complexity, capable of equalizing the charges of all battery cells. Such stations are rarely used in everyday life due to their high cost. A regular 12-volt screwdriver does not require such stations.
One of the reasons for the failure of a screwdriver is a malfunction of the battery, that is, its individual element. In such cases, when connected in series, the entire circuit fails. Therefore, it is very important to accurately determine the faulty location. As a rule, this happens after the specified service life has expired. This problem can be resolved in two ways: purchasing a new battery or repairing and restoring the old battery.

What batteries are used in screwdrivers?
Correct diagnostics requires knowledge of the main types of batteries used in screwdrivers and the design features of each of them. Each battery consists of mini batteries connected in series to form a single chain. Depending on the material of manufacture, they are nickel-cadmium (Ni-Cd), nickel-metal hydride (Ni-MH) and lithium.
The first option, Ni-Cd, is the most widely used. In these batteries, each cell has a voltage of 1.2 volts, for a total of 12 volts with a capacity of 12,000 mAh. They differ from lithium ones in their ability to be restored, since they have a known memory effect, which is a reversible loss of capacity.

Due to design features batteries, not all methods are suitable for restoring them. For example, lithium cells cannot be recovered using charging Imax B6, since lithium gradually decomposes, loses its qualities and does not hold 18 volts. The same method is not always suitable for Ni-Cd batteries, since in some cases the electrolyte may completely boil away in them. However, there are many options for recovery.
Different types of batteries also differ in their own operating voltage of the cells. This difference is due to the materials used to make a particular battery. This factor also affects the capacity providing long work tool without additional charging. Therefore, when initially opening the case, the type of elements placed inside is first determined. The fact is that it is not allowed to replace lithium mini-batteries with nickel-cadmium ones, since their operating voltages are significantly different. Accordingly, the methods of repair and restoration will differ.
To repair the battery you will need measuring instruments- 2 A, 2 and 15 V, tester, and milliammeter. Manipulations with the body are performed using a screwdriver, scissors and pliers. A magnifying glass may be needed to detect defects.
While solving the problem of whether the battery can be repaired, the faulty element is searched for and then replaced. Used for verification standard scheme, and based on the data obtained, the state is analyzed individual parts. It should be remembered that not only the mini-batteries, but also the terminals of the screwdriver itself may be faulty.

Determining the causes begins with measuring the voltage using a tester on each individual battery. All non-working elements are marked and separated from serviceable ones. If the battery discharges quickly, do not immediately disassemble it. First, you can try to restore the battery capacity of the screwdriver. For this purpose, the battery is fully charged and deeply discharged over several cycles. In most cases, capacity is restored almost completely.
Often a screwdriver stops working due to terminal failure. During operation, they gradually unbend, as a result of which the contact is broken and the battery is not fully charged. To repair the charger, you must first disassemble it and then carefully bend each terminal. After this, you need to check the charging quality using measuring instruments.
If the measures taken do not help, you simply need to replace the faulty part. If a specific cause of the malfunction is discovered, it is recommended to use the recovery methods below.
How to eliminate the memory effect
When a battery is undercharged and then discharged very frequently, it experiences a so-called memory effect. That is, the battery gradually remembers the minimum charging and discharging limit; as a result, its capacity is not fully used and gradually decreases further and further.

This problem is typical mainly for nickel-cadmium batteries and affects nickel-metal hydride batteries to a lesser extent. In any case, it is necessary to restore the battery capacity. The memory effect does not apply to lithium-ion batteries at all.
In order to solve the problem of whether the element can be repaired, it is recommended to completely discharge and charge the battery using a 12-volt light bulb. The positive and negative wires are soldered to it, which are connected to the battery contacts. This procedure is repeated five times or more.
How to add distilled water correctly
Distilled water only evaporates from nickel-cadmium batteries when they overheat during operation. Therefore, to eliminate the problem and restore their functions, water must be added.

This procedure is performed in the following sequence:
- After disassembling the battery, mini batteries will be found inside. Their number may vary, depending on the brand of the instrument. The faulty element is determined by a multimeter. In a working battery, the voltage is 1-1.3 V. If this figure is lower, then the element is faulty and needs to be repaired.
- Next, the faulty parts are carefully removed without destroying the connecting plates. They will be needed later for reassembly.
- A hole no larger than 1 mm is drilled in the side. It is not located in the middle, but closer to the bottom or top of the battery. You only need to drill the wall, without going deep into the element.
- You need to fill the syringe with distilled water. The needle is inserted into the hole and through it the battery is completely filled with water. After this, it should stand in this position for at least a day.
- In a day special device The battery is charged and then left charged for another 7 days.
- A week later, the capacity and voltage are checked again, and if it has not dropped, the hole in the case is sealed or sealed with silicone.
After all the manipulations, the batteries are assembled into one unit and inserted inside the battery case. Connection plates are soldered or connected spot welding. Then the functionality of the entire battery is checked again, after which it is completely discharged using small loads. The charging and discharging process is performed at least 3 times.
Replacing old batteries
This method can be used to repair the battery of any screwdriver. The repair procedure itself is not particularly difficult and begins with disassembling the battery. Using a multimeter, determine faulty elements, whose voltage will be below normal. Then they are carefully removed and exactly the same mini-batteries are purchased instead.

New parts are installed in place and connected by existing plates. Soldering or spot welding is used for connection. In this case, you need to ensure that the battery does not overheat. Therefore, the work must be done carefully and quickly using flux or rosin.
Battery Bleeding
This repair method concerns elements lithium-ion batteries. During the period of operation, they overheat, as a result of which the electrolyte evaporates from some batteries. Because of this, gases accumulate inside the battery, causing swelling, accompanied by bending of the plate. After this, you have to restore the screwdriver battery.

The solution to this problem is carried out in the following order:
- Disassembling the battery and finding a faulty battery using a multimeter. Usually there is no voltage in such elements.
- After this, the battery is removed and gas is released from it. In the first case, you will need some kind of flat tool, curved at the end. It is brought under the positive contact and the swollen plate is gently pressed down. The gas finds its way on its own, making a hole and exiting. In this case, you restore functionality only for a short time, since the electrolyte will evaporate completely through the hole and the battery will stop working again.
- In the second case, the positive contact is disconnected using wire cutters, after which it is slightly bent, but not completely cut off. After this, an awl is inserted under the curved plate and gradually pushed inward. That is, the plate is disconnected from the edge of the battery and the gas comes out. After this, it is inserted into its place, and the hole is sealed as close as possible. in a convenient way. All that remains is to solder the contact that was disconnected at the very beginning.
When using a screwdriver for a long time or storing it, after a certain time, the battery of the screwdriver becomes unusable. Further use of the tool becomes impossible. The consumer has to consider the option of purchasing a new battery or screwdriver. This decision the problem is the most simple way out from the current situation, compared to replacing the batteries in an old battery.
The cost of a new battery is about 60% of the cost of a screwdriver. Each battery contains the same type of cells, which are also sold separately. You can try to repair the battery. Repairing it is not considered a very difficult process, but in case of an unsuccessful attempt, the user can purchase new battery. Below in the article we will discuss in detail the issues of repairing a screwdriver battery with your own hands.
Types of batteries

Each type has its own advantages and disadvantages. Let's take a detailed look at each type.
Ni-Cd batteries.
- possibility of use in low temperature conditions;
- storage at low charge allows you to save tool parameters;
- a fairly common type of battery;
- low cost.
Negative sides:
- charge memory effect;
- spontaneous discharge;
- Not large capacity;
- a small number of charge-discharge cycles.
Ni-MH batteries
 Positive aspects: low charge memory effect; small spontaneous discharge; large capacity, relative to Ni - Cd; large quantity charge-discharge processes.
Negative sides: when the charge is low, it loses some of its parameters when it is in storage; price range; short service life when used at low temperatures.
Li-Ion batteries
Positive sides:

Negative sides:
- the price range is almost 3 times higher compared to Ni - Cd;
- after three years, the capacity decreases significantly, since lithium tends to decompose. It is not possible to revive such a battery;
- cannot be used in low temperature conditions.
 You can always restore battery functionality if the battery is not dry. Otherwise, it will have to be disposed of. How to revive a screwdriver battery is discussed below. The battery will need to be disassembled.
Recovery methods: compression (if there is electrolyte, but there is a high risk of volume loss); by applying voltage and current to each element significantly higher than the nominal value.
Identification of faulty elements and their replacement
To do this you will need the following tools:

Battery repair procedure:
- Charging the cans until they are fully charged.
- Disassembling the case.
- Measure the voltage with a multimeter on the elements, one by one.
- Identification of elements with voltage below nominal ( Rated voltage Ni - Cd element 1.2−1.4 volts, lithium element voltage 3.6−3.8 volts).
- Labeling of identified elements.
- Housing assembly.
- Operating a screwdriver under load until the power decreases.
- Disassembling the case.
- Voltage measurement on marked elements (the voltage will be lower than that of others), for example, for serviceable elements the voltage will become equal to 1.1 V, and for faulty elements it will be 0.8 V and lower.
This method identifies faulty elements rechargeable batteries 12-18 V that are subject to replacement or restoration.
In Li-Ion batteries, faulty elements are determined in two ways:
- By replacing the control circuit with another battery that is suitable for the parameters, if a fault is identified, a replacement is made.
- By using charger with the ability to adjust voltage and current. The voltage is set to 4 V, the current to 200 mA. The battery is connected. If the voltage rises to 3.6 V, the battery cell is working. Then the remaining elements are checked.

After repacking the screwdriver batteries, you need to equalize their potentials by charging the cans for 8-10 hours. After cooling, the voltage on the elements is measured. If everything is done correctly, the voltage will be in the range of 1.3-1.4 V. Then the cans are completely discharged using a screwdriver (you need to charge and discharge 3 times). This procedure is recommended to be carried out once every 3 months to eliminate the memory effect.
Repairing a screwdriver battery with your own hands is not difficult, but you will need to correctly identify the breakdown.
Breakdown of the screwdriver battery occurs due to frequent charging and operation in unacceptable conditions.
Today this tool Almost every man has one. This device is intended for various works for repair and installation. It can be used to tighten or unscrew self-tapping screws and bolts. It is known that rechargeable batteries in screwdrivers do not last long. Frequent charging and operation in unacceptable conditions can cause battery failure. In this case, many people go to the store and buy a new battery. However, you should know that the battery ranks first in the cost of a screwdriver. Almost anyone can do all the steps to repair a screwdriver battery with their own hands.
Please note that it is not always possible to quickly find a battery that is suitable for a particular model. Today there is a huge number various types batteries for such a device. The easiest way is to repair this part yourself.

Figure 1. The sum of all batteries will give the final voltage at the battery contacts.
Items that will be needed to repair screwdriver batteries:
- multimeter;
- soldering iron;
- flux;
- tin;
- copper wires.
It is worth knowing that, regardless of the brand of the tool and the country of manufacture, rechargeable batteries have the same structure. The assembled battery pack is shown in Fig. 1. From the physics course we know that elements that are connected in series add up their potentials. The sum of all batteries will give the final voltage at the battery contacts.
Banks in most cases have standard sizes and voltage, they differ only in capacitance. This indicator is measured in A/h and is indicated on the part itself. Visually this can be seen in Fig. 2.
To assemble rechargeable batteries for screwdrivers, the following types of elements are used:
- nickel-cadmium, the nominal voltage of which is 1.2 V;
- nickel-metal hydride, the voltage of which is 1.2 V;
- lithium-ion with a voltage of 3.6 V.
In most cases, they are installed nickel-cadmium elements, since they have a low cost. Their disadvantage is that they have a short service life. Can last longer lithium batteries. Their disadvantage is that lithium decomposes over time, and therefore they can become unusable prematurely.
How to diagnose faults?

Figure 2. Design of a battery bank for a screwdriver.
Before you start repair work, you will need to perform high-quality diagnostics of the instrument. Not in all cases it is possible to immediately determine the breakdown. Majority modern models batteries consist of parts that are connected in series. They have a specific voltage rating.
The first thing you need to do is disassemble this part. However, before disassembling it, the battery must be fully charged. Next, each element should be measured using a multimeter. On this device You need to set the nominal voltage of the battery, and then take measurements. It's very easy to do. Each element should have approximately the same performance.
Then you need to collect the battery and work with it until it completely loses power. After this, the device should be disassembled again and the voltage measured on each of the cans. If any of them shows a value 2 times lower than the nominal value, then this bank is unsuitable for use. There may be several such elements, so all parts should be replaced. It is not recommended to postpone this procedure.
What nuances should be taken into account?

If the screwdriver operates on a voltage of 12 V, then diagnostics can be performed using another method. You will need to disassemble the battery into its component elements, but they must remain attached to each other. The chain is sequential, so it will be possible to connect a light bulb to the ends of the battery. The voltage should be 12 V. The use of car light bulbs is allowed. After this, it will be necessary to measure the voltage drops on each part. The one at which this indicator is maximum is faulty.
It is worth noting that there may be other malfunctions. For example, contact may be lost in places where parts are fastened. The reason is poor soldering. In this case, you will need to reattach the wire that came loose. The thermistor may also be faulty. This part can be checked using the same multimeter.
How to repair batteries?
Many people want to know whether it is possible to repair batteries for screwdrivers?
If out of order lithium battery, then it should be noted that it does not have a memory effect. Therefore, they are very difficult to repair. Often the problem is that the lithium in the batteries has decomposed. This cannot be eliminated. However, the problem may also lie in the control circuit.

In order to perform the test, you can use a similar circuit, which is removed from the same device. If the device functions normally, then the problem is a malfunction of one or more batteries. If the part rating is 3.6 V, then you will need to apply 4 V to it at a current of 200 mA. If the battery is charged to the nominal value, then it is suitable for use. If it cannot be fully charged, then it will need to be removed from the chain. In this case, it will not be possible to restore the element, so you need to replace it.
If the screwdriver has nickel-cadmium batteries, the device can be repaired. It is worth noting that such batteries are most often installed on household appliances. The faulty part is subject to a compression effect. If it contains electrolyte, this will help solve the problem. If not, then another method should be used. You will need to charge the battery with a powerful charge. To do this, apply a voltage to the element that greatly exceeds the rated voltage. Then you will need to increase the current.
If these methods do not help, then the battery will need to be replaced. The problem is the electrolyte boiling away. If this happens, then individual elements of the tool will need to be replaced.
How to repair and replace batteries?
First, you should buy several cans or disassemble another battery that contains working cans. Batteries today are sold in many specialized stores, so you can try to find the right model.

A soldering iron is needed to repair the screwdriver battery.
To work, you will need to prepare a soldering iron. IN in this case will do household appliance low power. In order to perform soldering, you should prepare flux and tin.
The replacement process is quite simple. You will need to remove the faulty part and attach a new one in its place. If you have at least minimal experience in this matter, then the replacement work will take no more than 2-3 minutes.
During the soldering process, you must work as quickly as possible, otherwise all the parts that are planned to be replaced will overheat, which often leads to their failure. In the process of fastening elements, it is important to use original plates or perform soldering using copper wires. Soldering must be done efficiently, otherwise there may be poor contact. This is not recommended, as the bonding areas will overheat. This may negatively affect the functioning rechargeable battery screwdriver.
In the process of fastening parts, it is important not to confuse plus with minus.
All battery components must be connected in series: the plus of the previous can must be connected to the minus of the next one.
This should definitely be taken into account.
When all the parts are installed, you will need to equalize the potentials of each battery. To do this, you need to perform a charge/discharge cycle on the battery. During this, potential equalization will occur on all parts, and this is a prerequisite for proper functioning devices of this type.
When talking about how to restore a screwdriver battery, you should know that not all types of batteries can be replaced. Everything will depend on what kind of battery is installed in the existing screwdriver.
A screwdriver is one of hand tools, which should be in the arsenal of every master. If treated properly, it can last for many years. But when repairs are “underway,” anything can happen, and if it falls from even a small height, it or its battery can get damaged and stop working. This is what happened to the instrument that was brought to me for repair. When dropped, the screwdriver's battery failed (found out by repositioning the worker). This problem can be solved on your own without spending money on a new tool!
Repair
The battery compartment cover was secured with four screws. Having unscrewed them, I saw that the jumpers (plates) between the batteries were simply torn.

The jumpers to the batteries are usually spot welded. Since I don’t have such welding, I always solder the jumpers using a soldering iron with regular solder.
For the repair I needed:
- soldering iron;
- sandpaper;
- flux;
- solder.
When replacing or repairing torn cans, I first clean the soldering areas sandpaper. In order for the tinning to be of high quality, it needs to be cleaned as thoroughly as possible; the quality of the soldering itself will depend on this, which, in turn, will also affect throughput current passing through it.


Instead of flux, you can also use rosin (in this case it is not very convenient), soldering acid (some destroy soldering over time, toxic fumes), an aspirin tablet (strong smell when melting). I do not recommend using the last two methods at home.

Finally, observing the polarity, I solder the torn batteries back into place and assemble the battery.

It seems that nothing is easier than picking up a soldering iron and using simple manipulations to solder the batteries into place, but not everything is so simple when soldering nickel-cadmium (Ni-Cad), nickel-metal hydride (Ni-MH) and similar batteries; there are some nuances. Failure to comply with the subtleties can lead to both the unusability of the battery (a sharp drop in capacity) and its charger.
If you decide to repair a failed battery yourself, be sure to pay attention to the following points!
The batteries are connected in series, that is, the minus battery to the plus of the next one, etc.

On batteries, polarity is sometimes not indicated; in such cases, it is advisable to find out with a multimeter (usually the convex and smaller diameter plus end).

If there is no device, then you need to look at how the other cans are connected to each other and solder them in the same sequence.

Ni-Cad, Ni-MH and similar batteries are very sensitive to high temperature, so contact of the soldering iron with the battery should be minimized! In this case, it is better to take the soldering iron itself more powerful (60 watts or more), so that with a short touch it will have time to heat and solder the soldering area, but without having time to heat up the battery body itself.
At home, it is better to use flux or rosin for tinning and soldering.