How to peel a tile from a wall without breaking it. How to easily remove old tiles from bathroom walls. How to tear off floor tiles without breaking them
Situations in which it becomes necessary to carefully dismantle old tiles are completely different. Sometimes you just need to remove a few pieces, for example, if you are going to install a faucet directly from the wall. Then these tiles need to be inserted into place.
Sometimes, during total renovation work, you need to dismantle the entire wall, and then use these tiles somewhere else, for example, in the country house. Why should good things go to waste?
Sometimes, of course, it happens that there is no need to keep the tiles safe and sound. In this case, we only need:
- perforator;
- an uncontrollable desire to destroy.
As we understand, this method of dismantling does not provide for further use of the tiles. And the surface of the wall itself can be seriously damaged. Of course, this is not critical if in the future you are going to install new tiles, but you do not need the old one.
But if you still need the old tile, then you will not need any special knowledge/skills/skills to remove it without spoiling it. Of course, it will not be possible to remove absolutely all the tiles intact - approximately 20% will be destroyed during work.
And one more important nuance that you, dear reader, should know: the better the quality of the tiles, the more difficult the process of removing them will be. The same goes for her age. The older it is, the higher the risk that it will burst.

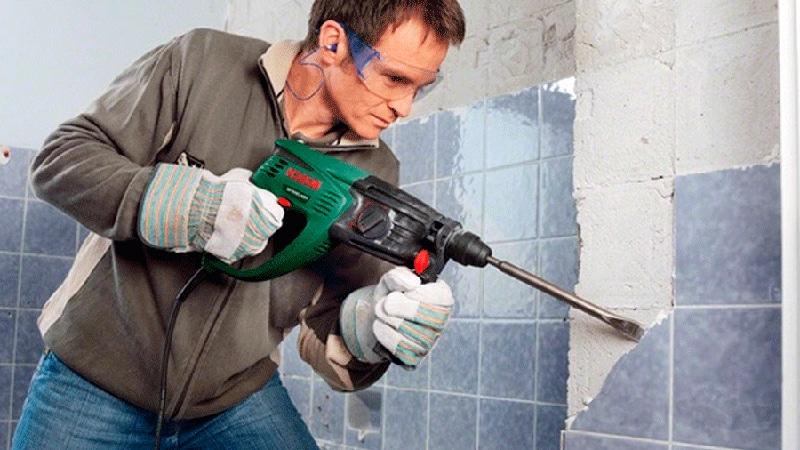
And yes, you will only need a hammer drill if you decide that you don’t need the old tiles. This tool does not imply careful handling of tiles. Even if the tile does not crack during the “painful” separation from the wall, it may crack when it lands. So, if you intend to carry out the work carefully, then it is better not to touch the hammer yet.
It will be needed when we remove the remnants of the mortar that held this tile in place. In the meantime, let's look at dismantling methods. To begin with - the simplest and most primitive - using a hammer and chisel.
Let's start dismantling the tiles
First, we break one of the top (!) plates with a hammer. Why the top one? It's simple. moving from top to bottom you will have the opportunity to protect yourself from unforeseen situations. But anything can happen. Sometimes not one, not two, but five or more tiles can fall off with one hit. If you go from bottom to top, then this entire layer can collapse on you, and this is already fraught with injury (sometimes quite serious). Therefore, it is very important to follow safety rules when working, although I assume you already know this very well.
Now we proceed to further careful dismantling. We need to drive the chisel between the tile and the wall, and then carefully hit this chisel with a hammer. If the tile after a strong blow has not moved one iota, then, most likely, you will have to say goodbye to it, since it is unlikely that you (or anyone else) will be able to dismantle it in its original form. No, well, you can, of course, try to pry it from some other side - why not try. If it doesn’t work out, then it’s not destiny. You read in the previous section that the entire tile will not “survive” this procedure.
When I had to do this kind of work, I was faced with the task of preserving the maximum amount of tiles, since the owner of the house was going to use it in the future to decorate the veranda. So, in the process of work, I learned to distinguish the tile that can be separated from the wall from the one that is tightly “clung” to the surface, and there is no other way to dismantle it except to break it. There are a great many factors at play here, which there is no need to list now: you yourself will understand what I was talking about when you get to work.
For example, if you find places where the tile itself lags behind the wall or is glued very weakly, then most likely you will be able to remove it without damaging it. Sometimes in this way you can separate five, seven or even ten (!) tiles from the wall. The main thing is that it does not fall from a height onto the floor, since a soft landing is not at all guaranteed.

Concluding this section, I would like to note one important nuance: if you are a professional use of a hammer drill and are 200% sure that you will not damage the tiles with it, then you can use it. It will not be as exhausting as, for example, using a chisel with a hammer.
And one more thing: pay attention to the video below. It discusses a method for removing tiles from the floor, which may also interest you and be useful to you:
I think we have sorted out the question of how to remove tiles with a hammer/chisel/perforator. Now let's look at another quite case: how to remove tiles from drywall.
Removing tiles from drywall
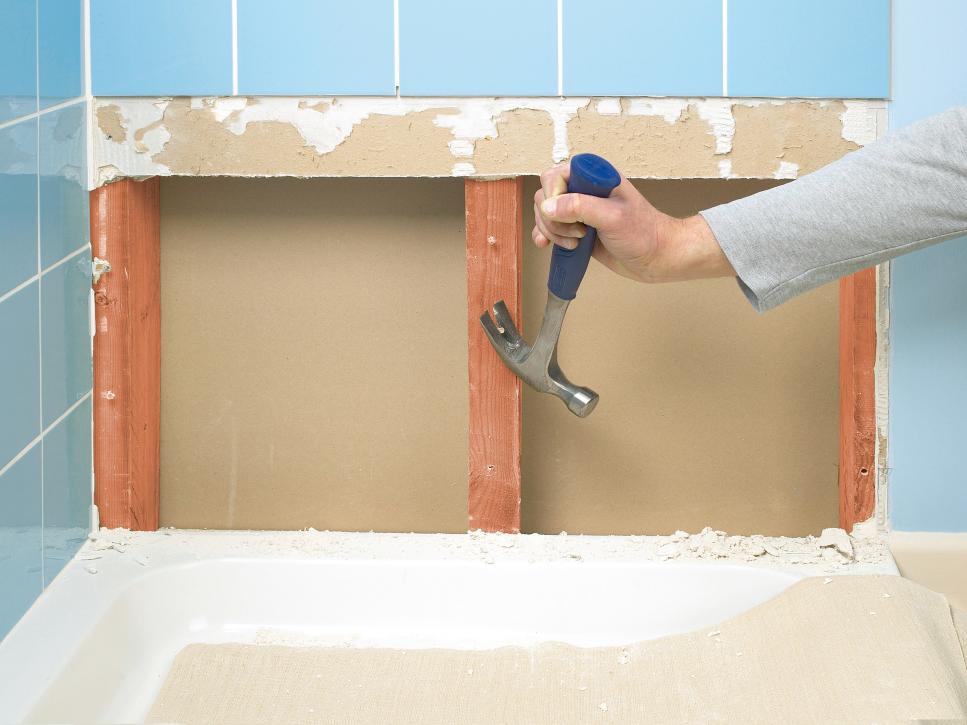
Let us note right away: the task is quite difficult. We need to not only preserve the tiles, but also gypsum boards (plasterboard sheets), right? And this is quite difficult. This is because the glue adheres very firmly to the surface of the sheet, so tearing off the tile becomes very, very difficult. If you need to remove one or two or three tiles, the task is not so difficult, because after dismantling the tiles, you can cut out the damaged fragment of the gypsum board, and then “cut down” a new fragment. By the way, on our website there is a separate article about DIY repairs, which will be very useful to read in this situation. The process of repairing a plasterboard ceiling is almost the same as how you should repair walls. So what if the action takes place on different planes? - the material is the same.
But what if you need to remove tiles from an entire wall? Here the task becomes much more complicated. In this case, we have to hope for luck and the fact that the tiles were not laid very well.
We have to proceed in the same way as in the previous section: using a chisel and a hammer, we peel off the tile covering from the surface, while trying not to damage the gypsum board. But be prepared for the fact that damage to the walls will still be caused, so in the future we will not be able to do without a primer. The only question is how strong this damage will be.
You can try to go another way: we will need a so-called diamond cup for the grinder and, in fact, the grinder itself. These “cups” come with or without threads, and you will certainly find such an “exhibit” in the “Tools” section of construction supermarkets. But working with a hammer drill here would not be the best idea. Still, gypsum board, despite its relative strength, will not withstand tool impacts. So you will have to rely on jewelry work with a chisel.
Tile products are a classic finishing material for a shower room. Ceramic tiles have high performance characteristics. It is durable, reliable, has good strength, and is also environmentally friendly and fireproof. In addition, the tile is not afraid of high humidity, dirt, dust, and also has a presentable appearance. Of course, like any other material, it has its weaknesses.
For example, after a certain time, ceramics wear out or various damage to its surface occurs. How to remove tiles from a wall? Replacing tiles is a matter of time and effort! However, in order to install it correctly in the bathroom, it is necessary to dismantle the old surface, and do this without damaging the base or adjacent finish of the same wall. In any case, the issue of replacing tiles is relevant.
Assessment of the quality of old coating
Before dismantling the previous layer, you should familiarize yourself with the principle by which it is laid. If the installation of ceramics was carried out using glue, then cleaning from the adhesive will not be laborious. In principle, an ordinary hammer and chisel are suitable for this. In addition, if you really want to, you can save the old tiles, however, to do this you will need to act much more carefully.

If in the bathroom the old tiles were installed on cement mortar, which has much better characteristics than glue, then its removal will require much more effort. Dismantling ceramic products will require special equipment, as well as some skill. To remove the previous surface, you will need a hammer drill, and the overall process will take a lot of time, and it will not be possible to save the old tiles.
Preparatory stage
Removing outdated ceramics from a wall or ceiling always results in the formation of dirt, dust, and construction debris. In order to avoid, or rather, reduce the damage caused by the negative consequences of repair work, it is best to cover the surrounding area with plastic film. Plumbing fixtures should be wrapped in soft cloth, and old rags should also be hung on other fragile items to soften the fall of tile fragments.

Need to know! At this stage, work should be carried out in special clothing with long sleeves, as well as safety glasses and a respirator.
Dismantling one or more products
There are situations when old tiles are only partially damaged, i.e. one or more ceramic products require replacement. In this case, there is no point in starting full-scale work. It is enough to replace the tiles with a new tiled element or its equivalent in the bathroom. First of all, this is due to the fact that dismantling work will require an unreasonably large amount of effort or time.

Thus, the stages of work:

It is important to know! To remove tile fragments, you need to attach the cutter to a drill and cut the ceramic product diagonally. Then finish the whole job with a chisel and hammer.
How to save tiles?
How to remove tiles from a wall and save them? In order to preserve the tiles you need to try a little. You will have to carefully remove the cement mortar yourself. In addition, you need to understand that a lot of effort will be wasted, since this is a rather simple and time-consuming procedure. However, it will allow you to keep many ceramic products safe and sound. Steps:
- Use a spray bottle, a regular cloth or sponge along with warm water to wet the grout joints.
- Removal and processing always starts from the top row.
- Carefully remove the tile seams using an ordinary spatula.
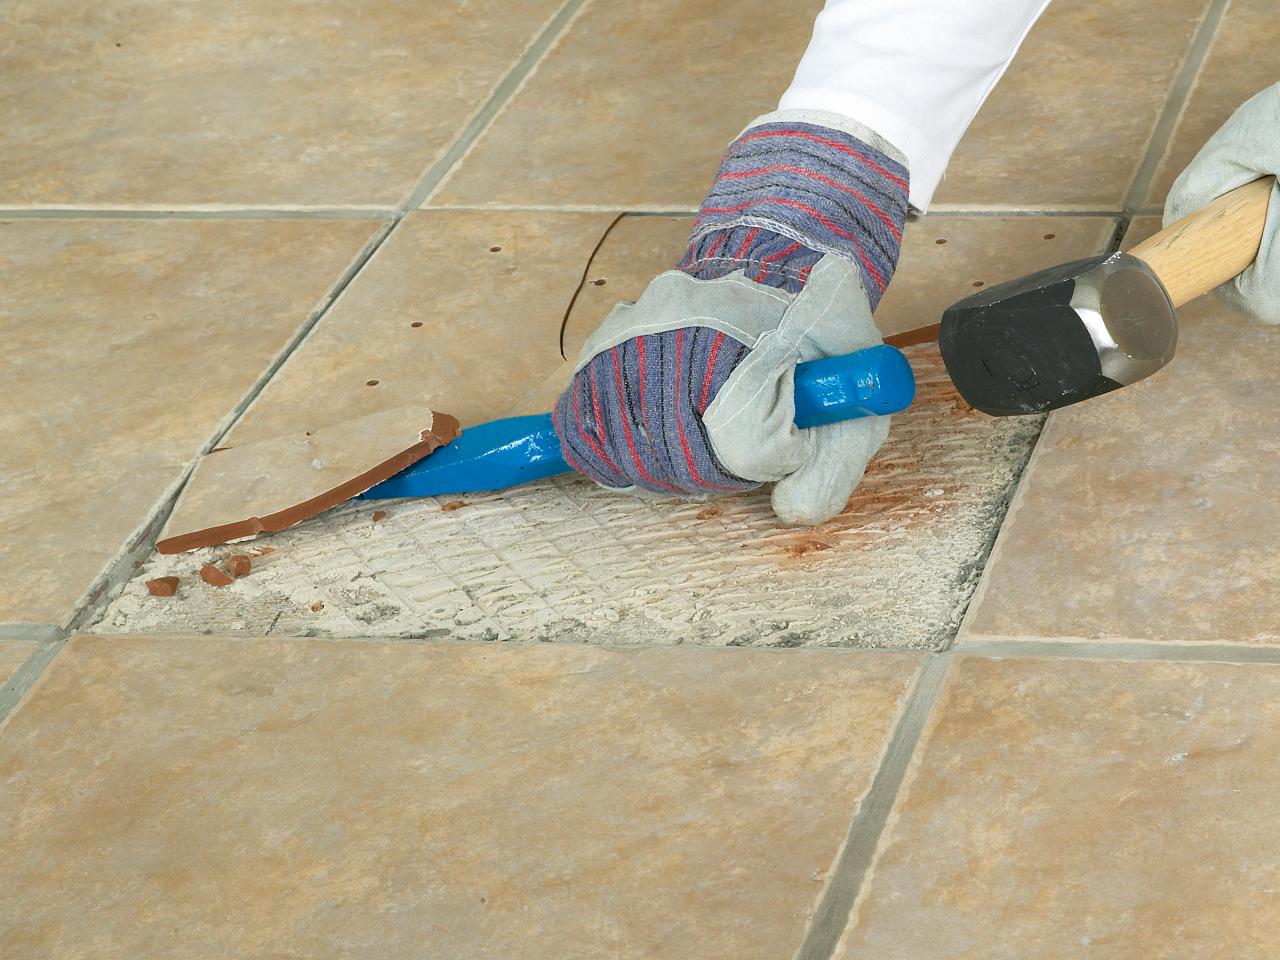
- We insert the chisel end-to-end between the top and bottom tiles and pry up the edge of the tile.
- We separate the ceramics from the surface; if difficulties arise, you need to lightly tap the tool with a hammer.
- Next, the adhesive or cement mortar is removed. In this case, special compounds are used or you can use a regular scraper.
Dismantling without saving
In order to remove ceramic tiles in the bathroom without saving them, strong arguments are needed. It is often more important to dismantle the waffle than to take care of its integrity. The use of specialized tools in the form of a hammer drill will greatly facilitate this task, while significantly reducing time. To work manually, you will need a hammer and chisel, however, this is a rather labor-intensive process.


Video instruction
Ceramic tiles are so strong and durable that they can be used several times: if you get tired of them in the house, careful owners lay them in the garage or in the country house. The problem is keeping the fragile facing material intact during dismantling. If you try, you can carefully remove the tiles from the walls and floors without damaging them, but still no one can guarantee that everything will go like clockwork. However, even split material can be given a second life if you show your imagination.
Features of dismantling tiles with different bases
Poor installation with many cavities gives hope for more intact tilesDuring operation, some of the elements will crack in any case, and whole tiles may not remain at all. Sometimes it’s easier to quickly knock down the cladding with a hammer drill and collect the fragments without wasting time and effort on careful dismantling. The ability to preserve tiles during removal depends on many factors, which can be assessed by visual inspection or tapping the wall and floor:
- If the tile was laid just a few days ago, it will undoubtedly be easier to remove than tiling that was ten years old.
- The better the quality of the craftsman’s work, the more difficult it is to dismantle the material, and the greater the percentage of losses. The presence of voids and a cheap adhesive make solving the problem easier.
- The base material affects the accuracy of dismantling.
- The glue is absorbed more strongly into the porous back surface of the finish and is fixed more firmly.
- Waterproof grout is stronger than regular grout and additionally holds the finish together into a single piece.
If the cladding remains from the previous owners, then you can assess its condition by tapping it lightly with a rubber hammer or other tool. A dull sound will be in areas with a dense, continuous fit, and a ringing sound will be in the presence of voids.
Removing the finish from drywall is doubly difficult, because you need to preserve not only the tiles, but also the base. The adhesive composition adheres perfectly to the gypsum board and eats into it very firmly. If you only need to remove a few tiles, then the damaged section of drywall can be cut out and a new one inserted in its place.
Plaster absorbs glue, primer and moisture into the porous structure, so in the bathroom the tiles can simply move away from the base due to constant crumbling of the material and exposure to dampness.
Brick wall and concrete floor have less adhesion, so the percentage of tiles that can be reused will be higher. In case of careless recent installation, up to 80% of the material can be saved. If the finishing was carried out by experienced repairmen who used a cement-sand mixture, almost the entire tile will crack.
Safety rules for dismantling
 When dismantling tiles, you need to wear clothes made of thick, coarse fabric with long sleeves.
 When a fragile tile hits the floor, it shatters into many large, heavy pieces and small fragments that can fall on an arm or leg, scratch the skin, or get on the face or eyes.
You need to take care of personal protective equipment in advance. These include:
- special clothing;
- closed shoes;
- thick gloves;
- safety glasses for construction work;
- headdress.
When knocking down tiles, a cloud of dust rises, which can lead to particles entering the respiratory system, so a respirator should be used for protection. You need to start work from the top of the wall, continuing down, then there will be less risk of several heavy pieces collapsing. It is better to close the door tightly, preventing dust from entering neighboring rooms, and open the window to provide ventilation and make breathing easier. The equipment must be taken out, and work with caution near communications and wiring.
How to remove tiles from the wall and floor
If, as a result of inspection and tapping, it turns out that the tile is firmly seated, and it will not be possible to remove it without damage, you should use the fastest and most popular dismantling method, which allows you to free up the walls and floor for fresh cladding, but splits the entire tile into pieces. This method is very noisy, and repairs must be carried out during the daytime, warning neighbors.
Fast way
 A hammer drill with pick and spade attachments removes tiles faster
 For work you will need the following tools and materials:
- perforator with a breaker blade;
- chisel and hammer;
- old burlap, thick plastic film, cardboard or plywood.
Sequencing:
- If you need to clean a wall, it is better to cover the floor with thick plastic film, cloth or cardboard to avoid scratches and dents. You also need to close the door, open the window, and cover the plumbing items with old blankets.
- Using a hammer drill, knock down the tiles, starting from the top row from the window or door openings and moving to the side to reduce the risk of damage. On the floor, you should start from the threshold or the junction with the wall.
- If individual elements cannot be removed with a hammer drill, you can place a chisel with a sharp edge at the junction of the tile with the base and hit the handle with a hammer.
- Carefully collect large fragments and vacuum to completely remove small ones.
Instead of a hammer drill, you can only use a chisel and a hammer. This is a more labor-intensive method, but less noisy and aggressive.
How to remove tiles without damaging them
 When removing adhesive with a knife, the risk of damaging the tiles is minimal.
 The principles and algorithm for working with different base materials on the floor and on the walls are similar. If, for example, the drywall was plastered and puttied before finishing, then it is easier to remove the tile without damage, because the plaster layer is weaker than the tile adhesive, and the rough base will remain smooth. Otherwise, when dismantling the tiles, the front cardboard layer will be torn off and many elements will burst.
Affects fastening strength and temperature rise. Near radiators and heated towel rails, the connection to the base will be more reliable. Cement, as an adhesive, eats into the base more strongly; as a result of the work, both the tiles and the gypsum board sheets will be damaged. Special ready-made mixtures will allow you to remove the cladding carefully.
To work you will need:
- a chisel or spatula that will not break when struck with a hammer;
- hammer and hacksaw;
- Bulgarian;
- water, sponge or spray bottle;
- masking tape.
Dismantling process:
- Wet the grout on the tile joints with water from a spray bottle or using a sponge to soften it a little. Let it stand.
- Using a knife or sharpened nail, clean the joints from grout and glue and wet them again.
- Pry the tiles with a spatula and, tapping it with a hammer, separate the tiles from the wall or floor.
- Soak the tiles in water for several hours, then use an angle grinder with a grinding wheel or a metal brush.
- Clean the plasterboard base from glue residues using a grinder with a grinding wheel attachment.
 If you do not plan to leave the drywall, the tiles can be removed along with it
 - Determine the area for cutting, for example, four tiles located between the guides of the metal frame under the gypsum board. To prevent mechanical damage, the edges of adjacent elements are sealed with masking tape.
- Wet the seams and go over them with a construction knife or spatula. You can buy a special tool to remove grout.
- Carefully insert a hacksaw into the seam between the tiles and cut out the piece along with the drywall. The teeth of the cutting blade should be smaller than the width of the joint.
- Carefully pull the finishing area out, and then separate the facing elements from the base by soaking them in water for several hours or cutting them off with a grinder.
The slabs on the floor must be removed as follows:
- Soak the tiles with a water-salt solution and leave for several hours. You can also use a ready-made acid cement remover. Tile adhesive will become more pliable and flexible.
- Place a spatula or chisel under the edge of the covering and slowly separate the covering element from the floor. In this case, the first tile may split, which will not affect the integrity of the rest of the material.
- Place a hammer drill with an attachment in the form of a wide spatula under the edge of the tile and, using pressure at an angle of 45º, make shallow notches in the middle and along the edges.
- Remove a single element and repeat the procedure for the entire tile.
Craftsmen often use homemade metal hooks, which can be made from two flat-head screwdrivers. The tool must be inserted under the tile into pre-soaked cement or glue and the element must be separated using pulling movements.
Features of dismantling 1–2 tiles
 To remove 1-2 tiles, it is better to use a spatula or chisel with a hammer, rather than a hammer drill.
 In a situation where one or two tiles are split, cracked and require replacement, or there is a problem in the communications behind the wall, and the owners forgot to make a door or hatch to access the pipes, you can dismantle part of the finish without damaging the adjacent elements.
For gentle removal you will need:
- a container with warm water and a sponge;
- durable spatula or hooks made of hardened wire;
- grinder for sawing seams;
- masking tape, construction knife.
Stages of work:
- Seal the edges of adjacent tiles in several layers with masking tape to avoid damage.
- Soak the tile joints with soapy water and allow the material to absorb moisture.
- Use a construction knife to clean the seams, and in the case of cement grout, saw through them, holding the grinder at an angle of 45º to the tile.
- Wet the adhesive under the cladding with a sponge, wait a while and, using hooks or a spatula, carefully remove the tile, holding it with your hand. To prevent falling, it is necessary to knock down the tiles little by little from all sides.
If the tile is already cracked or split, you can replace it by choosing in the store a similar shade and texture or, on the contrary, a contrasting bright tile with a pattern, using it as an element of wall or floor decor. In order not to risk the beautiful cladding in the future, it is better to build a small hidden door for free access to communications in the event of their failure. It can be finished with the same tiles as the main wall.
How to use old tiles
 Decorating the bottom of the pool with old ceramic tiles
 There is no need to throw away whole or broken ceramic tiles. You can create extraordinary beauty from it with your own hands, with a little imagination. Any non-professional master can do this. Materials and tools are inexpensive, and the basis for creativity is already available.
Variegated and multi-colored tiles make a beautiful mosaic. It can be laid out from fragments of arbitrary shape and size or sawn into identical squares or elements of any geometry.
 From fragments of tiles you can lay out a beautiful mosaic on the wall
 Floor tiles can be used to create a mosaic floor, combining neutral shades and elements with bright colors and patterns.
 From floor tiles you can make a mosaic floor in a boho style
 From boring picture and photo frames, coasters and flower pots, in combination with tiles, you can create fabulously bright design objects.
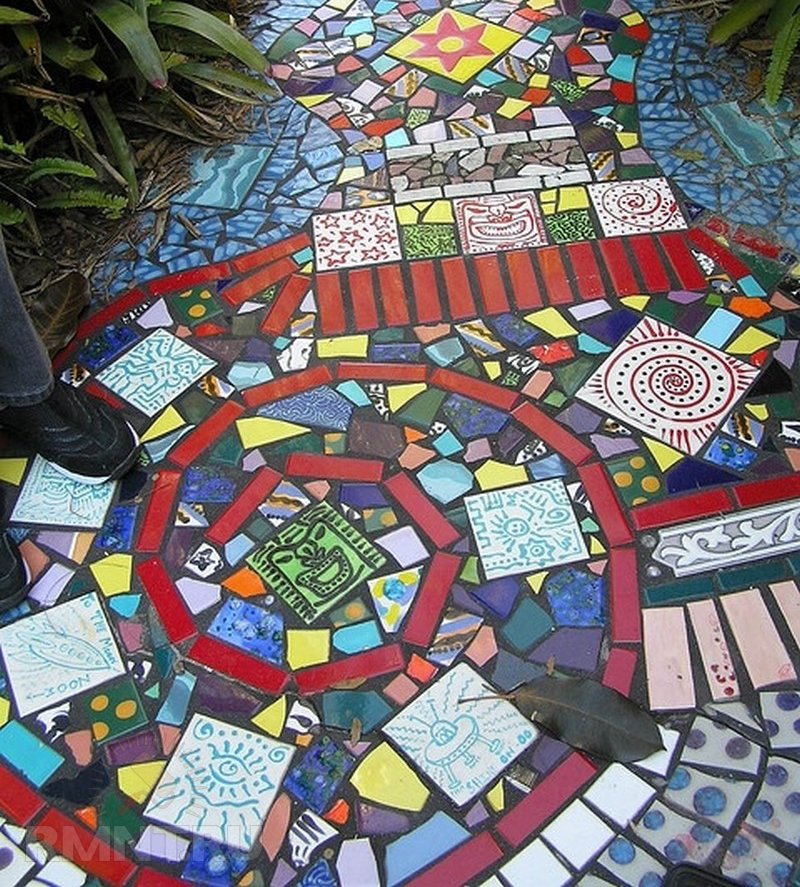 Floor tiles will look great on a garden path, protecting against dirt in wet weather
 Video: How to remove tiles without breaking them and put them back
Even if during dismantling it was not possible to keep the ceramic tiles intact, do not be upset, because there are many interesting ideas for decorating a modern interior. Designers enjoy using mosaics, creating masterpieces of amazing beauty and originality that can either stand out in the interior, standing out as a bright accent in the neutral palette of other elements, or complement a harmonious ensemble, joining the overall style and palette.
Sometimes it is necessary to carefully remove old tiles from the walls in the bathroom, for example, if they may be useful for tiling another room in the future or if you want to leave them for the renovation of individual products. In addition, careful dismantling reduces the likelihood of defects appearing on the vertical structure. As a result, repairs can be made in a shorter period of time, since you will not have to expend effort on restoring the rough surfaces of load-bearing walls.
Before starting work, you will need to complete the following preparations:
- Purchase gloves, closed clothing, and a hat. This is necessary to avoid contact with fragments flying off during dismantling.
- Respiratory protection is the most important stage of preparation, since when performing work a lot of dust is released, often containing heavy fractions. For this reason, personal protective equipment such as a respirator or multi-layer gauze mask must be used.
- Special glasses. Even if you perform the work as carefully as possible, there is a high risk that small fragments will fly apart. As a result, the organs of vision may be damaged.
- If you need to remove old tiles in the bathroom, you should remember that dust appears in large quantities during the work. Contamination will spread to adjacent rooms, which means dismantling should be done with the doors tightly closed.
- It is advisable to work with an open window, if there is one in the bathroom.
Preparatory stage
Dismantling of tiles is carried out using various types of tools, these are:
- hammer;
- chisel;
- drill with drills;
- putty knife;
- scraper;
In addition, prepare sandpaper, a special solvent for the adhesive, a spray bottle and clean water. If you need to maintain the integrity of the tiles, it is recommended to remove the cladding using a simpler tool. Use a hammer, chisel, chisel.

If there is no need to preserve the decorative coating, use a hammer drill, drill or grinder. If the tile is fixed too firmly, you will also have to beat it off using a power tool. Before proceeding with dismantling, it is necessary to cover the plumbing fixtures with dense material. This measure will protect the faucets, bathtub, washbasin, and toilet from possible damage.

The floor covering should also be covered. Thick polyethylene, fabric or cardboard is used. This will not only protect the surface of the tiles laid on the floor, but will also simplify the cleaning process after finishing the work. Simply collect the film and shake it out. The entrance to the room is covered with a thick cloth, it is advisable to moisten it: this way it will better collect dust.
Selecting the removal method
The degree of complexity of the process of dismantling finishing material is determined by a number of factors, including:
- glue composition;
- type of decorative coating: the more porous the tile was used, the more difficult it is to remove it, because when laying, the mixture penetrates into the structure of the material and adhesion increases.
You can easily and quickly remove the cladding with a smooth back surface. The structure of this material is finely porous. In this case, the adhesion of the decorative layer to the glue will not be strong enough and the tile can be quickly removed. It is difficult to dismantle the floor covering if it was laid on cement mortar in accordance with the technology: the temperature for preparing the mixture was maintained, the humidity level met the standards, and the composition did not change. Then the quality of the solution improves, it becomes stronger.
How to remove tiles without damaging them
It is possible to dismantle the finishing material without damage only if a mechanical tool is used. Use a scraper or scraper. These tools are used to clean seam joints. You should start working from the outermost row. To carefully remove tiles, you need to install a chisel and hit it using a hammer. Such actions are repeated at different points along the perimeter of the tile. Then pry the tile with a spatula and remove it, holding it.
Using a hammer and chisel
Dismantling of tiles that were laid with glue is done using a simple tool mechanically. This method is suitable for cases where finishing was done on top of a rough base of concrete and brick. In addition to the chisel and hammer, a small scraper may be required. It will be used to remove grout between the seams.

Prepare a container with warm water, as well as a sponge. The chisel is used in two versions: with narrow and wide blades. Instructions for dismantling tiles:
- Wet the coating generously with water and leave to soak for a while.
- Remove the grout using a scraper and sponge. If the seam joints cannot be cleaned the first time, they are re-wetted.
- To remove cement-based grout, use a grinder. Select a cutting edge of small diameter and cut the joint along the side of the tile. The depth of the groove must exceed the thickness of the decorative finishing material.
- To knock down the cladding without chipping, protect the edges of each product with masking tape (2-3 layers).
- Removal of tiles fixed with glue is done by generous wetting.
- Then place the chisel between the vertical surface and the finishing material and hit the tool several times with a hammer. The manipulations are repeated in different areas until the tile comes off.
Hammer
To remove tiles in the bathroom, you should prepare not only the power tool itself, but also a special attachment - in the form of a spatula. The principle of dismantling the cladding is the same as in the previously discussed case with a chisel. Only the speed of work will be much higher. The disadvantage of this method is the increased noise level, large amounts of dust, heavy fractions that are released into the air.

In addition, it will not be possible to carefully remove the tiles in the bathroom using a hammer drill. Power tools have a destructive effect on decorative coatings (tiles, ceramics). For this reason, this method should be chosen only in cases where it is not planned to preserve the cladding. It is necessary to control the level of pressure on the tool, because there is a high probability of destruction of not only the finishing material, but also the upper layers of the rough base.
Using metal hooks
To remove tiles from the wall, you should prepare metal wire or old screwdrivers. The tool must be rigid enough so that it does not deform under the influence of the applied load. First you need to soak the grout. The material is removed from the seam joints using a scraper and sponge.
It is important to completely clean the space between the tiles.
At the last stage, the tool is placed under the tile on both sides and force is applied to lift it.
Dismantling nuances
When performing work, you should follow the instructions. However, there are a number of subtleties that will allow you to avoid mistakes in the process of dismantling tiles in the bathroom.
Off the wall
In this case, work should begin from the top row of cladding. If the surface is only partially covered with tiles, this simplifies the dismantling process. To remove old tiles from the wall in the bathroom, simply place a chisel under the tile in the outermost row of the covering. When dismantling the finishing from the upper areas, you must remember to hold the tiles. This means that the work must be done with an assistant: one person removes the cladding, the second keeps the material from falling. This will keep the tile intact.

From the floor
To tile the bathroom, you should first assess the proximity of the communications, for example, if the room has a heated floor or the pipes are sewn into the rough base. Building regulations are not always followed, so when carrying out work it may be that the water supply cable/wiring is located closer than necessary.
This factor should be taken into account if you plan to perform dismantling using power tools (grinder, drill, hammer drill). In this case, you can remove the old tiles from the floor only after checking the rough base.

If the walls are made of plasterboard
The adhesion of this material and the adhesive composition is so high that it is extremely difficult to remove the coating layer from the surface of a gypsum fiber board structure. Despite this, it is still possible to remove tiles if the following details are followed:
- It is necessary to remove one product from the top row using a chisel and hammer. Then, using a spatula, you need to remove the remaining tiles.
- Suture joints are pre-soaked with a special solution.
- Do not apply intense pressure to the surface of the GVL.
Sometimes the drywall becomes partially warped during the tile removal process. The top layers of material can be removed. Correct the situation using a putty mixture. In some cases, a section of the partition is replaced.
Replacing multiple items
Instructions for performing the work:
- Clean the seam joints of the tile covering. To do this, use a drill (point holes around the perimeter) and a scraper. The scope of work is determined by the number of tiles that need to be dismantled. Sometimes you need to remove one or two adjacent tiles.
- Pry the edges of the product with a chisel and hammer it several times.
In cases where there is no need to preserve the tiles, they are broken with a hammer drill.
You can easily find videos on how to remove tiles from walls or floors on Youtube. And in addition 1000 and 1 advice on this matter. But in practice, the repairman will not guarantee that he can do it quickly, easily and without damaging the wall or material.
This is no accident. The process is labor-intensive and intricate, although the tools used for this are “heavy artillery.” Today we are talking about dismantling tiles.
How to remove old tiles
Repairs to the apartment will definitely be needed over time. But you can’t always limit yourself to replacing wallpaper. Some work requires a more painstaking, labor-intensive approach. A serious investment of time and effort. One such difficult task is removing ceramic tiles. This finishing material is very durable and strong. They put it “forever”, so it’s difficult to dismantle it.
First, let's understand the concepts. Tile and ceramics in relation to facing coatings are one and the same. Synonyms.
Let's consider the important question of where to start dismantling old tiles.
All stages of work are accompanied by the appearance of dirt, dust, and fragments. This is dangerous for the eyes and respiratory tract. Therefore, we start by protecting ourselves and the premises. Especially in the bathroom, because plumbing fixtures can be quite fragile. And it is not always carried out during repairs.
Let's prepare protective equipment
clothes and shoes:
- protective overalls;
- boots with a hard toe that cover the foot well;
- gloves;
- headdress;
special safety glasses;
breathing mask or respirator.
Preparing the room
We create a barrier for dirt and fine dust - we curtain the walls and doorways with polyethylene;
When removed from the walls or ceiling, fragments will inevitably fall, therefore:
- lay oilcloth or thick, durable film on the floor;
- we protect all easily breakable surfaces and objects with soft materials or pads;
- carefully wrap the pipes in polyethylene and secure them with twine.
Taking into account the basis
This is an important stage. You need to understand what surface the ceramics were mounted on. Only then can you determine how to remove the tiles correctly.
Options:
concrete and brick - a gentle and aggressive method of removing tiles is possible, everything will depend on the purpose;
drywall is a separate story; we’ll pay special attention to it below.
Determining the adhesion solution
cement-sand mixture, sometimes in combination with plasticizers - it is unlikely that it will be possible to remove everything without damage. Most likely, even professionals will not be able to maintain integrity;
adhesive composition for installing ceramics - there is a chance to remove the tile without breaking it.
Let's clarify
pipe location;
communications;
electrical wiring.
It is extremely important to exercise extreme caution in these areas. If possible, you need to disconnect all hidden electrical wiring. If not, then it is advisable to dismantle ceramic tiles using special metal brackets. It is better to exclude power tools.
Dismantling method
Depends on the goal:
aggressive, rude, if the main thing for you is how to quickly remove the tiles, nothing else is important.
Tool selection
Will depend on all previous factors. Let's talk about it in relation to each case. But you need to know the composition of the complete set.
We may need:
for the preparatory stage:
- a spray bottle or container with warm water, soap or saline solution;
- sponge;
for removing adhesives and binders:
- Bulgarian;
- a metal spatula: the stronger the better, a flexible one will not work;
- scraper, sandpaper;
- construction knife with a set of blades;
to remove tiles:
- hammer drill;
- chisel or chisel;
- hammer;
- U-shaped metal hooks;
- masking tape;
- drill with 6 mm drill bit;
How to quickly remove tiles
In this case, we do not need to maintain the integrity of the finish.
Choose any suitable option from 2.
Mechanical method
If the cement layer is not very thick and the cleaning area is small, then:
Soften the grout. To make it easier to succumb, we moisten it with warm water or soap solution.
We use the tip of a spatula to pass between the ceramic plates. We clear the seams.
We place the chisel under the tile and hit the handle with a hammer, keep in mind that it must be special, impact-resistant.
Remove the cement mortar remaining after dismantling the tiles using a hammer.
If the previous method did not help, or the processing area is large, then it is easier to use a power tool.
Let's figure out how to remove tiles using a hammer drill.
We will need a flat blade-shaped attachment: a chisel, chisel, bat, drill or pick. For quick dismantling in this way, it is very important that the base from which we will remove it is strong: brick or concrete.
Stages
Remove the grout.
We remove the tile. Let's start from the edge:
- place the nozzle at an angle;
- we put it under the tiles;
- we pry up each tile and break off one at a time, moving along the horizontal rows from top to bottom.
We knock off the remaining cement from the surface in the same way.
How to quickly remove old tiles without damaging them
The old is not always bad and sometimes it really needs to be preserved. Tiles are no exception. But unfortunately, it won’t work quickly.
Let's talk about this in detail.
temporary dismantling;
replacement of one or more damaged areas;
you need to gain access to hidden wiring or communications.
In each of these cases, it is important to leave the adjacent tiles intact.
Careful dismantling requires a lot of effort and skill. If this is not the case, then exercise maximum patience and caution. The tiles will have to be removed mechanically, by hand. Slowly and carefully.
We will tell you in detail how to remove tiles without breaking them. But be prepared for the fact that losses are possible in any case. It is rarely possible to keep all the fragments intact. Sometimes the damage during dismantling reaches 50% of the total volume of the coating. Think carefully about whether it is worth the effort and time. After all, even in the best case, half the material will not be enough to finish the same area. In addition, you will have to choose a shade. Or inserts that match the style to fill the missing amount.
Classic method. Procedure
We find a weak point, usually this is the topmost tile on the right. Gently tap its surface. We find voids. We break off a piece using a chisel and a hammer. Use a cutter to divide the tiles diagonally. We remove the remains.
Tap the entire surface. We find voids and dismantle them. This way we will avoid an uncontrolled collapse.
We glue several layers of masking tape along the edges of each ceramic fragment of the coating. This is protection against damage. It will be possible to use it in the future.
Remove the grout. Carefully soak the seams with a sponge and warm water. We wait. We clear the seams with a spatula or screwdriver. Carefully, without damaging the edges. Let's start from the top row. The rest of the process depends on how carefully this step is completed. If you are confident in handling the tool and have experience, then you can go over the seams with a grinder.
Let's move on to the main thing: insert the chisel into the seam like a wedge between the top and next row. We pry off the top part of the covering. We feel for the correct angle, approximately 45°, and separate it. But it's not easy. If you don't succeed the first time, a hammer will help. We hit the chisel with it, gradually increasing the blow. At the same time, we separate the tiles from the wall. If only a piece breaks off, a cutter will help. We work with it the same way as described in paragraph 1.
Now you have seen for yourself that the question of how to remove tiles without damaging anything is not idle. Preserving the material and the surface underneath is difficult. But if everything was successful and the ceramic plates remained intact, you need to clean them of any remaining mortar and glue.
Let's use a scraper. We wet every detail of the finish well. It is better to soak for several hours in a warm soapy solution. If the tiles were mounted on cement, then salt would be better suited for these purposes. This composition “loosens” the cement and destroys its crystalline structure. Finish cleaning with a wire brush. You can also use special solutions. This will make the process easier.
Important
When the tiles start to pull away from the wall, be extra careful. Don't miss the moment when it's 2/3 beaten. You need to be especially careful so that the corners do not break off. Pry each part of the covering from different sides.
Remember that if the case is particularly stubborn, you won’t be able to cope without a hammer drill.
How to remove ceramic tiles from a wall
In this case, it matters what kind of wall it is, load-bearing or not. Or rather, what matters is what it is made of and how durable it is.
There is no need to tell you in detail how to remove tiles from a wall if it is brick or cement. The methods are still the same. The choice will depend on the purpose, time and what material you have at your disposal.
But, if we are talking about an interior partition or a decorative structure, then most likely it is made of gypsum board. This deserves special attention.
Particularly difficult cases include removing tiles from the center of a wall or in a corner. In order not to take risks, we act with precision. First, let's loosen the parts to be removed. To do this, we make several holes in the facing surface using a drill with a drill bit. This will weaken the adhesion of the mortar on which the trim was set. This technique allows you to disassemble the coating in parts. After removing the remaining tiles, the adhesive layer is removed. Dust is removed with a brush, and the surface is primed for further installation.
How to remove tiles from drywall
In 99% of cases, it will not be possible to remove the tiles without damaging the ceramics and the wall. There is only a chance if the surface is plastered before installation. And the installation was done a few days ago. Then it is possible to dismantle the tiles with minimal damage. But even in this case, luck should be on your side. There is no guarantee that drywall, and especially ceramics, will remain safe and sound. In any case, accuracy and patience will come in handy.
If the surface was immediately coated with the solution, then all that remains is to replace it entirely. The adhesive solution penetrates deeply into the drywall and adheres firmly to it.
But you still need to try. First we use the mechanical method. Sometimes it is possible to separate only the tiles. Although more often it flies off along with a piece of drywall.
If it doesn't work out, there is a 2nd option. Try to cut the tiles with a grinder.
We’ll explain how to remove tiles from drywall without damaging the surface and material right now.
We use the classic method
Remove the grout with a knife or spatula. It is important to clean the seams completely. If you have any difficulties, try slightly cutting them with a grinder at an angle of 45° to the center of the part of the coating being removed.
Make the cut depth 1–2 mm > the thickness of the ceramic to avoid damaging it during dismantling.
Soak the glue or cement mortar with warm soapy water. You can use a spray bottle or a sponge soaked in the solution.
First you can get rid of one tile in the top row. It will be more convenient to work this way. Let's pry it off with a chisel or chisel. We will carefully remove it.
We clean the remaining plaster with a scraper. Let's do it quickly.
We prime and putty the drywall. This will help hide minor damage: pits and glue residues. Once dry, you can start refinishing.
If the damage is serious, then a complete replacement of the partition will be required. But this is a fairly easy process, because the drywall is attached to profiles. Dismantling will not be difficult. In addition, this material is not expensive.
How to remove old tiles from the floor
Dismantling is basically carried out in the same way as we have already described above. All steps must be followed.
Peculiarities
As for the tool, you may need a disc for stone and ceramics. In the event that the finishing is made of natural stone.
You can start removal from any side.
It is extremely important what can be located below the floor level
Dismantling is most difficult if under the tile:
- heated floor system;
- water and sewer pipes are being laid out,
It can be impossible to determine how deep they are located. And it’s easy to damage, especially when working with a hammer drill.
Therefore, it is important to choose the right tool and method of work.
The ceramics were glued to bitumen mastic. This is the Soviet version. It is easy to recognize: when dismantled, there will be a black and gray spot under the tile. In this case, it is better to warm up the floor covering. The mastic will soften and “release” the finish. You can heat it with a hair dryer, but do not overheat. Do not use the maximum mode immediately. A strong temperature change can cause a crack. Raise the temperature gradually, slowly.
As soon as we managed to lift it, we direct hot air into the gap. At the same time, we continue to pull up. But be careful not to break it.
If the screed used plastic paint mesh or something like that. Then it is better to drive the tool under it. Then perhaps the tiles will come off in larger pieces.
If the installation was carried out on a masonry mesh. This is a welded metal structure. It's good if you don't have to delete it. Then remove the layers above. If you need to remove it, you can try using a grinder to cut it to a depth that covers this mesh. Divide the floor into squares in this way. And then free up one section of the floor after another. A particularly complex process.
How to remove tiles from the floor without damaging the floor and ceramics is very important. After all, floor coverings are especially durable and expensive.
The technology is the same.
How to quickly remove old tiles in the bathroom and toilet
We have already considered all possible ways to remove the entire tile or just a part.
There remains one question that is most often encountered during repairs.
Removing tiles from walls or floors. In old buildings and in new apartments, such finishing is not uncommon. You need to understand whether it is possible to cope on your own. Especially in cases where the cladding is partial, say up to the middle of the wall.
The entire sequence of actions will be the same. Ways too.
But there is one more that we haven't talked about yet.
The method is simple. It uses U-shaped metal hooks. They can be made from hardened wire ⌀ 3–4 mm, old knitting needles or screwdrivers. The preparatory stages are normal. After removing the grout, the device is driven under the tile. Use two hooks to hook on the sides or top and bottom.
It's fast, not as noisy and dirty as a hammer drill.
Used for gentle removal without damaging neighboring areas. Used to remove tiles from the floor and in hard-to-reach places.
This method is especially convenient when the coating has been laid correctly, using special glue.
Removing ceramic and tiles is a difficult and time-consuming task. Only experienced craftsmen who constantly practice this can determine the amount of work in advance and choose the right method. Contact us at any stage of the renovation if you are wondering how to carefully remove the tiles. Competent consultation will help save energy, time and money. We are nearby, in Krasnodar. Contacts .
Always in touch, your Mayhom life.