How is the plane adjusted? How to properly install a knife in a plane How to set up a hand plane
Read also
With a regular hand plane. But working with hand tools is quite labor-intensive and, if necessary, planing a large number of boards becomes ineffective.
To speed up the process, it is more advisable to use a power tool. Modern electric planers are capable of performing large volumes of work with much less physical effort.
Let's find out how to use an electric planer correctly to get the job done with the quality we need.
Adjusting electric planer knives
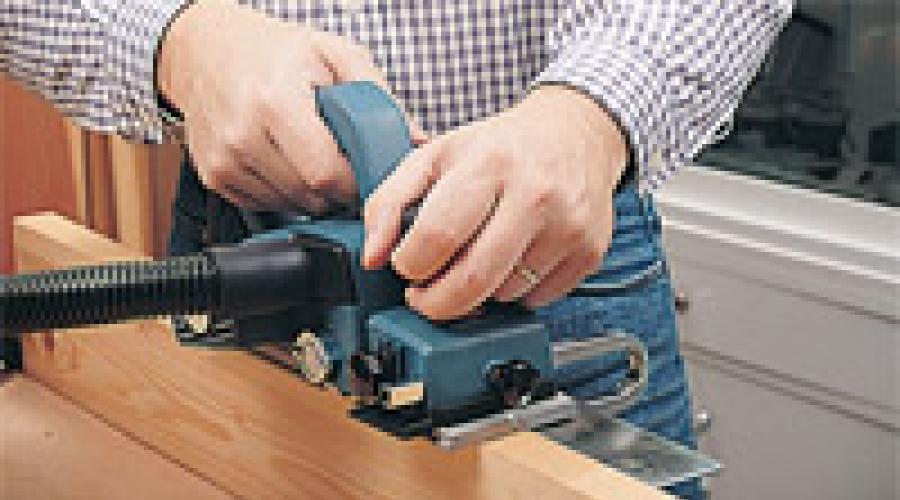
An electric planer can be used to perform both rough processing of wooden planes and finishing, after which sanding may not even be necessary. Therefore, it is important to be able to adjust the knives correctly so that the planing depth provides the surface cleanliness you need.
On electric planers, the planing depth is set by switching the handle. The adjustment step can be up to tenths of a millimeter. Therefore, when buying a plane, pay attention to this parameter as one of the most important. Depending on what work you plan to perform, you should select a power tool with a sufficient adjustment step for this purpose.
Before you start processing the surfaces of boards or bars that you will use in the future, make several test passes on a workpiece that you won’t mind throwing away later. It is during these test runs that attention should be paid to possible processing defects.
Most often, such defects are beveled surfaces or incisions. Both of these indicate incorrect settings of the knives in the drum of the electric planer.
To eliminate the defect, it is best to contact the experts in a service workshop or a self-taught specialist who has already adjusted the electric planer knives more than once. But if you don’t have this opportunity, then you can try to adjust the blades of the electric planer yourself.
To do this, loosen the fastening of the knives on the drum using a hex wrench in accordance with the operating instructions for the electric planer, and very carefully set the knives to the correct position. To align the knives, apply a ruler and determine the desired position.
After adjusting the knives, all the bolts must be tightened securely and, turning the drum by hand, see if the knives touch the body of the electric plane.
 Before you begin processing the wooden surface, the workpiece must be securely fastened. How well it is secured affects not only the cleanliness of planing, but also directly affects the safety of the work performed.
The board or block being touched should not have even a slight play. Otherwise, when in contact with the rotating knives of the electric planer, the workpiece may be torn out and thrown to the side with force, which can lead to injury to both the worker and people nearby.
After the workpiece is securely fastened, you need to stand so that, starting to plan from one edge, you can freely move next to the workpiece parallel to the movement of the plane. The body position should not be tense, and nothing should interfere with holding the power tool firmly with both hands.
Before turning on the electric planer, its knives should not come into contact with the surface to be cut. Only after starting should you carefully move the knives from the end of the board and start moving forward.
With each pass, try not to tip the electric plane onto your toe or heel. The sole of the plane must always be positioned strictly parallel to the surface being processed.
The pressure on the front and rear handles of the electric planer should be the same. In this case, at the beginning of the passage you should press a little harder on the front handle, and at the end - on the back. This will avoid blockages. The required pressing force is determined only by practice.
While the electric planer is moving along the surface being processed, jerking, acceleration or stopping is unacceptable. Otherwise, the surface will not be able to be made perfectly flat and various pits will be visible on it.
The speed of movement of an electric plane over the surface being processed is usually 1.5-2 meters per minute. In this case, you need to make sure that the shavings removed by the plane do not get under the sole.
Selection of quarters with an electric planer
 Often there is a need to select a quarter in the workpiece being planed. Modern electric planers have this option and can make this task much easier for you. However, when selecting quarters using an electric planer, there are also some features that should be taken into account when performing work.
As you know, when cutting a quarter, the side stop of the plane moves along the edge of the board. Therefore, in order for the groove to be smooth, you should be sure that this edge does not have any bulges or dimples.
When planing a quarter, the pressure on the plane handles is slightly different from the pressure when planing flats. With one hand you need to point the plane forward, and with the other, press its side stop to the edge of the workpiece.
Safety when working with an electric planer
When used correctly, an electric planer will help you quickly complete large amounts of work, but if handled carelessly, it can also cause serious injuries.
As mentioned above, the workpiece must be securely secured before starting work. Otherwise, there is a risk of it being pulled out and injuring the worker or other people nearby.
During any inspections of cutting edges or adjustments of knives, be sure to completely turn off the power to the electric planer by disconnecting the electrical cord from the network. Any accidental start can leave you without fingers.
Start processing the surface by first turning on the plane and allowing the knives to reach maximum speed until they touch the board.
If you put the electric planer aside to check the surface you are working on, place it only on its side.
The electrical cord should not have significant kinks or tangles during operation. The electrical insulation must not be damaged, all current-carrying structural elements must be reliably insulated.
In the video below you can watch tips on working with an electric planer (click on the triangle to view):
***
Now you know how to properly operate an electric planer in order to process wooden surfaces with the desired quality. Next time we’ll talk about how to properly sharpen knives for an electric planer if they have become dull and the cleanliness of the processing has decreased.
>> Setting up planes, jointers and sherhebels
5. Setting up planes, jointers and sherhebels
Before planing, the plow is adjusted: a plane, jointer or sherhebel. To do this, the plow (Fig. 4) is turned over with the sole 4 up and from the front side (along the heating pad A) they look at what value and whether the cutting edge 5 of the knife is set without distortion.
For a planer and jointer, the cutting edge should be located above the sole without distortion (parallel to the plane of the sole) by 0.3...0.5 mm, and for a scherhebel - up to 3 mm. The height of the cutting edge above the sole of the plane can be approximately measured with a ruler, as shown in Fig. 14. More accurately, the location of the cutting edge is measured using a special indicator device.
Rice. 14. Measuring the height of the cutting edge: 1 - block; 2 - knife; 3 - wedge; 4 - sole; 5 - cutting edge; 6 - ruler
To properly install and secure the knife, the plow is disassembled.

Rice. 15. Setting up the plane: a - grip of the plane; b - knocking out a knife; c - extension of the blade above the sole of the plane; g - knife jamming
Plows with wooden blocks and with a wedge fastening the knife are disassembled like this. With your left hand, take the plow by the block (Fig. 15, a), and with your right hand, apply light blows with a mallet or hammer (Fig. 15, b) on the back side of the block (in the direction of the arrow) until the wedge is knocked out. The knife is set to the desired value (Fig. 15, c) and slightly jammed with a wedge. Then hammer the wedge in with a hammer (Fig. 15, d) and check whether the knife is positioned correctly.
It should be borne in mind that when jammed, the knife moves slightly with the wedge. Therefore, the cutting edge is first set to a smaller value.
The distortion of the cutting edge is eliminated by striking the sides of the knife with a hammer.
A clogged taphole (hole in the sole) is cleaned by pulling the chips upward or pushing them through with a thin sliver.
If it is impossible to clean the tap hole, disassemble the plow, clean the tap hole and reassemble it.
! Safety regulations
Do not push clogged chips from the cutting edge. This may cause a cut on your hand.
Practical work
Setting up the plows
1. Disassemble one of the types of plows (sherhebel, planer, jointer).
2. Adjust the cutting edge of the knife to the desired height according to the teacher’s instructions and secure the knife.
3. Check the correctness and height of the cutting edge of the knife. Submit your completed work to your teacher for review.
ABOUTPlow sole, cutting edge, warp, chip breaker, chip breaker edge, taphole.
1. How should the cutting edge be positioned relative to the plow sole?
2. How do you set up and fasten a knife on a plow with a wooden block?
3. How do you set up and secure the knife on plows with a metal block?
4. What is the purpose of the chip breaker?
5. How do you clean a clogged tap hole?
6. List the safety rules when cleaning the tap hole.
Samorodsky P.S., Simonenko V.D., Tishchenko A.T., Technology. Labor training: A textbook for 7th grade students (option for boys) of a secondary school. / Ed. V.D. Simonenko. - M.: Ventana-Graff, 2003. - 192 e.: ill.
Lesson content lesson notes supporting frame lesson presentation acceleration methods interactive technologies Practice tasks and exercises self-test workshops, trainings, cases, quests homework discussion questions rhetorical questions from students Illustrations audio, video clips and multimedia photographs, pictures, graphics, tables, diagrams, humor, anecdotes, jokes, comics, parables, sayings, crosswords, quotes Add-ons abstracts articles tricks for the curious cribs textbooks basic and additional dictionary of terms other Improving textbooks and lessonscorrecting errors in the textbook updating a fragment in a textbook, elements of innovation in the lesson, replacing outdated knowledge with new ones Only for teachers perfect lessons calendar plan for the year; methodological recommendations; discussion program Integrated LessonsThis article will address the issue of how to set up a plane with your own hands, we will talk about the simplest hand plane, which our grandfathers used. To correctly install a cutter on a plane, you need to have certain skills. The plane is taken with the left hand, and the thumb should be on top of the back of the plane, and the remaining fingers on the sole near the span. With your right hand, take the cutter and insert it into the span to the sole of the plane. Moreover, the cutter must be placed on the base with the edge down. At this time, the base of the plane is in a horizontal position, and the knife must be supported with your thumb. Then they install the wedge, striking it with a weak blow with a mallet.
By tradition, we will mention the sponsor of the article, this is the ART-Group company, which offers blinds for the balcony, perhaps you will find it useful.
Next, you need to set the knife to the same amount along the width of the plane sole. To do this, the plane should be positioned with the sole up and at a distance of 30-35 centimeters from the eyes. Now you need to determine by eye the uniformity of the protrusion of the knife blade over the sole of the plane. If necessary, this protrusion can be increased by hitting the cutter with a mallet, and if you need to decrease it, you need to hit the rear end of the block. For larger chip thickness, a larger protrusion of the blade is installed above the sole of the plane. If the blade and the sole are not parallel, this can be eliminated by hitting the edges of the cutter with a mallet. To finally secure the cutter, you need to hit the end of the wedge.
To determine how correctly the cutter blade is installed, you need to place the plane with the sole up against the light and look at the protrusion of the cutter. In this case, the projection of the cutter will be clearly visible on the surface of the sole. You can finally check the adjustment of the plane only during trial planing. If the chips are of the same thickness, this means the plane is set correctly, but if not, then you need to check the installation of the cutter again.
It is also necessary to know that when setting up the tool correctly, the lower edge of the cutter should fit tightly to the surface of its base. And the wedge should tightly clamp the knife along the entire length of the stop of the taphole wall. To jam or release the wedge, you need to lightly hit it with a hammer.
The length of the wedge should ensure that there is no gap on the top surface of the cutter and that the end of the chip does not fall there. At this point, the question of how to set up a plane can be considered closed, now you know everything.
 To work on wood processing, specialists use special tools - planes. They are used in any wood-related industry.
And gradually electric planers began to come into fashion, which can be bought on a specialized website - price.ua. With their help, not only does the processing speed of wood increase significantly, but also the specialist does not spend a lot of effort and energy on mechanical work.
Even in ancient times, people tried to process wood, but only by the 15th century did they learn to use a plane, an almost exact analogue of which is modern planes.
It was created for processing the top layer of wood by cutting and sanding irregularities.
How to work with an electric planer correctly?
With the help of this tool, the ideal smooth result of the final product was achieved for the construction of huts, the manufacture of furniture and necessary household items.
The electric planer has several differences from its ancestor. Firstly, you do not need to make any visible effort when working with this tool, since it runs on electricity.
The second positive quality is the abundance of some attachments that can process wood at certain angles or bends, which makes it almost indispensable in furniture production.
It is also often used to give certain visual characteristics to any piece of furniture or wood decor. For example, interesting carved patterns or alternating smooth and rough stripes on wood. This tool is quite inexpensive and its purchase is affordable for everyone.
When working with conventional tools, the workbench, sawhorse or other supports must be stable during planing. Planes should be placed on the side of the block with the sole facing away from you so as not to accidentally cut your hands.
You cannot work with tools with blunt pieces of iron, as well as with tools with a piece of iron that is too far out of the plane's crack, since due to excessive physical stress, the hands will be torn off the plane or other planing tool and the worker may receive abrasions and bruises on the hands.
You need to sharpen the bits carefully, especially on a sharpening wheel, and do not allow your fingers to touch the sharpening tool.
The peripheral speed of the grinding wheel should not exceed 20-30 m/s.
How to properly install a knife in a plane
When sharpening a tool, you should wear safety glasses or install a protective screen made of transparent material, such as plexiglass.
You should not determine the sharpness of the blade by moving your finger along the blade, as this can easily injure your finger.
You cannot work with dull chisels. Most often, cuts and abrasions are the result of working with a poorly sharpened tool, since in this case the worker makes increased physical effort and uses incorrect techniques.
When working with a sharp chisel, the cutting edge should always be directed away from you and cut the wood only from left to right. When cutting a layer of wood, hold the workpiece with your left hand so that your fingers are not in the cutting zone and do not fall under the chisel blade in case the chisel breaks off while cutting the wood.
When cutting with a chisel, it is forbidden to press the workpiece against your chest or knees; it is better to secure it in the clamp of the workbench. Do not place the cutting tool on the workbench with the blade facing you or close to the edge of the workbench.
Excess tools should always be put away in the closet.
When working with hand saws, you must be careful to avoid injury. You cannot work with dull or poorly set saws, as in these cases the saw blade may break and lead to injury to the hands and face of the worker.
You need to be especially careful when sawing, when some workers guide the saw blade along the risk using the thumb of their left hand. This technique is dangerous: to guide the saw, it is better to apply a piece of wood or lightly nail a plank near the mark.
You should not use a screwdriver to open saws, as it can come off the tooth and a person pressing the handle of the screwdriver with his hand can severely damage his hand on the sharp teeth.
The teeth should be set only with special safe tools. You cannot use a saw if some teeth of the blade are set to the side more than others.
When working with hand-held power tools, you need to know the structure of these tools and the rules for their operation.
Do not operate the tool unless it is grounded at an operating voltage exceeding 40 V.
You can start and carry out work only after making sure that the power tool is in full working order and that the cutting tool is securely fastened.
When the electric motor is turned on, it is prohibited to troubleshoot.
For any repair, it is necessary to disconnect the power cord from the network.
The electric motor should only be turned on just before starting the work operation.
During any break in operation, the engine must be turned off.
It is necessary to ensure that the insulation of the power cord is in good condition and prevent it from being twisted.
If this cannot be avoided, the cord must be suspended or covered with boards to reliably protect it from damage.
It is not allowed to leave a power tool connected to the electrical network unattended; Changing any parts of the tool cannot be done while the electric motor is plugged in.
After repair, the power tool should be subjected to a control test (mainly the electric motor) in accordance with the control test program for electrical machines.
To connect to the mains ground, the power cord of the power tool must have an additional wire, the end of which is painted a different color to distinguish it.
For power tools designed to be connected to a 36 V network, protective grounding is not required.
When working with circular saws and grinders, it is not allowed to remove the safety guard.
Specific safety precautions for operating power tools are given in the instructions supplied with the tool.
The main malfunctions of a power tool that can be detected during operation and methods for eliminating them are given in table.
When working with power tools, work clothes should not have hanging ends, and the cuffs of the sleeves should be buttoned or covered with an elastic band.
When working with wood, it is recommended to use a plane in some cases and a planer in others. What are the specifics of each of these tools, what is their purpose, and how is a plane different from a jointer?
Let's try to figure this out.
general information
The general concept in our case is a plane.
How to use the plane
This invention, which dates back to the distant past, is used to design wood. Using such a tool, you can level the surface of the material, correct the shape and size of the workpiece, and, if necessary, make large cuts. This is similar to the plane traditionally used in carpentry:
But since the tasks in material processing can be different, then there are many different types of popular settings.
They differ in size, device characteristics and accessories. Here are some examples: Sherchebel, It is designed to process empty parts that have just emerged from a saw or axe; carry, operated by two carpenters; falsgegel, worker to handle commas.
Fuganok is also a sub-scheduler. Here's the tool:
comparison
Thus, both adjustments belong to the same class. That's why their device has a lot in common. In both cases, the base is shoes. In this place where the knife is attached, pressed tightly with a wedge. The cutting tool is set at an angle. The position of this element can be adjusted to remove the desired chip thickness.
From the common symbols, we will note that the difference between scheduler and connector is different.
They relate to both the intended purpose and the design features that arise from the use of these devices. It should be noted here that the standard plane, which has a more compact and proportional position, works at an early stage of material processing. The goal is to remove the outer layer of wood and do a general leveling of the surface, removing sediment, knot drops and other serious defects.
However, to complete the turn, use a jointer.
Her body is elongated, allowing for better alignment. Ultimately, if the short plane moves along the projections and cavities, as in waves, then the jointer lies on the heights and gradually breaks off. In operation, the tool first produces a steep facing, and when it achieves a perfectly level surface, it begins with a continuous belt.
What is the difference between a plane and a joint?
The fact that this other device becomes indispensable if it is necessary to give the correct shape to large or long pieces of material. In addition, the direct purpose of the binder is to ensure that the edges of the parts, for example, are perfectly matched to their adhesion. It should be noted that both tools are available not only in manual versions, but are also equipped with an electric motor.
In addition, specialized machines are widely used for this purpose.
Plane- a carpentry tool designed for manual planing of wood, consisting of a wooden or metal block, a cutter (knife) and a clamping wedge.

Hand Planing Tools: a - wooden plane; b - metal plane; c - jointer; 1 - body; 2 - holder; 3 - entrance; 4 - wedge; 5 - knife; 6 - stop; 7 - plug; 8 - clamp; 9- screw; 10 - handle.
All planes are divided into planes for planing flat surfaces and planing profile surfaces.
The plane has a wooden block, the lower part of which is called the sole.
To install the knife and release the chips, a slot is provided in the block - a tap hole. To allow cut chips to enter the tap hole, the sole of the block ends with a slot 5...9 mm wide, called a span.
The narrow slot (span) of the block allows you to obtain a smooth wood surface. To reduce the width of the span, the sole at the slot is secured with a hardwood insert. The knife is secured in the block with a wooden wedge resting on the shoulders of the block's taphole. The knife is pressed tightly and evenly against the block with a wedge, which allows you to obtain a high-quality processed surface. Planer knives are made of U8A or U9A steel.
Planing with a hand plane
The front of the block has a wooden horn, and the back of the jointer block has a handle. The block and wedge of the plane are made from hardwood (pear, ash, maple, hornbeam, beech, white acacia, etc.). Planer blocks are made of metal.

Planer components: a - block; b - planing knife; c - wedge; g - insert; 1 - shoulders; 2 - cheeks; 3 - entrance; 4 - bed; 5 - sole; 6 - span (slot); 7 - handle-horn.
Electric planers are an essential tool for modern carpenters, joiners, and all specialists involved in processing lumber. Their prevalence is due to practical efficiency and the presence of significant advantages of this equipment compared to manual analogues. To fully utilize the device's potential, electric planer blades must be pre-adjusted before processing wood. Also, the blades must be sharp. This, together with the correct adjustment of their position, will allow processing significant volumes of boards or beams without any problems or effort on the part of the user.
Knives on an electric planer are consumables. With their help, wood surfaces are processed.
Often knives come complete with power tools in the amount of 2 pieces.
Electric planer knives are classified according to the following criteria:
- opportunities for practical reuse;
- blade shape;
- knife blade sizes;
- cost.
When buying an electric planer, in addition to checking its performance and configuration, you should pay attention to the quality of the knives installed on the drum and their sharpening. The blades should be sharp, with a straight edge and no bends or gouges. You should also check spare knives. The final quality of lumber processing depends on the correct selection of cutting attachments.
Knives intended for one-time use are made from steel-based hard alloys in the form of plates sharp on both sides. Such cutting parts cannot be sharpened. After the edge being used is completely worn out, the blade is turned over and placed on the drum with the other side. At the same time, the tool continues to work. If the second cutting edge becomes dull, then the blade is simply thrown away.
Disposable knives are intended only for performing work that does not require high precision and quality of workpiece processing. But they are convenient for practical use: during installation they do not need to be precisely adjusted and balanced.

The shapes of disposable products are:
- straight;
- wavy;
- straight, but rounded at the ends.
The first type of product has a straight cutting part. It is convenient to use such consumables to process parts that have a smaller width than the length of the installed blade, and to select quarters. Wavy knives are used when necessary rough processing of lumber. With their help, you can give a wooden surface a different texture, for example, to simulate “aging.” Straight cutting edges, rounded at the edges, are good because they do not leave marks (grooves, steps) on the surface of the wood being processed. This is a suitable option when work needs to be done with wide wooden blanks.
Disposable blades have a longer service life, but can break quite easily if they accidentally collide with metal (for example, a nail, bolt). They are the best option for attachments when it is necessary to work with hard wood workpieces.

Reusable cutting attachments
Products that are intended for reusable use differ in both their shape and size from disposable cutting attachments. They are made using high quality steel, which ensures ease and quality of processing of wooden surfaces.
Using reusable knives, you can achieve such a smooth surface of the workpiece that grinding is not required. They have HSS marking(completely High-Speed Steel, which translates as high-speed steel). These blades are considered professional. Their installation is accompanied by high-precision balancing and adjustment. The sharpening must also be of excellent quality. In this case, tool high-speed steel can be sharpened so that it is very sharp.

It is more profitable to buy reusable cutting attachments because they can be sharpened multiple times. But high-speed steel products do not allow processing hardwood (for example, larch or oak).
The working drums of most models of electric planes can be equipped with both disposable and reusable cutting attachments. But there are also devices that can only be equipped with blades that are not intended for sharpening. For this reason, when purchasing an electric planer, it is recommended to give preference universal power tools.
Classification by size
Electric planer knives can be standard or custom size. Products of the first type, called “plates,” have a length of 82 mm, a width of 5.5 mm, and a thickness of 1.2 mm. Such cutting attachments are suitable for most models of electric planes from foreign companies Makita, Skil, Bosch, Black&Dekker.

Straight knives for electric planers Bosch, SKIL
Non-standard cutting attachments with larger blade widths and thicknesses are typical for electric planers from Baikal and Interskol. Due to their parameters, they are stronger and better than standard plates. When they come into contact with metal, such knives do not break. They can be sharpened using sandpaper. The width of the nozzles is about 1 cm. The length can be 82 mm, 102 mm, and for products from the Rebir company it reaches 110 mm.

Straight knives for electric planer Rebir IE-5709
Cutting head price depends on the manufacturer. Also, this factor often determines the quality of the product. If you purchase knives from well-known companies (for example, Bosch), you can count on their long service life.
Some models of electric planers are equipped with cutting attachments of unusual shape and design. In order not to be mistaken with the dimensions, it is recommended to take the old blade with you for comparison before purchasing.
When do you need to adjust or replace electric planer knives?
The knives on an electric planer wear out over time. They need to be removed and sharpened or replaced altogether, and then installed back on the drum. Newly installed cutting attachments need to be adjusted in order to process lumber as efficiently as possible. The blades of new power tools also require pre-setting. before use.
The following signs indicate that adjustment is necessary:
- change in sound when processing workpieces;
- vibration of the tool during operation;
- deterioration in the quality of planing lumber (formation of waves, chips, grooves, protruding fibers and other defects);
- increase in effort spent on work.
The change in sound is not typical for all models. This symptom may also indicate a number of other problems.

If, after adjusting the blade blades, the symptoms discussed above do not disappear, then more serious repairs to the power tool will be required.
Setting the correct position of the cutting attachments is carried out according to the following parameters:
- the height of the part of the blade that protrudes above the sole of the power tool;
- the size of the side protrusion of the knife intended for picking out quarters.
By correctly adjusting the position of the knife blades on the drum, high final quality of lumber processing is achieved.
How to properly adjust knives
Adjusting the knives on the drum yourself is not a big problem. To set the position of the tool blades before work, you will need:
- hex wrench included with the plane;
- metal ruler or piece of glass of suitable size.

The setup is carried out by performing all operations in this sequence.

In the considered sequence, the working position of the cutting edges is adjusted for models of electric planers with one, two or three knives.
It should be taken into account that the working parts of straight-shaped knives should protrude by approximately 0.5 mm, and rounded ones by 1 mm or more.
If the adjustment is carried out correctly, the cutting edges on the drum should be parallel to the sole of the power tool without distortion. A number of new models contain adjusting screws
, which simply need to be twisted to install the knife plates in the desired position. To set up the tool, it must be disconnected from the power supply, and in cordless models, the battery must be removed. This will ensure that the power tool does not start spontaneously.
Algorithm for replacing knives on an electric planer
- To remove the knives from the electric planer and replace them with new ones (or properly sharpened ones), you will need a set of wrenches, and also, in some cases, a screwdriver. There is no need to completely assemble and disassemble the electric plane to change working attachments. Replacement is performed in the following sequence:
- rotate the drum, placing it in such a position to gain access to the knife mounting bolts;

- loosen, but not completely, these bolt clamps;
- remove the working attachment manually or using a flat screwdriver;
- the rest of the blades are treated in a similar way;
- place new knives in the sockets, securing them with bolts;
put them in the correct position.
The main point is the need to place the blades exactly in the sockets and securely fix them so that they do not fall out while using the tool.
Due to the fact that different models of electric planers may have different attachments for working attachments, it is recommended that you first read the operating instructions for the equipment you are using. On sale you can find knives whose blades rotate. This is very convenient because it is enough to simply turn over the dull edge, replacing it with a sharp one. When the drum of an electric planer is installed
two cutting attachments
With regular use of an electric planer for processing wooden surfaces (planing, quartering, chamfering), its cutting edges become dull. If the knives are intended for repeated use, then you can sharpen them yourself. Sharpening is carried out according to the same principle as with hand planes. The differences are only in the number of cutting edges that need to be sharpened.
Use power tool with dull blades This is not possible for the following reasons:
- the load on the electric motor increases, as a result of which its wear accelerates;
- The quality of surface treatment of lumber is significantly reduced.
Specialists from service centers or special workshops will help you sharpen the cutting edges of working attachments correctly. If it is not possible to turn to professionals, then you can do all the work at home. To sharpen the blades yourself, you can use the following tools:
- knife sharpening machine;
- an ordinary whetstone (abrasive stone, whetstone);

- emery;
- metal file;
- grinding wheel.
You will also need special clamp to hold the part being sharpened.

Sharpening a blade using an abrasive stone is done as follows.
- Remove the working attachments that need to be sharpened from the electric planer drum.
- The knives are secured using special screws in the clamp so that their cutting edges lie in the same plane.
- The fixed blades, with light pressure, move smoothly over the surface of the abrasive, ensuring that they are sharpened at the same time.
- Inspect the sharpened parts for deviations, repeating the entire process if they are detected.
- Check the sharpness on any piece of board.
- Install the knife plates on the drum, adjusting their position.
Before performing work, it is recommended to pre-moisten the abrasive stone with water. It should be taken into account that coarse-grained abrasive is intended for primary processing, and fine-grained abrasive is intended for finishing. It is recommended to maintain the original sharpening angle of the blade (approximately 30 degrees).
The considered manual method works well for straightening sharpening. If the edges are very dull or have jagged edges, then we sharpen them on a machine. When doing this, you should be careful not to remove excess metal from the blades.

If a grinding wheel is used, the part removed from the drum is moved along its surface in translational movements.
With your own hands, all actions should be carried out carefully, carefully handling the blades to avoid injury. High quality sharpening will come with experience and skill.
The condition of the electric planer knives - their adjustment and sharpness - should be checked before starting to process lumber. Not only the quality of planing, but also personal safety depends on this. All operations for replacing, sharpening, and adjusting working attachments must be performed only with unplugged power tool. To give initial sharpness to the cutting edges, it is enough to use a regular whetstone.
A wooden hand plane is one of the main tools of a carpenter. Its form and the principle of working with it, despite all the technical improvements, have not actually changed over many years.
The main thing for a plane and its operation is the accuracy of setting the knife and the correct movement of the plane over the surface being processed. Such work will be indicated by chips coming out freely from the gap in the block. And then the whole planing process will give you pleasure, and not turn into torture.

Having looked at many photos of a hand plane on the Internet, you can see that it consists of the following elements: a taphole, a cutter, a wedge, a cutting depth regulator, a horn, a chipbreaker, a stop and a frog.


Preparing the plane for work
The knife is clamped in a workbench vice and the chip breaker is positioned, and then tightened with a screw to fix it in this position. And after wedging, the chipbreaker is fixed due to its self-resilience. Next, install the knife into the tool’s tap hole and tighten the wedge into the guides by hand.

To determine whether the knife is positioned correctly, turn the plane over and compare the parallelism of the surfaces of the blade and the sole. If you notice that it is necessary to adjust the knife, then release the wedge and set the knife in the desired position and then fix it again.

When planing with a knife, the thickness of the removed chips should be uniform. To ensure this, it is necessary to adjust the plane with a chipbreaker. The function of the chipbreaker can be understood from its name, and it should fit closely to the blade and be located 1-2 mm above it.

Next, the knife with the chipbreaker attached to it earlier is installed in the block in the tap hole and wedged a little. Then, using a hammer, carefully tap the knife to install it so that its tip is parallel to the sole with a small protrusion. Only then the knife is fixed with a wedge using a cam or screw mechanism.

To work correctly with a plane, it is necessary for the master to be on the side of the workpiece. This will allow him to correctly and without much effort make translational movements with the plane along the workpiece.

In order to avoid tipping over when planing, it is necessary to press down on its front handle at the beginning of the movement, and towards the end - on the back.


Precision plane
In modern examples of metal planes with a block, the knife is most often secured with a screw. And the second screw of the plane adjusts, with an accuracy of 10 micrometers, the thickness of chip removal.

They are also equipped with a knife slope regulator, which makes it possible to adjust the installation of the knife blade with one movement of the lever.

Burning edges
The key to success when gouging edges is the uniform pressure on the tool over its entire plane. When planing, it is also recommended to prevent the chips from breaking by moving the plane along the wood fibers.

If you come across a workpiece with a non-uniform or thin structure (such as the root part), we recommend using especially worn knives for a hand plane and continuously rotating the workpiece while planing.

It is easier to plane a narrow edge by applying several of these thin boards at a time. Thanks to this, the surface of the plane's support will increase, and it will be easier to control the correct position of the plane relative to the surface being processed. Indeed, in the case when the plane moves away from parallel with the surface being processed, the edge will turn out to be rounded.

- If you need to remove thicker chips, use a sherhebel.
- It is easier to plan the end of a piece of wood when the plane is positioned at an angle to its faces.
- By attaching wooden elements to the edges of the workpiece with a clamp, you will prevent chipping.
- Constantly check the surface of steel squares.
- Use a jointer to process long pieces. They can even plan against the grain.

Planing of faces
To get rid of roughness on a flat surface, sanding with a jointer is enough. A sander, a plane with a blade angle of up to 60, is intended for finishing wood.


To get rid of large irregularities, it is necessary to use Sherhebel. This tool is equipped with a narrow convex cutter with an oval-shaped blade. It can cut chips up to 3mm thick in one pass. After treatment with Sherhebel, the surface must be treated with a sander and a jointer for a fine finish.


End cleaning
To clean the ends, it is necessary to carry out the planing “from yourself”, with short pushes. Thanks to this processing principle, the wood fibers will be cut crosswise and less effort will be required.

To avoid chipping along the edges, it is necessary to chamfer them in advance. An even better option would be to process first from one end to the middle, and then from the other end to the middle.

The blade no longer deteriorates even during operation, but during its interaction with other objects, when not in use. During breaks, it is necessary to lay the plane not on the blade, but on its side. During long-term storage or during transportation, the knife must be pushed inside the block.

Plane selection
Taking into account all of the above, the type of plane you need depends on your goals:
- Sherhebel is designed for rough planing with the ability to remove thick chips;
- jointer - for finishing planing of long workpieces;
- sander - for particularly clean planing.


Photo of a hand plane


