How to protect (and repair) cables for iPhone, iPad and other devices from wear and tear. Four ways to save a lightning cable How to save an iPhone cord
Read also
Headphones have many vulnerable spots, since all elements of the headset are subject to mechanical stress during use. It’s not a shame to throw away an inexpensive product after it breaks down. Branded headphones will have to be repaired after a breakdown. However better headset Do not bring it to a deplorable state. There are many ways to protect your headphones and wire from bending, and you need to use them.
Wire exit from the plug

The most vulnerable spot is the wire coming out of the plug casing. This element is also called a jack. The plug and the wire coming out of it are constantly exposed to mechanical stress, even when the headset is not working, but is simply inserted into the phone jack.
Recommendations: How to fix headphones yourself if one stops working  , How to connect broken headphone wires
  , DIY headphone repair
Let's look at a few of the most common reasons:
- When listening to music mobile phone usually put in a pocket. The option is not bad, but you need to place it with the plug facing up. If the jack is on the bottom, the entire weight of the phone presses on it. L-shaped plugs suffer less from this position, since the wire exits the casing from the side. For an even jack, pressing it to the bottom of a clothing pocket is detrimental. The wire at the entrance to the casing is sharply bent at an acute angle, resulting in a fracture of the copper core.
- While listening to music from your phone while traveling, the headset cable is secured to your clothing with a plastic clip. In the event of a sharp turn of the head, the clamp will weaken the force of the wire jerking at the point of attachment to the plug.
- Music lovers have a habit of putting the phone in their pocket after listening to music without removing the headset plug from the jack. This option is detrimental to both devices. The phone's plug and socket gradually become loose. Poor contact will cause crackling noise in the speakers and loss of sound. Finding the location of the fault will become more difficult, since the wire breaks along with the connector and plug.
- Headphones deteriorate even during storage. There is a killer combination - leave the plug in the socket and wrap the wire around the phone. Such storage will kill even the most expensive and quality headphones. The plug and the entire wire before connecting to the speakers will fail due to sharp corners at the bend. The hard case provides safe storage of the headset. The wire is wound around three fingers. The coil is obtained without sharp bends and will be safely stored in the case.
- The long service life of headphones is taken care of even at the purchase stage. A headset with a straight plug is the worst design. The wire near the jack will quickly break due to sharp bends. It is better to give preference to a plug with the letter “G” or at an angle of 45°. If your favorite headphones are sold only with a straight jack, additionally buy an L-shaped adapter - an adapter.
- In addition to the adapter, there are female-male adapters. A piece of cable has a plug attached to it at one end, which is inserted into the phone jack. At the other end of the wire there is a socket - an analogue of a telephone connector, where the headset jack is connected.
If the wire near the plug is broken, it is cut off, after which the jack casing is cut off and the wires are soldered to the contacts.
Speaker wire output

The second weak point after the plug is the cable exit from the headphones. Most often, the wire here does not break, but comes off from the speakers. The user is to blame for pulling the earphone out of his ear by the cable. Even if the vacuum headset is deeply buried inside the auricle, remove it by holding the body with your fingers.
A wire break from the speaker contact occurs in cheap Chinese models. The wire inside the case is not secured by anything and dangles freely. The branded headset is designed differently. The cable connected to the speakers is tied in a knot before exiting the headphone body.
This creates a kind of stop that prevents the wire from breaking off the contact. However, you still cannot pull such an earphone by the wire. The core will not come off the speaker, but the cable itself will begin to stretch. Over time, a gap will form in the thinned area.
Near the input to the headphones, the wire is constantly suspended. Even if you don’t pull on it, over time the cable will tear the wires away from the speaker under its weight. You can ease the load by placing the wire behind the ear. In this position, no force is applied to the cable section near the entrance to the headphones.
How to disassemble headphones: instructions with step-by-step photos of repairing all elements of the headset 
Bifurcation section
The headset cable leading to the speakers splits into two. The separation point is secured with a plastic or rubber stopper. In this area, similarly, there is a threat of fracture of the veins, but this happens extremely rarely.
You can protect the split with a voltage reducer, but they are only installed on expensive branded headphones. For a cheap headset, the only salvation is the clip. The area where the bifurcation begins is secured to the clothing with a clothespin.
Basic rules for using headphones

The user can protect the headset from damage if they follow a number of important rules:
- Do not wash dirty tips without removing them from the headphones. Water that gets inside the case will damage the speakers.
Do not clean the plug, connector or earphone mesh with a needle or other sharp metal object. - Avoid blow-drying your hair while wearing headphones. Sudden immersion in cold has a similar negative effect. Due to the temperature difference, condensation forms inside the case, destroying the speakers.
- Do not remove the plug from the phone socket without stopping the playback of the music file.
- A hard case is used to store the headset, and the plug is removed from the connector of the player or phone.
- The earphone is removed from the ear by the housing, and the wire is secured to the clothing with a clip.
The rules for using the headset are simple and should be followed.
How to charge wireless headphones 
Two ways to improve your headset

When you buy new headphones, don’t rush to use them right away. There are two simple ways improve the headset by increasing the cable's resistance to mechanical stress.
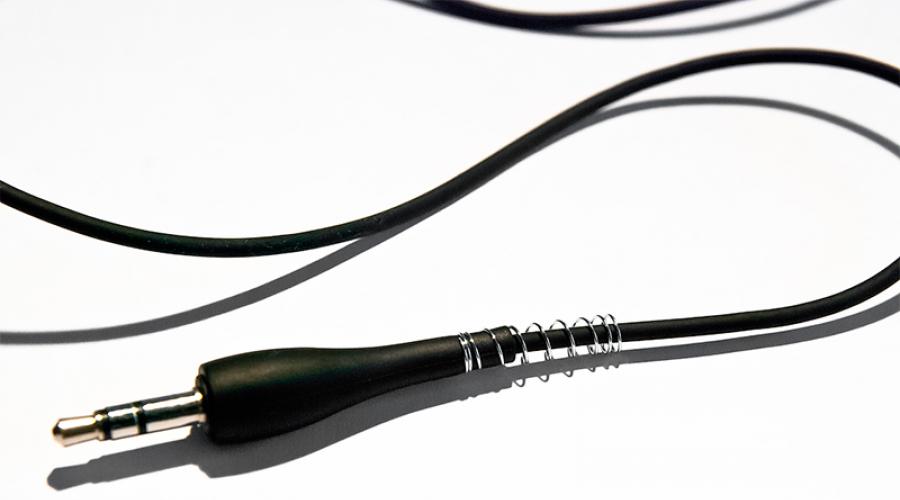
1. The first method is aimed at protecting the input to the plug. To prevent the wire from sharply bending into a break, you will need a bandage. A stiff spring is taken from a fountain pen or children's toy and wound in coils onto the cable. Next, the bandage is lowered along the wire to the connector, where a couple of turns are screwed onto the jack casing. The defense is ready. An elastic spring will never allow the wires to bend at an angle of 90°. A similar bandage can be screwed onto the area where the wire begins to bifurcate.
Everyone's home modern man it is impossible to imagine without electronic devices and household appliances, entangling the home with wires, like vines. Unfortunately, the cable is not permanent and is subject to wear and tear. In addition, if there is a cat or dog in the house, the cords have to be changed much more often. We offer you 8 ways to help protect wires household appliances from premature wear.
Please note that repair advice only applies to devices operating with low voltage current, such as smartphone charging cables and power cords game consoles or headphones. It is better to replace damaged wires from powerful devices completely.

Your a pet loves to chew cables? Luckily, there is an easy way to keep cords safe from sharp teeth. Buy a roll of vinyl tubing, make a lengthwise cut and thread the tubing onto the cable.


If you don't want to bother with vinyl tubing, opt for spiral binding. The advantage of this method is that you can tie several cords into one bundle at once.


In order to protect the junction of the cable and the connector, you can use heat shrink tubing. Carefully cut two 3 cm long pieces from the tube. Apply a little silicone glue (there are tubes with adhesive inside) on both ends of the cord at the points of attachment to the connectors and put on the cut pieces of heat shrink tubing. Wipe off any excess glue and hold the heat shrink tube over the flame of a lighter until it shrinks properly. Do not hold the lighter too close, otherwise the cord may melt. If you don't want to deal with fire, use a hair dryer on high setting to dry your hair.


Some cables, such as those for charging smartphones or for headphones, wear out faster than others. To prevent premature wear, use a spring made of ballpoint pen with a button. Stretch the spring slightly and place it over the wire.
You can combine protection using heat shrink tube and spring:


The damaged cable can be soldered again. In particular, you can use plastic soldering iron Bondic, with which the damage is corrected in just a minute. You just need to clean the wire and solder the damaged area using the LED lamp built into Bondic.

Damaged or worn cable insulation can be repaired using liquid electrical tape such as PlastiDip. Simply mold new insulation around the exposed wire and let it dry.
Briefly: Accuracy is the sister of talent.
Official Lightning cables fray and break - they break. We recommend that you accept it. But with desire and patience, extend the life of each. Use editorial experience website, which was multiplied by Internet opinion.
1. Scotch tape, electrical tape, etc.
To protect the wire more, instead of having two areas of potential wear, wrap the cable from end to end. And as a replacement for adhesive tape or tape, use thread and other similar materials.
2. Heat shrink tube will help

To make the first method aesthetically pleasing, use heat shrink tubing. Such devices are sold in a number of sizes in hardware stores. The price is minimal - a couple of tens of rubles per set.
Place the heat shrink tube over the potential break on top. And heat with a lighter, hair dryer or iron. The polymer will shrink in size and wrap around the cable. Pick up the phone white to increase aesthetics.
3. Ballpoint pen spring and more

The silver metal spring made from a ballpoint pen looks aesthetically pleasing on the official Apple Lightning cable. But not every one will do. I advise you to visit a stationery store and take apart a couple of things to look for them.
Sugru is recommended as a replacement for this method on forms. It's like plasticine for fixing things around. Use it to seal potential cable breaks. And after drying, the substance will turn into a polymer a la rubber.
4. Careful use/carrying

Editorial members website enjoy Apple devices for years. And they agree on one opinion - to prevent Lightning cables from breaking for months, carefully use and carry each one in your pocket, bag, and so on.
5. Using Apple Substitutes

I have personally used Lightning cables from third-party MFi manufacturers. I tried the “noodle” type and similar official ones in leather, fabric and metal. They didn’t wear out, but they stopped working after 5-9 months for no apparent reason.
On the forums they recommend buying a microUSB (female) to Lightning (male) adapter. And use it together with a thicker microUSB cable. This wire is cheaper and breaks less often. We haven't tried it, but we believe it.
Lightning was introduced to the public with the release of . Then it seemed that there was nothing better in the world among analogues, because the ability to install a cable on either side was not supported by any other connector. Over time, the situation turned against fans, who began to massively complain about the fragility of the device. 3.5 years after the announcement, the situation has not changed. That's why I want to tell you how to preserve lightning and make it “live” longer.
At a presentation in 2012, Apple presented the lightning cable as a technological breakthrough. It is worth remembering at least the image depicting Phil Schiller and the list of the main advantages of the device. Then its “advantages” included an 8-pin connector, an adaptive interface, improved wear resistance, the possibility of reversible use and dimensions that were 80% smaller compared to the old cable. But the company kept silent about the fact that lightning is a product related to the protection program environment. Actually, this is the very reason why the cable bends and breaks over time. In order not to harm the environment, Apple makes the device I am discussing from special rubber. If the user wants to throw it in a landfill, lightning will not decompose over a long period of time, but much faster, and without much harm to the Earth. This is the reason for the fragility of the famous cable.

It’s worth saying right away that the methods described below can only be used on whole lightning. If your cable has already broken and the wires are visible to the naked eye, then it is better to throw away such a device. Otherwise, the owner of such lighning will expose himself to danger in the form of a possible electric shock.

Let's start looking at the successful and unsuccessful ways to save lighthing that Apple users have come up with over several years of using this cable.
Method #1 - hopeless

Most of my friends who have an iPhone/iPad don’t really bother with lightning repairs. The easiest way is to take electrical tape and wrap it around the bending points on the cord: near the connector and USB. The problem is that the tape's adhesive can dry out over time. You can also accidentally tear off a piece of it, which will lead to further unwinding. But the result is the same - you have to either remove the old electrical tape or apply a new fresh layer, and this is completely unaesthetic. I believe that such an elimination of the problem, although it has the right to life, is not the best. That's why read on.
Method #2 - conditionally unsafe

IN in this case you need to have a regular spring available. You can get one by unscrewing the handle. It’s worth saying right away that it’s better to take a spiral dark shades, since the colorless metal oxidizes over time and can leave marks on the hands of the lightning owner. The cable repair process itself is quite simple. You need to squeeze out one of the ends of the spring and put it on the wide part of the cord near the connector itself. Next, move the spiral to the last one and begin to slowly wind the spring onto the cable base. After 30-60 seconds of labor you will get almost eternal lightning, because the spiral will prevent bending and tearing. This procedure can also be done near USB. What I like about method #2 is that once it's done, the cable is always straight (even if you try to rotate one of its ends 90 degrees or more). But the main “disadvantage” is the presence of sharp ends of the spiral, which can easily be scratched, and, if desired, also puncture your finger.
Method #3 is the best

This approach was first chosen by people who clearly understand electronics. Personally, it would never even occur to me to put heat shrink tubing on the damaged part of the lightning. It is worth remembering the different densities and the possible presence/absence of an adhesive layer inside it. To repair an 8-pin cable from Apple is better take the most stable and reliable specimens. Hard tube it will press more tightly to the cord when heated by a hairdryer and will not slide off, which is fraught with additional breaks in the area of the connection between the heat shrink and the intact part of the lightning.
The described method is the most aesthetic of those that you can apply yourself. But do not forget that its beauty implies the need to be careful: if you continue to use the cable in the same way as before processing, it will break completely. Heat-shrink tubing only extends the life of lightning when used carefully.
Method #4 - Safety Clips from Indiegogo

The LimitStyle company announced a fundraiser on the Indiegogo crowdfunding platform back in 2015, which was a success. It's no wonder that many people became interested in their mechanism, designed to eliminate the problem of broken sync cables. The design mount is assembled from four parts, which create a certain load on the lightning. Notably, the protruding components can be used to remove the cable from the connector. Owners of the product will enjoy the ability to mark different cables, thanks to the availability of eight colors of protection from LimitStyle: green, blue, yellow, white and others.
Almost every user of regular headphones is familiar with unpleasant situation, when after a month/six months/year (or more depending on the quality and high cost) the headphones have a long life. Occurs mainly due to the fact that the wiring in a particular one is subject to frequent and strong kinks while in a pocket or bag. Usually this is the very beginning, near the plug. As a result, the insulation of the cores deteriorates, and the cores themselves break. The situation is aggravated by the design of the plug, as in the photo above. Actually, all the tricks outlined below apply to such headphones. For example, I have a Sennheiser CX-55, but before that there were 2 pairs from Nokia with the same design.
How to postpone this unpleasant moment? First let's look at various designs plugs to understand what manufacturers do to soften the kinks of the wire immediately after leaving the plug. Let's look at the photo:

As you can see, our experimental plug number 1 is not protected by practically anything and the wires can freely bend in the pocket at least 180°. This is facilitated by the fairly solid body of the plug, which is very difficult to bend, so it is mainly the wire that bends. With such excesses, he is unlikely to live long.
Plug number 2 protects the wire from bending much better thanks to the curved tip and perforation of the body, which allows it to bend more freely, protecting the wire from extreme bends, taking part of the bend on itself. You're lucky if you have a plug like this: your headphones will live happily ever after.
Plug number 3 is dismountable, sold at any radio parts store and attached manually. Although it is straight, it protects the wire from sharp bends with the help of a soft spring. It was he who gave me the idea of how to protect the wire coming out of the first plug. You just need to equip it with the same spring!
To do this, we disassemble the old fountain pen, take out the spring and put it on the wire. We do this not according to the principle of a spring ring on a keychain, but through the middle of the spring. It's very simple, you'll figure it out on the spot. To protect the soft wire, we additionally strengthen it with electrical tape in the place where we will put the spring on, otherwise the tip of the spring, where the rings are pressed tightly, can dangerously crush it. After the operation, remove the tape.

All that remains is to bring the spring to the plug and put it on it. In the end, everything looks more than aesthetically pleasing, and the wiring is protected from dangerously sharp bends.
