How to cover a roof with metal tiles with your own hands. Do-it-yourself metal tile roofing How to install metal tiles on a roof
Sheet length from 550 to 8000 mm
Weight - 4.75 kg/m2
2. Lathing, hydro- and vapor barrier
As lathing for metal tiles profiles made of galvanized steel produced by INSI (PSh-28-0.7, PSh-28-1.0, PSh-61-1.5) or wood (boards 25x100, 32x100 or timber 50x50) are used, which are attached to rafters from bottom to top (from eaves to ridge) with a pitch corresponding to the pitch of the metal tiles. Vapor barrier film installed on the side of the warm room. Waterproofing is mounted on rafter structures.

Superdiffusion membranes are laid on the insulation without a gap, paying attention to the location of the side that should be adjacent to the insulation. Anti-condensation films must be installed with a gap between the film and the insulation. It is necessary to strictly follow the film manufacturer’s recommendations for its use and installation method. When installing a cold attic, it is possible not to install waterproofing, as long as proper ventilation of the under-roof space is guaranteed.

Roofing films are laid along the rafters, from bottom to top across the slope, parallel to the cornice. The joint of the film is made along the width of the slope, with an overlap of at least 100 mm. Along the length of the panel, the films are joined on the rafters with an overlap of 100 mm. The permissible sag of the film between the rafters is 2 cm. Maximum distance when installing films between rafter structures 1.2 m. When installing using wooden sheathing An anti-condensation film is installed under the counter-lattice to improve ventilation between the tile sheet and the film.

3. Cornice
The cornice is attached before installation metal tile sheets along the bottom edge of the slope. If the device is provided organized drainage, gutter holders are installed before installing the cornice. In this case, the cornice must be mounted so that its end ends in the first third of the gutter from the wall.

The cornice is aligned along the bottom edge of the slope using laces. Attaches to sheathing using self-drilling flat head screws. The joint of the cornices is carried out with an overlap of 50-100 mm.
The roof eaves are hemmed different ways. For filing they use: corrugated sheets, metal siding, façade panel. There are two options for arranging materials: along or perpendicular to the wall.
4. Installation of metal tile sheets
Styling metal tile sheets produce from right to left. Installation begins with the installation of the first two sheets. First metal tile sheet It is attached with a self-tapping screw in the lower right corner so that the lower edge of the sheet is along the edge of the sheathing. Second metal tile sheet is placed on top, closing the capillary groove. The edges of the sheets are aligned with the cornice and the plane of the slope gable. After alignment, the sheets are secured. Next, proceed to the installation of subsequent metal tile sheets.
If the length of the slope is more than 6 m, it is recommended to make it composite, due to the inconvenience of transporting and installing the sheets. When installing a composite slope, metal tile sheets are mounted from bottom to top, from right to left, according to the diagram. During this installation, it is important to align the capillary grooves of the lower and upper sheets. Otherwise, a gap will form between sheets of metal tiles. All sheets are laid with an overlap along a length of 200 mm. For proper organization overlap, the length of the bottom sheet of metal tiles must satisfy the formula:
Ln.l.=0.2+b*Nsh
b - tile pitch size; Nш - number of tile steps along the slope
For example, sheets with a length of 3.0 are subject to this formula; 3.4; 3.8; 4.2; 4.6; 5.0 m.
For installation of metal tiles roofing screws 4.8x35 or 4.8x20 mm are used. Metal tile sheets are fastened in the lower deflection of the profile (Fig. 12), screws are located on the sheets in a checkerboard pattern, near the edge of the slope (cornice, ridge, pediment, valley) in every wave. The longitudinal joint of the sheets is fastened with screws or rivets. In cases where the roof slope is less than 14°, it is necessary to seal the longitudinal and transverse joints of the sheets.
Fastening metal tiles to the upper deflection of the wave is strictly prohibited!
Fastening metal tiles with nails or self-tapping screws without sealing gaskets is strictly prohibited!
Clogging roofing screws using a hammer is strictly prohibited!
By metal tiles you need to walk carefully, in shoes with soft soles and step only into the lower deflection of the wave in the areas of the sheathing.


Self-drilling screw with sealing gasket is installed in the deflection waves of metal tiles under the transverse wave (at the bottom of the wave), perpendicular to the sheets. The screw is tightened until the gasket is straightened into a horizontal line. Excessive twisting leads to bending of the gasket and its separation from the plane of the sheet.
5. Endova
The sheathing at the joints of the slopes is made continuous at a distance of 400...500 mm from the middle. Lower valley attached to the sheathing using clamps. Metal tile sheets laid in such a way that at least 100 mm remains from the edge of the sheet to the bottom of the valley.
Upper valley installed after laying the metal tile sheets and fastened with roofing screws 200...300 mm into the top of the metal tile wave. Self-tapping screws should not violate the integrity of the lower valley.
6. Pediment
Gable is attached in such a way as to cover the upper deflection of the metal tile wave. In Fig. Figure 13 shows the lining of the roof overhang protruding from the gable side wall profile S-13 located across the roof slope. C-13, in this case, is ordered in advance or cut on site according to the size of the stem.

7. Horse
Docked ridge elements with an overlap of 100 mm. The ridge is attached with roofing screws 4.8 x 80 mm to the sheathing, to the top of every second wave. The flat ridge is attached with roofing screws 4.8 x 80 to the sheathing or 4.8 x 35 to sheets of metal tiles, to the top of every second wave.
A polyurethane foam sealant is placed between the ridge and the metal tile. The ends of the shaped ridge are closed with a decorative cap.
To ventilate the under-roof space, a ridge fan is used, which is attached to the ridge with roofing screws. The joint is treated with sealant.

8. Wall profile
Where the roof meets the wall, pipes and dormer windows, a wall profile is installed. The profile is applied to sheets of metal tiles and attached to the wall.

Brick protruding from the roof rectangular pipes framed in the following way:
Step 1 - Installing the lower pipe apron
First you need to prepare the junction of the lower apron to the side surfaces of the pipe. To do this, using the apron elements as a template, mark cutting lines on the pipe. Then, using a corner cutting machine (grinder), a groove is made in brick walls pipes. Having cleared the groove and the surface of the sheathing from brick dust, they begin the installation of the elements of the lower apron, having previously trimmed each element and bent it along the slope of the roof. When installing the apron, the bent upper edge is inserted into the groove, the vertical wall is pressed tightly against the surface of the pipe, and in this position the element is fixed with roofing screws with a sealing gasket to the sheathing. The first element is mounted to the bottom edge of the pipe, then the two side ones and finally the element to the top edge. The overlap of the upper elements on the lower ones must be at least 150 mm. After fixing all the elements to the sheathing, the edge of the apron inserted into the groove is coated silicone sealant. Attention! For better adhesion, the groove needs to be washed with water.
step 2 - Installation of the bottom sheet from the pipe to the cornice

At this stage, a flat (galvanized or painted) sheet is installed. The length of the sheet must correspond to the distance from the bottom edge of the pipe to the cornice or the nearest valley, the width is not less than the width of the lower element of the apron (including side bends). One edge of the sheet is placed under the lower element of the apron, and the other is brought out from above, onto the cornice or valley. After fixing the flat sheet to the sheathing, bends are made on its sides using hand tools.
step 3 - Laying sheets of metal tiles along the bottom and sides of the pipe

step 4 - Installing the wall profile
After installing the sheets of metal tiles around the pipe, finishing the pipe with a wall profile begins. The installation procedure is similar to the elements of the lower apron. First, a wall profile is installed to the bottom edge of the pipe, with preliminary cutting to its width, according to the drawing. Fastening to the pipe is carried out using dowel-nails, and the profile is attached to the metal tile using roofing screws in the upper part of the wave.

step 5 - Installing a wall profile on the sides of the pipe
It is necessary to process two wall profiles according to the lateral dimension of the pipe and install them on the side faces.

step 6 - Installing the wall profile on the top edge of the pipe
Install the wall profile on the upper edge of the pipe, while cutting the vertical parts protruding beyond the contour of the pipe from below and bending them onto the side edges of the pipe, securing them with dowel nails.

Step 7 - Installing the top sheet of metal tiles
Install the top sheet of metal tiles on top of the wall profiles and sheets of metal tiles laid earlier, leaving a gap of at least 100 mm between the lower edge of the metal tile sheet and the pipe. Place a polyurethane foam seal under the metal tiles. Place sealant in the small gap created at the junction of the wall profile and the top and side sheets of metal tiles.

The wall profile is also used for internal roof fractures. On the external fracture of the roof, a cornice element is used.

If you plan to sheathe the pipe with a profiled sheet, then after framing the pipe, a frame from a hat profile is mounted, a profiled sheet is attached to it, and the corners are formed with an outer corner 50x50.
The chimney is attached to the pipe with dowels and nails before installing the corrugated sheet.

Metal tile installation video
9. Drainage system
The drainage system is used in industrial, residential and public buildings for organized drainage of water from roofs.
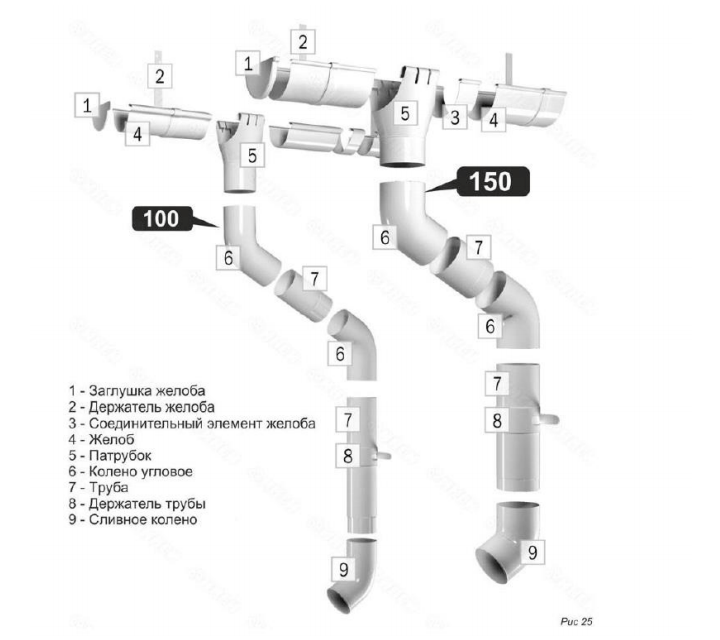
A drainage system with a pipe diameter of 150mm will allow you to drain rainwater with 117 square meters of slope. The number of pipes on building facades will be significantly reduced. Gutter holders are mounted at a distance of no further than 0.7 m, pipe holders - no further than 2 m from each other.
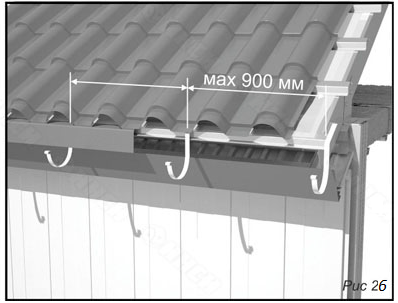
A drainage system with a pipe diameter of 100 mm will allow rainwater to be drained from 52 square meters of slope. Gutter holders are mounted at a distance of no further than 0.9 m from each other (calculated distance - 0.75 m), pipe holders - no further than 3 m from each other (for example, 3 holders are required for a pipe 5 m long, for a pipe 3 m long two are enough.
If there is a threat of freezing of the drainage system, it is recommended to use heating systems for gutters and pipes.
With a catchment area of less than 30 sq.m per drainpipe gutters can be installed with a zero slope, with larger area In the catchment area, the slope of the gutters can be up to 2%.
10. Installation of the drainage system:
step 1 - Calculation of the number of gutter holders.
Divide the total length of the gutter by the selected holder spacing (no more than 900 mm, recommended gutter holder spacing is 750 mm) (see Fig. 26). The resulting number of segments +1 is the number of gutter holders.
step 2 -Marking for gutter holders.
On the bottom sheathing, mark the installation locations of the gutter holders with the spacing selected in the previous step.
step 3 -Selecting the gutter slope.
Select the amount of gutter lowering (h) based on the aesthetic perception of the gutter line. The gutter line should go down smoothly, without causing a visual sensation of strong curvature of the edge of the slope or the facing of the eaves overhang. Recommended slope (i) gutter is 1%, that is, from 1 cm to 1 m. The difference in the heights of the upper and lower points of the gutter (h) can be calculated as:
h= L x i
where L is the length of the gutter;
i - gutter slope
Step 4 - Determining where the gutter holders bend.
Number the holders from the beginning of the gutter to drainage funnel. Mark the bend location on the first holder, thus determining the initial (upper) position of the gutter. When marking, it must be taken into account that the edge of the gutter is 2 -2.5 cm lower relative to the roof slope line (see Fig. 27).

Fold the holders in ascending order of numbers and mark the folding points, as shown in Fig. 28.

Step 5 - Attaching the gutter holders.
Aligning the bend with the edge of the sheathing, attach the gutter holders to the sheathing with self-drilling galvanized screws 4.8x22 with a flat head, 3 each. per holder. When using 50x50 beams as sheathing, a double beam must be installed to securely fasten the holders.
Step 6 - Creating a Slope
To create a slope, bend the first and last holder and pull the cord between them. Bend the remaining holders so that they touch the cord (Fig. 29).

step 7 - Installation of the pipe
In the gutter, at a distance of 150 mm from the bottom edge, cut a hole with a diameter of 100 mm for the pipe. Insert the pipe into the hole (Fig. 30). Start Front edge pipe under the outer bend of the gutter. Bend the flange of the pipe onto the rear edge of the gutter and secure with two 4.2x16 self-tapping screws.
Step 8 - Installing the Gutter
Install gutter plugs at the ends (Fig. 31).

Step 9 - Installing the Gutter.
Insert the gutter into the holders, placing the rear edge of the gutter into the holder's protrusion.
step 10 -Gutter connection.
Install the gutter connecting element at the junction of the gutters (Fig. 32).
Step 11 - Installation of the corner elbow.
Use a corner elbow to create a transition to the wall of the building. Length connecting pipe determined by location (Fig. 33).

Step 12 - Installation of the pipe.
The pipe is secured to the wall using pipe holders. The pipe is measured, if necessary extended at the installation site of the pipe holder, and secured with a lock (Fig. 34).

Step 13 - Installation of the drain elbow.
The drain elbow completes the drainpipe and serves to drain water from the foundation of the building. The bottom of the drain elbow should be located at a height of 300 mm from the blind area of the building (Fig. 35).
11. Snow guard and roof fencing
For safe movement on the roof, roof railings are installed at the eaves level, starting from the second line of sheathing.
The fence is made depending on the roof slope and the type of tiles. Fastening is carried out to the sheathing profile through a sheet of metal tiles and a rubber sealing gasket in the place where the wave deflects using self-drilling galvanized bolts 5.5x25 mm for metal sheathing and 5.5x60 mm for wooden sheathing. It is prohibited to attach a roof fence to one sheet of metal tile. The fencing sections are bolted to each other.

To prevent large masses of snow from falling off, snow guards are installed. The design of the snow retainer consists of brackets and pipes. The brackets are installed in the deflection of the wave and are attached through the metal tile and rubber sealing gasket to the roof sheathing. At the installation sites for fastening the bracket, an additional sheathing profile is pre-installed at a distance of 120 mm (along the axes of the sheathing profiles). Snow guards are installed above the roof railing. In the absence of a roof fence, snow retainers are installed no lower than the third row of sheathing. When the length of the slope is more than 10 meters, it is recommended to install two rows of snow guards. In areas with big amount snow precipitation, it is necessary to install a bracket rod. The snow retainer rod is attached at one end to the bracket, the other to another sheathing profile through a sealing gasket and a sheet of metal tiles (see Fig. 38).
It is prohibited to attach the snow retention bracket to one sheet of metal tile!


The installation step of the snow retention brackets depends on the snow area of construction, the roof structure, and the fastening element. Recommendations have been developed for calculating the installation pitch of brackets. The calculation was made based on the use of self-tapping screws with a diameter of 4.8 mm. The immersion depth of the screws is shown in Fig. 39.

snow guards are available in formatHTMLthis instruction.
12. Accessories

Weather vanes, decorative spiers, and chimneys are installed on the roof as accessories. Installation of all accessories is carried out in accordance with SNiP standards.
Master Flash roofing sealants are used to install roof exits for antennas, masts and round ventilation pipes with a diameter of up to 330 mm (with an external surface temperature of up to 130°).
13. Processing of wooden structures
Wooden structures used for roofing require antiseptic and fire retardant (fireproof) treatment. Processing can be carried out both before construction of structures (processing of individual boards and bars) and after (processing of rafters and sheathing). Processing is carried out various methods(immersion in a container with a solution, brush application, spray application.
14. Tools

- Screwdriver with 6 mm hex bit.
- Electric nibbler or nibbler.
- Manual roofing shears.
- Mallets (wooden, rubber).
- Hacksaw, jigsaw, hammer (used when constructing rafters and sheathing).
- Angle grinder (“grinder”), hammer drill, drill, gun for pressing out sealant (used when installing a wall profile).
- Level, level, plumb line, measuring instruments and devices.
15. Attention!
Use as ridge or valley seals polyurethane foam is strictly prohibited!
All products produced by the INSI facade and roofing plant are designed for use on pitched roofs in accordance with of this instruction on installation. The INSI plant is not responsible for damages or losses that may arise when using INSI products to perform functions that are not inherent to them.
28.09.2017 0 CommentsThe need for reliable and high-quality covering of structures for various purposes is an axiom. Developers are increasingly preferring metal tiles to replace classic slate and galvanized sheet metal. The seemingly complex installation of material, entrusted to specialists, can be successfully completed independently with helpers from among relatives and good friends. Desire, passion, and the availability of the necessary tools must be based on certain theoretical knowledge in order to obtain the result expected from the work. Theoretical points and useful tips presented in this material.
Classmates
Advantages and disadvantages of coating
The following qualities of roofing material can be cited in favor of choosing metal tiles:
- environmental friendliness - does not contain harmful substances and compositions;
- light weight – 3.6-5.2 kg/m2;
- excellent strength, achieved by the presence of structural stiffening ribs, gives a correctly installed sheet of metal tile with a thickness of 0.5 mm the ability to withstand a load of more than 200 kg/m2;
- installation and repair of the roof is not difficult;
- Fire safety;
- aesthetic classic look with wide possibilities selection of materials of various thicknesses, profiles, protective coating and colors;
- minimal linear expansion under the influence of temperature and high resistance to temperature changes.
When choosing a material, you need to know its disadvantages. For metal tiles it is:
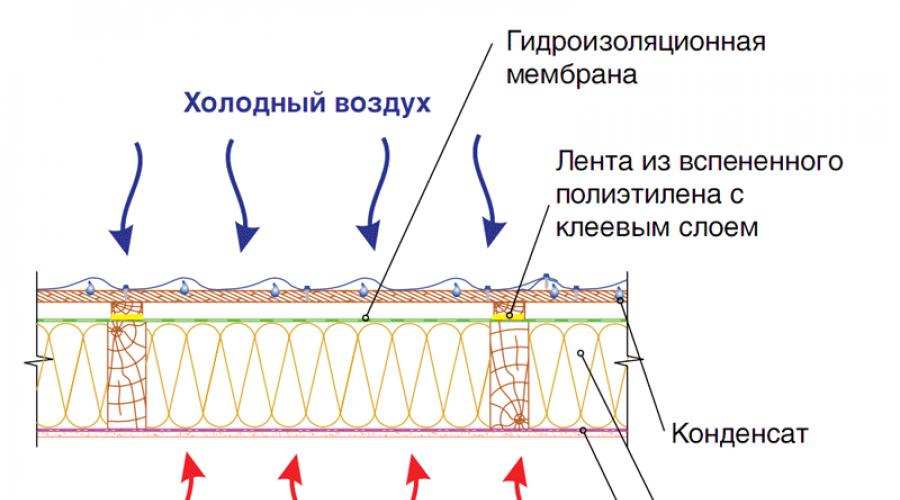
- Tendency to form condensation on the surface of the sheet due to the difference in outside air temperatures and attic space. For a material based on metal, this can cause corrosion processes.
- Noise when exposed to atmospheric precipitation (rain, hail) and from contact with tree branches swayed by the wind.
Both problems are significantly mitigated by mandatory roof insulation from the attic side. The insulating “pie” shifts the “dew point” outward and at the same time acts as sound insulation.
Calculation of material and necessary accessories
To order full set materials for roofing, it is necessary to measure the prepared structure. Subject to measurement:
- Length of the slope - measured in the center and at the edges of the overhang from the ridge to the outer edge of the lower eaves board. The main one is considered maximum rate with the addition of an overhang allowance.
- Slope width.
- Lengths of external (ridges) and internal (vales) angles and their summation.
- Lengths of ridges and eaves around the perimeter of the roof structure.
All measurement results are transferred to a sketch or roof plan. According to this sketch, a sales consultant or specialist construction company can make an accurate calculation required quantity sheets of metal tiles of various sizes. Sheets are produced in 1, 3, 6 or 10 modules (a module is a unit of area equal to one profile row of metal tiles). Selecting the required sheet sizes will reduce the amount of material waste when laying a roof with complex geometry.

An example of the layout of metal tile sheets on the first slope of a hip roof.
When calculating the number of sheets, their usable area is taken into account, which is 8-12% less than the total due to the overlapping of sheets. Then the list is supplemented by water collectors, valleys, ridge, snow holders, strips and sheets of steel in the color of the selected tile, and the necessary fasteners. The roof plan should show existing and planned ventilation shafts, antennas, windows (attic, dormer), chimneys. Their finishing in places adjacent to the roof will also require the purchase of special fittings.
Preparatory work
Main installation work preceded by mandatory preparatory training. Their importance cannot be underestimated. At this stage they check:
- The correctness of the assembled rafter system, the accuracy of its geometry.
- Availability of sheathing and counter-lattice. Compliance of the section of the molding material and the pitch of the sheathing with the pitch of the rafters, the expected load, and the recommendations of the accompanying documentation of the tile manufacturer.
- The presence of a continuous or additional sheathing of the cornice for reliable fastening of the safety elements used (fences, snow guards).
- Integrity of insulation membranes.
- The presence of additional boards for fastening skates and boards for reinforcement in the valleys.
- Possibility of organizing ventilation of the entire space under the roof. For this purpose, mandatory cornice and ridge vents must be provided. If they are present, air enters the eaves part, ventilates and dries the underside of the metal tile from possible condensation, and is removed through the ridge zone.
- Has the wooden structure been treated? by special means for fire and biological protection.

Installation of rafter system, sheathing and water vapor barrier.
Main works

Step-by-step installation of metal tiles on the roof on your own.
- For the intended water drainage system, brackets are mounted no further than 0.7 m from each other.
- The cornice strips are nailed (30 cm increments) with galvanized nails. The waterproofing film laid under the sheathing is lightly applied to the plank and trimmed.
- The first sheet of metal tile to be laid is aligned at the gable and temporarily secured with one screw at the ridge and the other at the eaves.
- The next three sheets are temporarily secured and the entire block is leveled.
- Now you need to secure all the sheets of tiles to the sheathing.
- Next, the operation with 3-4 sheets is repeated until the entire slope is covered.
- The edges of the metal tile profile should not reach the ridge axis of at least 8 cm. ventilation tape and then at the highest points of the profile, ridge strips are attached with self-tapping screws (step 30-80 cm).
- Installed from bottom to top gable plank: fastening step - 30-60 cm, overlap - 5-10 cm. The bar should cover the top line of the profile wave.
Arrangement of valleys
Once the full-size tiles are laid, the interior corners are finished. Even at the preparatory stage, additional sheathing boards were packed into the valleys to be able to withstand the load from possible snow “bags.” Now the gutter itself, made of bent sheet, is laid from below to the ridge. Vertical overlap of sheets is 200 mm. The width of the sheet from the valley axis is 0.5 m per side.

On the laid sheets of the gutter, markings are made (10 mm on the sides of the valley axis), along which the adjacent inner corner sheets. A special seal is attached to the edges of the gutter. The sheets of metal tiles, cut according to the markings, are placed in their places and attached to the sheathing no closer than 0.25 m from the axis of the corner. An indicator of correct fastening is the absence of gaps between the tiles and the seal and the tight fit of the sheet to the sheathing board at the place of fastening. If the edges of the tiles adjacent to the valley were cut unevenly and with defects, do not worry. All imperfections will be hidden under the installed decorative overlay.
Roofing near pipes

Pipes and ventilation shafts passing through the roof along the perimeter are lined with a wall profile made of bent galvanized sheets having a stable polymer coating. The overlap of the profiles on the pipe is at least 15 cm. They are attached to the sheathing under the tile sheets, and the junction with the pipe is treated with sealant. A “tie” - a flat triangular sheet with a flange - is inserted and attached under the lower profile to ensure the drainage of water entering under the roof from the pipe towards the eaves. After installing the wall profile, the “tie” and the metal tile itself, the elements of the adjacent “apron” are installed at the joints with the pipe.
Accessories
The installation of the accessories provided for in the plan is carried out strictly according to the technology specified by the manufacturer in the attached instructions for a specific product. But all installed stairs, railings, ventilation outlets, bridges and other accessories have one thing in common: general rule fastening - through sheets of roofing material directly to the sheathing using synthetic gaskets.

- Metal tiles are measured material, the length of sheets of which reaches 7.5 m. For its temporary storage or long-term storage a flat platform is selected with wooden beams installed every 0.5 m. The same bars are used as spacers between sheets. A stack of folded sheets is covered and pressed down on top (in 2-3 places) with a weight that can prevent unwanted movement of the material from gusts of wind.
- The roofing material is supplied to the roof along two boards, like guides.
- The use of a grinder when working with metal tiles should be avoided, because when cutting, in addition to the edge in the cut area, the polymer coating is also broken (burned) in places where hot metal filings come into contact with it. Second important point– the warranty for sheets cut with this power tool is canceled by the manufacturer.
- No seals are used under the decorative valley trim. When fixing the linings, you need to make sure that the valley itself is not damaged by the screws.
- The wall connection profile can be mounted directly on the wall plane or in a prepared groove with the obligatory sealing of the joint with sealant.
- A large overhang from the eaves can cause deformation of the edge of the metal tile. The optimal overhang is 40 mm.
- Self-tapping screws are purchased at the rate of 7-10 pcs/m2. The length of the self-tapping screws for attaching the tiles to the sheathing is 25 mm, and between them is 19 mm.
- Typically, metal tiles are attached to the sheathing in every third wave of the profile; near the gables, ridges and cornices - through the wave. The self-tapping screw is driven 1.5 cm below the stamping line.
- Working with metal tiles requires maximum care and delicacy to preserve the sprayed layer. Therefore, when working on the roof, use shoes with soft soles.
The technology for installing a roof made from a metal tile profile is not complicated. Following its points and proper maintenance of the roof in the future can remove the issue of covering the building from the agenda for 50 years.
How to lay metal tiles correctly? This question is asked by almost all developers who have chosen this modern, practical and durable material. We will try our best in detail tell what technology for installing metal tiles is recommended by its manufacturers and what installation scheme for metal tiles is most preferable.
The main advantages of metal tile modules are good strength and high fire-fighting properties.
In addition, you will learn how the roofing “pie” works, what materials and tools will be needed when building a roof, and much more. We hope that our instructions for laying metal tiles will be useful to both developers and builders, regardless of whether you are building a house or making a shed from metal tiles.
Metal tiles: installation technology

A design made according to this scheme, with proper selection of materials, will provide you with a reliable and durable roof.
Briefly about the roofing “pie”. Before you start installing metal tiles (you can download the video or watch it below), let’s remember some concepts and a diagram of the roofing “pie”. It got its name because large quantity layers performing various functions. It is this design, with the proper selection of materials, that will provide you with a reliable and durable roof.
Regardless of whether you install metal tiles yourself or hire installers, it is important to clearly understand that the roof is quite complex design, during the construction of which it is necessary to strictly follow the recommendations for the installation of metal tiles given by manufacturers, as well as all building codes and regulations.
Always keep under control the entire installation of metal tiles (you can download or watch video instructions here), since the consequences of poor quality work may not appear immediately. Thus, poorly laid vapor and waterproofing can lead to the accumulation of condensation, deterioration of thermal insulation properties, and rotting of wooden structural elements. Keep in mind that only by following all the rules for installing metal tiles can you build a reliable and durable roof.
Metal tiles and installation of structural elements are carried out according to the following sequence (diagram No. 1):

The technology for installing a metal tile roof requires mandatory protection of the insulation on the MC side using film waterproofing, and on the premises side - film vapor barrier.
- Rafter system.
- Counter rails.
- Waterproofing film.
- Vertical sheathing bars.
- The initial bar of the horizontal sheathing.
- Horizontal sheathing bars.
- Additional sheathing.
- Wind board.
- Gutter bracket.
- Cornice plank.
- Metal tiles.
- Roof ridge.
- Ridge seal.
- Dormer window.
- Thermal insulation.
- Vapor barrier.
- Attic filing.
Return to contents
Installation instructions for metal tiles (Monterrey and its analogues)
Return to contents
Tools and equipment
Installation of Monterrey metal tiles and its analogues must begin with preparation the necessary tool. You will need:

1. Hand scissors for metal.
2. Hacksaw for metal (with fine teeth).
3. Perforated metal shears.
4. A special attachment for a drill for cutting metal.
5. Electric nibblers.
6. Jigsaw.
7. Circular saw.
8. Grinder with an abrasive wheel.
- tool for cutting sheets of metal tiles (MC);
- screwdriver (preferably cordless);
- medium sized hammer;
- a long, even strip or rule;
- marker.
- metal scissors (manual and electric);
- hacksaw or electric reciprocating saw with matching canvases;
- electric cutting shears;
- jigsaw;
- circular saw with pobedit teeth.
Upon completion of work, carefully remove metal filings, otherwise they will rust and damage the polymer coating of the MP.
Attention! Under no circumstances should you cut metal tiles with tools equipped with abrasive wheels (“grinder”). Otherwise, under the influence of high temperatures, not only the polymer layer, but also the zinc coating will be destroyed. The result will be disappointing: a rapid rusting process will begin, and rusty streaks will appear on your roof.
Return to contents
Installation of metal tiles (Monterey and analogues)

If thermal insulation boards have already been purchased, then the pitch of the rafters will depend on their width, since the insulation will subsequently be inserted between the roof rafters.
The pitch of the rafters for metal tiles should be in the range of 550-900 mm. Keep in mind that if you have already purchased thermal insulation boards, the pitch of the rafters will depend on their width, since the insulation will subsequently be inserted between the roof rafters. As a rule, timber with a cross section of 150x50 mm is chosen as the material for rafters.
After the rafters are installed, it is necessary to take control measurements of the slopes. Check the squareness and flatness of the structure; to do this, measure the diagonals of the slopes. Small deviations (up to 10 mm) are acceptable; they can later be hidden with additional elements.
Please note that if metal tiles are used for the roof, the slope of the slope must be at least 14°. The length of the sheets is determined by the main size - the length of the slope. It is measured from the ridge to the eaves, taking into account the eaves overhang (at least 40 mm). If your slope is more than 6 m long, then the sheets must be divided into two or more pieces, which are then laid overlapping. The overlap of metal tiles should be about 150 mm. Of course, when using long sheets on the slope, fewer joints are obtained, but they are much more difficult to lay than short ones.

The length of the insulation should be 2–3 cm greater than the distance between the rafters.
With daily temperature changes, condensation may appear on the lower surface of the MP. Also warm air from the house, containing moisture vapor, penetrates into the cold under-roof space. Excess moisture leads to moistening of the insulation layer, and consequently, its thermal characteristics deteriorate. As a result, the roof freezes, ice forms on the metal tiles, rafters and sheathing rot, mold appears and the interior decoration of the premises is destroyed.
To avoid all these troubles, the installation manual for metal tiles from any manufacturer strongly recommends using insulation of the required thickness. In addition, the technology for installing a metal tile roof requires mandatory protection of the insulation on the MC side using film waterproofing, and on the premises side - film vapor barrier.
To remove moisture vapor from the under-roof space, it is necessary to create natural ventilation, that is, to ensure free movement of air from the roof eaves to its ridge. To do this, free space (about 40 mm) is left between the MP and the waterproofing film using lathing. On eaves overhangs, when filing them, gaps are left, and in rubber seal the ridge is cleared with special holes.
Roll out the waterproofing horizontally along the rafters. Start from the eaves, making a sag of about 20 mm. Make an overlap between adjacent panels (approximately 150 mm). Place films of the Yutafol or Yutakon brand outward with the side that has a colored stripe along the edge. It is not allowed to turn the film over. On the market today you can find a sufficient number of certain roofing films. Consult with managers about the specifics of their use.

1. Rafter leg.
2. Waterproofing material.
3. Counter-lattice.
4. Lathing.
After installing the waterproofing material, you can simultaneously lay the roofing outside and thermal insulation inside the building. Install thermal insulation boards between the rafters, leaving a gap of at least 20 mm for waterproofing “Yutafol” or “Yutakon”, otherwise the film will lose its properties. If you purchased Tyvek or Yutavek film, there is no need to create a gap.
On internal surfaces Use a stapler to secure the vapor barrier “Utafol H Silver” or “Utafol H 110” to the rafters. Lay the vapor barrier sheets overlapping, sealing them tightly with adhesive tape. After completing this stage of work, you can begin interior cladding (if it is an attic floor).
The lathing is made from antiseptic-treated beams with a cross-section of 50x50 mm and edged boards 32x100 mm (approximate values). First, nail the falling beams onto the rafters on top of the waterproofing film from the ridge to the eaves, and then attach the sheathing boards to them.
Take the first sheathing board (counting from the eaves) thicker than the others (about 10-15 mm). Now the most important thing is to endure required distances between the boards. If you have Monterrey metal tiles, the installation of the second board should be carried out by stepping back from the bottom edge of the first board by 300 mm (measure to the middle of the second board being nailed).

Before installing the metal tiles, at the internal junction of the slopes on continuous sheathing The bottom valley strip is secured with self-tapping screws. If the planks need to be joined, an overlap is made (100-150 mm).
The same distance for the MP Maxi MC is 350 mm. The center-to-center distance of all subsequent sheathing boards (32x100 mm) for the Monterey or Supermonterey MP is 350 mm, for the Maxi MP - 400 mm. If you have made a rafter pitch of more than 1000 mm, use sheathing boards of greater thickness.
Perform continuous sheathing in valleys, near chimneys, along the perimeter of attic and dormer windows. On both sides of the ridge, nail two additional edged boards, and raise the end strips above the ordinary sheathing to a height equal to the height of the MCH profile.
Before installing the metal tiles, secure the bottom valley strip at the internal joint of the slopes onto the continuous sheathing using self-tapping screws. If the planks need to be joined, make an overlap (about 100-150 mm). Then mark and trim (if necessary) the sheets of MP. Install metal tiles from bottom to top.
On top, at the junction of the sheets (it rarely looks beautiful), install a decorative element - the top valley strip. Attention! The junction points are the weakest point of the roof. Therefore, to avoid having to repair metal tiles later, be especially careful when installing them.
To ensure a tight connection of the MP roof to the chimneys and walls, an internal apron is installed on the slope. Use the lower abutment strips to make it. Place the lath against the pipe wall and mark the top edge of the lath on the brick. Then, using a grinder, punch a groove along the marked line. After finishing the gating, remove the dust and rinse the working area of the wall with water.
Start installing the inner apron from the pipe wall located on the underside of the slope (on the side of the eaves, not the ridge). Cut the plank into place, install and secure with self-tapping screws. Using the same principle, install the apron on all remaining sides of the pipe. If you have to join the planks, make an overlap (about 150 mm). Treat the edge of the apron inserted into the groove with silicone sealant (it is better if it is colorless).

Attach the gutter holders to the bottom board of the sheathing. Their mounting method and pitch are determined by the type of drainage system used.
Then, under the lower edge of the inner apron, place flat sheet, the so-called tie, which will ensure the flow of water. Direct the tie either into the valley or down to the roof eaves. Create a bead along the edge of the tie using pliers and a hammer.
Mount the MC sheets on top of the apron and tie. After laying the roof covering around chimney, proceed to the manufacture and installation of an external apron. To make it, use the upper abutment strips. Install them in the same way as the lower ones, only do not insert the upper edge into the groove, but attach it directly to the wall.
Attention! All movements on the roof made of MP must be carried out only in compliance with safety measures. Wear soft, comfortable, non-slip shoes. Step only into the trough of the wave. Put on the installer's belt and fasten the safety lanyard.
Attach the gutter holders to the bottom board of the sheathing. Their mounting method and pitch are determined by the type of drainage system used. Therefore, please read the instructions that come with it. Pay special attention to the location of the edge of the gutter. It should be 25-30 mm below the edge of the metal tile. This is necessary to maintain the integrity of the gutters when layers of snow fall off the roof.
If the drainage system has rectangular section, the gutter is simply inserted and secured in the holders. The eaves flashing is attached to the roof sheathing, with the bottom edge of the flashing overlapping the edge of the gutter. The waterproofing film is installed above the eaves strip (to drain condensate).
When installing a round gutter, you need to insert its rear edge into the locking lug on the holder. The cornice strip is installed according to the above method. The under-roof film is also installed above the eaves strip.
Return to contents
Installation of metal tiles - instructions for installing roof windows

The number of windows required for a comfortable level of illumination in the attic can be determined by the ratio usable area glazing to the area of the room. Recommended values are between 1:8 and 1:12.
Let's make a small digression and consider the option of a roof with dormer windows. The number of windows required for a comfortable level of illumination in the attic can be determined by the ratio of the usable glazing area to the area of the room. Recommended values are between 1:8 and 1:12. That is, if your attic has an area of 100 sq.m., then the total window area should be 10 sq.m. It is recommended to install roof windows at a height of 90-110 cm from the floor level. When choosing windows, also keep in mind that two windows small sizes located at some distance will give more light than one large one.
In addition, you can install roof windows in groups, horizontally, vertically or in combination. As a rule, windows are installed on the sheathing with simultaneous fastening to the rafter beams. Although there may be some peculiarities depending on the manufacturer skylights. If horizontal dimensions the windows do not coincide with the pitch of the rafters, a partial change in the rafter structure will be required. In this case, it is recommended to install a rafter fragment and additional horizontal counter-battens to secure it. The opening for the window should exceed its dimensions by 40-60 mm in the horizontal plane and 45 mm in the vertical plane. Typically, installing roof windows is not difficult, since each window has detailed instructions on installation.
Return to contents

The first sheet is aligned with the end of the roof and secured with one self-tapping screw in the upper part. In this case, a canopy of metal tiles (removal) of about 40 mm is made at the cornice.
Align the first sheet with the end of the roof and secure it with one self-tapping screw in the upper part. At the same time, make a canopy of metal tiles (offset) of about 40 mm at the cornice. Lay the second sheet overlapping the first (if you are installing from right to left) or place the edge of the second sheet under the first - when installing from left to right.
Connect the sheets together with self-tapping screws in the upper part of the overlap, but do not screw them to the sheathing and provide them with the ability to move relative to the self-tapping screw holding the first sheet in the upper, ridge part.
Place the third sheet in the same way as the second. Align all three sheets connected to each other parallel to the cornice. If it is necessary to join sheets along the length, lay them in the order shown in Figure B. Attention! If your metal tile is equipped protective film, be sure to remove it during installation.
Secure the lower part of the sheet with self-tapping screws into the base of the MCH wave. Step through the wave. Arrange the subsequent rows of screws in a checkerboard pattern, also alternating them through the wave. Fasten the side overlaps of the sheets with self-tapping screws along each ridge. The estimated consumption of self-tapping screws when installing metal tiles is 6-8 pieces/sq.m of roof covering.
Attention! When purchasing metal tiles, check with the supplier for warranty conditions. The fact is that some manufacturers provide a guarantee for MP only if they use self-tapping screws of a strictly defined brand. Therefore, advice: buy self-tapping screws from a metal tile supplier.
At the ends of the roof, install end strips with an overlap of 50 mm. Secure them with self-tapping screws every 550-600 mm. Use self-tapping screws 80 mm long at the top, and 28 mm long at the sides. Trim the slats if necessary.

A shaped seal must be placed under the ridge, having first released ventilation holes.
Ridge strips can be flat or round. Start installing the round ridge strip by securing flat or conical plugs to its ends using self-tapping screws or rivets (select their shape according to the shape of your roof). For a flat ridge, caps are not required.
Place a shaped seal under the ridge, first clearing the ventilation holes. Install a flat or round ridge on the laid seal. Place ridge screws 80 mm long through the wave of the MC. Make an overlap of 100 mm between the individual ridge panels.
Metal tiles are a modern roofing material that successfully combines the attractive appearance of ceramic tiles with the light weight and inexpensive price of metal coverings. Its advantages are considered to be good performance characteristics, corrosion resistance and long term services. It is important that, knowing the features of this material and having basic construction skills, you can easily cover the roof with metal tiles on your own. Installing metal tiles with your own hands is reminiscent of the creation process multi-layer cake, the components of which improve and complement each other. In this article, we will step by step describe a proven “recipe” that creates a reliable, high-quality roof made of metal profiles.
Laying metal tiles with your own hands is a proven way to quickly and inexpensively cover the roof of a garage, garden or small residential building. This roofing covering is one of the varieties metal profile, which has a wavy relief that resembles the shape of traditional tiles. Metal tiles are made of galvanized steel, which is coated with a polymer coating made of pural, plastisol or polyester during the production process. A roof made from this material has the following advantages:
- A light weight. One square meter metal roofing weighs 3.5-4.5 kg, which allows you to increase the pitch between the elements of the rafter frame, reducing the cost of constructing the roof.
- Mechanical strength. A roof made of this material has high strength and load-bearing capacity, so it can easily withstand snow and wind loads, even if the pitch between the rafters is quite large.
- Corrosion resistance. A roof made of metal profiles is not subject to the destructive effects of corrosion, because it is reliably protected by a layer of zinc and a polymer coating.
- Long service life. A do-it-yourself metal tile roof lasts for more than 20 years, thanks to the high quality of the metal and the strength of the polymer protection.
Important! Knowing how to cover a roof with metal tiles yourself, you can save a lot of money, because installing a roof covering costs 50-70% of the cost of purchasing materials.
Roofing pie composition
Do-it-yourself installation of metal tiles involves creating a multi-layer roofing cake, which consists of a vapor barrier, insulation, waterproofing and the actual coating itself. In order for a roof made of metal profiles to last a long time, it is worth choosing the right suitable friend to each other structural components and follow the rules prescribed by the installation instructions. The roofing pie for metal tiles consists of the following parts:
- Vapor barrier. This is the name for a film that allows steam to pass through, but blocks water and condensation, protecting the insulation from getting wet. The vapor barrier must be laid on the lower surface of the rafters and secured with a construction stapler.
- Rafter legs. To cover the roof with metal tiles with your own hands, you need to correctly calculate the pitch between the rafters and install them evenly on ridge run and Mauerlat. The strength and load bearing capacity roofs.
- Thermal insulation. Thermal insulation is installed between the rafters of the frame, so the step between them must correspond to the width of the insulation.
- Waterproofing. Waterproofing must be laid over the rafters so that it protects the wooden frame elements from condensation or atmospheric moisture.
- Lathing. This element of the rafter frame is used to distribute the weight of the roofing material. Roofing material must be laid on the sheathing. The pitch between its slats is chosen in accordance with the weight of the coating and the angle of inclination of the slope.
- Roofing material. Do-it-yourself metal tiles are laid on the sheathing. For fixation, special roofing screws are used.
Please note that there are 2 types of metal roofing – warm and cold. A cold roof differs from a warm roof in the absence of a thermal insulation layer and vapor barrier in the roofing pie. This design is cheaper, but can only be used in cases where the attic or second floor is not heated.


Rafter frame and sheathing
Before covering the roof with metal tiles, it is necessary to assemble the rafter frame. The frame is a kind of supporting skeleton of a structure that supports its geometry, and also distributes and transfers the weight of the roof to the foundation of the structure. It is made from wood coniferous species impregnated with antiseptic and fire retardant, or metal. Metal rafter system It costs more, but can withstand heavy loads, so you can increase the pitch between elements. The roof frame is assembled in the following sequence:
- First of all, the Mauerlat is installed. The support beam is laid on top harness at home, secured with metal studs, embedded in concrete, or anchor bolts. The Mauerlat is made from timber with a cross-section of 150x150 mm and is mounted on the walls on which the roof slopes will rest. How many slopes there are on the roof - so many support beams are needed.
- Then, tightening ties are installed to connect the Mauerlat in increments of 1-1.2 meters. The puffs are made from timber 100x100 mm or 100x150 mm.
- Install vertical racks in the middle of each puff in increments of 1-1.2 m. In order for them to stand vertically, they are supported with temporary slopes.
- A ridge run needs to be placed on top of the posts. This is the name of the beam that forms, the rafter legs will rest on it.
- Next, it is necessary to install the rafter legs of the frame in increments of 0.6-1.2 m. The spacing between the rafters depends on how much the roof covering weighs, the cross-section of the element and the width of the insulation.
- The rafters must be covered with waterproofing to protect against condensation and atmospheric moisture. The film should be laid “slack” so that it does not tear under water pressure.
- Lastly, you need to install a sheathing made of slats with a cross-section of 30x30 mm or sheets of moisture-resistant plywood. The pitch between the sheathing elements is chosen in accordance with the weight of the roofing material and how many degrees the angle is between the surface of the slope and the base of the roof. The flatter the roof, the denser the sheathing should be, and the smaller the step between the rivers.


Important! It is possible to cover a roof with metal tiles, regardless of its design. The minimum recommended slope for this type of roofing material is 12-15 degrees. If the roof is flatter, then the installation is carried out with the obligatory treatment of the joints with sealant to prevent leaks.
Insulation
Before laying metal tiles, you should take care to protect the wooden frame elements from steam, condensation and moisture. Metal roofing coverings They have high thermal conductivity, so they heat up quickly, but they also give off heat easily, so they need to be insulated. During the construction of a metal roof, 3 types of insulation are installed:
- Vapor barrier. The instructions for laying metal profiles require the mandatory installation of a vapor barrier on the lower surface of the rafter legs. This role is played by special membranes that allow air to pass through, but block water, preventing the insulation from getting wet. Indeed, when the humidity of a thermal insulation material increases by only 5%, its effectiveness is reduced by half and is not restored after drying.
- Thermal insulation. Insulation is laid between the rafters to maintain the temperature in the house. It protects against cold air in winter and prevents heating of the under-roof space from the hot roof in summer. Used as insulation mineral wool, ecowool, glass wool, polystyrene foam or polyurethane foam. How many layers of insulation are needed to protect a house from freezing is calculated in accordance with climatic conditions.
- Waterproofing. Waterproofing material that protects rafter frame and insulation against moisture ingress are laid on top of the rafter legs. Strips of film or diffuse membrane are mounted in overlapping strips to prevent water from flowing between them.
Experienced craftsmen claim that it is impossible to properly cover a roof with metal tiles without using all three types of insulation in a comprehensive manner. Only by working together do insulation, vapor barrier, and waterproofing become effective.


Covering flooring
Instructions on how to properly lay metal tiles are popular among inexperienced craftsmen. To work with this unpretentious roofing material No special skills or complex tools are required. Laying the covering will be done using roofing screws, a screwdriver, building level and sealant and a circular saw with a metal disc. The process of laying a metal profile is as follows:
- Before laying metal tiles, the sheets are first cut. To simplify this task, you can purchase metal tiles whose sheet length corresponds to the size of the slope, then there will be no horizontal joints during installation and you won’t have to cut the material. In other cases, to cut the coating to size, use circular saw or jigsaw.
- Then the metal tiles are laid. The bottom row is laid out first, starting from the edge of the slope. An overlap of 10-23 cm or 1-2 waves is made between the sheets. The flatter the roof, the greater the overlap.
- The joints between the sheets can be treated with silicone-based sealant to prevent leaks.
- Each sheet of metal tile is fixed using galvanized self-tapping screws equipped with a wide press washer, which closes the mounting hole from water penetration.
- After laying the covering, the ridge, ends, and eaves of the slope are decorated using additional elements, and drainage elements are installed.
Important! Knowing how to lay metal tiles correctly, without resorting to the services of a professional team of builders, you can significantly reduce construction costs. Handle your roof decking with this practical and lightweight material You can do it together in 3-5 days.

Video instruction