How to beautifully decorate an interior using homemade crafts (photo, step-by-step master class). DIY handicrafts for the home: photo ideas for creating luxurious decor, tips and master classes Making panels with your own hands
Read also
Sometimes, a laconic, strict and too ideal modern interior lacks a little charm, individuality, and a homely atmosphere. Handicrafts will help correct the situation. Beautiful handmade items will fill your home with warmth and comfort, making the interior special, sophisticated and unique. For you, we have collected the most original ideas for 2018 with step-by-step descriptions and examples in the photo.
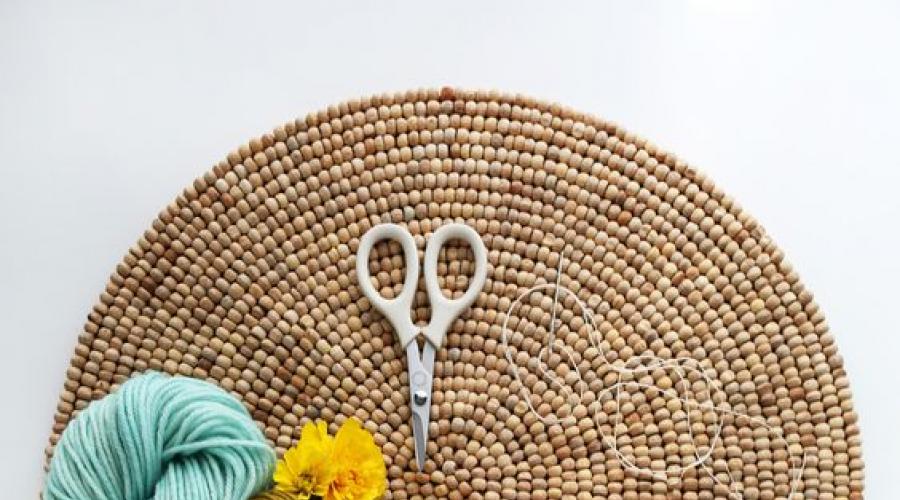
Rainbow wall decoration in bohemian style
This bright detail will significantly transform the interior of a hallway, living room or nursery. Making this beauty is as easy as shelling pears, and the results are amazing!
So, you will need:
- round decorative napkin made of wooden beads;
- 7 skeins of yarn in your favorite colors;
- sewing needle;
- white thread;
- scissors.

Step by step
1. Fold the napkin in half and carefully sew with white thread.
2. Cut the yarn into strips of equal length and volume, fold each of them in half and tie the bend with a thread of the same color.

3. Arrange the colors next to each other the way you like.
4. Start sewing the strands from the center of the straight line of the napkin. Thread one side thread of the strand into the needle, tighten it well to the base of the napkin and sew along one of the sides. To prevent anything from unraveling, leave a few centimeters of the thread free at the end, and then tie it to another strand.

5. Repeat this process with two bundles of the same color, and then with two bundles of the next color, etc.

6. To hang the product on the wall, make a loop of yarn by sewing it at the back.

Gorgeous rainbow decoration is ready!


We suggest making a sophisticated, delicate, elegant wreath-candlestick with which you can decorate a window.


For work, prepare the following materials:
- metal ring with a diameter of 25-30 cm;
- beautiful branches with leaves;
- candlestick on a clip;
- thin wire;
- scissors;
- leather cord.

In the project in the photo we used eucalyptus branches, but eucalyptus is not easy to find here, so you can replace it with branches of any plants - fresh rosemary, willow, mint, spruce, thuja, etc. Now let's get started:
1. If necessary, cut off short branches.

2. Cut several pieces of thin wire approximately 5-7 cm long.

3. Attach the branches to the lower semicircle of the ring so that the roots point inward. Attach them with wire at the top and bottom. 

4. The photo shows a candlestick with a clip. If you couldn’t find one, take another small candlestick and attach it with wire in the center of the metal ring. Use branches to carefully mask the attachment point.

5. To hang the product, tie a leather cord, braid or ribbon, as in the photo.

Magnificent window decor is ready!


Keep in mind that this wreath-shaped candlestick is more decorative. But even if you have lit a candle, do not go far or for long - it is unsafe!
Decorative wicker paper panel
From two of the most ordinary travel photographs you can make a completely unusual and stunning wall panel. How? We'll tell you in the next master class.

For such a panel, you can take images of absolutely any subject. However, it is important to choose photographs or drawings so that one is background, and the second is more graphic and contrasting (black and white).
Necessary materials:
- two photographs or drawings in the same format that need to be printed with margins;
- pencil;
- glue;
- metal ruler;
- stationery knife or scissors.

Step by step
1. Line the pictures into strips about 1 cm wide.

Number the strips to avoid confusion and cut along the marked lines. The empty fields that were left when printing the photo will come in handy for this.

2. On a contrast photo, leave a small indent on one edge. When cutting strips, do not go all the way to the end. We cut the second picture into even strips about 1 cm wide. The resulting “fringe” will stay on the common edge.


3. Start weaving according to the “one after another” principle. To prevent the strips from moving apart, glue them periodically.

When finishing weaving, the ends can be trimmed or wrapped. Insert the finished panel into a frame and enjoy the masterpiece!

DIY textile print
You can decorate home textiles with a cute print using the simplest means, for example, potatoes! It's easy to make original pillow covers using a regular stamp cut from a potato. 
Prepare:
- fabric on which the print will be applied (pillow case, kitchen towel, etc.);
- textile paint (several colors or shades are possible);
- two potatoes.

Let's get started:
1. For the stamps, cut the potatoes in half. Using a sharp small knife, apply a design to the half. It is better to draw geometric figures (squares or triangles), inside of which you can apply an additional pattern - for example, stripes.

2. Squeeze a small amount of paint onto a flat surface so that it is convenient to dip the stamp and the paint lays down evenly.

Tip: make test drawings on separate scraps of fabric (or paper). This way you can choose the best options.

3. Select patterns and stamp the covers. For one product, you can use one design, but stamp it in different directions, as in the photo. And don’t forget to put newspaper inside the cover or under the fabric so you don’t get anything dirty.

4. Leave the fabric to dry for at least an hour.

5. Fix the paint by ironing the covers from the wrong side at a fairly high temperature (in the “cotton” mode) for 2 minutes. We lay additional fabric between the board and the cover.
The product is ready! Hand-printed decorative pillows look very colorful.
 Floor lamp made of branches
The time of leaf fall, as soon as the trees are preparing for winter, is an excellent period for crafts from branches. Therefore, we advise you to use your leisure time usefully by making a cozy lamp from natural materials.

And for this you will need:
- branches of different lengths and sizes;
- a base for a future lamp (for example, a vase);
- wire with a light bulb;
- shade;
- glue gun;
- acrylic paint, glitter, brushes.

Step by step
1. First of all, you need to degrease the surface of the vase by wiping it with alcohol. Then rub it well with sandpaper. This will make the glue firmly connect the branches to the glass.
2. Glue the branches to the vase using a glue gun, leaving a small area without branches.


3. Place a lamp in a lampshade inside the glass vase.

4. Glue the branches to the remaining fragment of the vase.


You can leave the composition in its natural form, or you can continue to decorate:
Option 1- add gray hair by randomly painting the branches with white acrylic paint.


Option 2- New Year's. Paint the branches with silver paint and cover with glitter. Dress up the lamp with rain and small toys and you will have a wonderful New Year's composition.


Option 3- in Scandinavian. Ash pink is one of the most popular shades in the interior over the past few years. It is not necessary to paint all the branches; combine several tones, for example, pink, gray and white. The result is an exquisite lamp with a Scandinavian character.


 Marbling with improvised means
Marmoration is a popular technique in needlework, when special acrylic paints are spread over the surface of the water, where various objects are lowered - from paper to wood.
In our example of marbling on dishes, nail polishes (preferably slow-drying) are used as dyes.

Materials:
- slow-drying nail polishes;
- glass or porcelain cup, plate, vase, etc.;
- disposable container;
- stir stick.

Step by step
1. Prepare a container. Please note that after diluting varnishes in water, the container can hardly be washed later, so take one that you won’t mind throwing away later. The second point is that the container must be large enough so that the object can be freely rotated around its axis.
Fill the container about halfway with water. The water should be as hot as possible (so much so as not to spoil the container) - this will stop the process of drying the varnish in the water.

2. Add varnish to the water. Hold the jar of varnish horizontally, closer to the surface of the water, so that a drop of varnish does not immediately sink to the bottom. When it comes into contact with water, it will begin to blur and dry out. Therefore, in just a few seconds you need to have time to form stains with a stick for a marble effect. Or you can let the paint spread on its own in a thin layer.

3. Dip the dish into a container of water and varnish.
Hold the container at an angle and rotate it around its axis, as if collecting a varnish film from the surface of the water. If you marmorate food dishes in this way, be sure to leave a place where your lips touch, i.e. top part, without varnish.

Idea: Try experimenting and layering several similar shades, such as red and dark orange. For greater resemblance to natural stone, work in gradations of blue and gray.


4. Leave the finished products to dry. Drying time will take no more than 5 minutes.The convenience of this technique is that any imperfections during the work process can be easily removed and started all over again - just keep a nail polish remover nearby.
This decor is quite durable. Whether marble stains will withstand washing in the dishwasher is a controversial issue, but with a gentle hand wash they will certainly last until the next painting.If desired, in order to reliably fix the result, the product can be coated with an aerosol transparent varnish.
Even more ideas for your inspiration are presented in the following photo collection.
Embroidery


Original wall decoration


Panels made from scraps of different textures

Decorative fruit made from yarn

Ideas for the nursery


Colorful textiles


LED mat

DIY decorative vases


Chandelier and lampshades made from improvised materials


Painting on dishes


Designer watches as an idea for a DIY masterpiece


Handicraft is a real art of turning the most ordinary objects and materials into stunning works. A little skill, desire, creative imagination - and you will certainly be able to implement any of the ideas presented.
Today we will prove to you that making the most interesting handicrafts for the home with your own hands is much easier than it seems to inexperienced handmade lovers. To understand its basics, you will need a minimum of available tools, skills and time. At the same time, you will receive original products that you will not find anywhere else except in your own interior.
- Fabric crafts for home
The best thing about doing home and garden crafts with your own hands is that all the necessary tools and materials can be found at hand. There is no need to spend money on ready-made expensive products to add a touch of home comfort, warmth and warmth to your interior if you can make them yourself!


How to learn to make rugs yourself
Floor rugs, which suffered undeserved oblivion several years ago, are once again coming to the forefront of interior design. They will find a place in children's rooms, hallways, bathrooms, near the bed in the bedroom or in front of the sofa in the living room. Especially popular are small round or rectangular rugs with an interesting texture (shaggy, fluffy, with long elongated loops, and so on). Let's look at two simple master classes, after mastering which you will be able to perform this beautiful handicraft for your home with your own hands.
How to make a crocheted floor mat: a master class for knitting lovers

You will need the following:
- thick crochet hook (suitable #10);
- thick yarn (you can use yarn of different colors, then the finished product will be brighter and more original);
- scissors.
Advice! Instead of yarn in its traditional sense, you can use old knitwear - T-shirts, long sleeves, T-shirts. You will not only find a use for old things, but also get soft and pleasant to the touch yarn, which is a real pleasure to work with.


There are also many interesting rug ideas that can be woven, knitted or crocheted.

"Granny" rugs are very popular in modern homes

Fluffy grass mat using a hook
You will need:
- five skeins of yarn in different shades of green;
- very thick hook No. 14;
- scissors.


Advice! Be careful when choosing threads. If you take acrylic or any other synthetic yarn, the finished product may turn out slippery and electrified. If you use woolen threads, there is a high probability that the rug will “pinch” your bare feet. The ideal option is wool blend yarn.


In this simple way you can create an original rug for your home. Take a closer look, maybe there are materials in your apartment that are suitable for creating a real masterpiece?


Fabric crafts for home
Fabric decor is deservedly popular. It helps to bring a touch of home comfort, warmth and sincerity to the interior. Fabric decor looks especially good in rooms decorated in almost all styles. We invite you to get acquainted with very simple ways of making original fabric paintings.
How to make eco-paintings from fabric and natural materials with your own hands?

Prepare the following:
- burlap or other natural textiles with a bright, pronounced rough texture;
- any natural materials (for example, coffee beans, cinnamon sticks, star anise, dried flowers, natural moss, and so on);
- decorative elements (ribbons, wooden or bone buttons, lace);
- frame;
- cardboard for the base;
- glue gun;
- scissors;
- simple pencil.
Idea! Such paintings fit perfectly into styles such as country, eco, bungalow. They look best in kitchen decoration.

You can also create a huge variety of interesting things from fabric.


Fabric painting for a children's room
We offer to decorate your baby’s room with a very interesting homemade craft - a picture made of fabric on a foam base.
What will you need for this?
- colored shreds;
- foam base;
- picture to be transferred to the base;
- pencil;
- copy paper;
- glue;
- nail scissors;
- any flat, sharp object for pressing the pattern (for example, a patchwork spatula is suitable for this purpose);
- ripper
Advice! The steamer (as well as the spatula) can be replaced with other devices that are suitable in shape and thickness and are available at hand. For example, this could be a dull butter knife.
- On all sides of the foam blank, retreat 1.5-2.5 cm for the future frame. Press the resulting rectangle with a spatula.
- Transfer the selected image using carbon paper onto a foam base.
My home is my castle. Yes, that's what they often say. But you and I are not living in the Middle Ages, our fortress should not be an ordinary house, but a cozy nest, where everything is beautiful and comfortable. In this article, we will look together at various ideas for decorating rooms that you can do with your own hands without much expense.
Hallway
Even the simplest entrance area can be made functional and stylish. Wood paneling will bring a fresh touch to the interior. Not only is it simply beautiful, it is also convenient. On the panel you can screw hooks for bags and jackets. You can also make a small shelf on top for useful little things.
There is also an interesting solution for small apartments. Shoe rack, hooks and cabinets can be combined into one organizer.

An ordinary front door can also be made into a stylish element with the help of wooden trims.

To keep your shoes out of the way and not dirty anything, you can make an unusual stand from a wooden box and stones. So even after a walk in the rain, your hallway will remain clean.

By the way, instead of pebbles, you can use an artificial mat made of plastic grass.
An old ladder can be used as a shoe rack. Now all the shoes will be at hand.

For a couple of years now, it has been fashionable to make all sorts of household items from wooden pallets. In the hallway you can use them as shoe stands. You can make a shelf on top for small items or just put flowers, and attach hooks for umbrellas on the sides.

There is a small life hack for pet owners. To keep dog or cat bowls out of the way, mount them on a separate shelf in a closet or under a countertop.

Surprise your guests with a non-standard approach to such an ordinary thing as coat hooks. Wooden slats, branches, screws, a little imagination and voila! The unusual hanger is ready.

Bathroom and toilet room
These premises should, first of all, be comfortable. However, one should not forget about beauty. After all, everyone is pleased when the necessary things are at hand, when there is no need to untangle the wires from the hair dryer or rush around looking for ear sticks. We offer several simple ways to organize your space.
An old closet drawer or shutters from a flea market can be turned into a toiletry holder.

And old floorboards can be used in wall decor. It looks unusual, but is very simple to do: the slats are either glued to the wall or screwed with self-tapping screws. They can be painted, varnished or otherwise decorated on top.

Nowadays it is very possible to use jars to serve drinks and dishes. Why not use them in decoration? You don't have to look for those same Mason jars that the whole Internet is crazy about. Any others will do.

We are all accustomed to towels hanging on hooks and taking up quite a lot of space. Use shelves to store bath accessories. And it’s convenient, because you can put something else on the shelves, and it’s beautiful.


Now it has become very possible to use stone to decorate a bathroom. They cover the walls and decorate the bathtub. You can even make a rug out of pebbles! Just don’t forget the rubber base in this case so as not to scratch the floor.

To avoid the hassle of separating your laundry before washing, make a rack with several storage baskets at once. Baskets can be painted in the color of the laundry for which they are intended.

By the way, about washing. Tired of your regular white washing machine? Paint it. All you need is permanent enamel and a stencil. The latter can be made from masking tape.

Living room
Getting a stylish shelving unit quickly and inexpensively is no problem. Use wooden boxes. They can be arranged as you need, making shelves of various sizes. There is another plus - you can put together such a cabinet with your whole family and have a lot of fun.


Using the same principle, you can make a desktop. You will need modular shelving from Ikea, a table top, slats, screws and some paint. The number of shelves and the shape of the entire table depends on your needs.
In general, the use of wood in the interior is one of this year’s highlights. Wooden pallets, parts from old furniture, ladders, branches, etc. are used.


Hanging shelves will help make your living room more interesting. You can use both ropes of different diameters and belts.


A cornice is always a very expensive pleasure. But if you have a non-standard window and only need to order the appropriate size, then it turns into a complete pain. The simple solution is to use small-diameter plastic water pipes. You just need to paint them in a color that suits your interior.

Another life hack on the topic of curtains. How to decorate a window without using a cornice at all? You will need a wooden lath and a lot of hooks for clothes. Don't forget to sew the loops to the curtain.

You can zone the space in different ways: walls, screens, curtains. There is another way - jute cords. You can use any other materials like ribbons or colored fishing line.

Bedroom
Garlands and photographs will help you decorate your bedroom walls in an unusual way. But you don’t need heavy frames with glass or any special things for this. Photos can be posted on fishing line, string, or directly on the wall using double-sided tape. And single-color garlands will create an atmosphere of comfort and romance.


Shelves of unusual shape will add freshness to the interior.


Great idea for girls to organize their decorations. You will need branches, cords and decorative nails. The latter need to be stuffed onto branches at the required distance and hung on the wall with laces.

The new is the well-forgotten old. It's the same with decor. You don't have to buy a new chest of drawers or cabinets when you have an old one. You can simply paint it. And then your favorite thing will serve you for many more years.


To save space, there is one very simple “trick” - a shelving wall. This will help get rid of most of the closets in the room.

Add some magic to your bedroom with cotton clouds and garlands.

An old ladder can serve not only as a clothes hanger, but also as a library shelf. This solution seems strange, but just try it - it's really convenient.

The most important element of the bedroom is the bed. A large double bed is a dream. However, such a thing is often expensive. Don't despair, because making your own bed frame is not at all difficult. Using wooden slats of different thicknesses, self-tapping screws, saws and stain, you can make the bed frame exactly the way you want.

Kitchen
The kitchen is the most visited place in the house. Making it functional and comfortable is quite easy, and now we will look at several examples of rational organization of space that will not only help to restore order, but also make the room more comfortable.
To keep spatulas, spoons, forks and knives out of the way on the countertop, use jars. If you paint them, it will be great.

In small kitchens, you need to make the most efficient use of space. Hidden shelves and built-in wardrobes are your best friends in this case.
Even in the cabinets themselves, you can organize the space so that you can fit more. Internal shelves can be mounted not only on the walls, but also on the doors. It seems like such a simple idea, but so useful.

Life hack: to prevent lids from pots and pans from taking up much space, use regular plastic towel hooks.


There is always one problem with deep boxes - it is difficult to get to what is in the depths. The solution is simple - round rotating shelves. All products are visible and easy to get.

We are all used to the fact that spoons, forks, etc. are stored vertically in the kitchen drawer. What if the box is too small for, for example, a rolling pin? Diagonal placement of sectors will allow you to fit everything.

So that all the spices are visible and do not get lost on the kitchen countertop, make a stand with a ladder. On the top tier you can place small pots with herbs such as parsley, dill, cilantro or basil. Now everything is at hand.

Corner sofas and kitchen islands can also be assembled with your own hands. Moreover, you can think of places to store kitchen utensils in them. Not only will no one have such furniture, but it will fully meet all your needs.


One of the very convenient moves in the kitchen is the use of magnetic tape. You can store knives on it, as well as spices in jars with metal lids. Great idea to save space on your kitchen counter.

And your favorite mugs can be hung on regular hooks. Both stylish and comfortable.

Who said that when we grow up, we part with our toys? There's no need to do that. You can use small figurines to decorate your interior. They can find new life as magnets, coasters, handles, or anything else you come up with yourself.


It would seem that you can do with such an ordinary thing as a refrigerator. We all like to put notes on it with reminders. What if you write on the refrigerator itself, and with crayons? You just need to paint it all with special paint for chalkboards and enjoy. By the way, this technique works on any surface.

Yard and garden
When decorating your home, you shouldn’t forget about what’s outside. Let's start with the entrance area. From concrete blocks and a couple of wooden slats you can make a cute and comfortable table where flowers, a watering can, a lantern or anything else will live.

By the way, you can make various benches from concrete blocks, decorate flower beds, build a barbecue, and even make flower pots. It all depends on your imagination.


You can also make stylish ottomans and armchairs with your own hands. You need old tires, liquid nails and thick rope. The finished structure can be painted in any color. These ottomans are suitable for both indoors and outdoors, because they don’t mind rain.

Boxes or pallets made of wood can serve as the basis for a garden cabinet. Here you can store various flower accessories, pots, watering cans and other tools. And if you leave a flat work surface on top, you can make something or replant flowers.

What could be unusual in a flower pot? It would seem - nothing. However, here you can surprise everyone. Plant succulents in a birdcage. When they grow, it will be very beautiful. And instead of a regular hanging pot, you can use an old chandelier.

An ordinary children's inflatable pool can be used as a sofa. Just put a blanket or blanket inside and cover the sides with pillows.

It’s so beautiful to use candles in the garden, but they are constantly blown out by the wind. To prevent this from happening, you can make candlesticks from empty tin cans or ordinary glass ones. You can decorate everything with stones or ribbons if desired.


These, of course, are not all ideas for home and garden, only a small part of what you can do with your own hands. You just need to not be afraid to experiment and fill your home with cute and beautiful things.
The flower is made of the finest crinkled chiffon in two colors: purple and variegated geometric. Any fabric can be used, but not very dense. Production time approx. 3 hours. Difficulty 3.
Flowers made from untreated fabric do not wrinkle, do not rustle like paper, and look voluminous and stylish.
For such a rose you need to make squares from fabric (the fabric is not processed in any way): 5 pieces - 5*5cm, 5 pieces - 7*7cm, 5 pieces - 10*10 cm. Plus 3 squares 10*10 for leaves. The number of petals may vary depending on the required size. I always make more petals, because... somewhere I increase the number of petals in a row or make a bud.
2.
Petals. We fold each square diagonally and sew along the edge. This must be done with a double thread; there is nothing worse when the thread breaks and you have to start all over again. Afterwards, cut off the corners of the finished petals. If the fabric is loose, like mine, scorch it over a candle.
We fold the leaves of the square diagonally twice. Sew along the edge and pull the thread tightly. This model of leaves turns out to be pointed, but is not suitable for dense fabrics; the result is greater thickness.3. 
4.
5.
Assembly. The principle here is the same as assembling any rose. We roll the first small petal into a tight cone. Sew the remaining 4 petals around it, etc. all the petals. Two points: 1. Don’t try to pull everything into a small “butt”; sew the petals with air6. 
2. Starting a new circle, sew the first petal from the middle, overlap the second one, etc., place the last petal under the first and sew it on. Thus, we get a regular circle, where each petal comes out from under the other. We sew with double thread.
The wrong side No matter how beautiful a thing is on the outside, the wrong side must be at the highest level. Otherwise, it’s a beautiful cake with a spoiled filling. In my case, I needed a circle 5 cm in diameter. I cut it out of felt + a circle of fabric approx. 8 cm in diameter7. 
We baste the fabric to the felt circle, sew it on the machine and put on the fastener. Usually I glue a piece of fabric and close the part of the fastener with a seam, but in this case it was thin chiffon and it was impossible to glue it beautifully.
Sew leaves to the flower8. 
The most time-consuming part is to beautifully sew the circle with a clasp onto the flower.
9.
10.
In such colors it is very beautiful to use two types of fabric; volume is immediately added. If you need to add festiveness and brightness, then use feathers, rhinestones, and bright beads.