How to make an extension to a wooden house more beautiful. Extension to a wooden house - how to do it right. Tools and materials for creating a frame extension to the house
Read also
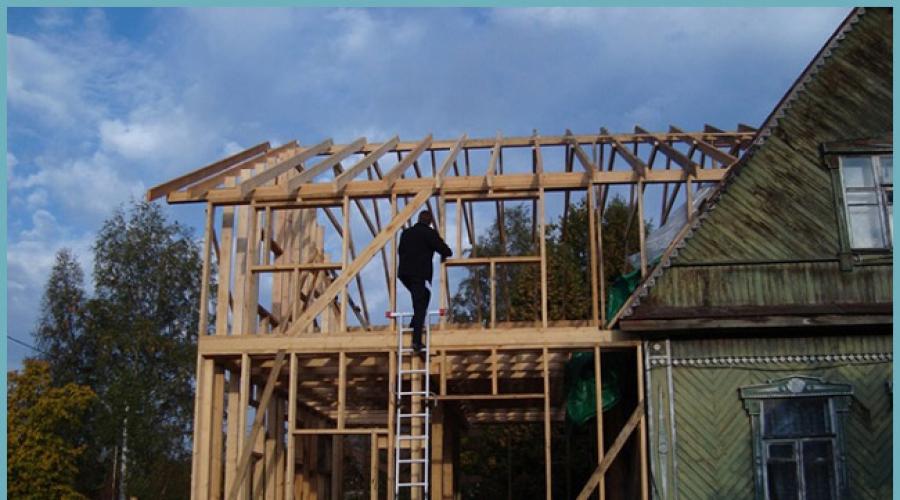
When, for various reasons, there is a need to expand the living space of a private house, the most economical and technologically simple option is a frame extension. Its advantage is the speed of construction with your own hands with minimal skill in working with carpentry tools. Step-by-step instructions for the construction stages with photographs will help you make a useful and beautiful extension, like in the video, that will last for many years.
To ensure that the extension does not subsequently have to be transformed, the design nuances should be considered even at the planning stage. First, decide on the purpose of the new premises.
 By adding an extension you can expand the area of the house
 - Additional room. Building an additional room is equivalent to building a small house. All structures of a new building must be thoroughly insulated, otherwise heating such a room will be ineffective due to large heat loss. You should not skimp on waterproofing, otherwise dampness and mold on the walls will make it impossible to live in such a room.
- Kitchen or bathroom. Take care of the installation of utilities before you start building the foundation. Places where water or sewer pipes pass through the foundation must be well insulated. This is easier and cheaper to do during the construction phase.
- A veranda is a lightweight extension to an open or glazed house. Used for summer holidays. The building is not heated, so the design is extremely simple: the flooring, walls and roof are on supports. Do not forget about harmony; the veranda must be combined with the house in scale, style and materials of construction.
Selecting the base
The veranda can be attached or built-in. If the second is planned at the stage of building a house, then a separate foundation will need to be built for the first. With a gap from the wall of about 40 mm. Otherwise, during shrinkage, the monolithic base will collapse due to the different weights of the veranda and the house. The seismicity of the soil and the weight of the future building are taken into account. A lightweight foundation built on soil prone to heaving will “lead” and the extension will move away from the house. Such a base is designed for light walls; shrinkage is inevitable under the weight of the brickwork.
 Brick columnar foundation
 Different materials are used for construction: concrete, brick, stone, piles made of wood, metal or concrete. It is important to choose the right depth and type of foundation for the extension:
- tape;
- slab;
- columnar;
- pile;
- pile-grillage.
In private construction, when constructing a base for a veranda, a columnar or strip structure is most often used. Let's take a closer look at the step-by-step instructions for arranging foundations.
Strip foundation
For large and heavy buildings, a strip type of base is chosen. It is advisable to make it from concrete in this sequence.

Important. Before erecting walls, waterproofing must be applied to the foundation. Use rolled materials or mastic.
Columnar foundation
For a light frame veranda, it is appropriate to construct a columnar base, which is made of brick, rubble stone or concrete. Or combine these materials. The holes for the pillars are dug to a depth below freezing of the soil. The step between the pillars is about 60 cm. Sequence of work:
- dig square holes 50 x 50 cm. Sand is poured onto the bottom and compacted thoroughly;
- lay a layer of concrete mortar, and after complete setting, begin the construction of brick supports. Use a level to ensure that the masonry is strictly vertical;
- a concrete support is made in the same way as a strip foundation: the inside of the formwork is wrapped with waterproofing and a reinforced frame is inserted. The form is filled with concrete, and the top is leveled. Wet the concrete a couple of times a day to avoid cracking;
 A columnar foundation is sufficient for a veranda.
 - after complete drying, the formwork is removed, waterproofing is applied to the pillar, and the top is covered with several layers of roofing material - the material will protect the wooden floor beam from getting wet;
- the remaining voids are filled with backfill: soil mixed with crushed stone is filled in, compacted every 15 cm of the layer.
Important. The height of the foundation pillars is calculated so that the distance to the finished floor of the extension is 30 cm.
Floor: wood or concrete
A concrete or wooden floor is installed on a strip foundation. The base on pillars is obviously designed for arranging a wooden floor. Let's look at both technologies.

Construction of frame and walls
Wall structures are erected from timber, attached to previously assembled crown beams. The wall elements are assembled on a flat area in a horizontal position, and then the finished wall panel is mounted in a vertical position or each beam is connected to a beam in series. Step-by-step instruction:
- On the lower beams of the harness, make a cut for vertical posts every 50 cm.
- Mount the racks, securing them with corners and self-tapping screws.
- Assemble the top harness.
 Construction of the frame
 - The veranda is connected to the house by attaching a vertical beam to the wall.
- Secure all posts adjacent to the house with anchor bolts.
- It is better to immediately sheathe the finished “skeleton” of the veranda on the outside with plywood, boards or OSB. This will give the structure rigidity.
- After erecting and insulating the roof, install windows and doors.
Ceiling and roofing
The shed type of roofing can be combined with almost any roof of the house, therefore it is the most common configuration. Let's consider it.

Insulation of walls and floors
Mineral wool is used as insulation material for walls. The mats are easily and quickly laid between the frame bars, as can be seen in the photo. When laying insulation in several layers, the mats are shifted relative to each other to prevent heat loss through the joining seams. The insulation is covered on both sides with steam and wind insulation material, which will protect the material from moisture accumulation, and the top is sheathed with finishing material. Internal walls can be sheathed with chipboard, plasterboard and covered with wallpaper or lined with clapboard. For the exterior wall, use wood, siding, or materials that match the finish of the house.
Floors on wooden joists are insulated in the same way as walls: mineral wool is laid on the subfloor between the joists, after covering the boards with a waterproofing membrane. A second layer of waterproofing is laid on top of the insulation and then leveled with plywood. After this, the finished floor covering is installed.
A concrete floor can be insulated in the same way as a wooden floor, using a dry screed, making a concrete screed and installing water or electric heating.
Do-it-yourselfers often overlook the need to comply with safety regulations. Use personal protective equipment and well-functioning, reliable tools, and then you will have only the warmest memories from the construction of the extension.
Frame extension on stilts: video
Sooner or later, every homeowner begins to think about expanding their living space. And here many questions arise, the main one of which is how to do this? Nowadays, the range of materials on the construction markets is quite impressive, which means that there are plenty of options for how to increase housing. Today we will look at some of them. Let's find out what an extension can be like (projects and photo examples will help with this), and also try to understand how complex such construction can be. It wouldn’t hurt to learn how to do this kind of work yourself.

You can find various projects for home extensions on the Internet. And before starting such construction it is worth familiarizing yourself with them. This will allow you to adopt any solutions and then add your own. Only then can you get a unique structure that will not only be, but will also increase your living space.
Many may say that such construction is too labor-intensive and practically impossible to do with your own hands, but this is a misconception. With the right approach and studying all the nuances, this is not so difficult, although you will have to face some difficulties. But, as they say, the eyes are afraid, but the hands do. But as a reward, you can get not only a self-made extension to a wooden house, but also satisfaction from the work done. In addition, the money saved on paying specialists will not be superfluous.
Let's look at various options for extensions in general terms, as well as examples of similar work done with their own hands by ordinary home craftsmen without any experience.

Solutions for adding a veranda to a wooden house in photo examples
This type of construction is quite relevant for summer residents who like to sit in the evenings over a cup of tea with family or friends. After all, it is much more pleasant to communicate in the fresh air than indoors. In addition, it is possible that the veranda will be designed in such a way that it is possible to install. This will protect it from snow, and will also add warmth to the house itself.
Another advantage of such a building is that you can spend it there in the winter. In this case, it can even be used as an additional room. But this is more suitable not for summer residents, but for owners in the private residential sector who live in the premises for a whole year.
The material for such buildings is most often wood. Sometimes, if there is such a possibility, they are done on those sides that are not adjacent to the house. We invite you to look at a few photos of wooden verandas attached to the house:
Looking at these photos of wooden verandas attached to the house, it seems that they were built by professionals, but this is not so. Today we will definitely look at how you can do this with your own hands.
Options for terraces attached to the house - how they differ from a veranda
We should start with the fact that many people confuse. But the differences here are fundamental. The fact is that the veranda is always attached to the house, but the terrace opposite is located and is not adjacent to the house. In addition, terraces are often without roofs and walls. At their core, they represent open . Hence the consequence - they are often built from more durable material that can withstand precipitation.
Of course, there are options for adding terraces to wooden ones, but this is rather the exception. Moreover, if we go back just a few decades ago, then at that time a terrace was considered to be an open (without roof) area of natural or artificial origin.
Now many people confuse these two concepts, calling verandas adjacent to the house terraces on stilts, but still, historically this is not true. Although time does not stand still, a person tries to make his life more comfortable. This is probably why they called the area with a roof adjacent to the house a terrace. After all, it stands on stilts, while the veranda must have a foundation.
Here are some examples of terraces in photo illustrations:
How to attach a garage to a house and why it is needed
An extension to the house is a very good solution. Indeed, in this case, in the cold season there will be no need to go out into the cold to reach it. However, there are pitfalls here too. The garage needs an ideal one that will not allow carbon monoxide to enter the home. And no one doubts that the car will start in the garage for sure. Here are some photos of garages attached to the house:
Adding a garage to your home is not an easy task, but it is quite doable. You just need to understand how capital it will be. Will a foundation be needed, what will the floor and walls be like? The most common material for such buildings is foam block. But many, as a garage attached to the house, use several racks made of timber, on which it rests. Thus, although the car is not protected from snow and rain in the wind, the roof will protect it from the sun.
Examples of residential extensions to a wooden house
An extension to a wooden house as a living space or - this is perhaps the most common type of all listed. This is not surprising, because not everyone has the opportunity to buy land and build a new, large and spacious one. And the construction of an additional room is possible even on a relatively small area. But here the situation is a little more complicated than with the construction of a veranda or carport. Do not forget that the building must not only be capital, but also be sufficient so that one can live in it comfortably.

Important! When constructing such an extension, it is necessary to carefully study the soil, calculate a foundation that can support the weight of the structure, and also draw up a detailed project. Do not forget that such a capital structure must be registered with the cadastral chamber. Otherwise, you can not only lose money on fines, but also receive a notice of demolition of an illegal building.

Still, extensions to a country house are a good solution. After all, no one bothers you to collect all the necessary papers on time. And additional living space never bothered anyone. Moreover, it will not require too much money.
Extension to a wooden house: projects, materials and photos of possible layouts
Although it is difficult to make an extension to the house with your own hands, it is quite possible. But this will require some knowledge. The main thing that needs to be decided before undertaking such work is what material the structure will be made of. The following materials can be used:
- Boards on a timber frame. Such a building requires a minimal foundation;
- Rounded timber or logs– such a building also does not require too strong a foundation. The fact is that its lower crown will already play the role of support. In addition, such a structure will be warmer and more durable, but at the same time more expensive;
- . This is where you will need a very strong foundation that can support the weight of the building. Otherwise, the extension will begin to collapse in a year or two, and may not last even 3 months. It all depends on the soil;
- - it also requires a strong base, perhaps even stronger than for a foam block. As a result, such extensions are very expensive.
Important! Regardless of what material it is decided to build a residential extension at the dacha, it must be firmly fixed to the house itself. Otherwise, the building will not have the required strength. In this case, there is a risk of collapse, and this is already life-threatening.

Let's try to understand each of these materials.
Extension to a frame house: nuances of construction, design and photo examples
An extension to the house is convenient because it requires the least cost and is easy to do with your own hands. Moreover, there is no need to work with a large number of people - two people are enough. But a foundation is still needed.
It is also convenient to make a frame extension to the house because there is no need to hire a designer who would calculate everything. This is another budget saving item. Of course, the extension will need to be insulated very well, but with the huge assortment on the shelves these days, this will be quite easy to do.
The most difficult stage in such construction will be the installation of the foundation. Well, assembling the frame, fixing it to the wall of the house and sheathing it is much easier. Today there are simpler ways. There is special material on sale. These are oriented strand boards. Moreover, with their help, the so-called one is manufactured at the factory, two sides of which are made of OSB, and between them a layer of foam plastic. This material is quite durable and strong, and it has another important advantage - it is an excellent insulation material. Thus, the home craftsman can only assemble a durable frame and cover it with similar material.
External finishing is also important in such cases, because the durability of the frame extension to a wooden house largely depends on it. You can read about similar work in our other articles. And now we invite our dear reader to look at several photo examples of similar extensions made by home craftsmen:
Extension to a house made of timber - some installation nuances
When planning an extension, you should understand that both its foundation and service life depend on how it is designed. After all, no one will start construction with the expectation that in a couple of years the living room will need to be demolished. Also, don’t think that you don’t have to “bother” with the design of such buildings. This is not a barn or closet, which means everything should be taken care of in advance.
Let's start with the fact that the best option (of course with low weight) would be a pile-screw. This will be a cheaper and less labor-intensive choice. Yes, and you can drive piles into the ground to the required depth yourself using special equipment or even manually. The main task here is to calculate the load on each pile to select their number and diameter.
Important information! When installing a pile-screw foundation, it should be understood that the supports must pass under each wall. If there is a partition in the room, then they are also required under it.
You should also pay attention to the lower crown. It needs to be made from something more durable. Ideally, it will be made of logs. You should not think that to install a timber extension to a log house you only need 3 walls - this is a misconception. 4 walls are also being built, because a joint one is necessary here. It makes sense to pay special attention to the fastening between common walls. It depends on this whether cracks will appear in this place over time.
Here are some photo examples of such solutions:
Extension to a house made of foam blocks - advantages and disadvantages
This is probably the most common option. After all, foam block has a relatively low cost, can provide fairly good insulation (compared to brick), and the installation speed is considerable. But when compared with timber, foam block has a big drawback - it requires a fairly strong foundation. And you can’t get by with pile-screws.
A foundation for a foam block extension to a wooden house is required. The best option here would be a grillage pile foundation. This means that the cost of the foundation automatically increases significantly.
Installation of extensions to houses made of gas silicate blocks is also quite common. But some home craftsmen do not understand the difference between them and foam blocks. It's quite simple. a little heavier and more expensive than foam concrete, but at the same time its strength is much higher. In addition, it does not require coupling from concrete mortar (special glue is used). As a result, there are virtually no seams, which contributes to greater thermal insulation, and therefore lower heating costs in the future.
Important! Regardless of what building material is chosen, you should consider the communication systems in the future living room. After all, if this is not done, you will have to drill holes for heating and trench walls for electrical wiring. Without this, there can be no talk of any kind of living, much less a comfortable one.
We offer our dear reader several examples of such buildings:
Extension to a brick house - differences from previous options
The main difference here is that there is no fourth wall required. This means that three general ones are quite enough. The foundation can be either strip or columnar. And you can choose any material for construction - it all depends on the wishes and capabilities of the home craftsman.
Adhesion to the load-bearing wall of the house occurs using. When building an extension to a house made of brick or concrete, a reinforcement coupler is also often used. The load-bearing wall is drilled using a hammer drill, and the drill should be slightly smaller in diameter than the rod for a more rigid coupling. After this, a piece of reinforcement (it should not be smooth) is driven halfway into the drilled hole, and the second part is laid into the joint of foam blocks or bricks.
Important information! You should not start construction if the house is quite old. This is irrational, because the brick softens over time, which will have a bad effect on the adhesion to the new building. In addition, drilling the wall, as well as new construction, places additional stress on it.
Perhaps the dear reader will be interested in looking at some solutions of home craftsmen:
Construction of a foundation for an extension to a house and its types
The foundation is the foundation that supports the entire structure. This means that you should treat its design with great responsibility. The simplest solution for a light-weight building would be to install a pile-screw foundation. To do this, piles are screwed into the ground at a certain distance from each other, which will bear the main load.
If the building is heavier, you will have to pour a strip foundation. In this case, piles will also not hurt, they will provide additional strength. But the strongest of all types of foundations can be called a pile-grillage foundation. To install it, you need to dig a trench around the perimeter of the future walls. Afterwards, screw piles are driven along this trench or holes are drilled into which the reinforcement cage is lowered and filled with concrete. This is done in such a way that their upper edge is slightly above ground level. And the last stage is to install the formwork and fill it with concrete. More details about how to make a foundation for an extension to a house or for a bathhouse are described in one of our articles.
Before pouring the foundation for an extension to the house, you should decide whether the ready-made mortar will be ordered and delivered ready-made or made independently. In the latter case, accurate calculations of the components for the required strength are required.

How to make a roof for an extension
The simplest option would be to install a pitched roof for an extension to the house. This option is easy to implement and requires the least cost. However, such work also has its own nuances. If we compare it with gable roofs, then simpler ones do not retain heat so well.
When constructing a veranda, the three-slope option is often used for an extension to a house, but such work is quite complicated. If you have some skills and knowledge of carpentry, then a home craftsman will be quite capable of it.
Important! The roof should be designed so that snow can easily roll off it, but at the same time, safety should not be forgotten. After all, an accumulated snowdrift can fall on a person. That is why they try to make the slope steeper. In this case, the accumulation of snow will be small, and its removal will not be dangerous.
If the home craftsman is not sure that he knows how to make a roof on an extension to a house and can do it, it is better to turn to specialists for help.
Instructions for installing a house extension with your own hands
Let's try to explain in general terms all the stages of constructing a veranda on a site adjacent to the house. We will discuss more detailed instructions for each type of building in the following reviews. Here's how to add an extension to your house:
| Illustration | Actions Performed |
 | First of all, we start with the foundation. In our case, this is a well. A metal pipe is lowered into it, which is filled with concrete. Depth is about 1.7 m. |
 | The distance between the piles needs to be calculated. In our case, the weight of the veranda will be quite small, and therefore the distance can be made larger. |
 | We assemble a frame of metal beams onto the piles, which will play the role of the first crown, taking on the main load. |
 | The channels are welded together. In this case, the seam must be very strong. |
 | We also took care of communications. The water drain from the sink in the house ended up in this exact spot. Well, let's deal with this too. |
 | The holes in the channel are necessary for fastening the timber on which the entire structure will be built. |
 | We lay the timber around the perimeter and fasten it. You can begin building the main supports and roof. |
 | Having assembled the main frame from timber, we strengthen it with transverse beams. In their role we have, 50 mm thick. |
 | We place the boards supporting the roof in pairs and tighten them together. |
 | It should look something like this. It should be noted that the boards that support the roof also give strength to the frame. They are secured to the main beams using tie rods. |
 | The roof can be covered with corrugated sheeting. It is quite resistant to any weather conditions. |
 | The diagonal board plays a rather important role - it prevents the building from tilting due to the supporting beam of the frame. In our case, ordinary railings were made, but it is fashionable to sheathe or deglaze the building. |
 | Here the diagonals are decorative, and therefore made of thinner boards. |
In general terms, the answer to the question of how to add an extension to a house looks like this.
The cost of specialist services for such construction
It is unlikely that you will be able to build an extension to your house inexpensively if you turn to specialists. But for general information, it wouldn’t hurt to consider the prices for such services using the example of various verandas:
| Types of verandas | Cost of work, rub. for 1m 2 |
| Open extension | from 8 000 |
| Frame extension with 50mm insulation | from 9 000 |
| Frame extension with 100mm insulation | from 10 500 |
| Frame extension with 150mm insulation | from 11 500 |
| Extension made of profiled timber 90×140mm | from 10 500 |
| Extension made of profiled timber 140×140mm | from 12 500 |
Photos of verandas and terraces attached to the house: the work of professionals and not only
For those who still doubt that without special knowledge and skills it is possible to make a rather beautiful extension to the house - photo examples of verandas and terraces made by ordinary home craftsmen. Perhaps the dear reader will find some solutions for his work. If not, then you can just admire it. It's really beautiful.
Surely many people liked the photos of verandas attached to the house with their own hands.
Finally
It is unlikely that anyone can refuse an additional room attached to the house. But it’s one thing when this work was done by strangers, and completely different if everything was done with your own hands. Moreover, as it turned out, although this is difficult, it is quite doable. Is it then worth paying money to “someone else’s uncle”? And it’s not a fact that the construction will turn out to be of high quality and beautiful (there are plenty of hacks these days). The veranda described in the step-by-step instructions, including painting, took about 10 days. This means that in a maximum of 15-20 you can make it completely perfect. Experts promise to do all the work in 30-60. It's worth thinking...
We hope that the information we presented today was useful to the reader. All questions (if you still have them) can be asked in the discussions for the article. Write, share your experience, because it may help someone.
YOU MAY ALSO BE INTERESTED IN:
When, for various reasons, there is a need to expand the living space of a private house, the most economical and technologically simple option is a frame extension. Its advantage is the speed of construction with your own hands with minimal skill in working with carpentry tools. Step-by-step instructions for the construction stages with photographs will help you make a useful and beautiful extension, like in the video, that will last for many years.
To ensure that the extension does not subsequently have to be transformed, the design nuances should be considered even at the planning stage. First, decide on the purpose of the new premises.
By adding an extension you can expand the area of the house - Additional room. Building an additional room is equivalent to building a small house. All structures of a new building must be thoroughly insulated, otherwise heating such a room will be ineffective due to large heat loss. You should not skimp on waterproofing and insulating the foundation, otherwise dampness and mold on the walls will make it impossible to live in such a room.
- Kitchen or bathroom. Take care of the installation of utilities before you start building the foundation. Places where water or sewer pipes pass through the foundation must be well insulated. This is easier and cheaper to do during the construction phase.
- A veranda is a lightweight extension to an open or glazed house. Used for summer holidays. The building is not heated, so the design is extremely simple: the flooring, walls and roof are on supports. Do not forget about harmony; the veranda must be combined with the house in scale, style and materials of construction.
Selecting the base
The veranda can be attached or built-in. If the second is planned at the stage of building a house, then a separate foundation will need to be built for the first. With a gap from the wall of about 40 mm. Otherwise, during shrinkage, the monolithic base will collapse due to the different weights of the veranda and the house. The seismicity of the soil and the weight of the future building are taken into account. A lightweight foundation built on soil prone to heaving will “lead” and the extension will move away from the house. Such a base is designed for light walls; shrinkage is inevitable under the weight of the brickwork.
Brick columnar foundation Different materials are used for construction: concrete, brick, stone, piles made of wood, metal or concrete. It is important to choose the right depth and type of foundation for the extension:
- tape;
- slab;
- columnar;
- pile;
- pile-grillage.
In private construction, when constructing a base for a veranda, a columnar or strip structure is most often used. Let's take a closer look at the step-by-step instructions for arranging foundations.
Strip foundation
For large and heavy buildings, a strip type of base is chosen. It is advisable to make it from concrete in this sequence.
Important. Before erecting walls, waterproofing must be applied to the foundation. Use rolled materials or mastic.
Columnar foundation
For a light frame veranda, it is appropriate to construct a columnar base, which is made of brick, rubble stone or concrete. Or combine these materials. The holes for the pillars are dug to a depth below freezing of the soil. The step between the pillars is about 60 cm. Sequence of work:
- dig square holes 50 x 50 cm. Sand is poured onto the bottom and compacted thoroughly;
- lay a layer of concrete mortar, and after complete setting, begin the construction of brick supports. Use a level to ensure that the masonry is strictly vertical;
- a concrete support is made in the same way as a strip foundation: the inside of the formwork is wrapped with waterproofing and a reinforced frame is inserted. The form is filled with concrete, and the top is leveled. Wet the concrete a couple of times a day to avoid cracking;
A columnar foundation is sufficient for a veranda. - after complete drying, the formwork is removed, waterproofing is applied to the pillar, and the top is covered with several layers of roofing material - the material will protect the wooden floor beam from getting wet;
- the remaining voids are filled with backfill: soil mixed with crushed stone is filled in, compacted every 15 cm of the layer.
Important. The height of the foundation pillars is calculated so that the distance to the finished floor of the extension is 30 cm.
Floor: wood or concrete
A concrete or wooden floor is installed on a strip foundation. The base on pillars is obviously designed for arranging a wooden floor. Let's look at both technologies.
Construction of frame and walls
Wall structures are erected from timber, attached to previously assembled crown beams. The wall elements are assembled on a flat area in a horizontal position, and then the finished wall panel is mounted in a vertical position or each beam is connected to a beam in series. Step-by-step instruction:
- On the lower beams of the harness, make a cut for vertical posts every 50 cm.
- Mount the racks, securing them with corners and self-tapping screws.
- Assemble the top harness.
Construction of the frame - The veranda is connected to the house by attaching a vertical beam to the wall.
- Secure all posts adjacent to the house with anchor bolts.
- It is better to immediately sheathe the finished “skeleton” of the veranda on the outside with plywood, boards or OSB. This will give the structure rigidity.
- After erecting and insulating the roof, install windows and doors.
Ceiling and roofing
The shed type of roofing can be combined with almost any roof of the house, therefore it is the most common configuration. Let's consider it.
Insulation of walls and floors
Mineral wool is used as insulation material for walls. The mats are easily and quickly laid between the frame bars, as can be seen in the photo. When laying insulation in several layers, the mats are shifted relative to each other to prevent heat loss through the joining seams. The insulation is covered on both sides with steam and wind insulation material, which will protect the material from moisture accumulation, and the top is sheathed with finishing material. Internal walls can be sheathed with chipboard, plasterboard and covered with wallpaper or lined with clapboard. For the exterior wall, use wood, siding, or materials that match the finish of the house.
Floors on wooden joists are insulated in the same way as walls: mineral wool is laid on the subfloor between the joists, after covering the boards with a waterproofing membrane. A second layer of waterproofing is laid on top of the insulation and then leveled with plywood. After this, the finished floor covering is installed.
A concrete floor can be insulated in the same way as a wooden floor, using a dry screed, making a concrete screed and installing water or electric heating.
Do-it-yourselfers often overlook the need to comply with safety regulations. Use personal protective equipment and well-functioning, reliable tools, and then you will have only the warmest memories from the construction of the extension.
Frame extension on stilts: video
Quite often it happens that the construction of a private house was carried out without the construction of outbuildings, but then the need for them arose. Modern house designs often assume only the utilitarian function of the house - people will live there. And what if the person will also conduct some kind of economic activity - no. In addition, sometimes there is an urgent need to increase the living space of the house. An extension made of foam blocks, a brick extension, a wooden one - the creation of these structures will help solve this issue once and for all.
Types of extensions
The type of building is determined depending on what exactly should be in it. This could be a room, a toilet, a garage, a kitchen, or anything. By the way, in central Russia you can often find a structure in the form of a greenhouse in which you can grow fruits and vegetables even in winter.

 Diagram of the garage-extension
 Indeed, in this case, all the necessary engineering communications can be easily extended from the house. Of course, the construction of a structure must be approved, even if we are talking about wooden terraces or simply adding a veranda to the house.
Creating a project and choosing the location of the extension
Projects and construction of such structures involve the following stages:

As for the choice of materials, it is better to be guided by the following rule: you need to create projects and build an extension from the same materials that the house itself consists of.

 Construction of a frame house in section
 For example, if you need to attach terraces to a wooden house, then it would be better if it was wooden. Of course, this rule cannot always be observed.
Let's say a person wants to raise chickens, he needs a high-quality, windproof, warm brick extension. In this case, this option should be preferred, despite the fact that the house is wooden.
 Options for the location of extensions to a standard wooden house
 Estimate calculation
Actually, drawing up the estimate itself is not so difficult, it is necessary to take into account the following:

 An example of a veranda attached to a wooden house
Construction estimates should be drawn up immediately after the projects are ready, regardless of whether terraces will be added or just wooden utility blocks. This will avoid unpleasant surprises in the future.
Construction of the foundation and connection of the foundation

 In Russia, bathhouses are often attached to wooden houses.
 Even the construction of an ordinary terrace for a wooden house involves the creation of a new foundation for it. The option of lengthening the old foundation disappears immediately: it is impossible to do this, but connecting both foundations into a single whole later is not only possible, but also necessary.
For example, even for wooden terraces you will need to make exactly the same foundation as the main house. So, first you need to decide on the type of foundation itself.
 General diagram of the gable structure of a frame house
 Actually, there are 3 foundation options that can be used as a base for an extension:
- Monolithic;
- Columnar;
- Tape.
Columnar foundations are used extremely rarely in Russia, since they can only be installed on very hard soils such as mountains.
It can be used, for example, to build a gazebo, however, such buildings are usually not attached to the house, but placed next to it. By the way, for a gazebo, instead of a foundation, you can use old tires - this will be quite enough.
 Layout diagram for an extension made of foam blocks
 A monolithic foundation will be the most durable, however, its installation is not always advisable.
Monolithic is the most solid foundation, as they say, “for centuries.” However, the cost of its construction, as you might guess, will amount to a tidy sum, and the labor costs will be very, very impressive. In general, it is better to choose a classic strip foundation, which is ideal for any extension to a wooden house.
Placement of communications

 An example of a garage extension to a wooden house
 As noted above, placing any communications in the extension is as easy as shelling pears, because the room will be adjacent directly to the house itself. What does this mean?
For example, it is enough to just extend the existing water supply, sewerage or heating system - that’s it, no foundation pits or grueling welding work. The same applies to laying electrical wiring, which probably even the most careless worker can do with a hammer drill.
It’s a different matter when we are talking about truly complex engineering systems. Let’s say you need to install a branch from the main gas pipeline into the extension. Firstly, no one will let you do it yourself.
 Construction of a veranda attached to the house
 Secondly, this will require, speaking without exaggeration, colossal expenditures. So it's worth thinking about. For example, in Kuban you can often find kitchen extensions to wooden houses.
And even if gas is installed in the house itself, there will still be a gas cylinder or the same electric stove in the extension (a stove is also a common option). Such nuances must be taken into account.
Communication with other premises
The question of how to make an extension to a house, even if we are talking about such a type of work as adding a veranda or another extension made of timber, should also involve solving the problem of communication between the attached structure and the rest of the house.
There are 2 solutions to this problem:

 A covered terrace is an excellent extension option
 - An extension to a house made of timber can have a connection with the house using a doorway made in the main wall of the house;
- The entrance can be from the street (an extension to a house made of timber makes it easy to implement both options, but another material made of wood does not).
In the first case, the solution will be convenient, because, in fact, the living area of the entire house increases. But there is one extremely important nuance: the approval process in this case can last for many months, because changes must be made to many documents.
And the load-bearing wall of the house can be seriously damaged. If the owner of the house is ready for such a development of events, then, of course, it is better for him to prefer this option rather than any other.
Cutting an opening in a load-bearing wall must be done with extreme caution!
If there is not enough money and there is no desire to go through the bureaucratic circles of hell, then the option of entering from the courtyard will not be so bad. Moreover, in terms of cost it will be much cheaper.
Video
You can watch a video on how to make a frame extension to a wooden house.
Do you dream of increasing your living space, but don’t know which extension to choose? A beautiful and functional extension allows you to make your home more spacious by adding the necessary square meters. To find the veranda option that meets your expectations and the architecture of the place, use photo ideas for house extensions. 


How to make an extension to a house?
If you have a private house, then in most cases you can always increase your living space thanks to an extension. Do you want a custom porch tailored to your needs? Consider the following photos of home facades to make your dream come true. 

Based on the budget allocated for the extension
Extending your home can be expensive, depending on the project you're considering. However, it is always possible to find a solution for all levels of funding, even within the minimum budget. For more or less well-endowed projects, it would be better to prefer installing a veranda for the construction of a large extension. Attic development projects are in the middle of the price range, provided they do not have to deal with too many structural issues such as access etc. Finally, the largest expansion projects overseen by the architect are in the high price range.


Choosing the right option
Construction of a veranda requires organization. You should definitely ask the experts what is allowed or not allowed in your home, consult regarding the extension, voicing your desires - an additional room all year round, a relaxation area, a kitchen, a spa, etc. Be sure to follow the technical or regulatory details that need to be taken into account . You will have a clear idea of what kind of extension can be built by forecasting the family budget. 


Lots of possibilities
Home extension or extension: a solution to expand space without a huge investment. Create a new bedroom, study, new kitchen or living room to reorganize your home. Modern architects work for most extension projects. But be careful as any expansion project, be it simply adding a room, installing a veranda or implementing an elevation, must be carried out in compliance with certain rules.


Extension to a private house: several solutions
You can expand the area of the house thanks to an extension, which can be separate from the common rooms, acting as a separate corridor, or complement the space of the living room. 


Side room extension
This is the preferred solution for owners of fairly spacious land. A side room extension allows you to add volume to your home with priority to create or change area, providing a connection between two rooms (old and new). You can then let your imagination run wild when choosing the style of new construction.


Entrance corridor
If you maintain separation of the extension from the main living environment in the house, then the veranda will be in the form of a cozy corridor, which is especially useful in winter due to the warmth from the street. Being a less used room on winter evenings, you need to heat this type of extension to a minimum. 


Living room addition
Unless you separate the veranda from the existing enclosure, for example by knocking down a wall to create a larger space, heating will need to be provided, even with good insulation. The design of the veranda also depends on the destination. An attached room can complement the kitchen or living room. 


Functional extension to the house
The use and placement of the porch will also affect the overall layout of the house. In some cases, you may need to modify some of the existing rooms to make the extension more functional. Consider photo examples that allow you to consider several options for verandas for living and relaxing, both open and closed. Both options will help create bright and comfortable spaces that make everyday life easier. The original extension of the house optimizes the living comfort of all family members. 


Closed extension
The closed type of extension perfectly serves as an additional room, if you take care of its interior design and insulation. Such an addition will not only harmoniously decorate the facade of the house, but will also increase the comfort of the living interior space. 


Open veranda
If you want to beautifully decorate the entrance to the house, increasing the porch area, creating a comfortable outdoor seating area in the summer, then a non-glazed extension will help you with this. The veranda can be equipped with garden furniture, where you will enjoy the peace and tranquility of the surrounding garden. Such extensions are especially popular for country houses and country houses. 


Verandas are the easiest option for expanding a house
Building a deck is a relatively easy way to change the square footage of your home. The cement board is poured and the porch is ready for assembly by the contractor. The wall to which the veranda adjoins must be reinforced, since it is load-bearing. The modern extension is a high-class structure with embellished gables whose charm is sure to attract everyone. You can choose both standard versions of the veranda and unusual ones, connecting the room with the living room or dining room. For good comfort, underfloor heating, blinds and year-round maintenance are necessary. 


Expanding your home with an extension is a solution that will bring additional value to your home in case of resale, but will also allow you to improve your living conditions. To carry out this work, it is necessary to select the most suitable project, remembering to comply with the necessary administrative procedures and other urban planning restrictions. An extension to a house is a fairly commonly used solution for expanding living space. If the architecture of the building and the area of the landscape allow for such an addition, then be sure to take this chance.