How and from what to build a simple greenhouse in the country. Construction of a greenhouse made of wood with your own hands - assembly of the frame and foundation Construction of the frame and covering
With the onset of spring, the active gardening season begins. City residents flocked to their dachas and vineyards to cultivate their acres. The villagers also took up shovels.
The seedlings are already growing, soon it will be time to plant them in the ground, but fragile plants need protection from cold spring nights. And everyone wants to quickly get some food early vegetables grown in our own garden beds. We urgently need to build a greenhouse.
Which greenhouse to choose
Depending on many factors, the design of the greenhouse will have its own distinctive features.
First, you need to decide what plants you are building a greenhouse for. Various cultures require their own specific conditions of detention, often incompatible. For example, cucumbers and peppers like a warm, stuffy and very humid environment, while tomatoes and eggplants prefer a hot, but well-ventilated environment. It is clear that they need different structures, taking into account differences in temperature conditions, moisture intensity, and maintenance methods. Some plants have a tall stem and are vigorous; they will require an appropriate height, while for growing, for example, greens, this issue is not important.
Secondly, you should decide whether your greenhouse will be a winter or a “spring” one, which is used in spring, summer, and autumn. The location of the building (west-east or north-south) depends on this.
It is advisable to erect a winter structure with the long side facing south, with a large slope of the slope, blank, painted in dark color northern wall. Sometimes it is made reflective and inclined to direct the rays onto the soil. Coating materials are used as transparent as possible and preferably least thermally conductive, with a decent margin of safety - cellular polycarbonate; several layers of dense stabilized polyethylene, which can be reinforced, bubbly, with foam layers. You will have to think through heating and additional lighting options in advance.
Thirdly, greenhouses can be intended for soil and soilless, hydroponic farming. They can be industrial and “dacha”, temporary and stationary, vegetable and seedlings.
The main thing is that the greenhouse reliably performs its main functions - it allows maintaining the desired temperature and humidity.
This is what we will build
Features of design and location
The design with one slope was chosen as the simplest to construct and very advantageous in terms of thermal engineering. We orient it with a slope to the east, so you can assemble it in the morning greatest number solar heat.
Having overall size 5.5 by 3.5 meters, the greenhouse is placed with its long side in the north-south direction, in the expectation that it the best way will be illuminated by the productive rays of the morning and evening sun, and on a hot afternoon the plants will be easier to shade, avoiding critically high temperatures.
As a material for the frame, we will use wood, which is easy to work with, it cuts well, and it is easy to attach film to it. At reasonable approach wooden structures very durable and strong. In addition, observing a certain “montage culture”, they are quite aesthetic. And its low price distinguishes this material from plastic and metal, especially non-ferrous ones.
Installing racks
According to the given dimensions, which is 5.5 by 3.5 meters, we mark the walls of the structure and pull the cords low from the ground. To maintain the rectangularity of the structure, it is necessary to measure the length of the diagonals - they must be equal.
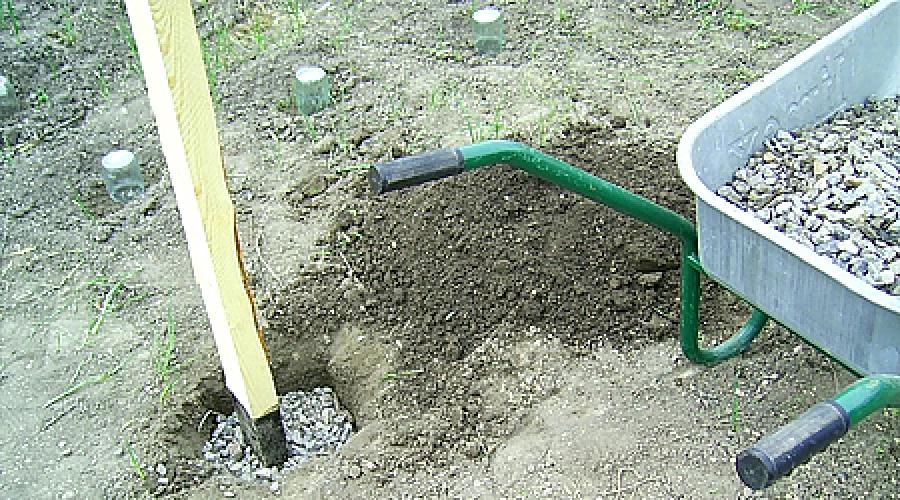
Now using a shovel or hand drill along the long side, after about 800 mm, we make holes about 300 mm deep.
 Well with crushed stone
The frame posts are made of pine beams with a section of 100x50 mm. Each stand, that part of it that will be in the ground, should be generously coated bitumen mastic and wrap them in plastic - this will protect them from rotting. If desired and financially possible, it would not hurt to treat their above-ground part with special protective impregnations or drying oil, since the greenhouse will be very humid.
 Waterproofing
We place pillars along the cord that have not yet been cut to height, and fill the well with medium or fine fractions of crushed stone, gradually compacting it. It fills voids very tightly and stabilizes the timber well. It’s worth using the long one now building level, although adjustments will still be required later.
Corner posts in strict vertical position They are secured with slab braces from the bottom of adjacent beams.
 Arranging the racks
On the short sides, the pillars are placed at a distance of 1150 mm from each other. Should be formed in advance on one of them doorway size of at least 800 mm wide, for free passage garden wheelbarrow(700 mm). To arrange the entrance, we step back a little from the high angle so that we can make it an acceptable height.
When the posts are in place, you can mark the cutting lines for the beams. Underneath it, horizontal struts are screwed to the posts from inside the future room, with which the pillars are leveled from the already rigidly fixed corners.
Now the timber can be sawed off. On the high side of the slope, the height is taken to be about 2100 mm - cucumbers will live in this part of the greenhouse. On the low side, the height of the racks is limited to 1300 mm, which is quite suitable for working with low-growing crops such as peppers and herbs. Close to the high part of the building, opposite the entrance, there is a convenient path. Note, real usable height the greenhouse will be 100 mm larger due to the roof.
 Stands in place
To eliminate some weakness of the structure, it is advisable to install an auxiliary rack in the middle of the long sides, from the bottom of which another brace is mounted.
 Auxiliary pillar in the middle
Roofing system
Rafters made of timber with a section of 100x50 mm and a length of 4.5 meters are installed on top of the pillars. They are attached to the posts with galvanized metal corners using commonly available 35mm “black” wood screws.
 Post and rafters
To save money, using metal scissors, you can quickly make a lot of budget corners and plates perforated with a large nail from scraps of “plasterboard” profiles.
 Installation and unfastening of rafters
Between rafter legs and small crossbars are nailed with long posts, stabilizing the resulting acute angle.
At the bottom of the slope, the rafters are not cut to length, this will somewhat complicate the installation of the film, but they can be used as a frame for setting up a small seasonal greenhouse for seedlings in the future.
 The frame is ready
Why plastic film
The choice of polyethylene as a coating is due to many reasons.
Unlike glass, film is permeable ultra-violet rays, which are also necessary for plants, it scatters light, which is also very useful.
Light transmittance for our spring greenhouse is not the most important factor, although glass is only 10-15% better in this regard, and even then it is perfectly clean, which does not last very long.
The financial issue will undoubtedly be in favor of polyethylene, given the price of glass, which does not last forever and quite often breaks and bursts. If your budget allows, then it is best to use polycarbonate for these purposes - it is preferable in all respects.
In our case, stabilized wide-format polyethylene with a thickness of 100 microns will be used.
Film fastening
First, we cut a strip of film 6 meters long, enough to cover the roof and low wall of the greenhouse. It is important that there will be no polyethylene connection at the bottom of the slope; therefore, there is no need to install jumpers between the rafters, which can delay water flow.
 Film stretching
The main pressing of the film to the frame is carried out with thin meter-long slats. The polyethylene must be stretched well and nailed through the shingles with thin 20 mm nails. It is better not to finish off the heads of the nails - this will allow dismantling and replacing the coating in the future with minimal losses.
At the bottom of the canvas, they are securely fixed to the posts and sprinkled with earth.
If you have to install the covering alone, a construction stapler will be a great help for temporary pre-tensioning. The main thing is that they can be used with one hand, while the other remains free. A high-quality staple gun will nail even thin slats, not to mention pneumatic or electric models.
Ventilation device
One of the main problems encountered when growing vegetable crops in a greenhouse, is to remove excess heat. In summer, in the sun, the temperature inside the cultivation structure can reach 60 degrees, especially in the upper part, despite the fact that the 40-degree mark is destructive for most agricultural crops.
Opening the doors and tucking the film from below on the walls does not give the expected effect, but only creates a draft, which carries away precious moisture. Cucumbers don't like it that much. It’s better to play with shading the plants with various curtains, or spray polyethylene with a solution of clay or chalk.
Therefore, at the very top of the slope we will install four opening transoms from old glazed windows. We fasten them with small canopies from the ridge into the overlay with the roof. Our windows have small windows that can be opened in the spring.
It is believed that the optimal ratio of transom area to total area greenhouses on the floor are approximately 1:6 or 1:7.
 Transoms on the ridge
There are several options for automating the opening of transoms. They are based on the use of an electric, hydraulic or bimetallic drive with the possible use of temperature sensors. This is very convenient - you do not need to constantly monitor the degree of heating of the air inside the greenhouse and constantly manipulate the vents, however, costs increase significantly.
Making a door
The door is made from dry slats with a cross section of 30x40 mm. Using angles and plates, a lightweight frame 10 mm narrower, braced with braces, is assembled doorway in width and height. It is covered with film and mounted with canopies on the rack with an outward opening.
 Convenient door
From the same slats, a porch is made on the opening, onto which a rubber seal can be attached closer to winter.
It is imperative to make a threshold. It will make it possible to avoid the penetration of cold air from under the door and raise it above the ground, facilitating free opening in the presence of an “unfavorable” slope of the site or fallen snow.
The door must be equipped with handles on both sides and some kind of closing mechanism (turntable, bolt, hook...).
Let's sum it up
Such a structure is erected by one person during 16-17 hours of leisurely, thoughtful work.
As far as power tools go, you can probably get by with a jigsaw and a screwdriver without any problems.
The total cost of a house for vegetables was around 4,500 rubles.
The following materials were used:
As you can see, in order to make a convenient, problem-free greenhouse of this size (5.5 x 3.5 meters), it is not at all necessary to invest serious funds. You just need to make a little effort, and she will definitely be with the most early spring and until late autumn frosts bring your owner a good, stable harvest.
 Ready. You can plant seedlings
Obviously some questions interior design structures remained “behind the scenes” - these are automation, irrigation options, artificial heating, heat accumulation systems, features of space organization, nuances of care greenhouse plants and many others. However, these are topics for another article.
Anton Turishchev, rmnt.ru
- The protective layer on which the inscriptions are applied must be located on the outside of the greenhouse.
- To get the maximum robust construction be sure (!) to pay attention to the location of the polycarbonate “honeycombs” - they should go only vertically, in inclined structures - parallel to the slope.
- When creating arches, keep in mind that polycarbonate sheets bend only in one direction - lengthwise, that is, along the line of the stiffeners.
- The joints of the sheets should be at the center of the frame post; the sheets are connected only in this way.
- This type of plastic is cut construction knife, jigsaw, grinder. You can also use a hacksaw or a circular saw.
- To firmly connect the sheets to each other, special plastic profiles. Manufacturers do not recommend overlapping polycarbonate. In practice, when making a polycarbonate greenhouse with your own hands, it is not always possible to cut and fit the sheets perfectly. Some craftsmen even manage to do without connecting profiles, placing polycarbonate overlapping. The most important thing is that the joint must be in the center of the rack, and not sag in the air. Moreover, even if perfect installation under snow pressure the sheet can be squeezed out of the profile. In the case of overlap, this does not happen.
- It is not advisable to use a powerful drill for screwing in self-tapping screws - it will overtighten the fasteners and often slip off during operation. It is better to work with a regular screwdriver. Polycarbonate is drilled at low speeds with little effort. Next, turn off the tool, insert the screws and continue working.
- The distance between the screws to be screwed in is 25-70 cm. It all depends on the type of frame and the expected snow and wind load.
- When assembling polycarbonate structures, rivets are sometimes used instead of self-tapping screws. However, dismantling the greenhouse or replacing a damaged sheet in this case will be more difficult.
- When the temperature changes, plastic can change size. When making butt joints between the sheets, be sure to leave small space a couple of millimeters in size - a technological gap. Otherwise, cracks will form at the junction. For the same reason, the size of the holes for fasteners is made a little larger. To prevent the plastic from cracking, do not tighten them all the way.
- To compensate for expansion and protect against cold bridges, it is recommended to use special thermal washers for polycarbonate (screws are purchased separately). Allowed to use roofing screws EPDM, equipped with a gasket or standard for metal with a rubber thermal washer, in which the threads have a small pitch.
When choosing material for a greenhouse, do not discount wood. Wood is easy to process and affordable. Gardeners who are not experienced in the subtleties of construction can work with it. By following the technologies for arranging the foundation and treating the frame with modern impregnations that increase resistance to moisture and fungal diseases, the service life of such a structure can be extended to 20 years. Building a greenhouse out of wood with your own hands is an excellent alternative to industrial frames.
Original greenhouse made of wood and polycarbonate
The most common types of wood for construction are conifers: larch, pine, spruce. It is possible to use lumber from oak, beech and hornbeam. But these types are expensive and require a lot of effort to process, which increases construction time.
Softwood lumber
The basis for building a wooden greenhouse with your own hands is usually ready-made lumber:
- block with a cross section of 40x40 or 50x50 mm;
- boards;
- beam;
- round saw log.

Simple greenhouse made of wood
Remarkable results are obtained when using laminated pine timber - it is not subject to cracking and deformation, and is better able to withstand impact. unfavorable factors – high humidity and temperature changes. It's easier to work with because smooth surface, which does not require additional processing.
When using substandard lumber to build a greenhouse made of wood - unedged boards, croaker, old window frames, achieving durability and elegance of construction will be much more difficult, and the service life of such a greenhouse will be short, but it will be possible to significantly save money and time on assembly individual elements– frames, doors, windows.

Small greenhouse for a summer residence
Processing lumber before construction
Any lumber used to build a greenhouse with your own hands must be treated with antifungal drugs and impregnated with compounds that make the wood resistant to high humidity. The modern chemical industry supplies trading enterprises an extensive range of impregnations, varnishes and paints that help to treat the wooden frame annually, extending its service life.
It is advisable to do impregnation before installation of the structure. This will reduce the consumption of expensive chemical substances and properly dry the lumber, preventing it from deforming.
In addition to impregnation with modern antiseptics, less expensive means can be used to protect wood - drying oil or used machine oil, bitumen, roofing felt. They are less effective, but more accessible.
At the right technology processing - using hot drying oil for repeated impregnation, soaking wooden elements in waste machine oil, application bitumen coating“hot” method - they are also able to prevent the destruction of wood for many years.

The inside of the wood also needs to be treated
Arrangement of a reliable foundation
The frame of their tree cannot be built directly on the ground. This will lead to rapid failure of the lower structural elements in contact with the ground. Therefore, before building a wooden greenhouse, it is imperative to equip the foundation, at least the most basic one.
Columnar foundation made of various materials
This type of foundation is the most common, easy to install and inexpensive in terms of materials. The basis for the foundation can be either ready-made reinforced concrete products: stumps of piles, window lintels, or asbestos-cement or plastic pipes with a diameter of 150-400 mm, filled inside with cement mortar.
If you plan to lay timber framing at the base of the greenhouse, the foundation columns should be placed at a distance of 1000-1200 mm. If the greenhouse has a frame structure without wooden strapping below - the posts should be under each vertical structural element.
It is necessary to deepen the foundation columns for a wooden greenhouse to the depth of freezing of the top layer of soil. Usually it is 400-600 mm.
The lightness of the structure does not require a stronger foundation. Can be used inside pipes metal elements(reinforcement rods, reinforcing wire), but you can do without them. To prepare the solution, cement of a grade of at least 400 is used; it is advisable to add silicate to the solution ( liquid glass), which will enhance the water resistance of concrete.
Strip foundation made of timber
The strip foundation can be constructed either from wooden beams, pre-treated with water-repellent impregnations and antifungal agents, or it can be made from concrete. Arranging a timber foundation consists of the following stages:
- According to the dimensions of the future greenhouse, a trench 250-300 mm wide is dug to the depth of soil freezing.
- 2/3 of the trench is filled construction sand, which is carefully compacted.
- 1/3 is filled with crushed stone of a fraction of 15-30 mm and compacted in the same way.
- A layer of roofing material is laid on top of the crushed stone, and treated wooden beam cross section up to 300x300 mm.
- At the corners, the timber is fastened either into a groove or into a tenon. To strengthen the structure, you can tighten it with metal staples.
- Excess edges of roofing material are placed on the end surfaces of the beam and secured using construction stapler or slate nails with a wide head.

Base for a greenhouse made of timber
The upper part of the beam cannot be covered with roofing felt, in order to avoid the “greenhouse” effect inside the roofing felt.
Installation of a greenhouse made of lumber
The optimal option that requires a minimum building materials and assembly time is wooden greenhouse arched shape. There are two options: a greenhouse with a semicircular arch and a “Gothic” type arch. The manufacturing technology is the same. The difference lies in height and resistance to snow loads. In a “Gothic” type greenhouse it is higher.

Gothic greenhouse
Consumables for a greenhouse measuring 3x5 meters
- Wooden block with a cross-section of 40x50 mm and a length of 3000 mm – 30 pcs.
- Bolts 8 x 100 mm – 36 pcs.
- Metal washers – 72 pcs.
- Door hinges – 3 pcs.
- Window hinges – 4 pcs.
- Thermal washers with self-tapping screws (at the rate of 1 piece per 500 mm of fastening length + 25%).

Arched frame made of wood
Greenhouse of “Gothic” shape:
- Plywood 2440 x 1220 mm – 1 sheet (12-15 mm).
- Wooden block with a cross section of 40x50 mm and a length of 5000 mm – 10 pcs.
- Bolts 8 x 100 mm – 36 pcs.
- Nuts for bolts d-8 mm – 36 pcs.
- Metal washers – 72 pcs.
- Galvanized or oxidized wood screws 3.5 x 45 mm – 1 kg.
- Wood screws 35 h 40 mm – 1 kg.
- Metal corner corner – 14 pcs.
- Reinforced metal corner 40h 40 mm – 40 pcs.
- Drywall hangers – 24 pcs.
- Door hinges – 3 pcs.
- Window hinges – 4 pcs.
- Cellular polycarbonate (4-10 mm) – 30.5 (+20%) m2.
- Thermal washers with self-tapping screws (at the rate of 1 piece per 500 mm of fastening length + 25%)
- Antiseptics for wood – 5 liters.
Preparing a template for arcs and lamellas
Work on building a wooden greenhouse with your own hands begins with the preparation of a conductor - a template according to which the arcs will be made in the future:
- On flat surface lay out three boards 25-40 mm long 3.5-4 m.
- Place two sheets of plywood or chipboard on them. Secure with self-tapping screws. Using a cord with a pencil attached to the end, draw an arc on the sheets (segment ¼ circle - d 3 m).
- Attach three pieces of timber along the edges of the arc with a distance between them equal to the thickness of the lamellas. Secure one block at the top point.

Structural elements of a wooden greenhouse
If a block is used to make lamellas, loosen each of the blanks using circular saw into strips (lamellas) 20 mm thick and 50 mm wide. When using plywood, mark the sheet along its short side (1220 mm) into strips 50 mm wide and unravel using a jigsaw.
Attention! The presence of strands, knots, and cracks in the bars is not allowed. When bent, this will cause the lamellas to break.
Cutting reinforcing bars 60-70 mm long is carried out using a jigsaw, at the rate of 10 pieces. for 1 arc – a total of 120 pcs.
All sawn material is treated twice with an antiseptic or hot drying oil. Dry until the stickiness on your hands disappears.
Assembling arcs for the frame
Assembling a greenhouse made of wood with your own hands begins by securing a lamella (a strip of plywood) between the two lower bars, first on one side and then on the other side of the template. In the upper part, the curved lamella is attracted to the block with a clamp. The second lamella is bent in the same way. Both lamellas are tightened with a clamp at the top point of the arc.
Reinforcing bars are placed in the gap between the lamellas. The outer and central bars are attached to the lamellas using bolts - through a hole drilled through the lamellas and the bar. The remaining bars are fixed with self-tapping screws. After fixing all the elements, the finished arc is removed from the conductor (template). All 12 arcs are made in the same way.

Assembly of arcs into a single structure
Assembling the frame halves
To assemble half of the frame, 6 arcs and 3 bars 40x50 mm are used. If the bars are shorter, they are placed in a checkerboard pattern during assembly.
The block is marked into segments with a pitch of 1000 mm. After this, the arc is inserted into the gap between the lamellas. So, step by step, all the arcs are “strung” onto the block. First, mount the lower fragment, secure it with self-tapping screws, and then fasten the upper one.
Using a plumber's angle, check the verticality relative to the bottom bar of each of the arcs (angle 90°). After this they are secured with self-tapping screws. Complete with the installation of the middle bar. The second half of the frame is assembled in the same way.

Installation of arches on supports
Frame installation technology
Due to the lightness of the design, it can be installed by one person. But it's better if you have an assistant. Half of the frame is installed on the foundation. Using a reinforced steel angle and self-tapping screws (2 angles per rack), they are attached to the mortgages wooden parts V concrete foundation or directly to the beam wooden foundation. If there are no mortgages in the foundation, use a hammer drill to drill holes in the foundation and, using plastic dowels, secure the corners.
During installation, place under the upper part of the frame half support posts. They must be located strictly in the middle of the width of the greenhouse and be equal in height to the design height of the structure. The second half of the frame is mounted in a similar way.
In the upper part, both halves are pulled together using drywall hangers, fixed with self-tapping screws on both parts of the frame.

Construction of a greenhouse made of wood
Construction of greenhouse end walls
With a greenhouse length of 5 meters, install two doors in end wall x is inappropriate. Therefore, the door is made only in one of the walls; a transom (window) is provided in the second wall.
First, the sheathing is made - a horizontal beam made of timber at a height of 210 mm. Then they attach to it vertical racks, forming a doorway with a width of at least 800 mm (if there is a garden cart on the farm, they are guided by its width - the distance between extreme points handles
On the opposite side, a sheathing is installed, consisting of two horizontal and two vertical bars. The distance between the vertical and horizontal bars will determine the size of the window. For a wooden greenhouse of 15 m2, a window area of 1 m2 is sufficient.
The door and window are assembled from a block on a horizontal surface. Corners are reinforced with overhead metal corners or plywood scarves. After assembly, they are hung on the hinges.

Installation of door leaf
Installation of polycarbonate or polyethylene film
It is advisable to purchase polycarbonate sheets with a length of 2500 mm to minimize waste.
- Installation begins from the top edge of the sheet, located along the ridge of the greenhouse. The distance between the screws should be 500 mm.
- The sheets are mounted with an overlap (50-60 mm).
- Before laying the next sheet, the edge of the mounted sheet is coated with transparent silicone sealant.
- It is advisable to issue 200-250 mm polycarbonate sheets from the ends of the greenhouse to protect the end walls and foundation from rainwater.
When covering a wooden greenhouse with polyethylene, reinforced film should be used. It is attached to the wooden frame using staples from a stapler (construction stapler). A two-layer greenhouse cover is possible plastic film- outside and inside. The thickness of the frame allows this to be done without problems.
Building a wooden greenhouse with your own hands is the most “budget” option. It does not require a large amount of lumber and minimally shades inner space greenhouses and is resistant to snow and wind loads.
Almost every garden has a greenhouse near its home. Until recently, almost one hundred percent of these were homemade greenhouses.
Based on the fact that in our north the tree is the most cheap material, almost all homemade greenhouses are made of wood. Saw logs, bars measuring 75 by 50 mm, are best suited. They turn out great if you spread a 150mm wide board along the middle.  Slats 25 by 50 mm are also cut from the same board, or from inch. The board itself, 50mm thick, is well suited for supporting posts. Often, round timber posts are used as vertical load-bearing posts, and cross beams are made from poles of a suitable diameter.
  The usual form of a greenhouse is a house, length from 4 to 6 meters, width from 2 to 3 meters, the entrance is usually made on one side. For better ventilation of the greenhouse, in addition to the doors, additional frames or transoms are installed.
  Used for covering greenhouses Various types films, glass and polycarbonate. For the budget type, of course, they use film; it is the cheapest of all coatings.
The most common film is polyethylene. It is usually sold in 1.5 meter wide sleeves. Film thickness varies from 50 to 300 microns.  The main disadvantage of this film is that it dries at the folded point. sunny side per season and bursts in the fall. For the second season there is no longer enough such film, so you have to buy a new one.
Reinforced film has performed well in greenhouses. My neighbors have had a greenhouse with reinforced film on their property for nine years now. In winter, it is covered with a layer of boards on top to prevent it from being torn by snow.  There are still not very many homemade greenhouses made of polycarbonate, since the material itself is expensive, so it’s easier to buy already ready-made greenhouse together with metal frame, especially since companies have appeared that produce all-metal arcs from profile pipe- it turns out to be a very strong greenhouse frame. Although, in my opinion, a homemade wooden greenhouse under polycarbonate will be more convenient to use.
Photo 1a,b shows a “house” greenhouse covered with reinforced film. Entrance on one side, ventilation through doors. Columns buried in the ground were used as load-bearing structures.  In photo 2a,b there is a greenhouse under film, size 2.5m by 6m. Distinctive feature This greenhouse consists of the fact that it is closed on the sides with frames, which are opened when ventilation is necessary, and for the winter they are folded separately into a shed. This allows frames with plastic film to be used repeatedly. The roof of the greenhouse is covered with a whole piece of film and pressed with wooden glazing beads onto the nails. Another feature of this greenhouse is the absence of a cross beam in the middle of the greenhouse, which everyone always hits their head on, despite many years of practice.
  An interesting greenhouse in the form of a kind of gallery is shown in photo 3a. The greenhouse is structurally integrated into the general row outbuildings. The greenhouse is covered with glass on the side and film on top. North side The greenhouses are closed with boards, the side walls are adjacent walls of neighboring buildings. Nevertheless, there is enough light and warmth too.
  The greenhouse in photo 4a, b is intended for growing seedlings from early spring. It is attached directly to the wall of the bathhouse, which gives a significant gain in warmth. The top and three sides of the greenhouse are covered with polycarbonate. The beds are located on trays and have the possibility of heating. The size of the greenhouse is approximately 2 by 4 meters. Such a greenhouse allows you to grow seedlings of vegetables, flowers, etc. already in March in a comfortable environment.
  The most durable from a mechanical point of view is the arched greenhouse. When covering with film in such a greenhouse, constant tight pressing of the film is ensured at each point of the arc. Therefore, the film can only be attached at the bottom and along the edges. The design of such a greenhouse is shown in photo 5a, b.
  Greenhouse arcs are made of polyethylene pipes for reclamation with a diameter of 50 -70mm. Many such pipes turned out to be unnecessary after the closure of land reclamation in the 90s. The arches are connected by longitudinal boards or bars. To create rigidity of the structure, inclined wooden reinforcement posts are installed. The size of the greenhouse is 3 by 5.5 meters. The greenhouse is closed with a single piece of reinforced film 6 by 6 meters.
  On the sides below, the film is attached to the longitudinal rail with twine using a stapler. The film was attached to the ends of the greenhouse in an original way. The edges of the film are folded over and taped to create a cavity. A tube from medical dropper which has good strength and elasticity. The tube was then wrapped, which ensured that the film was pressed along the entire perimeter of the arc.
Very interesting arched design greenhouses are shown in photo 6a, b. The size of the greenhouse is small, approximately 2 by 4 meters.  The supporting arcs of the greenhouse are made of plywood. Thick plywood is spread out on a circular machine into bars, which are then clamped with clamps in a mold to give the necessary bend. After drying, the greenhouse frame is assembled using self-tapping screws. The greenhouse is covered with reinforced film, attached with plastic plates using a stapler. Such a greenhouse can withstand winter snow loads without additional fastening.
  Greenhouses are used to grow cucumbers (and tomatoes). The dimensions of the greenhouse allow plants to grow normally in it; to maintain the greenhouse, you need to open it and cultivate the soil and plants while outside.
Photo 7a,b shows homemade greenhouse made of metal arcs, the ends of the greenhouse are made of boards according to the size of the arc. The film on the non-working side of the greenhouse is nailed tightly with slats, on the other side it is attached to a block or pole and, when closed, is pressed to the ground due to the weight of the block.  When the greenhouse is opened, the film is wrapped around a block, which gradually rises to the middle of the arc and remains in this state. To close the greenhouse, it is enough to push the block out of balance and hold it so that the film is not damaged. In hot weather, the entire greenhouse can be opened. Cucumbers in greenhouses usually grow on the ground, and are not tied vertically, as in greenhouses, although in this greenhouse they are also tied vertically - the size allows.
  The original greenhouse made of polyethylene pipes in photo 8a. The bottom of the greenhouse is made of boards. The pipes at the bottom are sawn in half and attached to the boards. The ends of the greenhouse are covered with a film, which is attached to the arcs with brackets using a construction stapler through twine. The covering film is nailed to the rail and put aside for the day.
The simplest village greenhouses are shown in photo 9a, b. The walls and sides of the greenhouses are made of boards or slabs, the frame is made of any slats. Typically, film is needed to cover plants from spring frosts. When the tomatoes and cucumbers grow and crawl out of the greenhouse, it is no longer closed.