How to dismantle parquet boards in an apartment. How to remove old parquet: step-by-step description. When it becomes necessary to remove old parquet
Parquet – wear-resistant coating, which, with proper care, can last 20 years. But sooner or later, even the most durable floors become unusable. How to remove old parquet? In the article we will look at the features of partial and complete replacement parquet
When is the coating not subject to restoration?

One of the main advantages of parquet flooring is maintainability. If necessary, failed coating elements can be replaced, and the surface can be polished and varnished. However, remove defects on wooden floor not possible in all cases.
When can parquet flooring not be repaired?
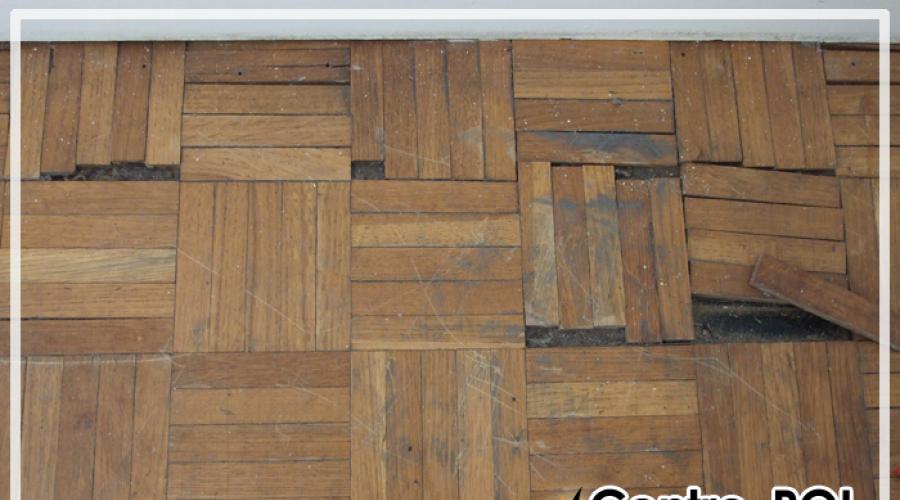
- Large cracks and wavy hollows in the dies. A similar situation often occurs when the floor is flooded. Since wood is hygroscopic, when saturated with moisture, parquet flooring begins to warp. As a rule, after drying they become deformed and therefore simply need to be replaced;
- Numerous areas with swollen dies. Deformations of this kind often occur in the case of improper installation of parquet flooring or poor-quality waterproofing of the base. Moisture rising from the screed contributes to the deformation of the dies, which swell and form swollen areas on the floor;
- Looseness of parquet floors. If wooden elements the floors have become loose and darkened; most likely, mold or mildew has developed in the floor. Parquet that has been “eaten” by pathogenic microorganisms must be replaced, after which the base must be thoroughly disinfected.
Necessary tools and dismantling features

How to remove parquet? The process of disassembling the old wood covering must be carried out in such a way as not to damage the walls and foundation. To work you will need the following types of tools:
- chisel and hammer;
- chisel and nail puller;
- crowbar and circular saw.
Degree of difficulty dismantling works depends on several factors, namely:
- Vida parquet flooring. Dismantling will be the most difficult piece parquet and parquet strips, which are glued to the prepared base during installation;
- Method of fastening dies. The easiest way is to remove a parquet board with a locking joint, but with dies attached to the floor with nails or glue, you will have to suffer;
- Type of base. The degree of accuracy in the process of removing parquet depends on the type of base, which can be represented by a cement screed, plywood sheets, chipboard, etc.
Preparatory work

Dismantling the old coating always begins with preliminary preparation premises. How does this happen?
- First, all furniture and equipment are removed from the room;
- Then along the perimeter of the room the baseboards are dismantled and decorative inserts(corners);
- When partially replacing parquet, the usable part of the coating is covered with film to prevent the entry of dust and debris;
- Since removing old dies is a dusty process, you need to be properly equipped using a respirator, gloves, construction glasses, etc.
Before you begin the work of replacing the coating, you need to find containers for periodic garbage removal. Cluttering the floor will only interfere with the dismantling of old tiles.
Features of dismantling work
To replace old and unusable parquet, you need to do several types of work:
- remove parquet boards;
- dismantle the old substrate;
- collect all debris and clean the base.

As already mentioned, the specifics of dismantling work depend on the type of parquet flooring. Let's consider everything possible options disassembling a wooden floor:
- Piece parquet (this kind of coating is the most difficult to remove, since the parquet flooring was glued to the base during the installation process):
- Parquet flooring cannot be removed entirely, so they are broken off in pieces using a chisel and chisel;
- To speed up the dismantling of the dies a little, you can use a hammer and an angle grinder;
- It is not advisable to use a sanding machine to remove old parquet, since the nails present in the dies can damage the tool.
- Panel parquet:
- Removal of the shields begins with the element that was laid last;
- The dismantling of shields begins with the capture required element, after which the rest begin to rise.
- Parquet board:
- Parquet boards usually have locking system, so it is easy to dismantle;
- If the coating was not glued to the floor during installation, the dismantled elements can be reused;
- If the installation of dies was carried out by gluing the covering elements to the base, the parquet can only be removed using a chisel and a hammer.
Despite the apparent simplicity of the process, you need to trust the dismantling of the old coating to professionals. As a rule, under the parquet flooring in good condition there is plywood or OSB that can be reused. But if the old coating is removed incorrectly, the substrate can be damaged.
How to prepare the base?

The basis for parquet is always a plank covering, which also needs to be replaced if the floor is flooded. If sheet materials are not glued to the concrete screed; to dismantle them, it is enough to unscrew the screws or pull out the nails. The hardest part to remove is bituminous substrates that need to be cleaned off.
If you need to change the parquet flooring and properly prepare the base, you will have to perform the following work:
- Collect large parts remaining from the old parquet in a garbage bag: dies, nails, screws, wood chips;
- Remove small chips and dust using a construction vacuum cleaner;
- Then remove dust from the cleaned base using impregnation or a special primer.
Conclusion
Removing parquet is a rather labor-intensive process and requires careful execution of all necessary steps work. The most difficult thing to dismantle is coverings whose dies are glued to the base (piece parquet). To remove it, it is advisable to use special tools: a chisel, a hammer, chisels and a circular saw.
Parquet is a very durable coating. But sooner or later it may also require replacement. The reasons for this can be very different - from flooding by neighbors to infection by fungus or insects. The procedure for dismantling old parquet is not particularly difficult. However, it takes quite a lot of time.
The technology for removing parquet primarily depends on its type. The most difficult thing to remove is the piece one. We’ll talk about how to properly dismantle parquet with your own hands below.
Dismantling block parquet
Removing block parquet is done as follows:
- All furniture and other furnishings are removed from the room.
- The baseboard is being dismantled. How to remove this decorative element Right? Remove the baseboards by simply prying them with a crowbar.
At the first stage you will need to remove the baseboards
- The first die can be removed by cutting off the ridge.
- Further dismantling of the parquet is carried out according to circumstances. If the dies are nailed, use a nail puller. You can also recess the nails through the shelf of the die into the backing. Sometimes elements are additionally glued. In this case, in order to remove the dies, you need to pry them off with a hatchet or crowbar.

Some tiles come off the base easily, some peel off or have to be removed from the floor in parts
Important: Dismantling the dies must be done as carefully as possible. It is unlikely that it will be possible to do without losses. But you can try to reduce them to a minimum.- How to open the backing? In most cases, it is attached to self-tapping screws that just need to be unscrewed. If nails were used during installation, they are removed with a nail puller.

In most cases, dismantling the substrate can be done using a screwdriver
- The screed can be cut with a hammer drill. However, it is usually not dismantled. It is simply repaired and leveled for a new coating.
Tightly glued elements can also be removed using a hammer drill with a flat tip. Below you can see how to remove parquet (video) that is permanently fixed to the base. With this method, it would be better to protect your eyes from splinters with glasses.
How to remove panel parquet with your own hands
Replacing parquet in an apartment, if it is panel-based, is easier. Laying the modular covering usually starts from the window. With this method, elements with an open ridge are located against the opposite wall. All you need to do is use a crowbar to pry one of these shields (from the corner) and tear it off the floor. The remaining modules can be removed in the same way.

Dismantling the panel covering is not a particularly complicated procedure
Advice: Sometimes the shields are additionally attached to nails. It is better to first pull them out with a nail puller.Often apartment owners are interested in the question of how to dismantle very old panel parquet. Once upon a time it was laid not with glue, but with resin. Such shields are very dirty on the back side. The difficulty is to carefully clean the resin with a hatchet.
How to remove a parquet board
Removing parquet, as you can see, is a rather tedious procedure. The parquet board can be easily dismantled. The dies of such a coating are not fixed to the base. They are laid like a laminate - to each other using a special lock.

You can remove the parquet board simply by unlatching the lock.
It will be easy to snap them out. If desired, the removed coating can be reused somewhere else in another room. To understand the technology better, we suggest you watch a video on dismantling this type of parquet laid on joists.
Wooden parquet has always had many advantages: its wear resistance and long term service, soundproofing. Any parquet looks great modern interior, and in the old style.
Parquet can last for many years if it is made from natural material, and also the laying technology and correct operation. The service life of parquet typically ranges from ten to fifteen years.
However, someday the time will come and the parquet will lose its original appearance, and then the question will arise about replacing it and, accordingly, how to remove the old parquet.
All renovation work will depend on the condition of the old parquet. Therefore, if the parquet planks are well preserved, and the color has practically not changed, then it will be enough to just go through it. And if there are a lot of defects, then it’s time to dismantle the coating.
Of course, it's easier than replacing it completely. With constant use of a parquet floor, some planks either fall out completely or simply wear out greatly, so you have to replace them with new ones.
 Dismantling parquet is a very difficult and dusty job. First, you will need to clear the room of furniture. In order not to inhale construction dust, you need to properly protect yourself and take care of protective clothing.
If you need to completely change the floor, then you should dismantle all the skirting boards this room and remove ventilation grates, as well as decorative thresholds. If you have to dismantle not all of the parquet, then you need to protect the rest of the area by covering it with thick cardboard and gluing a layer on top polyethylene film with tape. It is also necessary to prepare for a large amount of garbage and take care in advance of its timely removal.
How to remove old parquet without damaging the exact part where the nail is driven is main task during dismantling. This means that a nail in an old stave must be driven through the stave into the floor with a hammer. And if the rivet is not glued, it will be removed easily. Otherwise, you will have to punch nails through the rivets, and hit the rivet itself with a hatchet, and in this way it will be separated from the floor. Well, if there is any glued part on the underside, then it must be cleaned with an ax.
The most difficult task will be dismantling the coating that was laid on the resin. This type of parquet does not have nails, and rivets stained with resin will be very difficult to clean. But if you still have to restore this same parquet, you will need to find the narrowest stave and make all the others according to its dimensions. In general, the rivets should be standard, but in fact they all differ slightly, namely by one to three millimeters.
The dismantling process largely depends on the technology of laying parquet flooring. For example, the most difficult thing to dismantle parquet is when piece laying. In this case, chisels, hammers, and nail pullers will be useful in order to remove each part of the parquet one by one.
This is explained by the fact that in most cases, well-glued parquet boards delaminate. But as for panel parquet, then it is much easier to remove it, the main thing is to find the last board and pry it properly, and then the rest of the covering will gradually begin to be removed.
Dismantling the base itself involves unscrewing and removing nails and screws with which it is strengthened. Cement screed cleanse in the usual way, preparing for a new coating.
Video seminar on the advisability of removing old coating
Note: if you need high-quality repairs turnkey apartments, then you should contact the specialists upper class on the website www.serre.ru.
Similar news:
How to care for parquet boards. Expert advice.
Parquet board is one of the least finicky and durable floor coverings. However, failure to follow the basic rules of care will very soon result in the perfect shining parquet floor that just recently made your heart beat faster...
Since ancient times, parquet has been considered one of the most durable and decorative floor coverings. Accordingly, dismantling this material requires a special approach, patience, experience and a set the necessary tool. In a word - painstaking and tedious work, which not everyone will undertake. But that's not the point.
This article will discuss how to properly dismantle parquet flooring, with maximum preservation for subsequent use. Is this possible? Yes. But there is one caveat. It all depends on what the parquet was fixed to when laying it. There are three technology methods:
- Floating - each plank is fastened together with a tongue and groove (lock);
- Mechanical - self-tapping screws are screwed into the edge of the strip at a certain angle;
- Adhesive - planted on special glue or bitumen mastic.
We most often encounter the last option when we carry it out in Stalinist apartments. Disassemble similar design extremely difficult, and even more so if we're talking about about the preservation of material.
Note: in most cases it is almost impossible to keep all the slats intact and undamaged in order to reuse them.
Type of parquet and details of dismantling
These days there is a large assortment types of parquet (piece, panel, palace, etc.). Each type has its own characteristics. As an example, let’s take the most popular one, namely the one that we have repeatedly had to disassemble (dismantle).
Piece
Example
Among its counterparts, piece parquet is perhaps the most difficult to dismantle. To be honest, even a seasoned professional with many years of experience will not be able to disassemble it, keeping all the dies safe and sound - this is unrealistic.
What tools do we need? To carry out the work, you must have the following equipment on hand:
- Chisel, chisel - excellent for prying up boards;
- Hammer, mallet - for tapping the flooring;
- Nail puller (crowbar) – for pulling out nails;
- Spatula - for cleaning plywood or concrete screed from adhesives;
- Ax - used in special cases.
Stage No. 1
First of all, it is advisable to tap the parquet rubber mallet and focus on the muffled knocking. A muffled sound means that there is emptiness under the parquet. Thus, it is from this place that you should start disassembling it.
As a rule, if the parquet is fixed with nails, then we dismantle it with a nail puller, and remove it from the glue using a chisel and hammer. All actions must be performed extremely carefully, especially if you want to save the material.
It is important!!! To avoid unforeseen situations, do not forget to wear safety glasses and gloves, and it is better to use construction bags for the resulting debris.
Stage No. 2
On at this stage Let's look at how and what you can use to clean the glue from the substrate on which the parquet flooring was lying.
 Glue
Glue Of course, no doubt. If the volume is small, you can remove the remaining glue using a chisel, a hammer drill with a wide spatula, or use special chemicals. But what if the area of the room exceeds more than 20 m².
In our opinion, the most effective option: put a cup-shaped one on a powerful grinder grinding disc(brush) and connect an industrial vacuum cleaner to collect dust. The process itself will be much faster than the manual method, and the final result will be much better.
If you don’t want to bother with all this yourself or just don’t have enough time, we recommend contacting our service. Company specialists "Demonter" implement assigned tasks within precisely established time frames.
You can find out more details at telephone numbers which you see on our website. We process applications seven days a week and holidays. Call! And they will help you.
The coatings have earned special respect from consumers. They are valued for their natural and attractive appearance, reliability and durability.
However, even with the most careful treatment and proper care there comes a time when the old parquet needs to be completely replaced or repaired. To carry out this work, you can hire specialists, or you can save money and do all the work yourself.
We will look at how to dismantle the old coating yourself and whether it can be restored to its original appearance in this article.
Determining the scope of work
Depending on the nature and extent of damage to the old coating, the scope of repairs is determined. If the old parquet is very worn out, the boards have a large number of cracks, darkening and chips, it must be completely dismantled.
If defects appear only on some elements of the coating, the strips can be carefully removed and replaced with new ones.

If the boards are fairly well preserved, but have unsightly scratches, chips, and the floors themselves have begun to creak unpleasantly, you can do without dismantling. IN in this case It is enough to restore the parquet and make minor repairs.
Situations also often arise when the coating has not yet lost its presentability, but the owners of the room decided to change the decor and change the floor covering. In this case, you can very carefully remove expensive material and put the old parquet in another room.
We will tell you below how to do the job correctly in each of the above cases.
Preparing to remove parquet
Before proceeding with dismantling, the room should be cleared of furniture. Don't forget about your own safety. It is necessary to prepare thick clothing, protective gloves and a hat in advance. If there is wiring in the area of the baseboards, the room must be de-energized.
During the work you will need the following tools:
Hammer;
Hatchet;
Chisel;
Circular Saw;
Degree of difficulty this process will depend on the type of parquet (slatted, piece, panel) and the method of its fastening at the base (using nails or glue).
Complete dismantling of block parquet
If the old parquet is presented in the form of piece strips that are attached to the base with glue, it will not be possible to remove it carefully. In such cases, the boards split and become completely unusable. Modular and plank decks are much easier to remove.
The process of dismantling block parquet includes the following steps:
1. Using a crowbar, all skirting boards are dismantled.
2. The covering is tapped with a hammer, and from those places where the sound from the impact is more dull, they begin to dismantle the parquet.
3. If the dies are fastened with nails, the work is done with a nail puller, and if the planks are fixed with glue, an ax and a crowbar are used for the work.
4. Tightly glued elements can be removed using a hammer drill with a flat nozzle. In this case, it is necessary to protect your eyes from splinters by wearing safety glasses.
Removing parquet boards and modular coverings
Very similar to the process. The elements are secured using special locks, so all that needs to be done to dismantle them is to carefully snap out the mounting grooves.

In this case, no damage is caused to the coating, so it is quite possible that it reuse. For example, in rooms where old parquet can be laid.
Dismantling the modular flooring also does not require much effort. Here it is only important to determine on which side the elements with an open ridge are located. Since the installation of such a covering always starts from the window, it is more logical to start dismantling from the opposite wall.
The corner module is pryed off with a crowbar and torn off from the base. If nails were used, they are first removed.
Many people are interested in the question: how to remove old parquet if it is fixed with resin? In this case reverse side The module must be carefully cleaned of glue using a hatchet.
How to carry out partial parquet repairs
During the operation of such a coating, the planks may dry out and lag behind the base.

In such situations, you can do without completely replacing the flooring by repairing the old parquet.
To do this you need to do the following:
1. The old varnish must be completely removed to reveal all the loose elements.
2. Severely dried dies, with a distance of more than 5 mm between them, are removed and replaced with new ones. To dismantle unnecessary elements, they are split into chips with a chisel.
3. To install a new die on empty place, the protruding spike is cut off from it. The base is covered with glue, after which it is laid (at an angle). new element so that its groove fits onto the tenon of the adjacent plank.
4. If the cracks are small, glue is poured under the board. This area is pressed down with a heavy weight and left overnight.
5. The restored flooring is sanded and varnished.
Color restoration
Under influence external factors covering from natural wood gradually loses its attractiveness, begins to fade and darken. However, this phenomenon can be easily eliminated; it is enough to just slightly restore the old parquet. Coverage that does not have large mechanical damage, can be easily repaired and does not require large expenditures.

To do this you need to do the following:
1. Using grinding or scraping equipment, the varnish is removed.
2. The surface is cleaned of dust, small cracks and cracks are puttied.
3. If the owners want to change the shade of the coating, at this stage the floor is covered with stain of the desired color.
4. Using fine-grit sandpaper, the decking is sanded again. This is necessary to eliminate chips and darkening.
5. Smooth surface cleaned and treated with 1 layer of primer varnish. After this, the floor is sanded again sandpaper and again varnished. This treatment can be performed up to 9 times until the surface becomes perfectly smooth.
6. After applying the final layer of varnish, the floor is left to dry (for 3 days). There should be no drafts in the room, high humidity and sudden temperature changes.
Removing scratches
Scratches are the most common defect in hardwood floors. If they are not very deep, they can be easily eliminated using a parquet repair kit or special wax pencils. But what to do if the old parquet is covered with deep and numerous scratches? In this case, you won’t have to lay a new coating, but you will need to spend time and effort to repair the damaged one.

In order to remove deep defects, the parquet must be completely cleaned of varnish and using scraping machine remove the damaged layer. This cannot be done in one go, so you need to be prepared for several treatments.
What to do if the floor begins to creak a lot
Old parquet flooring can start to creak for several reasons:
If voids have formed under the planks;
If the spacer wedges are sagging;
If the slats are loose.
To find out the cause, first of all, the baseboards are removed and the wedges are inspected. They may dry out, as a result of which they will no longer perform their functions. New wedges are installed in their place and the sounds of the floor are observed for a week. If the squeaks do not disappear, the problem is something else.
If certain elements creak, this indicates that a void has formed underneath them. Then a hole is drilled in the center of the plank through which glue is poured under the plank (until it stops being absorbed). This area is pressed down with something heavy and dries for 3 days. When the mixture has completely hardened, the hole is completely filled with putty.

If creaking is observed throughout the entire flooring, the above methods will not help. This defect can be eliminated by completely re-laying the parquet.
As can be seen from all that has been said, during operation, parquet flooring gradually loses its original qualities. However, they are very easy to repair, so any acquired defect can be removed and you can continue to enjoy the beauty of the natural coating.