How to make a partition from plasterboard. Assembling a partition from plasterboard. Construction of a plasterboard partition
Read also
Many modern apartments do not have a layout and therefore the owners independently break down total area for rooms using interior partitions, or use decorative ones.
The simplest, fastest and in an accessible way creation interior partitions are plasterboard structures . Such partitions can be either solid or with a door, and if you have the desire and time, then you can make them yourself.
Drywall is universal building material, which is used both for finishing a room and for creating new structures in it, including interior partitions, and for creating apartments. The only things that can compete with it in terms of characteristics are: or
Benefits of using drywall if it is necessary to create an interior partition with a door, they will be as follows:
- This lightweight material , so the load on the structure of the house will be insignificant;
- All work with it is done by hand, without the involvement of assistants, since the material is light;
- the cost of drywall is low, as well as the materials necessary to create the frame and surface finishing ;
- material is easy to cut, it bends easily, so even arched structures are created with its help;
- installation of the frame and sheets is simple and quick;
- finishing of such structures is carried out with various materials;
- plasterboard sheets consist of natural materials, therefore they are safe for human health.
 Eat different types drywall, so before buying it, you need to decide which one you need:
- ordinary, more often gray, used in rooms where humidity is not more than 70%;
- moisture resistant, has green or Blue colour and is used in rooms where there is constantly high humidity;
- refractory, usually used in the kitchen, where there is a possibility of strong heating of the wall, it contains fiberglass and other additives, it is red or gray in color;
- fire-resistant moisture-resistant, it is rarely used in rooms with difficult conditions.
The thickness of a regular sheet is 12.5 mm, and to create arches they use sheets 6.5 mm thick, to give them flexibility, they are pre-moistened.
Installation of an interior partition
At the first stage of the work, it is necessary to determine the location of the future partition. To mark, use a plumb line and a cord, parallel lines are drawn on the floor and ceiling.
 It is much easier to work with a laser level, but buy it only to create plasterboard wall inappropriate.
Taking into account the presence of a door, the profile is not laid on the floor along the entire length of the partition, but space is left for the doorway. When laying the profile, keep in mind that the distance left for the door is 1-2 cm greater than its width in order to be able to install the door frame.
When marking, the width of the partition is also taken into account, if it is sheathed in one sheet, then 2.5 cm is added to the thickness of the frame, and if the gypsum board is laid in two layers, then 5 cm is added.

To perform the specified work, you will need the following tools:
- building level;
- measuring instruments;
- cord and plumb line, or how to replace them - laser level;
- corner;
- electric drill;
- metal scissors or jigsaw;
- pencil;
- stationery knife;
- putty knife;
- container for plaster.
 After marking, cut the profile to the required length, back walls cover with sealing tape.
Installation of profiles
 Work begins with laying and securing the guide profile to the floor, after which it is installed along the entire perimeter of the future partition. The profile is fastened using self-tapping screws or dowel nails, it all depends on the material of the walls.
 Now, using the rack profile forming a doorway, this must be done carefully and carefully, so that the distance between the racks at the top and bottom is the same. The verticality of the racks is checked by level, after which they are fixed.
To increase the strength of the doorway, it is recommended to lay wooden blocks of the appropriate size in the racks and secure them with self-tapping screws.
At the next stage, the remaining rack profiles are mounted if you have plasterboard standard width, then the distance between them is required 60 cm. 
To increase the strength of the future partition, between the vertical posts it is necessary to secure horizontal jumpers, which are cut from the same profile.
A wooden block is also installed and secured into the transverse profile located above the doorway; it should easily fit into it so as not to disturb the shape, using a square check that the angles are 90 degrees.
The remaining transverse profiles are attached to the racks; special short screws are used for this.
After the frame is created, you will see that its structure is quite rigid and durable, start laying electrical wiring. The rack profiles have holes through which it will be convenient to thread wires.
The wiring is placed in a special corrugated non-combustible insulation.
Fastening drywall
At home You can use a utility knife to cut drywall and a long ruler or staff. To do this, apply a ruler to the sheet, make a cut along the line several times, the deeper it is, the better, and then carefully break the gypsum board and get the required size.
 To simplify finishing work, make a chamfer at the cut site at an angle of about 45 degrees, a plane or knife is used for this.
During the calculations, It is necessary to foresee in advance the places where you plan to mount hanging furniture or equipment.
Here additional profiles reinforced with wooden blocks must be installed, it all depends on the weight of the suspended structures.
 Left place the sheet on the posts and secure it, this is done using self-tapping screws; they are installed in increments of 20 cm and slightly recessed into the sheet.
If you forgot to chamfer the sheets before installing them, do this with a knife when they are installed on the wall.
Carrying out finishing work
Installation of the frame and gypsum board is only the beginning of creating a plasterboard partition. At the next stage All seams are sealed. To do this, use sickle tape and putty. The entire surface of the wall is also puttyed. 
After the base has dried, begin leveling the surface. The wall is covered with primer, which will allow the plaster to adhere better and provide additional protection GKL. Leveling is carried out with a wide spatula and finishing plaster. 
Door block installation
In the prepared opening is performed installation of the door frame, do this with wedges, screws and polyurethane foam . First, the frame is aligned using wedges and fixed with self-tapping screws, after which they proceed to installing the door leaf.
The correctness of the work is checked, and the door should open and close easily. If everything is normal, then the remaining gaps are filled with polyurethane foam.
 At this time, the door is in the closed position, or spacers are inserted into the frame so that when the foam hardens, it does not deform it.
The foam is cut off after it has completely hardened; if the canvas was removed, then it is hung only a day later, after installing the box.
Finishing
On last stage creating a wall from plasterboard, it is carried out finishing, for this it is usually use paint or wallpaper. The frame is covered with platbands, which help hide the door attachment points.
Features of insulation and sound insulation
It is not recommended to leave a hollow partition; it will be filled with sheet or roll insulation. They are laid after one side of the wall is covered with plasterboard, and only then is it sheathed on the other side. 
If you plan to install utilities in such a wall or sliding door, then in the place where they are located, insulation is not laid.
To create sound insulation, use mineral wool or isover. From below, when installing the sheet, you need to leave a small gap, so stands of the appropriate thickness are installed.
In order for you to be able to create a plasterboard wall with an opening for doors yourself, must be adhered to the following tips specialists:
- During the installation of partitions in the room must be at least 10 degrees Celsius.
- You need to calculate required amount guides and rack metal profiles, only then purchase them. Cut them according required size You can use a jigsaw or metal scissors.
- The sheets are laid tightly to each other.
- To create holes for sockets, you must use special drill bits.
- In the places where the sheets are joined, be sure to use a sickle and seal the heads of the screws well with putty, after which the entire wall is puttied.
- As finishing materials, you can use paint, wallpaper, tiles, cladding panels and others.
Conclusion
Now you see that there is nothing complicated in the construction of plasterboard partitions and all the work can be done independently. Having studied the technology of performing the work, advice from experts and prepared necessary tool, feel free to begin performing the specified work.
Useful video
How to make a partition from plasterboard with your own hands, step-by-step instructions in the video:
In contact with
The desire of every person to make their home unique and comfortable found a way out in the zoning of the premises.
The most inexpensive and easiest way to do this is to install a gypsum plasterboard partition in the room as a tool for zoning the space. And to further reduce costs, you can install it yourself. Before the advent of drywall, partitions were built from foam blocks or bricks.
Advantages of gypsum plasterboard construction:
- It is flexible and allows you to create a design of almost any shape;
- large selection of profiles for the base;
- due to the ease of assembly, you can make a partition with your own hands;
- special moisture-resistant gypsum allows you to install drywall even in rooms with high humidity, and regulate this indicator using its porosity;
- light weight does not create a large load on the structure and helps reduce the cost of raw materials;
- safe for health because it is made from natural ingredients.
Before you start installing a partition in a room with your own hands, it is advisable to first think about what load will be on the wall and what decorations are expected there. This will help to provide in advance auxiliary jumpers and places for their attachment.
First you need to find out what you will need for the job. The main thing is a metal profile specially designed for use under the base. Two types are used:
- larger (W) - for installing partition frames;
- smaller (D) - for cladding ceilings and walls.
For each main standard size, additional types have been developed:
- guide (U);
- carrier (C).
To build a simple partition wall with your own hands, you will need UW and CW type crossbars. If a wide structure is planned, and even with communications, use UD and CD.
To build the wall, choose plasterboard measuring 12.5 mm. If zoning is planned in wet areas, may only be used moisture resistant drywall(Green colour).
 Tools
Tools Tools needed:
- perforator;
- roulette;
- level 120 cm and 80 cm long;
- fishing line or thick thread (rope);
- construction knife;
- plumb line;
- drill or screwdriver;
- hacksaw for metal;
- sandpaper.
Types of raw materials for frame
Zoning of the room begins with the selection of a base for the wall being constructed.
It happens:
- metal;
- from wooden beams.
Everyone chooses the type that suits them. But it is better to use a metal base:
- it is durable;
- easier to install than wooden ones (especially if the work is done with your own hands);
Wooden sheathing is exposed to moisture, which causes it to change in size, and the edges of the gypsum board may diverge.
After this, they begin to mark the room.
Marking the room
Before applying markings, make sure that the ceiling and floor in the room are level, dry, and free of dirt.
Using a building level and a plumb line, draw a line where the base of the frame will be located, starting with the floor, then moving to the walls, and then the ceiling. Keep in mind that the thickness of the wall itself along with the finishing will be added to this line.
Assembling a metal frame
The zoning of the room begins with the installation of the main guide. It is cut to the required length, taking into account the possible doorway. If provided, make a bend with scissors up 15-20 centimeters and cut lateral surface.
 Basis of design
 Before proceeding, a sealing tape is secured between the metal base and the surface. Installation of the skeleton of the structure begins with fastening it to the floor every 60 cm with a screwdriver.
The base is installed to the ceiling exactly above the bottom one. Next, a vertical bar is installed and screwed to the bottom and top. Wooden beams strengthen the supporting skeleton of the septum. They are inserted inside the base, secured with a self-tapping screw. The size of the bar must correspond to the size of the plank.
To mark the openings provided in the wall, a guide (UW) is used. Starting from the edge of the plank, the sides are cut at an angle of 45°. By bending them, a U-shaped structure is obtained, which is attached to the first vertical profile of the opening using a self-tapping screw. Thus, the skeleton is formed along the entire perimeter of the opening.
The installation of the partition sheathing is completed.
Types of partitions
Plasterboard partitions can be decorative or simple.
Curly plasterboard partitions made of gypsum plasterboard perform the function of zoning a room, but they are more decorative and do not have a doorway. Instead, they create arches of various beauty and all kinds of figured elements.
A simple design is also used for zoning a room, but this is not its only function. Such partitions hide pipes or electrical wiring.
 Curly partition
 Sheathing
Unlike a wall, a plasterboard zoning partition is sheathed with sheets on both sides. The material varies in thickness (9-20 mm), and is selected based on the design requirements. For curly elements It is better to choose thinner raw materials, since drywall is flexible.
Everything here is easy to do with your own hands. Attach the layers of drywall to the grid using a self-tapping screw. Start from the edges, moving towards the midline. The distance between the screws is 10-25 cm. Plasterboard sheets are placed 10-15 mm above the floor to maintain the integrity of the structure.
After attaching the first sheet, measure the remaining distance to the ceiling and cut off a piece of drywall accordingly. The following ones are installed whole, without cutting. It is advisable to ensure that the edges are always in the center of the wall skeleton. This is how the first side of the wall is sheathed.
How to cut drywall correctly
The sheet is placed on flat surface. Mark the cutting line with a pencil and construction knife cut upper layer, after which the gypsum board is moved from the support and carefully broken off. On the other hand, the drywall is cut (but not all the way through), placed on its edge and bent, then, moving it to the edge, it is broken off.
Communication wiring
If you need to stretch the electrical wiring through the wall with your own hands, do this before installing the gypsum board on the second side of the structure. First of all, the wires are placed in a special tube, which is made of non-flammable material, which reduces the occurrence of fire to zero. The pipe is laid 15-20 cm from the ceiling or floor, therefore, the outlets for the switches must be placed vertically. The pipe is laid without pulling too much, after which it is attached with clips.
 Soundproofing
 The material does not require additional fasteners. Then the second side is faced. The edges of the sheets should rest on different profiles to distribute the correct load on the structure.
This video will show you this process in more detail:
Finishing
After installation is completed, finishing begins. To do it yourself, it is enough to prime the surface, use plaster to treat the seams, the places where the screws are attached and the structure as a whole. The joints are treated with fiberglass mesh. To do this, apply a layer of putty to the seam and immediately apply a mesh. It is important to press it in thoroughly with a spatula. Then another layer of putty is applied and smoothed out efficiently. Now everything should dry, after which the seam is sanded.
 Sealing seams
 When the plaster is completely dry, start painting the wall or wallpapering it. You can decorate the building as much as your imagination and finances allow.
Creating zoning in a room is not difficult, and thanks to drywall, everything can be done with your own hands. Whether it’s creating a kitchen connected to the dining room, a separate children’s room, or separating the bathroom and toilet. After all, such a partition will cost much less and will delight residents with its functionality and aesthetics.
Read also: – types of products, rules for mounting on walls, examples of interiors with finishing, photos and videos
Photo gallery
Some beautiful ideas for implementation:
 How to install a partition for zoning a room made of plasterboard
  Perfect solution for zoning
  Any room can be demarcated
  Several profile zones thanks to plasterboard
 Another decent option for implementation
  Good decision for an apartment or house
  The partition allows you to increase the space
  Several zones in one room
  Comfort comes first
  The children's room also requires zoning
  Everyone will appreciate the comfort in the apartment
  Partition instead of a massive cabinet
  Wardrobe or modern partition
  Non-standard solutions in the interior
  Sleek design
  Partition with shelves
  Openwork design
  Decorative partition for a room
  Two zones in one room
  The partition in the room serves several functions
  Decorative functions of partitions
  Several ways of interior zoning
  Not just for differentiation
  Drywall is ideal for partitions
 There are many designs of interior partitions; they can be used regardless of the materials from which the house is built. It is important to make partitions technologically correctly and ensure that they meet exactly the requirements that are necessary for certain premises.
Among vertical structures Inside the house there are load-bearing walls and partitions. The first ones are supported by floors and roof structures, they themselves must rest on the foundation, and on the second floor - on the underlying wall. Position load-bearing walls rigidly fixed on the house plan.
Interior partitions are not load-bearing structures. They only divide into separate rooms inner space house, limited by main walls. Therefore, they can be made from both heavy massive materials (for example, brick) and light ones (for example, plasterboard, wood). Sound insulation, environmental friendliness, aesthetics, and the possibility of remodeling the space depend on the material and quality of the partitions.

Requirements for interior partitions
All interior partitions in the house must:
- be strong and stable so as not to pose a danger to residents;
- maintain the required service life, in some cases equal to the service life of the house itself;
- have no cracks on the surface and in places adjacent to other structures (so as not to become a haven for insects, rodents and moisture storage).
In addition, there are special requirements:
- For bathroom and laundry room partitions, resistance to moisture and steam is important. It is advisable to make them from waterproof materials, but the main thing is to prevent moisture from getting inside the structure. This problem is solved by cladding made of waterproof material;
- for partitions of second floors and attics in houses with floors of wooden beams light weight is important, since they can withstand less load than reinforced concrete ones;
- if you need to illuminate a room in the back of the house, then it is better to use a translucent partition - made of glass blocks or structures with glass inserts;
- for laying utilities (electrical wiring, chimneys, water pipes, etc.), a stationary partition of increased thickness is suitable;
- partition separating areas with different temperature conditions, must be massive and guarantee high thermal insulation.
In most cases, the systems must provide soundproofing of the premises. Massive structures cope well with this task, and in lightweight partitions, soundproofing material is used between the skins for this purpose.
Sound protection level
Insulation index airborne noise for interior partitions between rooms, a room and a kitchen, a room and a bathroom according to regulatory requirements must be at least 43 dB. The higher this indicator, the better design prevents the spread of household noise - from conversational speech, radio, TV. However, it does not take into account the isolation of low-frequency sounds from a home theater or operating engineering equipment(ventilation, pump). With equal airborne noise insulation indices, a massive partition attenuates low-frequency sounds much better than lightweight frame. It is also important to take into account that holes in the partition (for example, cracks in doorway) significantly reduce the level of sound insulation. There are many nuances in matters of acoustics, and if for some reason it is important to perfectly soundproof a room, you should contact an acoustics engineer.
Traditional types of interior partitions allow you to provide a comfortable level of sound insulation. Structures made of massive and at the same time porous materials - ceramics, aerated concrete, gypsum concrete, shell rock - absorb and reflect sounds of any frequency well. Such partitions, about 10 cm thick, provide an acoustic insulation index of 35-40 dB, and 15 cm thick - up to 50 dB. In order, if necessary, to improve the sound insulation of systems made of these materials, create an air gap between two rows of masonry or additionally line the wall with plasterboard.
Multilayer structures are also effective, in which outer hard layers that reflect sound (for example, plasterboard sheets) are combined with soft layers that absorb it. In frame partitions, mats or slabs from basalt fiber, which are laid between the cladding. At the same time, the level of sound insulation frame systems the higher, the greater the mass and rigidity of the cladding layers, the wider the gap between them and the better the insulating properties of the soft material. Therefore, noise absorption will significantly improve the use of a double layer of cladding and special sound-, rather than heat-insulating, materials.
To achieve the same soundproofing effect, sometimes you have to choose between thick monolithic and narrow multilayer partitions. The latter can save usable area Houses.
 |
The places where frames are attached to rigid structures, as well as the places where they are connected to the floor and ceiling, must be insulated with elastic gaskets |
 |
As a middle layer, a material with a thickness of 100 mm is used (fiberglass, mineral wool, cellulose insulation), for cladding - gypsum plasterboard or gypsum fiber board (12 mm) |
 |
Taking care of safety, electrical cables laid in, and the freon tubes of the air conditioner are thermally insulated |
Massive partitions include partitions made of ceramic materials, shell rock, aerated concrete, sand-lime brick.
Application area
Such designs are used in houses made of appropriate materials with reinforced concrete floors. Aerated concrete partitions It is not advisable to use in rooms with high humidity.
Materials and designs
Brick partitions are made from building ceramic or silicate bricks of at least M25 grade. A sufficient thickness of a single-layer system is 12 cm (half a brick), if the partition is small - 6.5 cm (made of brick laid on edge). To improve sound insulation, structures can be made three-layer - mineral wool (5 cm) is placed between two walls 6.5 cm thick or an air gap is left.
If a brick partition (or part thereof) is installed ventilation ducts or hide pipelines, its thickness reaches 38 cm. Such systems are already too heavy to be installed on the ceiling. On the first floor they are supported on the foundation, on the second - on the wall ground floor. Traditional finish brick partition - plaster 1-2 cm.
In a house made of ceramic blocks, partitions can be partially or completely made from the same material, namely from one layer of blocks 10-12 cm thick. For aerated concrete structures, blocks 8-12 cm thick in one layer are used. Partitions made from these materials are lighter than brick, they are advantageous to use if it is necessary to reduce the load on the ceiling, in addition, they are easier to finish.
Installation
Installation of massive partitions begins after installation load-bearing structures building. The base is leveled cement-sand mortar. To ensure accuracy when laying corners, a wooden (from panels) or metal template is used, and the verticality of the masonry is checked with a plumb line. To connect the partitions to the walls, when laying the latter, grooves (grooves) 5-6 cm deep are left at the junctions of the partitions. Bricks are placed in them when installing the system. If grooves are not left, the partition and wall are connected with metal rods. Wooden wedges are driven into the gap between the top of the partition and the ceiling, and the gap is filled with gypsum mortar.
At the same time, the peculiarity of the installation of structures made of ceramic blocks and aerated concrete is that large and exact dimensions blocks allow the mason to work without templates. To ensure straight lines, the partitions are fixed on the floor and on the wall at the junction points. wooden slats, along which blocks are laid out.
Control zones
- When installing partitions made of aerated concrete, place at their base waterproofing material(two layers of roofing material).
- If the length of a 12 cm thick brick partition exceeds 5 m or the height is more than 3 m, then the masonry is reinforced with mesh or wire rods, laying them in mortar every 4-5 rows, and connecting the ends of the reinforcement to the vertical and horizontal load-bearing structures of the building. Brick partitions 6.5 cm thick are reinforced at any length and thickness.
- Aerated concrete and ceramic blocks must be cut to ensure that the seams are tied (two vertical seams should not be on top of each other).

Based on gypsum and various fillers, prefabricated large-sized slabs are produced for partitions.
Application area
Structures made of gypsum concrete slabs are used in houses with reinforced concrete and wooden floors. For rooms with high humidity, moisture-resistant boards treated with a water-repellent agent are used.
Material and design
Gypsum concrete slabs can have dimensions of 30-50 x 80-125 cm and a thickness of 6, 8, 10 cm. Usually, grooves and protrusions are made along the edges of the slab, which ensure quick and durable assembly. The material is easy to cut and groove for laying utilities in it. Gypsum concrete partitions are three times lighter than brick ones and have a smooth and even surface. The thickness of the structure from one layer of slabs is 6-10 cm. If it is necessary to improve the sound insulation of the room or lay pipelines in the partition, it is made double.
Installation
The system is installed on a floor leveled with cement-sand mortar, and roofing felt waterproofing is placed under the lower blocks. The template is made of two racks with a movable rail. The slabs are installed on top of each other, usually with the long side horizontal, with the seams bandaged. Use gypsum solution. Reinforcement is placed in horizontal seams and secured in the walls that border the partition. The gap between the ceiling and the partition is sealed with gypsum mortar. There is no need to plaster the slabs, just putty.
Control zones
- The gypsum solution should be prepared immediately before use, as it hardens quickly.
- The metal rods that are laid between the rows of slabs must be treated with bitumen varnish.
General installation rules
- In new buildings, before installing partitions, it is advisable to wait several months after the construction of the building’s load-bearing structures to allow their shrinkage to occur.
- Partitions are installed before screeding the floor. Carrying out further screeding or roughing wood flooring, between the floor and the wall of the partition a gasket is made of soundproofing material 2 cm thick.
- Installation of systems begins by marking their position with lines on the floor, walls and ceiling.
- The structures are rigidly connected to the floor at the base and adjacent walls (or other partitions).

Video guide for installing partitions and non-load-bearing walls made of gypsum concrete slabs:
Basically, two types of partitions using wood are used - solid and frame.
Application area
Wooden partitions can be used in houses made of any materials, without even reinforcing wooden floors; they are ideal for the second floors of buildings and attics. Structures made from this material are easy to disassemble, so they are appropriate if redevelopment is possible in the future. In rooms with high humidity wooden partitions must be protected with a waterproof finish.
Materials and designs
Solid wooden partitions are made from vertically standing boards that are as long as the floor height and 4-6 cm thick. To improve sound insulation, the boards are installed in two rows, placing soundproofing material or an air gap between them. The disadvantage of the design is the high consumption of materials and, accordingly, cost, as well as high weight compared to frame partitions. Systems based wooden frame made from racks - beams with a cross-section of 50-60 x 90-100 mm and upper and lower frames (horizontal beams that frame the frame) of the same cross-section. Soundproofing boards are laid between the frame posts. The cladding is made of lining, plywood, OSB or gypsum board. At a partition of two rows of frame with a separating air gap or with double-layer cladding, the sound insulation index increases significantly. This design has a thickness of 15-18 cm; utility lines can be mounted inside.
Installation
At the base of the partition they lay strapping beam, which must rest firmly on the floor beams. The easiest way is to place it directly along the beam, and when placing the partition parallel or perpendicular to the beams, as well as diagonally, the beam is installed on a crossbar resting on adjacent beams. To create a continuous structure, two horizontal guides are fixed to the frame, between which boards are installed vertically, connecting them at the top with a fastening bar. When installing a frame partition, racks are placed on the strapping beam in increments of 40-60 cm (it is desirable that it coincides with the size of the cladding slabs), combining them top harness. The frame elements are fastened together with nails or self-tapping screws, using metal corners. Sheathing is installed on one side, and then the space between the beams is filled with sound insulation. The frame structures are attached to the walls with metal spikes and to the sheathing with self-tapping screws.
Control zones
- At the junction of the partition with adjacent structures it is necessary to secure metal mesh. This will prevent cracks from appearing.
- IN wooden house frame structures must be installed a year after the construction of the building (after its shrinkage). The distance between the top of the partition and the ceiling must be at least 10 cm. It is filled with tow and covered with triangular bars.

Special installation system frame partitions from (GKL), which provides all necessary elements, allows you to complete work especially quickly.
Application area
Lightweight gypsum plasterboard partitions can be used in houses made of any designs and materials and in any rooms, even with high humidity (special moisture-resistant sheets are provided for such objects).
Materials and designs
The system includes metal profiles frame - horizontal guides and vertical racks (section 50-100 * 50 mm), as well as gypsum board sheathing 1.25 cm thick and 120 x 200-300 cm in size and soundproofing material. They use designs with one-, two- and three-layer cladding, as well as on double metal frame(with space for utilities). The level of sound insulation of a partition depends on the number of sheathing sheets, the thickness of the internal soundproofing layer, and the presence of an air gap. Depending on this, the thickness of a partition with a single skin can range from 7.5-12.5 (single) to 17.5-22.5 cm (double), and with a double skin and an air gap - correspondingly greater.
Installation
The structures are installed during finishing works before installation floor coverings, on a screed or ceiling. Polyurethane or foam rubber soundproofing tape is glued onto the horizontal profiles and secured to the floor and ceiling using dowels and screws (in increments of about 1 m). Rack profiles are installed in increments of 30, 40 or 60 cm. The frame sheathing on one side is secured with self-tapping screws, and soundproofing material is placed between the profiles. Then the sheathing is installed on the other side of the partition. Irregularities in the cladding and screw heads are sealed with putty.
Control zones
- To improve sound insulation, partitions are mounted to the supporting structures of the ceiling and only then plasterboard is installed.
- The seams between the gypsum boards should be puttied in two steps.
- To protect against cracks, the joints between gypsum boards and adjacent structures should be puttied with reinforcing tape.

This video guide clearly demonstrates all the stages of building interior partitions from plasterboard sheets small size(small size):
To create partitions, glass blocks are produced, which are distinguished by a wide palette of colors, an assortment of surface textures and sizes.
Application area
Glass partitions are used so as not to block the access of natural light to rooms located in the depths of the house.
Designs and materials
Glass blocks are hollow “bricks” with walls made of transparent or colored glass. Due to the presence of air inside, they have good soundproofing properties and transmit 50-80% of light. As a rule, they square shape with dimensions 19 x 19 cm or 24 x 24 cm and a thickness of 7.5 - 10 cm.
Installation
Glass blocks are laid at the stage finishing premises after screeding and plastering the walls, but before finishing the floor and finishing walls and ceiling. Glass blocks can be laid on cement screed. The process of laying them in the wall is similar brickwork, however, the sutures are not ligated. The thickness of the seam is about 1 cm. Cement or cement-lime mortar is used, which is applied to the horizontal and vertical surfaces of the block itself before laying. From an aesthetic point of view, high-quality jointing is mandatory.
Control zones
- The connection of a partition made of glass blocks to the ceiling must be elastic, using cork gaskets, since glass is a fragile material, and if deformed, the wall may crack.
- It is better to lay glass blocks on white or colored cement, then the seams will look more aesthetically pleasing.

Prices
The final cost of the partition depends on many factors. Moisture-resistant and fire-resistant materials are more expensive than usual; the price is increased by the quantity and quality of finishing, frame and soundproofing material. Installation of the partition is 30 - 40% of the cost of the material, and its delivery and unloading, especially in the case of heavy materials, can be equal to their cost.
Many people are not satisfied with the standard layout of residential premises. You can change it using partitions. You can use any material for the partition. It should be taken into account that this heavy material, such as brick, creates additional stress on the panels interfloor covering. Most best option– a partition in an apartment made of plasterboard.
Drywall is a fairly light material, not only in weight, but also in processing and installation. It is very easy to cut it into pieces of the required size; there is no need to make additional holes in it for fastening; all parts are fastened with ordinary self-tapping screws.

An important role in choosing the material for the partition in favor of drywall is played by it. low price. Structures made of this material, unlike brick, are considered temporary, so before their construction you do not need to obtain permission to redevelop the apartment. This article describes how to make a partition using drywall.

The technology for working with drywall is quite simple; with minimal construction skills, you can build a partition with your own hands without the involvement of hired specialists.


Where to begin
Before you start work, you need to draw up a project future design, determine the consumption of materials that need to be purchased.

The design of plasterboard partitions is limited only by the owner’s imagination. It can be a strict solid straight wall with or without a door, arched design, the partition may contain openings for greater illumination or decorative holes; the edge of the partition can be made vertical, beveled, or any complex configuration. It all depends on decision taken and purpose of the septum.


Partitions are often made to zone space, that is, not to cover the entire width or height of the room. In this way it is emphasized functional purpose parts of the room. This technique is most effective in apartments with small rooms.

Frame
Drywall sheets cannot be attached vertically directly to the floor, ceiling or wall. Therefore, a frame is first constructed, to which the sheet material is then screwed. The frame is made of a special metal profile.

First of all, the base of the future partition is fixed. It is placed on the floor and ceiling in strictly parallel stripes. The edges of the base profile should be on the same vertical line.

This is controlled using building level, the best results are obtained with a laser tool. Fastening is done with self-tapping screws or dowel-nails, depending on the surface material.

A vertical profile with reinforced edges is inserted into the base. The structural parts are connected to each other with self-tapping screws. The distance between the vertical posts should not exceed 60 cm to ensure the necessary rigidity.


Door and window openings
If you plan to make partitions with a door, then you need to attach a horizontal profile along the height of the upper edge of the door frame. The vertical posts and horizontal lintel are secured so that the solid side of the beam profile faces the inside of the opening. It is better not to install the lower base in place of the door, so that later you do not have to make a threshold.

A wooden block along the width of the profile is placed inside the profile along the perimeter of the opening. The door frame will be attached to these bars. To increase the rigidity of the frame in the area of the door, the horizontal jumper must be connected with additional vertical sections to the base on the ceiling.

Her good result allows placement of additional vertical profiles from floor to ceiling next to the main posts of the opening.

The frame for the window opening is arranged in a similar way, with the exception that the horizontal lintel is also made along the lower edge of the window frame.

Arched design
Even though drywall is tough sheet material, it can be used to make a structure with a curved surface.

To do this, shallow notches are applied to one side of the sheet. They are moistened with water, and after impregnation with moisture, the drywall becomes plastic and can be bent in an arc. You need to fasten the sheet without waiting for it completely dry to avoid cracks.


The frame for the arched opening is made from a standard profile. To bend the profile, cuts are made on its sides with great frequency.

The upper side of the arch is reinforced by fastening it with one or more vertical posts to the ceiling base.

Cutting and fastening sheets
The dimensions of the sheets almost never coincide with the right sizes, you have to cut off the excess or add the missing. Cutting off part of a sheet of drywall is extremely simple. To do this, along the marked line sharp knife make a cut that does not reach the paper layer reverse side. Then the sheet is broken along the cut line and the remaining paper is cut through.

At the joints of the sheets, a chamfer is made into which part of the plaster solution will go. The chamfer is made with a plane at an angle of 45 degrees or with a regular knife.

To ensure the reliability of the seams, reinforcing tape is applied to them. Without such preparation, cracks will form in the plaster at the joints of the sheets.


The drywall is attached to the frame with self-tapping screws in fine increments directly through the sheet without preliminary holes. The screws are placed evenly at a distance of about 30 cm from each other.

Electrical wiring in the partition
Often it is necessary to install sockets, switches and lighting devices on the partition. IN in the right places holes are made in the sheet of drywall for installation boxes.

Electrical cables are laid inside the partition at the stage of constructing the frame. If necessary, holes are made in the profile for the cable.

Partition finishing
There are several options for finishing the plasterboard surface:
- painting;
- wallpapering;
- finishing with panels or tiles.

Any of the options requires preliminary preparation walls. A mandatory step is priming the surface to bind dust on the surface and better adhesion putties.


Puttying drywall is necessary to hide installation defects and seal seams. Paint or wallpaper is applied over the finishing putty. Fastening panels and tiles is done in the same way as on other surfaces.

In conclusion, here is a photo of a plasterboard partition.

Photos of plasterboard partitions


Recently, drywall has become a very popular material for construction. Most often it is used to create interior partitions, ceiling and wall coverings. But such structures cannot be created from drywall alone without creating load-bearing structures assembled from special guide profiles. Let's look at step-by-step instructions on how to make plasterboard partitions with your own hands.
Let's look at the most popular types of profiles for drywall.

These profiles differ, firstly, in their functional purpose:
- The guide profile (marked PN or UD) has a cross-section in the form of a channel. It is used as a basis for securing the rack profile. The width of the shelves of the guide profile is standard and is 40 mm, and the width of the backrest can be 50, 65, 75 or 100 mm. The profile is marked according to these parameters. For example, the profile PN 40-75 has a shelf of 40 mm and a back of 75 mm.
- The rack profile (marked PS or CW) looks the same, but its shelves have small bends inward at the ends and have a slightly larger width - 50 mm. It is marked similarly, i.e. profile PS 50-75 has a shelf of 50 mm and a back of 75 mm. In practice, the width of the backrest is slightly smaller than indicated. For example, for the PS 50-50 profile it is about 48.5 mm.
- Ceiling (marked PPP or CD) and ceiling guide (marked PNP or UD) are used in the manufacture ceiling frame under plasterboard sheathing.
- To create smooth and beautiful outer corners, use corner profiles for drywall (marked PU). They protect soft corners, formed by plasterboard sheets from various damages.
- To create curved structures, a special arched profile is used, consisting of a solid back and shelves, divided into separate sections, allowing it to be easily bent and given smooth rounded shapes.
- The beacon profile (marked PM) is designed to align walls to a given level; it works as a stop that sets the desired level to the rule.
The length of finished profiles varies from 2750 to 6000 mm.
In addition, profiles also differ in the thickness of the metal from which they are made.
- A profile with a thickness of 0.4 mm is used only for light structures, for example, sheathing for walls or ceilings.
- The 0.45 mm thick profile has an average load-bearing capacity and is often used to create non-load-bearing partitions.
- The 0.55 mm thick profile has good bearing capacity and is used to create interior partitions that will be loaded, for example, with shelves.
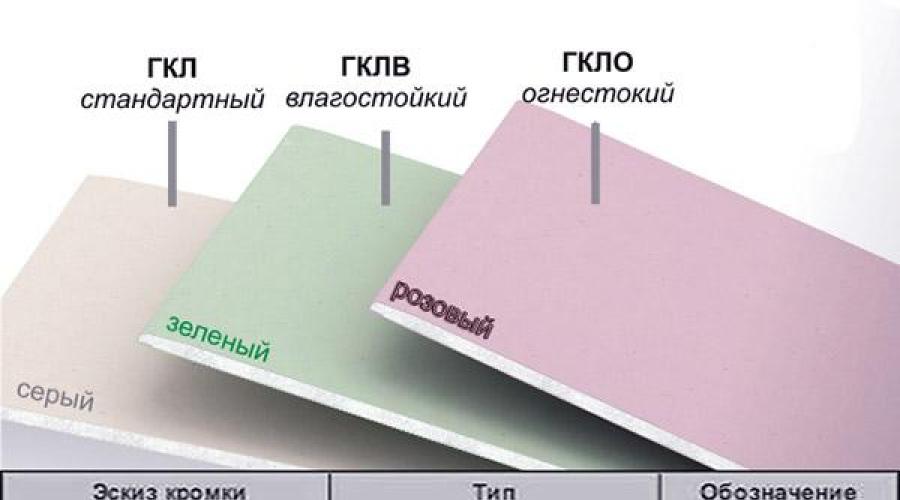
Drywall is also divided into several types:
- GKL is a regular plasterboard for finishing premises, produced in gray color with blue markings.
- GKLV is a moisture-resistant plasterboard for rooms with high humidity, available in green color with blue markings.
- GKLO - fire-resistant plasterboard for attics, electrical rooms, ventilation shafts, produced in gray color with red markings.
- GKLVO - fire-resistant and moisture-resistant plasterboard, produced in green color with red markings.
The standard thickness of drywall is 6, 9, 12.5 or 15 mm. Small thicknesses are used to form curved surfaces and create arches. For wall cladding, only 12.5 or 15 mm sheets are used.
Installation
Based on the above-mentioned characteristics of the materials, for the manufacture of the internal frame of the partition we will use a profile with a width of 75 mm and a thickness of 0.55 mm, and for cladding - gypsum plasterboard sheets with a thickness of 12.5 mm.
Main tools used in work:
- screwdriver;
- level;
- square;
- plumb line;
- roulette;
- stationery knife;
- metal scissors.
Installation of the guide profile
We begin work by installing the guide profile. We mark a line on the floor along which we will build the future partition. The line can be marked using a laser level or the profile itself.
When installing partitions, it is necessary to take into account that in the drawing they may have zero thickness, but in reality their thickness will be the sum of the width of the profile and the thickness of two sheets of drywall attached to it.
We fix the guide profile along the line marked on the floor. If the floor is wooden, use self-tapping screws of the appropriate length. If the floor is cement-concrete, then you need to pre-drill holes with a drill and secure dowels in them. We make fasteners at intervals of 30-40 cm.

Using the guide profile as the bottom mounting point, we install another guide profile on the wall. We make sure that it is installed strictly vertically, controlling the level or plumb line. We attach it to the walls in the same way as we attached the lower guide profile. For walls made of gas silicate blocks, dowel-nails should be used, which are also installed at intervals of 30-40 cm.
We connect the profiles at the joints with short self-tapping screws (10-15 mm).
Similarly, we fix the guide profile on the ceiling, closing the contour of the future partition.
Installation of vertical rack profiles
To install a blind partition without a doorway, we begin the installation of vertical rack profiles from one of the walls. The installation locations of the profiles are calculated depending on the width of the plasterboard sheets. Each sheet should have three vertical posts - left, center and right. For example, if the width of the sheet is 120 cm, then the racks must be positioned in increments of 60 cm. The installation of vertical profiles must be carried out so that the measured 60 cm fall in the middle of the shelf when fastened. Then the joint of the drywall sheets will be in exactly this place and they can be easily fixed.

The length of the rack profile should be 0.5-1 cm less than the height of the room. In case of possible shrinkage of the room, this distance will allow the structure to “settle.”
When connecting profiles, screw the screws first closer to the back, and then closer to the edge. If you try to do the opposite, there is a high risk of the shelf bending.
Installation of horizontal cross profiles
Short pieces are cut from the profile and installed between adjacent vertical posts, increasing the overall rigidity of the structure. The length of these sections is chosen so that they can be securely fastened to the rack profiles with short self-tapping screws.

Horizontal profiles are also placed in increments depending on the length of the plasterboard sheets, but not less than 40 cm. The edges of the sheets should fall in the middle of these profiles. In addition, horizontal profiles must be provided in places where shelves, hooks, etc. are planned to be placed. Wooden blocks should be inserted into these profiles to which the load will be attached. The size of the bars should be such that they fit tightly into the horizontal profile without distorting its shape. We attach such profiles with embedded parts to vertical posts with self-tapping screws 35 mm long.
When fixing horizontal profiles, it is necessary to check with a level or a carpenter's square that they do not distort from the horizontal level along their axis.
Electrical wiring placement
When the frame is completely assembled, it is placed inside electrical wiring. In rack profiles for these purposes, special holes are provided through which wires are passed.
Electrical wiring is located inside partitions in non-combustible insulation. It is recommended to check its serviceability before starting finishing work.
Fastening drywall
When the partition is completely installed, it is the turn of the drywall. Where the width and height of the partition allows, we place the sheets entirely; in other places they will have to be cut.

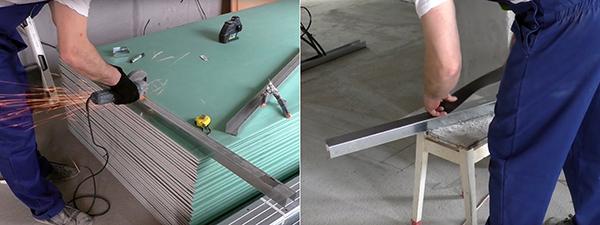
It is best to cut drywall using a drywall knife or a large utility knife. To do this, having marked the required shape, the knife is repeatedly drawn along the cut line, not trying to cut through it immediately, but gradually going deeper into it. There are more quick way cutting drywall, suitable for straight lines only. We notch one of the sides of the sheet according to the markings, turn it over and bend it towards ourselves along the notched line. In this case, the plaster breaks exactly along the intended line and only the cardboard on one side remains uncut. We cut this cardboard and the part is ready.
For ease of finishing work, a chamfer is formed on the cut edges of the drywall using a plane with an inclined blade. If you don’t have a plane, then a regular knife will do.
When installing plasterboard sheets, we provide a small gap between them and the floor using supports 3-5 mm thick.
Next, we attach the sheet to the guides and vertical posts in increments of 15-20 cm. The self-tapping screws should be recessed 1 mm into the surface of the sheet. We check each installed sheet for horizontal level. An additional guideline for this is the vertical rack profiles.
Partition with door
When installing a partition with a doorway, we begin the installation of vertical rack profiles not from the wall, but from this opening. In the guide profile on the floor we provide a gap at the site of the future opening. We install the rack profile in the guides so that the width of the doorway at the top and bottom is the same.
When calculating the width of the opening, remember that it will contain not only door leaf, but also door frame. Its thickness also needs to be taken into account.
To increase the strength of the future doorway, it is necessary to use dry wooden blocks inserted inside the profile. To attach the rack profile with the bar to the guide, we use self-tapping screws 35 mm long.
The transverse profile delimiting the doorway from above is also strengthened wooden block. The length of this bar should be equal to the width of the doorway. After laying the bar, the transverse profile is secured to the rack profiles with self-tapping screws 35 mm long.
We connect the bars located in the racks with a bar embedded in the transverse profile using self-tapping screws or nails 120-150 mm long, forming robust construction for future fastening of the door frame.
Having installed the profiles around the doorway, we mount the remaining rack profiles along the entire length of the partition, also starting from the doorway in accordance with the width of the drywall sheets, as described earlier.
Soundproofing of partitions

We soundproof partitions using sheets mineral wool or any other insulation material that is cut and placed in the formed cells between the profiles. The thickness of the insulation is chosen equal to the width of the guide profiles, in our case – 75 mm.
When installing drywall, make sure that entire sheets are installed from the middle to the edges. In this case, the trimmings will be closer to the wall, in less noticeable places.
After installing the soundproofing, we attach the drywall to the back side, covering our partition. We seal the gaps formed between the wall and the profile with polyurethane foam. This will improve sound insulation.
In order for the built partition to become suitable for final finishing, its surface must be puttied. The putty will hide the joints of the sheets and the heads of the screws, forming a smooth surface.