How to make a self-leveling floor on a wooden surface. Do-it-yourself self-leveling floors on a wooden base. Is it possible to lay self-leveling floors on a wooden floor?
Most often, self-leveling flooring on wooden floors is found in homes wooden type. Perhaps these were built a long time ago village houses or large cottages built according to modern projects from a log house. In any such house it is possible to install a self-leveling floor. Perhaps someone will make a small discovery for themselves, but making a self-leveling floor in a wooden house today is not considered a particular problem. Modern polyurethane mixtures allow you to create any coating. The only and an important condition is the complete readiness of the wooden floor.
Modern elastic, fast-acting self-leveling flooring is considered an excellent replacement for expensive particle boards. Together with a special reinforcing mesh, a special universal primer, a system is created that helps overcome the stress experienced by a wooden floor that does not have cracks. The result is an absolutely smooth coating on which a variety of operations can be carried out. You can put carpet, stick ceramic tiles or just paint it. A wooden floor must have a layer of self-leveling flooring with a maximum thickness of 20 mm. After 5 hours have passed after applying the coating, walking on the new floor is allowed. wooden floor after 12 hours, it becomes possible to carry out further work.
And, of course, in order for the installation to proceed efficiently, prepare in advance:
- empty containers;
- screwdriver;
- perforator;
- hammer;
- rule;
- level;
- roulette.
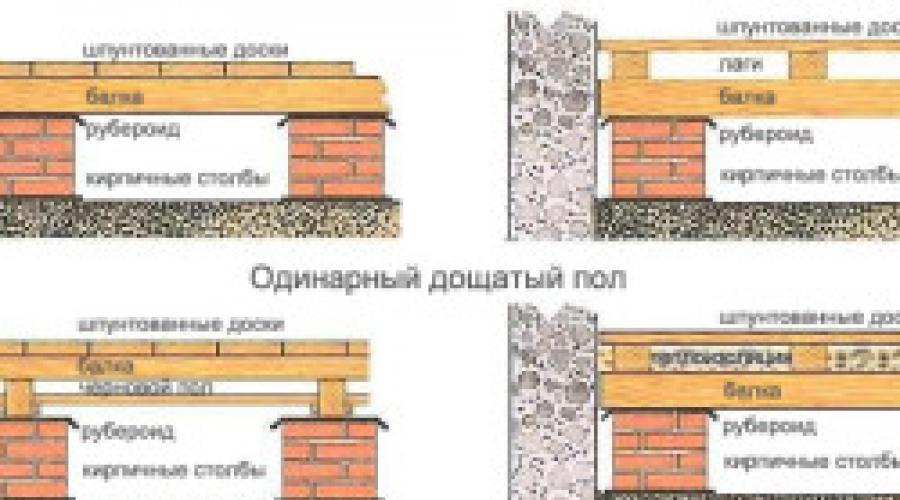
What kind of floors do wooden houses have?
Wooden houses, similar to residential premises, require special attention to the arrangement of the floor, since the rooms in such a house are usually located on ground floor. That is why the coating must be absolutely smooth, look attractive and must be insulated.

In most cases, a wooden house has two types of floors. They can be concrete, or they use wood. Moreover, the concrete floor has the most advantages. This type of floor requires a small investment, there is much less fuss with it, and it does not require special professional skills to install such a coating. However concrete covering is the weight exerted increased pressure on the foundation of the building. Any vibrations of the walls can cause cracking of the base, resulting in loss of thermal insulation capacity material.
A wooden floor is more resistant to any vibrations of the walls, it meets all environmental requirements. Such a wooden floor can be easily processed, rotten boards can be replaced, and all work can be carried out even after complete installation wooden floor. Negative side this gender is high price, the work of installing a wooden floor can only be performed by professional workers, get absolutely smooth surface almost impossible.
Preparing the base for pouring mortar

How high the quality of the coating will be depends largely on the most important stage, during which the foundation is prepared. Failure to comply with step-by-step competent technology obtaining self-leveling floors will lead to cracking of the coating, it may begin to deteriorate, peeling will be observed, occurring before its service life. Only a reliable foundation made with high quality, can become a quality guarantee of long-term operation flooring.
Sometimes a self-leveling floor is installed directly on an antique wooden floor. In this regard, the wood must be sanded using sandpaper, achieve a rough structure. Treated boards must be painted with a special primer. If the first layer is not very strong and monolithic, it is necessary to apply several more layers. The surface of the wood should be free of grease, varnish and oil stains.
The next step is to remove installed skirting boards fill any cracks in the floor with blocks. Wooden floors need to be cleaned very thoroughly using a scraper. When performing such an operation, you need to pay a lot of attention to the existing inter-board joints and expose all existing cracks. Using a vacuum cleaner, it is necessary to thoroughly clean the surface of the self-leveling floor and degrease it using cleaning powder.
After this, the well-treated cracks must be sealed using mortar and the surface leveled. Then lines are drawn along the entire perimeter of the room, the length of which is less than the length of the room. Screws are placed along each line, maintaining a step of 30 cm. With help laser level the highest point on the surface of the self-leveling floor is found.
The screws must be screwed in at the same level.
Moreover, they need to be screwed into the ends at an angle of 90 degrees along previously drawn lines. Place several pieces of alabaster near each screw.
The next step will be laying the beacons that are required self-leveling floor. They are installed directly on the screws. There should be no subsidence of the beacons; if this happens, they need to be cemented.
Some features

Before you begin installing a self-leveling floor on a wooden floor, it is necessary to lay mounting tape. This will be a damper gasket; it will protect the surface in case of expansion as the temperature increases.
After completing all the preparatory work, you need to determine the air humidity and temperature in the room. Production technology very often requires that these parameters have certain values. This is especially true for self-leveling floors where wood is used.
The prepared solution is immediately poured onto an area equal to 2 square meters. m. The solution is leveled using beacons. To obtain uniformity, it is rolled with a needle roller. When carrying out work, it is necessary to ensure that the lift of the self-leveling floor is maintained in relation to installed beacons. The poured floor must dry thoroughly.
After the surface has set and completely dried, pour finishing coating consisting of varnish and resin. It will give the finished coating a magnificent glossy shine and improve its strength characteristics.
If the old wood flooring in your home has lost its appearance, has not rotted or broken, or you want to heat it, you may be interested in information on how to pour the floor over wood floors without dismantling them. So, concrete screed will be poured from above onto the existing base, for which you initially need to coordinate the height of the future coating with doorways and communication lines (pipes, radiators, etc.). In most cases you have to shorten door leaves, filing them from below. Sometimes they resort to installing new doors, and all the highways are laid in a new way; here the owners of the home make the decision.
To install a high-quality screed on an existing wooden floor, choose mixtures that are suitable for such purposes, otherwise there is a risk of destruction of the screed if the old floor is rotten or sagged from age. This would be the best fit here bulk mixtures
, which are easy to level and harden quickly. For greater strength, such a screed should be strengthened by reinforcing it, and it is advisable to check the compressive strength 28-30 days after installation. Typically the height of the concrete layer is 10 mm.
Concrete as a screed: installation stages Anyone who is familiar with construction knows that any such process begins with preparatory work, and the installation of the floor covering wooden house
not an exception.
Preparing the baseBe sure to make sure that the old floor is not rotten and can withstand the load from the new screed the main task , which stands before the masters in in this case
– ensuring high strength of the screed after it hardens. If you are dealing with a very worn-out previous foundation in a concrete house, you need to eliminate the peeling layer by grinding or milling. Fat accumulated over years of long-term operation of the floor structure, adhesive base , old bulk mixtures must be removed, as well as unevenness whose differences exceed 10 mm must be leveled. For such purposes, special cement-based mixtures are used, or, more simply, concrete.
Final leveling can only be done after the mass that has filled the recesses has completely hardened. When pouring on old wooden flooring in a house, all rotten and broken boards are removed, and new ones are nailed to the joists in their place. You also need to ensure that each board is securely fixed and does not wobble, which can be eliminated using ordinary self-tapping screws. Under no circumstances should there be any creaking or bending of the floor when exposed to its surface. If there are holes in the flooring through which concrete will leak, they are sealed with wood putty, which consists of wood dust and plastic components. You can also prepare this putty yourself: mix sawdust with oil paint
in a ratio of 4:1. Water-soluble putties are not suitable for such purposes.
- The baseboards are dismantled and planks are put in their place to cover the openings between the wall and the floor.
- The gaps between the installed planks and the base are puttied. After removing the boards between the wall and the covering, ventilation of the underground space will be restored.
Padding
The wooden flooring in the house needs to be sanded, and then using a vacuum cleaner to remove all debris and prime it. The primer will significantly improve adhesion between the concrete and the old coating and prevent the appearance of air bubbles.
Also, the soil will prevent the water contained in the solution from quickly being absorbed into the wood and will ensure that the mixture spreads evenly over the base. Dry flooring needs to be primed twice, and in the case of multi-layer leveling, each layer of fill is processed. Make sure that before applying the primer, the floor is not damp even to a slight extent, otherwise the result will not give the desired effect.

Reinforcement
For weak wooden foundations in the house, it is best to purchase a fiberglass-based mesh, which will strengthen the leveling layer. It is attached directly to the base using staples and a special stapler. The staples will prevent the mesh from floating after pouring the solution. The reinforcement system must be installed in the middle or slightly below a third of the thickness of the screed. When hammering in the staples, control the strength of their fixation to the flooring.
Mixing concrete The preparation of the solution takes Special attention , because the final result depends on its quality. Basically, for such purposes, dry formulations are purchased in 25 kg bags. This amount of dry matter takes approximately 6.5 liters of water; if the required consistency is not obtained, you can gradually add another 0.5 liter of liquid. Do not overdo it, as a thin solution is difficult to pour and will not have the necessary strength properties. The mixing process itself is best done using a drill with a special attachment until a homogeneous consistency is obtained. The prepared solution must be used within 15 minutes after mixing, otherwise it will harden and be unsuitable for use. Also don't forget to control temperature regime in a wooden house and in mortar. The optimal value is considered to be no lower than +10C. If you are carrying out work in a new, unheated building, it will help warm water
, the temperature of which should not exceed +35C.
Pouring concrete The screed is poured continuously until its surface is perfectly leveled. Spatulas with steel or serrated blades are used for this work. 4-5 hours after wood flooring will be covered with a mortar mass, you can carefully step on it. 6 hours after the completed process, grinding the surface is allowed, if necessary. It is usually carried out for future painting or application of liquid floors. Before sanding, remove the boards that are temporarily installed instead of baseboards; they have completed their mission and are no longer needed.

Processing expansion joints
In the places where they were expansion joints(doorways) using a grinder with a diamond wheel, cut out a layer of screed. This process is carried out only after the self-leveling surfaces have hardened and are allowed to be walked on. Next, each seam needs to be filled special material , which is intended exclusively for such purposes. It is highly elastic and hermetically fills the holes in the screed. When will you count? required amount
material for self-leveling floors, proceed from the following parameters: for a layer thickness of 1 mm, 1.5 kg/sq.m. is consumed. mixtures. After finishing work, be sure to clean the tool before the solution on it hardens, which will complicate such actions. To do this, rinse the spatulas and rules with water, and clean off the hardened mass with a coarse brush or spatula with a flat blade. Now you know that in a house with an old wood covering you can install a screed made of concrete mortar
, and are also familiar with the technology of such work.
A visual example of pouring a floor is shown in the video:
Self-leveling floors have recently become increasingly popular. This is due to the fact that thanks to them it is possible to obtain an almost ideal surface that is resistant to mechanical stress and can easily withstand a humid environment.
Moreover, the components of such mixtures can make it possible to install a self-leveling floor on a wooden floor, without first creating a screed.
Installation

First of all, it should be noted that the wooden surface should not be rotten or loose. There should be no significant damage or large irregularities on it. Otherwise, self-leveling floors should not be applied to wooden floors.
- Preparatory work
- At the next stage, it is necessary to scrape the floor, removing a small layer of material. This is done not only in order to detect all the cracks, but also taking into account that a self-leveling floor on a wooden base will raise its level, which means it is necessary to remove a little of the surface.
- Next, the floor is carefully inspected to detect cracks, which are marked with a marker. This defect can also include gaps between boards.

- Then, using putty, all damage is repaired. It is worth noting that the installation instructions recommend using material designed for working with wood.
- After this, the surface is covered with a layer of primer with an antibacterial coating. It should not only increase adhesion, but also provide protection for the wood.

- In order for the self-leveling floor for wooden bases to obtain a good connection with the surface, it is necessary to apply a second layer after 4 hours. In this case, you can add a small amount of sifted corundum to the mixture.
Advice!
Some craftsmen first recommend applying a layer of primer intended for working with wood, and then a material for concrete work.
However, this is not necessary and can lead to unnecessary reactions if the components are selected incorrectly.
Fill
- Before applying self-leveling flooring on a wooden floor, you need to install a special tape around the perimeter of the walls. It will act as a damper pad, protecting the surface from the effects of expansion when heated.
- It is also necessary to install special benchmark beacons. This is necessary so that self-leveling wood floors have a certain level, which they control.
- It is worth noting that the beacons are placed according to the water level, and the distance from the floor is set in accordance with the required layer of the future screed. It is worth remembering that for this type of work it is better to use thin-layer mixtures that allow you to obtain a coating with a thickness of 1 to 5 mm. This is due to the fact that the coating is applied to the finished floor, which means there is no need to create differences at the threshold.
- After everything preparatory work produced, it is necessary to check the room humidity and air temperature. Compliance with certain values of these parameters is often required by production technology, and given that self-leveling floors are installed in a wooden house, this requirement should be approached especially carefully.
- The floor is poured in one stage, starting from the deepest places.. In this case, you can use a special soft spatula, which is used to distribute the material over the surface. You can make it yourself by attaching a soft but wide instrument to a long wooden handle.
- During installation, quite often there is a need to move along a surface that has already been poured.. For this purpose, special linings for the soles of shoes with spikes have been developed.
- To ensure that the self-leveling floor in a wooden house does not contain small air bubbles, you should walk over it with a plastic roller with long spikes. It is specially designed for the installation of such floors and, especially for mixtures with rapid hardening.
- When self-leveling floors are on wooden base applied, all beacons should be removed from the surface. After this, you need to wait until it hardens completely.
- It is worth noting that the period after which you can walk on the surface is indicated on the packaging of the mixture.. At the same time, professionals recommend not starting other work on the floor earlier than in a week.
Advice!
To remove moisture from a room and maintain it required temperature can be used household heater air with a fan.
This way the process will happen much faster.
Conclusion
It is worth noting that there are special brands of mixtures for self-leveling surfaces, which were developed for application to wood. They have high level adhesion to this material and have great ductility, maintaining all the necessary properties. However, not all manufacturers produce them, citing the fact that they have universal components for such work." width="640" height="360" frameborder="0" allowfullscreen="allowfullscreen">
Conclusion
In the presented video you will find Additional information on this topic. Also, based on the above text, we can conclude that the cost of creating self-leveling floors on a wooden surface will be somewhat less than when organizing preliminary screeding or leveling large differences. Therefore, if the coating is in satisfactory condition, then pouring is done directly over it.
It is worth noting that there are special brands of mixtures for self-leveling surfaces that were developed for application to wood. They have a high level of adhesion to this material and have great ductility, retaining all the necessary properties. However, not all manufacturers produce them, citing the fact that they have universal components for such work.


The 21st century is the time that made self-leveling floors on a wooden base so popular and in demand both in residential premises and modern offices. Today, self-leveling floors on wooden floors are not just a covering, but also an excellent decorative solution, especially if 3D imaging technology is shared. Such floor coverings have many advantages and are worthy performance characteristics, as well as a completely affordable price. Few people know how to make a self-leveling floor on a wooden floor with their own hands, but it is not as difficult as it might seem at first. This guide will help you make a self-leveling floor on planks.
What types of self-leveling floors are there on a wooden base?
Self-leveling flooring on a wooden base is not just one solution, but a whole category of materials that are applied to a concrete or wooden (as in this case) base. Self-leveling floors on wooden floors can be divided into:
- Polyurethane. A durable polymer floor that is resistant to prolonged exposure, which is ideally suited for arranging flooring in areas with big amount of people.
- Epoxy. These are self-leveling floors on a wooden floor that do not react in any way to moisture. It is recommended to install such floors in wet areas, especially in the bathroom and kitchen.
- Epoxy-urethane. A type of polymer floor that has good strength and wear resistance. Can be used as an alternative to polyurethane coating.
- Methyl methacrylate. Polymer floor with excellent thermal insulation properties, is often used for arranging floors in rooms without heating or with poor heating during the cold season.
Do-it-yourself self-leveling flooring on a wooden floor can be one-component or two-component. The first type is often used as a basis for installing parquet, stone, tiles or other decorative covering. Two-component coatings often contain a three-dimensional image, which gives the floor a creative and unusual look. appearance. Next we will figure out whether it is possible to make a 3D floor on a wooden floor and how to do it.
The main advantages of self-leveling floors on a wooden base
A poured floor on a wooden floor is a solution that has gained its popularity not only due to its appearance, but also because of its good technical characteristics and numerous advantages. They can be found below:
- High resistance to prolonged mechanical stress, resistance to wear and abrasion.
- Excellent impact resistance chemical substances– wood-look self-leveling floors will withstand even acids.
- Wide range of available color solutions, design styles, patterns and textures, images.
- Excellent sound and heat insulation properties - creative self-leveling wooden floors are quiet and warm!
- High strength, reliability, long service life of the coating, which will last for decades.
- The presence of antistatic properties, thanks to which the self-leveling wooden floor is quite easy to clean.
- Absolute seamlessness - this simplifies the process of maintaining the floors and prevents squeaks from the coating.
You can see that self-leveling flooring in a wooden house is not only modern and beautiful, but also practical solution, which can delight the inhabitants of the home for many years. In addition, such a coating can be equipped on its own. We will learn how to fill a wooden floor with self-leveling flooring, what tools and building materials are needed for this.
What tools are needed to install the floor?
Do-it-yourself self-leveling flooring for wooden bases requires the use of a wide range of tools, devices and materials that must be prepared before starting work. You should definitely have on hand:
- A special mixture for self-leveling flooring is the basis of the future floor covering.
- Long spatula, needle roller (necessary for removing air bubbles).
- A construction mixer or a drill with a special attachment if you don’t have a mixer.
- Laser or ordinary building level, aluminum rule.
- A container of at least 20 liters, a set of construction beacons and wooden blocks.
- Alabaster, mortar, water in sufficient quantity for the mixture.
- Triangular scraper, screwdriver, screws, dowels, long ruler.
It also wouldn't hurt special clothing– protective gloves, eye and face masks, as well as shoes designed for walking on painted surfaces (paint shoes). After preparing the necessary arsenal, you can begin.
Preparing the base for a polymer floor
Is it possible to pour self-leveling floors on a wooden floor? Yes, sometimes craftsmen do not ask themselves whether it is possible to make a self-leveling floor on a wooden floor and apply the solution directly to the old coating. However, even in this case, it is necessary to carefully prepare the wood base - it should be sanded well so that the surface becomes rough. This will significantly improve the adhesion of the floor to the layers. polymer coating. It is also worth making sure that there are no traces of grease, dirt, oil and other contaminants on the wooden floor surface - they are removed with a solvent.
Is it possible to apply self-leveling flooring to a wooden floor if it creaks? No - otherwise the final coating will lie unevenly and cause a lot of problems. To avoid trouble, you also need to check the floor. All boards must be securely fastened to correct position, the floor itself is smooth, without unevenness or defects. Also, before applying the polymer floor, you will need to remove all paint from the surface of the base, if there is any.
Before making self-leveling floors in a wooden house, you need to do a little preparation of the coating:
- Remove all baseboards and close the holes created by removing the baseboards.
- Seal all cracks, chips and uneven areas on the floor surface with mortar.
Now you can begin actions that will ultimately lead you to completing the installation of the self-leveling floor.
Level the surface and install beacons for the floor
In order for the floor to be as level as possible, you need to take care of it initial stages. So, before pouring the solution, draw a line along the entire length of the room, then place self-tapping screws along it, the distance between which is 30 centimeters. Using laser building level you will need to find the highest point located on the wooden base for the polymer floor. After detection, you need to add about 5-6 mm (the thickness of the floor layer) and align the screws at the same level. It's still too early to do 3D flooring on wood floors.
The next stage, which continues the installation of a self-leveling floor on a wooden floor, is the placement of beacons. They must be placed on previously installed screws, securely fastened using mortar. After this, you should prepare a solution for the self-leveling floor - to do this, the contents of the package must be mixed in a container with water according to the instructions indicated on the package, and then stirred until smooth with a construction mixer.
Let's start pouring the mortar for the self-leveling floor onto the wood
We already know whether it is possible to use a self-leveling floor on a wooden base. The solution prepared in advance should be carefully poured onto the prepared base, covering an area of about 2 square meters at a time. meters. The layer must be leveled along the beacons using a long spatula. When the formation of the layer is completed, you will need to remove all air bubbles on the surface of the coating using a needle roller - this is very important stage, on which it depends further fate the whole result. Wait until the floor is completely dry.
Now you know how to make a self-leveling floor on a wooden floor - video instructions on the Internet will help you see what the process looks like visually, which will give you a better understanding of the essence of the technology. The prepared coating can be used as a basis for application decorative materials, or left as an independent gender.
Self-leveling mixtures are gaining popularity as they form durable, wear-resistant coatings, allowing the creation of surfaces with artistic effects. Therefore, many are wondering how to quickly and efficiently make a self-leveling floor on a wooden base and what instructions to follow. Wherein we're talking about about a wide variety of housing - from frankly old houses with interfloor ceilings on beams, to apartments with wooden flooring concrete slab, as well as housing where parquet is laid.
General requirements
Before considering an option such as a self-leveling floor on a wooden base, you should carefully evaluate existing conditions. The most important of them include:
- quality of flooring. The wood should not be rotten, dried out, or affected by mold;
- level of existing coverage. The poured floor has a recommended thickness of 20-30 mm, so if you have to compensate for a significant difference in heights, you will need to invest significantly more money in the purchase of the mixture and additionally use fiberglass reinforcing mesh.
The process of preparing the surface for a self-leveling floor on a wooden base depends on what class of coating will be used. The most a difficult situation– if you want to get an artistic or so-called 3D floor. In this case, you cannot use mastics on water based and any compositions that can be mixed with the specific construction mixture used for pouring.
Elevation differences are assessed using laser level. The highest point is determined in several directions and the difference in floor level is calculated. Based on the data obtained, a decision is made whether it is possible to get by with quick surface preparation or whether it will be necessary to resort to a leveling operation so that the self-leveling floor for wooden bases does not require a significant investment of money and time.
Inspection and repair
Before making a new covering, especially a self-leveling floor in a wooden house, you should carefully inspect and, if necessary, repair the existing flooring. To do this, do the following:
- the surface is inspected for clearly visible drying out and cracks;
- one board is torn off and assessed for fungal and mold damage;
- boards are inspected to identify large areas of damage;
- the surface is checked, boards are found whose attachment to the support joists is broken.
For small areas with signs of drying out, cracking and destruction, you can carry out partial renovation with your own hands. To do this, boards in poor condition are torn down and replaced with new ones. You can partially repair the floor yourself: to do this, the damaged segments are cut out with a jigsaw and covered with new wood.
Important note: parquet that is in extremely poor condition does not make sense to repair or restore. It's easier to rip it off entirely. The same operation should be performed if inspection of the boards shows that they are affected from below by mold, rot, have dried out or decayed. Repairing a floor that is in extremely poor condition on your own is ineffective; it will not serve as a reliable foundation for pouring.
Surface preparation: option one
If you decide to make a self-leveling floor on a wooden base and an assessment of the boards shows them good condition– you can prepare the surface quickly and quite effectively. This will require the use special tool. The following operations are carried out:
- baseboards around the perimeter of the room are torn off;
- the entire surface where the wood self-leveling floor will be located is cleaned of linoleum, glue residues, and paint coatings;
- the surface is scraped, a sufficient layer of chips is removed to obtain a smooth base with a minimum of depressions and cracks;
- all through cracks and gaps are covered with wood putty. Do the same with depressions formed as a result of the destruction of the board.
The rough-prepared base for self-leveling wood flooring is sanded and thoroughly cleaned of sawdust and dust using a vacuum cleaner. The board is degreased and coated with anti-mold and antifungal agents.
After this, coating is done with bitumen, and if desired, self-leveling floors are made on a wooden floor with 3D technology - a one-component polymer or epoxy mixture for waterproofing.
This method of preparing the base is the fastest, the resulting characteristics of the flooring are acceptable, the technique is used with a height difference of up to 40 mm (during scraping, you can compensate for a 10 mm difference by removing a larger layer of wood in in the right places pouring area).
Surface preparation: option two
If self-leveling floors on a wooden floor are made with the condition effective protection from leaks, it makes sense to create a waterproofing layer using roll materials. This option has an attractive cost-quality ratio compared to the option of coating with polymer or epoxy mixtures.
In order to prepare the base, you will need:
- free the wooden flooring from remnants of paint, glue, linoleum;
- carry out degreasing, treatment with anti-mold and antifungal impregnations;
- apply bitumen mastic;
- lay the rolled waterproofing material. The strips of material are overlapped by 10-15 cm; when using a polymer film, the joint is glued with tape to bituminous materials– the application area is heated construction hairdryer and roll it with a roller.
This method of operation is applicable for small height differences of up to 30 mm. The main goal is to obtain a base that is reliably isolated from leaks.

Surface preparation: option three
If there is a large difference in height, apply a self-leveling floor to a wooden floor using one construction mixture– economically ineffective. The base has to be leveled, reducing the level difference. To do this, it is convenient to use a simple composition, which is a mixture of PVA glue and sawdust. The work stages look like this:
- wooden flooring is cleaned of linoleum, glue, paint and varnish coatings;
- the surface is degreased and treated with protective impregnations;
- Using thin strings stretched from corner to corner of the room, a leveling guide is made relative to the highest point of the existing base. It serves to estimate the amount of leveling mixture that will be applied to individual sections of the base;
- a mixture of PVA glue and sawdust is laid and leveled so as to form a surface along the drawn lines.
After the laid composition has hardened (the time will be less if ventilation is provided), the surface is suitable for any further work according to a simplified scheme. For example, you can do smearing thin layer special waterproofing compounds, lay a polymer film, carry out any work to protect against leaks.

General requirements for the waterproofing and pouring procedure
Before any work, either using coating waterproofing materials or rolled materials, the perimeter of the room is covered with a special construction tape. When installing protection, it is worth remembering: film, roofing felt, glassine and other insulators should be located about 10 cm on the wall.
Before pouring the floor, the perimeter is covered again, this time with a damping tape 20 mm thick along the waterproofing. This is necessary to compensate for temperature expansions that occur in the thickness of the self-leveling floor to prevent its cracking.
The actual filling process is not difficult. The mixture is diluted according to the manufacturer's instructions, poured onto the prepared base, treatment should be carried out in small areas 2 sq.m. Although the composition is quite liquid, it is recommended to level it using a long rule.
In order to prevent the formation of cavities, bubbles, and other structural disturbances when the self-leveling floor dries, all air must be removed from the mixture layer. This operation is carried out with a special roller with needles; it can be used immediately to level the layer of the mixture.
Video on how to make a self-leveling floor on plywood:
Since it is convenient to fill the floor in relatively small areas, you may need to move around the partially or completely treated area. Special shoe linings with a needle-like surface are designed for this purpose.
After it is poured, all that remains is to wait for it to dry, maintaining the microclimate in the room recommended by the manufacturer of the composition. Applied to a carefully prepared and protected wood base, the self-leveling layer will delight you with its strength, durability, aesthetics and perfectly smooth surface.