Production of facing tiles in plastic molds. Making facade tiles with your own hands. Making molds from polyurethane
Read also
Facade tiles are often used to decorate the outside of a house. Various materials are used in its production. Each type of product has unique properties.
Fake diamond
Types of facade tiles
This decor is used in exterior cladding of buildings. That is why a number of specific requirements are imposed on it:
- Strength. Immunity to mechanical damage, scratches and pinpoint impacts.
- Wear resistance. Must remain in its original form for a long time and resist abrasion and deterioration, including mold.
- Waterproof. Minimizing the number of pores through which moisture penetrates.
- Frost resistance. A must for any type of outdoor tile.
- Light fastness. No negative reaction to ultraviolet radiation, including preservation of the original color.
And, of course, when making facade tiles with your own hands, keep in mind that it must guarantee the durability of the coating.

One of the cladding options is the production of artificial stone from concrete
The following types of tiles are used in the decoration of building facades:
- Porcelain stoneware. This is a combination of clay rocks and granite chips, which provides maximum strength and imitation of natural surfaces.
- Clinker room. Expensive, but high-quality material obtained from slate clay by firing.
- Terracotta. Made from porous kaolin clay. Heat resistant, but not strong enough.
- Concrete. It is made from a mixture of raw materials for cement and additional additives that improve its properties.
Required tools and equipment
A huge advantage of making cladding yourself is the ability to develop unique designs. Experiment with the composition of raw materials, but do not violate the basic proportions and requirements for the product.
The easiest way to make tiles is from concrete. To make it using the vibration casting method, you only need a set of molds and a vibrating table. Matrices are made of wood, plastic, plywood, but the best option is polyurethane. Such templates allow you to convey the texture of the tile in the smallest detail and imitate natural stone. You can make a vibration table yourself from a metal frame, a sheet for the tabletop, springs and a motor from a washing machine.

The easiest way to create concrete tiles is vibration casting; you only need raw materials, a vibrating table and molds for pouring
The second method is vibrocompression. This installation is necessary for all tile options, as it allows you to maximize the density of the raw material without using a large amount of water.
In order for porcelain stoneware, terracotta and clinker to reach a finished state, you need a kiln. Each material requires compliance with a certain temperature regime from 1000 to 1300 degrees.
Manufacturing methods
Let's consider two options for tile production. The first is made of concrete, which is much more accessible to most people. You will need white Portland cement, sand and small crushed stone, as well as lime or another plasticizer. Be sure to use modifiers to increase frost resistance and water repellency.
The principle of making concrete tiles by vibration casting is as follows: the mass is poured into a mold, then the blanks are placed on the vibrating table platform and the equipment is turned on. After removing air and compacting, the molds are dried.
To color concrete tiles, pigment is poured into the liquid mass at the mixing stage. A more economical option is to apply paint to the inside of the mold.

Use of polyurethane matrices
Clinker tiles are made slightly differently. The clay mass is mixed with modifiers, then it is poured into a vibratory pressing machine, which forms blanks by compressing the mass under pressure and vibrating it. After this, the clay is allowed to dry and sent to the kiln to fire. For clinker and porcelain stoneware, the temperature is raised to 1300 degrees, for terracotta – to 1000.
Laying tiles
Level the surface of the building walls in advance. In addition, it is best to carry out insulation and treatment against fungus.
The tiles are laid using a special adhesive that is resistant to weather conditions and temperature fluctuations. Use compounds that are not afraid of moisture, but this is not necessary, unlike the frost resistance criterion. Since the weight of the finish is significant, the adhesion of the solution to the surface must be appropriate.

Stages of installation of homemade facade tiles
Laying is carried out under favorable weather conditions. The temperature should be between 5-25 degrees Celsius. When it's cold, the properties of the glue deteriorate, it freezes, and when it's hot, the moisture evaporates too quickly.
Apply the solution both to the wall and to the tile itself. If the layout is complex, it is better to use the second option. Remove any glue protruding from the seams after final fixation of the material. The gaps are filled with waterproof fugues, for example, cement-latex. It is best to use a syringe so as not to stain the tile itself. After drying, the facades are treated with a water-repellent liquid, for example, a water repellent. This is especially true for concrete and clinker samples. After such work, the cladding will last you much longer.
Making facade tiles with your own hands is one of the options that is used to save money. For this production you need:
- Buy and prepare molds for tiles;
- Purchase and assemble a vibrating table;
- Mix the mixture for making;
- Form a shape on the vibrating table;
- Keep the products directly in the molds for several days;
- Make formwork of finished tiles;
- Use the finished tiles for their intended purpose.
Do not forget that before filling the molds with the mixture, they should be treated with an antiseptic or anti-stick compound.
In such conditions, you can reduce the cost of the facing material, but the façade tiles themselves will most likely be far from ideal.
Stages of manufacturing facade tiles
Quarry jobs
Work on the extraction of material, its transportation and storage. To increase elasticity and improve molding properties, the material is soaked and frozen in open air for about a year.
Treatment
In order for the mechanical processing of the material to be successful and of high quality, clay processing machines are used. They are needed for processing and separating excess inclusions.
Molding
The following methods are used for molding: casting, semi-dry pressing, plastic molding.
Drying
Drying is carried out so that the molded facing tiles do not crack during firing and shrink evenly.
Burning
The final stage is the firing process, during which the structure of the facade tiles and its technical properties are formed.
The video below shows how facade tiles are made with your own hands.
What are facade tiles made of?
To create facing tiles, both clay and concrete mixtures are used. For concrete mixtures, the vibration casting method is relevant. This method allows you to obtain concrete tiles with a low level of porosity. This technology makes it possible to use crushed stone, sand, plasticizers, cement, pigment and standard equipment for home production as raw materials: a concrete mixer and a vibrating platform.
Plastic molds are suitable for making artificial stone from gypsum and concrete. However, you should remember that you cannot make molds from plastic that will absolutely replicate natural stone, since subsequently you will not be able to remove plaster or concrete stone from the plastic mold.
Additional Information:
- Making tiles with your own hands requires, first of all, prepared forms. It is better to give preference to forms made of rubber or polymers, from…
- Do-it-yourself production and production of paving slabs is unprofitable. You will ask why?" - because in this case the savings...
 Have you decided to make a beautiful path on your summer cottage and are now thinking about how to choose the right paving slabs? First…
- Laying tiles under brick with your own hands, as well as laying tiles under stone, occupy a special place among the many types of installation, especially...
Clinker tiles for facades have the highest physical properties among all types of building materials. The main advantages are:

But there is also flaws. The first is high cost. Depending on the brand, the price of clinker tiles can be several times higher than the cost of ceramic tiles. The second drawback is fragility. In its physical characteristics, clinker resembles glass, and it has the same fragility. It is difficult to cut, and the cut area is often chipped. In addition, as a result of sharp impacts, the material cracks.

Excellent performance characteristics are obtained due to a special production technology; unlike other clay building materials, clinker is fired at very high temperatures (at least +1300°C). Under these conditions, clay and brick melt and turn into a glassy mass. The mineral dyes used give color, and special pressing molds change the structure of the front surfaces. During production, the technology must be strictly followed, otherwise the tiles will be deformed, the linear dimensions will be violated, and the quality will be significantly reduced. Production can only be carried out by reputable companies that have not only the most modern mechanisms and equipment, but also responsible, highly qualified specialists in various specialties.


Before buying a tile, you should decide on its characteristics. What to look for?
| Options | Tips for choosing |
|---|---|
| Price | The price of clinker tiles can reach 4000 rubles/m2. and more. Do not buy too cheap material, it is better to focus on the middle range. For luxury buildings, purchase the most expensive products. Unfortunately, the price does not always correspond to the quality; on the building materials market you can find products with a high cost, but also of unsatisfactory quality. |
| Manufacturer | The best option is imported manufacturers. Domestic companies, unfortunately, do not always meet quality requirements. Buy products only from brands that have been tested by time and have numerous consumers. |
| Front surface texture | The more complex the texture, the better the facade looks. But you need to keep in mind that clinker tiles with such a texture require highly qualified craftsmen and additional costs for maintaining the facade of the building. |
| Color | Universal advice - the color should be in harmony with the overall appearance of the building. This applies not only to design, but also to the architectural features of the building. There is little personal experience - consult with experienced architects or designers. |
Select adhesive and grout at the same time as tiles. The glue must be frost-resistant and withstand at least 50 freeze/thaw cycles. Clinker tiles are a very expensive material; you should not allow unpleasant situations due to poor-quality glue, which subsequently cause the need for repairs.


As for the grout. All of them must compensate for the thermal expansion of the tiles. Clinker is very fragile; with increasing loads, it can crack. There are no universal recommendations for color; the grout in each specific case should emphasize the beauty of the finish.


Laying clinker tiles
Strict adherence to existing technologies guarantees the quality and long-term operation of the finish. Do not try to speed up work by skipping individual operations, such actions will have bad consequences.
Step 1. Surface preparation. They must be smooth, dry and clean. Leveling should be done carefully, avoiding large differences in height. The fact is that the adhesive under the tiles must be applied with a comb spatula, this is the only way to ensure reliable adhesion. A comb spatula only works on flat surfaces. The best option for laying tiles on plastered surfaces.
Step 2. Determining the number of tiles.

The work algorithm depends on the type of tile. If the kit contains special corner elements, their number is calculated separately. Next, determine the area of the wall and give a small margin. For ordinary ceramic tiles, the reserve is within 10%; for clinker tiles, the reserve is reduced due to the high cost. You will have to work very carefully to minimize the amount of loss of expensive material.
Step 3. Preparation of materials and tools. To work you will need special glue and grout. Tools: spatula, tape measure, level, rope with blue (beating thread), electric mixer. We have already mentioned above that all materials must be of high quality and in terms of performance indicators correspond to the weight and dimensions of the clinker tiles and the climatic zone of residence.
Step 4. Marking. A very important point: the thoroughness of the markings determines the consumption of tiles, the speed and quality of the tiling work. How to make markup?
- Start marking the facade walls from window and door openings; problems most often arise in these places. Using a level and a pencil or felt-tip pen, mark the position of the beginning of the row above the jumpers. Check the position of the windows with a level; if they are not on the same line, then the bottom edge of the first row of one of them will have to be trimmed a little. Strike a line above the windows.
- Measure the distance from the windows to the first row of tiles, taking into account the thickness of the joints. Take accurate measurements, do not allow errors of more than a few millimeters.
- Mark the lowest line on the wall of the house, taking into account the previously made markings above the openings. Check its position again. To measure horizontality, it is better to use a water or laser level; an ordinary construction level can make significant errors on a long wall.
- If you have special elements for finishing corners, check their location and calculate how many tiles along the length will fit from one corner to the second. This is necessary in order to make the cutting point along the length of the tile invisible. The longer the façade wall is, the more carefully you mark it, taking into account the number of corners and curves of the surface. The facade walls of prestigious buildings have original architectural elements; it is quite difficult to cover them with tiles.
- To constantly monitor the position of the tiles on the wall, beat parallel lines at a distance of three to four rows, taking into account the thickness of the seam. Such lines greatly facilitate the finishing process and eliminate the appearance of defects. Remember that correcting mistakes is always much more difficult than preventing them.
Step 5. Attach an installation strip along the edge of the bottom line of the first row of tiles; it will keep the material from sliding until the glue sets firmly. The rail can be fixed to the wall with special devices or ordinary dowels. The holes from the fixation points are then sealed.


Step 6. Prepare the adhesive solution. Be sure to pour water into the container first, and only then add dry glue. Read the instructions carefully and add only the required amount of water. We have already discussed this topic above.
Practical advice. Inexperienced craftsmen may at first think that the solution is very thick. Don't pour water right away! Keep stirring it, it will become thinner after a few minutes.
After the first stirring, leave the solution for 4-6 minutes to infuse. During this time, the remaining dry lumps of powder will absorb water and easily break when mixed again.
Step 7 Laying begins at the corners of the lowest row. Prepare the workplace, remove construction debris and objects that interfere with work. If you need scaffolding in the future, you need to check its completeness and prepare it for installation. When installing scaffolding, safety regulations must be followed.
Apply glue to the wall and press it with sufficient force.

To eliminate gaps, pass a comb spatula with glue over one place at least twice in perpendicular directions, gradually reducing the angle of its inclination.

Very important. The amount of glue applied should correspond to the productivity of your work. At first, process small areas, with time you will gain experience and the work will go faster.
There are two ways to lay clinker tiles: one row along the entire length of the façade wall, or three to four rows in small sections. The first method reduces the likelihood of errors, but increases time. If you work slowly, you will have to apply glue only along the width of one tile, and this is very inconvenient and time-consuming. In addition, there is a possibility that before laying the second row, the glue will have already hardened and will have to be removed with a flat spatula, which means a loss of material. Another problem is that it is difficult to apply glue with a spatula at the edge of the tile; this technology takes much more time. And lastly, during such application, the solution will definitely get on the surface, it will have to be removed - even more time is lost. But we cannot give definitive advice on exactly how to lay tiles; it all depends on your practical skills. How much time you have left is written on the glue package, and how much time you can glue the tiles during this period is up to you.
Step 8 To improve adhesion, be sure to coat the tile on the back side with glue. The thickness of the glue is within a millimeter. The fact is that clinker almost does not absorb moisture, and this significantly reduces the adhesion coefficient. Spreading the back side minimizes the negative effect of low water absorption.


Step 9 Use crosses between the tiles. The recommended width of the crosses is 10–14 mm, which is much larger than when laying ordinary tiles.

Continue laying tiles over the entire surface of the facade wall, periodically remove crosses from the bottom rows and use them for the top ones.

Prices for clinker facade tiles
Clinker facade tiles
Treatment of window and door openings

Proceed with them only after you have gained experience in laying tiles on smooth façade walls.

Step 1. Lay the tiles on the windowsill. The rows must exactly match those laid on the wall. The surface of the window sills must be flat and sloped to drain water.
Step 2. Protect the finished horizontal parts of the window sills from contamination. You can simply stick a newspaper or a piece of plastic film with construction tape.
Step 3. Try the tiles on the side surfaces of the window sill. As a rule, they have different widths at the top and bottom; this discrepancy should be eliminated only by using the top and bottom tiles. They will have to be cut at an angle.
Step 4. Using a level, draw a horizontal line on the side window sills and measure the remaining triangles. The outer tiles are cut along them.

Step 5. The aesthetics of the facade is greatly influenced by the alignment of the joint lines across the entire surface; pay due attention to this factor. After you have laid the first two corner tiles on opposite vertical slopes of the window opening, check their position with a level. They must lie on one strictly horizontal line.

Step 6. Glue all the tiles on the slopes one by one and check their position periodically.

Step 7 Upon completion of work on the vertical slopes, proceed to laying tiles on the upper horizontal slope. Marking and measuring corner tiles is carried out using the same algorithm as for the side vertical ones. Laying technology requires increased attention. Check the condition of the glue; it should hold the tile securely until it hardens completely.
Features of cutting clinker tiles
The best option is to cut clinker tiles using a professional machine with a diamond blade and water cooling. This way you can get a perfectly flat cut surface and almost completely eliminate the risk of cracking or chipping. But such equipment is quite expensive; purchasing it is only beneficial for professional craftsmen, for whom laying tiles is their main income, not a pastime. If you do not have a machine, you will have to cut the tiles with a cylindrical grinder and a diamond disc.

Important. There are two types of diamond blades: for cutting concrete and ceramics. Discs are not interchangeable and cannot be used for other purposes. What are the differences between the disks? For cutting concrete, the plane of the discs has through slots to remove large amounts of dust; discs for tiles do not have such holes. They only have small indentations where the diamond chips were applied. Discs with slots hit the tiles hard, which causes chips. Always keep these differences in mind.
Prices for angle grinders (grinders)
Angle grinders (grinders)
How to cut clinker tiles with a grinder?
- Prepare a level and stable stand and ruler. Draw a cutting line on the tile, making sure it is exactly on both sides.
- Cut the tile along a line of no more than half the thickness in one pass. Never try to cut off the disc in one pass, it will definitely crack.
- Turn the tile over and cut it in the same way, only reduce the cutting depth even more.
- Place the notched part on the flat edge of the table and, with sharp pressure on the edge of the tile, break it off along the cutting line. The more confident your movements are, the less risk you will end up with a marriage.
- Very carefully trim the edge of the cut with a grinder. Tilt the disk at the maximum possible angle, do not press it too hard, remove irregularities gradually.

Keep in mind that cutting a strip less than one centimeter wide from clinker tiles is very difficult. To do this, you must have experience working with electric tools and clinker. If the technology requires gluing such pieces, then be prepared for a lot of waste.
Video - Master class on cutting clinker terrace slabs
Video - How to quickly cut clinker tiles
Grouting joints

Has its own characteristics. After the glue has slightly hardened, use a special thin spatula to remove it from the seams and clean the surfaces of any glue residue. Start grouting no earlier than three days after installation, otherwise the tiles may become damaged and will have to be re-glued. Prepare the grouting solution taking into account the manufacturer’s recommendations; we described above which brand to choose. It should be semi-dry in consistency.
Place a little mortar on a trowel or any flat surface; to seal, you need to have a long narrow tool the width of the seams.

Lean the trowel against the wall, pick up small portions of the thick mortar with the tool and carefully seal the seams. Level their surfaces at the same time.
Practical advice. It is much faster to first seal several rows of vertical seams, and then horizontal ones. At the same time, remove the difference in height between them.

Prices for construction grout Ceresit Super
Construction grout Ceresit Super


This method of semi-dry grouting significantly reduces contamination of the front surface of clinker tiles. Final cleaning is done with an ordinary brush.

Brushing the seam with a brush gives it
appropriate structure


If you have sufficient skills, then you won’t have to use a damp sponge; the work will be done neatly and beautifully. If not, then the problem areas will have to be wiped. But remember that the surface of clinker tiles is easy to dirty, but difficult to clean. After drying, the stains will appear again, the procedure will have to be repeated several times.


Clinker tiles absorb no more than 4% moisture. Such properties put forward special requirements for the consistency of the glue - it should not be liquid. Ceramic tiles absorb a lot of moisture; liquid adhesive is not a problem for them. At the same time, the glue should not be very thick. Why? Firstly, its adhesion to both load-bearing surfaces and tiles is significantly reduced. Secondly, the mixture hardens quickly, making the installation process much more complicated.

Any adhesive that gets onto the tile surface must be removed immediately. Pay special attention to clinker with an uneven front surface. Don't wait for the glue to dry. The fact is that high-quality glue is difficult to clean later; it adheres very firmly to the texture. Use a clean, damp sponge or cloth for cleaning.
The production technology allows for slight differences in color shades in one batch of clinker tiles. To avoid the appearance of large areas with different colors on the façade, periodically take tiles from several packages. The facade will look beautiful, and some difference in shades will serve as an additional decoration. When purchasing, pay attention to the batch number, it is indicated on the packaging. If you need to purchase additional tiles in a few months, then there is a high probability that this batch will no longer be available for sale.
It is not recommended to lay clinker tiles in very hot and windy weather. If it is not possible to wait for suitable conditions, then you can lightly spray the surface of the clinker tiles on the back side with water. This will improve adhesion and fixation reliability will increase.


Video - Technology for laying clinker tiles
A tiled house has several advantages - it is beautiful and durable. You can buy exclusive material to order or purchase the product you like in the store, or you can make it yourself and decorate the walls yourself. Making facade tile shapes with your own hands is not as difficult as it seems at first glance. This article talks about the most reliable and uncomplicated methods for producing tile material at home.
Many people doubt whether this entire process can be carried out without special equipment and how durable the material will be. Therefore, before you start making facing products yourself, you need to study what tiles are and how they are made in production.
There are several main types of tiles based on the main component:
- concrete - made of cement, sand and plasticizers;
- ceramic - made from special grades of clay and fired in ovens at high temperatures;
- clinker - high-quality types of clay are pressed under high pressure and fired at a temperature of about 1200 degrees;
- porcelain stoneware - made like clinker, but granite chips are added to the composition;
- terracotta - made from porous clay of the same name.
Brick elements look natural and neat
Each type corresponds to the manufacturing method and the main filler, which gives the material aesthetics and protective properties. Tile products can be divided according to shape:
- finishing facade stone;
- clinker brick;
- imitation of finishing or masonry brick;
- flat rectangular tiles with a smooth, rough, matte or glossy surface.
Manufacturing processes can be: firing or dry pressing. Conventional ceramics go the following way:
- Extraction of raw materials in quarries.
- Processing of material, its cleaning.
- Formation;
- Drying;
- Burning.

The production of concrete tiles is quite accessible to everyone
For concrete products and for many types of artificial stones, the process is limited to vibration casting and drying.
Let's compare what equipment is used in production and what can be used to replace it at home.
- The crusher and extrusion machine can be replaced with a ready-made mixture from a hardware store.
- A concrete mixer will completely replace a mini concrete mixer or a bucket and a drill with an attachment.
- A vibratory casting press will replace a vibrating table.
- You can make press molds yourself or purchase them in a store.
As you can see, the whole process is easy to repeat at home. Some will ask why this is needed, because the required material can be bought for a suitable amount. But here’s an example: you have a design in mind, but a suitable stone is not on sale, or is available, but the color is not suitable. And it may also be too expensive. In the end, this type of cladding may not exist at all. That's when your own hands and useful advice come to the rescue.

For wood it is important to choose a relief textured pattern
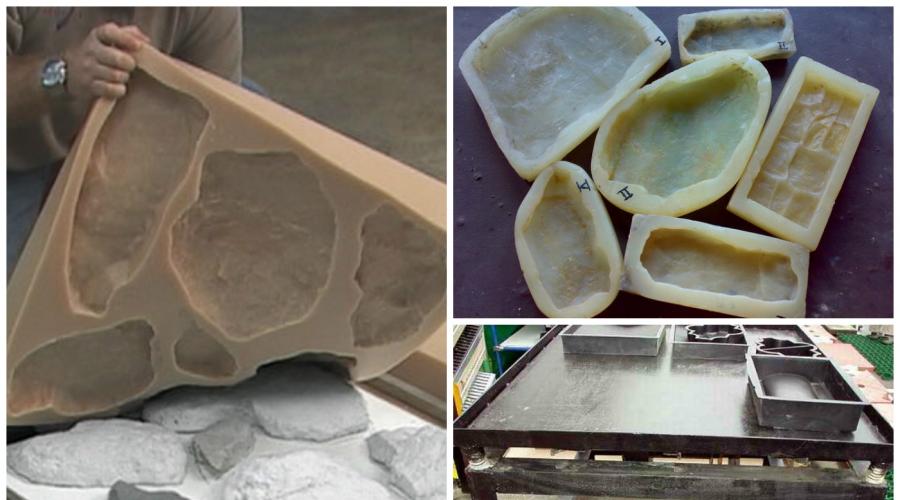
Mold making
Today it is quite possible to purchase ready-made forms. They come in all types of tiles; if you look hard enough, you’ll be lucky enough to buy exactly what you need. The most important thing is not to purchase cheap plastic matrices. Usually they are enough for no more than one application of the solution, after which the plastic becomes unusable. As already noted, a suitable form may not be on sale, then you will inevitably have to make it yourself. Whatever material you choose for the matrix, you can take an artificial analogue, tile or natural stone as a basis. If you choose the second option, then buy several different samples, remember that nothing is the same in nature. The base can be a wooden beam or log. The main thing is to choose a beautiful wood texture. Let's understand the technology of the form.
Let us immediately note that the base can be made for one tile or directly for a group of stones. It is more profitable to do the second one, since the output is several finished products at once, and the speed of work, accordingly, increases. Whatever material you use, you will need formwork. Buy ready-made or make it yourself.

Silicone sealant is cheaper to choose in large packaging
Silicone
Silicone is sold in different packaging. It’s better for you to look in buckets, since in tubes you will overpay for packaging, but you need quite a lot of it.
Now we lubricate the bottom and walls of the formwork with a special lubricant, and lay tiles or stones on the bottom. The sources also need to be lubricated, since they will have to be freed from silicone.
Important! If gypsum stone or tiles are used as the starting material, then they must be covered with several layers of varnish, only then coated.

The form is filled to the brim
Prepare a soap solution for brushes and spatula. Apply silicone and smooth it with a brush, constantly pressing. This way you will avoid bubbles. Now it is advisable to compact the silicone and level it with a soap spatula. Now the mold must be left until the silicone hardens.
The polymerization process takes a long time. The standard rate is 2mm per day. The thicker the future workpiece, the more time it will take. Don’t rush to pull out the matrix; the stronger it is, the longer it can be used. A poorly polymerized form can be used once or twice. Standard properties of silicone sealant that should be taken into account when working:
- tensile strength - 01 MPa;
- density - 1200 kg/m3;
- viability - 8 hours;
- durability - 20 years.

Base for stone tiles
After complete hardening, the material is removed, the matrix is washed with soap and can be used.
Compound molding dies
There are special compositions for casting molds. They can be purchased at construction stores or craft departments. There is no need to chase imported compounds; our compounds are of good quality and reasonable cost.
The example shown in the photo has two components. Silagerm -5035 has a tensile strength of about 4 MPa, shrinkage of no more than 1%, and a complete hardening time of 24 hours.
The quality of the composition is better, and accordingly the forms made from it are used longer.
Important! Before pouring plaster or cement, lubricate the mold with a special compound - Tiprom, then it will last even longer.

Domestic polyurethane compound
Professional production of tile material at home
Do-it-yourself tiles are made using gypsum or cement. Gypsum cladding is usually used indoors, but if its surface is impregnated with hydrophobic substances, it can be used on building facades in dry climates. Nevertheless, many are interested in gypsum products, since they are easier to give the required color, they have better adhesion and are much lighter than cement elements.
Production of gypsum-based facing elements
To work you will need the following tools and materials:
- Plaster, preferably white.
- River purified sand.
- Lemon powder.
- Necessary dyes.
- PVA glue.
- Drill with mixing attachment.
- Matrices for shaping.
- Plastic bucket for solution.
- Brushes and spatula.

Gypsum also comes in different forms.
Before work, prepare a place to dry the material. It must be perfectly even so that the products are of the same thickness. Let's look at the whole process step by step.


Finished elements can be painted white
Video instructions for making tile elements from gypsum mortar
We invite you to watch a detailed video tutorial. After watching it, you will learn how to cast beautiful finishes for your home without difficulty.
Cement paste tiles
Cement or concrete tiles and artificial stones are much more in demand, as they can be used on any facades, garden paths and other types of landscape design. Nothing will happen to them in any weather. This tile is resistant to weathering, chemical and biological influences. It is durable and wear-resistant. Such products can be formed from Portland cement, river sand and water. PVA glue is added as a plasticizer. The following is all familiar:

- After the solution has set a little, a mesh is drawn on it to improve adhesive properties.
- The tile must dry. Then it is carefully removed from the molds and left to dry completely for several weeks. It is then stacked on pallets and stored in a dry, dark place.

Storage of finished products
To avoid mistakes during installation, we will give some recommendations that will help make the cladding process better and faster.


Seamless installation method
Making cladding yourself is a fascinating process; in addition, it is good for the wallet and will satisfy any needs and imagination. Don’t rush to buy ready-made finishing materials; perhaps you will end up with exclusive forms of facade tiles like in the photo, and even with your own hands.
Post Views: 254
It includes:
- cement;
- sand;


The tiles are attached to concrete surfaces or with dowel nails. Tiles are attached to log and plank walls and frames, as well as those made of timber, using self-tapping wood screws.

If you plan to install the tiles yourself, it is best to choose this method of cladding. Firstly, such cladding can imitate various types of stone and brickwork. However, unlike concrete facade tiles, they will be significantly cheaper, you can fix them quickly and easily, and the coating will look no worse.
- plain;
- iridescent;


Components for the production of concrete tiles
It includes:
- cement;
- sand;
- mineral powder - a cement substitute made from ash, ground slag, stone crushing waste, etc., introduced into concrete in a volume of 5-20% to give the concrete special properties (heat resistance, different colors, etc.);
- plasticizing additives - used to increase the mobility of the concrete mixture;
- stabilizing additives - to prevent separation of the concrete mixture;
- water-retaining additives - to reduce water separation.

Manufacturing technology for concrete façade tiles
The main method for producing facade concrete tiles with low porosity is vibration casting. The prepared concrete mixture is placed in plastic forms mounted on a vibrating table and completely compacted under the influence of high frequency vibration. Then the plastic forms are transferred to racks, covered with plastic film to prevent moisture loss and kept for a day. Next, the finished tiles are removed from the plastic molds and transported to the warehouse.
Using this technology, it is possible to obtain tiles with both matte and glossy surfaces, without pores or other defects. The use of high-quality coloring pigments makes it possible to obtain tiles painted in rich colors that do not lose their brightness for many years. You can read the material about.
Advantages and disadvantages of concrete facade tiles
All building materials have both advantages and disadvantages.
The advantages of concrete tiles include:
- the mass of facade tiles is relatively light, which not only reduces the load on the structure of the structure, but also makes it possible to implement exterior finishing on your own;
- it is similar to stone, not only visually, but the natural aging process of these materials is also practically indistinguishable in appearance;
- Since the surface of the tile is hard, it withstands the effects of precipitation well and is resistant to mechanical damage, i.e. will serve for a long time if installed correctly and timely maintenance;
- To attach concrete tiles, you do not need a special spacer layer; they can be mounted on walls made of various materials that adhere well to adhesives.
- Concrete façade tiles are cut with a simple chisel (cutter), although cutting with a circular saw produces less labor and better results.

However, concrete tiles also have disadvantages:
- It is better not to use this tile in cold climates, since not all manufacturers guarantee the stability of its properties in the presence of freeze/thaw cycles;
- Sometimes, even during the normal manufacturing process, the edge of a concrete tile is uneven or an unnecessary edge is formed on its edges. And although they can be easily removed with a circular saw or cutter, installation labor costs increase.
Dry method of installing concrete facade tiles
Important! The dry method is intended for tiling brick, concrete and wooden surfaces without the use of any adhesives or mortars. Among other things, the work described can be done at any time of the year.
The tiles are attached to the surfaces of concrete or brick facades with dowels and nails. Tiles are attached to log and plank walls and frames, as well as those made of timber, using self-tapping wood screws.
If you plan to install the tiles yourself, it is best to choose this method of cladding. Firstly, such cladding can imitate various types of stone and brickwork. However, unlike facing bricks, concrete facade tiles will be significantly cheaper, you can fix them quickly and easily, and the coating will look no worse.
Painting of façade concrete tiles for dry laying is carried out during their manufacture. In this case, the product is painted completely throughout its volume, and not just on the outer surfaces. Therefore, fading of colored concrete tiles under the influence of ultraviolet radiation is excluded.
These tiles can have almost any color:
- plain;
- iridescent;
- imitating the surface of granite, marble, malachite, amber, etc.
Properties of facade tiles (video)
Wet method of installing concrete facade tiles
To achieve good quality cladding of façade walls, it is necessary that they be smooth. If there are irregularities, it is recommended to plaster the walls.
The installation process includes the following steps:
- Before installing the tiles, the surfaces of the facade walls and the back sides of the tiles should be moistened with water using a paint brush.
- The façade should be faced starting from the plinth, which is the base of the facade walls of the house and creates a transition to the areas of the earth's surface adjacent to the house - sidewalk, driveway, lawn. It is better to make the color of the plinth cladding darker than that of the wall cladding, then it will look more monumental. In order to maintain the same level along the entire perimeter of the house when covering the base, a starting strip is nailed at the bottom of the base, which is strictly set according to the level (preferably a laser level). It is on the starting bar that the first row of tiles is laid out. Install the tiles starting from the corners from bottom to top.
- To apply a 0.5 cm layer of tile adhesive to the surface of the walls, use a smooth spatula. Next, level the glue with a notched trowel with teeth 4–6 mm high.
- A 0.4–0.6 cm layer of adhesive is applied to the back of the tiles with a notched trowel.
- Next, using gentle movements and turns, the tiles are pressed against the wall surface until the glue comes out at the joints between the tiles.
Correct and professional execution of wall cladding will significantly extend the life of the house façade. Therefore, before you start installing facade tiles, study the technology of this work, or better yet, watch it with your own eyes or at least on a video on the Internet.


