Making a change house with your own hands drawings. Do-it-yourself installation of a cabin: step-by-step instructions. Materials required for the manufacture of metal cabins
Many novice summer residents often wonder: what is the best thing to do, buy a ready-made change house or make it yourself? As practice shows, finished goods often turn out to be of low quality and short-lived. Therefore, we definitely recommend self-construction. You can learn about all its nuances and subtleties from this article.
Why do you need a change house?
Before you start designing and building a shed, you need to decide on its purpose, because its dimensions, layout and other aspects largely depend on this. As a rule, a change house performs the following functions:
- residential premises - the building can be used as housing during the construction of the main house. Subsequently, it will not be difficult to convert it for other household needs; in addition, the change house can serve as an additional summer house, for example, to meet guests;
- household items - can be stored indoors summer cottage equipment, work clothes, etc.;
- sanitary and hygienic - the change house can be equipped with a bathroom, for example, here you can perform Summer shower and install a dry closet.
If desired, the country house can be equipped with a bathhouse or other functions. The main thing is to think carefully about all your needs and wishes in advance, so that you don’t have to deal with alterations later, as is often the case.
Design - creating a change house on paper
Having decided on the requirements for the change house, you need to create a plan on paper and indicate the dimensions of the structure. Most often, the structure is a trailer 2–3 m by 5–6 m. Of course, it is not at all necessary to make it elongated. The main thing is that the shapes and sizes allow the implementation of all intended functions.
In order not to rack your brains over the layout, you can use ready-made drawings as a basis. Adjust dimensions if necessary. The only thing we note is that it makes no sense to build a building that is too large, since it will no longer be a change house, but a permanent structure with completely different construction costs. As a rule, a building measuring 6x3 m is quite sufficient for all household needs.
Next you need to decide on the design and materials. Since a change house is an inexpensive and lightweight structure, which, if necessary, can even be moved from one place to another, we recommend making it from wood. Next, we will consider two construction technologies using this natural material:
- frame - this is the cheapest, fastest and easiest way of construction, but keep in mind that the strength and durability of frame cabins is not their strongest point;
- from timber in the form of a log house - just like timber houses, such cabins are strong and durable, but more expensive than frame analogues.
Basis frame structure, as you might guess, is a frame made of timber. It consists of racks located with a pitch of 600 mm, and connected to each other by the lower and top harness(horizontally located boards or timber). To strengthen the racks, braces and horizontal jumpers are additionally used. The space of the frame is filled with insulation and sheathed.

The distance of 600 mm between the racks is indicated for a reason - it is for this step that they are designed thermal insulation boards, as well as OSB. If desired, the step can be changed, but in this case you will have to cut the insulation and sheathing.
Before you start building a frame shed, draw up a diagram of the walls and ceilings indicating the dimensions of all parts. This will allow you to calculate the amount of lumber and make an estimate. We'll talk more about the materials that will be used during construction below.
Calculate lumber for timber cabin even simpler: to find out the number of crowns, simply divide the height of the wall by the height of the beam section. The length of each crown is already indicated on the plan. That's why additional project You don't even have to do it.
Foundation – even a cabin needs a good foundation
If you are installing a change house for a month or two, then it is not necessary to build a foundation for it. A backfill of crushed stone leveled horizontally will be sufficient. To protect the bottom of the building from moisture, several beams or bricks/blocks should be laid on the bedding.
If the change house will be used as a permanent structure, it will not be possible to do without a foundation. Of course, in our case there is no need to construct a massive ribbon structure. It is more expedient to make a lightweight base in the form of separate columns connected to each other by beams (grillage). We begin construction by preparing the site: we get rid of the plant layer of soil, after which we mark the site according to the design dimensions of the building.

Then you need to prepare holes for posts about 40 cm deep, located at a distance of one and a half meters from each other along the length and width of the building. Cover the bottom of the holes with a layer of sand and crushed stone 150–200 mm thick. Be sure to compact the bedding well and level it horizontally. Then build posts from blocks or bricks 30-40 cm high above the soil level. Treat the surface of the posts with bitumen, then cover with several layers of roofing felt.
Next, you need to lay beams (beams 150x150 mm) along the perimeter of the columnar foundation. To attach the timber to the posts, use special fasteners, the so-called studs. When laying the grillage, be sure to ensure that the beams are horizontal. If necessary, you can level the position of the beams by placing bars or boards under them, but in general, try to ensure a horizontal plane even at the stage of erecting the columns.
The beams can be connected to each other “in half a tree” - in this case, at the joints of the beams, even grooves with a depth of half a beam are made. The grooves must be reciprocal, i.e. in one beam the groove is cut from the top, and in the second, accordingly, from the bottom. Additionally, the joints can be strengthened with self-tapping screws and steel corners. The floor beams are laid in the same way and cut into the outer beams.
We build a change house quickly and cheaply - the nuances of frame technology
To build a frame shed you will need the following materials:
- timber 100x100 mm;
- boards 35x100 mm;
- mineral mats with a thickness of 100 mm and a density of 25–35 kg/m3;
- vapor barrier;
- wind and moisture insulation;
- finishing material - lining, block house, etc.
We begin the construction of walls with installation corner posts, which are made from timber 100x100 mm. To fix them, use corners and screws, reinforce them with braces. After making sure that all the posts are vertical, connect them with the top strap, for which use a 35x100 mm board.
If the roof of the cabin is pitched, do not forget to make one long wall 30-40 centimeters higher than the other.
Then you can install intermediate racks made of boards. They are attached to the upper and lower harness using metal corners. To give the structure rigidity, secure horizontal jumpers between them in a checkerboard pattern. In addition, install horizontal strips from the same boards above and below the openings.
If the roof of the structure is gable, lay floor beams on the wall frame. Since the beams will not carry virtually any load, you can use the same 30-100 mm boards. Place them with the edge on the harness and secure in this position using the corners. The pitch of the boards can be made about 40 cm.

After this, you can begin insulating and covering the frame. It is better to start with the roof, but we will consider this stage separately, and now we will insulate the floor and walls. Thermal insulation of the floor begins with laying the rough flooring on the floor beams. Since it will not perform a load-bearing function, any boards can be used for these purposes. Waterproofing is laid on top of the subfloor, and then the floor joists are installed. Don't forget to align the joists horizontally.
All rolled materials, i.e. vapor barrier, wind protection and waterproofing are mounted with an overlap of 15-20 centimeters. Moreover, it is advisable to glue the joints of the canvases with butyl rubber double-sided sealing tape, which will ensure complete tightness of the joints.
Next, the log space needs to be filled with thermal insulation material; for this you can use either mineral wool or any other insulation. The surface of the logs and thermal insulation must be protected from moisture with another layer waterproofing film. Then you can install the plank flooring.
The ceiling ceiling is insulated in approximately the same way - the space between the floor beams or rafters is filled with insulation (if the roof is pitched). To fix the slabs, you can stretch a wire or nylon cord in a zigzag pattern between the beams. Then a vapor barrier film is stapled from below to the floor beams. On top of the vapor barrier, a lath of 20x30 mm is made, to which the lining or other finishing material is attached.
If the thickness of the rafters is not enough to secure insulation between them, build them up using timber or boards.
One of the most important points is wall insulation. Not only the comfort of staying indoors and the energy efficiency of the building, but also the durability of the entire structure depends on it. We start thermal insulation with installation vapor barrier film, which is attached to the frame with inside walls It is advisable to first stick a sealing tape onto the racks to prevent subsequent depressurization of the circuit in the areas where the film is attached to the frame. The vapor barrier is fixed using a stapler - staples are hammered in increments of 100-150 mm.
Then the frame space must be filled mineral mats. During the insulation process, follow one main rule - there should be no cracks anywhere in the walls. If cracks have formed, they need to be filled with scraps of mineral wool, otherwise cold bridges will form. Upon completion of the thermal insulation of the frame, secure the moisture and wind protection on the outside. The membrane is installed according to the scheme described above.

A sheathing is attached to the frame over the windbreak. As a rule, the slats are located vertically. To fasten the sheathing, use self-tapping screws, screwing them in at 25 mm increments. Then the walls are sheathed on the outside with OSB. The slabs are also attached to the sheathing with self-tapping screws. In order not to cut out the trim in advance, door and window openings can be cut in place with a jigsaw, i.e. after installation of the slabs. Keep in mind that 5 mm thick expansion joints must be provided between the slabs. Be sure to fill these seams construction sealant or polyurethane foam.
Next, you need to finish it with clapboard, corrugated board, siding or any other façade covering. Install doors and windows immediately. On the inside, the sheathing is attached to the frame in the same way as on the outside, after which the walls are sheathed with clapboard or even plasterboard.
You can add more as needed frame structure, expanding its area, or even build another shed nearby and connect it to the first. In this case, you will get a whole house of cabins that can be used for any of your needs.
Making a Russian folk log cabin
If you want to make not a temporary structure, but a change house “for centuries,” then it is better to build it from a log or timber in the form of a log house. For this we will need the following materials:
- timber 150x100;
- wooden dowels;
- interventional insulation.
Place the first crown of the house on the grillage. Be sure to align the beam with the grillage, and also make sure that the angles are 90 degrees. Connect the timber to each other “in half a tree” according to the scheme described above. Immediately lay the first crown of partitions, and in the same way cut it into the first crown of the outer walls. Then secure the inter-crown insulation to the first crown using a stapler.

Lay the second crown in the same way. To connect both crowns to the grillage, drill vertical holes along the diameter of the dowels. To do this, use an electric drill and a special long drill. The holes should reach the middle bottom beam and be located in the walls in increments of one and a half to two meters. Carefully hammer the dowels into the resulting holes with a hammer.
Then two more crowns are laid and connected with dowels to the lower pair of crowns in the same way. The only thing is that the pins are installed offset, i.e. in a checkerboard pattern, as shown in the diagram above. According to this principle, the walls, together with interior partitions"rise" to the designed height.
The result was a box without windows or doors. Therefore, you need to mark the door and window openings on the walls, and then cut them out with a chainsaw. First, temporarily fasten all the beams with boards to the left and right of the opening. After completing the openings, immediately install window boxes made from boards. They will fasten the cut beams of the crowns together, preventing them from falling apart.

It must be said that openings can be made during the construction of walls. In this case, the beams are fastened to the left and right of the openings with dowels. You can use any option you like.
As for the floor and ceiling, all work is performed in the same way as during the construction of a frame cabin, so we will not repeat it.
If you decide to decorate the change house, keep in mind that you can begin this operation no earlier than one and a half to two years after the completion of construction, i.e. after the structure shrinks. The exception is the cabins made of profiled laminated veneer lumber, which practically do not shrink.
Roof installation, or how many slopes do you need for complete happiness?
The type of roof structure depends on the purpose of the cabin. If it will be used in summer time, better - it is easier to implement and cheaper. For its construction you will need the following materials:
- timber 50x150 mm;
- superdiffuse moisture-proof membrane;
- slats 20x30 mm;
- boards 100x20;
- roofing material.

Step-by-step instructions for installing a pitched roof look like this:
- 1. The rafters are laid on long walls that have different heights. They need to be placed vertically, i.e. to the edge. To fix the rafters in the mauerlat (the upper crown of the walls or frame), you can make grooves. Additionally, use corners and screws. Since a pitched roof will carry a large snow load, do not make the distance between the rafters more than 40–50 mm.
- 2. Fix a moisture-proofing membrane on top of the rafters, and then fasten the counter-lattice - 20-30 mm slats. The counter grille should be parallel to the rafters.
- 3. Next, boards are mounted on the counter-lattice perpendicular to the rafters. The sheathing pitch depends on the type roofing material, but in any case, the distance between the boards should not exceed 15-20 cm.
- 4. Now we lay roof covering. Since the roof will be flat, overlap the sheets more; for example, when installing slate or tiles, it should be not one wave, but two.
If you plan to use the change house not only in the warm season, but also in winter, it’s better to do so. It is based on roof trusses, i.e. isosceles triangles, educated rafter legs. From above, i.e. at the top of the triangles, mounted ridge run- This is a beam that connects all the roof trusses. In addition, every roof truss strengthen with ties - horizontal jumpers connecting two rafter legs.
Waterproofing and laying of roofing material is carried out according to the instructions for a pitched roof. The only thing is that if the change house is winter, it is advisable to insulate not only the ceiling, but also the roof itself. This operation is carried out on the same principle as.
So we built the change house with our own hands, now all that remains is to install communications to it. As you can see, there is nothing super complicated in this work. Yes and not in vain folk proverb says: it is not holy pots that are made.
There are situations when a person needs temporary housing, where he can take a break from work and spend free time. Particularly relevant are carriages that are used as change houses, where construction workers, security guards and the military live. Also, the carriage can become quite good and be used for personal purposes.
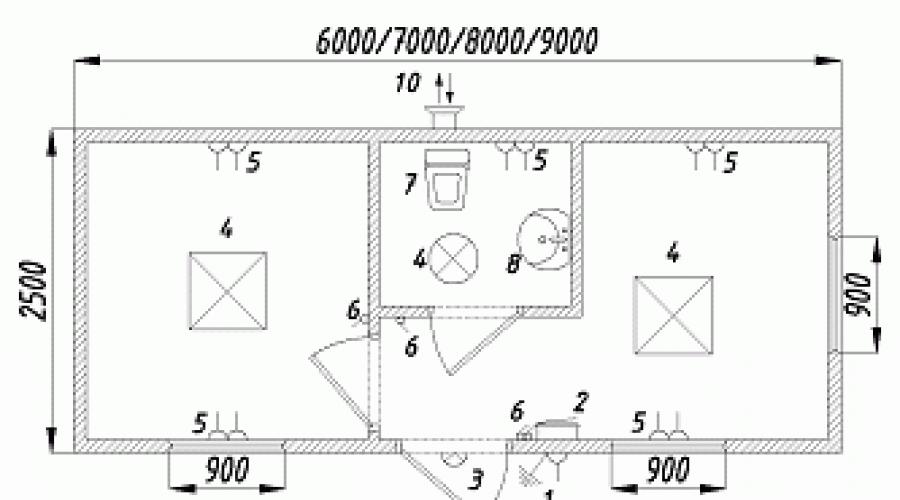
Drawing with dimensions and design of a construction trailer
Any construction requires the presence of such elements as a diagram and drawing. Exactly graphic image allows you to avoid problems during the construction of a change house. The project is inherently simple, so it is quite possible to create it yourself.
To do this, it is not necessary to be an expert in drawing; it is enough to know the basic design features carriage and be able to depict them on paper by marking them. How to make a full-fledged project and draw up a drawing correctly, we will analyze further.
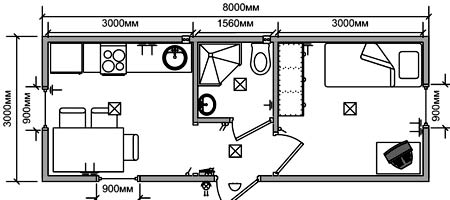
At the planning stage, the issue of the functionality of the change house is decided. It is on this parameter that the drawing and general scheme. If the area involves temporary housing, this must include three separate rooms:
 Construction drawing of a construction trailer
 - bathroom;
- bedroom;
- kitchen.
If desired, all three rooms can be combined into one and separated by ordinary interior screens. They also pay attention to the mobility of the structure. If there is a need to move it and put it on wheels, then another drawing is added to the project: marking the bottom and attaching it to the walls. TO individual elements include windows and doors, as well as a ventilation system, which is difficult to do without in such a confined space.
The carriage itself can be either small or large, providing housing for a maximum of 5–8 people at a time. By attaching wheels, the cabin can become a magnificent home on wheels, thanks to which you can travel around the world with your home.
Read also
Construction of a shed from foam blocks
How to make a drawing
Before starting work with a ruler, take appropriate measurements. The height of the structure must be no less than human height plus 50 cm. This will create the most comfortable living conditions, reducing costs for additional building materials. The width is calculated in accordance with its purpose, as well as the length. This includes the following indicators:
- Number of people living;
- Number of rooms;
- The area of individual plots and the total area of the building;
- The need to frequently transport the car over long distances.
When all measurements have been made, they begin drawing. Note that drawings can be created not only with your own hands using paper and pencil, but also with the help of special graphic editors. The latter significantly save time and allow you to produce additional calculations amount of required building material.
 Drawing and layout with dimensions of the construction trailer
 If it is not possible to connect Computer techologies, when a project for a change house is created, you can make a drawing. The main drawing (top view) should display the following indicators:
- Walls and their thickness;
- Location of rooms;
- Communication means and their location.
If there are many rooms, additional drawings of individual rooms are required, where all components are depicted in more detail, right down to the arrangement of furniture. If it is possible to create a two-dimensional image, then you can make a drawing with your own hands of the outer part of the trailer, where the frame, its thickness and mounting location are indicated. This scheme is more than satisfactory for the construction of the most primitive trailer used as a change house.
Why do you need a drawing?
Drawings are not only a guide for DIY construction. 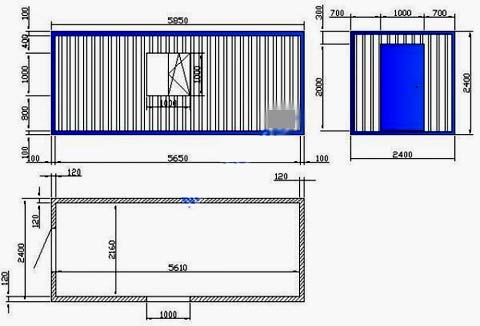
They represent a full-fledged document, which is approved by the developer (when used for commercial purposes). If cabins are built for home use, their frame may have different rigidity. For construction project the drawing must take into account all the subtleties, as well as construction material, used in the construction of a structure.
The schematic image clearly shows the designed object, allowing you to eliminate the possibility of inconvenience and miscalculations even at the planning stage, saving time for further alterations.
Drawings also help save money. No matter how strange it may sound, it is much cheaper to build a cabin frame and cover it with sheets of metal than to buy a ready-made trailer. Each drawing is accompanied by a TO (technical justification), where the designed trailer is described in more detail in words.
If you are the owner of a country house land plot, then you probably thought about arranging it in accordance with your own preferences. In order for a family or a team of workers to live in comfort during construction, a change house can be erected. It is a special type of temporary housing, which has the form small house with comfortable conditions.
Design
Construction of a cabin can take a certain amount of time, which is limited to a few days, and sometimes lasts up to several months. Everything will depend on the material used and the complexity of the project, as well as the availability of skills. If this house will be used for short term, that is, the opportunity to save on interior design. At the same time, you can refuse to have partitions by installing a minimum number of sockets.
It is possible to use cheap materials for cladding. If the change house is built for long-term use, then the project may include the presence of a bathroom.
The need for a foundation
A foundation is needed in any case; most often its role is played by a base of pillars, which are located in the corners and long sides. The distance between these elements should not appear to be more than 2.5 meters. Before laying the pillars, a gravel cushion is laid, which prevents plants and trees from breaking through. The construction site should be located on a hill, which will prevent flooding by rain and melt water. If this condition impossible, then storm drains should be installed.

Materials for making a change house
The construction of a cabin can be done using different materials. For example, piles or pillars can be used to build a foundation. The further apart they are supporting elements, the more reliable the grillage should be.
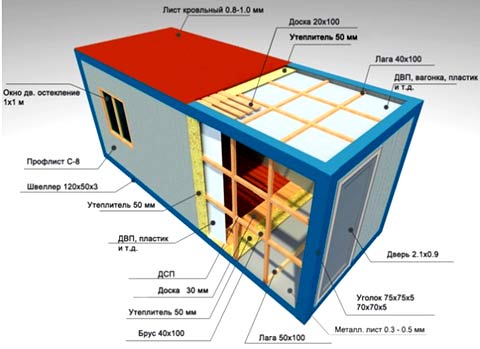
There is no point in carrying out work on arranging an expensive foundation. The cabin will be based on a frame, which can be made of wood or metal. The use of metal corners and channels will allow you to create a change house that is ready for use. Sheathing can be done using lining, profile sheets, block house or siding.

Thermal insulation must be given Special attention. To do this, you can purchase polystyrene foam, glass wool, and seal the seams construction foam. The floors are laid hydro- and thermal insulation materials. The inside walls are lined with clapboard, hardboard or special panels. If it is provided temporary operation, edged boards can be used for this purpose.
Construction of the foundation
The construction of a cabin begins with the creation of a foundation. If the building is to be demolished in the future, then dismantle it columnar foundation it will be quite simple. Quite often, cinder blocks are used, which can be purchased at low cost or made independently. It is necessary to remove construction debris from the surface of the earth and remove the fertile layer. The soil is compacted, covered with geotextiles, covered with sand and compacted again.
You can install blocks on the prepared base, placing them in the corners. Among other things, these elements must be 1.5 meters apart from each other around the perimeter. The blocks must be waterproofed using bitumen mastic or roofing felt. Then the wooden frame is fixed using an anchor method.

If you want to build a stationary type of cabin, then you need to pay more attention to the foundation. To do this, remove the fertile layer over the entire surface, lay geotextiles and sand five centimeters thick, after which everything is thoroughly compacted. To install the pillars, 50-centimeter holes are prepared, which should be located in the corners and along the perimeter every 1.5 meters. The holes are covered with geotextiles and then filled with 40 centimeters of sand.
It is best to carry out the construction of a change house with your own hands step by step; in seven days you can complete such work with outside help. On the first day, it is best to start arranging a brick foundation; the height of the base should be 30 centimeters. In this case, 10 cm will be hidden underground, and the remaining 20 will rise above the soil. Reinforcement is driven into the central part of the foundation, the height of which should be 1 meter. It is necessary to strengthen the lag. This indicates the need for an empty area in the center, which, after placing the rods, is filled with concrete.

Bottom harness
If you have certain skills, you can carry out construction (step by step). It is quite possible to carry out such work in seven days.
An important step is the formation of the lower trim. Can be used for fastening which is made. For fastening, holes are pre-drilled in the supports and metal. If it is intended to lay on piles wooden blocks, then the heads are covered with two layers of roofing felt, it can be replaced bitumen mastic. The above-mentioned wooden beams must have a certain cross-section, which is 100 millimeters.

Creating a wireframe
Home craftsmen quite often build a shed with their own hands. At the next stage, you can form the frame. The base of the building is formed from beams, which are located around the perimeter and are well reinforced. Afterwards, transverse and longitudinal logs are laid. To create the frame, you should prepare beams with a cross-section of 150 x 100 millimeters. The floor is made from this material and support posts. The latter should be located in the corners. Reliable connection is guaranteed by cuts in the logs, in which the beams are installed one into the other and reinforced with self-tapping screws. The logs must be placed on the reinforcement contours. To fix vertically located logs and attached to them, use self-tapping screws and corners.

Forming the roof frame
The construction of a change house with your own hands should be carried out step by step in several stages. At the next stage, the craftsman will have to form the roof frame. If we're talking about about single-pitch design, then you should use bars with a cross-section of 50 x 100 millimeters. There are cuts in the load-bearing bars where the rafters are installed. Fastening is carried out with the same self-tapping screws. The rafters should extend 30 centimeters beyond the perimeter of the building. As a coating, you can choose ondulin, which does not provide for installation work the master has special construction skills.
The roof structure must contain hydro- and vapor barrier layers, as well as insulation. When building a cabin with your own hands, it is recommended to consider the photo in advance. They will allow you to understand which design is best to choose for your site.
At the next stage, you can lay a sheathing of wooden blocks or boards on the rafters, since ondulin is enough lightweight material. Its sheets are laid overlapping, and it is necessary to move from bottom to top. For this purpose, special fasteners are used, which are included in the kit.
Finishing work
The construction of a change house on the site involves the following stage: First, the craftsman will have to lay the subfloor, treating the boards with an antiseptic. Mineral wool must be laid between the layers of waterproofing. Then you should lay the finished floor. When you plan to use the change house for a long time, it is best to carry out interior decoration apply clapboard. If necessary, you can save money by purchasing OSB. To fix these materials, you should use self-tapping screws rather than nails. We should not forget about the presence of an insulating and vapor barrier layer.
If you are building a 6x3 change house with your own hands, then, as with the construction of a large building, you need to calculate the amount of material for finishing. On external walls you can strengthen, for example, a block house. And in order not to run to the store during the work, and also not to overpay, you should calculate the amount of material. To do this, the area of all walls is determined, the numbers are added up, and the final result should be divided by the area of one finishing board.


Many people have summer cottages outside the city, but not all of them are equipped for living. Some use the land as a vegetable garden, while others are just planning to build a house on it. But coming to the dacha in the morning and then leaving in the evening back to the city is not convenient for everyone, and sometimes you don’t even want to. After all, spend time away from the bustle of the city, enjoy fresh air and the singing of birds in the garden is a pleasure.
But to come to the dacha and stay there for a while, you will need shelter. Construction of a full-fledged residential building will take a lot of time and money, but the equipment of a small country house from the change house will appeal to every owner of a country plot of land.
A house from a change house can become like permanent place living in a dacha during the warm season, or temporary while a full-fledged residential building is being built. It is worth noting that you can live in a change house throughout the entire calendar year if you equip it with heating, electricity and water supply. And after the construction of the cottage is completed, the change house can be sold or left as utility room. Read more about what a change house is, what it is made of and how such a country house is used in our article.

A small country house from a change house, equipped open terrace
Types of cabins
Manufacturers offer quite a wide range of cabins that can be equipped with everything necessary for both permanent and temporary residence. According to their purpose, cabins are divided into:
intended for country utility premises;
residential cabins for temporary residence of workers or the owner himself.
can play the role of a manager’s or foreman’s office.
Change houses also come in construction, country and block containers, and according to their design they are divided into:
-
lumber.
frame.
Most often, the cabins are manufactured at the factory and if you decide to order them, they will be delivered by truck already assembled. As for the dimensions of the cabins, they are calculated so that the structure can easily fit into the body truck or trailer.

Features of block containers
For some reason, the very word “container” is immediately associated with metal and the idea appears that it will be very hot in the summer and cold in the winter. But not all containers are metal; moreover, their walls and ceilings are insulated and finished both inside and outside. Manufacturers of modular containers take utmost care to ensure that the use of such cabins is as comfortable as possible.

Metal container block used as a utility unit
As mentioned above, block containers are not only made of metal, they are also made of wood. Metal constructions most often used as construction cabins, standard sizes which are 2.5x6 m, and the ceiling height is 2.2 m. As has already become clear, the frame of such cabins consists of metal, the outside of the structure is finished with galvanized corrugated sheets, the inside is dry wooden clapboard, PVC panels or fiberboard, MDF paneling or hardboard. Mineral wool is used as insulation. The doors of the cabin are made of fiberboard, and the windows, measuring 1x1.2 m, are equipped with double glazed windows. Buyers are given the opportunity to install partitions in the change house to create several rooms.
Manufacturers of metal block containers provide a five-year warranty on the operation of the cabin.

People most often buy a residential trailer made of wood when they are going to build a summer house or to live in them on suburban area in the warm season during vacation. Therefore, such cabins are also called “country houses”. Wooden block containers are also used as utility units, summer kitchens, or equipped with everything necessary for year-round living.
Wood structures are much warmer and lighter than metal ones. Wooden lining is used as finishing both outside and inside. As for the dimensions of the cabin and the size of the windows, they are the same for metal and wooden block containers.

Block containers can be used for more than fifteen years. Entire modular houses are built from such cabins by connecting them together and removing partitions. And if you put the structures on top of each other, you will get a two-story house.


On our website you can find contacts construction companies who offer house design services. You can communicate directly with representatives by visiting the “Low-Rise Country” exhibition of houses.

A small country house made of two block containers with a canopy and an open terrace on the second floor
Country cabins
Like block containers, country cabins are made of metal and wood.
The latter are best used for living in the warm season, and metal cabins are excellent for year-round use. Metal structures, thanks to corrugated sheeting, better withstand changes in weather conditions.
The interior of the country cabins is finished with fiberboard or wooden lining. Last option finishing is more suitable for permanent residence. Country cabins have separate rooms, a utility block, a toilet and a shower, and this is their main feature.
Wooden country houses, in turn, are divided into frame, panel and timber.
Panel dacha cabins
Most cheap look wooden country house - panel house. Such structures are not designed for long-term use, but due to their low cost they are in great demand among summer residents during the construction of a house. As exterior finishing panel structures do not use solid lining, but the inside of the walls is sheathed with fiberboard.
Foam plastic or glass wool is used as insulation. The floor in the cabin is made of planks, 21 mm thick, and the roof is iron. Country panel houses are highly susceptible to change geometric dimensions, since their design does not provide stiffeners.

Frame type country houses
Most best option in terms of price and quality - a frame country house. Used as a basis wooden beam 50x50 mm in size, giving the structure stability and the ability to withstand loads.
The final cost of a frame cabin depends on the material used for interior and exterior decoration. Manufacturers offer a choice of fiberboard, plywood or lining.
Important! The most expensive finishing option is lining, which, if the cabin shrinks, does not swell or bulge like other materials, which also absorb moisture well and change their geometric dimensions.
Paul in frame change house double - consists of a rough and finishing floor board measuring 32 mm. A layer is used as insulation for walls, floors and ceilings. mineral wool 50 mm thick. The structure also has a vapor barrier - glassine or polyethylene film.

Summer cottages made of timber
The most expensive, but at the same time more durable, is a country house made of coniferous timber measuring 100x150 mm. Wall decoration in this design is usually not provided, but the ceiling, doors and internal partitions country house are made of lining. Manufacturers offer to choose the type of roof - single- or double-slope, but the first is usually used for buildings up to 5 m.
If a log cabin is installed in an area where winter temperature air does not fall below -10 degrees, then you can do without additional insulation structures, but only on condition that during the manufacture of temporary housing the manufacturing process. If the timber is tightly laid and secured with metal staples, and the seams are insulated with tow or flax, only in this case can you count on high strength and heat retention inside the room.

How change houses are equipped for a residential building
For comfortable stay cabins made from cabins are equipped with all necessary communications, divided total area into rooms, connecting several cabins into one solid structure. Minimal amount premises in a country house:
- kitchen;
- bedroom;
- bathroom;
- utility block

A bedroom in a country house can be equipped under the ceiling
If more than two people live in a cabin, then due to limited space in the bedroom they install bunk beds, for this, a room width of 2.5 meters is quite enough. Country houses made from cabins must be connected to the following communications:
- electricity;
- water supply;
- sewerage
To prevent the occurrence emergency situations, communications must be connected by specialists.
In a country house, it is necessary to make heating out of a change house, which is often a conventional stove on solid fuel. If available backup source electricity in case of a power outage, then heat the cabin using electric heaters.
Video description
Watch the video for a selection of country houses from cabins:
It is possible to install a hot water boiler and a radiator system. This option is especially convenient when the house is built from two or more cabins. In this case, one boiler is sufficient, in which the heated coolant will be transferred through pipes to the combined rooms.

Country house made from a cabin, equipped with a solid fuel stove
The advantage of using several cabins on the site is the possibility of combining them with each other without compromising strength.
The use of two cabins, which are installed at a distance of 3 m from each other, allows you to significantly increase living space house. When equipped with such country house can be placed in it significantly more people due to the fact that the kitchen and bathroom will be equipped in a separate shed.
To ensure that the space between the containers is also used for its intended purpose, two walls are made that will unite the cabins, and a common roof. Thus, the house turns out to be quite suitable for living throughout the year.
The space between the cabins can be used not only for living, but also for placing a car. In this case, instead of one wall connecting the cabins, it is necessary to equip a gate. Also, the middle part can be used as a storage room or workshop.
Video description
The construction of a house from several cabins is clearly shown:
If a house consisting of two cabins will be used by only one or two people, then it is advisable to heat only one cabin and use the rest of the space exclusively for economic purposes.

A house of two cabins with a common gable roof

A house of two cabins with an open terrace in the middle
Variants of houses from cabins - photo examples
When choosing a house from cabins, you can go through projects endlessly, especially if you want something original and comfortable. Manufacturers of cabins offer consumers a huge number of different functional options country houses, from standard to large and two-tiered. If you order several cabins at once to furnish one house, you will be offered a lot ready-made solutions their connections.
In the photo below is a project of a change house with a canopy. By extending the roof a little, you can arrange a canopy that will protect front door from precipitation. Aesthetically, this design looks much better than a standard change house.

If the cabins are placed at right angles, as in the photo below, you will get a very interesting design.

From several cabins you can make a permanent modular structure suitable for year-round use.

If you need to place a large number of people on a small site, then you can install a two-story building.

Multi-storey buildings can be built from cabin modules to accommodate workers.

Conclusion
Cabin houses are very popular. Firstly, it is inexpensive and convenient option for temporary residence, accommodation of workers, equipment summer kitchen in a private household or utility room. Secondly, from several cabins you get quite original houses and for permanent residence. And most importantly, the cabins are mobile; if you need to move your cabin to another site or even to another city, this is easy to do by hiring a truck.
A change house is small house, which is easy to transport on a truck trailer. The change house is used as temporary housing for builders, or a garden (dacha) house during the construction of a full-fledged dacha. The advantage of a homemade cabin is that it is inexpensive and provides at least a minimum level of comfort, so it is well suited for temporary living. There are wooden and metal cabins, read about the latter on this site. The cost of cabins that can be bought on construction market or in stores, starts from 30 thousand rubles (size 2x3 meters), so many people prefer to make a change house themselves. This will not only save at least a third of the amount, but also make the change house more convenient for yourself. In this article we will talk about building a cabin with your own hands from the most available materials.
How the change house works
Any change house consists of the following elements:
- frame;
- roof;
- exterior decoration;
- insulation;
- interior decoration;
- window;
- doors.
Frame

The frame is the basis of any shed; it is what determines its size and shape. The strength of the cabin, its ability to withstand wind and any other loads depends on it. To make the frame they use different materials- from debarked logs to galvanized steel profiles, but the most popular material remains sawn dry board 25 mm thick and 100 mm wide. To create a frame 6 meters long and 3 meters wide, 60–100 meters of board are required, which is 0.15–0.25 meters³.
With the average cost of such a board being 10 thousand rubles, 2.5 thousand rubles are enough for boards for the frame. Metallic profile and wooden beams are much more expensive. And the cost of ready-made cabins of this size starts from 40 thousand rubles.
Roof

The roof is made of dry boards 25x100 mm. To create a gable roof 1 meter high for a cabin 6 meters long and 3 meters wide, 100 meters of boards are enough, which will cost 2.5 thousand rubles. This board is used to make triangles that form the ceiling joists and roof rafters. For a cabin 6 meters long, 7–8 such triangles are enough. From above, the triangles are connected by one board - a ridge. After this, the resulting roof frame is sheathed with the same board or OSB sheets (oriented particle board). The board is stronger, but more expensive.
If gable roof is perceived as unnecessary luxury, then they do pitched roof, the cost of creating which is a quarter less. Such a roof consists of triangles formed by the ceiling joists, the gable wall and the roof rafters. Then the roof frame is also sheathed with OSB sheets or boards. After completing these works, the roof is covered with a roofing, which uses the following materials:
- roofing felt;
- slate;
- roofing iron;
- galvanized iron;
- metal profile.
Exterior decoration

For exterior decoration they use the most various materials. The most popular are:
- roofing iron;
- plastic and metal siding;
- moisture-resistant plywood or OSB;
- clapboard board.
Each material has advantages and disadvantages. Roofing iron is very cheap, but wooden frame under strong wind starts to rattle. Plastic or metal siding is durable and beautiful, but is much more expensive than any other materials. Moisture-resistant plywood or OSB are inexpensive, but they must be treated with water-repellent compounds at least once every two years. The lining board creates a beautiful and stylish appearance, but is expensive and requires treatment with hydrophobic compounds at least once every 2–3 years.
Insulation

To insulate a cabin, use:
- Styrofoam;
- foamed cellophane;
- mineral wool;
- polyurethane;
- ecowool;
- wood concrete;
- fiberboard
Interior decoration
- For interior decoration the following are most often used:
- Fiberboard (fibreboard);
- drywall;
- carriage board.
The finishing material is chosen based on the desired interior of the cabin and the cost of materials.
Windows and doors
In most cases, either new or dismantled but fully functional windows and doors are used for change houses. Such windows and doors can be purchased inexpensively at some hardware stores that accept them on consignment. It is advisable to clean a new window or used door from old paint and repaint. There is no need to paint new windows and doors.
How to make a change house - step-by-step guide and drawing
Below we will tell you how to make a change house with dimensions of 2.2x3x2.2 meters (width, length, height), one window and one door. Here are the materials you will need for this:
- sawn board 25x100 mm – 0.5 m³;
- Moisture-resistant OSB with a thickness of 9–15 mm and a size of 2.44x1.22 meters - 20 sheets;
- plywood 5–7 mm thick or fiberboard of the same thickness – 7–8 m²;
- roofing material 7–10 m²;
- fine wave slate (used in good condition) 7 waves – 5 sheets;
- used wooden window and door, completely ready for installation;
- foam insulation 10 cm thick or any other area of 32 m²;
- floor and ceiling plinth 22–25 meters;
- galvanized ridge - 8 meters;
- hydrophobic impregnation with an antiseptic (for example, Senezh OgneBio);
- brush or roller;
- self-tapping screws of various lengths;
- nails of various lengths;
- reinforcing corners made of galvanized sheet metal 0.4–0.9 mm thick.

Required Tools
You will also need the following tools:
- electric circular saw;
- drill with a set of drills for wood and metal;
- screwdriver;
- jigsaw;
- grinder with a disc for stone;
- extension;
- electric generator (if it is not possible to connect to a 220 volt network);
- tape measure 5 meters long;
- hammer;
- axe;
- chisels;
- stapler;
- sharp knife;
- wood hacksaw;
- pliers;
- level;
- square;
- protractor;
- pencil;
- construction tape.
Step-by-step instruction
- Cut the following elements from a 25x100 mm board:
- vertical posts 230 cm long – 12 pcs;
- floor joists 220 cm long - 7 pieces;
- ceiling and roof logs 260 cm long – 7 pcs;
- roof rafters 3 meters long - 7 pieces;
- roof supports 120 cm long - 7 pieces;
- vertical roof posts 20 cm long – 7 pcs;
- cross boards 305 mm long – 7–8 pcs;
- cross boards 220 cm long – 15–20 pcs.
- Treat all cut elements with hydrophobic materials. Perform the same operation with other wooden parts, which you will cut from boards, plywood, fiberboard or OSB.
- Place two vertical posts on the ground parallel to each other at a distance of 220 cm from each other (measure the distance from the far sides). Place the ceiling joist along one edge so that it protrudes the same distance in both directions.
- Using a square, align the boards relative to each other so that all angles are equal to 90 degrees.
- Nail the ceiling joist to each board using nails 70–90 mm long. The nails must go right through.
- Step back 15 cm from the bottom edge of the vertical posts and lay the floor joist.
- Align all corners with a square and nail the joist to both vertical posts nails 70–90 mm long.
- TO leading edge ceiling joists, place the vertical roof post at an angle of 90 degrees and nail them with two nails 70–90 mm long.
- Connect the top of the vertical roof post and the back of the ceiling joist using a rafter so that the top edge of the rafter runs along top corner ceiling joist and the outer corner of the upright, then nail in place.
- Install a support from the corner between the ceiling joist and the vertical roof post and rafter, then nail it in place.
- Turn the structure over and use pliers to bend the ends of the protruding nails into an “L” shape.
- Have a helper hold the head of each nail with an ax so you can drive the bent nails into the boards. Do not try to simply bend the nails with a hammer, this type of connection is very fragile, be sure to bend their ends in an “L” shape first.
- If necessary, cut off the protruding piece of the lid support.
- You need to make 5 such structures. Then make two more structures, but without the front vertical post; you will place them where you will install windows and doors.
- Determine the most comfortable spot installation of cross boards. We recommend placing the bottom board under the door so that the door rests on it, placing the top board directly above the door, and the middle one approximately between them. Another option is also possible, for example, placing the bottom one directly above the floor joists, the top one directly under the ceiling joists, and the middle one between them.
- Mark the locations for them on each structure and select a groove for their installation. To do this, use a jigsaw to cut 25 mm deep cuts at the end of the vertical board, the distance between the cuts is 100 mm, then carefully chop the wood with a chisel. If for some reason it is impossible to make such grooves, then double the number of transverse boards and nail them directly to the ends of the vertical posts, with the exception of the boards passing through the window and door.
- Place each structure vertically (as it should stand in the frame of the house), level it and nail a cross board to it.
- Nail the side cross boards to the vertical posts at a distance of 30–40 cm from each other.
- Nail vertical boards at 50 cm intervals to the side transverse boards; they will create a frame for interior decoration and insulation.
- From inside the change house, nail braces to the transverse boards, installing them at an angle of no less than 30 and no more than 60 degrees, which will increase the rigidity of the structure. It is advisable to install at least 2 braces on each wall. Length optimal length braces 80–120 cm. Use nails 70 mm long to fix the braces and bend them as described above.
- Place the change house on its side and hem the floor joists from below with plywood or OSB with a thickness of at least 6 mm. This is necessary for laying the insulation, then install the change house normally again.
- To insert a window and door, nail horizontal spacers to the vertical posts (they must be installed level), the distance between which is 2–5 mm greater than the height of the window and door frames.
- Insert windows and doors, support their frames with wood chips and make sure that the panel and sash open and close normally. After this, secure with self-tapping screws. To do this, drill holes in the horizontal boards of the box according to the diameter of the self-tapping screws, and in the spacers, drill holes with a diameter 2 times smaller than the diameter of the self-tapping screw. Then tighten the screws and make sure that the door leaf and window frame open and close normally.
- From the inside of the cabin, line the ceiling with OSB sheets, then tightly lay insulation on these sheets from the roof side.
- Lay a 25x100 mm board decking on the roof joists. We recommend using solid flooring when there are no gaps between the boards. It is more expensive, but it provides better warmth and sound insulation.
- Lay sheets of roofing felt over the flooring and secure them with a stapler.
- Lay slate on the roof.
- Cover the gable with a 25x100 mm board, laying the boards without gaps. Drill 6–8 holes with a diameter of 20 mm in the lower gable boards; they will ensure sufficient air movement for ventilation.
- At the front and sides, cover the joints between the pediment and the slate with a galvanized ridge.
- Sheathe the outside of the change house with OSB sheets, trying not to allow gaps larger than 0.5 mm. If cracks appear, they will need to be sealed with putty made from PVA glue and sawdust.
- Cut the foam to size and insert it from the inside of the cabin into the space between the vertical boards and secure it with construction tape. Then line the space between the floor joists with foam. Sew the floor with a 25x100 mm board. If it is possible to cover the floor with a thicker board, take advantage. Lay OSB over the floorboard.
- Sheathe the inside of the walls with OSB.
- Install the sex and ceiling plinth. If necessary, you can install plinths in the corners to hide the cracks.
- Treat the inside and outside of the cabin with hydrophobic agents and fire bioprotection.
Conclusion
Now you know what tools and materials are needed to build a shed, so with minimal construction and carpentry skills, you can build a shed yourself. Is our step by step guide By self-construction change house will help you avoid many mistakes and severe waste of material.