Products made from plywood for sawing. Sawing from plywood. What if you use wooden blanks?

Read also
Any building materials are adjusted to the required dimensions by cutting. And plywood is no exception. Sawing plywood can be done manually or using special tools. Cutting plywood involves not only using it in construction, but also as a decorative element. Lace lattices, boxes, stands and other variety of decorative items are created using artistic cutting of a plywood sheet.
Construction cutting of plywood
How to cut plywood on a construction site and how to do it without chipping? Most often, at home, a knife, jigsaw, or circular saw is used for this.
Some rules for working with plywood sheets:
- thin sheet, the thickness of which does not exceed 2 mm, can be cut with a mounting knife
- sheets from 3 to 6 mm can be cut with a jigsaw
- if the sheet thickness is more than 6 mm, you will need a circular saw
- remember that coniferous timber has a viscous structure due to the presence of resins, so this material dulls the cutting edge of the tool
- You need to work with plywood along the grain. If it is necessary to cut across the fibers of the outer layer, you must first make weakening cuts with a knife, and then work with a jigsaw
- if your work involves screwing in self-tapping screws, then before doing this you need to drill a hole of the appropriate size.
Figure cutting from plywood
Shaped cutting of plywood is a fairly popular activity among decorators and furniture makers. Using a plywood sheet and special tools, you can make not just a craft, but a real work of art.
The choice of tool for this procedure depends on the complexity of the pattern and the thickness of the plywood sheet. If the bend radius does not exceed 1 cm, then you can use a hand jigsaw. A round hole is made using a drill. When the bending radius exceeds 3 cm, you should use an electric jigsaw. Which saw is suitable for plywood? Remember that the finer the saw teeth, the smoother and more complete the cut edges will be. For this purpose, for very small and complex figures it is better to buy a metal canvas.
It is better to apply the sketch on the back side of the sheet. In this case, if the chips rise, it will not be noticeable. At the same time, you should not rush, because the quality of the future product depends on the drawing. Drawings for cutting out plywood are available in large quantities on the Internet. Here you can find everything: from children's crafts to the most complex patterns.
You can create a craft from plywood using the following tools:
- hand jigsaw
- laser machine
- electric jigsaw
- CNC milling machine.
Sawing with a hand jigsaw
For this work you will need the following tools:
- saw for plywood. You may need several files of different sizes
- pencil and ruler.
Start with a simple drawing. If you have a 5 in drawing, you can apply the pattern to the sheet with a simple pencil. If you are not very good at drawing, use carbon paper to transfer the pattern. For the first time, animal figures, flowers and other light designs are perfect.
Before starting cutting, it is necessary to secure the plywood sheet with a special machine to prevent the occurrence of defects, for example, in the event of the sheet shifting. However, if such a machine is not available, try to hold the sheet as tightly as possible. During cutting, only the jigsaw moves.
If you need to create through elements, you should use an awl. The file must be held strictly perpendicular to the sheet. At the end of cutting, it is necessary to sand the edges of the product with sandpaper.
Laser cutting of plywood
A laser machine burns a pattern onto the surface of a plywood sheet with a beam.
The main advantages include:
- the quality of the cut is the highest, the thickness is the smallest. Such indicators are quite difficult to achieve with other types of equipment.
- saving time and effort. No need to handle defects that occur when working with a manual or electric jigsaw
- high accuracy. All parts will be the same size, and the design may be the most complex.
 Among the negative qualities we highlight:
- In case of excessive power, charring of the material may occur, as well as fire. Experienced craftsmen should work with such machines
- Each type of timber and type of adhesive composition requires its own processing mode
- if the machine operator is inexperienced, the beam may hit a knot, which is likely to fall out, and, consequently, there will be a defect in the work.
If we do not take into account the human factor, then we can say that laser equipment provides enormous opportunities for bringing design ideas to life.
Using a milling machine
The main advantages of this method:
- high speed
- There are no charred elements, as is the case with a laser machine. This machine is best used by beginners
- high precision, as with a laser machine
- there is no need to process or sand the edges.
Using a jigsaw
It is worth noting that jigsaw files are fragile and can only be moved in a strictly vertical plane. Any distortion will cause the fabric to break. The saw functions when moving downwards, and the saws are positioned in the same way, with the teeth downwards. When working with complex areas, it is the workpiece that is scrolled, and the blade should remain in one place. In the case when the outer perimeter does not contain difficult patterns that could be damaged while working on the internal scheme, then you can start working from the outer perimeter. This way you will lighten the weight of the workpiece.
 It is imperative to control the temperature of the canvas. The file tends to heat up quickly, and overheating causes damage. For this reason, it is worth letting the nail file cool from time to time or changing it to another one.
In this article we tried to answer the question: how to cut plywood? Cutting plywood is more labor-intensive than cutting wood. This is mainly due to the multidirectional nature of the fibers and viscous adhesive mixtures. However, with the right equipment, these problems can be overcome with ease.
Openwork saw-cut ornamental carving is perhaps the most beautiful type of artistic wood processing. The cutting carving technique involves preliminary marking of a flat surface, on which patterns are subsequently cut out using a jigsaw. The result, as a rule, is beautiful openwork lace, although here everything depends only on the imagination of the master.
Unfortunately, these days many people consider it more advisable to buy a ready-made craft than to make it with their own hands. However, mass replicated production does not know such a thing as “exclusive”.

And many of us would like to put something original on our shelf that no one else has. And the most obvious way out is to make such a product yourself, which we will talk about in this article.
Jigsaw cutting technology
Probably, few people did not pick up a jigsaw during labor lessons during their school years. And those who not only held this tool, but also tried to cut something out with it, were probably convinced that it is quite difficult to achieve high-quality crafts using a hand jigsaw. Only the most diligent and assiduous manage to become true masters of their craft.
By cutting out shape templates from plywood, over time you will be able to move on to more complex patterns that will require more precision from you in your work. However, in order to learn all the intricacies of this craft, you must first master the basic principles of work.
Tools and devices that will be useful at work
- First of all, you will need the jigsaw itself.. The price of this tool is low because it has a very simple design.
It consists of the following elements:
- Frame. Made in the shape of the letter "P". It comes in both metal and wood.

Advice!
The metal frame can be tubular (tube-shaped) or plate-shaped.
A tubular frame is preferable because it ensures even tension on the saw blade.
In addition, the length of such a frame is greater, which ensures cutting out more distant edges.
The wooden frame has a screw for fixing the saw. The metal frame has no screws.
Advice!
To ensure the quality of the metal frame, it should be tested for elasticity.
To do this, you should pull it tightly with both hands, hold it in this position for about two minutes, and then smoothly release it.
If the distance between the clamps is restored, the frame is of high quality.
- Files. Today you can find a wide variety of jigsaw files on the market, but for your work you will only need two: with a fine and a medium tooth. Fine-toothed files are used when forming small ornaments with sharp turns of lines. Coarse-toothed ones are needed for cutting carved slots, large holes, etc.
Advice!
When fixing the file on the jigsaw, make sure that the teeth “look” down.
- To adjust the part, you should stock up on a sharp knife and needle files: flat, rhombic and round.

- Wooden sawing table, strengthening of which in the workplace is carried out using a clamp. It is necessary when cutting out small ornaments.
- An awl for making punctures.
- Old copy paper(for a not too intense print) is useful when transferring the design to the surface to be processed.
- Sandpaper I drank to clean the places.
- Carpenter's glue for making crafts.
Features of cutting with a jigsaw
Carrying out sawing work is carried out in several stages:
- Templates for cutting from plywood are selected. These days you can find them anywhere: from specialized magazines to pictures, including on our website. Many craftsmen also use patterns from knitting or embroidery magazines. (see also )

- transferred to paper using carbon paper.
- Next, all the places intended for sawing are cut out in the paper pattern.
- The pattern is applied to a sheet of plywood and transferred onto it using a pencil.

- The pattern is cut out with a jigsaw.
- The product undergoes decorative finishing (sanded with sandpaper, opened with varnish, or assembled from several parts, etc.)
Let's get started
The following instructions will help you avoid making mistakes when cutting:
- Sawing should be started only after all the punctures have been made in the workpiece, since the workpiece will lose its strength during operation (drop-out contours are removed). A “weakened” sheet may break when punctured. Holes are pierced in all places where “closed” patterns are present.
- Punctures are made with a sharp awl. It is impossible to pierce all plywood layers at once, since in this case the bottom layer will crack. The puncture is done as follows: we make a hole so that only the tip of the awl comes out on the other side. Then we turn the sheet over, expanding the hole on the opposite side.
- Sawing obtuse angles is done by turning the sheet in place. Having finished cutting to the top of the corner, stop pushing the sheet onto the file, while continuing to move the jigsaw. When you feel the file move more freely, turn the sheet in the desired direction.

- We cut out templates from plywood only with the correct fit and positioning of the hands. If the fit is incorrect, the saw blade deviates from the vertical. You can check the correctness of the cut as follows: when after, insert it into place from above. If it inserts without effort, the cut is perpendicular and you are doing everything correctly.
- Sharp corners can also be sawed out, but in this case the file should be slightly pulled towards itself to avoid excessive rounding.
Conclusion

In this article we looked at the basic principles of openwork sawn carving. With this knowledge, you can, with due diligence, cut out a design of any complexity from plywood. In the video presented in this article you will find additional information on this topic.
Similar materials


You can make so many decorative items and useful little things from carved wood and plywood that it is stupid to limit the scope of the work. In fact, it can be absolutely everything that your imagination allows for: boxes, covers for decorative and collectible books, lampshades, panels, shutters, furniture elements, trim, cornices... But the most attractive thing about creating exclusive works is that anyone can do them willing, if he puts in a certain amount of effort.
Wood carving: photographs, drawings and sketches
The main key to success in creating interesting things with slotted carvings is the choice of pattern. It is he who conveys the overall concept and sets the aesthetic tone for the entire product.
The easiest way for beginners is to make geometric patterns, as in the photo.


Carved designs of floral and animal themes are classic ornaments for any field of application.


Inscriptions are a modern version of the use of wood and plywood carvings. At the same time, you are unlikely to be able to find drawings and sketches on the Internet - they will have to be compiled purely individually according to personal requirements for sizes, fonts, and words.

Stencils for slotted threads
However, unlike cut-out inscriptions on plywood, drawings with plant, animal and fantasy themes can be found on the Internet. So feel free to choose the stencils you like for your album, and you’ll have plenty of ideas for creativity for a long time!
The simplest sketches are suitable both for training at the very beginning of product manufacturing, and can become individual elements of a complex design. For example, this is how carved houses are decorated.


More complex templates will require some skill and patience, but the results are worth it. Such pictures can serve as an independent product, even as a gift.


Entire compositions with an idea and meaning usually serve either as a separate work or form the basis of a work.


Tools for slotted carving: jigsaw or router
However, choosing a design is only a third of the success. Another important aspect that must be considered before starting the work itself. Namely, the choice of tool that will be used to carve wood or plywood.
Depends on the equipment:
- how thin the thread will be;
- complexity of pictures;
- cutting speed;
- accuracy of work.
Therefore, it is important to evaluate all the pros, cons, capabilities and limitations of each of the traditional sawing tools:
A jigsaw is a device for shaped cutting of parts. Working with a hand tool is quite labor-intensive, but it allows you to cut very accurately according to the drawing. Power tools allow you to quickly produce shaped plywood products, but require caution.

A milling cutter is a tool thanks to which flat-relief slotted threads acquire a thinner and more complete appearance. It is with its help that you can round edges, remove chips, make valances, and carry out the most complex cutting.

Theoretically, a milling cutter can do the same work as a jigsaw, and even more, but in fact, such handling of the tool is fraught with its rapid failure and frequent replacement of the frieze.
Materials for slotting threads
In most cases, plywood is chosen for this type of work - it is uniformly thin, has a pleasant color and structure, and does not suffer from further use or storage, unlike solid wood. It is the choice of material that becomes the third pillar of successful work.
The modern market is replete with different types of materials, so it’s easy to get confused. For this work you should choose:
- FC plywood - harmless to humans and the environment, durable, easy to cut, practical;
- FB plywood is also safe for humans, but resistant to aggressive environments, since it undergoes special processing and receives a protective coating, which is why it can cost an order of magnitude more.
Note! Under no circumstances should you choose FSF class plywood for interior work - it is treated with carcinogenic preservatives and is suitable for use only in the fresh air - they are excellent for lining a bathhouse or a house outside.
Photos of carved wooden houses
For Russia, slotted carving is of particular importance as a decoration for building facades. Since ancient times, ornaments carved on birch bark and other similar materials have been decorating huts, bathhouses, and churches, as photographs colorfully demonstrate.


Video of wood milling with a hand router
If you have just decided to try your hand at curly slotted carving, it would be a good idea to watch a video with a master class. It will help you better understand how drawings are created and how such home beauty appears.
Carved platbands serve as an incredibly beautiful decoration for wooden residential buildings. The owner can make such elements with his own hands, which will add individuality to the residential building. The part has its own characteristics. One side of the casing is straight. The second is a figured carving.
DIY carved wooden frame
The framed windows on the façade evoke memories of grandma's house in the countryside. The structural element - the platband - serves as reliable protection from drafts, noise, rain, snow and dust. It completely covers the gap formed between the window frame and the opening. The carving gives the part an attractive appearance. The whimsical pattern can be modern or borrowed from ancestors.
The master must first decide on the method of manufacturing the platbands:

If desired, the master can combine two different types of carvings together.
Repair of dilapidated platbands
If the owner of a summer cottage inherited a house, then dilapidated frames may remain on the windows. Damaged items that cannot be repaired should be removed. Replace them with new parts. Carefully remove the layer of old paintwork.
Wood is a soft material, so it is easy to damage. How to remove old paint depends on the thickness of the layer and the presence of damage. If the previous paint coating is thin, without cracks or blisters, then the surface of the wood is treated with sandpaper to remove the gloss and painted with appropriate paint.
 The process of repairing carved platbands
 When the surface has been painted in several layers or there are swellings and cracks on it, then the coating cannot be left. It is scraped down to the wood with a metal spatula.
The thin layer of old paint does not need to be completely removed.
It is also necessary to remove paint from wood when you plan to use another type of coloring composition. When incompatible substances interact, they destroy wood and coatings. To protect the wood, coat it with a special primer and apply new paint. 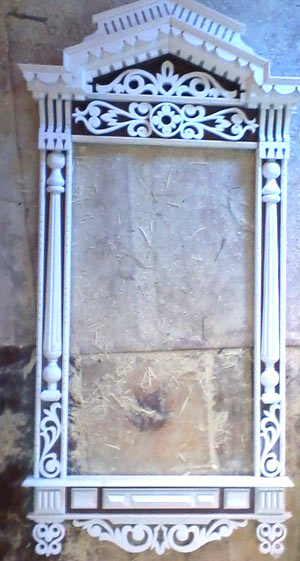
Preparatory stage
Prepare the necessary tools and materials for slotted carving:
- planed edged boards from coniferous trees with a thickness of 18 - 20 mm;
- a simple pencil;
- carbon paper;
- jigsaw
Instead of a jigsaw, you can choose a set of chisels and knives, but an electric hand tool has a number of advantages:
- house carving is performed quickly, accurately, and with high quality;
- compact dimensions;
- light weight;
- the ability to make straight and curved cuts;
- making round and rectangular holes with different diameters.
Professional carvers note that a universal jigsaw is convenient and easy to use. When choosing a tool, power is of paramount importance. Using a household jigsaw you can cut wooden trims for windows with a thickness of less than 70 mm.
Read also
Decorative carved panels
 Carved window casing ready for painting
 The professional model has more capabilities: a jigsaw cuts wood with a thickness of 80–135 mm. The cost of high-performance tools is influenced by the presence of additional functionality.
What equipment is required to work with a jigsaw?
The following items are often included with a jigsaw:
- replaceable files;
- several screwdrivers;
- lubricating fluid;
- storage case.
The master will also need a table on which the tool will be mounted at the workplace. This handy tool lets you move the material instead of the jigsaw. This is necessary when processing small parts. By attaching a replacement plate to the support platform, optimal gliding can be achieved.
Carving with a jigsaw
The process of manufacturing carved elements is carried out in several stages: 
Making a sketch
The jigsaw begins only when the master has prepared the templates. Those who are trained will help you execute exactly what you want on wood. Take your time to get to work on wood as quickly as possible. Let you have not one sketch, but several. Sculpt the pattern to feel its volume. When choosing a design, you can start with simple elements of an openwork pattern, characteristic of slotted carvings in Russia.
Look for inspiration in the contemplation of immortal masterpieces of folk art. You can look at samples if you look at furniture in the Baroque or Rococo styles. Select a sketch of a baroque ornament used by Russian master carvers. The pattern depicts national characteristics. Rococo motifs include motifs of plant elements, small birds, curved shells, and fancy curls. 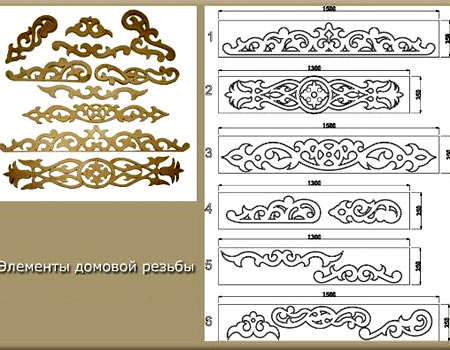
in any of the above-mentioned styles involves the preparation and execution of complex technical compositions for window decoration. House painting contains all the richness of traditional patterns.
Any woodwork is available to skilled craftsmen today.
Modern CNC machines do an excellent job of bringing a sketch to life. With the help of high-precision equipment, any design idea can be easily realized.
Multifaceted and sophisticated elements can cause admiration among others. House carving can be represented by a combination of different types. In order not to spoil the future product, be sure to use templates or stencils to make markings. House paintings from the past are a rich source of inspiration, in which you will find all kinds of Russian ornaments.
Creating a template is the best option
In the process of making a template, the following steps are distinguished:

Select a file and install it in the tool
Never use saws designed for working with metal.
Buy wood saws for window frames in advance. It's better to take the whole set. These parts can quickly wear out and break.
 A selection of sketches for carving platbands
 It is difficult to cut according to the intended markings with a jigsaw with a narrow file, but with it complex shapes will be obtained accurately. The quality of the cut and the lifespan of the jigsaw file depend on how correctly the file was installed. The tension should be optimal.
Please note which files you don’t need to buy for a jigsaw:
- The nozzle is selected in accordance with the maximum possible length of the cutting part for a specific jigsaw model.
- Do not buy files with kinks. House carving will be of poor quality due to the bending of the blade of the cutting part. The quality of the cut will deteriorate or it will become impossible to make it completely.
Patterned cutting of plywood is one of the most beautiful works of art, which contains grace and lightness. At the same time, in order to translate your ideas into a finished product, you practically do not need to resort to any expensive equipment - in most cases, having a jigsaw and the desire to create is quite enough. With the right approach, acquiring initial skills is not as complicated a procedure as it might seem at first glance.
The main role in the process of cutting patterns from plywood is played by the ability to use a jigsaw, as well as the properties of the material used. Also, a lot depends on how well the drawings for cutting out of plywood are copied - only through a correctly transferred sketch can you turn an ordinary sheet of plywood into a real work of art.

 Sides - drawings for cutting out a box from plywood with a jigsaw
 This article will provide you with detailed instructions on how to learn how to cut basic shapes from plywood with your own hands. Having mastered cutting simple drawing lines, you will understand the basic principles of this process - in the future you will not have any difficulties mastering the next levels of skill. It will also describe the most common methods of transferring drawings to workpieces.
Basic shape cutting skills
There is also an electric modification of the jigsaw, which runs on a 220W network - its use is also acceptable, which significantly speeds up the cutting process. However, the increased weight of the tool makes it more difficult to cut smooth lines, which can be a serious drawback for a non-professional - if you are learning the basics from scratch, then it is much more convenient to use a manual analogue. 
Body positioning
The most optimal position for cutting is a sitting position - cutting while standing is quite tiring. The workbench (work table) should be low enough so that you can sit with a straight back.
To reduce the load on the working arm, you can place your elbow on your knee - this way it will get less tired. Ideally, the workplace should be fully adapted to the above requirements.
Tool
To perform shape cutting you will need:
- Jigsaw complete with file– the main tool for cutting;
- Awl or drill with a fine tip– to create initial holes;
- Set of files, needle files and sandpaper– for processing edges;

Basic moments
Before you seriously think about the question: what can you cut out of plywood with a jigsaw? — you should pay attention to the main features of this process, failure to comply with which can lead to damage to the tool and uneven cuts.
- The position of the jigsaw must be strictly vertical - the sawing movements must be carried out up and down. Even a slight tilt of the jigsaw will make the cut oblique and the file will “lead”;
- The sawing movement should be carried out smoothly, without excessive force and pressure - this can damage the file and cause it to break;
- When cutting out the internal contours using an awl or drill, an initial hole is created into which the file is installed and only after that it is fixed. When positioned correctly, the teeth should face toward the bottom of the holder;

- The file must be well secured and tensioned - this is a prerequisite for the normal operation of a manual jigsaw. If the blade is not tensioned enough, the cut will have a wavy structure, which will make the work impossible;
- Vibrating the plywood during the cutting process is unacceptable - this will lead to chips and breakage of the blade. If the sheet is thin and small in size, you need to use a wooden block with a cut, which is fixed on the workbench;
- As the teeth of the blade cut through the wood, the sheet of plywood should be moved towards the jigsaw. The jigsaw must be kept in a strictly vertical position throughout the cutting process.

Sawing simple shapes
Smooth lines
There is no need to apply additional effort or create pressure - continue to saw smoothly, returning the jigsaw to a vertical position until the blade levels itself.
Acute and obtuse angles
 Obtuse corners - drawings for beginners for cutting out plywood with a jigsaw
 To cut obtuse corners, you need to master the “turn on the spot” technique - after cutting to the corner, stop moving the plywood and start turning it, without ceasing to cut, until you reach the required degree. You can cut sharp corners in the same way, but in some cases this is not possible - in this case, the method described below is used.
One of the sides of the angle is formed, then a small loop is cut along the outer contour of the line, through which an acute angle is formed as in the figure below. 
Internal corners are cut out as follows:
- A hole is made with an awl or drill - the cut begins from there, which continues to the top of the corner.
- Then the blade returns along the cut to its original position.
- After which a small hole is cut out, in which the file unfolds to form the second side of the corner.
 Plywood drawings for cutting with a jigsaw - sharp corners
 Transferring a drawing
Almost all patterns are transferred to plywood from a paper sketch - in most cases this process cannot be avoided. The cheapest option is to use tracing paper - with its help, the drawing is transferred from the paper to the workpiece.
Its price is quite affordable, but the process itself is quite labor-intensive, since each line has to be traced with your own hands.
A less labor-intensive way to transfer drawings for cutting out plywood with a jigsaw is to use a projector, through which the image will be projected onto the workpiece. This option is also suitable for cases where the initial image size is not large enough and cannot be transferred without first enlarging it.
Note!
This method, although it has a place in modern practice, is outdated.

One of the most modern options is the use of self-adhesive sheets of paper, onto which the desired sketch is applied using a printer, after which they are glued to the workpiece.
The paper adheres quite tightly to the plywood, and its presence has practically no effect on the cutting process. The only disadvantage of this method is the relatively high cost.
Bottom line
Our guide will help you master the basics of this skill, which will later allow you to move to a more professional level. In the video presented in this article you will find additional information on this topic.
Similar materials


