A new one from the old Soviet wall. How to remake old furniture with your own hands, visual examples before and after. Wallpaper or film
The history of the chair... and the table
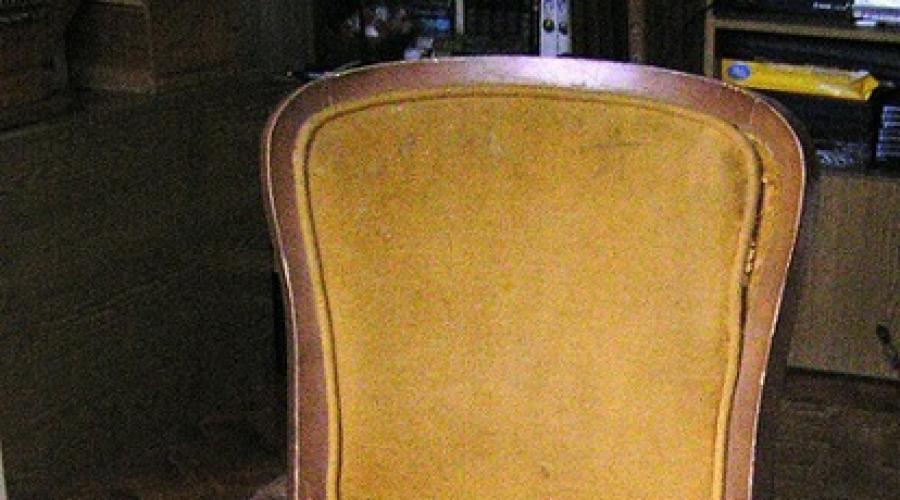
In a way known to all “remodelers”, namely, from the trash heap (!), a chair came to me, I waited a long time for resuscitation followed by “tuning”, and well, I waited: I sanded it, puttyed it, painted it. The chair, frankly speaking, was in good condition, nothing creaked, did not fall apart, the springs were in place, appearance, of course.... But this can be fixed! I corrected it. I decided to make a completely “outrageous” thing out of it - bright, catchy, contrasting with my very restrained white and gray interior. I bought bright tapestry fabric for the upholstery, decorative cord, and painted the back and legs with contour paint (for glass and ceramics from TAIR). After finishing the work, it became obvious that something needed to be “paired”... An Ikea table with bent legs was purchased and subjected to the same alteration. I admire it.
Photo:
2 - chair before alteration
3 - back with traces of someone's activity
4 - grinding, putty
5 - back of the chair. Fragment of the painting
6 - chair legs. Fragment of the painting
7 - desk drawer. The handle was replaced with a porcelain one
8 - bottom shelf of the table. A little painting + tapestry napkin
9 - table legs.
10 is the total.
2.
3.
4.
5.
Often people don’t even think about how many pieces of furniture are nearby that are amazing in beauty and execution. Dilapidated chairs, tables, chest of drawers, inherited or bought for pennies, old sofa or a chair never fits into the interior modern apartment, so they often become a burden and are sent to the country. At the same time, a relatively simple refurbishment of old furniture, which only takes a couple of weekends, will return the rarities to their former shine and beauty. If, of course, you know how to properly handle such items.
What can you do with old furniture?
Until recently, old furniture was of interest only to connoisseurs, collectors and professional restorers. Today, remodeling interior items has turned into a colossal business, the existence of which many are not even aware of. Therefore, before throwing away or sending old furniture to the stove at the dacha, you can try your hand at restoring and remaking old items, at the same time increasing their value by an average of 10 to 50 times.

It goes without saying that high-quality alterations and restoration require considerable knowledge, work skills and special tools. However, even for a non-professional restorer, remaking furniture with your own hands is quite an affordable activity, but in a slightly shortened version:
- If the old structure has retained the strength and main details of the cladding and load-bearing elements, you can restore the paintwork, reupholster and remake upholstery and replace wooden parts, hidden from view;
- If the objects being restored are in terrible condition, missing covering elements, cladding, legs, drawer faces, tabletop surfaces can be restored and remade using modern materials. In this case, you will get antique furniture, with obvious signs of a remake, but retaining the features of old rarities;
- Complete refurbishment of old items. From old tables, chairs, chests of drawers, cabinets, only the frames and drawers are preserved; everything else must be radically remade into stylish and modern furniture.
Any work on restoration and alteration of old interior items requires a separate, dry and well-ventilated room where the wood can be varnished and dried without the risk of harming the health of household members.

Important! The most difficult stage is reupholstery upholstered furniture, upholstery of chairs, sofas, ottomans. It is best to entrust such work to an experienced craftsman.
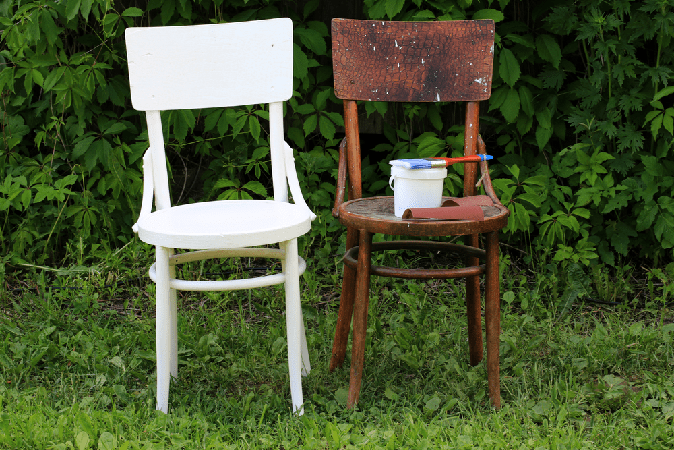
The simplest option for remodeling furniture is known to almost everyone. This is re-gluing the surface of old cabinets, sideboards, furniture walls, kitchen furniture Soviet-made laminated films. Old varnished surface furniture boards made of chipboard have long faded and lost their attractiveness, so remodeling with film will significantly refresh the appearance. It is enough to buy a self-adhesive film “for water”, stock up on a stationery knife, a set of rulers, a spray bottle, a dry cloth and a place for cutting the film.
We remodel the cabinet in the following sequence:
- We free furniture from drawers and accessories;
- For each item, we cut out our own film pattern, with an allowance of at least 3-4 cm per side;
- Wipe off old surface from dust, spray it from a spray bottle and carefully stick the film on;
- Using a napkin, carefully squeeze out air bubbles, as when gluing wallpaper.
For the most persistent bubbles, the film can be pierced with a needle. After drying, we install handles, fittings and return the cabinets and doors to their place. This method of remodeling old furniture will take a maximum of one weekend day.
Options for remaking old furniture
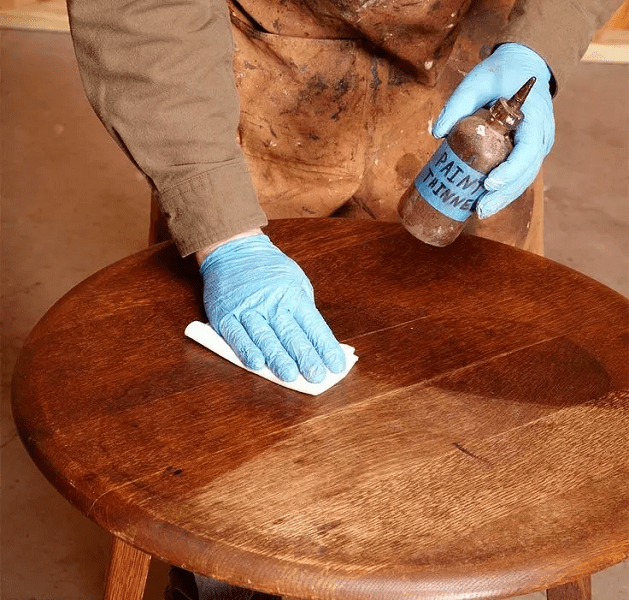
The easiest way to work with old lacquered furniture is to remodel and restore a chest of drawers, coffee table or old chairs much easier and more affordable than you might imagine. To work with old paint and varnish coatings, you only need to remove the old varnish, polishing paper, high-quality varnish or paint, and sometimes repair compounds for veneer surfaces. It is worth making a reservation - only furniture made from solid wood or prefabricated structures lined with natural sawn veneer are subject to radical alteration. Any furniture made from chipboard cannot be restored; the maximum that can be done is to cover it with film.
We restore old wooden furniture, chairs, cabinets, tabletops
First of all, it is necessary to disassemble the piece of furniture as carefully as possible and remove any contaminating paint or varnish residues.

The easiest way to remove old varnish is in three ways:
- Chemical remover, most often a mixture of acetone, alcohol and 647 solvent;
- Clean with sandpaper;
- Heat with a hairdryer and carefully scrape off with a sharp knife, then sand by hand. sandpaper.
For your information! As a rule, old furniture is subject to repeated painting over a long life, so the most difficult thing in such a remodel is to carefully remove the old paint and varnish.
If you do everything carefully, then even a child will be able to do the further part of the remodeling. Will need to cover wooden surface varnish, preferably under mahogany or ebony.
When restoring countertops, the most common defect is a chip on the edge of the polished surface. In the old days, the defect was filled with acrylic paste and painted with alkyd enamel. It is clear that such a rework is tantamount to destroying the table, so it is easier to restore the old polish with a special tool.

Often, during a remodel, it is necessary to replace some of the old rotted, cracked or lost pieces of furniture with new parts. For example, you can make new drawers for an old chest of drawers or cabinet.
To make the parts look old, you have to use an awl to apply marks of the bark beetle in dots, and use a bronze brush to imitate marks and abrasions.

After remodeling, the wood of the box is bleached and painted to match the old furniture.


Advice! If you do not have the opportunity to select during the rework the right coverage, then it’s better not to paint old furniture, but leave the natural, cleaned wood texture.

Sometimes during the rework you should not strive for complete authenticity of the restored copy; this can be done by professionals. If the old furniture is in extremely poor condition, then instead of an unsuccessful alteration, it is better to make an adapted version of the new furniture from it. For example, very good idea is to repurpose an old chest of drawers into a new sofa.

To do this, cut off the upper part that has become unusable - the lid and the front part, leaving only the frame with legs. After installing the stand and stowing soft pillows It turns out to be a very nice sofa.
The most successful examples of remaking old things
Not everyone can handle labor-intensive cleaning, varnishing and polishing wooden items furniture. There are two ways to simplify the remodeling process - select unusual style for a new coating or refuse to use paint and varnish materials at all. Restorers, who are rightfully considered the trendsetters of style and rules in matters of furniture refurbishment, have the most bad decision Regular painting with paints is considered, no matter what, acrylic or expensive powder compositions.
For example, old wooden furniture- a cabinet or chair, which has the style and beauty of varnished wood, after painting turns into dull monochrome trash.

The exception is black and white varnishes. If you like painted furniture, use glossy, non-bleeding white or black paints. This alteration will add style and spectacular look old furniture.
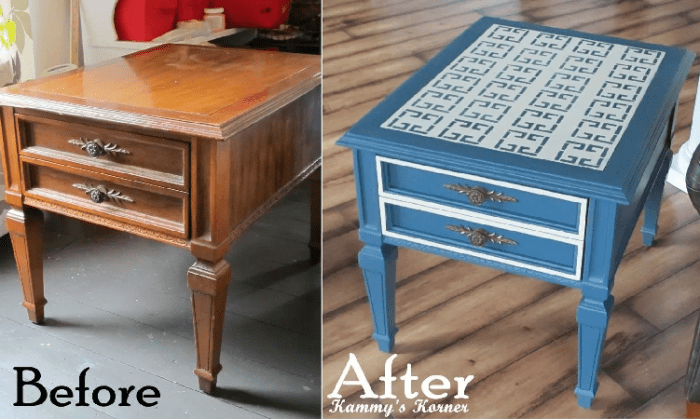
Sometimes several colors are needed to enliven the space of a room and interior, in this case good decision There will be painting, application of thematic drawings to the tabletop or front part. This will not only not spoil the item, but will also make it original. True, its price, as a rarity, will decrease several times.

The redesign option can be called ingenious old bedside table using newspaper pasting and varnishing.

Such a product can be safely put up for auction of old items - demand and positive responses are guaranteed.
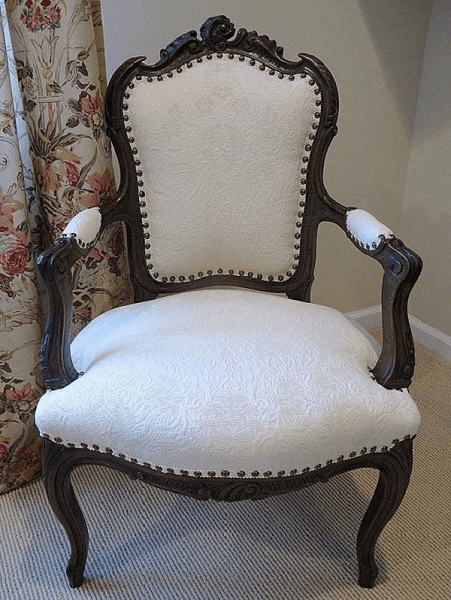
Separately, it is worth mentioning a very special category of old furniture - designer chairs with elements of carving and edges. If you still have similar items, know that they are worth reworking and being restored by the hands of a master. Firstly, walnut chairs are very beautiful in any setting and are highly prized. Secondly, any designer furniture from a famous master from the beginning of the last century can cost very good money.

Often, owners, starting with the remodeling and restoration of one chair or table, assemble entire sets of restored furniture. Interestingly, the results of a relatively simple alteration will only increase in price and value every year.
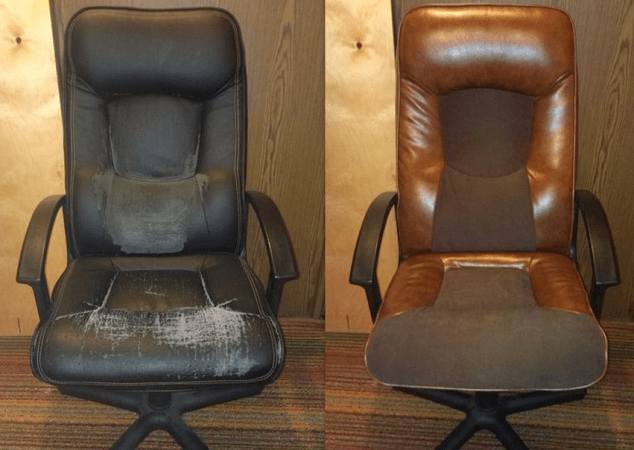
It is clear that it is not only old wooden objects that can be restored and remade. Ordinary office chair after reupholstery, it can also become part of the antique decor.
Conclusion
Restoration of old furniture does not require special equipment or technology. This is the case when the main decoration of a table or an old chest of drawers is not perfect shape or color, but the visible labor invested by people in the manufacture and restoration of an object. If you are lucky and the furniture has been preserved with minimal damage, then it is best to leave it maximum amount original details, paint coating, accessories. The furniture will only benefit from such a remodel.
Remaking old furniture is not only an interesting, but also useful activity. So, let's discover the hidden charm of discarded things with the help of our creativity and skillful hands.
Ideas for repurposing old furniture. Let's arrange the hallway.
This chest had a torn top and rusty wheels, but the seat and large space Covered storage makes it ideal for a hallway.

Primer, two coats of white paint, simple cushions, and new wheels complete the look of this refurbished chest. To make the same picture on top, paint old frame match the color of the chest, insert a piece of wallpaper inside and attach the branches with glue, which will serve as a hat hanger.
Updating an old cart.

The second-hand tea table was functional, but nothing special.

Sand, prime and paint the cart to make it look new again. After drying, make a simple pattern on it with a pencil. Cut scrapbooking paper into small pieces and then attach them to your design with decoupage glue. Apply two more layers of decoupage glue to the finished pattern.
Cover for foot ottoman.

This second-hand pouf retains all the charm of furniture from the seventies. Colorful fabric and accessories presented to the ottoman new life.

Update that boring ottoman with a fun cover. Cut a circle of fabric for the top and a strip of fabric for the sides (don't forget the seam allowance). Sew the piping along the top seam of the side fabric and the frill to the bottom. Add five elasticated top pockets in contrasting fabric. Place the cover on the ottoman. Screw the painted legs to the bottom of the ottoman.
Rescuing a broken chest of drawers.

Unsightly, used and damaged, this chest of drawers languished in a thrift store for a ridiculous price.

Give your furniture originality and modern style with paint. Paint the tabletop a bright, contrasting color to the rest of the furniture and screw in painted legs. Decorate the fronts of the drawers with a pattern using a stencil. Take out the small drawers and replace them with baskets with tags. Make open shelves out of small drawers, place patterned paper inside them and hang them on the wall.
Chair update.

This formerly excellent chair had worn parts and terrible upholstery.

New paint and fabric brought this one back to life. old chair. Remove the fabric, cut off the top decorative finishing, sand, prime and paint the chair. Once dry, add batting to make the chair even taller and upholster it new fabric. Apply the monogram to the back of the chair using fabric paint using a stencil.
Let's refresh bookshelf

The substantial but boring bookcase was functional but hid its potential.

Your bookcase will be more useful if you add a drop-down table and a door for the lower shelves. Cut the doors out of MDF, then prime and paint the bookcase and doors. After the paint has dried, hang the bottom door on the French hinges and install the horizontal opening door using hinges and chains. Screw new handles to the doors.
New lamp from old

A used tea can was on its way to landfill until it was given new life.

The design of this lamp turns an ordinary gray tin can into a bright one. decorative element rooms. Dip a paper towel into the paint and run it over the entire surface of the can. Wipe off excess paint with dry paper towel so that you can see through it original finish. Once dry, drill one hole in the center of the lid and another in the back of the jar near the bottom. Following the manufacturer's instructions, install all parts for the lamp, which can be purchased at a home improvement store. Place a beautiful lampshade on top.
Damaged TV stand

Ugly TV stands like this one are permanent goods cheap stores for the thrifty.

To turn this old, useless cabinet into a charming one bedside table, start by replacing the rollers with new ones wooden legs. Prime and paint the cabinet. Remove the doors and cover their front parts with decorative paper. Cut out the back part from plywood and cover it with paper suitable color. Screw the new handles onto the doors and hang them back on the nightstand.
Let's repurpose trays

Trays are a must-have for 60s and 70s apartments—they're a dime a dozen in thrift stores. Boring designs have little to offer a modern interior.

Repurpose old trays into artwork contemporary art. After priming them and painting them in colors that match your interior, print patterns on magnetic paper using an inkjet printer. Cut them out and glue them onto metal trays.
Remake your bed

The discarded bed had a decorative silhouette, but the finish was dull and damaged.

The bed turns into a charming sofa. Saw the bed base in half vertically to make arms for the sofa. Cut a piece of MDF for the seat and a piece for the front crossbar. Assemble all parts using screws and glue. Sand, prime and paint the sofa. After it dries, attach an ornamental decorative strip. In order to do soft base wrap the foam with batting and blanket. Or sew a cover from the bedspread to create a finished look.
Transforming an old mirror

Deep drawers and charming patterns set this piece apart, but the finish and shape are too dark and worn.

Color and patterns transform the old dressing table V small table, ideal for small room. Remove the mirror, sand, prime and paint the table. After it dries, glue the pretty paper to the fronts of the drawers and to the handles using decoupage glue.
Chair transformation

Although this chair is sturdy and well made, the upholstery and woodwork are worn and worn.

The paint and fabric give it comfortable chair absolutely the new kind. First remove the soft base. Disassemble the chair in the following order: inner back, wooden base, internal handles, external handles, external back. Prime and paint all wood parts. Using old pieces of fabric as templates, cut out fabric for each section of the chair. Attach the fabric to each part of the chair and reassemble it in reverse order. Attach an ornamental decorative strip.
Let's decorate the table

Retro table had good shape, but not a very attractive finish.

With a little paint and fabric a new original item furniture. Prime and paint the table in White color. Once dry, cut the fabric the size of the tabletop plus a few centimeters so that it can be tucked. Glue the fabric to the surface of the tabletop using decoupage glue, smoothing it with your fingers to remove any air bubbles. Once the glue has dried, wrap the fabric under the table and secure it with a furniture stapler.
Let's revive the coffee table

This table is not bad, but too provincial for a modern interior.

A simple remodel will give a country-style table a more modern look. Take out the table legs and make a paper template for the new simple legs. Cut the legs from MDF and attach them to the tabletop with screws. Paint coffee table and when dry, add a decal to the tabletop for a flirty finish.
Dressing up a chair

The ugly cane chair, out of its kit, had little chance of salvation.

Unleash the inner beauty of your chair with bright colors. Sew a fun patterned pillow using two napkins or towels. Decorate the back of a chair by attaching yarn to it fabric flowers and leaves.
Remaking a rarity

I saw and saw the old cedar wardrobe better times. The dark, unadorned façade was featureless and featureless.

Become more emotional and sensual with your transformed furniture. Make stencils big size on paper for contact copying, enlarge the words or patterns on the computer, or hand-draw the patterns onto contact copy paper and cut them out. Peel off the back and glue your design onto furniture painted white. Paint the cabinet in Brown color and let it dry, then remove the contact copy paper. Attach a bow shape to the doors and complete the design with yarn and wool.
We all come from childhood and know how difficult it is sometimes to maintain the atmosphere of tenderness and carefreeness of these times. The special charm of young years is largely formed thanks to the environment: caring parents, absence of problems, loyal friends, surroundings at home. But if it is impossible to maintain a serene mood, then everyone can surround themselves with memorable things.
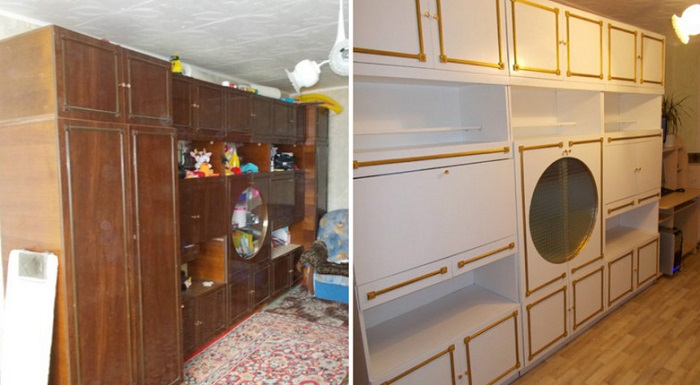
The old wall can be easily restored to normal condition using available materials, sold in construction stores.
It is a rare adult who does not have memories of an almost bottomless wall of furniture in which mothers and grandmothers carefully kept memories, packing them in boxes and hiding them behind glass. Many people still have such sets today, but the furniture, alas, not only becomes obsolete morally, it wears out. It is not necessary to exchange a thing dear to your heart for a modern soulless wardrobe. You can update or remake the wall with your own hands, giving it a new life in which it will store your memories.
Second life as before
If a wall dear to your heart has worn out over time, scratches and chips have appeared on its surface, it can be renewed. Restoration will not take much time, and the set will get a second life.
To correct deficiencies you will need:

Furniture wax can easily cover all scratches on old furniture.
- soft and hard furniture wax;
- candle or lighter;
- spatula, soft cloth;
- PVA glue;
- furniture varnish in spray;
- felt-tip pen, regular or special;
- self-adhesive furniture edge;
- clamps.
This set of materials and tools is sufficient for high-quality restoration mechanical damage. Before carrying out any manipulations work area You need to clean it thoroughly with soapy water and let it dry. This preparatory stage will ensure better adhesion of the materials to the surface.
To get rid of a scratch, it is enough to apply hard wax to it, after softening it using a fire source. After the material has hardened, you need to use a felt-tip pen of a suitable color to apply strokes that imitate the structure of chipboard. The lines should be thin, slightly uneven. You need to focus on the drawing on the undamaged area. After applying the strokes, you can lightly smudge them by lightly rubbing with a dry cloth. Excessive graphics will be too conspicuous. After the desired result is achieved, the restored area must be covered with a layer of varnish. If the coating on the facade is fairly worn, you can use spray varnish to renew the entire surface.

Furniture edging is necessary for gluing the ends of old furniture.
It’s even easier to eliminate unsightly abrasions on the facade. To do this, just moisten a small piece of fabric with a felt-tip pen of a suitable shade and treat the damaged area. Movements should be smooth, parallel to the lines of the structural design. You can also fix the result with varnish.
To get rid of cracks and delamination, a syringe, PVA glue and an adjustable clamp are enough. Using a syringe, you need to inject a sufficient amount of adhesive into the split, compress the parts of the slab and carefully remove the excess. Then secure the area with clamps and leave for at least a day.
The chip needs to be smoothed out using a spatula and a sufficient amount of hard wax applied. After drying, use a spatula and cloth to form a right angle and sand the surface. Next, as when processing scratches, apply strokes with a felt-tip pen and fix the result with varnish.
Return to contents
Lacquer miracles of transformation
If a simple restoration does not suit you for certain reasons, the old wall can be radically transformed. This can be done in several ways, each of which has a right to exist. And you need to choose based on preferences, free time and, of course, artistic skills.
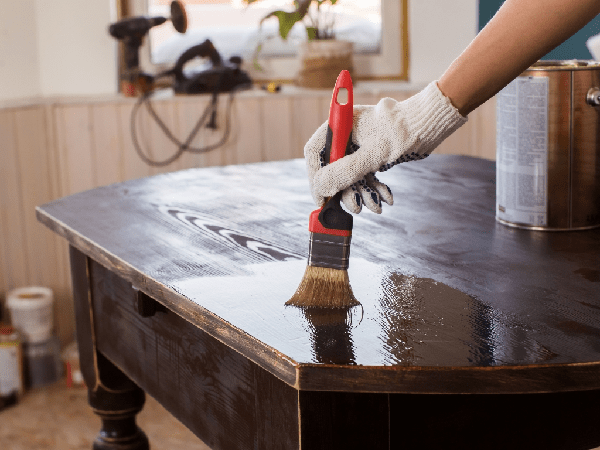
The simplest and affordable way restorations - varnishing. It’s not at all difficult to do this, the main thing is to understand the order of actions and not ignore important stages.
To update you will need:

An old wall can be easily updated with a fresh coat of varnish.
- soft fabric;
- putty knife;
- sandpaper;
- brushes or roller;
- suitable varnish.
The set is simple, and in order for the result to exceed expectations, you should proceed according to the following scheme.
First of all, take a photograph of the assembled wall. This documentation will avoid future confusion and make assembly simple and enjoyable.
After this, you need to disassemble the furniture as much as possible, remove the doors and all fittings. Be sure to thoroughly clean the furniture. Wipe the facades with a mild soap solution, clean the joints with toothpicks or an old toothbrush. The better this stage is carried out, the better the varnish will adhere.
Next, it is necessary to assess the condition of the facades. If the old coating is well preserved and only requires updating, you can move on to the final stage. If multiple mechanical damage is detected, you should remove it with a spatula. old layer. Can be used special compounds for removing furniture varnish. After this, treat all cracks and chips as suggested above.

Furniture coated with wax is sanded with fine sandpaper.
After completely dry wax, you need to sand the facades using fine sandpaper. Carefully remove dust and proceed to the next step.
The surface must be coated with several layers of varnish. It is better to make more thin layers, this will avoid the formation of drips that will ruin the look of the furniture. Manufacturers usually indicate on the label required amount layers, it is these recommendations that you should focus on.
After drying, the wall needs to be assembled and the updated handles returned to their place. To enhance the effect of restoration, the fittings can be replaced with modern ones, but it must be taken into account that such manipulations can deprive the furniture of its original appearance.
Return to contents
Updating with self-adhesive film
Today it is often used for furniture restoration. self-adhesive film. The advantage of such a coating is that it is easy and pleasant to work with, the material is not too expensive, and a wide range of allows you to choose a color or pattern that will complement the existing interior. In addition, the film protects furniture from external influences and the vagaries of the environment.
To update you will need:
- self-adhesive film;
- edge tape;
- scissors, iron, rags.

Using self-adhesive film you can quickly update the facade old wall.
First of all, you need to do the preparatory work, just like before varnishing: disassemble the wall, remove the fittings.
After this, thoroughly clean the facades by wiping them with a weak soap solution. After drying, the fat layer that prevents the adhesion of the materials should be removed. This can be done using a weak vinegar solution.
While the facades are drying, it is necessary to cut the film. Each sheet should be 5-10 mm larger on each side than the surface to be coated. After gluing, excess can be easily removed using sharp knife, but it will be impossible to hide the spaces. Once everything is prepared, you can proceed directly to gluing.
The surface to be treated should be lightly sprinkled with water. Apply the film to the top edge and peel off the strip of protective layer. Gradually move down, removing protection. You should not remove it immediately; removing an incorrectly fixed coating will be extremely difficult.

After gluing, the film is smoothed using a dry cloth.
After application, smooth the film using a dry soft cloth. You need to move from the center to the edges, removing moisture and air bubbles. Movements should be light and smooth. If the bubble cannot be removed, it must be punctured using a fine game and smoothed out.
At the final stage, the surface is ironed with a moderately hot iron, this effect stimulates the film to shrink and adhere more tightly. All that remains is to stick the tape on the edges and return the fittings to their place, the alteration is complete.
Don't get hung up on film that imitates solid wood. Today there are a lot of colors on the market that allow you to turn old furniture into a masterpiece of design. Bright colors and a skillful combination of shades will breathe new life into a worn-out but dear wall. Feel free to use the ideas and advice of the masters.
Return to contents
Classic and original coloring
Repainting old furniture allows you to completely refresh its appearance while maintaining its shape and charm. To carry out such restoration work You don't need a complex set of tools or special artistic skills.
For the remodel you will need:

An old wall can be updated by painting.
- wax;
- putty knife;
- sandpaper;
- dye;
- brushes or rollers;
- additional elements: stencils, lace.
Of course, first of all you need to prepare the wall, remove the fittings and disassemble it. These manipulations will lengthen the restoration process, but when painting disassembled, it is much easier to avoid drips and layering of the coating.
After disassembling, the parts need to be cleaned and the coating removed, partially or completely. Estimate general state and, if necessary, treat scratches, chips and delaminations. After drying, use sandpaper and a soft cloth to clean and sand the facades. After this, you can proceed to coloring.
It is better to apply 2-3 thin layers. You need to paint slowly, making sure that sagging does not form. If a defect is discovered after drying, it must be sanded using fine sandpaper and coated additional layer paints. Once the desired effect is achieved, the wall should be left to dry completely. After this, return the fittings to their place.
Repainting should not be perceived as a boring and primitive method of restoration. This technology allows you to get a completely unique result with a minimum of effort. There are many methods, and everyone is sure to find an option to their liking.

A wall in the style of Provence will fit into classic interior premises.
- Spirit of Provence. The wall or part of it after preparatory stage you need to paint it with white paint, making sure that the strokes are even, but not too dense. The background should “look through” the coating. Additionally, you can sand the corners with sandpaper. This alteration of the old wall is designed to preserve traces of use.
- A world of brightness. The doors of the set can be painted different shades within the same color. The gradient also looks stylish and interesting - a transition of tones from light to dark within the same range.
- The charm of lace. A unique pattern can be applied to the facade using ordinary lace. To do this, it must be secured with reverse side doors and paint the wall with paint from a can. The interplay of renewed and unpainted areas will create a delicate, washed-out print.
After the renovation, the apartment is pleasant to the eye and easier to breathe. But returning old furniture to its original place can ruin the impression of a fresh renovation. If getting rid of ancient interior items is not part of your plans, remodeling old furniture can improve the situation - be it a cabinet, shelves, or even updating an entire kitchen set.
A little imagination and effort will help you update your interior at low material costs. Main, Before you start work, decide what you want to do:
- Choose a style.
- Draw a sketch.
- Make a list of necessary materials.

And, of course, study the technology of remaking with your own hands those interior items that you decide to change. Remodeling furniture that has lost its appearance with your own hands is not as difficult as it might seem.
For work Tools required:
- screwdriver or screwdriver;
- sandpaper;
- wood putty;
- brushes or rollers;
- glue;
- wood paint;
- furniture varnish.
Preparatory work

Regardless of what style will be used for remodeling, old furniture will need to be given time for preparatory work. For example, if the object of alteration becomes old wardrobe, it will be necessary to dismantle it. For the cleaning:
- remove all doors;
- remove drawers and shelves;
- unscrew the fittings;
- remove decorative elements.
If the cabinet does not need repair, it is not necessary to completely disassemble the cabinet yourself. It is wiped with a damp sponge with a solution laundry soap. After this, the cabinet is wiped of moisture and allowed to dry.
Getting rid of unnecessary things
Next important stage preparatory work– removal of old varnish. Things will go faster if you use a grinder.


Rare furniture should be cleaned of varnish using more gentle means. To do this, use special washes. It is more convenient when the surfaces on which such gels are applied are in a vertical position.
You can remove a layer of varnish from furniture using ordinary sandpaper. To make it more convenient to hold it in your hand, a block is wrapped in a sheet. An old chipboard-based cabinet must not only be sanded, but also degreased.
If necessary, replace old ones rusty bolts and screws. Small cracks are coated with wood glue. More significant faults are masked with putty to match the wood.
Painting old furniture: plain classic or two-color modern?
The easiest way is to give old furniture more modern look, refreshing the surfaces new paint. For cabinet good choice It will be acrylic. Among its advantages:
- no odor;
- once thickened, simply dilute with water;
- you can adjust the shade by mixing colors;
- easy to wash off if necessary;
- dries quickly.

Before painting furniture, the surface must be primed. The primer is applied thin layer. To do this, use a roller.
The paint is applied in 2-3 layers. The next one is applied only after the previous one is completely dry. Movements of the brush on the surface are made in one direction.
When painting a cabinet with your own hands for the first time, you can start with one color of paint. Monochrome color design Ivory or natural wood tones will look organic in any interior.

If plain furniture seems boring to you, when the main color is applied, individual details You can put emphasis on others. Having chosen a pattern, apply adhesive paper tape along its contour to the cabinet. This way you will avoid unevenness and errors when painting parts.
The remodeling will not be complete unless the product is varnished. It dries quickly, forming transparent film. Such Kitchen Cabinet can be washed warm water and mild soap. All that remains is to add the fittings.
Sophisticated shabby chic

A popular trend in furniture design today is shabby chic. This original style combines objects in pastel color scheme with a touch of antiquity, artificial wear and cracks. It is used in the interior of bedrooms, children's rooms, and kitchens.
It’s not difficult to create an exclusive item with your own hands in this style. Especially if you are going to experiment on old furniture.
Surface aging
To remodel your kitchen cabinets in a shabby chic style, you will need:
- PVA glue;
- one-step crackle varnish;
- sandpaper;
- paraffin candle;
- dark acrylic paint;
Paint to create the effect of artificial wear is applied to the cabinet using a special technique:
- One coat of paint is applied to the surface.
- When the product is dry, you need to go over it with fine sandpaper.
- The next layer is applied across the previous one.
- This procedure is repeated 3-4 more times.
- To achieve a texture with the effect of scuffs and cracks, dark paint is applied to these places.
- The top of such spots is coated with one-step craquelure varnish.
- The varnish can be replaced with PVA glue, which is applied in a thick layer to the dark spot.
- When the glue dries a little, apply the main tone and immediately dry it with a hairdryer.

Rubbing the surface paraffin candle, you can create the effect of an “old surface”

It’s easy to achieve the antique effect with your own hands in another non-standard way. To do this, rub areas with dark paint with a paraffin candle where you want to see cracks. After complete painting and drying, these areas are rubbed with sandpaper. The light tone will be removed, and dark cracks will appear through it.
Decoupage of old furniture: floral motif
Decoration using the decoupage technique is perfect for decorating furniture in the shabby chic style. To do this, use paper napkins with patterns of flowers:
- Separate upper layer napkins with a picture.
- Carefully cut off the pattern along the contour. If you use scissors, sharp transitions of cut edges will be visible on the surface.
- The napkin is applied with the front side to the stationery file.
- Moisten with salted water from a spray bottle.
- Apply the file with a wet cloth to the surface of the furniture.
- Straighten the pattern through polyethylene using a rag.
- The file is removed, and after 1-3 minutes the napkin is coated with PVA glue.
Decoupage of a chest of drawers in shabby chic style (video instructions)
If the design looks too bright, it can be easily aged with a stiff-bristled brush and basic-tone paint. Blot the paint brush with paper and light movements go through the drawing. When the strokes dry, the pattern is rubbed with fine sandpaper.
Varnishing the work
The finishing touch will be varnishing the product. If the cabinet will be in the kitchen, it is better to choose a waterproof one. For furniture in other rooms you can use parquet.

It is important to take into account that different varnishes create a different effect on surfaces. They can be glossy or matte, silky. For a shabby chic style, the coating should not give a strong shine.
It is more convenient to work with varnish in a spray bottle. It is applied several times in a thin layer. Drips and unevenness can be easily removed with moistened fine sandpaper.
Conclusion
As you can see, remodeling furniture is not only a budget saver, but also a very exciting activity. Look at your old closet from a new angle. Surely you will see in it a wide scope for creativity, which will be limited only by your imagination.