What to make a wooden fence from. Deciding how to make a wooden fence. To build a wooden fence you will need
Read also
It is a mistake to believe that modern wooden fences do not gain a second life and become widely popular. Since wood is a practical and relatively inexpensive material, the decision to fence residential buildings and summer cottages with it has always been quite common. There are many options for such fencing, and most of them can be built yourself from commercially available timber.
Beautiful wooden fence made of horizontally installed boards
Types of wooden fences
All wooden fences used for the area around a private house or cottage are built from two parts - supports (otherwise known as pillars) and spans (sections) installed between them. When they talk about some kind of fencing, they mean exactly the method of filling the spans, because the supports can be made of different materials.
To choose a suitable design, and then build a wooden fence with your own hands, you should familiarize yourself with the most popular options:
- A regular or figured picket fence, assembled from slats on two crossbars attached to posts.
- Traditional wickerwork that came to us from time immemorial.
- A solid wooden fence made of small logs with ends pointed at 45° (picket fence).
- The so-called checkerboard, where boards are nailed to both sides of the crossbars in a checkerboard pattern so that there are no openings.
- Sections of boards nailed vertically or horizontally overlapping each other. The design resembles blinds.
- Ranch wood fences. They are a fence made of horizontal poles nailed to posts at a great distance.
In addition to the listed types of home fencing, which have to be assembled from individual parts, ready-made ones are used in the form of frames with various fillings - gratings, slats, wickerwork.
When choosing a type of fence, you should consider what role the wooden fence should play and where it is planned to be installed. In practice, for the front side of a private house, a decorative, solid picket fence and “blinds” are most often used, less often “” and wattle fence. Ranch post fences, originally designed to enclose livestock, are used to enclose plots of land or gardens at the rear.
Preparation of materials for the fence
Before you make a wooden fence, you need to select and purchase timber for it. If you are planning to build a picket fence, then the following wood products are suitable for its installation:
- edged boards of the same width;
- croakers;
- figured pickets cut on a machine;
- small diameter logs.
The dimensions of the picket fences do not have to be the same in height. Planks of various lengths are selected in such an order that the lower ends are on the same horizontal line, and the upper ends form bulges or depressions, creating a wave effect. During the flight you can make several such waves.
 A wooden picket fence designed in the shape of a wave
 Long trunks with a diameter of up to 150 mm, completely cleared of bark, are suitable for a stockade. This measure is extremely necessary, because various tree pests live in the bark, which will quickly bring your new fence to a state of rottenness. If the bottom of the palisade rests on the ground, the lower ends of the logs should be treated with bitumen.
 Fence palisade on a stone foundation
 For a double-sided fence for a private house (checkerboard), wide boards, possibly uncut, will be used. It is advisable to select them approximately the same width and completely remove the bark. Fences resembling vertical or horizontal blinds are made from the same timber.
 Checkerboard fence with horizontal boards
 You need to make a wattle fence from vines or flexible rods of small diameter (up to 4 cm). There is no need to clear them of bark; this is too labor-intensive an operation. The twigs are harvested by cutting in the cold period of the year, when the movement of juices inside the tree has not yet begun
 Wooden fence - wattle fence made of branches
 For a fence on metal poles, you need to select rolled steel of the appropriate sizes in advance. It is most convenient to work with profile pipes with a cross-section of 60x60 mm; there is no point in taking more. Ordinary round pipes purchased at the nearest scrap metal collection point are also used.
Selection of wood species and its processing
What it is not recommended to build wooden fences from is birch. This rock, when exposed to weather conditions, begins to rot quite quickly, which is why the fence around the house will not last even 10 years. Of the most common and affordable species for fences, the following are used:
- pine;
- aspen;
- alder;
- larch.
Coniferous trees are characterized by a high resin content, due to which they successfully resist the effects of moisture, subject to proper processing and constant care. The best option is to build a fence from larch, which is not afraid of either rain or cold. If you wish and have the funds, you can make a fence from valuable types of wood - oak or ash; their dense structure also tolerates precipitation well.
Wicker wooden fences are made from flexible rods and branches of various species, including fruit trees:
- nut;
- willow, willow;
- maple, poplar;
- mulberry;
- Apple tree;
- cherry.
When buying wood for building a fence, you should make sure that it is well dried, otherwise your structure will lose its appearance after 2-3 cold seasons. As the timber dries naturally, it will begin to crack, warp and become deformed. Drying the wood can be done at home under a canopy, which will take at least 1 year. This condition does not apply to wicker fences, where, on the contrary, good flexibility of the branches is required.
In addition to drying, timber requires antiseptic treatment to prevent rotting and destruction by various insect pests. An excellent way is to apply a continuous layer of resin or special bitumen impregnation to the wood. But you cannot cover the entire fence with bitumen, which is why the technique is used only to protect the underground parts of wooden posts.
For antiseptic treatment, colorless commercially available compounds are used (Biosept, Novotex), as well as Swedish paint, made at home using the following algorithm:
- Boil a paste from 550 g of flour dissolved in 3 liters of water.
- Strain the paste so that there are no lumps left, put on low heat.
- Add 240 g of copper sulfate and table salt, mix thoroughly.
- While stirring, pour 220 ml of drying oil and 230 g of red lead into the solution.
- Bring the volume of water to 4.5 liters and let the paint cool.
Construction of the supporting part of the fence
The first thing you need to do is mark the area for the wooden fence with your own hands. Having retreated the required distance from the house, you should stretch the cord along the installation line of the future fence. Then, in the places where the pillars are installed, you need to drive stakes into the ground with the following calculation:
- the optimal distance between supports is 2.5 m with a fence height of up to 200 cm;
- if you plan to install a fence higher than 200 cm, then to contain the high wind load on the posts, it is better to reduce the distance between them to 2 m;
- The posts of low fences (up to 120 cm) can be spaced up to 3 m apart.
If you do not use ready-made sections of a standard size, then divide the entire length into equal intervals, taking into account the listed recommendations. Then proceed with the installation of the supporting part made of wood or using metal elements (pipes, channels, corners). You can combine wood with metal by fixing a steel pipe in the ground and attaching a 100x100 mm timber post to it.
There are 4 ways to install support posts in the ground:
- Driving a post into the ground to a depth of at least 0.8 m and then compacting the soil around it.
- Digging or drilling a hole 40 cm deep and driving a post another 40 cm below its level. After compacting the bottom, the hole is filled with concrete. The name of the technique is the construction of a concrete collar.
- Zabutovka. The hole is dug to its full depth (0.8 m), then compacted, a stand is installed and backfilled with stones with compaction. The gaps between them are filled with a liquid clay solution.
- Full concreting. The same pit with an installed support is filled with concrete from bottom to top.
 Methods for installing metal poles
 Since wooden fences are not very heavy, but experience lateral loads from the wind, the most reliable methods are concreting and backfilling. Simple hammering and posts with a concrete collar are appropriate for small fence heights or low windage, when there are many gaps between the elements.
Frame assembly
At this stage, the installation of horizontal crossbars is carried out, connecting the pillars with each other and serving as the basis for fastening the span filling elements. The frame is assembled using the following methods:
- A beam of 40x60 mm or larger is nailed directly to the wooden posts. The joints of adjacent bars should be located in the center of the support.
- The same, only for the horizontal beam in the column, a sample is made, and fastening is carried out using both nails and self-tapping screws.
- The easiest way to attach a jumper to an iron pipe is to drill a through hole in both pieces and pass a bolt through them. The beam is securely attached to the rack with a nut.
- Sections of metal corners or strips are welded to steel pipes. Holes are drilled in them and the timber is again bolted.


If you decide to install a fence with horizontal elements in the form of unedged boards, slats or logs near a private house, then you will need one lintel - at the top of the posts. To attach a picket fence you need 2 crossbars, to install a “checkerboard” - three. It is assumed that a wooden fence has a standard height of 2 m; with other parameters, the number of cross members may vary.
The construction of a fence with elements in the form of slightly open blinds is somewhat different. The supports should be tied together with one beam on top, and the visor will then be attached to it. And to install wooden planks at an angle on poles, you will have to vertically install 2 wide boards on each side.
Final installation of spans
This is the final stage of assembly, during which the installation of filling parts is carried out - pickets, palisade logs or checkerboard boards. Traditionally, 2 types of fasteners are used - nails and galvanized screws. To ensure that a wooden fence near a private house is reliable and lasts for many years, follow these recommendations when installing it:
- Attach the picket fence strips to the lintels from the outside, driving 2 nails at each point for rigidity;
- when assembling a double-sided fence, nail the front boards first, and then the back ones;
- use a building level, checking each plank;
- the logs of the palisade should be nailed on the reverse side;
- Attach fencing slats in the form of slightly open blinds from the ends through boards secured to posts;
- horizontally oriented boards must be attached directly to the posts.
Finished wooden fences are often protected on top with a canopy, which at the same time plays a decorative role. The easiest way to make it is from thin metal with a polymer coating or remnants of metal tiles. The construction of the fence is completed by painting all wooden parts in the desired color or varnishing.
The content of the article:
A wooden fence is an excellent solution for a suburban area. Any owner, relying on his own imagination, can make a completely exclusive fence thanks to the properties of wood and the many options for using it for this purpose. You will learn how to make a wooden fence without resorting to high costs from our article.
Types and features of wooden fences
Depending on the height, fences are divided into three categories: low, up to 0.8 m high; medium - up to 1.5 m; high - more than 1.5 m.
Based on their appearance, wooden fences can be divided into several types:
- Fence. It is a canvas made up of slats nailed to horizontal purlins and secured between support posts. Such a fence is often used for decorative purposes, as well as to fence off a site from the street and neighbors.
- . It consists of treated boards nailed together tightly, overlapping or with gaps to purlins located horizontally between the supports. Among wooden fences, plank fences are considered the most reliable.
- Palisade. This is a fence consisting of a series of logs dug vertically into the ground. The logs can be located close to each other or with gaps. To strengthen such a fence on its inner side, the logs are connected using nails with transverse strips. The consumption of wood material when constructing a log fence for a garden plot is often unjustified.
- Wattle. For a dacha, such a fence is a beautiful and successful solution. It is made of small height, using willow or birch branches to weave the fabric.
Regardless of the type, the design of any wooden fence consists of three main elements: support posts, transverse purlins and material for filling its sections - boards, rods, slabs, etc.
Advantages and disadvantages of a wooden fence

The main advantages of wooden fencing are the low weight of the wood, which makes it easier to transport, and its affordable cost. The simple design of such fences allows you to build them yourself.
Wooden fences combine perfectly with the green landscape of the site, a stone house or a log house. If you show a little imagination, you can make your wooden fence absolutely unique.
The disadvantage of constructing wooden fences is their short service life. Wood is susceptible to rotting and damage by wood insects. Fire and precipitation have a negative effect on it.
But it is not difficult to deal with such problems today. There are many different protective compounds such as antiseptics, stains and fire retardants. Lumber or logs treated with them last much longer.
Wooden fence installation technology
Even the most ordinary wooden fences can be made beautiful with proper installation and finishing. Installing a wooden fence consists of three steps: installing the support posts, attaching the transverse purlins and nailing the picket fence. Instead of picket fences and purlins, such fences can use a slab, a palisade made of logs or wickerwork. Let's consider the basic principle of installing a wooden fence.
Preparatory work

They include the choice of fencing design, design, preparation of materials, tools and marking of the fence perimeter on the ground.
You need to start work by determining the type of fence you are planning. The easiest way is to build a picket fence. If such a fence is decorative, it can be assembled from thin strips with a diagonal arrangement. Many owners like a solid fence made of slabs that imitate a palisade.
The top of the fence sections can also be done in different ways. It can be curly, convex or concave. In any case, before starting work, you need to clearly understand the appearance and design features of the planned fence. Several options for its sections can be depicted on paper and at the same time decide on the need for a plinth underneath them. Such a fence will be combined, that is, consisting of wood and stone, but in appearance no worse than a regular one.
In order to calculate the required amount of materials for external fencing, it is necessary to draw a plan of the land plot to scale. Knowing the dimensions of the sides of its perimeter, it is easy to calculate the length of the future fence. At its corners and entrance group it is necessary to plan the installation of support pillars, and every 2 m - intermediate posts, which will provide the fence structure with the required rigidity. Having all this data and determining the height of the fence, you can calculate the amount of material.
After completing the calculations on paper, you need to prepare the tools necessary for the work and begin marking the fence on the ground. The set of tools should include: pegs, nylon cord, tape measure and hydraulic level, shovel, axe, hacksaw, garden drill, hammer and nails. To install fence posts and install waterproofing, in addition to basic materials, you will need roofing felt, bitumen mastic, M400 concrete, crushed stone and river sand.
Marking the fence on the ground should begin with determining the installation points of the corner posts. These places must be marked with pegs driven into the ground. After this, you need to stretch and secure the nylon cord between them, and then mark the locations of the intermediate posts with pegs. Thanks to the cord, they will all be on the same line along the perimeter of the site, and after installation the wooden fence will be smooth.
When the marking is completed, it is necessary to prepare the fence support posts for installation. At the request of the owner of the site, they can be made of rolled metal, timber or logs. When choosing the first option, plugs cut from a metal sheet must be welded to the top of all pipes. This will prevent moisture from precipitation from getting inside the racks and causing them to oxidize. The underground part of the supports should be covered with bitumen mastic, and the rest should be primed and painted with anti-corrosion enamel.
If you choose the option of wooden posts, it is recommended to first sharpen their tops. This will prevent rainwater from penetrating into the rack through its end. The moisture will simply roll down the support without penetrating its body. As for the thickness of the logs or beams for supports, you should choose something in between. Fence supports that are too thick will look ridiculous, and posts that are too thin will not have sufficient strength. Before installation, it is advisable to burn the pillars over a fire, and then their lower part, which will be underground, must be covered with bitumen and wrapped in two layers of roofing material.
In the places marked with pegs, holes should be dug for supports. Their depth is directly related to the height of the planned fence. If the height of the above-ground part of the support is less than a meter, the hole can be made 0.8 m deep. Further, accordingly: for a support up to 1.5 m - 1 m, over 1.5 m - the depth of the hole is 1/2 of the column. The width of the hole must be such that a distance of at least 0.2 m is maintained between its edge and the installed post.
If the posts are metal, it is convenient to make holes for them using a garden drill. If you stick electrical tape on it, it will be possible to control the depth of the recesses with high precision while working with this tool.
Installation of wooden fence supports

Before installing the support pillars, the bottom of the prepared holes must be covered with medium-fraction crushed stone. In this case, when the ground freezes in winter, the fence posts will be able to maintain their original position. It is recommended to cover the walls of the dug holes all around with roofing felt, constructing a kind of formwork from it.
Installation of fence supports in holes should be done using a plumb line. After installation in a strictly vertical position, the racks must be temporarily secured with stops. If the height of the supports is less than one and a half meters, it is enough to fill the cavity of the holes with broken bricks, crushed stone and compact everything. If the height of the fence is over one and a half meters, the hole with installed supports should be filled with M400 concrete. In order to reduce its consumption, 2/3 of each hole can be filled with stones or broken bricks.
If you plan to install a combined fence with a plinth, the installation of its supports should be done differently. Instead of holes along the marking lines, you need to dig a meter-deep trench. Its bottom must be covered with crushed stone, the walls covered with a waterproofing film, and wooden formwork installed outside, which should form a base and therefore rise 0.5 m above the top of the trench.
After this, support pillars and reinforcement cages can be installed in the trench. The bottom of the supports, which will be in concrete, must be treated with bitumen. Their installation should be carried out using a plumb line and a building level. The vertical position of the racks must be fixed with stops made of bars.
When everything is ready, the formwork along with the trench must be filled with M400 concrete. If you prepare the mixture yourself, you will need a concrete mixer, as well as cement, sand and crushed stone in a ratio of 1:2:3.
After pouring, you need to wait until the concrete hardens. If the supports were installed in holes, this period will be a little more than a week. Hardening of the base will take almost a month. After the concrete has gained the required strength, you can line the racks with brick or stone.
Fastening purlins and other elements of a wooden fence

These fence parts are bars or slats with a small cross-section that connect the posts and form the frame of the span between them. When erecting a wooden fence, each purlin must be attached to the center of the support, and when installing the next span, the new purlin should be joined to an already fixed beam. The purlins can be nailed on top of the wooden support, or you can cut out a seat in it for a more durable fastening.
To make the fence structure strong, the transverse purlins can be nailed, placing them in a checkerboard pattern and excluding their joining on one support. The thickness of the purlin bars should be selected depending on the thickness and weight of the lumber. The more massive it is, the stronger the purlins should be.
Their location should be parallel to each other and perpendicular to the supports. Otherwise, the appearance of the fence may be spoiled. This will be especially noticeable when installing a picket fence with gaps. The installation of purlins should be constantly monitored using a tape measure and a building level.
If a horizontal arrangement of boards is planned in a wooden fence, then the purlins must be connected with vertical guides that will carry the load from the spans. It is recommended to fasten purlins to wooden supports using galvanized self-tapping screws. If nails are used, they should be driven into the wood not vertically, but slightly at an angle.
To install the picket fence in a vertical position, it is recommended to make a template that will facilitate the work of evenly fastening the boards. The template is a strip with a width corresponding to the distance between the picket strips. If you make it T-shaped, you can additionally control the height of the picket fence.
If the picket fence will be located diagonally in a wooden fence, you need to make a frame from planks in accordance with the size of the span. The frame should be secured to supports, and then a picket fence should be nailed to it.
When making wattle fence, the support posts have a small cross-section and are mounted in relation to each other at short distances of 40-60 cm. Before installing such a fence, the vine from which it is to be woven should be soaked in water for a couple of days. After this it will be easier to work with this material. A wattle fence with horizontal or vertical branches of the vine is very beautiful and resembles a traditional village fence.
A picket fence can be fake or real. In the first case, it is a slab nailed to the purlins. Its boards must be placed closely. Much less often the palisade is real. To make it, pointed logs need to be dug into the ground. This type of fence is strong, but requires a lot of logs.
Caring for a wooden fence

Due to the fact that wood can gradually rot from constant exposure to moisture, a wooden fence requires periodic maintenance. It consists of treating boards and supports with antiseptic compounds and painting all wooden parts of the structure with waterproof enamels.
It is recommended to carry out such work every year, preferably in the spring. Before the next painting, old peeling enamel must be removed from the fence with a brush with metal bristles. If it is white, it will have to be painted up to three times a year. Only in this case will such a fence always look fresh.
How to make a wooden fence - watch the video:
Building a wooden fence with your own hands is absolutely not difficult. However, after its completion, such a design requires constant attention. Without it, it will become vulnerable, but with good maintenance it will delight everyone with its appearance and protection from many misfortunes for a long time.

When it comes to fencing the estate, the board is most often relegated to the background. This material is considered by many to be a temporary and uncreative option.
However, in recent years, the designs of plank fences have changed significantly. From primitive “ladders” they turned into masterpieces of wooden architecture. Excellent appearance, ease of installation and minimal cost attract the attention of many country home owners.
In this article we bring to your attention an overview of modern board fences and practical recommendations for their manufacture. We hope that after getting acquainted with the presented options, you will change your mind and build a beautiful and practical wooden fence at your dacha with your own hands.
Options for plank fences
In order to install a wooden fence, you don’t need to strain your imagination and test your design talents. Dozens of interesting varieties of fencing have already been built and captured in photographs.
The simplest option is a horizontal slab fence. Its cost is minimal, and its aesthetic qualities are high. Before installation, the slab must be refined by grinding, tinted by firing and varnished. Otherwise, its appearance will be associated with a pasture for livestock.
One more tip. A wooden fence made from unedged boards looks ideal with wooden buildings. In the photo below, the white color of the walls of the mansion and the columns of the entrance group do not combine well with the wooden fence.

A fence made of slabs is simple, inexpensive and aesthetically pleasing
In the design under consideration, purlins made of boards are fixed between two wooden posts. The ends of the racks are protected from rain by an inclined bar. The most vulnerable point - the contact between wood and concrete - requires high-quality insulation. Here you need to use modern antiseptic impregnations or coating with hot bitumen.
A croaker, cleared of bark and installed with an overlap, looks very beautiful in a fence. It is nailed to wooden posts. The front joint is covered with an edged board. An easy-to-make plank canopy tops the structure.

Another interesting option is “artificial” croaker. In this case, the edges of the boards are cut so that they form a symmetrical pattern.
To create a color contrast, the wooden caps on the posts are treated with a dark stain.
The “decorative turn” method is equally suitable for both slabs and edged boards. In the latter case, we get an aesthetic shutter fence. When viewed directly, he appears deaf. However, due to the spaces between the slats, this design is not only well ventilated, but also partially transmits the sun's rays.

Climbing plants love such fences and quickly turn them into flowering trellises.

Fragment of a fence-blind design made from edged boards
In passing, we note that the best basis for attaching fence boards is metal posts. A compromise option is to embed steel cages in concrete from scraps of profile pipe. Wooden posts are inserted into them and secured with self-tapping screws.

A little imagination and a nondescript croaker-obapole turns into a designer picket fence guarding the “kingdom of Berendey.”

The posts for such a fence can be cut from cheap round timber. The natural shape of this material will fit perfectly into the “country design” chosen for this fence.
The classic picket fence (planed board with a rounded edge) remains a relevant element of the fence structure. The only condition is not to paint it with dull green or brown paint. It’s better to treat the planks with an antiseptic and open them a couple of times with a good varnish. After such finishing, the wood will sparkle with golden hues and last 10 years longer.

If you prefer tinted wood, then use dark brown paint for this purpose. It will reliably protect the picket fence from dampness and give it a noble appearance.

A blank fence made from edged boards looks better when the vertical slats are installed not on one, but on both sides, overlapping. This installation scheme creates a rhythmic stepped structure. The ends of the boards are covered from above with a planed plank. A decorative framing belt is also installed at the bottom of the fence.

A blank fence will not look boring if arched grilles made of thin strips are introduced into its design.

Arched lattice inserts eliminate the monotony of a blank fence
When choosing a material for a fence, pay attention to the decking board. It is strong, expressive and durable. It is attached to metal posts installed in the concrete foundation.
The photo below shows an option for double-sided horizontal installation of a terrace board (American fence). To increase rigidity, vertical bars are placed in the middle part of the spans.

Fence made from decking boards - 50 year guarantee
This kind of fence cannot be called cheap, but it is very durable and beautiful. The decking board is made from a colored wood-polymer composite and does not require painting.
In a fence structure, the board can be combined with timber. Below we see a fencing option in which the timber is installed on the outside and the board is nailed on the inside. Its joints are not visible, since they are covered by timber. The brown tinting of the wood in contrast with the white base gives the structure a solid and solid appearance.

From the facade this fence is made solid. There is no guard on the side at the bottom of the board. This decision was made to improve ventilation of the site.
Russia is far from America, but the romance of cowboy ranches has reached us. On a spacious area, remote from other buildings, a low country-style fence looks great. Its base is thick wooden pillars, to which three belts of boards are nailed horizontally on one side. In the upper part, a wooden plank is placed crosswise, closing the open “windows” of the sections.

Wicker fences from boards
If someone tells you that you can weave fences from boards, don’t hesitate. This is the most fashionable topic today. A wicker fence made from boards looks great, and there are many options for its installation.
The board for wicker fencing should not be very thick. Therefore, having bought an edged “thirty” in a warehouse, you can safely plan it on both sides to a thickness of 25 mm. The optimal width of the strip is from 8 to 10 cm.
The simplest version of such a fence resembles the wall of a summer gazebo. Having made openwork panels from wooden slats, they are attached to the pillars. You can nail a dark board frame along the contour for contrast.

A board fence with a diamond pattern is elegant and light

The wooden fence post is antiseptic and concreted in the ground
And here is another, no less interesting plank wickerwork.

Here, a thin planed board 25 mm thick and 2.5 meters long is attached to the posts in a checkerboard pattern. The bend is given by the original method of installation: the ends of the boards are alternately attached to one and the other side of the wooden stand. In the middle part of the span there is a vertical rail that fixes the bend. The places where the boards are attached to the racks are covered with slats.
Vertical weaving from boards looks no worse. In this case, the answer to the question of which board is best to use for a fence is obvious: at a length of 2 meters, it is easiest to bend a plank, no more than 16 mm thick and 8 cm wide.

A wicker fence is good for everyone, but it can also be improved by combining it with a picket fence.
This design is quite difficult to install, but its picturesque appearance justifies all the effort.

An original version of the fence, combining weaving from boards with double-sided installation of a picket fence
Those wishing to build an exclusive fence from boards should contact an experienced craftsman. Only he will be able to assemble the structure depicted in this photograph.

Each board for such a fence is cut separately, based on the section template. At its ends and side edges, connecting tenons are cut, with which the boards, like puzzles, are connected to each other, attached to the pillars and to the lower belt.
The advice that we gave throughout the article should be supplemented with the parameters of the main elements of the board fencing:
- The cross-sectional size of the wooden posts is 10x10 cm.
- If a steel profile is used for racks, its cross-section must be no less than 40x40 mm (wall 2 mm).
- Horizontal crossbars (purlins) must have a cross-section of at least 30x50 mm with a strut spacing of 2 meters.
- For ease of installation of wooden purlins, fastening plates “ears” with holes drilled in them for self-tapping screws must be welded to the steel posts.
At the stage of purchasing materials, the question arises of how to calculate how many boards are needed for the fence. The solution is simple. If the fence is solid, then its total length must be multiplied by the height and thickness of the purchased board.
For a lattice picket fence, the calculation is done differently. Taking into account the selected spacing of the slats, their number per 1 linear meter of fencing is determined. The resulting pieces are multiplied by the total length of the fence, and, if necessary, converted to cubic meters, multiplying the total area by the thickness of one plank.
Another important point - how to paint a fence made of boards? If you save on the quality of paint, the fence will have to be updated more often. Therefore, we recommend buying expensive paint for exterior use. Before applying it, treat the board with hot drying oil or antiseptic impregnation. The consumption of paint and impregnation will be minimal when applied to a planed board. Consider this nuance when choosing a material.
Given the large area of the board fencing, it needs to be painted with a roller or spray gun. Omissions and errors made during work are corrected with a paint brush.
Wooden fences are considered the most short-lived. After all, not everyone knows (or does not want to know) the secrets of wood and its processing.
An untreated pine fence will, indeed, last no more than 10 years, and then only if the lower part of the post is reliably waterproofed. If you are making temporary fencing for the period of construction and improvement, then this is a completely justified decision.
It’s another matter when wood is chosen as a building material not because of its cheapness, but because of its design capabilities. After all, wood is considered the most amenable material to decorative processing.

This is what the fence looks like from the first photo from the side of the yard. Agree, no less attractive...

Pay attention to the outline of the boards: how much “attention” was paid to each of them, how carefully the edges were worked out and the corners were smoothed... The photo shows sliding gates from the same yard.
And there are so many design techniques: firing, tinting, aged effect, combination with forged overlays, and finally, just perfect sanding and coating with yacht varnish.

Design options for wooden fences are given at the end of the article.
Having invested labor (or money) in creating a masterpiece of wooden architecture, you want to admire it for as long as possible. Therefore, there are a number of important points that the owner of the estate should know.
Pledge OF LONGEVITY
For the fence, choose those types of wood that are characterized by high density: Siberian larch, oak, mulberry, acacia, aspen, alder, ash. By the way, a fence made of Siberian larch can be called eternal - on the contrary, the wood of this tree grows stronger when it comes into contact with water.
Limit the use of pine to creating a fence panel - if it wears out quickly, it is not difficult to replace it. Under no circumstances should you install a fence made of birch - it is the most unstable wood.

Support pillars for a wooden fence they can be wooden, metal or made of masonry.
The last two options will serve as a reliable support for many years. But don't write off the tree. It doesn't have to be buried in the ground.
To extend the service life, you can use special metal consoles (stands), which are concreted, and then a wooden beam is attached to them (see link on the side).

The most vulnerable part sawn wood - the one where the cut is made across the grain. A horizontal arrangement of boards or a protective canopy over vertical ones will help extend the life of a wooden fence.
Wood is vulnerable when it comes into direct contact with air: when it is wet it swells and is affected by fungus; too dry it causes it to crack. Risks can be reduced through mandatory treatment: impregnation with an antiseptic plus painting with special dyes (Swedish paint, yacht varnish, impregnation with hot drying oil).
SWEDISH PAINT
- iron (copper) sulfate – 260 g,
- red lead – 260 g,
- table salt – 260 g,
- rye flour – 580 g,
- drying oil or linseed oil – 240 ml,
- water - about 4.5 l.
Composition consumption is approximately 200-300 ml/m2. Color – golden. If you require a different shade, then red lead can be replaced with ocher or manganese peroxide.
Prepare the coloring composition as follows: mix flour with 3 liters of water and boil the paste, pass it through a sieve to avoid lumps, put it back on the fire and add iron sulfate and salt, stirring constantly until the vitriol is completely dissolved, continuing to stir, pour in small portions first oil (drying oil) then water (until a liquid homogeneous consistency is obtained).
The paint must be applied immediately because it thickens quickly. Therefore, it is better to work with two or three people, or divide the composition into smaller portions and prepare it as it is used.
WOODEN FENCE FRAME

The pitch of the support pillars is 2-3 m.
As supports, choose a round or square beam with a cross-section of 100x100 mm or a metal pipe with a cross-section of 40x40, 40x60, 60x60 mm (with a wall thickness of 2 mm), for gates 80x80 and 100x100 mm (with a wall thickness of 3 mm). The wider the support spacing and the greater the load (weight and wind), the larger the size and thickness of the walls.
So, for a fence-blind with a two-meter section, choose the minimum parameters from the above, for a solid one, and even with forged overlays, the maximum.
If there is no choice of lumber (wood species), then budget pine is carefully treated with protective chemicals, and the posts must be installed on a concrete base.

For horizontal crossbars, use a beam with a cross section of 30 (sufficient) x 50 (and wider) mm.
To mount wooden crossbars on a metal pole, “ears” with holes for fastening are welded to it. To avoid welding during installation, you can purchase ready-made posts with fasteners.
The cladding (shield) is covered with a 25 mm thick board. The width varies depending on the design.
The rest of the technological sequence, depth and method of laying, up to the chemical treatment of the frame, is the same as for a fence made of corrugated sheets:
- the frame is mounted,
- paint,
- after that they stuff the shield.
METHOD OF ATTACHING THE FRAME AND BOARDS
The most durable connection will be with self-tapping screws. Self-tapping screws are selected taking into account the following requirement: the body of the wooden post (crossbar) should include 30-40 mm of thread.
Each board is secured with at least two screws on each edge.

There are options for a non-standard approach to fastening boards. Here is an example of a fence assembled according to the wattle fence principle. The curved board, trying to straighten itself, presses itself tightly against the support. Although, given the flexibility of wood in a humid environment, additional fixation of each board will still have to be done.

For the fence in the photo above, we used wood siding. Begin attaching the boards from bottom to top with an overlap of 2.5 cm.


If the boards are made with a downward slope towards the street, you will get an invisible fence that will not experience strong wind loads. There are several ways to secure boards at an angle.
In the photo on the right, wooden slats are nailed to a rack, which, in turn, is fixed to a support post.

Another way- nail the boards from the ends. It is important to clearly mark the wooden stand. This option is relevant for a fence with metal supports. When all sections are filled along the front and back parts, they nail a board that will cover the entire “kitchen”. A wooden cap must be placed on top of the post.
Are you interested in the question of how to mount the next section if the adjacent one restricts access to it? It is simply pushed slightly first towards the street, then towards the plot (or vice versa) to fix the lamella. Fastening to a metal support is carried out after installing adjacent sections.

Third option for wooden beam support. It makes inclined cuts-grooves into which the end of the lamellas is inserted. Each one must be screwed on with a self-tapping screw, and then a wooden overlay is made from the front part, which will hide the attachment points.

Ultimately, a wooden shutter fence will look like this. Be sure to nail the end caps to the top of the post.

Simple horizontal fastening of boards looks boring. But if you make small (up to 1.5 cm) gaps between them, the section’s canvas will take on a more modern sound. How at the same board (within reason), the more interesting and modern the finished fence looks.

It’s also a good idea to alternate boards of different widths - the main thing is that adjacent sections repeat the pattern.


Don't ignore unedged boards. Besides the fact that it costs less, it also looks more exclusive. The truth is not suitable for all site design styles. It will look win-win in a forest area.

Here is another option for a wooden fence in a brutalist style.

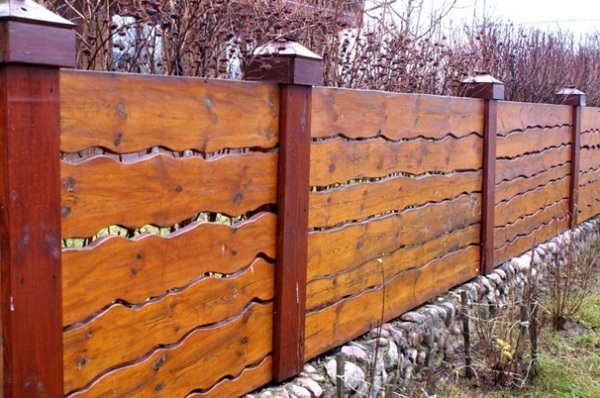
You will need a jigsaw, a wood carving knife, sanding paper and skillful hands to create this original fence with the effect of a time-worn board.

Have you ever put together puzzles? So, to create these fence sections (pictured above), you first need to draw them and carve them out of boards. Each board of this fence has its own clear size and bend, that is, first a template is created, then cut, chamfered, sanded, and treated with protective chemicals. And only then are they brought down to the section. And how the elements are fixed together is the master’s secret...

For the slab fence in the photo above, all the wane was carefully selected, because it is unacceptable that some sections of the boards were too thin in thickness. The bark was removed, each plank was given piquant contours with a jigsaw, and the surface was sanded. In general, the cheap price of the material is offset by painstaking work.

I recommend copying this design exactly in relation to the original, or first creating a project (span diagram) of the entire fence, selecting alternating patterns. And only after making sure that the fencing canvas as a whole looks harmonious can we begin implementation.
Don't get carried away with such a bright texture for all the wooden elements of the yard. An exclusive wins only when it is unique.