What can you build a gazebo from? How to make a gazebo with your own hands, photos of different designs. Site selection and project development
Read also
A gazebo is an ideal addition to any dacha, because it’s a nice place to sit alone with a cup of tea, talk with friends, and celebrate a family celebration. Do you want to become the owner of such a functional and cozy building? There is nothing simpler - you can make it yourself, using the most common materials at hand. In order to cope with the task 100%, we suggest you understand the construction technology step by step: for your attention detailed instructions, how to build a gazebo beautifully, but quickly and cheaply, as well as photos and videos that will serve as a useful visual reference in your work.
Stage 1: Deciding on the parameters of the gazebo
To ensure that the construction of a gazebo does not result in large time, effort and financial costs, it is important to think through every detail to the smallest detail. future design. In particular:
- dimensions;
- shape;
- roof type;
- foundation type;
- materials for the frame.
The dimensions of the gazebo are best calculated using the formula: 1 person = 1 sq.m. space. The shape of the structure determines the level of complexity of construction, so if you are taking on such work for the first time, give preference to a traditional rectangular gazebo.
The roof of the gazebo can be single-pitched, gable, round or pyramidal. Naturally, it is cheaper and easier to install a pitched roof.
As for materials, it is best to build a gazebo from wood beams, corrugated sheets and metal racks - it is much easier to work with them than with brick, stone, logs or forged gratings. In addition, these materials are very inexpensive.
Stage 2: Getting ready for construction
As we see, perfect option for a novice builder - rectangular gazebo With pitched roof on a slab foundation. To build such an extension, you will need the following supplies:
- beams of two types - with a section of 50 x 50 and 100 x 100 mm;
- wooden boards 30 x 150 mm and 50 x 150 mm;
- corrugated sheets;
- reinforcement bars;
- large crushed stone;
- concrete solution;
- sand;
- self-tapping screws and self-tapping screws;
- primer;
- dye.
Don't forget about working tools:
- Bulgarian;
- jigsaw;
- hacksaw;
- screwdriver;
- anchor bolts:
- steel corners
- hammer;
- level;
- rule.
After all the materials and tools are prepared, you need to select the location for installing the gazebo and mark it. To do this, you first need to determine the four corners of the future structure, taking into account the pre-designed dimensions, and mark them with beacons. Then you need to stretch the string between the beacons. As a result, you should end up with a rectangle - this is the area your gazebo will be.
Stage 3: Setting up the foundation
Pouring the foundation begins with preparing the pit. Its depth should be 20-30 cm. You can dig it with a simple shovel: remove the soil, level and compact the bottom. Make sure that the walls of the pit are vertical, without slopes. A 10 cm layer of sand should be poured into the finished recess. It should be moistened and compacted tightly. When you are sure that the layer is perfectly even, place formwork from boards around the perimeter of the pit. Its height should be no more than 10 cm. Next, you need to secure the formwork with beams.
The next step is filling the pit with large crushed stone. Then, in the corners of the future gazebo, reinforcement bars must be installed in the crushed stone. To ensure stability of the extension, the rods should rise 10-15 cm above the foundation level. Then fill the pit with concrete mortar.
Advice. After pouring, be sure to level the concrete so that the base is perfectly level. Proceed with further construction work only after the foundation has completely hardened!
Stage 4: Assembling the frame
Installing a gazebo frame is one of the most difficult and responsible work the entire construction process, so it is very important to perform it in a clear sequence:
- Prepare 4 bars with a cross-section of 100 x 100 mm and cut them to the height of the structure. Treat the finished elements with a primer.
Important! The front bars must be at least 15 cm longer than the rear ones to be able to form a roof slope.
- Drill each support bar at the bottom end. The hole diameter should be equal to diameter reinforcement bars installed at the corners of the foundation.
- Place the support bars on the rods and level them vertically using a level. Secure them with anchor bolts.
- Connect corner bars boards 50 x 150 mm and install special braces for the rafters.
- At a distance of 10 cm from the top of the structure and 50 cm from the floor, connect the racks with jumpers made of bars with a cross-section of 50 x 50 m, securing them with bolts. Between these jumpers, every 50 cm, use steel corners and self-tapping screws to fix the vertical bars. Only the entrance area should remain free.
Stage 5: Install the roof and arrange the gazebo
Installing a roof will not require much time and effort, since single-pitch structures very easy to install. So, first install the joists on the boards that connect the corner bars. The average step is 30-40 cm. Then cover them with boards 30 x 150 mm, leaving 10 cm gaps between them. Next, cover the boards with glassine and stuff thin slats on top. Place sheets of corrugated sheets on these slats and secure them with screws or nails. Actually, the roof is ready.
After the main construction works completed, start decorating the gazebo. First, it must be treated with an anti-corrosion agent. Then the structure can be painted, varnished or even sheathed with clapboard. After this, conduct electricity and install necessary furniture. And finally, you can cover the walls of the gazebo with light tulle to give the space even more coziness.
As we see, in construction summerhouse there is nothing complicated. If you follow our simple instructions, you can get beautiful corner for a comfortable holiday in nature.
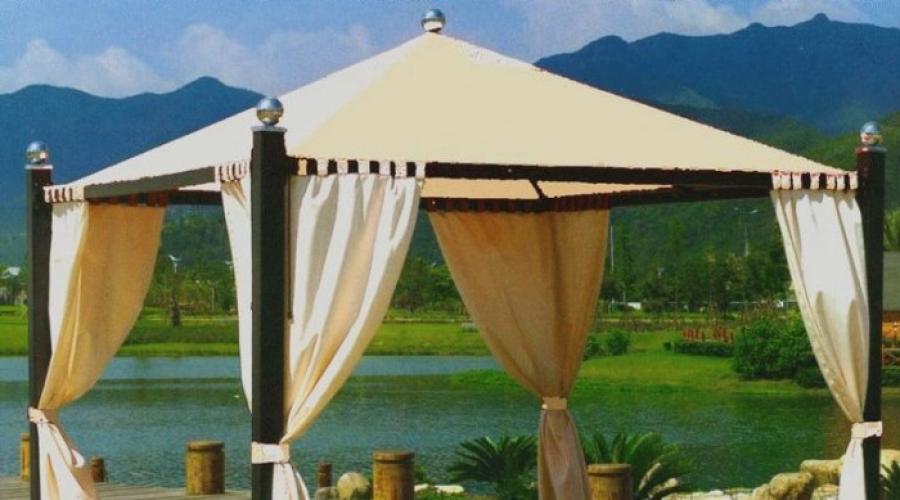
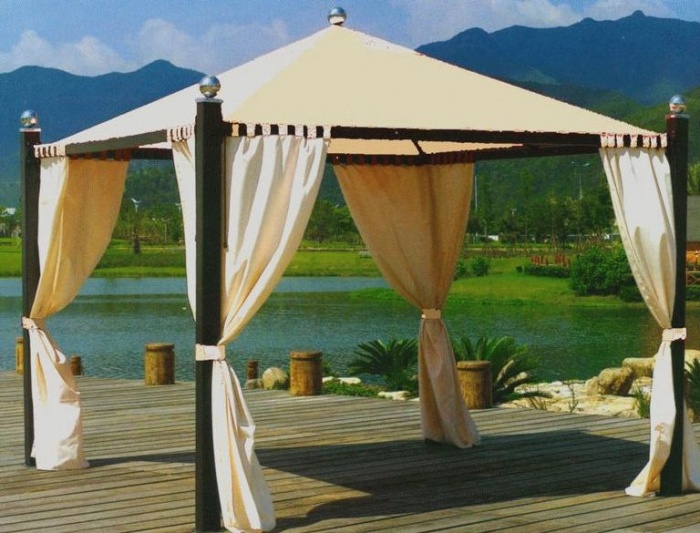
At the dacha, it is not customary to sit in the house when it is sunny and warm outside. Only during bad weather can a summer resident take refuge under a roof. However, you can resort to another option. You can stock up on great impressions at outdoors, if you build your own gazebo.
Such a building will become a decoration garden plot, as well as a place for have a nice chat with family and friends. There are many ready-made schemes light gazebos. If you assemble the structure yourself, its cost will be 50% lower than that of a finished building. The simplest gazebo can be assembled with your own hands quickly enough. If you work slowly, it can be built in 2-3 days.
Materials and designs
Cheap and practical option– a gazebo made of wood. This material looks beautiful and is easy to process. If wooden elements are impregnated with special solutions, they can last quite a long time. In addition, the construction of a summerhouse will not take more than 3 days, even if you do the work slowly.
Another material that is used to construct such structures is metal. When making a frame from profile pipe and steel corners, the gazebo can last for many decades. You can build it yourself. The work is completed quickly enough, and the materials are quite cheap.
DIY gazebo
How to build a simple gazebo with a minimum of cost and effort? To build such a structure, you will need to create a frame and floor. If it is wooden, the base is made of beams. The flooring is made of planks. It is better to pour a concrete screed as a base. This foundation option will be simple and affordable. Before work, you need to choose the right location for installing the gazebo. The site for concreting should also be leveled.

Important! For a simple gazebo, you should not combine wooden and metal elements frame.
Practice has shown that even when wooden supports are protected with roofing felt or bitumen, when placed in concrete, the elements begin to rot. Subsequently, this can cause their destruction. For this reason, it is better to immediately exclude contact between wood and concrete.
For this purpose you should:
- Concrete the round ones metal pipes.
- Then screw wooden posts to them. Metal rods should come out of concrete base by 30 cm.
- Holes are made in them for fastenings.
A gazebo can stand on such supports for decades. Any roof can be mounted on the resulting supports. It is quite simple to build a wooden structure with your own hands.
For normal light gazebos do not require the construction of brick fences. You can limit yourself to a simple fence made of eurolining. Its height usually does not exceed 90 cm. Such a fence is attached to longitudinal bars. A gazebo will help you hide from the scorching heat sun rays, and will also avoid strong winds blowing your back. The fencing for the walls of the structure is fixed to wooden supports using self-tapping screws.
Eurolining can be replaced cellular polycarbonate. This material looks great and does not overshadow the space of the gazebo. It is also easy to install. The material is not afraid of sudden changes in temperature and high humidity.

Roof
For the roof frame it is better to find 50x50 mm timber. It is necessary to create a frame from it on which the sheathing will be installed, and then roofing material. The frame is installed on top harness. The roof is covered with the following materials:
- ondulin;
- metal tiles;
- slate.

When choosing optimal width the roof should be calculated in such a way that when installing the roofing covering you do not have to cut the sheets. To do this, you first need to measure the dimensions of the panels used, and then subtract the overlaps of the sheets on each other, which will be done during installation. The result obtained will be taken into account when calculating the length and width of the roof. It is also worth considering the side overhangs and end overlap. You can make a gazebo with your own hands quite quickly. The main thing is to choose the right materials, including for roofing.

For example, for slate with 8 waves in each panel, the length of the arbor is chosen as a multiple of 1 meter. The length of the slopes can be equal to 1.75 m. If several panels are laid along the slope, the estimated length of each of them is reduced by 15 cm - this is necessary to create an overlap.
Choosing best option for roofing, worth Special attention give to polycarbonate.
Distinctive features of the material:
- He is great option in the construction of light structures.
- Fencing is also made from it.
- Polycarbonate is a transparent plastic with low mass.
- A metal profile is often used in combination with it.

Such gazebos are especially attractive and practical if they are located in the shade of trees. If there is a translucent roof and shade created by dense foliage, the atmosphere in the gazebo will be as comfortable as possible for relaxation.
Garden gazebos made of polycarbonate are simple and affordable. To create them, you need to have several tens of meters of steel angle, as well as polycarbonate panels and a steel strip. Also, before constructing such a structure, it is worth preparing planed boards, which will be needed for making benches and a table. Original photo the gazebos can be seen below.

Manufacturing stages
To understand how to make a gazebo with your own hands, you should get acquainted with the main stages of the work. It's better to choose the simpler option. First you need to equip the foundation. It is concreted support posts gazebos. After this, they should be scalded with a 25x25 mm corner. After this, 2 corner belts are welded to the racks. One of them is placed in the middle of the supports. The second one should be placed on top - the roof will rest on it.
Polycarbonate sheets have the ability to bend perfectly. For this reason, they can be used to create an arched roof. For this purpose, it is necessary to weld steel strips, which have a width of 50 mm, to the racks. They are installed on support posts. And then holes are made in them to fix the polycarbonate. You can assemble a simple gazebo for your summer house with your own hands (as in the photo) quite quickly.

Also roofing often made from tiles. For the base, OSB sheets should be prepared. The material does an excellent job of holding bitumen shingles on the roof. The thickness of such sheets can be 10-12 mm. It has fairly high strength and rigidity. That is why it does not have to assemble a spatial frame from wooden elements. You just need to firmly attach it to the harness.
Features of simple gazebos
A simple gazebo for a summer house does not have to be made with a frame frame. The foundation for it is concrete screed, which was reinforced with steel rods. You can put a barbecue on such a surface. The safety of this design is quite high, because concrete floor Hot coals are not scary. In case of winter option It is better to equip the floor with planed boards, and sheathe the area around the grill steel sheets. This winter design looks simple and beautiful.

Inexpensive to construct and easy to install is a columnar foundation. In order not to overpay when building a gazebo for your dacha with your own hands, you can prepare red brick. To install the foundation, you need to dig holes for support pillars and then put them in brickwork, place the reinforcement and pour concrete. 20 cm anchor bolts are placed in the masonry. There should be a thread at their free end.
Supports are placed on the pillars. It is better to make the frame from 50x100 mm timber. If you put antiseptic boards on it, you can get an excellent heated floor. Subsequently, the gazebo can be equipped open hearth. With this decoration, you can relax comfortably in the room even during severe frosts.
To figure out how to build a gazebo, you should get acquainted with the main features of simple structures, as well as learn more about popular materials. You should also understand the sequence of construction of simple gazebos.

Conclusion
As you can see, build simple design you can do it yourself without resorting to help professional builders. First, an exact drawing is made, and then everything is carried out in accordance with it. necessary work. It is important to consider the capacity of the gazebo, its location and materials. In order to avoid mistakes during the work process, it is worth performing the correct calculations.
Today it is becoming increasingly popular to buy summer cottages, but even more fashionable - to equip them yourself. For example, a do-it-yourself gazebo is not just cozy and beautiful, but also proof to yourself that you can do anything if you want. So where to start?
Stages of building a garden gazebo

First of all, we carefully clean the selected area where we plan to build a gazebo with our own hands, from various debris, unnecessary building materials and all sorts of rubbish.

If there are any stumps or snags, it is better to get rid of them immediately, since this will be much more difficult to do later.

Then we determine what size we want to build our gazebo. Let's say total The number of people the building can accommodate is 15-16 people. We make our own drawings or take ready-made ones. Below in the article you will find drawings of a garden gazebo, but they are suitable for a different type of gazebo, not the same as in the photographs in the article. We outline the places where our foundation will be poured, then we should dig a hole of a suitable size and arrange the formwork.

Do-it-yourself gazebos for a summer residence do not require the same amount of work as, for example, the construction of a country house or other premises, but some procedures in all construction processes still similar.

Despite the fact that a gazebo is a room that is as open as possible, the structure must be strong enough to protect those in it from rain and wind.

The next stage is the installation of load-bearing vertical structures, then floor beams. Vertical structures They are connected with special logs and the whole thing is covered with ordinary floorboards.

Wooden structures are coated with primer deep penetration and finally painted in any color you like. As a rule, most people who make summer gazebos with their own hands prefer pleasant, unobtrusive shades of pastel colors, close to beige and brown.

In combination with green foliage it looks very harmonious. It is worth remembering and taking into account the fact that whatever weather, every year the gazebo should be repainted so that it is minimally exposed to destruction.

It is best to make a roof for a gazebo with your own hands, as shown in the photo, flat and slightly recessed into the structure. In order to rainwater water falling on the roof did not accumulate there, but could drain, a homemade drainpipe was installed.

Next to the main gazebo, you can dig a small pit, if you can call it that, which can go deep below ground level up to 70 centimeters. Not added to sandy soil a large number of crushed stone to form natural drainage for sufficient drainage Wastewater. Here you can equip a small special area for barbecuing (the only thing you need to do is make sure that there are no branches on top).

If you decide to build a wooden gazebo with your own hands, do not forget about the area for children - another small area on which you can install.

The final stage is the improvement of our gazebo: installation of barbecues, tables and other necessary accessories. You can put soft, bright pillows on the benches, and put massive candles in elegant candlesticks on the tables. Since the gazebo is mainly open design, its virtual walls should be protected from prying eyes and create comfort. This can be done using light light tulle or special awnings.


It is noteworthy that modern wooden gazebos with your own hands are not just a dull little “hut” with cracked green paint, as we remember from childhood, but entire mini-entertainment centers, in which there is a place for cooking barbecue and for quiet, secluded conversations, and for children's entertainment.
Drawings of a garden gazebo
We invite you to familiarize yourself with the drawings of the garden gazebo:


Opening summer season implies not only the beginning of land and planting work, but also recreation in nature, away from the bustle of the city. And so that no bad weather or scorching sun prevents you from having a good rest, summer cottage should acquire small house or a summer gazebo.
It is good because it consists of simple and lightweight design. In addition, the gazebo will not only be protection from inclement weather, but also the highlight of the site. There are an incredible number of options for country gazebos, both in design and in price category.
But if you decide to build a miracle house with your own hands, then before this venture it is recommended to become familiar with some of the intricacies of the work and consider the projects.
From the article we will learn how to build cheaply and beautifully summer gazebo.

Choice of materials and design
Most budget material For the manufacture of a summerhouse, wood remains unchanged. But despite the low cost, this will last summer house long enough. Especially if wooden blocks also treat it with various antiseptic impregnations, which will save the wooden structure not only from exposure external environment, but also from unwanted wood pests and prevent fire.
Creating such a gazebo will not take much time and will not be difficult. Approximate time Manufacturing at a leisurely pace will take about three days.

A summerhouse based on metal structures will also last for decades, but the cost of such an invention will be many times more expensive. And besides, from time to time it will be necessary to treat metal pipes with various protective equipment for metal.
And the owners summer cottages The bigger concern is creating quality, low-maintenance, low-cost gazebos.

Therefore, before building a gazebo with your own hands, it is recommended to draw up an estimate and a drawing of the future structure, where all measurements and materials for manufacturing will be indicated. And then you should familiarize yourself with the construction projects. So, how to cheaply and beautifully make a summer gazebo for and what is needed for this? Before construction you need to choose appropriate place for a structure where before starting work it is necessary to remove upper layer about 10-15 cm of earth and compact it.

It is important to know that the cheapest option will remain a gazebo made of wooden structures without the use of metal components.

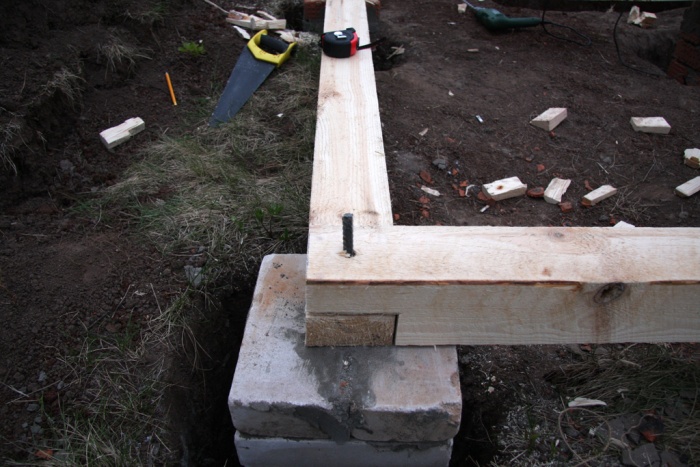
But before creating it, you should consider some nuances. Let’s say that if you make a concrete foundation for a wooden gazebo, then the service life of such a structure will be no more than 5 years. Since prolonged contact of wood with concrete leads to further rotting due to damage, despite previous treatment with antiseptics. And, as a result, further destruction of the structure.

The best way to protect wooden gazebo The wooden supports will be treated with bitumen or roofing felt.
If you still decide to make the base of the structure concrete, then it is recommended to place it in in the right places small metal pipes so that the ends are at least 30 cm from the base of the concrete. Next, holes are made in them for fasteners, which will subsequently support the structure for many years.

For further protection against strong wind It is not necessary to build brick fences. It will be enough to make a fence from eurolining about 80 cm high, strengthening it with two longitudinal beams. Such a fence will completely protect from gusty winds.


Polycarbonate structures
Cellular polycarbonate will help protect you from wind, sun rays and rain. They can easily cover a wooden gazebo structure. Cellular polycarbonate has a lot of positive qualities:
- shockproof;
- waterproof;
- sunscreen;
- light weight;
- flexible;
- variety of color (from transparent to dark tones).

Using cellular polycarbonate, you can not only sheathe a gazebo, but also build a high-quality fence. In addition, it is not necessary to make a frame out of wood; metal structure Polycarbonate is attached no worse. When creating such a gazebo with your own hands, you can resort to the help of the Internet. You can find a large number of photos of polycarbonate gazebos with complete instructions on production.


Typically, polycarbonate gazebos are installed near dense trees. Thanks to its transparency, sunlight will be supplied in sufficient quantities.

You can sheathe a gazebo made of wood or metal construction using wave slate.
Do you know how to build gazebos?
Vote
But there are several nuances:
- The gazebo must have a length that is a multiple of one meter.
- The slope of the structure is made 1.75 m long.
- When laying the slope in several rows, it should be overlapped by about 10-15 cm.
Let's find out how else you can build a summer gazebo, consider cheap and beautiful projects.

Features of the construction of simple gazebos
A gazebo made of cellular polycarbonate is not only low-cost, but also easy to manufacture. For its construction based on metal frame, you will need a corner made of a metal structure, a strip of metal, polycarbonate and a planed board. You also need to first pour the foundation base, concreted the corner supports into it. The next step will be welding.
It is necessary to weld a metal corner to the supports. One corner chord should be welded to the roof base rods. Two belts are welded in the middle part.

The flexibility of cellular polycarbonate simplifies the work when creating an arched roof. You should only light movements bend and attach to a metal structure in the form of an arch.
The roof of the gazebo will look gorgeous from pieces of bitumen shingles. You just need 3-4 OSB panels. They will serve as the basis for the future roof. The panels are quite rigid, even with a thickness of 10 mm. That's why additional protection in the form of bars will not be required. Panels can be fixed to strapping beam designs.


This gazebo does not require an additional frame frame, as it is quite lightweight. Flooring usually is, reinforced metal mesh, concrete screed. You can easily install a barbecue on such a surface.
To use such a gazebo in winter period, it is recommended to insulate the floor with wood and cover the walls with cellular polycarbonate. Thus, this building will be protected from snow and rain getting inside.


Advice! By installing a fireplace inside, as well as creating comfort and coziness, you can not only spend time here in the future, but also simply relax in body and soul.

Wooden garden gazebo
It is not difficult to build a garden gazebo with your own hands. Wooden buildings they look very beautiful and expensive. Using simple drawings and projects, it is possible to build a fairly high-quality and inexpensive gazebo. How to do this, see below.


To build a wooden gazebo you will need the following materials:
- beam 1 cm x 1 cm;
- roofing sheets;
- packaging of self-tapping screws;
- edged boards;
- slats.
To build the structure you will need a screwdriver, a circular saw and an electric planer.
In such a gazebo you can build safe place for a future barbecue or to make a summer kitchen.
Install similar summer building It is better to be away from a residential building so that smoke and noise do not cause inconvenience in the future.

Construction of a wooden structure
To create a cheap and beautiful design made of wood with your own hands, you should thoroughly study all the nuances and understand all the intricacies of such gazebos. So, let’s look at how to build a summer mini-house original project below.
For the future construction of a gazebo from wooden structure 11 recesses should be made in the ground under the racks for further installation columnar foundation. To do this, you need to have a construction drill in your arsenal. Then, the recesses are filled with reinforcement strapping and filled with concrete.

The next step will be to assemble the frame. By using metal corners, at a distance of half a tree, you will need to fasten wooden blocks together. Then, you should lay the logs under the flooring.
The assembled timber frame must be treated with protective antiseptic agents.

The next step will be laying the floor boards


Installation of rafters
Before installing the rafters, you should make cuts on the bases of the gazebo at the points of contact and sign the products with a marker.

- To fix vertical racks It is recommended to use construction angles. You should always check the perpendicularity of the position of the racks.
- Then horizontal ties are mounted along the contour from above and fastened with self-tapping screws to the load-bearing logs.
- All the main parts for the final installation of the roof are tightened and fixed, and after that the support should be cut flush in the center.
- Next, lay the sheathing and you can begin installing a fireplace or making a summer kitchen.
- Before this, it is necessary to prepare the trim to the base in order to install the sheathing later.
- The walls of the structure are covered with roofing felt for safety and filled with concrete.
- After this procedure, when everything is dry, you can start covering the walls with clapboard or blockhouse.
- The roof can also be covered soft tiles and start interior decoration. The gazebo can be painted in all sorts of colors bright colors, so that it stands out against the background of other buildings, or simply treat it with a protective impregnation and leave the wood structure, which is very fashionable now.

The interior decoration can be done at your discretion, the main thing is that it is comfortable and cozy with family and friends.
The gazebo is an integral part of many suburban and summer cottages, as it is perfect for a comfortable pastime in nature. It is included in most landscape projects, and today consumers are presented with a huge selection of forms and models of this structure. However, most original designs are obtained with independent work. How to build a gazebo with your own hands, without spending a lot of time and effort, we will talk in this article.
Choosing a location and type of gazebo
Before starting construction, it is necessary to study the landscape of the site and select the most suitable place for the future structure. It is better to choose a quiet and cool place, perhaps near a body of water.
Then you need to decide on the type and type of gazebo. Decide for yourself for what period you need the structure. If vacation on the site is planned exclusively for summer period, then in in this case A temporary structure that needs to be dismantled during cold weather is suitable. If outdoor recreation is expected throughout the year, then it is advisable to erect a high-quality structure that is not afraid of temperature changes.
The material for the future design can be:
- tree;
- reinforced concrete;
- brick and foam blocks;
- metal constructions.

Of course, for self-construction Wood is best. It's affordable and inexpensive material, which does not require special operating skills.
Foundation
As with most structures, a gazebo requires a foundation. Since the structure is quite light, a strip or screw foundation is perfect for it. If the soil is difficult, then you will have to make a monolithic foundation.

Before starting work, you should carry out preliminary preparation plot for construction. All large debris and vegetation must be removed, including tall grass. The top soil layer is also removed to a depth of approximately 10 cm.

Strip foundations are more suitable for light, stable soils. Manufacturing strip foundation consists of digging a trench up to 1.5 meters deep along the perimeter of the future structure, installing formwork and pouring a concrete mixture reinforced with reinforcement.

Screw pile foundation make it easier. It is more suitable for clayey, mobile soils. In this case, it is sufficient as supports in the right points drill iron screw piles. Of course, first you will need to carry out preliminary calculations.

The piles will subsequently serve as the basis for the future floor. They are tied with timber with a section of 50x100 mm.
Floor

It is recommended to make the floors in the gazebo from edged boards 100x30 mm, impregnated with a special solution that protects against moisture penetration. The final stage When installing the floor, the surface will be varnished. At the location of the fireplace or barbecue, the board must be protected with sheets of stainless steel or pave with stone. For ease of use of the gazebo, steps are installed to smooth out the difference in floor height relative to the ground.
Walls
After the foundation and floors are ready, they proceed to the construction of walls and partitions. If construction is carried out from wood and timber, then the wood must be treated with means of protection against moisture and fungal infections. This will significantly extend the life of the structure.

Stonework with a thickness of half a brick or brick is made according to the usual scheme. The inside may need to be coated with paint to give it a more noble look. appearance. For this purpose, coatings designed for facade works. Alternatively, you can cover the walls with slats or timber.
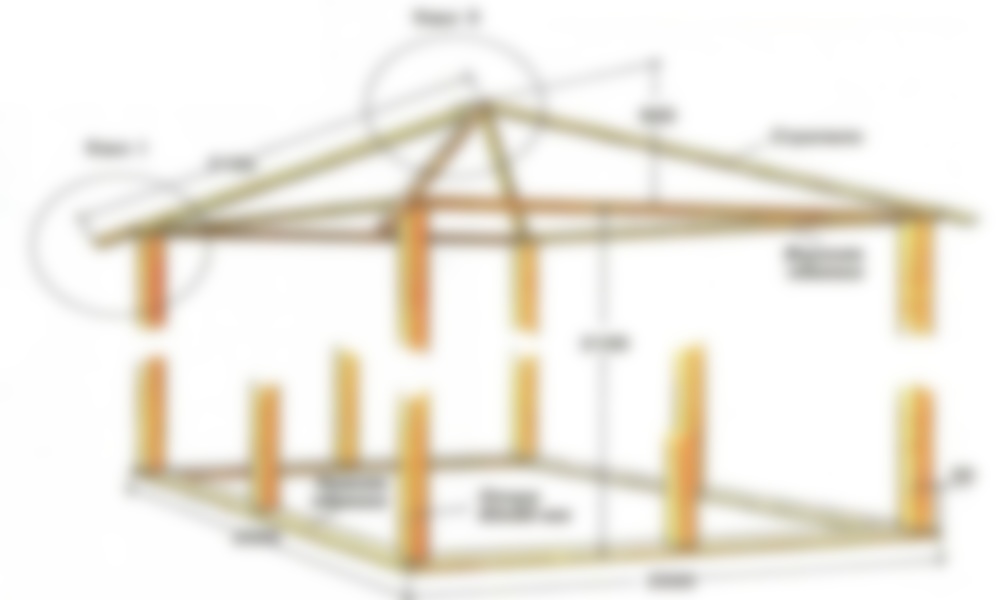
Roof
One of the main stages of construction is the construction of the roof. For a light structure, a roof with two or four slopes is most suitable, thanks to which all precipitation will roll down and not linger on the structure. This will allow the roof to last a little longer. Dirt will also not linger on it.
To make a gable roof, it is necessary to erect 4 rafters from each side of the building, which will be connected by a beam at the highest point. They are additionally attached to each other and to the strapping beam with slats.
When hipped roof rafters are installed at the four corners, additional beams are attached in the middle of each side.
Sheets of plywood are laid on the rafters, then laid out on them bitumen shingles. The ridge is decorated with a corner of tin or parts of tiles. Drainage drains are installed along the contour of the roof, through which melt and rainwater will flow freely.
Frames different types roofs for gazebos are shown in the photo below:


Additional work
After the gazebo has acquired its final appearance, they move on to interior decoration and filling it with pieces of furniture.
Note! If a light source is needed in the gazebo, then it is laid from the house open wiring using corrugation and ceramic fasteners.

A self-made gazebo will delight the whole family and friends for many years, making outdoor recreation convenient and comfortable.