What is the best way to assemble a bouquet of flowers? How to make a bouquet of fresh flowers with your own hands? What to consider when composing compositions
Read also
Evgeniy Sedov
When your hands grow from the right place, life is more fun :)
It is difficult to imagine a solemn moment without picturesque flowers. They decorate the interior of the house and serve as signs of attention. You can easily buy a plant arrangement in the store, but if you want to make it yourself, take a moment to immerse yourself in this interesting and creative process.
How to make a bouquet of fresh flowers correctly
A creative and exciting activity - arranging bouquets of fresh flowers - requires knowledge and skills. To make a beautiful composition, follow certain rules. Need to consider:
- intended for a woman or a man;
- color combination;
- incompatibility of plants with each other;
- sizes in accordance with the donation situation;
- texture of the components - it is better to use different ones (needle-shaped, terry);
- undesirability when composing the use of a large number of plants;
- proper preparation of the material for the composition;
- beautiful design and packaging.

Types of flowers for a bouquet
The art of arranging bouquets of fresh flowers - floristry - takes into account that each plant in the composition has a special meaning. It can be conveyed without words to the person receiving the gift. Plant meaning:
- lotus – health, happiness;
- calla lilies - poise, beauty;
- peony - wealth, glory;
- rose - love;
- lily - nobility;
- aster – charm;
- irises - wisdom, peace;
- tulips - wealth;
- lavender - admiration.
Decorative greenery plays an important role in composing the composition. It helps to highlight beauty, add volume, and revitalize. Popular plants in floral design:
- Asparagus. Its feather-light branches create volume and decorate the bride's bouquet.
- Aspidistra. The wide, large and dark leaves of this plant set off the flowers with a rough texture.
- Gypsophila. The cloud of its small white flowers creates lightness and volume.
- Bergras. Its unusual, thin, thread-like leaves, collected in a bunch, add grace to the bouquet.
- Fern. These carved, graceful leaves will decorate a bouquet of different flowers.
Plant preparation
How to make a bouquet of fresh flowers so that it stays fresh and beautiful longer? To do this, collect them early in the morning or late evening. To properly prepare plants for composition:
- remove the lower leaves from the stems;
- remove thorns from roses;
- on chrysanthemums and plants with hard peduncles, make cuts up to 2 cm;
- remove anthers from lilies;
- burn the flower stalks of dahlias and peonies over a fire and place them in cold water;
- Make an angled cut on the stem under water.

Bouquet shape
When starting to compose a bouquet, think about the shape. It may vary in size and assembly patterns. Particularly popular are small original compositions of small plants, which are based on a wire frame. They are used as:
- neck jewelry;
- bracelets;
- boutonnieres for the groom's suit.
Large sets can be symmetrical in shape - pyramidal, oval, round. Asymmetrical compositions are characterized by the appearance of an irregular triangle or crescent. When compiling, the following forms are often used:
- loosely assembled - good as a gift option;
- round – ideal for desktop use;
- one-sided - from plants of different lengths, arranged in tiers;
- linear - consists of several peduncles and greenery;
- Biedermeier - modern style with dense plant placement and trim with ribbons and lace.

Combination of flowers in a bouquet
If you have a question about how to make a bouquet of flowers so that it pleases with its beauty and does not irritate you, consider all the subtleties. When creating a color scheme, use the following options:
- similar – colors close to each other, for example, yellow, orange and red in different shades;
- contrasting – looks bright and optimistic;
- monochrome – one color, but different shades;
- polychromatic or rainbow - all the diversity of the palette.
Decoration
When composing and decorating a composition, decoration should not be intrusive and distract from the integrity of the idea. The design depends on the occasion to which the gift is dedicated:
- birth of a child - bears and hearts are used;
- New Year's Eve - supplemented with sweets, figures of animals, birds;
- romantic date - characterized by the presence of beads and butterflies;
- autumn anniversary - allows additions in the form of branches with berries.
How to pack a bouquet of flowers
When arranging bouquets of fresh flowers, packaging is an important point. It serves as decoration, but does not draw attention to itself. With the help of design you can hide the shortcomings of the kit. It is important to choose the right material and not to overdo it with decorative elements. Synthetic materials are used for decoration:
- film – colored, transparent;
- organza – plain, with sparkles, patterned;
- artificial mesh that retains its shape well.
Original bouquets of fresh flowers are decorated using natural materials. They give the composition a finished look, look organic and stylish. Popular packaging options include:
- thin felt – successfully complements tall compositions;
- sisal - decorates sets with a short stem;
- jute mesh – serves as decor for status compositions;
- corrugated paper - has good drape.
Look at the photo below to replenish your piggy bank with new ideas. A round set of roses, decorated with felt that matches the color of the flowers, looks elegant. The packaging in corrugated paper, which does not distract attention with its colors, beautifully complements the composition. Bouquets of flowers collected using the spiral technique are distinguished by their splendor and grace. They will be appropriate for any special event. A mini bouquet of tulips is perfect as a gift for a girl on a first date.

For those who don’t like to throw away wilted bouquets, florists have figured out how to extend the life of cut plants. Creative bouquets in a box of fresh flowers will delight you with their splendor for a long time. You can use toys and butterflies for decoration. In addition to fresh flowers, Japanese bonsai trees are decorated in this way. The secret is that the box contains a special sponge soaked in water.

Educational video tutorials: floristry for beginners
Store-bought gift sets of flowers amaze with their variety, but a composition that would reflect all facets of the creator’s personality can only be made independently by studying floristry. Arranging bouquets of fresh flowers brings many pleasant creative moments. To familiarize yourself with the rules for composing flower arrangements and the features of arranging different types of bouquets, watch the free video course of 4 lessons below. This way you will develop your taste and learn how to create original floral compositions.
If you want to create a wedding bouquet yourself, then choose any of the two proposed methods. Learn about the language of plants and the principles of flower compositions.
The content of the article:
Flowers are amazing natural creatures. Just looking at them is sometimes enough to lift your spirits. Flowers are used to decorate rooms, decorate tables during a significant event, and are presented as a sign of respect and love. They are bred at home, in the country. It’s nice and easy to go out into nature in the summer to admire the blooming of charming plants and immerse yourself in their aroma.
Language of plants

If you know how to make a bouquet, then you can become a florist, at least in your family, and delight your friends and loved ones with such picturesque gifts. Different colors, different groups of plants are able to tell for a person what he did not dare to tell.
Before you arrange a bouquet, learn about the language of flowers:
- Anyone who wants to express his admiration should present a bouquet of lilies and camellias.
- Mimosa will hint that the giver is carefully hiding the feelings he has for you.
- If you were given a bouquet of white irises or pink or red roses, tulips, these plants speak eloquently of love.
- Also, red and white roses can, in the language of flowers, assert that you are the other half of the giver (at least he or she thinks so).
- But it’s better not to receive yellow carnations, as these flowers will convey the unpleasant news that you have fallen out of love.
- Carnations of different colors, chrysanthemums and hyacinths are given as a sign of respect.
- Be sure that someone is enchanted by you if you present a bouquet of lavender, violets or burgundy roses.
- If a bouquet of orchids and chrysanthemums is made, it means that the giver is pleased to meet you.
- And one or more branches of lilac will remind or inform that you were the giver’s first love.
How to make a bouquet

If you want to put together a spring composition of fresh flowers, then use plants of no more than three colors. Of course, the range of shades must be combined with each other.
For example, if you take purple lilacs and want to add tulips to the composition, they should not be red or yellow. In this case, tenderness will not be achieved. To make it happen, include white, light pink or soft lilac tulips in your bouquet.
You can add other flowers, such as hyacinths, but they should also be subtle in color and blend in with the rest of the plants.
Speaking about how to make bouquets, it is important to note that one can contain several names of plants. A composition that uses gerberas, red tulips, gypsophila, and chrysanthemums looks beautiful.
It is important to follow the color palette and the principle of composing a bouquet:
- Place the lightest or smallest flowers along its edges, but they should not hang down. Gypsophila will look great here. Place dark and bright plants in the center of the composition. Falling and curly ones are placed near the stems of the main flowers.
- Don't use too many greens. Just add a carved palm leaf or a fluffy sprig of asparagus. In this case, the greens should not rise above the flowers, unlike cereals.
- Making bouquets also includes the knowledge that the flowers in such a composition should not be located close to each other, let them look free.
- When creating a composition, think about its concept. When you make a field bouquet, do not combine “complex” and “simple” flowers. After all, among lilies of the valley, daffodils, small daisies, for example, an exotic anthurium, an orchid will look ridiculous. The charm and elegance of a “simple” bouquet of small daisies and lilies of the valley will be emphasized by solidago, iris and other flowers in the same color scheme.
- Use plants that are in different stages of buds: have strong buds, slightly bloomed and fully opened.
To prevent cut flowers from wilting longer, add a sprig of geranium or thuja to them. At least every other day, trim the stems, wash them and change the water in the vase to fresh water.
Examples of creating compositions from fresh flowers

If you don't know what bouquet to create for the teacher, the one presented below will be an ideal option. After all, in the language of flowers, hydrangea means “impartiality.”
To create such a flower arrangement you will need the following:
- blue hydrangea, red lily, solidago, spray white chrysanthemum, greenery;
- floral sponge “oasis”;
- thin cardboard;
- polyethylene film;
- artificial small apples;
- sisal coconut fiber;
- red spray paint;
- thick aluminum wire;
- glue gun and silicone glue for it;
- thin floral wire;
- wire cutters;
- scissors.

Take cardboard, form it into a ball 25 cm high. Secure it with glue. Make a small loop from the aluminum wire that will secure the other end of the wire when you remove it from the bottom of the bag.
If you are using cardboard whose color matches the sisal fiber, then there is no need to dye it. If the shades are different, then coat the outside of the bag with spray paint.
Disassemble sisal fabric into fibers or use coconut fabric. Using a glue gun, attach this decorative element to the cardboard cone. And at the bottom, wind it onto a curl of wire.

Take a floral sponge and place it in a container of water. To ensure that it is evenly saturated with liquid, do not drown it with your hands. After 20 minutes, take out the sponge, cut a blank out of it so that it matches the internal dimensions of the bag. To prevent the cardboard from getting wet, wrap the sponge horn in cellophane, leaving only the top part free.
We will insert flowers into it. Trim them and stick the shortened stems into a sponge horn. To make a bouquet of flowers, first take lily, solidago and greenery.
After you place them in the “oasis”, stick hydrangea, chrysanthemums there and decorate your creation with artificial apples, stringing them on small pieces of wire. You can use toothpicks instead.

The flowers in the bouquet should be arranged quite tightly, but not overlap each other. Along with the blossoming lily, its buds also look beautiful.

You can create such beautiful flower arrangements yourself and present them to a teacher or other respected person.
Jewelry for the bride

Flowers are used not only to decorate the newlywed’s hairstyle, decorate the hall, the festive table, but also, of course, to make the bride’s bouquet.
Below will be presented 2 master classes on this topic. In the first, the flowers for the wedding bouquet will be decorated using a porta bouquet maker. In the second one, no.
The bouquet holder is a hollow plastic tube, expanding towards the top, into which a floral sponge is inserted. It is saturated with a preservative solution or water so that the liquid nourishes the flowers for some time.
A bride's wedding bouquet made using this device will not only look beautiful, but will also be able to remain fresh throughout the holiday.
To create this you will need:
- Portable bouquet holder “Lady”;
- satin ribbon;
- a piece of oasis sponge;
- anchor tape;
- green tape;
- double sided tape;
- 4 white and 5 crimson roses;
- salal leaves;
- viburnum (viburnum berries);
- scissors;
- pliers.


The bride's dress should look perfect from both the front and back. Therefore, we decorate the outer upper part of the portaquet holder with salal leaves, gluing them to double-sided tape.

For a better fit, you need to secure these leaves to the ribbed surface with anchor tape.

So that it is not visible, we wrap a light green tape over it.

If you have dry Crisal powder, add a little of it to cold water so that the sponge soaked in this solution will nourish the flowers.
If not, then place the semicircular piece of “oasis” that you first took out of the horn into the water. Don’t forget, he must drown in it himself, without your help, then he will be evenly saturated with moisture.

After this happens, take out the sponge, put it in place in the portaquet holder and secure it by covering it with a mesh. Moreover, the latter should snap onto the white part of the horn.

Next, we form the bride’s bouquet with our own hands, or by calling in assistants. We move on to decorating the handle of the horn, since the composition should look amazing from all sides. Starting from the bottom of the bouquet, cover its narrow part with double-sided tape, and place a white satin ribbon on top of it. Attach its tip using a glue gun.


Now decorate the side expanding part of the horn with leaves. Cut their stem at an angle and immediately pierce the sponge with it.

To prevent the water flowing down from the sponge from wetting the handle of the portaquet maker, we put a dry piece of “oasis” into its hollow part. It will absorb excess moisture, thereby leaving the bottom of the bouquet dry and the bride’s hands clean.
We begin to decorate the wedding bouquet with flowers. Trim the brighter roses at an angle first, distributing 3 on one side and 2 on the other side of the sponge. Then stick in white flowers and fill the gaps between the roses with viburnum and leaves. After which the composition for the bride from roses, leaves and unripe berries of viburnum is ready.

Another wedding bouquet

If you do not have special equipment, then you can perform the composition using a different technique. Not only does the bride’s bouquet consist of such roses, it can be made and given as a gift, timed to coincide with another event. This is what the final composition looks like.
For this we have prepared:
- 10 single-headed roses;
- 20 spray roses;
- greenery to decorate the cuff;
- tape.
To make a beautiful bouquet, start by placing 5 flowers parallel to each other. Their height should be the same. Place the next, sixth rose at a slight angle. Place the seventh one at an angle as well.

Gradually, turning the bouquet slightly to one side, arrange all the roses in this way. As a result of using this spiral technique, you will get a beautiful hemispherical shape. Tie it with anchor tape or tape, wrap it several times, tie it, trim off the excess.

To create a cuff, also surround the bouquet in a spiral around the outer circle with greenery. Then tie the composition again, this time with greenery.
Trim the ends of the petioles with sharp scissors or pruning shears so that they are the same height and the cuts are perpendicular. When you hold the arrangement, the remaining stems should be slightly longer than your palm. Now you know how to make a bridal bouquet in another way.

Gift for your girlfriend

Flowers designed in the shape of a heart will touch any representative of the fair sex. And if you make a bouquet with sweets, you will like this gift even more. To create such an original presentation, you will need a little, namely:
- red carnations;
- floral anchor tape;
- ribbon;
- scissors;
- wide green tape;
- decorations in the form of butterflies on wire;
- pink or scarlet silk ribbon;
- thick floral colored aluminum wire;
- candies "Raffaello" or others in wrapper.
Now decorate the stems with a wide decorative ribbon and tie a scarlet bow on top of it.

Wrap a thin textile ribbon around the inside of the carnation heart. To do this, pass it between the colors in different directions. Fill the resulting bowl with sweets and decorate the bouquet with butterflies. After which you can give a beautiful, fragrant, tasty gift.
There are many more ideas that provide both fresh and dried flowers, as well as house plants. You can familiarize yourself with them in the following articles. In the meantime, we invite you to watch interesting videos that will help you better master the presented technique of creating bouquets:
![]()
Since ancient times, bouquets of artificial flowers have been used to decorate the interior. Now they are made both to create doubles for the bride, and as an original gift.
Over time, manufacturing techniques and the materials themselves began to change. At first, such compositions were made only from paper, fabric, foamiran, ceramics and clay. Then heavy ceramics and clay, which harden after firing, were replaced with polymer compounds and lightweight plastic. Well, no one has canceled the use of ready-made artificial flowers, which can be bought in many stores. This article describes in more detail what materials are used to create bouquets with your own hands, what their advantages are and how to make them.
Materials and their features
Popular materials for making bouquets of artificial flowers with your own hands have their own characteristics:
- Plastic flowers are the most practical. This is a very cheap and lightweight material. However, the low cost is offset by the short period of use, because sooner or later the pigment on the surface of the plastic will begin to fade and the flowers will have to be replaced.
- Polymer clay is heavy but durable. There is no way to drop such bouquets, because this material easily splits.
- Textile. The products are durable, strong and inexpensive, but they collect a lot of dust or can fade in the sun. Among the disadvantages, one can also highlight the weight of such a bouquet. Sometimes it reaches several kilograms.
- Paper or satin ribbons. This composition looks very impressive, but will not last long.

Additional decor includes:
- beads;
- beads;
- ribbons;
- glass balls;
- buttons;
- brooches;
- pearls;
- chains;
- ropes;
- twines.
Important! To ensure that the decoration lasts as long as possible, it is not recommended to place compositions on a windowsill or where there is a lot of sunlight.
Containers for artificial flowers
An artificial bouquet made by yourself can stand in different containers:
- In pots. Classic option.
- In vases. It will look very original if you fill a glass vase with smooth pebbles and multi-colored balls.
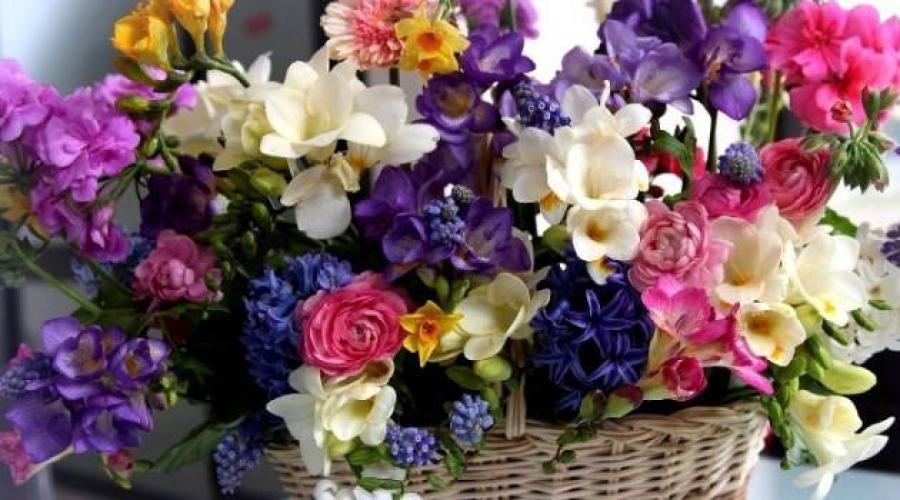
- In wicker baskets. They look very cute and cozy.
- In a flowerpot. A cover, for example, a knitted one, is put on the pot, and it is hung from the ceiling by a loop.
- In bottles or glasses (suitable for miniature compositions).
In addition to beautiful decorative compositions, you can make a bouquet of artificial flowers with your own hands for a beautiful bride or simply as an interior decoration. Below we will look at the most interesting ideas.
Master classes
The floristry industry does not stand still; new forms, types of flowers and color solutions are emerging. Artificial bouquets are not an innovation, but a very original option.
Bouquet of kanzashi
Every bride wants her bouquet to be the best and unique, even if it is a duplicate. An artificial wedding bouquet made with your own hands using the kanzashi technique (made from ribbons) is ideal for this.
You can create any flower from ribbons, give it different shapes and choose the color you want. This composition is also suitable as the main bridal bouquet. It will look original and bright in photographs. It’s easy to make it yourself, all you have to do is turn on your imagination and put your soul into it.

For an artificial bouquet for a wedding you will need:
- Ribbons (for buds, handles and leaves). One flower requires approximately 40 cm of ribbon 2.5 cm wide.
- A roll or roll, for example, from kitchen napkins.
- Wire.
- Glue.
- Threads.
- Styrofoam ball.
- Lace or openwork ribbons.
- Decor (rhinestones, beads, etc.).
This will be a bouquet of artificial roses. Forming a flower:
- We take one ribbon for a flower bud, bend the edge and stitch it, tightening the thread so that a petal is formed. For one flower you need to make 11 petals.


- We attach all the petals to the wire. For one rose you will need 5 cm of wire with a diameter of 6 mm. One of its edges bends into a loop. The petal is smeared with glue on one edge and wrapped around the wire.
- To form a rose bud, 3 petals are glued, then in the first row - 3 more, in the second (final row) - 5 petals, the last one is glued under the first. This way you can independently adjust the size of the buds.
- For green leaves you will need an atlas. It is necessary to cut the tape 5*5 cm (one sheet). It is folded in half, each corner needs to be burned with a candle. The leaf is glued under the rose bud.
- To make the base, the foam ball must be cut in half. Only one piece is needed for the bouquet. 4 through holes are made in this half, and a place for the roll is cut out. The same holes for the wire are made in it, it is mounted on glue and wire.
- Now let's start decorating the bride's bouquet, made with our own hands from artificial flowers. The roll is decorated with a green ribbon. First, rectangles are cut out of the tape to cover the bottom edge, after which the tape is wound over the handle.

- All the roses made are strung onto a ball. Here you can dream up. Roses can be made plain or combined in several colors, for example, blue and white. This will depend on the style of the wedding and the image of the bride herself.

- Having decorated the composition with roses, you need to secure the green leaves along the bottom edge. You can glue an openwork ribbon along the bottom of the bouquet under the leaves, it will look more elegant and interesting. You can make two tiers of loops from satin ribbons that will decorate the bottom.
- All that remains is to decorate the flower ball with beads, stones and rhinestones.
This hand-made artificial kanzashi bride's bouquet will delight guests and become the highlight of the celebration.
Bouquet made of clay
For a decorative bouquet of artificial flowers made by yourself, polymer clay is also suitable as a material. You can make many different types of flowers from it. Such a composition in a beautiful vase will ideally complement the interior of your home.
What you will need:
- Clay in three colors (two for buds, green for the stem).
- Latex gloves.
- Stationery knife.
- Toothpick.
- Beads for decorating the flower core.
- Board for work.
- Wire used as a frame.
Our flower will need white and pink clay to give it a natural look. Sequence of work:
- Wear gloves to avoid the material sticking to the bunches and to avoid getting dirty.
- You need to pinch off identical pieces from two multi-colored bars of clay. Roll them into “sausages” on a board. Wrap one of the finished “strips” in a spiral around the other.
- Roll the clay into a ball, which is cut in half. You will get two pieces, from which a pair of buds will come out.
- Roll each hemisphere into a round pancake. One side of it needs to be pulled out a little and lengthened, like a leaf. Twist it into a bud.
- To give the flower a natural look, it is necessary to lengthen the wide part of the flower a little too.
- Use a toothpick to make a hole in the middle of the bud. A stem will be inserted into it, which is made of wire wrapped in clay or crepe paper. The core is decorated with beads.
- All that remains is to repeat this process as many times as you need flowers. You can use your imagination and make several buds on one stem. Then it will turn out very original.

Important! When the material begins to dry out or becomes difficult to work with, you need to add a little baby cream. If the clay begins to stick, you need to sprinkle the board with talcum powder.
To create more complex flower buds, templates, stamps and stacks are used.
Cascading bouquet-understudy
This option uses the taping technique, which allows you to give the composition any shape with your own hands.
To create a cascading wedding bouquet of artificial flowers you will need:
- Small artificial roses (40 pieces).
- 2 branches of white carnations.
- 10 rose leaves.
- Artificial greenery with small leaves (several branches).
- Thin floral wire (0.7 mm).
- Glue gun and glue for it.
- Tape.
- Wire cutters.
- Lace about 50 cm.
- Scissors.
- 15 beads for decoration.
- Satin ribbons 2 m long (width 4 cm and 2.5 cm).
- Decorative button.

The process of making a duplicate bouquet of artificial flowers:
- It is necessary to trim the carnations so that only the “legs” remain of them, which will be used to form the stems of the roses. We use this carnation wire, cutting it into pieces of 4-5 cm. There should be as many such pieces as there are roses that will be used to create the composition. We put buds on these segments. First, apply a drop of glue to the tip of the wire.
- For further formation of stems, floral wire is used. It needs to be wound to the legs of the roses so that the ends of the wire become a continuation of the existing legs. The same must be done with all the flowers and sprigs of greenery.

- Now you need to tape the wire using tape. By stretching it from top to bottom, you need to tightly wrap the ends of the wire.

- We assemble a bouquet by putting one flower together and forming the “head” of the composition. It is better to secure everything with tape several times during the process. It is necessary to alternate red and white flowers, periodically inserting small greenery, trying to form a hemisphere.
- Let’s start decorating the handle of an artificial bride’s bouquet made with our own hands, this option will also be beautiful. But since now we are talking about a cascading bouquet, we need to make a falling part. To do this, take 1 rose, then 2 more roses (heads) are located below. There should be 3 more roses under them. At the same time, do not forget to add cloves and herbs. The number of roses will depend on the required length (you can make it up to the floor).

- We combine the hemisphere and the falling part so that they become one. Everything is fixed with tape.

- To decorate the stem of the bouquet, you need to surround it with leaves and secure it well again.
- We cut the satin ribbon (4 cm) into 8 pieces 10-12 cm long. All pieces need to be folded in half, folded and secured with glue. We paste the leg of the composition in a circle with such blanks.

- We cut off the excess stems with cutters, everything is fixed with tape.
- We begin to decorate the leg along the entire length using ribbon (2.5 cm).
- The final stage of making an artificial wedding bouquet with your own hands will be decorating roses with beads. There is no need to glue them into each rose, but arrange them randomly. You need to tie a lace ribbon on the leg and decorate it with a decorative button.

Beauty is a relative concept. What was admired yesterday may seem completely tasteless today and not worthy of attention. It’s not difficult to make a beautiful bouquet with your own hands, but you should first familiarize yourself with the latest trends in the world of floristry so that it looks stylish and fashionable.
Current trends in floral design
Natural, practical and creative - this is how a beautiful arrangement should be, according to leading florists. It is important that the bouquet arrangement not only pleases, but also surprises, for example, with an unexpected combination of components, color scheme, decor, and packaging method. Contrasts that until recently shocked and caused bewilderment are now met as a matter of course.
It is fashionable to mix exotic plants with field and garden plants, adding fruits or vegetables as an accent. Due to the beneficial interaction of shades and textures, dynamic, expressive compositions are obtained. But the main trend in recent years has been mixes of fresh flowers and sweets - the quintessence of pleasure.
The second no less popular trend is mono-bouquets. To highlight the natural beauty of flowers, luxurious, carefully thought out packaging is used. Some mono-compositions are best “diluted” with decorative greenery and berries, but roses, callas, carnations, gerberas and eustoma do not need such an addition.
Those who decide to please their loved ones in the winter do not have to wander in search of exotic flowers, like the heroine of the famous fairy tale “The Twelve Months”. It is allowed and even fashionable to make beautiful bouquets with your own hands, not only from flowers, but from any seasonal materials. Cones and branches of coniferous trees, dried flowers and succulents in combination with “New Year’s” fruits - oranges, pomegranates, kiwis will make a magnificent arrangement, in no way inferior to their traditional counterparts.
With the arrival of warmer weather, when the choice of floral components expands, the time comes for creative experiments. Nothing prevents you from combining spray roses and decorative sunflowers or delicate garden anemones, protea, cereals and cotton bolls. Boldly? But with a delicate taste, it turns out fantastically impressive.

Beauty is in convenience
The well-known slogan: “Beauty requires sacrifice” seems to be losing its relevance. Floral compositions now impress not only with aesthetics, but also with practicality. An original type of packaging is coming into fashion - a cone-bag, which allows you not to hold a huge armful of flowers on outstretched arms, but to carry them freely, like a purchase from a store.
Only the desire to simplify life can explain the appearance of miniature “compliment” bouquets, which are usually given on a date, as a sign of sympathy, or as an encouragement to employees. Almost weightless compositions in original paper envelopes do not embarrass or oblige the recipient to anything, but they definitely lift the mood.
Another “convenient” trend is to present flowers in boxes, baskets or drawers, equipped with a floral sponge. A creative solution saves a lot of hassle, because the arrangement already has both a vase and water, all that remains is to decorate your interior with it. The box is often made into 2 compartments, adding some pleasant surprise to the floral elements.

Among the most popular gifts:
- perfumery;
- decorations;
- Stuffed Toys;
- elite confectionery products.
Examples of fashionable and stylish flower arrangements
Thanks to the fashion for naturalness and unusualness, making a beautiful bouquet with your own hands today is easier than ever. Novice florists can give full rein to their imagination and passion for experimentation. But fresh ideas will not hinder even the most creative individuals. As well as useful tips for their implementation.
Moss and cotton
A birthday bouquet is one of the most popular after wedding floristry. But if previously it was compiled exclusively according to the rules of floral etiquette, now is the time to break stereotypes. An unusual combination of dried flowers, cotton bolls and moss accessories will be appropriate in almost any situation, regardless of the gender, age and taste preferences of the birthday person. This bright and positive mix is simply bound to please.

For convenience and ease of assembly, a floral frame is used. You can twist it yourself from wire, but it is better to buy it ready-made in a specialized store. The frame perfectly retains the shape of the bouquet arrangement, helps distribute the plants without resorting to spiral techniques, and also eliminates the need to make complex packaging.
You will need:
- eucalyptus greens, stabilized moss balls, cotton bolls, Albiflora brunia sprigs;
- decor: rattan balls, wood wool, “ladybugs” figurines for decoration;
- floral wire, pruning shears, heat gun.

We cut “stems” of the same length from the wire. We attach plants and decorative elements to them. We braid the rattan balls with wire, place moss elements on it, and extend the cotton bolls.


A small tuft of decorative filler, known as “wood wool,” is wrapped in the middle with thread to give it a neat shape. And glue it using a heat gun at the base of each moss ball.

We mask the wire “stems” of all decorative components with tape.


And let's start assembling the bouquet. It is based on 2 types of decorative balls and cotton.

We fill the gaps with brunia sprigs and eucalyptus greens. Next, we carefully “thread” the bouquet arrangement into the finished frame, decorated with moss. After shaking slightly, we distribute the plants throughout the frame so that there are no voids and “crowding”, and additional volume appears.

We fix the stems with tape, after which we wrap them with decorative ribbon made of organza folded several times. There is still an unattractive underside of the frame. We mask it with the same wood wool, gracefully lowering some of the material onto the handle.

Having secured the filler with threads, we decorate it with a colorful textile bow. And we enliven the composition itself with cute ladybugs. The result is a very original and stylish arrangement in eco-style.


Blooming Provence
Delicate compositions in pastel colors, reminiscent of one of the most beautiful provinces of France, are unlikely to ever lose their relevance. They only change slightly, following new fashion trends. Today it’s especially chic to give such floral masterpieces in hat boxes.
This is perhaps the best way to beautifully pack a bouquet of flowers with your own hands. By performing all the operations step by step, you can get an excellent result without delving into the intricacies of professional floristry. The main thing is to choose a harmonious color scheme and plants with different textures that will effectively complement each other.

For example:
- roses of 2 varieties: bush and peony, eustoma, ranunculus, waxflower, viburnum, eucalyptus greens, as well as the symbol of Provence - lavender.
Materials you will need:
- elegant box;
- floral sponge (piaflor);
- mica packaging film.
- We assemble the bars of dry piaflora together using wire staples. Using a utility knife, cut a circle to fit the size of the gift box. In order not to make a mistake, we simply place the “container” on the structure made of bars and trace the outline with a marker.
- We line the inside of the box with thick cellophane film, which will protect the cardboard from getting wet.
- Place Piaflor in a container of water and let it submerge freely without pressing to speed up the process. Otherwise, dry areas may remain.
- Wrap the damp sponge in cling film, leaving the top open, and place it in the box. We smooth out the cellophane protruding above the piaflor with scissors, leaving 1.5 - 2 cm.
- We prepare the plants. We cut the stems obliquely, having previously measured what length is needed to make the composition look beautiful. First we distribute large roses, then eustoma and ranunculus, and finally decorative greenery. We complete the arrangement with lavender, which will add not only a special charm, but also an aroma.


Everything in the garden
A hot trend is to collect as many seasonal plants as possible in one arrangement. It turns out very fresh and unexpected, as if a piece of a summer garden was in the girl’s hands. An interesting and beautiful do-it-yourself bouquet can be made from gladioli, roses, carnations and Santini chrysanthemums. Especially if you add umbrellas of dill and its close relative bouplerum, jasmine branches or other ornamental shrubs to the flowers.
To cope with lush forbs you will need the following tools:
- pruning shears, scissors, tape.
And materials:
- decorative braid of several types, pins.

How to put together completely, seemingly incompatible plants? In the traditional way, using the spiral technique. The core is formed by roses.

Then they are joined by small-flowered chrysanthemums and greenery. In order not to disturb the horizontal composition, tall gladioli are disassembled into inflorescences and placed in capsule stems with a nutrient solution.

Each layer of flowers is interspersed with greenery. Umbrellas of dill and buplerum add delicacy, and bush leaves add picturesqueness.

Having gained sufficient volume, we fix the plant stems with tape. Then we cut it with pruning shears to the desired length. We decorate the stem with several types of satin braid.


If fresh flowers do not seem creative enough, you can replace them with a beautiful paper bouquet. Gone are the days when such a decision was frightening and alarming. Exquisite roses collected from sheets of an old book will be an excellent gift for a paper wedding.
Before starting the creative process, you need to make sure that the paper, if we are talking about really old editions or sheet music, is still flexible enough to withstand various manipulations with it.
- Let's prepare 5 types of petals, as shown in the photo below. All of them are intended for one rose. The number of petals of each type depends on how lush the flower is needed. In any case, there should be at least 5 of them. The smallest petals, from which the middle is collected, have a narrow, pointed shape, the peripheral ones are wider and rounder.
- We bend each piece slightly along the midline, and pull the edges back, as if “curling” them with our fingers. This way the petal turns out voluminous and naturalistic.
- We twist one of the paper blanks intended to form the central bud into a tube and glue it to the wire. We begin to collect the rest of the flower around, using increasingly larger petals. Each subsequent copy must overlap the junction of the previous two.
- We wrap the wire stem of the rose with tape. You can also make sepals from it.
- We assemble the composition on a foam ball or porta bouquet.


The simplest and most effective way of packaging
Even a simple arrangement will sparkle with new colors if it is designed correctly. Not only baskets or hat boxes, but also ordinary wrapping paper can work wonders. Moreover, with its help you can beautifully wrap a bouquet of flowers with your own hands in just a few minutes.
Required:
- 1 sheet each of craft paper and tishy, as well as 2 sheets of wrapping paper;
- ready-made floral accessory.
We collect a small free composition on our stems. We cut the packaging sheets into rectangles with sides 20x25 cm. We place them on top of each other at a slight angle. We cut out a base from kraft paper, 50 cm wide and 1.5 times the height of the flowers.

Let's start assembly. Place 2 sheets of wrapping paper on craft paper so that their bottom edge is centered and the top edge protrudes slightly. We arrange the flowers. We cover the lower part of the stems to the leaves with a long rectangle. We gather thin tissue paper into wide folds.

We lay 1/3 of the craft sheet on top, and form an envelope from the rest of it. We secure the packaging with satin ribbon.

A wedding is fun, a day for the newlyweds, happy guests, a host with a microphone, nuances. Wedding floristry is important to create an image for every girl. Choosing flowers for a wedding is a responsible step, so many people do it on their own. The advantages of a composition made by yourself are obvious: it is cheaper, it satisfies your own desires. The age of technology allows you to learn how to make a bridal bouquet with your own hands from fresh flowers using the Internet.
Important Details
How to make a bouquet for the bride with your own hands? We will learn in more detail what a do-it-yourself bridal bouquet is, step by step, using fresh flowers, photos are attached. If you decide to create a wedding masterpiece yourself, keep these rules in mind:
- The shape of the floral work, the details are selected to suit the type of figure, the image;
- Choose seasonal varieties, this is a budget option.
- Choose a material that will not ruin the dress. Smearing pollination of stamens, prickly thorns of roses are a bad choice;
- Before making a wedding bouquet from fresh flowers, practice. Since we have not been involved in floristry professionally, it may not work out; it is difficult to work with the material. It’s okay if you don’t succeed the first time, you need practice;
- Talk to a professional florist, design specialist, or look at arrangements in salons to stay up to date with new products. Watch the master class, but go beyond your own desires;
- Choose a variety that does not cause allergies. A wedding is a day for fun, not teary eyes due to an allergic reaction. Take into account the physical characteristics of the body so as not to cause harm;
- When forming a bouquet of roses, consider the weight. Calculate so that you don’t get tired during the day.

It's about the form
How to make a bouquet for the bride with your own hands to achieve what you want. This day will be remembered for the rest of your life, spend maximum time preparing. Individuality is required when designing a wedding bouquet for a wedding. Floristry knows how to make a bride's bouquet with your own hands from fresh flowers in such a way as to surprise and discourage. The following works are popular:
- Small compositions;
- Ball-shaped - based on a portobouquet;
- Cascade;
- Vertical (on long stems);
- Arbitrary;
- It is independently formed from the petals of a bud;
- Avant-garde, non-standard (in the form of a belt, handbag or fan).

Basics of home floristry
To figure out how to correctly formulate a reliable work, learn the basics. We will consider in detail the following formation methods:
- On the stems. The composition is formed from varieties with a long stem;
- On a wire. A wire is inserted inside each stem. The stems become brittle;
- Bouquet in a porta bouquet. Portbuketnitsa is a foam ball on a plastic handle, it is moistened in water. When the porta bouquet is saturated with water, it preserves the freshness of the elements. This design creates spherical compositions.
The last option is simple. If there are no floral tools, then choose the first method. It is budget-friendly, convenient, and requires a minimum amount of time. If you are still interested in how to make a bridal bouquet with your own hands from fresh flowers, let’s get started.

Step-by-step instructions “on the stems”
Since this option is easy, we'll start with it. We will figure out how to make a bouquet for the bride with our own hands, having a minimum number of tools and materials. To compose hydrangeas and chrysanthemums on stems we will need:
Twine made of natural material – 1 pc.;
Floral wire – 1 package;
Organza ribbon 5 cm wide;
Secateurs or scissors;
Pushpin.
Choose the number of flowers in the bouquet that suits you. Before moving on to the step-by-step creation, we note that everything will be done in white with brown shades. A bouquet without a porta bouquet looks gentle at a wedding, emphasizing the neatness of the future wife. These secrets will tell you how to make a bridal bouquet with your own hands from fresh flowers.

1. First, prepare the material: cut off the excess leaves with pruning shears. We form a triangle out of 3 hydrangeas, put 3 more flowers below, thus leaving room in the center. We carefully insert the last hydrangea there so that it rises above the rest.
2. We surround the ready-made wedding bouquet with white chrysanthemums. It turns out that we also form a triangle from them, only an external one.
3. We fix the stems with floral wire at the base so that they do not fall apart. Carefully trim the ends with pruning shears.
4.Now we decorate the “handle” of the bride’s bouquet of fresh flowers: we wrap the stems with ribbon from bottom to top, and then secure it with a button.
5.Use twine to overlap the ribbon in a loose form to add an accent and create a real masterpiece.

Step-by-step creation of a composition with a porta bouquet
Let's find out how to make a bride's bouquet with your own hands from fresh flowers, as well as which options are popular. Wedding bouquets of spherical fresh flowers are in demand because they seem fabulous. They look harmonious, neat and tidy. The formation, which is based on a porta bouquet, has secrets on which the lifespan and preservation of the appearance of the composition depend. To create we need:
Porta bouquet;
Satin ribbon;
Double-sided tape;
Scotch anchor;
Tape;
Knife, pruning shears or scissors;
Glue gun;
Water;

So, we will begin to create a bride’s bouquet with our own hands using fresh flowers step by step (photos clearly demonstrate the result). Choose the material that will match each other in color. Light colors are suitable for young girls, while a dark color palette will emphasize the femininity and elegance of women. Be careful, because a bride’s bouquet of fresh flowers with your own hands is a responsible matter that requires seriousness and concentration. Also pay attention to the size of the bride's bouquet of fresh roses. If the girl is large, then a small object will distort and visually enlarge, but neat, miniature compositions are suitable for short ones.

1. Prepare the porta bouquet: open and insert a long piece of oasis. Oasis is a special foam sponge that is soaked in water. It can be purchased at a salon or ordered online.
2. We decorate the expanding part of the portaquet with leaves. Glue it in a circle with double-sided tape. To secure, glue the ends of the leaves with anchor tape on top. The leaves do not fall apart, but for aesthetic purposes, we will hide the tape behind a green tape.
3. Wet the round part of the oasis in cold water. It is important that the sponge is soaked evenly. Why is it important? Elements of a work must be nourished to maintain freshness.
4.Decorating the handle. We seal the end with satin ribbon and double-sided tape. Next, we wrap the tape along the handle and cover it with tape. We glue the tip under the base with hot glue. For this you will need a glue gun. You can buy a glue gun in a decorative store or order it online on the website.

5. Decorate the cuff. First we decorate with leaves, which we cut at an angle and stick in. Why do we trim leaves? To keep them fresh longer, an oblique cut increases the area of the stem that will be saturated with water. Under the weight, the moisture from the round oasis will fall down. We inserted an oblong piece of sponge, which will absorb excess moisture so as not to spoil the handle.
6. All we have left is to decorate the spherical sponge. You can opt for the classic version of a bouquet of roses. We leave 6 cm of the stem so that it is convenient to insert into the oasis.

This instruction explains how to make a bouquet for the bride with your own hands. In addition to the compositions, also decorate the tables, the boutonniere of the groom and witnesses, and create a design for the presenter’s microphone. Remember: a wedding is all about the details.


Learn detailed instructions on how to create a wedding masterpiece from the video.