DIY shell decor ideas: photo frames, mirror, pots and vases. Crafts from seashells - DIY mirror decor How to decorate a mirror in a marine style
Currently, a mirror is an integral attribute of any living room, the purpose of which is not only to admire your reflection. A mirror is also an important decorative element and decoration of any interior. Often, industrial mirrors cannot fully emphasize the individuality of a room’s design. And this is where hand-made mirrors come to the rescue.
Naturally, if we talk about the decor of an old mirror that we personally designed, we should not mean a forged frame or a frame made, for example, from mahogany. There are many ideas for decorating mirrors using readily available and relatively cheap materials that will allow you to do it yourself make an original decorative element.

In a modern house or apartment, almost every room is equipped with mirrors: hallway, bathroom, bedroom or children's room. Depending on the location in the house, the purpose of mirrors may be different, but they are united by the fact that modern people simply cannot imagine life without a mirror. This household item should also be in the living room, although many people believe that this is not the case.
If the room is spacious enough, the absence of a mirror in it can of course be justified, but the presence of this household item in small rooms can visually expand the space of the room.

Room decor with an unusual mirror

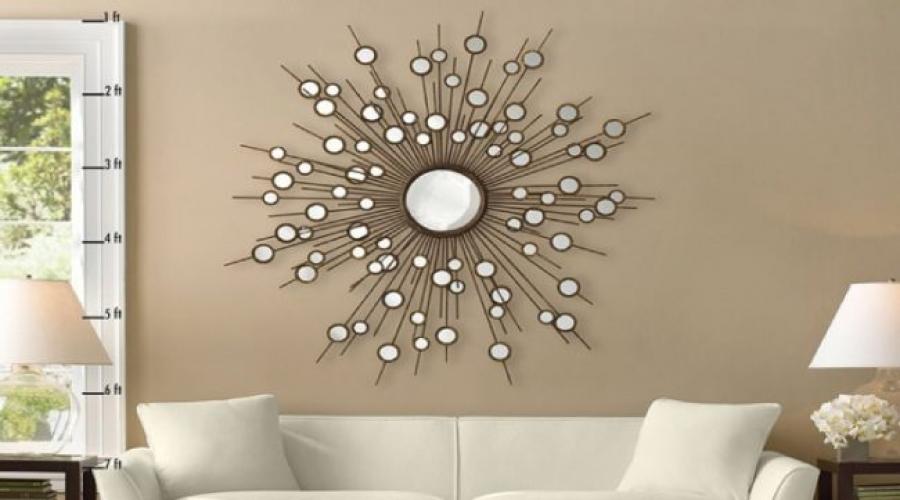
Do you like this sun frame for the mirror? A detailed lesson in this article -.

You can also make these 3 very stylish mirrors with your own hands - follow the link for a detailed master class -.
At first glance, it seems that all mirrors are similar to each other. You can avoid this by decorating the mirror yourself. Let us next consider the most common decoration options.
The decision to equip the walls of a room with mirrors often leads to problems caused by the need to purchase a product of a certain size, shape and design so that it harmonizes with the interior of a particular room. Decorating mirrors with your own hands helps solve this problem.
It should be noted that this work will require not so much mastery and skills in a certain area, but rather a developed imagination and good taste, as well as a creative approach to business.

Wall decoration with small mirrors

An unusual shape or frame for a mirror is an excellent solution for an empty wall in a room.

These shaped mirrors are easy to make yourself - you need to choose a shape and order cutting

Composition of 16 mirrors

A feather-shaped mirror is an excellent solution for a relaxation area


7 rules for decorating interior mirrors
When using mirrors as a decorative element, you must follow the following rules:
- It is better to select products of the same size, preference given to small and medium mirrors.
- If the mirror object has an irregular shape and should not be placed in a frame.
- It is recommended to enclose round or square mirrors in a beautiful frame.
- To make the composition look like a single whole, it is best choose frames of the same type.
- The most important thing is to use the same frames for different sized products.
- When creating a composition of mirrors on the wall, you need to try not to create excessive clutter - sometimes in order to create a harmonious image, 5 mirrors with spectacular frames are enough.
- The frames look great and match the decor of the room as a whole.
ADVICE! For example, a frame made of wood goes perfectly with a wooden table. In general, as professional designers say, the design that is made with your own hands using imagination and a creative approach will look impressive.
Mirrors are capable of visually expanding the space of small rooms (for example, in Khrushchev buildings), but often this will require more than one mirror.
- Three, six, or even ten products of different shapes and sizes will allow you to achieve the desired result. In an interior made in a classic style, volumetric frames made of stucco are suitable for such mirrors.
- Modern trends in room design are ideally complemented by narrow mirror frames of various geometric shapes, sometimes with patterns on the surface.
- When using lamp lighting, a bright reflection in the mirrors will contribute to the visual expansion of the space.

Large mirrors for the living room
You can order the production of “crooked” mirrors and place them on one of the walls (in the form of appliqués or a single size in the shape of a square).
Light walls can be perfectly decorated with mirrors of varying shapes and sizes. Such a “row of windows” will enliven the room and brighten it even more.

Mirror over the fireplace
A beautiful large mirror ideally placed above a sofa, table or fireplace. However, combining this household item with other mirrors should be avoided.
DIY wooden frame for a mirror
Wood looks great in almost any interior. This is a very popular and time-tested natural material. Wood products have excellent performance characteristics and an attractive appearance. That's why wood is ideal for use in homemade mirror decoration. Square or rectangular household items are well framed with ordinary wooden borders, but you can and should experiment with round and oval mirrors.

Mirror sun made of branches
It will look original for any interior called the mirror-sun. It is made using blocks or twigs of wood, a plywood frame, a primer, special glue, aerosol, sandpaper, and a glue gun.
How to make a sun mirror:
- To begin with, twigs are glued with wedges along the entire perimeter of the frame, alternating long and short, so that it looks like rays from the sun.
- Each block is necessary hold for 15-20 seconds, so that it sticks well.
- After waiting for the glue to dry, you need to remove its remnants with sandpaper, and then apply primer and leave for 1 hour.
- Then you need to cover the frame with paint or varnish.

Decor with dry branches

The twigs can be replaced with wooden clothespins. So, a few minutes - and the decorative sun frame is ready!

Mirror frame made of clothespins
Paper decor
Round and small mirrors can be decorated, using egg cartons. This solution is very original and requires very little cost. It will be necessary to cut out each individual cell, glue the flower and paste it over the mirror.

Mirror frame made from egg packaging
DIY bathroom mirror decor
By decorating an object we mean achieving a form and color scheme that is in harmony with the style in which the interior of the room is made, as well as with its purpose. When decorating a mirror in a bathroom, you must ensure resistance to moisture and strong fixation of decorative elements.

Decor of an old mirror in the bathroom - acrylic painting
How to decorate an old mirror in the bathroom:
- First you need remove the previous coating from the surface of the frame. To remove old paint, use paint stripper - it is not expensive and can be found in any building materials store.
- Then priming occurs in order to prepare the base for the glue.
- After this, glue must be applied to the places where beads or shells will be attached. Decoration can be done in random order.
The original design idea is a frame made of metal rulers, which are also arranged in the shape of a sun.

Mirror frame made of metal rulers
The standard rule for decorating walls with mirrors is: if the products are voluminous, then there should be few of them. For example, to decorate a large mirror, you can glue toy cars to it and paint them on top. One product decorated in this way is quite enough for the room.

Original mirror frame from old toys
By imagining and using ordinary objects that are at hand at the moment, it is possible to decorate the mirror so that it looks unique and at the same time retains a piece of the invested soul and warmth.

Also, a backlit mirror looks very trendy in the bathroom - it’s very easy to make with your own hands. Here's the detailed one.
Mirror decor with shells
Before starting work, make a pattern of shells by placing them on the surface to be decorated. The composition may or may not have symmetry. Use your imagination as much as possible when creating a drawing.

- To avoid contamination of the mirror glass, it must be sealed with masking tape. After this, you can start gluing the shells onto the frame. For the glue to dry completely you need to wait for several hours.
- After making sure the glue has hardened, start painting the frame.
- Painting is done in several layers, which are applied every 20 minutes in order to give them the opportunity to dry slightly.
- The layers are carefully applied so that they are as thin as possible.
This design of a mirror using shells will decorate any room whose interior is made in the “classic” style.

You can also make decorative candlesticks from shells - detailed lesson:.
Mosaic mirror decor
To decorate a bathroom mirror yourself, you can use glass or ceramic mosaics.

Bathroom mirror with mosaic tiles

If you want to make such a mirror yourself, here is a detailed one

Frame decorated with sequins

You can make such an original bathroom mirror yourself by simply ordering shaped mirror cutting
Decor of a round mirror with a frame made of pipes: Master class
A very stylish and modern frame for decorating a round mirror can be made from ordinary polypropylene pipes for water supply.

Frame for a round mirror made of pipes
To do this you will need:
- plastic pipe;
- electric saw;
- skin;
- glue gun
Assembly technology
Step 1
- We cut the rings with great care. At the same time, they must have the same width, otherwise the finished product will look sloppy.
- Therefore, a miter saw with fine teeth is ideal.
If you don’t have such a saw, you can use a miter box.

We take polypropylene pipes for water supply - you can choose any diameter at your discretion
Step 2
- Just before gluing, cuts on each ring processed using fine sandpaper, to avoid the occurrence of burrs.
- Since our task is to produce an accessory that has a beautiful appearance, every little detail should look neat.

We lay out the rings in any shape you like
Step 3
- Rings fastened with a glue gun, which will provide discreet fastening. Gluing of rings can occur in different ways; a different method may be used than in the photo.
- The form of the composition can be both square and oval. It is recommended to make it in the shape of a mirror.

We glue the rings together with a gun
Step 4
The mirror is also glued to the rings with a glue gun exactly in the middle. It should be noted that all elements must be cleaned of dust particles and degreased before gluing. You can hang the finished product on the wall using the rings.

So, you can make a product that combines 2 or 3 mirrors, and to give a greater effect it can be supplemented with a glass vase or table.
Master class: Mirror with lace
A frame made of paper lace looks very unusual and homey. It can be purchased at any store that sells disposable tableware.

We have to:
- Paper lace for cake.
- Double-sided tape.
- Round mirror.
- Covering paper.
- Aerosol paint.
- Scissors.
Technology step by step
Step 1
Take some cake paper lace and spray paint it. Dry well for 1-2 hours.

Paint the lace with spray paint
Step 2
Cover the back of the mirror with double-sided tape. Then cut off the protruding end of the tape.

Apply double-sided tape to the mirror

Trim the excess tape along the contour

Removing the protective film
Step 3
Remove the protective film and place the mirror on the previously painted paper lace and press well.

Making external mounts for the mirror

Place a mirror in the center of the lace and press the tape well

Hanging a mirror on the wall
The final touch remains, attaching it to the wall.

These frames look especially beautiful if there are several of them!
Master class: Mirror decor with petals
The frame for the mirror can be decorated with artificial petals; they are usually sold in bags in goods for decoration.

Mirror decor with petals
For this we use:
- Petals of artificial silk flowers.
- Glue gun.
- Round mirror (or oval).
- Aerosol paint (any color).
Work order
- We paint the frame white.
- Starting at the outer edge, use a hot glue gun to glue on the petals.
- And so we lay the petals row by row.
- We insert the mirror into the frame. Your amazing mirror is ready!

Row by row, hot glue the petals in a circle.

Finished mirror with petals

Master class: Mirror decor with gold leaf
An unusual and modern mirror will be created if its edges are decorated with gold leaf. If you don’t find it, you can take regular thin foil.

Mirror decor with gold leaf
We have to:
- Glue gun.
- Mirror of any shape.
- Foil or gold leaf
Decor technology
- Take the foil and tear it into different shapes.
- Using a glue gun, glue the edges of the mirror with pieces of foil or gold leaf, placing them tightly on top of each other.
- Let dry for 1-2 hours.

Glue the foil onto the mirror with a glue gun

I really want to extend my summer vacation at sea, don’t I? But work and other obligations cannot be delayed; at least the memories of a wonderful seaside holiday are warm in the soul!
But such memories can be extended, not by looking at colorful vacation photos, but by making a mirror frame with your own hands, decorated in a nautical style. Just imagine how wonderful it will look in the interior of a bathroom or hallway, constantly feeding you with pleasant memories of the warm sea!
Mirror with shells photo 

If you brought shells from the sea, then literally after a few days you may notice that they have darkened and a terribly unpleasant smell has appeared. Below you will learn how to bring the shells into proper shape.
How to clean seashells at home.
1. Freeze the shells. Some people recommend freezing the shells in a bag filled with water, I know from experience that no water is required, place the shells in a bag, tie it and place it in the freezer. After a while, when you can deal with the shells, take out the bag, wait until the shells defrost (do not untie the bag during defrosting - otherwise you will smell a pungent odor). After defrosting, tie a cotton-gauze bandage on your face, put gloves on your hands, arm yourself with tweezers, a knife, and a sharp wooden skewer and remove the insides of the shells.
2. Boil the shells. There is another way to clean shells: pour water into a saucepan, carefully immerse the shells in it, and boil the shells in boiling water for about 15 minutes. Then drain the water, let the shells cool, use tweezers and remove all the insides from them. At the final stage, rinse all sinks thoroughly with running water.
3. How to bleach shells. Take a glass container, immerse the shells in it and fill it with laundry bleach. After 1.5 hours, you can take out the shells; if necessary, you can hold them longer. Rinse the sinks under running water, dry, grease with vegetable oil and after a while, coat with colorless varnish. When drying in the sun, try not to overexpose the shells, otherwise they will crumble. 
Mirror with shells photo 


How to decorate a mirror with shells.
✓ Required materials:
✓ Mirror in frame;
✓ Hot glue gun with glue sticks (transparent instant glue can be used);
✓ Shells, pearl beads and river pebbles;
✓ Colorless varnish;
✓ Tweezers. 
Where can I get shells?
Gather on the seashore; Purchase in coastal shops (usually these departments sell shells of all shapes and sizes at affordable prices); Purchase in souvenir shops in your city; Order in the online store; Purchase in “Everything for Creativity” stores; Ask friends and relatives. 
Well, let's start decorating the mirror with shells.
We place the mirror on the table, heat up the heat gun or simply arm ourselves with a bottle of transparent instant glue. We cover the mirror canvas with cloth or paper so as not to drip glue or scratch it.
We glue small shells along the inner contour of the mirror; it is better to apply the glue to the shell itself. Of course, when applying glue to the frame, things will go faster, but since the moment tends to harden quickly, you may simply not have time to glue the seafood. Make sure that they are located symmetrically and do not jump out of the intended row. 
After creating the shell outline, you can start gluing large shells, but before gluing, just apply the shell to the frame and evaluate whether it looks appropriate here.
After gluing the large shells, start filling in the gaps between them using pearl beads, river pebbles and small shells. If you plan to stick on starfish, then remember that they are very fragile and need to be glued on first, and then other decorations should be placed around them. The gaps can also be filled with clean sea sand or light beads can be used. 
When a marine-style mirror is completely decorated with all kinds of seafood, leave the product to dry completely; 24 hours will be enough. Then we coat the frame with a glossy, colorless varnish, and after drying again, we admire the result! 
I suggest you look at a selection of photos of square mirrors, complemented by shells.
Such mirrors will highlight the interior design of the bathroom, hallway and bedroom. And how wonderfully they will fit into a marine themed interior! 
Mirror with shells photo 


Round mirrors decorated with different-sized shells.
Such mirrors look very neat and quite compact, so they can be hung in any room of the house; in addition, such a mirror is perfect as a gift! 
Mirror in marine style photo 


Oval mirrors decorated with shells and other seafood.
Such mirrors look truly cozy, they will instantly help to enliven the overall interior atmosphere. Just one mirror can dramatically change the entire home environment; thanks to its bright decor, it will become the main accessory in the house and will constantly attract attention. 


Rectangular mirrors decorated with large and small shells.
This form of mirror is perhaps the most traditional and in demand. A large mirror, decorated with shells of various shapes, can be hung in a central place in the living room or dining room.
Mirror in marine style photo 


Posted from: 9-21-2016
This year I finally realized my old dream - I made decor from seashells. I have been collecting shells for a long time - from every trip to the sea I brought with me a certain amount of shells. I was all about to start making crafts from shells for the interior, but, as they say, “the preparations were short-lived” 🙂 The only thing is that the shells were used to decorate miniature gardens in bowls, the creation of which I am passionate about.
This year I was lucky enough to visit the sea near Anapa, in st. Blagoveshchenskaya, where we were camping on a sand spit. There were absolutely extraordinary shells there - the likes of which I had never seen in my life. They were large, bright, some were even covered with some kind of limescale, reminiscent of coral formations.

Of course, during my vacation I was enthusiastically collecting this beauty, with the goal of subsequently making decor from shells. Other shells, smaller ones, I collected on the Sea of Azov when we went to the port of Caucasus near Taman to meet a friend from the ferry.
When we were returning from the sea, we stopped at Ikea near Krasnodar and there I bought two wooden mirrors, hoping to decorate them with shells. I started decorating the mirror with my own hands while on a trip - it’s nice to do something creative on vacation when you have a lot of free time. For this I only needed pva glue, shells and the mirror itself.

How to glue shells to glass
Many people ask me how and what kind of glue can be used to glue shells to glass. I will say with all responsibility that you can’t think of a better glue than PVA glue.
You need to glue the shells like this: you squeeze PVA glue onto the surface (it should be thick and create a layer of 3 millimeters on the surface. That’s exactly how it is, and not as many people do - they simply smear the surface with a brush. In the latter case, the shells will fall off almost immediately.
But if you squeeze out the glue in a thick layer, then carefully place the shells in the glue (don’t be afraid, this will not harm the beauty), then they will stick very well. When the glue dries, its layer will become thinner and it will become transparent and invisible. This is exactly how I glued the shells to the mirror. Large orange ones were collected on the Black Sea, and small ones - on the Azov Sea.
Look at the shells themselves in macro photography - you can’t see the glue at all!

This is how the mirror was originally.

Well, this is what it became after decorating with shells.

The next idea to implement is to make one out of shells. Fortunately, after my last trip I have a lot of them.
In addition to its functional mission, the mirror serves as a decorative decoration for the entire interior of the room, regardless of its purpose. Basically, mirrors are purchased ready-made, and the products offered are produced mainly in standard configurations, but you can also purchase a designer item, but its cost will be quite high.
You can solve the issue yourself by making a frame for the mirror with your own hands, or decorate an existing one using scrap materials and personal imagination.

If your imagination is a little tight, you can always resort to online resources, where you can see many photos with mirror decor options.

Mirror decorating ideas
Perhaps almost everyone knows the amazing property of mirrors - expanding the space of a room, making it visually larger than its actual size, and the role of stylish interior decoration.


You can decorate mirrors with various materials, available in sufficient quantities for everyone. And your irrepressible imagination and great desire will bring any ideas for decorating mirrors into reality, moreover, made with your own hands, which will make your creation truly priceless and unique.

The main field for creativity in decorating mirrors is not the mirror surface, but its framing, i.e. frame. To decorate it, you don’t need any special knowledge or work experience; this process is quite accessible to everyone, the main thing is to have good taste and a creative approach to the design process.

To decorate a mirror frame, you can use: seashells, pieces of broken glass or ceramics, tile shards, paper, newspapers, jewelry elements, mosaic remains, bamboo sticks, tree branches and much more.


Using broken glassware
You can easily make mirror decor from broken glassware with your own hands. Did your favorite cup or plate break? Don’t rush to throw away the fragments, because you can use them to make decorations for a mirror frame.

Cut the mosaic pieces using the appropriate tool. Prepare in advance a project for your future creation and a field for creativity.

Glue the mosaic components on top of the workpiece using regular glue; small beads and pebbles with mother-of-pearl will not be superfluous, in addition, you can use other details at your discretion. At the end of the process, it is necessary to grout the frame surface and wipe it with a soft cloth.

Decor using shells
Decorating a mirror frame using shells couldn’t be easier if you have glue, acrylic-based paints and a sufficient number of different shells on hand. Prepare the surface of the frame in advance, clean it from dust and dirt. Apply glue on top of it and place the prepared shells in the intended order.


Straight lines, wavy lines, in the form of circles or bends, and other configurations will look beautiful. Dry the composition for some time, then cover it with acrylic paint or fix it with varnish.

Decorating with stones
A frame decorated with stones looks quite expensive and stylish. When using glass drops, do not forget that they are quite massive, which means you should leave some space around them free. Do not combine stones of different types and textures.

For decoration, the ideal choice would be: smaller-than-average pebbles, drop-shaped glass, crystal elements, artificial or natural stones, rhinestones and other materials. Use special transparent glue to secure it.

We decorate the wall with mirrors according to the rules
In order not to spoil the wall with future creations, and to successfully decorate the mirrors on the wall, you must follow certain simple rules:
- give preference to mirrors of one size; it is better to use products no larger than average;
- products of non-standard shapes, as a rule, are not placed in frames;
- round or square mirrors should be decorated with a beautiful frame;
- a composition of the same type of mirror frames will look seamless, regardless of the size of the mirrors;
- use no more than 5 mirrors with a spectacular and stylish frame in the composition, otherwise you will disrupt the harmony;
- A win-win option would be to use mirror frames that fit perfectly with the entire style of the interior design of the room.


Photo of mirror decor


A mirror is not only an object that helps you evaluate your appearance, it complements the interior, adds style and performs aesthetic functions. With the help of an originally designed mirror, you can significantly change the image of your home and give your home a complete look and unique style.
You will need:
- Various shells;
- Pearls of different sizes;
- Sea pebbles;
- Glue "Moment";
- Clear varnish;
- Sand, beads, sparkles, etc.
- Self-adhesive paper;
- Ammonia;
- Water;
- Mirror.
Instructions:
- First of all, it is necessary to degrease the surface of the mirror, shells, pebbles and pearls using water and ammonia. Using self-adhesive paper, make a frame for the mirror of the desired shape and size.
- Once you have made the frame, you can begin the most exciting process - decorating. First, it is recommended to stick large shells symmetrically. They can be fixed to the sides or corners of the mirror. If you use starfish when decorating, be careful, they are quite fragile.
- Fill the space between the large shells with small shells, pearls and pebbles. You can also add sea sand, salt, beads or glitter. Do everything carefully and carefully, carefully thinking through where you glue the elements.
- At the end of the work, shake off excess sand, remove any remaining glue and coat the frame with clear varnish (if the mirror will hang in the bathroom, coat it with 2 layers of varnish). This will add reliability and prevent the elements from crumbling, maintaining their appearance.
- When the mirror is completely ready, you can hang it in the place provided for it.
Decorate the mirror with beads

You will need:
- Mirror;
- Transparent silicone sealant;
- Beads;
- Masking tape;
- Alcohol.
Instructions:
- First you need to prepare the surface of the mirror: to do this, treat it with alcohol. Using tape, separate the part of the mirror from the part you will decorate. The border should not be made too wide, otherwise the decor will look tacky and heavy. The line of tape can be uneven and arbitrary, the main thing is to maintain symmetry.
- Apply a thin layer of sealant to the part limited by the tape. Carefully pour the beads onto the surface with the sealant, leveling it. The beads should lie in an even layer without visible gaps.
- Instead of beads, you can take transparent pebbles of different sizes. In this way, decorate the entire separated surface of the mirror.
- Once you have made your beaded frame, carefully remove the tape and let the sealant dry.
DIY mirror: decor options
The easiest way to decorate a mirror is with regular paint. You need to choose the right paint not only by color, but also by the nature of the frame material. The mirror frame can be painted in a neutral solid color or in a bright one with contrasting patterns. The only thing worth considering is the harmony of the interior colors.

The mirror can be decorated with artificial flowers. You can take flowers of different sizes and glue them in any order. The gaps between them can be filled with beads, sequins, sparkles or beads. A mirror decorated in this way will look beautiful in the bedroom.
A good option for decorating a mirror is ribbons. You can make many different colored bows in different sizes and attach them to the frame. In addition to bows, you can cut small squares from multi-colored ribbons and place them on the frame, creating a patchwork fabric. This mirror will look great in the hallway.
To decorate a mirror in the bathroom, use ceramic tiles or CDs. You can decorate a mirror using the mosaic technique. For effect, use bright or mirrored tiles. This option is quite labor-intensive and time-consuming, but the result is worth it.
A mirror for a children's room can be decorated with a puzzle. Buy a children's puzzle and glue its pieces onto the frame to create a picture. This method is original and bright, your child will be delighted!
Decorate the mirror for the New Year You can use rain, tinsel, garlands, paper snowflakes and angels. In addition, you can buy artificial snow at a special store and spray it on the surface.