Garland of stars. We make beautiful and festive garlands ourselves. Wrap paper lanterns with garland around a branch and hang above your bed
Read also
On New Year's Day, a paper garland is used to decorate the holiday tree and as an independent decor. It is easy to make it from scrap materials with your own hands. There are several options for creating such decoration.
Garland of paper lanterns
New Year's lantern garland can be used as a night light
The finished decoration can be placed on top of electric lanterns. Only before this is it carefully inspected, checking the wires for integrity.
To create lanterns you will need the following materials:
- scissors;
- colored paper;
- a simple pencil;
- ruler;
- needle;
- glue;
- thread.
Making a garland takes place in several stages:
- Cut a strip 7–8 cm wide from a sheet of colored paper.
- Mark a piece of paper using a pencil along a ruler. You should get vertical strips of equal size.
- Repeat the procedure, but use a needle instead of a pencil. Then it is easier to bend the parts in places where the lines outlined in pencil are pressed with a needle.
- In the middle of the workpiece - perpendicular to the lines on it - mark a zigzag with a pencil and push it with a needle.
- Assemble the resulting workpiece into an accordion. It is important to pay attention to the oblique areas in the middle of the workpiece.
- Using glue or thread and a needle, assemble the accordion into a lantern.
- String several lanterns on a thread.
The diagram shows the sequence of actions when making a flashlight
A garland of paper lanterns is perfect not only for the New Year, but also at regular times for interior decoration, shop windows, etc.
Decor made of three-dimensional stars for the New Year
If you make stars from white material, then you can color them with paints or felt-tip pens
To create decorations, use plain white, colored or packaging paper. You can take paper intended for scrapbooking.
Materials for making stars:
- paper;
- scissors;
- eraser;
- protractor;
- compass or saucer;
- ruler;
- simple pencil.
The work is performed in a certain order:
- Turn the paper over to the reverse side. Using a compass, draw a circle on it - the diameter of the star. Instead of a compass, you can use a saucer - attach it to the paper and trace it with a pencil. Draw a straight line from the edge to the center.
- Using a protractor, measure an angle of 72°. Draw a straight line. Repeat the procedure along the entire diameter. The result should be 5 lines with the same distance between them.
- In the middle between the straight lines, draw additional ones - you can use a dotted line. Connect the resulting lines into a star shape. Erase the circle and other extra lines with an eraser. On the right side of each edge of the star, mark a connecting strip.
To make a garland, it is good to use elements of different colors and sizes.
- Cut the resulting workpiece and bend along the guide lines. If the paper is thick, the folds are creased with scissors or a ruler to give them maximum expressiveness. Then the workpiece should be bent.
- Using the same principle, make the second half of the star. Coat the connecting strips with glue and glue the two parts together.
The result is a three-dimensional star
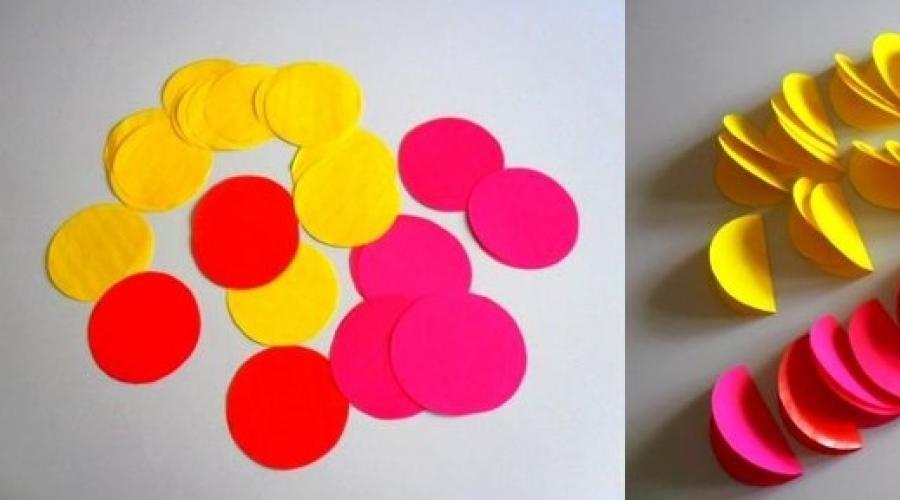
Paper ball decoration
The garland can be hung in any position - both horizontal and vertical
To make a garland you will need:
- colored paper;
- compass;
- scissors;
- glue;
- needle with thread.
Work order:
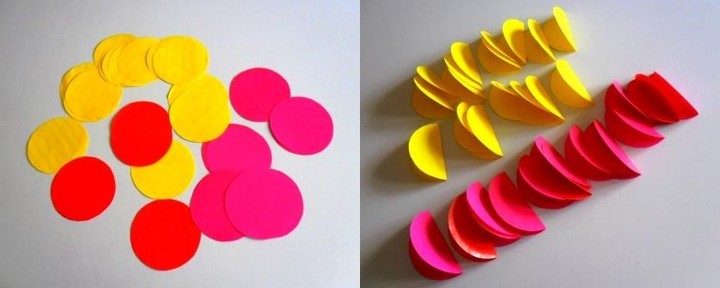
If you glue a rectangle to each figure from below, you will get baskets with balloons. Then, in the interval between them, you can string clouds cut out of paper onto a garland.
Volumetric paper snowflakes
It is advisable to choose cardboard with a density of 65 g/m2. cm. The larger the square, the higher the paper density should be.
To make jewelry, you need materials and tools:
- cardboard - 6 squares;
- scissors;
- stapler;
- glue;
- threads;
- pencil.

Paper garlands are a simple and inexpensive option for holiday decor. Children are always interested in making New Year's decorations, experiencing pleasure from the process itself and rejoicing at its result.
Photo: thehousethatlarsbuilt.com
You can make a variety of New Year's decorations and decor from paper and cardboard - from simple to unusual!
1. Paper garlands and lanterns

One of the simplest and most effective options for paper New Year's decorations is garlands and lanterns. This way you can decorate both your home and office.
All you need is a pack of regular A4 sheets, paper scissors and glue.

Paper chains are the simplest decor. Cut the sheets crosswise into strips of 2.5–3.5 cm. Glue one strip into a ring. Pass the second strip through this ring and also glue it into a ring. Continue until you get the garland to the desired length.

Making a flashlight is also easy. For each flashlight you will need one sheet of A4. First, cut a strip along the sheet - the strip will be needed for the handle of the lantern. Fold the remaining sheet in half lengthwise and make cuts as shown in the photo. Unfold the sheet, glue it into a lantern and add a handle.

You can also make a garland of Christmas angels. To do this, fold each sheet crosswise in four like an accordion. On one side, draw the silhouette of an angel, as shown in the photo. Cut along the contour, unfold and connect with other similar parts of the garland.
The decor can be hung on the walls, windows and ceilings.

2. Garland of small Christmas trees

An idea for those who love minimalism. Among other things, this garland is very easy to make! You will need double-sided cardboard in three shades of green, scissors, thick thread and a large needle. For each Christmas tree, cut out 2 identical triangles, cut one to the middle from the top, the second from the bottom, and assemble the Christmas tree. When all the blanks for the garland are ready, assemble them on a thread, piercing the cardboard with a needle.

Photo and source: aliceandlois.com
3. Paper candles for the Christmas tree

Such candles are not only beautiful, but also much safer than ordinary ones: decorating a Christmas tree with them would be a great idea.

You will need thick paper for yellowish candles, small paper baking cups (if you can’t find gold ones, you can paint them), gold glitter / loose sequins, a hot glue gun and clothespin holders for Christmas tree decorations (by the way, clothespins can replace them). curtain holders) and scissors.

For each candle, cut out a 5x8 cm rectangle. Glue it into a ring, connecting the long sides. For the top of the candle, cut out a circle of the required diameter and glue it on top. Cut out the flame and glue it onto the circle.

Using a glue gun, apply drops of glue to the flame and on top of the candle to form drops, and while the glue is wet, sprinkle them with glitter.

Glue paper molds to the bottom and clothespins to their bottom. Ready.

Photo and source: thehousethatlarsbuilt.com
4. Christmas tree decorations made of colored paper

These decorations are easy to make, the main thing is to choose beautiful paper. It's better to take a fairly dense one.

You will also need something round as a template, scissors, glue, pencil and floss.


Draw circles on paper using the template and cut them out. For each decoration you will need 4 identical circles. Fold the circles in half and glue them together as shown in the photo. When gluing the last of the four circles, place a loop of thread in the center, making a knot at the bottom.

Photo and source: aliceandlois.com, minted.com
5. Garland of colored paper lanterns

To make such a garland, you will need sheets of colored and black paper, a pencil and ruler, a knife, glue and a long cord.

Draw a template based on the picture above. Using it, you need to cut out blanks for lanterns from colored paper. Don't forget to make holes for the cord. Also, for each lantern you need to cut out a part for the base from black paper (see photo above).


On each workpiece, draw lines for bending with the blunt side of the knife, as shown in the photo. Fold and glue the lantern. Thread a string through the holes and tie. Add a black base piece on top, gluing it into a ring and gluing it to the lantern. Now all the colorful lanterns can be assembled into a garland. By the way, you can hide small sweets inside.

Photo and source: thehousethatlarsbuilt.com
6. Garland of lanterns: simplified version

You can make a similar garland in a simplified version. You will need colored double-sided paper, scissors, cord and colored (in this case black) tape. Cut out parts in the form of light bulbs from colored paper and glue them with tape to the cord - you're done.
7. Paper snowflakes on a branch

Just find some suitable branch while walking, clean it, paint it white and use it as the basis for a New Year's installation of paper snowflakes! The idea is well suited for a nursery, and you can implement it together with your children.
8. Volume star made of cardboard

To make such a star, you need thick, thin cardboard that holds its shape well. If you don’t have gold cardboard, you can take regular one and then paint the star. You will also need scissors, a pencil and a ruler and a knife, glue and thread for the loop.

First draw a star or use the template above. Transfer the image onto cardboard and cut along the outline.

Mark five lines, each from the center of the beam across the entire width of the star. The lines must be drawn with the blunt side of the knife along the ruler. And then fold the cardboard so that the folds are alternately inside and outside.

Glue a loop of thread to one of the rays. To make the star double-sided, it can be painted on both sides.

Or you can make such large stars and decorate your room with them.
Photo and source: mintedstrawberry.blogspot.com, katescreativespace.com
9. Garland “collage”

To make such a garland, you don’t have to buy special paper: you can use unnecessary postcards or magazine covers (it’s better that the paper is quite thick). You will also need a craft knife and/or scissors, glue, a ruler, and strong thread.

Cut the postcards into shapes - circles, hexagons, triangles and so on. Each figure of the same shape and size needs two pieces. Glue the figures into a garland so that the thread is inside.
Why not make the starry sky your wedding theme? Let stars be everywhere. In the decorations of the hall, in the attire of the bride and groom, on the sweet table and in the hands of the bridesmaids.
Preparing details and decorations for such a wedding will not be difficult; you can make them yourself. And such a wedding will look truly fabulous.
In this master class we will tell you how to make garlands of stars. They will serve as a decoration for the banquet hall and the bride’s room; you can also take them with you to a photo shoot and hang them on the trees in the park. You will get original photos.
To make garlands of stars we will need:
Colored cardboard (you can use silver or gold)
Long satin ribbons, 0.5 cm wide
Glue
Note: The master class uses a hot-melt gun and hot glue. Its distinctive feature is instant hardening (10-20 seconds) and a strong connection. But it’s not so easy to master a glue gun the first time, and besides, it’s not cheap. Therefore, the heat gun can be replaced with ordinary glue.
Scissors
Pencil
The process of making garlands of stars:

For a “star” wedding you can also make
9 293 912
From paper
A paper garland is quite simple to make; it can be made for a child’s birthday or simply to decorate a room for any holiday. Making the brightest and most spectacular paper garlands is not at all difficult - the instructions will help you do it in literally a matter of minutes.We make a garland of flowers with our own hands.

Stylized flowers

Funny roses
Another garland of paper flowers - this time it's stylized roses. Making such a flower garland from paper with your own hands is quite simple - draw it yourself by hand or print out templates for cutting, and trace them on any paper (by the way, you can use paper with a pattern).
Make a lot of roses - you need to cut out a spiral and then glue an original rose out of it. When there are enough flowers, string the roses on a rope, and your DIY paper garland for a wedding or birthday is ready!

or you can cut out a spiral with a wave, you get a flower like this:

Printable template:

From felt
It is very easy to make a garland with your own hands from felt.
For this we need:
- colored felt (it is better to take pure shades);
- lace, ribbon or braid;
- sharp scissors;
- sewing machine (or thread and needle).

If you already have a flat garland, and now you want to make voluminous New Year's garlands, then you will like the butterfly garland.
Making this original Christmas tree garland is very, very simple:
- we cut the blanks (you can use diagrams - you can download them for free, you can cut them by eye);
- we collect bow ties - we sew a large rectangle with thread across it, pull it together, tighten the knot and close it with a small jumper;
- we string the butterflies on a thread or a beautiful cord; you can also use twine or ribbon for the garland;
- straighten the butterflies - your DIY wedding garland is ready!
From hearts
Garlands made of hearts look very impressive - they can be used for any holiday, you can make your own decoration for a wedding or simply decorate an apartment or office for Valentine's Day.
How to make a garland of hearts using colored paper and a stapler: 
You can make a one-color garland - for example, in red or pink tones, or you can use paper of several shades (by the way, double-sided colored paper is well suited for a printer).


There is another option for a garland of hearts made from paper yourself. We will need colored paper, a cutting template (you can download and print), a pencil (to transfer the template onto paper), scissors and a sewing machine.


This DIY heart garland is made like this:

By the way, a garland of paper circles is made using the same principle - circles of colored paper are folded in pairs and stitched. You can stack three or four blanks, then you will get multi-colored paper balls.


From checkboxes
A flag garland looks very elegant - it can have an inscription happy birthday, or welcome, and a garland of flags can be used at any party or children's party.
How to make a garland of flags for a children's birthday with your own hands? Three simple steps:  Simple, isn't it?
For those who want a little more complexity, a garland of flags and fabric. So, we already understand how to make a garland of flags with our own hands, but at what stage should we add fabric and what kind? Again, it's simple.


It is clear that paper garlands are not very durable - they will last a maximum of one or two uses, but what if you want to make something more durable? For example, for a kindergarten you can make a flag garland from fabric.

How to sew a garland of flags step by step:  Decorative braid with flags made in this way can be used at home and in the kindergarten, you can make special decor for the street (kids especially like this for the New Year).
for the new year
Making New Year's garlands is fun and exciting! To make a beautiful and original garland you will need small candle lamps, narrow tinsel and a couple of jars of paint - special for glass or regular acrylic. The light bulbs are dipped one at a time in paint and dried on a cardboard stand (the bases can be wrapped in cling film to prevent them from getting dirty). Then the light bulbs are glued to the tinsel in a chaotic order, and the unusual Christmas tree garland is ready!
Making another Christmas tree garland is also not too difficult - the main thing is to stock up on a template. For printing, you can use colored paper at once, or you can make one general template and copy it onto paper of any color. Printed or redrawn templates must be cut as shown in the diagram and strung on bright twine.
A garland made of felt balls looks very cozy and very Christmas-like. You can do it together with your child - you just need help. In order to make such an interior decoration, you will need felt balls. No, not even that - A LOT of felt balls.

Making them is quite simple - take a little wool for felting in your palm, wet it under the tap, and then lightly roll it into a ball. Add foam or soap and continue rolling. When the ball starts to form, you need to apply a little effort.

If the wool is capricious, try changing the water temperature several times - after a couple of changes from cold to hot water and back, the fibers begin to fall off. The future ball must be thoroughly rinsed from soap. The ball is ready when it becomes hard.

Make a lot of these balls - they can be the same color (then it is better to take a contrasting thread for stringing) or different shades, and then just string them on a thread and a needle, and your cozy winter decor is ready. By the way, you can decorate a Christmas wreath on a door or a New Year tree with these balls.


Christmas tree patterns:


 Well, I’ve infected you with my handicraft enthusiasm and you already want to make all kinds of garlands from flowers, felt balls, flags and other things? Then it's time to see what other decors are available.
For example, you can make chic wedding garlands with your own hands.

How to sew a garland of artificial flowers in half an hour on a machine? There's an answer. By the way, if you want, you can make butterflies out of paper and alternate them with flowers.

It’s completely in vain to remove the glowing garland after the winter holidays. There are many interesting ways to decorate your home interior with it.
1. Place a garland around the edge of the mirror of some interesting shape.

2. Wrap paper lanterns with garland around a branch and hang above your bed.
3. Create a cascading light by decorating the garland with large bulbs.

4. Create an original tree from a garland.


Draw an outline on the wall, drive carnations around the perimeter and wrap a glowing garland around them. As easy as pie!
5. Attach photos to the glowing garland using clothespins.


6. Create your own canvas with a pattern of glowing lights.


7. Thread the garland into flower baskets or place it directly there.

8. Fill wine bottles with lights to effectively illuminate them from the inside.

9. Create an angel wreath using paper napkins.

Using wire cutters, form a round snowflake holder and wrap it with an electric garland with small bulbs. Then glue decorative snowflakes onto the holder.


10. Or use napkins to make a wedding wreath.

Just make small holes in the napkins and thread lights through them.
11. Cover disposable cardboard cups with unusual paper; this will help create interesting light shades using an LED garland.
12. Crochet a glowing rug using rope and garland.

13. Decorate your Christmas garland with tulle bows.

14. To create a festive mood, decorate the garland with old ornaments.

15. Create colorful balls of twine and decorate them with glowing garland.
16. Make flaming snowflakes using store-bought bouquet holders.

17. Intertwine a rope with a garland for a nautical-themed room decor.

18. Create a network of glowing garland in your bedroom.

19. Hang air clouds with a dangling glowing garland.


The photo shows a two-dimensional version of the cloud.
20. You can also use egg cartons to create a floral effect.

21. Write a letter-by-letter message on pendant lights.
Make letters by punching holes in the paper.
22. Create a romantic headboard.

Knock down a simple wooden frame and add crossbars. Drill small holes and insert rosettes into the bottom of each niche. Paint the frame and screw it to the wall. Fill each niche with garland and connect it to the outlets. Cut transparent panels from polycarbonate sheets and attach them to the frame using fasteners.
23. Use glitter wrapping paper to create giant glowing candies.
 Required materials and tools:
- disposable plastic container with lid;
- electric garland;
- scissors;
- wire or pipe cleaners;
- wire cutters;
- multi-colored wrapping paper;
- scotch.
Preparation method:
- Cut a piece of wrapping paper measuring 45x45 cm from the roll.
- Wrap the garland with wrapping paper. Don't forget to leave both ends of the garland outside in order to connect it to the network and connect the element with other candies.
- Place the wrapped garland in a plastic container and seal it. Wrap the container with wrapping paper and secure with tape.
- Using pipe cleaners or wire, shape the container with the garland into a candy shape.
- Decorate the entire garland in this way, leaving free space (20-40 cm) between the links.
- Connect the finished bunch of candies to the network.

24. Insert lanterns into tiny preserving jars.

Take special lids with a hole for the garland. Close each jar with a lid and insert a garland light bulb into it.


25. Insert an LED string light into an old toy.
 You will need:
- old toy (made of cotton fabric);
- PVA glue;
- brush;
- scissors;
- threads;
- light garland.


26. Write a light message.


27. Arrange the glowing garland in a wave-like pattern.

28. Cut out black cat shapes to make this cute garland.

29. Wrap the garland around a wire wreath.

Probably one of the easiest options for creating homemade wreaths.
30. Light up the canopy over the bed with garland.

31. Cut the paper into strips to create the same fringed lanterns.

32. Use foil from a muffin tin as a garland decoration.

This is a great idea for any party.
33. Create sparkly decorations with mirrors and lighting.
 Take:
Take:
- brushed aluminum rod;
- hooks for hanging;
- a garland with mirror pendants;
- electric garland.
Instructions:
- Attach the rod to the wall using two hooks.
- Hang a mirror garland on the barbell. To enhance the visual effect, you can trim some of the threads with pendants so that the finished curtain is of different lengths.
- Stretch a string of lights behind the pendants and connect it to an outlet.

34. Use twigs to create a rustic chandelier.

This idea can easily be implemented with a luminous garland.
Take:- dry branches;
- hemp twine;
- stain (optional to darken the color of the wood);
- wood color paint;
- lamp sockets with a removable cardboard cover for painting;
- plastic ties;
- glue gun;
- electrical cable black and white;
- black electrical wire with plug;
- Branch squeezes "nuts".

35. Make a garland of geometric lanterns.

You can make your own lanterns from black wire or natural straw.
Take: