Plasterboard construction on the wall with a corner fireplace. Corner fireplace made of plasterboard - design options and installation procedure. Fireplace made of plasterboard: photo in the interior
Read also
The desire for comfort and coziness is inherent in each of us. Warm hearth and home- these are not empty words. What could be better than spending evenings by the fireplace watching the flames? Owners of private houses can afford a real fireplace, but for residents of city apartments this, unfortunately, is an unaffordable luxury. But for real masters nothing is impossible, and today we will tell you how to make a false fireplace in an apartment.
What is a false fireplace and why is it needed?
In a city apartment, conditions will not allow you to install a regular fireplace. The lack of chimneys and floors not designed for such loads are the main obstacles to obtaining permission to build such a structure.
False fireplaces come to the rescue, which you can easily assemble yourself without having any special skills in construction work. Of course, you can buy an electric fireplace - such devices are now common, and their installation will not take much time and effort. But the creation of a fireplace with my own hands
- a very exciting activity, it gives free rein to imagination, allows you to make an exclusive thing. In addition, an open fire in an apartment is not necessary (and you are unlikely to be allowed to do so), and a false fireplace will serve as a multifunctional decoration.
Note! Although you won't light a fire in a false fireplace, still don't put flammable things underneath. Especially if the structure covers heating radiators or you plan to place electrical appliances in the firebox.
False fireplace looks like a real one U artificial fireplaces
- there are such advantages:
- cheap - you only need money for materials;
- availability of materials necessary for the manufacture of the structure;
- the ability to change the decor at any time according to your mood;
False fireplaces are divided into 3 groups:
- Reliable artificial fireplaces completely imitate real ones, respecting both dimensions and design principles. Inside the firebox you can install a bio-fireplace burner, which will provide an almost exact effect of a burning hearth. Quite an expensive option, but it looks the most plausible.
- Conventional false fireplaces have a portal protruding from the wall. They can be decorated according to your taste and desire. The combustion hole is usually filled with firewood or candles are placed there.
- Symbolic ones can be made from any materials. Their peculiarity is that they are not at all like an ordinary fireplace. It could even be a drawing made on the wall with some decorative elements.
Manufacturing options
For the manufacture of artificial fireplaces, the most simple materials, which can always be found not only in the store, but also at home:
- drywall;
- plywood;
- Styrofoam;
- cardboard;
- tree;
- brick;
- polyurethane.
You can make such a structure even from old furniture, which has already served its purpose, but it’s a pity to throw it away.
This is the simplest and quick way. You only need to buy a polyurethane portal for the fireplace. The most difficult thing in this task will be choosing the style and size suitable for the room, and everything else will take you a minimum of time and effort.
If you want to install an electric fireplace, take into account its installation and dimensions, method of connection to the electrical network and quality of ventilation.
The lightweight body of the false fireplace made of polyurethane will save you from many installation hassles
You will need:
- polyurethane portal for the fireplace;
- contact glue;
- putty;
- materials for finishing the firebox (for example, decorative brick).
Now we’ll tell you step by step how to install such a fireplace.
- The best place to install such a fireplace is one of the side walls of the room. The structure should not clutter the room or interfere with passage.
- If you decide to place an electric fireplace or decorative electric lighting inside the portal, take care of the wiring and socket first.
- Make the firebox frame from profiles or wooden blocks, and the walls from plywood or plasterboard.
- Install the portal, carefully secure it with contact glue. Carefully fill the gaps between the portal and the firebox with finishing putty.
- Finish the firebox in the style you choose, or install an electric fireplace. If desired, you can install a mantel made of artificial stone or wood.
Such portals are made not only from polyurethane, but also from wood. They are much more expensive, but among them you can find real masterpieces, additionally equipped, for example, with a built-in bar.
Plywood construction
This idea is useful if you need to hide some defect in the room, for example, an old heating radiator, the replacement of which will not be cheap. A false fireplace will come in handy here.
The need to cover up the old heating radiator- an excellent opportunity to install a false fireplace
Carry out calculations and make a drawing of the future structure. This will help you avoid wasting extra money and time.
Drawing of a standard fireplace
Note! When you develop a drawing, refer to ready-made options stone fireplaces. Based on them, you can easily design your false fireplace.
First of all, install the frame directly in place. Wooden blocks are suitable for it.
Frame made of bars for a false fireplace
Next, cover the frame with plywood. Fireplace design and appearance can be adjusted during operation. For example, you can add a podium to the portal. Inside the structure there is heating battery, so it is better to assemble the frame with screws: nails in conditions high temperature do not guarantee a tight fit of plywood to the bars in the future.
Frame covered with plasterboard
Along the back wall, attach a firebox that imitates a fireplace to a block. Cover all surfaces visible from the outside with self-adhesive film.
Install the firebox and cover it with film
Cover the corners of the portal with a wooden layout, and cover it with film of the same color.
The corners of the portal need to be closed and also covered with film.
This design is easily removable (it is not attached to the wall at this stage), and you can easily access the radiator. The firebox needs to be decorated with something, so you can put a metal mesh tray on the radiator.
A metal mesh tray that will become the bottom of the firebox
You will fill it with pebbles, firewood or other decorative elements.
Fill in metal mesh pebbles or other filler
You can order a fireplace grate or make it yourself. For this you will need a copper profile. If this is not available, aluminum wire inserted into a vinyl chloride tube and painted with gold paint will do. This grille is attached to the fireplace body copper wire in 4 places.
Metal grating diagram
The pipes that go to the battery can be covered with an extension of the podium.
Cover the heating pipes with a podium
To usable space don't go to waste, make a bar under the mantelpiece.
Using extra space
As a result, you will get a fireplace like this, almost indistinguishable from the real thing.
Ready-made false fireplace
New life for old furniture
This is the most budget option. You probably have an old wardrobe or sideboard. Don’t rush to throw away this piece of furniture: on its basis you can easily make an excellent imitation of a fireplace with lighting.
you will need:
- plywood sheets;
- wood sander;
- jigsaw;
- screwdriver;
- acrylic paint;
- putty;
- LED Strip Light;
- stucco molding, decorative elements, gypsum finishing stone;
- surfaces.
- Remove the doors from the old sideboard and remove the lower cabinet. The top section will remain, place it on its side.
Preparing an old sideboard for use
- Screw two beams in front.
Screw 2 beams
- Attach two sheets of plywood to the bars at the top and bottom. This will give the fireplace the required thickness.
Secure the plywood sheets
- Cut a hole in the door of the side cabinet (which is now located at the bottom) for the “blower”. Here you can store firewood, just like in a real fireplace.
Cut out a hole for the “blower”
- Your raised fireplace will need a pedestal and mantel. These can be served by two backrests from old bed. Don't forget to unscrew their legs.
The headboards of the bed will serve as a pedestal and mantelpiece.
- The structure is ready, now we need to start finishing work. Sand the polished surfaces to roughen them. Prime the walls; after they dry, putty and level the surface. Dry the putty and sand down any uneven surfaces. Paint the body acrylic paint, trim the corners with brick or artificial stone. Glue on decorative elements and install a mantelpiece.
Finishing a false fireplace from old furniture
- Decorate the firebox. Glue LED strip around the perimeter. Red or yellow will do - they will perfectly imitate a smoldering fire. Place shells, pebbles or sand at the bottom.
Decorate the firebox: glue in an LED strip, add pebbles, shells or sand to the bottom
As a result, you will have this magnificent fireplace in a vintage style.
Ready-made false fireplace from an old sideboard
Imitation of a fireplace made of plasterboard
This time we will consider the option of a corner false fireplace made of plasterboard. This task will be more difficult than the previous ones. Why a corner fireplace? Because in conditions small apartment the angle is the most free place, which is ideal for installing such a structure.
Corner false-plasterboard fireplace
So, you will need the following materials:
- metal profile - 13 pcs;
- moisture-resistant plasterboard 9.5 mm - 3 sheets;
- tiles - 5 m;
- self-tapping screws - 200 pcs;
- tile grout;
- LED Strip Light;
- decorative lattice.
- Calculate the dimensions. However, keep in mind: if you need to close the battery, you need to do it in such a way that it can be easily reached. For possible emergency situations It is better to run the battery through the lower opening.
Approximate diagram of a corner fireplace
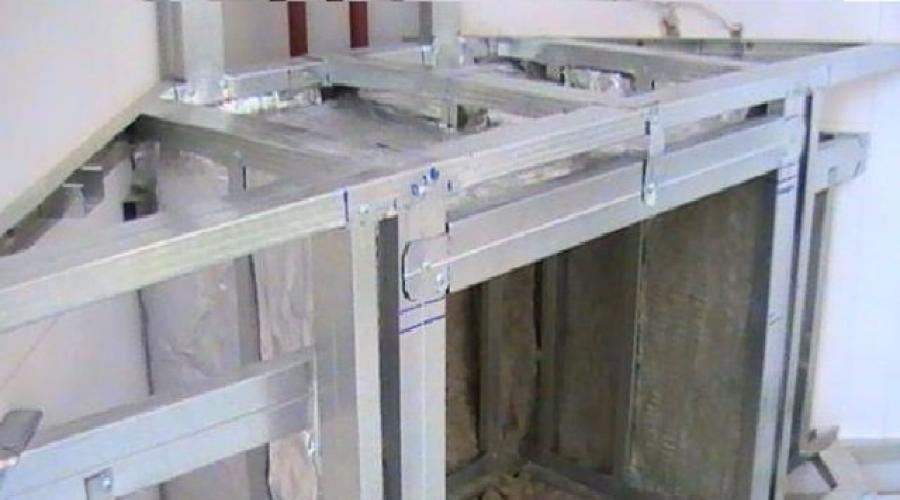
- After the calculations have been made and the fireplace diagram has been drawn up, begin installing the frame. Good for him ceiling profile, and it's also cheaper.
- Immediately make electrical wiring for the lighting. As you can see in the first photo, in our case there are three output points: two on the facade and one above the shelf. An LED strip is used as illumination.
- The combustion hole can be made with double walls. Non-flammable insulation will be laid between them.

Finishing a false fireplace with decorative tiles
- For decorative finishing, you can use stone-like tiles. It is made of plaster, so it is not suitable for work surfaces.
This fireplace takes up approximately 1.6 square meters. You can place a small electric fireplace or a small alcohol burner inside the firebox.
Finishing
It is very important that the fireplace fits harmoniously into the interior of the room. You should carefully choose the style and color. But also decorative finishing should please the eye and create comfort.
How to simulate fire in a fireplace? Above, we offered options with LED strip, which provides illumination with a burning effect. But progress does not stand still, and an electronic photo frame can serve you well. It is a liquid crystal display that is designed to display pictures. You need a model that can play animated files, such as GIFs. Upload an image of a burning fire to your photo frame and enjoy!
- Many owners of false fireplaces love to decorate niches with candles. different heights. It looks beautiful, stylish, and gives a real live fire.
- An excellent choice would be to install a mirror deep in the combustion chamber, on the wall. The mirror will multiply the reflections from candles or electric lighting and add mystery to the fireplace.
- It will help you provide the effect of an expensive finish fake diamond. It is available in a variety of color and texture options. Tiles, bas-reliefs and decorative tiles will give expressive individuality to the structure. But don’t overdo it: excessive pomp may be out of place in your interior.
- Doors for false fireplaces will probably be superfluous, but if you decide to install them, make them from plexiglass. They can be transparent or tinted, but they simply must allow light and glare of the “fire” to pass through.
- It is better to decorate the firebox of an imitation fireplace with a forged metal grate. It can be bought or ordered from the workshop.
Photo gallery of artificial fireplaces


 An original and concise version - simple niche with candles

Video: how to make a false fireplace from plasterboard with your own hands
As you can see, building a fireplace at home yourself is not at all difficult, and it’s also cheap, especially if it’s just an imitation. Accuracy, attention, the desire to do something original and creative imagination - that’s all you need to enjoy comfort, like the heroes of classic films. Share with us your experience in implementing such ideas, or ask any questions you have on this topic. Easy work for you and comfort for your home!
It just seems like you can’t have your own fireplace in a city apartment. In fact nice addition to the interior is easy to arrange in any home. It is enough to purchase an electric fireplace with a decorative flame, and make the portal yourself. Today we will look at the materials that will be needed for this creative work, and we’ll give you a couple of instructions to help you.
What is a portal for an electric fireplace and why is it needed?
In the design of real fireplaces, the portal performs an important function - it protects the adjacent walls from the high temperature of burning wood. In the case of an electrical appliance, the enclosing structure is only required to have an aesthetic appearance and make the dummy resemble a real fireplace. To do this, the portal must externally replicate traditional fire-resistant materials: brick, wild stone, marble. However, a wooden copy will also work for decorative purposes, but the credibility will be reduced.
An elegant portal makes the electric fireplace look like a real one
General design
We have already decided that the portal is a kind of frame that frames the electric fireplace and helps it “fit” into the surrounding interior. Also, a stable design with a massive shelf can serve as a stand for souvenirs, family photos and other accessories. The main thing is that it can support the weight of the built-in fireplace. Complex portals that are a continuation of furnishings look unusual: cabinets, shelving, niche systems made of plasterboard.
An unusual portal under the window can itself become a decoration of the room
Structurally, portals are divided into stationary and portable. The former are undemanding when it comes to manufacturing materials, but mobile models require special stability. Portable portals should be low and have sufficient depth and width. They are distinguished by a low center of gravity, which means they will not fall if moved carelessly.
This fireplace can be easily moved to another place if you want to refresh the interior
If you plan to place any equipment on the fireplace tabletop, it is better to make the shelf wider. And for greater reliability, it can be supported not only on the portal, but also on a corner screwed to the wall.
What materials to use for the portal and mantelpiece
Traditionally for construction fireplace portal stone is used on the countertops, but even artificial agglomerate weighs a lot, and it will require certain work skills from the master. There are also more “friendly” materials on the market that can be easily improved with the help of properly selected cladding. For example, a classic tabletop can be made from a thick board by toning the wood and opening it thin layers varnish More budget option is plywood or MDF - after installation they are covered with small ceramic tiles or laminated with decorative film.
Before choosing the material for making a portal with your own hands, it is worth deciding on the functionality of the decorative fireplace. If this is just an installation or a screen with the image of a living flame, there are no restrictions: drywall, foam plastic, chipboard or natural wood will do. The main thing is that after finishing works they acquired similarities with natural materials.
Using polyurethane elements you can create a luxurious portal for a decorative fireplace
For decorative heating equipment that actually warms up the room, you will have to choose safer options (gypsum plasterboard, foam blocks) or protect the structure with heat-resistant cladding.
It is not necessary to build a portal out of brick, but for finishing it is better to use non-flammable or low-flammable products and mixtures: tiles, mineral tiles, plaster.
Decorative brick cladding is not afraid of overheating
| Table: Advantages and disadvantages of basic materials | Tree | Wood-based panels materials (chipboard, MDF) and plywood | Drywall |
| Weight, kg/m 3 | 400–700 | 600–700 up to 850 for MDF | 800–850 |
| Bending strength, kgf/cm 2 | 1000 | 20–250 | 15–18 |
| Compressive strength, kgf/cm 2 | 500 | 60–200 | 100 |
| Flammability group (only taken into account for heating devices) | G3-G4 (G2 after processing) | G3-G4 | G1 |
| Environmental friendliness | ++ | - | ++ |
| Machinability (milling, drilling, cutting) | ++ | + | + |
Solid wood is easy to shape the required form, and also decorate it, if not with carvings, then at least with elegant milling. But this will require special equipment, so workability is a very conditional advantage of wood. Its main disadvantage remains that over time it dries out, warps and becomes covered with cracks. When the humidity in the room changes, the array can indeed behave unpredictably. If it is not possible to maintain stable conditions in a room with a fireplace, but you definitely want to use natural wood, it is better to choose species that are not prone to serious deformation:
- pine;
- cedar;
- aspen.
According to their strength characteristics, pressed slabs made from veneer and wood processing waste are quite suitable for the manufacture of an electric fireplace portal. However, unprofessional cutting of sheets leads to loosening of the fibers at the ends, which somewhat complicates the covering of the frame with small elements. The disadvantages include the toxicity of phenolic and formaldehyde resins in their composition, but after finishing with airtight materials the question harmful effects per person is removed.
OSB can also be used in independent work
As for drywall, it is considered the best material for creating decorative elements DIY interior. Low load bearing capacity slabs are fully compensated by a reliable metal frame. The variety of gypsum plaster boards will allow you to choose the appropriate design for any conditions: fire-resistant boards for heating fireplaces, waterproof boards for ceramic finishing.
Selecting the portal shape and design style
The portal should be designed after the electric fireplace has been purchased. Firstly, this way you can remove exact dimensions taking into account ventilation gaps and releasing the cord. Secondly, it will be clear in what style the entire set should be maintained. Today, decorative fireboxes without pronounced design elements are very popular - any portal that is in tune with the interior of the room itself will suit them. But if the electric fireplace has a decor on the visible part that emphasizes its belonging to a specific style, you will have to focus on it.
This electric firebox is already decorated with rich decoration in a classic style
Main portal design options:
- Country - for small room a compact design made of painted or simply varnished is suitable light wood. In spacious rooms, lining with decorative bricks or a plastered surface, partially lined with artificial stone, looks better.
- Victorian - high-quality carved portals made of expensive types of wood, decorated with gilded monograms and moldings. The cladding with slabs imitating polished stone, but always in dark tones, looks great.
- Classic - symmetrical structures with marble finishing or plastered portals with discreet stucco. Distinctive feature- imitation of columns or at least a hint of them in the form of vertical stripes of framing panels. Such models are made of polyurethane or gypsum.
- Modern styles (urban, hi-tech) usually do not require the creation of a bulky portal, being content with a modest frame of a simple shape made of metal or painted glass. A minimum of decor and compactness are the main rules of these trends.
- Chalet or Romanesque style - despite the significant differences between the two design directions, fireplaces for them are designed approximately the same. Bulky structures faced with stone are welcome here, and the shelf and pedestal decor are made of an array of rich tones.
As for the shape and dimensions, it all depends on the characteristics of the room and the chosen location for the future fireplace. Since this interior detail attracts Special attention, it is better to allocate a free wall to the hearth without unnecessary decor. At the same time, the portal must be proportionate - you should not install an overly bulky and lush structure in a cramped room. Standard form for wall models - rectangular.
Regardless of the execution, tradition requires the installation of a small pedestal at the base of the fireplace. Its width should be 30 cm larger than the portal, and its height can reach 20 cm. However, here the owners are free in their choice, but without a stone or brick pillow, an imitation of a real hearth will not seem very plausible.
The wide marble-effect pedestal gives the electric fireplace greater significance
Corner models of electric fireplaces always look impressive, moreover, they do not take up much space, so they are worth choosing for small apartments. The design can be either the simplest - repeating a triangle in cross-section - or prismatic. For fireplaces with panoramic semicircular glass, it is also better to make the portal radius: thanks to it, the whole set will look more harmonious.
Wide corner portal does not take up much space
Calculating the socket
The power cord coming from the fireplace can ruin the whole picture. But you still need to install the socket outside the portal in order to have free access to the plug. The distance to it is limited by the length of the cord of the artificial hearth without tension. And here technical side the issue requires more serious calculations.
The outlet must be able to withstand the current supplied to the fireplace. It is not difficult to determine its amperage: you need to divide the power of the device by the network voltage (220 V) and add 10% reserve.
Purely decorative models usually consume no more than 500 W, that is, the maximum current in the outlet will be:
500 ÷ 220 x 1.1 = 2.5 (A) - even old Soviet 6 A equipment can handle this load. Electric furnaces with a heating function have higher power - about 2–2.5 kW. Using the same formula we get an amperage of 12.5. That is, you need a standard modern socket at 16 A, to which all that remains is to connect the wire from distribution box
. Use a copper three-core VVG cable with a cross-section of 2.5 mm 2 - it can withstand a current of 19 A and a load of about 4 kW.
Drywall portal - step-by-step instructions for making it yourself Drywall - enough reliable material to withstand even heavy ceramic cladding . It is easy to process and allows you to create three-dimensional structures of any complexity with your own hands. Sheets are sewn to metal frame
, which takes on the weight of the electric fireplace, so the reliability of the portal is also in order.
Tools and materials You will need a little drywall for the job, and if there are scraps left after the repair, you won’t have to spend money on it. But please note: for tiling you only need waterproof gypsum board ( Green colour
). It is better to make the frame from galvanized special profile - it is more convenient to work with it, and it is easier to maintain the geometry of the structure. The rest of the list of materials depends on the chosen finishing option. You can take it to the tabletop edged board , although plywood or MDF with decorative plastic coated simulating texture natural wood
Example drawing and calculation of materials
Only after deciding on the size and design of the portal can you go for building materials
Drawing up a sketch of the future portal with all dimensions will allow you to determine the amount of materials needed:
- Drywall dimensions - area external surfaces structures minus the rear wall. In this case, you need to immediately estimate the cutting scheme standard sheet 2.5x1.2 m (it’s more convenient to do this on graph paper). The recommended thickness of gypsum plasterboard is 12.5 mm and 9.5 for radius elements.
- Metal profiles - the number of racks and horizontal lintels is determined by the dimensions of the portal. For the guides, 27x28 mm PP slats are used; 60x27 mm PS slats will be used for the posts and reinforcement.
- Hardware - to assemble the frame, “bugs” with notches against self-unscrewing are used. Their number corresponds to the number of profile connection points. Hardened self-tapping screws (black) with frequent threads and a countersunk head are used for the casing. The most popular size is 3.5x25 mm, fastener consumption is 20–25 pcs/m2.
Work order
It is better to install a plasterboard structure permanently - it will not withstand moving from place to place. Therefore, we will mount the portal immediately where it was decided to locate decorative fireplace:
- Referring to the drawing, mark the floor and walls - draw the dimensions of the future portal with a pencil or chalk. Cut the metal profile for the frame according to the existing dimensions.
It is more convenient to work with a galvanized profile using metal scissors
- Lay U-shaped guide rails along the floor markings, check the horizontal position with a level and secure with dowel screws. Mount counter horizontal profile sections on the wall in the upper part.
Long sections are fastened with self-tapping dowels at at least three points
- Screw the vertical PS strips to the wall, additionally securing them to the base of the frame. Finish the top trim.
The racks are attached strictly vertically in relation to the guide
- Connect the racks with transverse stiffening ribs in increments of no more than 60 cm.
- Strengthen the fireplace podium with short vertical posts installed every 20 cm - they will take on the weight of the electric firebox.
Where additional load on the drywall is expected, additional reinforcing racks are needed
- At the installation height of the decorative hearth, make a horizontal trim and secure the vertical guides that will frame the screen.
- The last belt is placed above the upper edge of the electric fireplace, but it does not experience any load, so a short strip connecting the side slats will suffice.
Ready-made spatial structure
- Check the dimensions of the resulting structure, transfer them to sheets of drywall and make patterns.
GKL sheets are cut with a special knife
- Fix the gypsum boards to the frame with self-tapping screws, recessing the caps by about 1 mm.
The sheets are screwed to the frame so that the attachment points fall into the center of the slats
- Glue the corners of the portal with sickle tape or reinforce it with a perforated L-shaped profile, fill the seams between the sheathing sheets and the attachment points with putty.
The tape will not allow the plaster to crack at the joints of the sheets
- The finished fireplace is finished with the selected material, after which you can lay a tabletop on top and insert an electric firebox.
Decorative stone turns a plasterboard portal into a fireplace made of “brick”
If the fireplace design includes radius elements, the metal profile for them must be bent. To do this, the side shelves are cut into equal parts 5–8 cm long, after which the rail is easily bent into the correct arc.
Final design and design of the portal
Drywall gives very flat surface, which can simply be puttied before painting. This fireplace looks especially impressive in white with a wooden tabletop. Without any additional decor it will fit perfectly into an interior decorated in a country or chalet style. If you decorate it before finishing putty plaster stucco or polyurethane moldings, it will be a worthy addition classic design or rooms in the spirit of Provence.
As for tiling, ordinary tiles are inappropriate here, unless, of course, these are painted tiles - they are ideal for creating a Scandinavian interior. To decorate the portal, it is better to take a flat imitation of brick or wild stone , then the fireplace will look massive and quite real. The tiles are attached to primed surfaces using special glue
The work is done from the bottom up - this way the lower rows of cladding will create support for the next ones, preventing them from slipping. After about a day or three, when the glue has finally set, you can use the applied decor and install the tabletop. For a mantelpiece, a board with a humidity of up to 20% is simply primed and covered with several thin layers of varnish. And to give it a more expressive shade, pigments are introduced into the base.
Video: Drywall portal with chic stucco molding
Plywood and wood - step by step instructions
Making a portal from plywood and beams is almost no different from working with drywall, but here you have to take into account both the large mass and the significant thickness of the materials used. The finished structure will be noticeably heavier, but will be able to withstand the weight of not only a full-size fireplace, but also additionally installed equipment on the mantelpiece.
, which takes on the weight of the electric fireplace, so the reliability of the portal is also in order.
To work you will need:
- frame beam 50x50 cm;
- plywood with a thickness of 12 mm;
- wood screws;
- jigsaw;
- screwdriver
For finishing, you can take primer, wood putty and paint that is resistant to high temperatures. In case of heating fireplace All flammable surfaces must be impregnated with fire retardants, if the manufacturer has not done so in the factory. To attach the overlay decor you will need carpenter's glue - hardware will spoil the solid image of the wooden portal.
Schemes and calculation of materials
To give the electric fireplace maximum resemblance to the real thing, it is necessary not only to select a suitable sketch of the portal, but also to maintain the “classic” dimensions. After measuring the firebox, a drawing is made so that the height of the structure is twice as high as the visible part of the electric fireplace, and the width is 2/3 greater.
Fireplaces have long ceased to be bulky brick structures that are used to heat homes. Now they are increasingly used for decorative purposes, and heating occurs using electricity. All more people They live in city apartments, where it is impossible to install a real fireplace, and it is not necessary. Therefore, electrical analogues are installed or imitations are created from various materials. In the latter case, the most popular material for creating such a decorative element is plasterboard.
They make a decorative fireplace with their own hands from plasterboard for two reasons:
- Protect the room from heat sources and increase their efficiency. In this case, you buy a special device that is powered from the mains and simulates a flame, but gives off heat. In this case, fireproof plasterboard is used for the fireplace.
- For interior decoration using a fake fireplace without a heat source. Any gypsum boards are suitable for cladding.
Regardless of the reason, you can create a fireplace from gypsum plasterboard with your own hands, because the order of work will be the same. Creating such a design has a number of advantages:
- safety. The absence of open flames and the use of gypsum plasterboard reduce the risk of fire to a minimum;
- homemade fireplace made of plasterboard has simple design. Although it is possible to create projects that are so complex that they can take up huge areas;
- the use of gypsum plasterboard allows you to create any shape of fireplace, even the most bizarre. You can even create a structure with a chimney;
- the size of the room does not play a big role, because the structure can be installed in any place, even in a corner;
- cladding can be carried out using any materials.
Types of false fireplaces
All false fireplaces can be divided into three categories: authentic, conventional and symbolic. Once you understand which option interests you, you can begin to implement it.
 A decorative chimney gives greater authenticity to the entire structure
 Reliable fireplaces are made so that they are an exact copy original designs. If this option is used outside the apartment, then you will never think that this is an imitation. Characteristic feature such designs is the use of furnaces where combustion is carried out various types fuel. The imitation comes out so good that it has the appropriate dimensions and design principles. Such a fireplace made of plasterboard in the interior can look very massive, and it is rational to install it in a cottage where there are large rooms.
Having the dimensions of the future structure, you can calculate how many profiles, fasteners and gypsum boards will be required. Let us remind you once again that heat-resistant plasterboard is needed for a fireplace only if there is a heating element inside the structure being created. Otherwise, a suitable material for finishing a metal frame will be suitable.
To make it easier to work, you need to make a drawing of a plasterboard fireplace with dimensions. After this, the dimensions can be transferred to the wall so that you can see exactly where to mount the frame. At this stage, you will need a level (ideally a laser) so that the finished structure does not turn out to be skewed. By the way, the work will require the following tools and fasteners:
- level to create a level structure;
- metal guide profile for creating a frame;
- metal scissors for cutting profiles;
- tape measure for performing various measurements;
- electric drill and dowels for attaching the frame to the wall;
- plasterboard for covering the frame;
- knife for cutting plasterboard to specified sizes;
- a screwdriver and self-tapping screws for attaching frame elements to each other and drywall to the profile.
Additionally, you will need materials for finishing (trowel, putty, tape for seams and facing material). At the very end, we will consider the question of how to decorate a plasterboard fireplace.
Assembly and fastening of the frame
There should be markings on the wall and floor to make it clear where the do-it-yourself plasterboard fireplace frame will be installed. To assemble it, rack or guide profiles can be used. You can assemble the frame separately and then attach it to the wall, but it is better not to resort to this method. You can miss the markings, and attaching the entire bulky structure is inconvenient. It's better to do everything sequentially. You need to make fireplaces with your own hands from plasterboard step by step, and not try to combine several stages into one or skip them.
 It is advisable to provide a stand in the frame
 First of all, the guides are attached to the wall and to the floor. To do this, you need to mark the places where they will be fixed, after which holes are drilled with a drill, and the profiles are attached to the wall and to the floor with dowels. It is not necessary to cut the profile into many pieces, because it can be trimmed with scissors and then simply bent at a right angle. This way the guide on the floor and wall will be the same and you won't have to worry about making sure everything is aligned.
Vertical guides are checked with a plumb line so that they are fixed level. Ideally use a laser level.
Racks are inserted into the guide profiles on the floor and secured with metal screws. These posts go from the bottom profiles to the top, where they will be secured into guides that are mounted parallel to the profile on the floor. You should get some kind of parallelepiped if you assemble the simplest structure. This will be the main frame, in which you will also need to make a place to insert the heating device. A drawing of a false fireplace made of plasterboard will help with this.
 Frame option without fixing to the floor
 The jumpers between the racks are installed at the height at which the electric fireplace will be installed. One of the guide profiles at this height is attached to the wall. It turns out a quadrangle, which will be the bottom of the niche. For greater reliability, you can add a few more jumpers inside this rectangle (relevant for heavy heating devices). All other frame elements are assembled in a similar way. For example, you can create a fireplace box from plasterboard that will imitate a chimney.
Plasterboard cladding
 Can be installed on top of the fireplace wooden table top for decoration
 GCR must be cut so that it can be used for sheathing assembled frame. It’s not difficult to figure out how to cover a structure with plasterboard. Just take it plasterboard sheets and fasten them with self-tapping screws. Cladding a fireplace with plasterboard with your own hands begins with a niche for the electric fireplace, into which it is then inserted. If mistakes were made, then part of the structure may have to be reassembled. If the fireplace goes well, then take it out and continue working.
| Main characteristics of wall (GKL) and fire-resistant (GKLO) plasterboard | ||||
| Name | Size in mm. | Sheet area in sq.m. | Sheet weight in kg. | Color |
| GKL | 1200x2000x12.5 | 2,4 | 23 | Grey |
| 1200x2500x12.5 | 3 | 29 | ||
| 1200x3000x12.5 | 3,6 | 35 | ||
| GKL | 1200x2000x12.5 | 2,4 | 26 | Pink |
| 1200x2500x12.5 | 3 | 31 | ||
| 1200x3000x12.5 | 3,6 | 37 | ||
After covering the internal space of the structure, you need to move on to the external one. We fasten everything with small self-tapping screws in 15 cm increments. The procedure is quite standard and common. Do not forget that the caps of the screws must be flush (not protrude or be pressed in too much). Now you know how to make a false fireplace from plasterboard, but that's not all.
You can provide special double walls for the combustion hole (if it will be used for its intended purpose). Non-flammable insulation is placed between these walls, for more efficient heating rooms.
Features of corner fireplaces
I would like to dwell on the option of installing a fireplace in a corner. This method has both advantages and disadvantages. Let's talk about the advantages:
- You can save space since the space required in the corner is smaller.
- The space in the corner of the room is used, and usually the corners are empty.
- Less material consumption and lower cost of the entire structure.
- It looks original and stylish.
Unfortunately, a do-it-yourself corner false fireplace made from plasterboard will also have disadvantages. There is not always a free corner large enough to avoid a window with a radiator. Even if the window is far away, there are curtains that will interfere. Therefore, it will always be impossible to use two corners in a room.
 An imitation chimney will not steal space and will look stylish
 The remaining two corners are usually formed by the part of the wall where the doors are located. For some people, if a do-it-yourself corner decorative fireplace made from plasterboard is located in such a place, then this is unacceptable from the point of view of room design.
Step-by-step instruction
For the most part, creating corner false fireplaces from gypsum plasterboard is not much different from the procedure described above for frontal structures. The main difference is in the shape of the frame.
Do-it-yourself corner fireplace made of plasterboard - step-by-step instruction:
- Calculation of sizes. Everything needs to be taken into account. For example, a heating pipe running along the corner of a wall that needs to be hidden. It may interfere with the assembly of a solid frame. If the battery is hidden, then you should definitely provide a design feature that will make it easy to get to it if necessary. When assembling a corner fireplace made of plasterboard, the dimensions of all elements must be carefully thought out.
- We mount the frame. For this, the cheapest profile or the one that is most convenient to work with will do. Special requirements no to the guides.
- We provide electrical wiring. These could be sockets or lighting wiring finished design. Additional lighting is especially relevant if work is carried out on a large frame.
- The frame is covered with sheets of plasterboard.
- Finishing is carried out.
Here's how to make your own fireplace out of plasterboard. You just need to follow the sequence of work in the instructions.
Finishing - the last stage
The fireplace should fit harmoniously into the interior of the room where it is installed. That's why it's so important to choose the right finish. The most popular materials for such work are decorative bricks, ceramic tiles and artificial stone. However, ordinary paint is often used for these purposes.
 With proper finishing, no one will guess about using drywall
 Before painting a plasterboard fireplace, it is puttied, making all surfaces smooth. Then everything is painted twice water-based paint using a brush. For other types of finishing, you will have to use plaster compounds so that nothing falls off. All this significantly increases the weight of the structure. So you need to know in advance whether the drywall will be covered with ceramic tiles (stone) or not.
It’s not as difficult to make a fireplace in an apartment with your own hands from plasterboard as it might seem. The main thing is to carry out calculations correctly and use a level, do not forget about jumpers and finishing.
Today a fireplace can be found both in a country house and in an apartment. This is a popular part of the interior, as it makes the room much more comfortable and the design original.
Often they install a false corner fireplace from plasterboard with their own hands. This does not require special skills or knowledge, you just need to be able to use simple tools and desire.
Of course, now there are many different materials from which you can build a fireplace. Drywall is a material that is lightweight and durable, and is also easy to work with. Namely, it is a good base for plaster, paint, etc. For the functionality of this material, it comes at a low price.
Types of plasterboard fireplaces:
- Symbolic- this is a picture that imitates a fireplace, and minimal design from plasterboard.
- Conditional- it's small plasterboard construction, which protrudes slightly from the wall, electric stoves are usually installed in it.
- Reliable is a structure in which a biofuel stove can be installed.
Device
The design of a false furnace consists of a body and a device. The most convenient material for such a housing is plasterboard. And in the future you can cover the frame with ceramic tiles, stone, etc. Also, a corner false fireplace is often decorated with elements made of plaster (Fig. 1) or polyurethane, for example, these can be columns.
Rice. 1When choosing a place for a corner fireplace, you need to take into account its functionality and aesthetic appearance. You need to choose the least involved angle. But it should also be taken into account that designers often install a fireplace in the corner opposite the front door, then the fireplace will become the center of the interior. A corner fireplace made of plasterboard takes up little space in the room.
When designing a fireplace, you can come up with absolutely different variants its appearance and finish.
, which takes on the weight of the electric fireplace, so the reliability of the portal is also in order.
In order to know exactly what materials will be needed to build a fireplace with your own hands, you must first decide on its design and draw a drawing. It is according to this scheme that you can calculate the approximate amount of materials.
As a rule, for the case you need:
- Drywall. It is sold in sheets different sizes;
- A metal profile is needed to build a frame;
- Self-tapping screws;
- Primer and putty;
- The material that will be used for cladding.
A metal profile is a fastener that is made of galvanized sheet. There are several types of such profiles that are used in installation: corner, rack, guide, arched profiles.
To build a plasterboard frame with your own hands, you will need the following tools:
- Drill;
- Level, preferably laser;
- Jigsaw;
- Square;
- Tape measure and long ruler;
- Corner Grinder(Bulgarian).
Installation
Before the beginning installation work that are made by hand, markings should be made. It needs to be drawn on the floor and walls to which the frame structure will be adjacent. It is better to use a marker for this. Also, before starting installation, you should connect power to the fireplace. This is necessary if an electric oven or other electrical appliance.
 Rice. 2
A metal profile should be screwed to the marked lines (Fig. 3), and racks, etc., are then installed from the wall. If the false furnace frame should have rounded axes, then it should be metal profile make cuts and bend. Depending on how much you need to bend the axis, the distance between cuts can be every 4 or 6 cm.
 Rice. 3
Next you need to start working with drywall, it is cut out according to the dimensions in the drawing. The frame is covered with self-tapping screws (Fig. 4); it is very important to tighten the screws to the end and even recess them a little into the drywall. Otherwise, their caps will stand out when further decorating the corner fireplace.
 Rice. 4
Depending on what will be installed in the firebox of the structure, you should select the right material, for example, if there is a biofuel stove, or candles will be installed there, then the firebox should be finished heat-resistant material. For example, such a material could be magnesite, asbestos, metal, etc.
Next, the finished frame must be treated with putty. Particular attention is paid to the joints and screws that are screwed in. The surface still needs to be sanded and primed. These processing methods are needed to prolong operation. After all the treatments you need to sand the surface and start decorating facing materials.
If for decorative cladding When ceramic tiles or stone are used, glue is needed for such work. It dries within 12 to 20 hours.
The top panel in corner fireplaces made of plasterboard is quite functional, and this is where you can install a wooden or stone shelf with your own hands. Thus, you can put a TV, books or souvenirs there.
Cladding works
Finishing material gives the fireplace a pleasant appearance. Of course, depending on the installation budget, you can choose different materials. The most accessible and cheapest way to decorate a corner false fireplace with your own hands is to stick a special film. It can be of different colors and with different patterns. But this method is not durable; the film may become deformed. First of all, it begins to peel off at the joints, and the color of such a film may fade over time.
Painting is also inexpensive way fireplace decoration. Paint is applied to the surface only after the putty and primer have completely dried. You can choose different colors depending on the interior. The most common is white.
Ceramic tile- this is a reliable, durable and not too expensive material, which can also be selected desired color or imitation stone. It can be of different sizes, for example, there is a model of small tiles that imitates brickwork(Fig. 5). Having decided to cover the structure with tiles, you need to calculate its size so that you do not need to cut it.
 Rice. 5
Wooden panels are great natural material, thanks to which you can emphasize English style interior You can use carved panels.
Using drywall, you can decorate the entire corner with your own hands by making various shelves and niches above the fireplace. Also considered decor are various baseboards that are attached to the fireplace and give it a more attractive look.
Filling the firebox
Filling the firebox in a plasterboard structure with your own hands can be different. Of course, this also depends on Money allocated for such a design.
Namely:
- Electric fireplace– this is a device that generates heat and creates an imitation of fire in the hearth and corresponding sounds;
- Electronic photo frame - this element simply visually imitates fire;
- Candles. Sometimes the firebox is filled with candles; of course, they cannot always burn, but still it is very beautiful and aesthetically pleasing;
- Special lights. Today in stores there are many options for electric lighting for false fireplaces;
- Often several logs are simply beautifully stacked into the firebox, making the fireplace look like a real stove with a hearth.