Yew foundation. Pile foundation using Tise technology. Drilling and expansion of wells
The most popular type of supporting structure among private developers is the foundation using Tise technology. The abbreviation TISE means Technology of Individual Construction and Ecology. Tise technology allows you to build a house with your own hands without experience in construction and in the absence of qualifications.
To build a foundation using Tise technology means saving almost 2 times the family budget allocated for building a house and also saving money during the further operation of the house.

The TISE foundation allows you to save money during construction and, at the same time, does not harm the environment.
When using this technology, the environment does not suffer, since the construction of the house is carried out using available raw materials. The following tasks are solved with Tise technology:
- insulation of premises from contact with materials for building a house;
- the possibility of using effective ventilation, which avoids the appearance of stagnant unventilated zones in the house, the introduction of displacement ventilation schemes;
- the ability to create a favorable electromagnetic field;
- does not create increased background radiation;
- reliable insulation of structures from the penetration of radioactive elements, in particular radon gas, is ensured;
- introduction of a new energy saving system that reduces the energy level from heating systems by 2-3 times;
- the ability to ensure the environmental safety of a residential building.
Advantages and disadvantages of the foundation
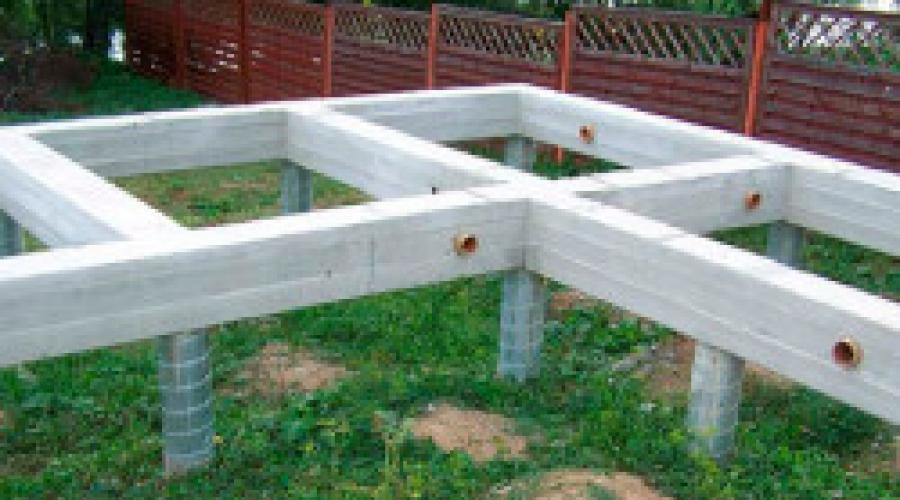
The foundation built using the Tise technology is a pile-tape structure, which is made in the form of a pile field. The connecting pile does not touch the ground. This property of the structure eliminates soil pressure on it at any time of the year.
The chise foundation has the following characteristics:

- reliability;
- efficiency;
- ease of installation;
- short construction time;
- the possibility of constructing the structure in winter;
- environmental friendliness;
- possibility of use in seismically hazardous areas;
- leveling of any vibrations;
- possibility of construction at any groundwater level.
The chise foundation consists of the following elements:
- reinforced piles of special shape;
- reinforced concrete grillage.
Piles for the Tise foundation have a hemispherical expansion at the bottom. This expansion allows you to increase the support area and improves the load-bearing characteristics of the foundation of the house. This feature of the supporting structure allows it to be used in the construction of different types of houses. This foundation does not shrink and is suitable for both light frame houses and stone houses.

The spherical part of the pile structure has a very useful property: it resists the extrusion forces that occur on heaving soils and maintains support in the ground.
Disadvantages of building a foundation include the need to purchase professional equipment: drills or motorized drills.
The grillage is a strip part of the Tise technology, made of reinforced concrete. The grillage is made at some distance above the ground. The presence of a gap between it and the ground does not allow heaving forces to affect the foundation.
Return to contents
Economic component of the supporting structure
The construction of a column-and-strip foundation using the Tise technology is also advisable from an economic point of view. It is characterized by a small volume of excavation work and lower costs for the production of concrete mortar, since when making a supporting structure of this type for a house, less of it will be needed than for an ordinary strip foundation.
Construction of a foundation using Tise technology allows you to save money and build a structure in a short time; for its construction it is not necessary to attract additional labor.
Return to contents
Installation of a column-strip foundation

Installation of foundations using Tise technology requires a preliminary calculation of the number of piles and determination of their exact location under the grillage, taking into account the load-bearing characteristics of the soil and the design of the house. It consists of the following steps:
- contour marking;
- drilling and expansion of wells;
- reinforcement of piles;
- grillage production.
These calculations are entrusted to specialists from design organizations, since it is necessary to conduct a study of the soil on the site, calculate and prepare a construction project.
Scheme for marking the foundation according to the Pythagorean theorem.
- First, 2 enclosure boards are hammered in. They are installed at a distance from the length of the future wall, increased by 2 m. A cord or fishing line is attached to the boards. The cord material should not stretch, so fishing line or twine is more often used. The first angle is determined by retreating 1 m from the outer board, and a peg is driven in. From the first peg, measure the length of the wall of the future house and drive in a second peg, this will be the location of the second corner. Extension boards are installed to indicate the zero level of the building in the TISE foundation; it corresponds to the upper level of the grillage. Using a hydraulic level, check that the top edge of the board coincides with the zero mark.
- To mark the 2nd wall of the foundation, a right angle should be determined perpendicular to the first. This can be done by applying the Pythagorean theorem or the Egyptian triangle principle. According to the Pythagorean theorem, knowing the dimensions of the walls of the house, you need to calculate the diagonal. At the first point, a cord longer than the length of the 2nd wall is attached and stretched between the railing boards. From the 1st point, the length of the 2nd wall is measured and the 3rd peg is driven in. At the second point, a cord equal to the diagonal of the triangle formed by the walls is attached; it is connected at the 3rd point with the cord from the first point. If the cords are well tensioned and do not sag, then at the first point an angle of 90º is obtained. When using the “Egyptian triangle”, measure 12 m of cord and tie it into a ring. At a distance of 3 m the 2nd knot is knitted, after 4 m the 3rd knot is knitted. The distance between the 1st and 3rd nodes will be 5 m. Using the resulting triangle, a right angle is fixed on the site of the future foundation. To do this, place a knot at the marked point, which is located between the sides of 3 and 4 m, 2 other corners are spread to the sides along the future walls, with an even tension of the cord along the sides, a right angle is obtained.
- Repeat the steps to determine the right angle for the 3rd wall, hammer the peg into the 4th point. Connect the 3rd and 4th points with a cord, creating the outer contour of the chise foundation.
- Internal casting is carried out by measuring a distance from the corner points equal to the width of the grillage, hammering in the pegs and connecting them together with a cord or fishing line.
- The locations for drilling wells for piles are determined. The centers of the wells will coincide with the line located in the middle between the cast-offs; a cord is pulled along this line. Places for drilling corner wells at the intersection of walls are marked with pegs.
Along the perimeter of the walls, the locations for drilling wells are determined according to the step calculated by the design organization, and they are marked with pegs.
Return to contents
Drilling and expansion of wells
In the places marked for wells, they dig holes half a shovel deep and begin to drill. Wells are drilled using a TISE drill. This is a hand tool consisting of a handle, a drill, a two-section rod, a soil accumulator and a folding shovel. The drilling depth is adjusted by a rod. The soil intake and loosening is ensured by the soil receiver, and the folding blade leads the process of expanding the lower part of the well.
To optimize the drilling process, experts advise drilling 5-6 wells and then expanding them, this will save time on drill conversion.
To improve the sand drilling process, experts advise pouring about 5 buckets of water into the well overnight. This will make the expansion easier the next morning.
When drilling expansion, the drill and rod must rotate, a folding blade is put on the rod and secured with a pin to the soil receiver. The shoulder blade is raised using a cord, and it lowers itself under its own weight.
Having completed the expansion under the support, reinforcement begins.


The TISE foundation is a popular foundation in low-rise construction, suitable for the construction of frame houses and buildings made of wood (timber and logs), foam concrete and brick 1-3 floors high. The key advantage of this technology is the ability to implement all stages of construction with your own hands, without the use of special equipment.
This article discusses the foundation of TISE technology. You will learn the pros and cons of this method, design features and foundation calculation technology, and also receive detailed instructions for its construction.
Design features of the TISE foundation
The foundation using TISE technology was invented by the Soviet design engineer R. N. Yakovlev, who published his findings in the books “New construction method - TISE technology” and “Universal foundation TISE”.
The TISE foundation is a pile-tape structure consisting of two structural elements:
- support piles;
- tape grillage.
The functional task of piles is to transfer the load coming from the mass of the house to a deep, high-density soil layer. TISE piles have a dome-shaped expansion in the lower part, due to which an increase in the stability and load-bearing capacity of the support is achieved. This solution allows for the construction of heavy houses in low-density soil conditions, where conventional piles will shrink, leading to deformation of the building walls.

The construction of piles is carried out by developing wells on the site (using a special TISE-F drill) and concreting them with a mixture of grade M200-M300. The supports are necessarily reinforced with a longitudinal frame made of hot-rolled fittings with a diameter of 12-16 mm, in this case, the reinforced frame of the piles is connected to the frame of the grillage, which ensures maximum rigidity and reliability of the foundation.
The supports are tied with a monolithic reinforced concrete grillage of tape type. The grillage connects separate piles into a single structure, which increases their resistance to deformation under the influence of overturning loads. The grillage also acts as a supporting surface on which the basement floor is placed and the walls of the brick house are erected.
Advantages and disadvantages
As the inventor of the method, R. N. Yakovlev, states, one of the main advantages of this technology is its cost-effectiveness. The author provides the following calculations: the construction of a strip foundation with a cross-section of 70 * 40 cm and a length of 30 m requires: 0.7 * 0.4 * 30 = 8.4 m 3 of concrete, whereas to build a TISE foundation of 20 piles 1.2 m long and 0.6 mm in diameter, having a similar load-bearing capacity ability, no more than 2 cubic meters of concrete are required.
Let's look at the advantages this method has:
- the ability to build the TISE foundation with your own hands, without the use of special equipment;
- minimal amount of excavation work - there is no need to level the site and develop a trench, as is the case with a strip base;
- construction autonomy - no need for electricity, with the exception of power supply to the concrete mixer, which can be connected to a generator;
- high stability of the foundation in heaving and moving soils, the ability to build a house in low-density soil conditions;
- durability - if the construction technology is followed, the foundation will last over 100 years;
- The TISE foundation is universal - it is suitable for the construction of low-rise buildings of any weight and configuration.

The TISE method has numerous advantages, but it also has disadvantages. According to reviews, the construction process is accompanied by enormous labor costs, since all work is done manually. Let us note the difficulty of developing wells for piles in conditions of highly hard soils, which are extremely problematic to drill with hand tools.
Additional disadvantages of this method are the impossibility of arranging the basement floor, and the low stability of piles in swampy and water-saturated soils. However, in general, the advantages of this technology are more significant than the disadvantages, and its implementation in individual construction is fully justified.
Calculation method
Calculation of the foundation consists of determining the depth, number and spacing of supports. TISE drills used to develop wells make it possible to form piles with a diameter of 250, 500 and 600 mm; the load-bearing capacity of each size of pillars is given in the tables inside the instructions.
- Calculate the total mass of the building being constructed. To do this, the area of the individual structural elements of the house - walls, roof and ceilings - is multiplied by the specific gravity m 2 of the building material from which they are constructed.


The depth of the pillars depends on the level of soil freezing in your region. Use the map below and determine its size. Wells must be drilled so that the support base of the pillar is located 20 cm below the soil freezing line.

All that remains is to draw up a diagram for placing the supports in the foundation - they must be present at the corners of the house and at the intersections of the walls, the remaining number of pillars is distributed at even intervals along the perimeter of the building (optimal distance 2-2.5 m).
DIY TISE foundation (video)
TISE foundation construction technology
Construction begins with marking the foundation - using reinforcing stakes you need to mark the drilling sites for the piles. A string is stretched between the stakes, which indicates the contours of the walls of the house. After marking, you need to check the right angles using the Egyptian triangle method - at a distance of 3 m from the corner peg, a mark is made on the string, the same mark, but at a distance of 4 m, is made on the perpendicular side. Next, the diagonal is measured - if it is 5 meters, then the angle is correct.
Do-it-yourself TISE piles are made using the following technology:

You can tie the TISE foundation with a grillage after two weeks after pouring the pillars, during which they gain their design strength. The supports are tied with a grillage with a cross section of 40*40 cm.
Grillage installation technology:

At this point, the columnar foundation with a grillage using TISE technology can be considered ready. The walls of the house can be erected after a 28-day period for the structure to gain strength.
Is the foundation of TISE. Its main difference is that at the end of the pile there is a hemispherical (dome-shaped) thickening. This form allows the use of pile foundations on heaving soils, while the volume of excavation work remains very small.
TISE piles
The main disadvantage of the classic pile foundation is that with severe heaving, the support can simply be pushed out. But since the idea itself is very attractive - it can be built quickly with a minimum of costs - on difficult soils they began to make a base at the bottom of the pile - a rectangular reinforced plate. But with this option, the volume of earthworks immediately increased significantly: for each pile it is necessary to dig a pit larger than the planned base. But the building stands normally even on soils with severe frost heaving.
Under piles made using TISE technology create a similar thickening. But there is no need to dig pits. This extension is formed using a special knife, which is attached to a proprietary drill. This knife forms the extended dome. Further, the entire technology almost exactly repeats the process of constructing a pile or pile-grillage foundation.
Previously, expansions were also practiced, but they tried to do them using micro-explosions or by picking with a blade on a long pole. The main innovation in TISE technology is a drill with an opening adjustable blade. With its help, it is much easier to expand the sole.

Advantages and disadvantages
TISE foundations are quickly gaining popularity: with minimal additional costs, a more reliable foundation is obtained. So, its advantages:

If a pile or pile-grillage foundation is recommended for your house, it makes sense to make TISE piles. With a small increase in workload, you get a significant increase in reliability. After all, designers do not like pile foundations because it is impossible to find out what kind of soil is under each support. Therefore, it is impossible to predict how reliable and stable the foundation will be. And the TISE foundation has a wider support, which reduces risks. As before, nothing can be predicted, but a large load distribution area is always good.
However, there are also disadvantages. The main thing: the heel of a TISE pile cannot be well reinforced. You can lower the reinforcement cage to the very bottom, but expansion cannot be reinforced. Therefore, there remains the possibility that this thickening will collapse.

TISE piles are the basis of the TISE pile-grillage foundation
There is one more drawback, but this is from the practice of using a drill: it is not easy for them to work. The design itself is interesting. This is not a blade wrapped around a rod, but some kind of container with a composite bottom. Four blades set at an angle are welded onto the plates that form the bottom. When you spin the drill, they loosen the soil. Since the bottom is not solid, the soil gets into the body, from where it needs to be removed.
The order of work is as follows: rotate the drill several times around its axis, take it out, and shake out the soil. They lowered it into the hole again, turned it several times, etc. The technology is not complicated, but the work is tedious. The device itself weighs 7-9 kg, plus soil. It needs to be raised and lowered frequently. Overall, it's tiring. Plus, no mechanisms are needed. The downside is that the work is not easy physically. Especially if the soil is rocky or dense clay.
Where can I use it?
There are no restrictions on the types and materials of buildings: you can make a TISE foundation for wooden, frame, brick and block buildings. Number of storeys - up to three.
The restrictions on soils are the same as when using pile foundations: it is necessary that the piles transfer the load to the soil with normal bearing capacity. To decide whether it is possible or not to use TISE, a geological study of the site in the place where construction is planned is necessary.

Since the base of the pile is expanded and the resistance to buoyancy forces is greater, this technology can be used on heaving soils. But at the same time you need to consider: there is no point in placing piles closer than 1.5 meters. If placed closer, one extension of the sole will overlap the other. On the other hand, you can’t make a pile larger than 30 cm in diameter either - there is no such drill. If the load-bearing area with such parameters is not enough, you need to use a different type of foundation.
Reviews of the branded drill
The main questions for developers are related to how realistic it is to drill wells manually using a proprietary drill. Looking at the video, it seems that this task is not easy. But here are some reviews.
The soil on my site is different: some are loam, some are dense clay, and such that you can only chop them with an axe. At first I thought about renting a motor drill, but I decided to try it straight away with a drill. And nothing, not very hard. As a result, I decided that a motor drill would not speed up the process much, so I made all 40 pieces by hand. During the day, 5-6 2-meter wells were produced. They drilled easily, but with expansion it was difficult: I already had dense soil there, and it was difficult to turn with the blade open.
Oleg, Kharkov
I modified the TISE drill I bought: I welded additional teeth, instead of a rope that opens the blade, I adapted a rod - now you can put pressure on it, and not just pull. And most importantly, he lengthened the handle so that two people could turn it. While they were drilling the extensions, they twisted it 90°, but the work became much easier. In general, I'm pleased.
Nikolay, Krasnoyarsk
Calculation of the TISE foundation
The calculation method is no different from the calculation in the general case. The load from the house is calculated and then compared with the total load-bearing capacity of the planned number and diameter of piles.
First, place the piles on the house plan. They must be in the corners and at the junctions of the walls. If the distance between the piles is more than 3 meters, intermediate ones are placed between them. So you place all the supports on the plan, adhering to the rule:
- minimum distance - 1.5 meters;
- maximum 3 m.
Then calculate the load from the house. To do this, you first need to calculate the weight of the house (all building materials + furniture, plumbing, heavy household appliances).

Speaking on average, for buildings made of brick or shell rock, 2400 kg can be taken for each square of area, for light building blocks (foam concrete, aerated concrete, etc.) - 2000 kg, for wood and frames - 1800 kg. These average standards can be used as a preliminary guide. If you decide to take everything seriously, you will need to follow the entire methodology: counting materials of walls, ceilings, roofing, finishing, etc. Since the technologies and materials used may be different, the discrepancies can also be significant.
We multiply the resulting value by a correction factor - 1.3 or 1.4. This is a safety margin. The resulting figure is the load that will need to be transferred through the piles.
Now, using the table, you select what diameter the pile should have so that it can transfer the required weight.

If the planned number of columns with an expansion of the selected diameter can transfer the required load, you do not need to redo anything. If the transferred mass is too small, it is necessary to either increase the number of piles or make a “heel” of a larger diameter.
TISE foundation: work order

TISE foundation is a subtype of pile-grillage foundation. And the technology for its production is no different. The whole difference is in the drilling process. No others. . And in this article we’ll better give some practical advice.
Difficulties during drilling
If the soil is very loose - fine sand - the walls of the well may crumble. To prevent this from happening, add water. The sand will compact and hold its shape. Water will also help if the soil is very dry and dense. After drilling a few tens of centimeters, fill the well with water. It will soften the soil, it can be chopped with a shovel or other device, and then removed with a drill.

Difficulties are created by the powerful roots of trees and bushes. They need to be chopped. To do this, the ax handle is welded (attached) to the handle. By sharply lowering it into the hole, the roots are crushed.
How to create an extension
After reaching the design depth of the well, a plow is attached to the drill. It can be fixed in two positions: to form a heel of 50 or 60 cm. The plow is tied to a rope.

You lower the drill down, the rope is taut, the plow is pressed. The rope is released, and he falls down under his own weight. You start to rotate (it’s hard - the cutting surface is large), the blade cuts the soil, forming a thickening.
You can rotate both clockwise and counterclockwise. If clockwise, then try not to press down: there is no need to go deeper. When rotating counterclockwise, only the soil is cut without deepening, but another problem arises: the soil is poured under the drill, pushing it upward.
The optimal order of work is as follows: scroll counterclockwise several times. As soon as you feel that the blade has rested against the arch, make a few turns clockwise, collecting cut soil into the drill body. Take out the drill and pour out the soil. Repeat several times until an extension is formed (the soil stops building up).
On hard soils, working with the plow open can be problematic. Then you can create the expansion in stages. First set the plow to the smallest distance, then increase it to the desired size.
Filling with concrete
If the groundwater level is low, no problems arise: fill it in and treat it with a vibrator. All.
If the groundwater level is high, the heel can be filled immediately after it has been formed. You will only need to insert the reinforcement. Then you knit it before drilling begins. Filling the main part of the well can be left “for later”.

If there is a lot of water and it comes quickly, you will need a large bag made of thick film with a hole at the bottom. You insert it into the well and pour concrete. Because it is denser, it displaces water. Having filled the heel, pull out the bag. It will be useful for the next piles.
The video below demonstrates the technology of building a foundation with TISE piles and a high grillage.
This time we will talk about one of the most technologically advanced and easy-to-install types of foundations for buildings with low weight. We will tell you what the advantages of the TISE foundation are over other types, where its use is most relevant, and most importantly, how to do the work yourself.
What is TISE and what is its peculiarity?
The TISE foundation is a part of the complex that allows you to create a strong and reliable foundation for the subsequent construction of a building using masonry with small-sized elements up to three floors high. At the same time, the emphasis in the construction of such a foundation is on manual labor without the use of mechanization.
Structurally, the foundation is similar to a pile foundation, but has a shallower depth due to expanders at the base of each column. Thanks to the hydrophobic shell of concrete piles, their saturation with moisture is excluded, that is, when heaving, the soil cannot tear the concrete - it simply does not freeze to it.

1 - waterproofing; 2 - fittings; 3 - concrete M350
With a diameter of the narrow part of 200 mm, a column made of class B25 sand concrete will provide guaranteed strength with a load of up to 40 tons. This is more than enough, considering the base area of the pile is 0.8 m2, which allows you to reliably support 4-5 tons on a pillar even when building a foundation in weak and wet loam.
Application of TISE and the myth of basement floors
Of course, the TISE foundation is not a panacea at all, but this technology can rightfully be called the least expensive for construction in conditions where nothing can be built without a reinforced foundation. Unfavorable conditions include heaving and water-saturated soils, regions with a freezing depth of more than one and a half meters and areas close to water bodies.
TISE, however, is practically useless on quicksand and in rocky soil. But it is indispensable for the quick construction of small utility buildings and frame-type country houses. Due to their low weight, such buildings do not require high load-bearing capacity from the foundation.

There is an opinion that columnar foundations exclude the possibility of building a basement or basement under the house. In the standard view, this may be true, but both columnar foundations and TISE, as their particular variety, are often used to stabilize slab foundations and increase the bearing capacity of the base due to additional support on deeper, and, therefore, denser layers of soil .
Both the heads of the pillars and the grillage (slab) are located at the bottom of the common pit below the freezing depth. Such a foundation will be optimal for buildings on monolithic reinforced concrete frames, characterized by significant weight.
Drilling wells with an earthen plow TISE-F
A drill for making wells for piles is a product that, for proper use, requires knowledge and understanding of the mechanics of the processes that contribute to the excavation of soil.
The hole itself can be made by almost anyone, including a motorized drill with a diameter of at least 250 mm. For these tasks, TISE-F has two inclined cutting edges, in the lower part of which there are a pair of teeth that loosen the soil. Both cutting edges are located inside a 200 mm high annular storage tank, which facilitates rapid removal of the loosened mass.

Drilling begins with digging pits along the markings to make it easier to insert the drill into the ground. With slight vertical pressure, the drill is rotated clockwise, after 2-3 full turns it is removed and cleaned from the ground. On average, drilling a two-meter well takes one person 2.5 hours, two people about 40 minutes.

Expansion sampling is carried out after installing the plow on the drill. Due to the telescopic device of the drill rod, the plow is pressed to its axis while the drill is suspended. When pressure is applied to the handles, the mechanism moves the plate to the side, thus gradually “gnawing out” a cavity in the shape of a hemisphere at depth.

TISE well drilling technology: 1 - board formwork; 2 - sand; 3 - reinforcement frame; 4 - concrete
Further preparation of the wells involves installing a waterproofing lining. For these purposes, we can use roofing felt, although, if possible, it is recommended to use PET sheets or fiberglass with bitumen impregnation. The waterproofing pipes are cut with a knife along a common secant horizontal plane, and square formwork made from 120 mm boards is installed at the tops.
Reinforcement and filling
If you are laying a foundation at a high groundwater level, before filling each well, you need to lower a submersible slurry pump into it until the liquid is completely removed. A 20 cm sump under the extension helps with this, where residual water accumulates.

To reinforce the pile, a foam structure is used of four longitudinal rods of 12 mm reinforcement with transverse ligation with clamps every 40-45 cm. In plan, the reinforcing frame has a square cross-section with a side of 180 mm. To fix the reinforcement exactly in the center of the pile, 35 mm spacer rings are placed on the rods at meter intervals.

Filling occurs as follows: a bucket of coarse gravel or road crushed stone is poured onto the bottom of the well. The reinforcing frame is installed in place: if a concrete grillage is planned on top of the pillars, the tails of the reinforcement are extended 30-40 cm above the pile formwork.
Concrete of class 20-25 is used for pouring. The most suitable from the point of view of mass compaction is sand concrete or concrete on granite screenings with a ratio of 400 grade cement to filler as 1: 3.5.

After pouring the concrete, it must be compacted by pinning, and then a vibrator must be immersed in the well several times. The upper end of the column is trimmed with a trowel; the protruding reinforcement must be immediately washed off from the cement. The piles gain full strength like any concrete - in 28 days, but after 100 hours the construction of superstructures can begin, and the concrete grillage can even be cast on the same day as the pillars.
Manual production of piles - advantages and disadvantages
TISE foundations did not make a revolution - self-filling piles with expansion were introduced into construction much earlier. And there are a number of circumstances when preference should be given to the standard method of constructing such a foundation without cunning drilling devices.
At the very beginning, we noticed that the tensile strength of the pillar is much higher than the supporting capacity of the soil, even in the presence of expansion. This difference can be used to advantage if you arrange the expansion manually and reinforce it correctly, which will allow you to increase the installation step of the piles to 3-4 meters.

Wells 100x100 cm are dug under such pillars, the bottom is poured to 150 mm with the laying of gratings of 14 mm reinforcement rods in two layers and mortgages for reinforcing the pile. After this, the formwork is built - a square pillar with a clearance inside of 200x200 mm, diverging into a trapezoid of plywood 35 cm from the base. This makes it possible to construct an expansion proportional to its strength, properly reinforce and waterproof concrete, and backfill around the pillars with material that is not subject to heaving.
An alternative method of filling via PET pipes
In conclusion, we present a similar version of such a foundation, which uses substandard PET or wide HDPE pipes. The method is especially good if you have minimal mechanization - a gas drill or a KBM from local utilities.
A well with a diameter of 400 mm is opened 50 cm below the freezing depth, and 30 cm of concrete is poured onto the bottom over a sand bedding. Plastic pipes are inserted into the set but not hardened concrete and leveled, which subsequently serve as formwork, waterproofing and a casing sleeve that prevents the soil from freezing.

The diameter of the pipes must be at least 200 mm; for light domestic buildings it is permissible to use standard 110 mm pipes with a pile spacing of no more than 1.6 meters. The pillars need to be filled with sand concrete, pinned and seated by vibration, and then driven inside 3-4 rods of 12 mm reinforcement along the entire length of the pile, without worrying about the protective layers.