Photography with wiring: camera settings, shooting modes. Shooting with wiring - just about the complex
Read also
Many people know that when using long shutter speeds, pictures can turn out blurry. This effect can be used to benefit the composition when taking photographs with wiring. This shooting technique allows you to get incredible pictures, filled with dynamics. In order to learn how to take such photographs, you need to know a little theory and practice as much as possible.
The whole point is that during exposure of the frame, while the shutter is open, the camera should move behind the subject at the same speed as he himself. This will allow you to get the main subject sharp, and the background blurred in the direction of camera movement.


The easiest way to take photographs is with tracking, shooting objects whose direction of movement and speed are known to you in advance, or at least it is easily predictable. Otherwise, it will be very difficult to follow the object and it will end up blurry.

How to take photos with wiring?
- The shutter speed should be set longer than usual. It will have to be selected experimentally. It's better to start with 1/30 of a second. Shooting should be done in shutter priority mode or manual mode. The longer the shutter speed, the longer the streaking will be, but the main subject will be more difficult to sharpen.
- Having decided on the subject of shooting, you should find a place to photograph where nothing will interfere with the view. Of course, you should take care of the background of the photo. Despite the fact that the background will be blurred, random figures of people or inharmonious colors can ruin the photo.
- Perform smooth wiring. Then, when the object appears in the field of view, you should catch it in the viewfinder, hold down the shutter button and move the camera after the subject for a while. For a smoother shot, you can use a tripod or monopod.
- It's easiest to shoot from the side of your subject.
- Autofocus If the camera has an autofocus tracking function and it works fast enough, you can use it.
- If the camera's autofocus cannot work under such conditions, then you will have to foresee in advance where the subject will be and focus the camera on this area.
- After pressing the shutter button You should move the camera smoothly after the subject. You need to turn not only your head and camera, but also your entire body above the waist. Your feet should be firmly planted on the ground so as not to stagger. The shutter button must be pressed smoothly to eliminate camera shake as much as possible.
Another option for shooting with wiring.
Sometimes nice pictures are obtained when using the flash while shooting with wiring. This works especially well when photographing in low light conditions. The main advantage of using flash is that the subject appears brighter than the background, and thus stands out better in the photo.


When photographing with flash, the main thing is not to expose the subject to light or make it stand out too much. To do this, you need to adjust the flash power.
Practice shooting with wiring


Achieve immediately good results Shooting with wiring will not be easy. Most likely, the first photos will be unsuccessful. Then, when you understand how to move and how to adjust the camera, the pictures will turn out better and better. It is best to practice on sports competitions or just standing at the edge of the road. Remember that your subject doesn't always have to be perfectly sharp. A slight blur of the subject will only emphasize the dynamics depicted in the photograph.
Driving photography is a technique where you move the camera in sync with a moving subject.
This shooting method allows you to focus on the movement of the subject. Ideally, everyone wants to get a photo with a motion-blurred background and a clear subject. Although sometimes photographers show movement by making a dynamic subject blurry, this one artistic technique used much less frequently.
For this shoot, you need to know the basics of exposure and understand the relationship between shutter speed and aperture.
In this article I will tell you how to shoot moving cars. With people it’s the same – only simpler.
Excerpt
In shooting with wiring, shutter speed rules. I always use shutter priority, in this mode I can be sure of the degree of background blur.
The shutter speed is selected depending on the speed of the object. And it depends on how blurry the background you want to get.
Diaphragm
As you know, aperture is directly related to shutter speed. IN in this case we work with relatively slow shutter speeds, which results in a closed aperture. This is not a problem, a greater depth of field will help us keep more detail in the frame. And it will cover a little from small autofocus errors.
Using aperture priority, you run the risk of getting shutter speeds ranging from 1/15 to 1/60 (for example, if a truck with a very dark or light body passes in the background of your subject).
Tripod
If you're filming a car in motion, a tripod (or monopod) can help eliminate vertical motion by allowing the camera to rotate only in the horizontal plane.
Autofocus

When shooting while shooting, using autofocus tracking helps a lot. As you know, the camera focuses best on the central focus area. Therefore, tracking autofocus is better used when photographing people than cars. It's easier to keep focus on a face than on a fast-moving object, which is quite monochromatic, making it difficult for the focusing system to work.
For filming cars, it is convenient to use manual focusing - it eliminates autofocus errors. Focus on the place where the car will pass, watch the car and in the right place press the trigger.
Continuous shooting
Sometimes burst shooting helps. Why sometimes? When a car flies past you, a split second in one case can catch good shot, in another - miss with framing.
Whether shooting with manual focus or using autofocus tracking, continuous shooting will really increase your chance of capturing a great shot. But if you use single-frame focusing, it is simply pointless.
Stabilizers
A stabilizer in the lens (or camera) won't change the situation much. But if you have it, it won't be superfluous. After all, the movement of the camera, even on a tripod, is not perfectly smooth, but occurs in small jerks, and if not used, there will be vertical vibrations. The stabilizer will dampen vibrations and make the frame smoother.
Contrast

If the photo above seems boring to you, don't think you can save it in Photoshop. Try to highlight the car in the frame not only through movement, but also through light contrast.
Choose a shooting location so that the background behind the car is light, or better yet, illuminated by the sun. Set your metering to spot metering and only shoot dark cars. For example, dark red, or better and faster - black. The camera will measure the light on a dark object, and the background will be overexposed. As a result, you will have a frame with a clear car, a light background, and plus there will be a sense of movement. Look at the following example.

I shot this moving car from a distance of several tens of meters at a focal length of 70 mm and a shutter speed of 1/30.
As you can see, the depth of field is not large and the car turned out to be sharp only in the center, closer to the edges - blur is slightly visible.
At shutter speeds of about 1/30, the depth of field is not very large, especially at long focal lengths.
Bottom line - practice more
There will be a lot of unsuccessful shots. Remember - the result depends more on your experience than on a tripod or stabilizer. The main thing is to feel the movement in the frame, and with experience you will definitely learn this.
So, my first ever photo article about photography with wiring (don’t judge too harshly). Personally, I really like photographs like this: looking at them, you can’t say that it turned out to be a cool photo by accident! It is clear that the author was confused, read articles or watched videos, trained, gained experience...
Wire photography is one way to show movement in the frame. The technique is as follows: during the period of time when exposure occurs (the shutter is open, light hits the matrix), the subject and the camera move with same speed, along the same trajectory, in parallel planes. The result is a sharp subject, and the background (especially if it is not uniform, for example, a wall with graffiti) is very effectively blurred.
How to shoot? We place the shooting object at the starting point A, it will move to point B (and then back from point B to point A), and you yourself are at point C. All 3 points form isosceles triangle. We become more stable, holding the camera firmly with both hands. I would advise, to begin with, just follow the subject through the viewfinder. You need to move with your body, trying to keep your hands/head/camera still. When you are sure that the surveillance is successful, start filming!
About the numbers: in this technique, the priority is exposure. Smart books say that its value is set in the range from 1/125 to 1/8. In my opinion, with a little practice, everyone will choose a comfortable shutter speed for themselves. Personally, I find it most convenient to shoot at 1/40 plus/minus. When we decide on shutter speed, we set the aperture and ISO according to exposure metering (or instinct). If your camera has a tracking focus function (all servo in the canon) and the ability to shoot continuously, be sure to take advantage of these extremely useful options for us.
So, everyone is in their starting positions, we command the object “To start”, and we begin to move together with the model. We press the shutter button a second after the start of movement. While watching the model through the viewfinder, enjoy the wonderful sound of the shutter clicking. Well, and then, one more time... and another... and, after 50 frames, successful ones will start to appear. And then after 20. And then in every episode. As a rule, a good shot is 2-3 frames of the series.
The technique of photographing with wiring is far from the simplest; even 1 successful frame out of 100 will be a small victory and an undoubted reason for pride).
So, if you really want to do it cool photo, take as models your wives/husbands/friends with cars (and if a friend suddenly has a ’59 Cadillac Eldorado, then call me too;), brothers with mopeds, children with bicycles and scooters, and go for it! Well, viewers, just enjoy good photos, because now you know that this is not just a randomly successful shot, but the work and diligence of its author) Good luck to everyone!
Shooting with tracking serves two technical purposes (transferring movement in the frame, separating a figure from the background) and countless artistic purposes. In a simple case, when tracking, the camera moves after the moving object, as if “following” it. No special technical means This type of photography is usually not necessary, but there are a number of tricks that are useful to consider. I'll start with types of "wiring", including exotic options, then I'll talk about camera settings, and finish with "tips & tricks" - practical advice.
Types of filming with wiring
The terminology is mine, and in my opinion, it is not so important. Even if you call it a mushroom, the main thing is to remove it well.
Classic wiring. The object moves, the camera turns to follow it. For example, you grab the camera, aim at the carriage, and, continuing to turn the lens after the carriage, press the shutter.
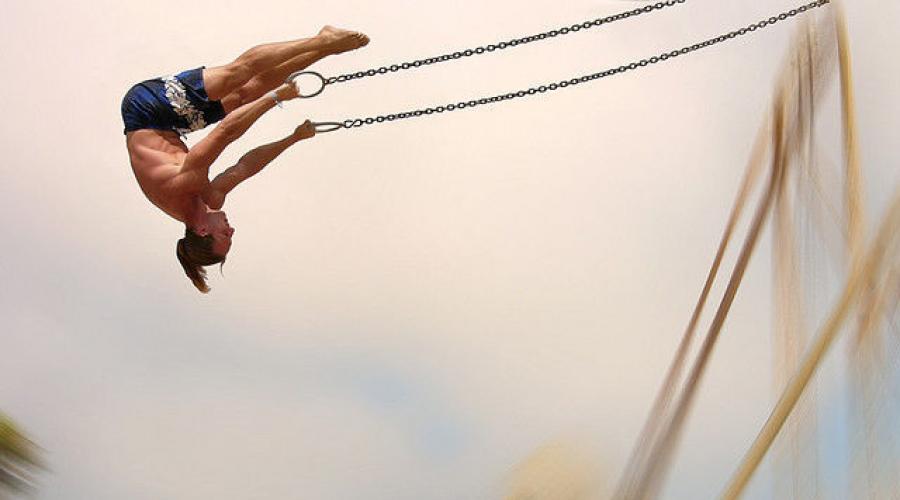
A variation of the classic one, but for rotating objects, like a Ferris wheel or gymnasts doing somersaults. In this case, the camera is fixed to the center of rotation and rotates along with the object. This also works for stationary objects, in which case you move the camera around.
The object is stationary, the background is moving. , shooting from a moving car of another moving car, etc. It is a little controversial to attribute all this to wiring, but it has a lot in common with the classics - both from the point of view of the goal of conveying movement, and in terms of camera settings.
"Anti-wiring". The object is stationary, but you are moving. For example, you are sailing on a boat, and on the shore you proudly stand beautiful stone.
Zoom wiring. The object moves towards you or away from you, and you fixate on it and move the zoom so that the object is always the same size.
Camera settings
The three main goals of all settings: 1) during the exposure time, the background should have time to move so as to look beautifully blurred; 2) the object itself must be adequately exposed; 3) the object should not be too blurry - ideally no blur at all.
Therefore, in most cases, the shutter priority mode is useful for shooting with wiring: “Sv” / “Tv” (you can read more about all modes). The shutter speed is set, depending on the scene, from 1/150 to 1/2 second. You can add Auto ISO, this will give more flexibility in terms of guaranteed exposure - if suddenly it’s too dark even at an open aperture, the camera will increase the ISO and save the frame. The aperture is usually not very important; the background is already blurred by movement. Noise is also not particularly scary and is invisible even at high ISOs.
If you set the shutter speed too long, the background will blur into an uninteresting mess, and the subject itself will also be cloudy due to its own movement and a shaky camera. Mane will grudgingly approve, the rest will not. If you set the shutter speed too fast, the subject will be clear, but so will the background - which again is not interesting. In some cases, no matter what shutter speed you set, everything is bad - for example, severe breakdancing on dark background. In this case, you can use the flash.
A few examples along with estimated shutter speed:
- The movement of continents takes millions of years.
- Growing child - months and years.
- Growing flower - days.
- Turtle - 1 - 2 seconds.
- Woman with a stroller - 1/3 - 1/5.
- The spoon that is brought to the mouth is 1/5 - 1/10.
- Walking with normal speed people - 1/8 - 1/15.
- Falling rain or hail - 1/20 - 1/30.
- Runner - 1/20 - 1/60.
- Cyclist, roller skater - 1/30 - 1/100 (if agile, more is possible).
- Flying dart in darts - 1/60-1/100.
- A car traveling at a speed of sixty kilometers per hour is 1/150 - 1/300.
- Airplane taking off - 1/500 - 1/1000.
- Flying by spaceship- I think the limiting factor here will not be shutter speed, but the speed at which you can move the camera manually.
- Elementary particles in the accelerator - it's better to photoshop it.
Of course, in a particular scene you should experiment and find the optimal speed yourself.
You can remove anything with wiring. At first I only shot classic scenes, running people, motorcyclists and the like. Then he became bolder and began filming slowly walking people, even mothers with strollers. And, in the end, he completely let loose, removing the motionless stones and mugs on the table. Try it!
Jpeg or RAW- here it is more convenient for anyone in terms of . My opinion: usually Jpeg or reduced RAW is enough (many cameras allow you to shoot in all sorts of sRAW). RAW is useful for "saving" shadows and highlights if something goes wrong. And something can go wrong in something like this difficult conditions filming can happen very often. But big size I have never found it useful yet: no matter how you hold the camera, the sharpness of the object is still not the best. So why waste megapixels on blur?
In Canon I made a separate "custom" setting for shooting with wiring. These are Tv mode (shutter priority), AutoISO, sRAW, spot metering, overexposure +1/3 ev and high-speed shooting. I set the settings to C3, the very last position of the dial switch, so that if the scene suddenly jumps out, you can instantly switch it to desired mode and film the series with the wiring.
Mentioned above high-speed continuous shooting convenient - a single frame is rarely of high quality, but you can almost always choose something good from a series.
For serial shooting it is better to set quick card. So as not to gnaw on body parts, looking after the passing plot, while the camera painfully slowly pours the episode onto the flash drive.
Overexposure by a third - two-thirds of a stop, so that the background is lighter, ideally it goes almost into the upper key. It seems to me more aesthetically pleasing, and it’s more important to save the shadows than the lights. But here, whoever’s exposure metering behaves, may need underexposure. It is also important not to overdo it, if the background is just white, then why was the wiring done?
In the case of “classic wiring”, It is convenient to fix the camera in a “triangle” from your hands and turn your whole body behind the object, along with the camera. This provides greater stability and even turning.
First you raise the camera, you begin to guide it after the object, then smoothly, like a trigger, press the shutter button. You gotta squeeze the trigger, Harley. Don't yank it. It's not your dick. Squeeze it. ©
Zoom wiring It’s more convenient to do this with lenses that zoom not by turning, but by “trombone”. But it’s difficult to do wiring with televisions, and I don’t know “trombones” - wide-angle ones, so it’s inconvenient to do zoom wiring with anything.
"Reverse" wiring is not necessarily done from a car or train. You can walk parallel to a moving object and or front.
If you are out hunting for wiring, wide-angle(or even a fisheye) is more convenient than a telephoto.
Crop It’s better to have a reserve - you can edit it later.
See off not only the straightforward, but also diagonal and any other movement.
Stabilizer the lens helps a lot. Monopod Same.
Hood. This has been said many times, and I’ll say it again: you need a lens hood. Especially when shooting with wiring. Single frames are one thing, when in principle you see glare and can take them into account. Another thing is when the camera rotates back and forth, and there is simply no time to evaluate the light picture. The hood does not guarantee the absence of “hares”, but it reduces the risk of their appearance.
If you're not sure in autofocus, put the camera in M (manual) mode, hold down the aperture to f/8-13, set Auto ISO and use a wide-angle with autofocus disabled, focused at some reasonable distance. But in my opinion this is needed extremely rarely.
If you are shooting with wiring stationary object, then the camera can fly in your hands as you like - provided that the lens is always aimed at one point on the object. LiveView This helps a lot.
On a bright day, with shutter speeds of the order of a fraction of a second, even at ISO 100 the maximum aperture may not be enough, and the frame will be overexposed. Use neutral gray filters- Cokin, Lee or something similar. Or ask to cover the Sun with clouds.
Nobody forbids using it when shooting with wiring flash- monopulse or even strobe. As a rule, a more attractive result is obtained when synchronizing with the second curtain (the flash does not fire immediately, but when the shutter is already starting to close, which results in a realistic motion blur in the frame with the last phase of movement captured). LED lamps are also suitable, with the caveat that, unlike flash, they will give a greater sense of continuity of movement.
The phases of movement in a series with wiring can be combined in one frame in Photoshop, resulting in an exotic version.
Series removed with wiring, convenient group in Lightroom using Auto-Stack (Photo: Stacking: Auto-Stack).
If you're into photography, you've probably heard of line photography. But you don’t fully understand what it is and how it is, but you want to know what it is and what it looks like in a photograph. This material will help you understand the details of shooting with wiring, and you will also learn when and why to use this technique.
First, let's decipher the concept itself " Shooting with wiring».
So, shooting with wiring is special equipment shooting fast moving objects (freezing the object - blurring the background). That is, you watch the movement of the object in the camera viewfinder, and in right moment release the shutter.
It's easy to say, but not easy to do. While we won’t look at the details of the shooting technique, let’s now see how it looks in the pictures. In the pictures it looks like this: - a “frozen” object on a blurred background, but sometimes the background can be partially blurred or not blurred at all, this depends on many factors that we will look at a little later.
In general, background blur usually occurs in the horizontal plane, but the direction of the blur depends on the direction the subject is moving. Photos taken using this shooting technique look very impressive and expressive. Such photographs attract the viewer’s attention, hence the interest and desire of photographers to use this technique in their works. And so, we sorted it out, we can move on.
Shutter speed is one of the background blur tools
To obtain blurred background in the image, for this you need to use a long shutter speed, for example 1/15 - 1/60 sec., with the camera moving along the axis, approximately 30° per second. But if you use short excerpts, for example 1/200 sec., the camera movement must be many times faster, otherwise the background will remain unblurred or only partially blurred.
Please note that this long exposure, most likely, will also lead to partial blurring of the main object if the object is not "leading" accurately. To get a high-quality shot with the effect of movement, panning photography requires that the subject in the frame be as static as possible at the moment the shutter is released. This is quite difficult to do, especially when the object is continuously moving left and right, up and down, approaching and moving away, for example, like this running squirrel.

Keeping the object in the viewfinder window is not enough for a high-quality photo; the object needs to occupy the right space in the frame, be in the right place in the frame, and be in focus. This shooting technique requires not only perfect mastery of the camera, but also places high demands on the capabilities and level of the camera itself. The camera's autofocus and lens focusing system should work like a clock: - quickly find the target and hold it firmly.
What camera modes should I use when shooting live?
For shooting with tracking (when you need to get the effect of movement), in my opinion, the most suitable mode is manual mode or shutter-priority auto mode. In these shooting modes, you can set the desired background blur, which is largely dependent on the shutter speed. If you shoot in automatic mode with aperture priority, background blur can be achieved due to a small depth of field, but such blur does not contribute to the formation of the effect of movement (photo above).
Also, in this mode it will be difficult to achieve the required background blur with the effect of motion, since in this mode the camera automatically selects a shutter speed that may be too fast to blur the background.
Setting Auto Focus Mode
Continuous shooting means shooting moving objects, which means that “Continuous AF Mode” suits us like no other. As long as the shutter button is pressed halfway, this autofocus mode provides continuous focus on a moving subject, which is very useful in these shooting conditions.
Focus area selection
Selecting the metering area
In this shooting situation, I recommend using 3D color matrix metering. This is because the subject can take up a different percentage of the frame, so in order for the camera to adequately expose the subject and background, it must be metered across the entire frame. If you set the exposure to center-weighted metering, you may lose background detail, for example if the subject is quite light and takes up a third of the frame. Spot exposure metering is absolutely not suitable under the conditions of this shooting.
Use vibration dampening systems
If your lens is equipped with a vibration reduction module (image stabilization system), I recommend using it in active mode. This will to some extent increase the chances of getting a clear image of the main object. How do you know if your lens has Vibration Reduction? Designations of vibration damping systems on cameras different manufacturers you will find it at the link provided.
Use burst mode
By shooting in burst mode, you will have the opportunity to assemble interesting collages from a series of frames during post-processing, for example, like the photo below (Panorama gallery). Also, continuous shooting will help to capture that one unique shot that might fly by...

Features of the technique of shooting with wiring
How to get the motion effect?
In conclusion, I would like to draw your attention to some features of this shooting that can significantly affect the final result. And so, we already know that the shutter speed to blur the background should be set within 1/15 - 1/60 sec. But the level of background blur depends not only on this shutter speed. For example, if you set the shutter speed to 1/100, or even 1/200 sec, you can also get a sharp subject and a blurred background. Depending on the distance to the subject, as well as the distance to the background, you can get a great motion effect.
For example, an object at a distance of up to 3 meters, a background at a distance of more than 50 m, as a result we will get a perfectly blurred background even at a shutter speed of 1/200 sec., provided that the subject is moving quite quickly (approximately 8 m/sec. ). In the case when the object is at a distance of more than 10 meters, at the same speed, the background is at the same distance (more than 50 m), then the background blur will be much less, or the blur will not be noticeable at all. This is due to the fact that in relation to the background, the object moves more slowly, which means that the camera’s rotation speed also slows down.

We use a telephoto lens (200-500mm) when shooting with wiring
If the background is at infinity, then even with 5 meters to the object it will be difficult to blur the background qualitatively, unless, of course, this is a photograph of a Formula 1 car moving at breakneck speed with Schumacher on board. But this rule applies to those cases when a standard lens (50-80mm) is used. If you use a telephoto lens when shooting with a wire (200-500mm), then the background can be “smeared” better at large distances to the object, but provided that the object moves perpendicular to the shooting point, that is, the movement occurs from left to right, or vice versa .
In cases where the object moves towards us, away from us, or diagonally, see photo above (Kitesurfing), it is unlikely that it will be possible to obtain high-quality background blur, even with the use of a telephoto camera. A simple rule works here: - the higher the speed of the object in relation to the background (the faster the camera moves), the better the blur (motion effect) is obtained. That, in fact, is all I can tell you today about the technique of shooting with wiring. If I invent new shooting techniques for this technique, I will definitely share it with you.
I wish everyone many successful and high-quality photographs. Thank you for your attention.
| Kitesurfing - photography features |