Finnish or taiga candle how to make. Swedish torch, Finnish candle and other vertical fires. Assembly of thin logs
Read also
There are many types of fires, and we need them, like the fire itself, in the forest for various purposes - for cooking, heating, illumination in the dark and scaring away wild animals. Let's look at the main types of fires and talk about how to light them.
It is important to light a fire with care to prevent the possibility of a fire. It’s best to use the previous fire pit. Make sure there are no stumps, dry grass, leaves, or bush branches nearby. Clear the area thoroughly. Do not leave the fire, but carefully extinguish it. To do this, pour a bucket of water over the fire and cover it with earth.
Bonfire - hut
You will need: kindling, tree branches, matches or other ignition material.
This is a famous type of fire. Small branches are placed in the shape of the hut, and kindling is placed in the center. As it burns, larger branches are added.
This type of fire is good for cooking, heating and lighting. The downside is that it requires constant addition of fuel.
For kindling, birch bark is suitable - the “paper” bark of a birch tree, which is spaced from the trunk. It happens both on standing wood and on fallen wood. If there is none, then bark that fits tightly to the birch trunk will do. In this case, in order not to injure the tree and expose the trunk, remove only the top layer of birch bark. To do this, a longitudinal cut is made, and half of the birch bark is easily removed. Also suitable for kindling are spruce bark with resin, dry grass, small twigs, moss, etc.
Bonfire star

You will need: an axe, kindling, up to 10 long logs, matches or other means for lighting.
Such a fire does not burn intensely, but is economical and does not require frequent addition of new branches. It requires up to 10 long logs. The logs are laid in the form of an asterisk, so that they diverge from one point in a circle. The center of the star is set on fire, and as it burns, the logs are moved towards the center.
Bonfire well

You will need: axe, kindling, logs, matches or other kindling material.
The logs are stacked in a log house. We put kindling - wood chips, twigs, dry grass, chopped small firewood - inside the log house and set it on fire. After some time, the logs themselves are engaged.
In such a fire, the logs burn slowly, and a lot of coals will be created, releasing high temperatures. It is suitable for cooking, heating and lighting.
The advantage of this fire is good air circulation and oxygen access to the burning wood.
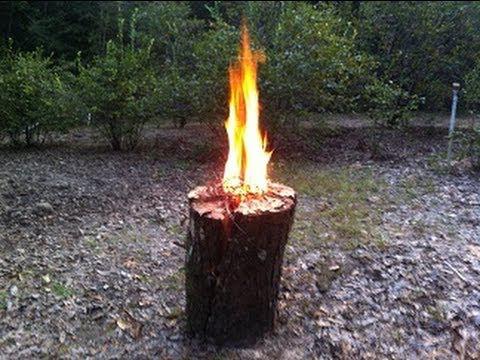
Log fire - Finnish candle

You will need: saw, axe, log, kindling, matches or other kindling device.
Another simple way to start a fire, which will also allow you to easily cook food. Take a log, 15-35 cm in diameter, or saw off part of the log. It is important that the log is cut from the log clearly vertically, so that it can stand securely on its base, and on top there is a horizontal surface on which to place a saucepan or kettle.
Chop the log with an ax or saw into four to six pieces. Gather the pieces back into the log so that they stand vertically, but slightly apart, about two centimeters. In the resulting space, place kindling - twigs, dry grass and birch bark. Place the twigs and wood chips horizontally, in different directions, in the space between the parts of the log, and then set fire to the resulting filler. The kindling will burn out, and then the firewood itself will take over. You will get a reliable, upward-pointing flame. Since the logs are vertical and bunched together, high temperatures are generated on top. Adjust the temperature by moving the logs apart and moving them apart. And since there is space between the firewood, this promotes air circulation, as a result of which the flame does not go out. Place a pot or frying pan on top of this firewood for cooking, or place a kettle and boil water.
There are variations to this method. Instead of splitting the log into pieces, you can make cuts to the middle of the log. Another option is to use several whole logs instead of parts of one log; this will increase the operating time of the Finnish candle.
Bonfire Pyramid

You will need: an axe, kindling, logs of various sizes, matches or other means for ignition.
This is a slow but long-burning fire. It is useless when the logs are damp, since they are stacked tightly and there is very little air circulation. However, in dry weather, this is an excellent type of fire, allowing you to practically not worry about maintaining it.
The fire pyramid consists of several layers. At the bottom there are two large logs laid in parallel. Several logs of smaller diameter are placed on them, in a continuous layer across the bottom two logs. The third layer is even thinner logs and the same across the second layer, and then we continue in the same spirit up to 8-10 layers. Kindling is placed on top, which is set on fire.
Bonfire Dakota

You will need: a shovel, kindling, firewood, matches or other means of ignition.
It is done in the ground. A hole is dug 30-50 cm deep and 30 cm in diameter. After the cylindrical hole has been dug, step back 10 cm from the top and expand the bottom of the hole so that the hole takes the shape of a light bulb. And then, stepping back 30 centimeters from the dug hole, dig another hole with a tunnel to the first one. Dig the second hole in relation to the wind: if the wind blows from the left, then dig a hole to the left of the first, if the wind blows from the right, then dig a hole to the right. This is needed for traction. Next, we put kindling in the first hole and set it on fire, and then gradually add larger branches and logs.
This type of fire is suitable for windy areas where it is difficult to light a fire on the surface. Such a fire does not smoke and is hardly noticeable, therefore, if you want to hide your presence, it is better to place the fuel no higher than the edges of the pit, otherwise the fire will smoke. At night, this fire is also not noticeable, since the flames are mainly concentrated below the surface of the earth.
On a Dakota fire you can boil water quite quickly or cook food in a pot. It is convenient to regulate the draft of this fire by opening and closing the second pit.
Bonfire in the winter forest – Nodya

You will need: an axe, kindling or coals from another fire, two logs of the same size - 2-3 m in length, two poles - 4-5 meters in length, two hook branches, matches or other means for ignition.
This is actually not even a fire, but a smoldering powerful source of heat. It is reliable, long lasting, warm and discreet as it does not burn brightly. This is a good way to start a fire in the snowy winter. Nodya heats for a very long time, but it is better to take into account that it is designed to heat only one person.

The node looks like two logs 2-3 m long, laid on top of each other horizontally, with a wall with a small gap of 2-2.5 cm. To prevent the top log from rolling down, a special hanging system is made of two poles and two hook branches.
For nodes, it is better to take standing wood, as it is important that it be dry. Two large logs of equal length are required. You also need 4-5 meter poles with a fork at the end. It is important that the poles are elastic. We insert them into the snow or under a tree trunk at an angle to the top log. You also need two hook branches.
We hang the top log. We make a nick from the top of the edge of the log with a strong blow and hammer the hanger hook into the nick. We do the same on the other side. We take a log and hang it on poles by the hangers. The poles should rest against the hooks. To do this, you can support the poles from below with logs, branches, etc. The poles hold the top log, preventing it from rolling down during the burning process.
There are two ways to light a node.
- Wedges are driven into the side of the lower log, on which the pole is placed. It turns out to be a shelf on which coals from a regular daytime fire are placed. And the node flares up from these coals.
- Second way. We need to stuff kindling between the logs. To do this, initially create a gap between the logs using support sticks. Having stuffed the kindling, we set it on fire, the knot flares up, and we remove the supports.
Nodya should burn along the entire length of the logs, this is very important. If you do not use the ends of the logs, the middle will burn out, the gap between the logs will increase and the node will go out. If it smolders throughout the log, it will work for up to 15 hours.
Important! You won't be able to install the node the first time! In order to start winter sleepovers with Nadia, you will need a lot of training setups first.
Bonfire in a wet forest

You will need: an axe, a knife, logs, branches of different diameters, matches or another source of fire, a tarpaulin or awning.
To light a fire in a wet forest you will need to get dry wood chips. How to do it?
Wet twigs are not suitable for this. Take a thick log, split it into pieces and plan dry shavings from the core, which will turn out to be dry. You can cut the lower branches from the trees, and by cutting away the damp upper wood, you will get to the dry center. Thin, dead spruce trees are also suitable, and for the fire you need fragments of trunks coated with resin, because It protects the wood from moisture penetration, and it is also possible to plan dry chips from this wood.
The process of collecting shavings and wood chips is long – an hour or even two. However, if you have a lot of fine wood shavings, the fire will burn quickly and easily. During rain or snow, to prevent the shavings from getting wet, cover yourself and the shavings with a piece of polyethylene or tarpaulin, or collect the shavings under an awning.
When there are a lot of shavings, melt them and place small wet sticks around them - vertically, in the form of a hut. As they dry, they will start to burn. Next, install larger sticks, etc.
To keep the fire burning, collect spruce bark with resin, as well as birch bark, which contains flammable tar.
Gas burners instead of a fire for cooking

You will need: a gas burner and a cylinder.
Gas-burner- an excellent source of fire for cooking; with its help you can easily and quickly heat up a kettle or cook food for 1-3 people. You don't have to waste time making a fire, getting coals, and putting out the fire after cooking.
Also, by using a burner, you do not harm nature. Fires leave burnt circles for several years; a burner allows you to avoid this.
The disadvantage of a burner compared to a fire is that it weighs a lot, and you have to carry the cylinders on yourself. Also, at low temperatures and in the mountains, burners do not work well. But otherwise it is a good source of fire. Especially if you go to nature reserves where fires are not allowed. Also, a gas burner is a good option for a fire source in a wet forest, where it is difficult to organize a fire, and you don’t want to spend hours preparing coals.
Anyone who loves outdoor recreation (especially not a picnic, but an active one - hunting, fishing, hiking) knows how important a properly built fire is. If you don’t carry a barbecue with you, you need to worry about safety so that you don’t have to run away from a forest fire and feel like a criminal. And lighting a fire in the snow, so that it doesn’t go out every minute, seems to many to be the pinnacle of fire-making skills. However, experienced travelers know how to build a fireplace in a fire-safe manner so that it burns for a long time, does not go out even in slush, and does not require regular feeding. Everyone calls it differently: Finnish candle, taiga candle, Indian or Swedish, but the essence remains the same. There are even several ways to make it.
Maxi-bonfire
The Finnish candle is most successful if you “land” not far from sawn logs. No effort is required: select three saw cuts of approximately the same height and diameter, place them in a circle close to each other and light a fire in the middle. In order for the fire to burn evenly and the burnout to be the same in all directions, you need to choose the logs wisely in height. The Finnish candle lasts the longest; the logs should be twice their diameter in length. The power of such a fire is enough to boil a five-liter boiler in a third of an hour, and you don’t even need to hang it - it will rest on the logs themselves. As the logs burn, they seem to form into a hut. If you need a Finnish candle fire for a long time, at this stage you can maintain it as usual, by adding firewood.

If you have a chainsaw
If there is no need for such a large hearth and the presence of an appropriate tool on your hands, you can do otherwise. A piece of thick log half a meter long is taken and sawed crosswise (not all the way, about three-quarters of the length). If the diameter of the cut is large, you can work with the chainsaw a little more to get eight “slices”. You should not make more cuts, because the narrower the sector, the faster your Finnish candle will burn out. The log is firmly fixed on the ground (you can dig it in or support it with stones), kindling is placed inside (from sawdust, or just liquid ignition) - and for several hours the fire is at your service.

Field method
Suppose there is no saw, but do you need a Finnish one in this case? Well, there is an ax in nature anyway. The log of wood chosen for this purpose is split like regular firewood, only a little more diligently so that the logs do not vary too much in thickness. Then they gather into the original log, only around a thick branch - this will be the hearth. Below, closer to the ground, and approximately in the middle, the Finnish candle is tied, preferably with wire - it will definitely not burn out. But if you don’t have it, twine, fishing line, and flexible rods will do. It is especially important to tighten it securely at the bottom, since in the middle the logs will burn out faster, and without good fixation near the ground, your fire will fall apart. The central branch is pulled out three-quarters from below and sawed off, after which the Finnish candle is placed on the ground. By the way, if the original log is not too massive, you can use this branch as a leg and simply stick it into the ground.
Hand candle
If there is no nearby (either a suitable dry object for sawing, or a saw or even a normal ax), then the Finnish one is made a little differently. Quite thick poles, at least five centimeters in diameter, are collected around the area and gathered into a bunch, again around the center branch. The side of the poles that will be inside needs to be cut a little with a knife - it will work better. The rest of the manipulations are the same as when creating a “finca” from logs.
Primus candle
It is used specifically as a stove for cooking. The main points are the same as when making a fire-candle using the field method. There are two nuances:
- The original log must be partially hollowed out from the inside. Alternatively, you can not plan the core, but split it into logs and peel them. Such a fire is assembled in the snow using the same method, around a branch, but the cavity inside must be made artificially, and the outer walls are closed, if possible, without cracks.
- On two opposite sides, the logs are either trimmed less or pushed upward more, by five to six centimeters. Due to this design, the fire in the center will be fanned by air, and its tongues will be directed predominantly upward.
Such a Finnish candle is not suitable for heating - the fire is all concentrated inside. But the food cooks much faster.

What can a Finnish candle be useful for?
In addition to cooking and heating (except for the Primus stove), such a fire is simply irreplaceable as a beacon. Experienced fishermen who go out at dawn leave it on the shore as a signal for those who are late - in the dark it can be seen from afar.
It is very convenient when using Finnish candles that almost until they completely burn out, they can be moved from place to place without difficulty and without causing burns. The long-lasting nature of the fire can be considered a significant advantage: a medium-sized log provides light and heat for about four hours. And a maxi-fire without additional fuel can perform its functions all night long.
If you are not a fan of “wild” tourism and fishing, but like to celebrate the New Year at the dacha, Finnish candles placed along the paths will bring romance and decorate the garden no worse than garlands and Chinese lanterns.
Finnish candle - simple and effective for boiling water and cooking in the field.
Its essence lies in the fact that two longitudinal cuts are made in the log, perpendicular to each other, as a result of which an X-shaped crosshair is formed at the end. The depth and number of cuts depends on the desired time and intensity of combustion. The positive of this configuration is also that you can independently choose the total length of the log and the depth of the cuts, thanks to which you have the opportunity to raise the burning part of the log above the surface or snow to the required height if you do not want your fire to fall into the snow, or left noticeable scorch marks on the ground. Commercial and field representatives of this configuration are often cut with a chainsaw, the chain of which is wide enough so that such a Finnish spark plug can be easily ignited later.

However, my attempts to make it using a folding camp saw were not successful, and I see the reasons for this as follows:
- The thickness of the saw is small, which is why the existing cuts do not provide the proper air flow to ignite the insides of the log.
- Inability to influence the processes occurring inside the log. A log with cuts is a kind of monolith that cannot be moved apart or looked inside. Anything that falls back into the cut is unlikely to be removed, again due to their small width. If you make a mistake, there is no way to correct it and, most likely, you will have to break the existing one or cut another log.
- Smooth cuts of wood inside the cuts, which is why it burns poorly. The flame emitted by the kindling in the early stages of combustion is not sufficient for tangential ignition, and the combustion temperature is not yet sufficient to burn the fibers deep.
- When the cuts are densely filled with kindling (sawdust, leaves, bark fragments, etc.), the air flow is further blocked, thereby disturbing the balance.

In addition to attempting primary ignition (by igniting kindling inside the cuts), I also tried secondary ignition (using coals from another fire), but although success increases, such a Finnish candle requires another fire, as well as an impressive amount of time for burning and fanning. Not that this is a pleasant and 100% reliable option.
In general, I consider this configuration not the best. If you have a chainsaw - yes, but only with a camping saw - it is better to use other configurations. Wider holes can theoretically be obtained by making not one, but two cuts on each side at a distance of about a centimeter from each other, with further removal of the wood between them. But in this case, I consider the labor costs too significant and ineffective to even start doing this. In addition, for this configuration you generally need to have a saw with you, otherwise it is not at all possible to make longitudinal cuts in the log.
Finnish candle - configuration 2
This configuration eliminates most of the problems with narrow cuts and the need for a saw, because To create it, you can get by with an ax, or even just a knife if you don’t have any other tools. Moreover, for this configuration, not only a smoothly sawn log will be suitable, but also its severed counterpart, which will not have such a smooth surface.

With an ax or knife using and/or, the log is split into quarters. If they are not completely even, it’s not critical, because... We are interested, first of all, in the possibility of installing dishes on top of a Finnish candle, and not in appearance.

Next, on the inner surfaces of each quarter, using the same ax or knife, many notches should be made, peeling off part of the wood in the form of splinters and feathers. Their direction should be opposite to the direction of fire movement, i.e. the fire inside the log should flare up not along the chips, but “against the grain.” This wood chips will subsequently play the role of kindling for the Finnish candle, significantly accelerating and simplifying its ignition.

The next step is to cover the treated quarters with soil and tie them with wire or rope at the bottom, which provides the necessary support and stability when placing the utensils on top of the log. After fixing, the spaces between the quarters are filled with kindling and small combustible materials (sawdust, leaves, pine needles, bark fragments, etc.)

The significant advantage of this configuration over the previous one is the following positive aspects:
- The ability to influence the width of the gap between the quarters of the log. They packed too much kindling and blocked the flow of air - the quarters can always be moved apart and some of the materials removed, then compacted the soil again and taken a step back. This Finnish candle forgives some mistakes that the previous configuration does not allow.
- Notches on the inner surface of the quarters flare up much faster and easier than the smooth walls from the previous configuration due to the increased contact surface. Thanks to this, less external kindling is required.

Among other things, this configuration ignites equally well using primary (ignition of tinder and kindling) and secondary ignition (coals from another fire). So, in the photo above, several coals were simply thrown into the Finnish candle, and then everything happened by itself. There was no need to inflate anything, because... To control the air flow, simply move the quarters apart to the required width. The notches inside the log quickly raise the flame above its surface, and the Finnish candle goes into its working mode.
Finnish candle - configuration 3
This configuration requires the most materials to create, but it also has the highest efficiency and run time in my experience.

For the third configuration of the Finnish candle, you will need as many as three logs of approximately the same length. Fortunately, it is almost always possible to cut them from one tree trunk. The length and diameter of the logs are selected based on the desired operating time and the duration of cooking of certain dishes.


Try to choose a log without bark, or additionally debark it before proceeding. Bark is a tree’s natural protection from many negative factors, including fire, so logs with bark, due to their increased density, flare up much worse. On the outside of three of the six halves of the logs you will need to make notches that are already familiar to you from the previous configuration. They, as in the previous case, will act as kindling and help spread the flame over a large area inside the future Finnish candle.

After the notches are made, place the halves with them in the shape of a triangle, with the notches inward. Remember also that the flame inside the Finnish candle should go against the “wool” formed by the notches. With the remaining three halves, prop up the notched halves as shown in the photo above.

Next, the channel inside the three halves should be filled with tinder and kindling and ignited. Until the moment when the logs themselves ignite, you will get some kind of semblance inside the logs, therefore in the early stages you will mainly observe a large amount of smoke coming out of the bowels of the Finnish candle.

But as the temperature rises and the coal base accumulates, the logs themselves will light up, and your Finnish candle will go into its operating mode, accompanied by a high flame. This design resembles an eternal flame, with long tongues of flame and a clearly distinguishable roar during operation. But this configuration is good not only, and not so much as the ability to replace logs as they burn out. This is not a monolith (like configuration 1), there are no connected or twisted elements (like in configuration 2), so you can replace any of the burnt-out internal logs with one of the spacer halves at almost any time. All that is necessary for this is to lift the dishes from the Finnish candle, take one of the supports, place it in place with the burnt inner log and lower the pot or frying pan back. The place of the support can be taken by the next half, prepared for the next replacement of logs.
In terms of labor costs, efficiency, success and flexibility of the organization, the Finnish candle in this configuration seemed to me the most effective. You make your own choice, and do not hesitate to share your experience of organizing a Finnish candle in the comments.
Hello, dear users of this site. It's summer. The most convenient and good time for nature trips, picnics, and fishing. In general, this is the best time for an active vacation.
Every time, going out into nature, many people take with them a pile of firewood or coals on which to cook food. It is not always possible to find dead wood at a vacation spot to use as a combustible material. Therefore, I want to tell you how you can make a so-called Finnish candle. The good thing about it is that it doesn’t take much time to make and it burns for quite a long time. To make such a device, you only need a piece of log, a drill with a drill bit and a chainsaw.
The author of this master class initially took a small log and worried about making it easy to saw. To do this, he drills a hole in a shorter log, drives a stick into it, and also makes a hole in a second, longer log. He puts on a small log and a longer one and already saws. Here's how it happens and what comes out of it.


Next, he takes a regular paraffin candle and drips paraffin into the cuts from the inside.

Then he takes a newspaper several centimeters longer than the depth of the slot in the log and crumbles candle shavings into it. The edges are also melted with molten paraffin. The resulting part is inserted into the slot of the block.


Then this wick is set on fire and the candle flares up.

This is just one of the options. Usually in nature, my friends and I have prepared a candle blank in advance, a thicker log and no candles with a wick. A waste of time. In our country, small wood shavings and dry grass are poured into the slots and set on fire. Much faster and more convenient. According to the author, this candle burns for no more than half an hour. And the production time is twenty minutes. In our case, the production time is no more than five minutes. And it burns longer. But this depends on the thickness of the log. It is easy to install - either stands on its own if the lower part of the log is wide enough, or is dug into the ground. All you need to do is prepare the fish soup and boil the tea. So there you go. But in general, it’s quite a convenient and useful thing. Saves time and effort!
On a trip to Lake Chepolshevskoye in July 2012, I decided to make that famous stump with vertical cuts, which a young Finnish woman used to surprise experienced Siberian lumberjacks (funny story!). It turned out exactly like in that story: first I was subjected to public ridicule and criticism, and then the critics themselves used a chainsaw, making more and more logs with cuts...
Take a piece of DRY pine or spruce log at least half a meter long and from one end with a chainsaw two cuts are made “crosswise” along the log at about three-quarters of its height. A certain amount of gasoline or other flammable mixture is poured into the center of the cut and set on fire. The flame spreads upward in the center of the log; the side slots serve to supply oxygen to the combustion zone. The log burns for a long time, several hours, and during this time you can not only warm the kettle, but also prepare serious dishes...
Some people call this type of fire a Finnish candle, some an Indian candle, and some a Swedish candle. Sometimes you can hear the word Volya or even "turbopen".

My main mistake in making the first Finnish candle in my life was that I took a damp pine log, almost completely wet by the rains. After several unsuccessful attempts to set fire to its center from below, under the ridicule of friends, I placed this log on a regular fire with the sawn end facing the fire. It only took a couple of minutes for the wood in the cut to dry out, start fire, and my first Finnish candle started working, and how it worked!.... Laughter gave way to exclamations of surprise and approval, people immediately began to offer options with a large number of cuts, even eight

While former critics were extolling the simplicity and genius of this human invention, I cooked food for my fox terrier Bundy, and called out to the camp; “Hey, people, who needs a new stove?!”

It should be noted right away that the pot or kettle stands on the end quite securely and conveniently; putting dishes on and off the fire is also convenient. These are the advantages. The downside is that the dishes still get dirty

We remembered that we need to boil the crayfish while they are still alive

And now the main critic of my idea with the log - Viktor Lobachev - with undisguised pleasure he cooks lake crayfish for dinner on a Finnish candle

It seems that later our women also heated water on a candle for washing dishes. When it got colder, a candle that continued to burn was used for heating.
We’ve just run out of ideas on what else can be cooked on one log.
Already in Obninsk, they told me that one wonderful company has long been going to the forest in winter to make dumplings, having only one pre-prepared log. You don’t have to trample snow in search of firewood, or destroy trees in the forest near the city, but it’s light, hot and the whole company feels good around a big cauldron of dumplings

The more side slots, the more intense the supply of oxygen to the combustion zone, the stronger the flame and the shorter the life of the candle. The picture shows how big the flame is on the Finnish candle with 8 side cuts. One such Finnish candle replaces an entire fire. And pay attention that behind Dasha’s back there is a smoldering old fire that no one needs anymore - everyone has enough light and heat from one pine log
In the near future I will write a note about an Indian candle - a fire based on one log, but with a slightly different design