Stone-look facade panels: types of materials, features of use and installation. How to cover a house with stone: design and materials Stone cladding for exterior decoration
Read also
Manufacturers offer a large number of materials so that each developer can cladding the façade of a house to their liking. Of course, stone finishing is one of the most ideal options, but also one of the most expensive. An alternative is panels with an imitation of stone texture, while the material retains all the qualities and practicality, and in some ways even surpasses natural material.
Features of the material
Facade panels imitating stone are divided into two types:
- Having a homogeneous structure, made of PVC and modifications.
- Combined elements with a multilayer structure, equipped with an insulating layer.
Thanks to the presence of expanded polystyrene, combined type profiles have increased thermal insulation qualities and also protect the house well from noise from the street. Sometimes there are foam sheets used as insulation, however, like polystyrene foam, foam is installed without the use of glue by heating.
The peculiarity of the product is its resistance to temperature phenomena and imperviousness to water flows. Moreover, even sharp changes in thermometer readings per day do not affect the strength of the profile in any way; there is no deformation, fragility or other unpleasant qualities. Having a low linear expansion rate, the panels eliminate the appearance of such factors as: peeling, change in stable shape. Well, wide color and the lineup products allows you to select profiles the desired shade and textures.
Material advantages

The main advantage of the material is its price. It is much lower than natural or artificial stone. Installation work can be easily done with your own hands, and paneling the house does not take much time. The all-season nature of the processes is also a plus: profiles are attached even in snow or rain, of course, if it is a glue-free technology, otherwise dry and warm weather. Also:
- There is no large dust when working with panels;
- The profiles are light in weight, unlike natural or artificial stone, which means that the weight of the finishing will not have to be taken into account in the project and a strong foundation will not be laid;
- During the installation process there is practically no need to use adhesive solutions;
- The presence of corner fasteners reduces the time of drawing corners;
- The large area of the panels allows you to quickly cope with façade cladding of any size;
- The strength qualities of the panels, resistance to water and snow will serve good service any facade;
- The material from which the building is built does not matter - installation is carried out on buildings of any type and number of storeys.

According to their varieties, profiles are divided into two types:
- Decorative. They are used for covering both the walls of the house and the basement. The variety of palettes and textures will help you choose perfect solution for facing works.
Important! If you choose panels that are fastened to each other, you will not need to install a frame.
- Insulated ones allow you to fulfill two conditions at once: decorate the facade and lay additional insulation. This achieves significant savings on materials, heat loss is reduced and the risk of mold and mildew formation is minimized.
Thus, stone panels are a good substitute for natural or artificial material. Service life of 25 years, high strength indicators, no need for professional installation, efficiency of work, minimal load on the foundation and a huge selection color solutions– in many respects the facing material is superior to natural and artificial stone. Considering that the price of profiles is several times lower, it becomes clear that cladding a house with stone panels is profitable and practical solution problems of aesthetics of any structure.
Step-by-step instructions for installing profiles

It’s worth noting right away that the cladding of the plinth and facade have the same technology, so there is no particular difference in the process
It is worth immediately noting that the cladding of the plinth and the facade have the same technology, so there is no particular difference in the process. The main thing to remember is that to decorate the basement of a house with plastic panels, select products made specifically for basements! Such profiles are slightly thicker and therefore stronger. At the same time, the panels for the ground floor are better able to withstand mechanical stress, and if desired, the developer can completely decorate the façade of the building with just such a material. However, wall profiles have big sizes, rather than products for the ground floor.
What to do:
- Determine the amount of material for finishing the outside. To do this, you need to know the profile area and the area of the house facade minus windows and doors. You will have to take into account overlaps, cuts and add another 10% to the resulting amount; if the panel has a complex texture and configuration, then add the entire 15% to the resulting amount. The quantity is also calculated starting bar, for this, the sum of the perimeter of the building is divided by 3 meters - standard length planks.
- You will need external corners according to the height of the cladding, the number of which is also calculated by the sum of all angles and dividing the result by 0.45 m (height of the standard element) plus 5%.
- An internal J-profile, the length of which is 3 meters, will come in handy. The quantity is calculated as needed, for example, if you plan to use profiles for finishing a doorway, then there will be more.
- It would also be a good idea to check fasteners and tools before starting work.
- The installation process begins from the corner, at a distance of 10 cm at the very bottom of the wall, a starting strip is attached, the horizontal and vertical level is measured, the mounting step of the strip is 30 cm.
- Facing the foundation involves first fastening the first outer corner, then checking the lower level for the evenness of the starting strip, and fastening it.
- The panel is inserted into the strip, pushed into the groove so that the gap from the outer corner is no more than 3 mm, the lock of the strip is latched, and the edge of the panel entering the groove is cut at a right angle.
Important! You should not veneer two corners at once; all work is carried out in stages. The panels can and should be cut, but the first and last profiles must be at least 30 cm wide, but the remaining trim is inserted just as the first or last panel.
- The last profile is attached to the left with one fastener, the right side is bent, the last element is mounted in the groove, both panels are bent and joined, secured.
- After the first row is completed, each subsequent row is performed by installing the upper profile into the lower one. And to connect with the previous one, it moves slightly to the left.
Important! In the place where it ends ground floor, a curb is mounted on the profile, only then attached to the wall panel. And the façade outer profile is inserted into the mounted border.

Don't forget about the additional facing decor. These could be visors, shutters, and other elements. Installation is carried out on top of the panels to the sheathing. Drilled out required quantity holes, the diameter of which is larger than the diameter of the fasteners, the trim is installed. After this, the work process can be considered complete.
As you can see, cladding a house with stone panels is much easier than laying a wall made of natural or artificial material. Among other things, you don’t have to resort to the help of professionals, lift weights and spend a lot of money. Well, the result will exceed any of your expectations - it turns out very beautiful stone house stable form, even if it is an old wooden mansion that has stood for decades.


Siding is not just a boring and monotonous exterior facade decoration. There are many varieties of this material for all occasions. If you are a follower capital buildings, then pay attention to the stone-look facade panels, which will give the house the new kind. The material imitates large boulders, flat, rubble and other types of stone. Facade panels for exterior finishing They will completely transform the simplest house into stone, and in addition it will become warmer.

Finishing the facade of the house with stone panels
Blocks for exterior finishing perform not only an aesthetic function. The facade decoration is reliable protection home from negative impacts. Installing slabs on the walls of a building allows you to extend its service life and completely renew the façade without significant costs. Siding is a lightweight material that does not place significant load on the building. Installation of the panels is simple - their installation does not require highly qualified workers, which means the cost of the work will be low.
Stone façade finishing options
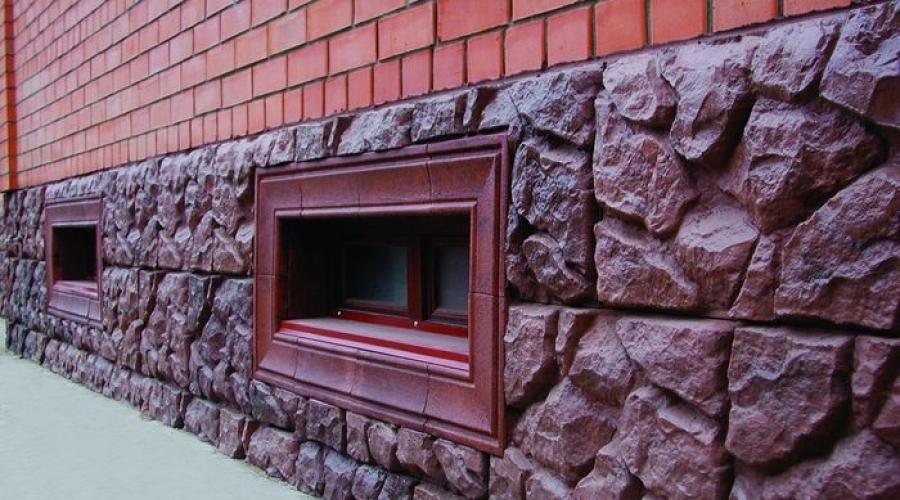
Cladding a house with stone-like panels is done in one or several shades of the panels. By using multiple colors and textures, you can highlight multiple design elements. These could be windows, corners, basement.
It is customary to install darker and larger elements on the base. Lighter blocks are used for walls.

The finishing of a private house is made with stone-like facade panels in two shades
Manufacturers produce a large number of stone panels designed to various conditions operation.
Types of panels
Stone siding differs in several ways:
-
the presence or absence of insulation;
fixation method.
material;
The following materials are used for siding:
-
fiber cement.

The dark shades of the panels highlight the light windows of the building well
Metal siding
Metal panels are made by stamping. Galvanized steel blocks are coated with polymer protective composition, a layer of decor that reproduces the surface of the stone. By applying several layers of coating, the blocks become thicker and heavier. But this increases the strength of the material. Metal siding is more expensive than vinyl siding.

The panels may have different pattern, for example, the corners are “lined” with a geometric pattern
On our website you can find contacts construction companies who offer the service of finishing and insulating houses. You can communicate directly with representatives by visiting the “Low-Rise Country” exhibition of houses.
Vinyl panels
Panels made of plastic (polyvinyl chloride), known as lining, serve indoors without problems. This material is not suitable for finishing the facade. Manufacturers have created a special composition for external finishing works. It is characterized by increased strength, resistance to temperature and mechanical damage.
The main advantage of vinyl blocks is their lightness. They do not significantly increase the weight of the building. The material is plastic, so vinyl siding reproduces as much as possible appearance natural stone.
The disadvantage is considered to be its fragility. Vinyl is inferior to metal in its resistance to temperature changes and is easily damaged during installation. It is less resistant to mechanical damage during operation. Under influence high temperature it can increase in size. This subtlety should be taken into account when calculating the number of finishing slabs.

The texture of the panels imitates granite stone
Acrylic
By technical specifications acrylic siding is similar to vinyl. It has the same advantages as vinyl, but is more resistant to high and low temperatures. The material is neutral to chemical influences.
Stone-look acrylic panels for exterior façade finishing are slightly more expensive than their vinyl counterparts.

Volumetric facade panels imitating rocky stones
Fiber cement
A relatively new type of finishing is fiber cement siding. Of the listed types of panels, this is the heaviest. The weight of the blocks is 15 kg, thickness 10 mm. They have increased strength and durability.
The cost of fiber cement siding is much higher than other types. For finishing facades, consumers prefer lighter and cheaper types of slabs.
The color and texture of the finish reproduces granite, rocky stone, rubble or burnt stone. By using modern technologies it is possible to reproduce natural stone with maximum accuracy. The similarity of siding is not only visual, but also qualitative.

Imitation rubble stone
Some types of blocks are not only decorative - they also inside they have insulation on them, so that insulation work can be combined with façade decoration.
If the building is located in an area with a warm climate, finishing the house with stone-look panels made of fiber cement does not require additional insulation of the walls. If the house is located in a cold climate, additional insulation of the building will be required.
Therefore, there is no point in buying siding with insulation in cold regions. The installation of blocks with a warm layer is no different from the installation of conventional panels. The cost of warm siding is higher than the cost of simple siding.
Each block is equipped with locks. With their help, fragments are held together. Fixation is carried out by snapping the locks.
Advantages and disadvantages of stone-look facade panels
Stone siding has a number of positive qualities:
long service life (50 years);
resistant to weather factors (wind, high and low temperatures, high humidity, exposure to sunlight);
not subject to corrosion;
universal – suitable for installation anywhere – on walls, plinth;
easy to install;
there is a large assortment on the market;

Facade panels imitating burnt stone
has low cost;
does not require maintenance;
has low weight (surface load facade panels imitating stone is 3-5 kg/m², natural stone – 53 kg/m², brick – 34 kg/m²);
resists insect damage and fungal infections.
Stone panels for external cladding facades are inferior to natural materials in strength and durability, but not significantly. On the background large quantity advantages, this disadvantage fades.
Video description
Watch the video to see what a house clad in stone panels looks like:
Stone plinth panels
Plinth (literally, a shoe with a wooden sole) is a footing located on the foundation of a building. The load on this part of the buildings is greatest, so increased strength requirements are put forward for the base itself and the finishing materials.
The industry produces special plinth slabs taking into account the installation location. These are blocks made of stronger material with increased resistance to damage, temperature changes, moisture, wind, and ultraviolet radiation. Fiber cement siding ideal for plinth installation.
Often basement part houses are decorated with contrasting plates. Installing slabs on the plinth gives the building a more beautiful appearance.
This is exactly the decoration of the facade of the house with stone panels in the photo below:

Using siding that is darker than the base tone has become a popular home decorating element. Plinth blocks have a larger texture. This makes the lines of the house more expressive.
Step-by-step installation
For self-installation Sandwich panels should be prepared:
-
screwdriver;
-
centimeter;
hacksaw/grinder;
pencil/marker/chalk.
Before installation, the walls should be prepared. Remains of cement mortar, moisture stains are removed from them, metal elements. The surface is processed special composition, preventing the appearance of fungi and insects. After the solution has dried, begin installing the blocks.
Installation of the slabs is carried out on the prepared sheathing. If it is planned to lay insulation, heat-insulating blocks are installed first.
Step-by-step installation of stone siding.
The sheathing is installed on the wall. For this they use wooden blocks or metal slats. The planks are arranged in increments of 30 - 40 cm. They not only serve as support for the blocks, but also help to ventilate the walls.

Several types of profiles are used in the lathing
The starting bar is set. It is verified by level and the rest of the blocks are oriented according to it.
Corner panels and window panels are installed. Blocks are installed around doorways.
The following panels are carefully fastened to the corner blocks. The locks should be latched with a smooth movement so as not to break the structure.
Fixation with self-tapping screws is carried out with a small allowance. The cap is not screwed into the sheathing all the way, leaving 1-2 mm.
Each next row of panels is leveled. Sandwich panels should be installed from left to right.
First, the blocks are installed on a flat surface. After installing all the panels, the corner parts are secured. They snap easily onto the mounting profile.
Main condition quality installation sandwich panels – neatness. German Holzplast Wandstein panels have proven themselves well. Plinth blocks require special attention.
Video description
For an example of installation of Holzplast panels, see the video:
When calculating the number of panels, add 10 - 15% to the resulting number. This must be done, since the blocks have to be trimmed during installation.
Before installing the sheathing, you should first make markings in increments of 30 - 40 cm. After the position of the beams has been accurately determined, they are installed on the wall. The correct installation of the planks is checked using a horizontal and vertical level.
The screws are screwed into the center of the holes.
After installing the starting panel, pull the thread from the panel to the opposite corner. The correct tension is checked with a level. All lower blocks are installed according to this guideline.
The installation of basement blocks is completed by installing a drainage system. It is placed on the upper horizontal surface of the base. Metal elements are used for this.

Where is the best place to buy panels?
Manufacturers produce sandwich panels designed for the various financial capabilities of the end buyer. In Moscow, the cost of slabs starts from about 900 rubles per m². By purchasing facade slabs from certified manufacturers, we must remember that, unlike counterfeits, the price of the material is also affected by the rental of premises, the number of intermediaries and the wages of store employees. But in return you get quality products, which is guaranteed.
In addition, many manufacturers are beginning to master the sale of stone-look facades in online stores, which allows customers to save money and time.
If you want your home to look beautiful, solid and elegant, and at the same time for a long time did not require repairs, it is important to take care of good cladding of the building. At the same time, the quality, durability and unusual finish requires a lot of labor and significant cash injections. In particular, modern market offers such innovative products as façade panels imitating stone, brick or wood, which so reliably imitate these materials that they can only be distinguished from natural ones upon closer examination.
Also important is the fact that the panels can be installed with your own hands. Next, we’ll talk in detail about the varieties and features. basement siding, paying Special attention"stone" options.
Let's look at the most popular options that help create an interesting visualization of masonry, incl. such invoices as wild stone, rock, slate.
PVC or vinyl
They are based on various polymers, to which coloring, modifying and stabilizing substances are added, resulting in options of a wide variety of colors and textures.
Advantages of plastic panels:
- fireproof;
- water resistant;
- Fade resistant;
- have little weight;
- easy to install and maintain;
- inexpensive.
Weaknesses of the material:
- release toxic gases in case of fire;
- become brittle in the cold.
Vinyl siding prices
Vinyl siding
Fiber cement panels
They are made from sand and cement with the addition of cellulose and mineral fiber as follows: cement mortar it is poured onto a reinforcing frame made of cellulose, synthetics or fiberglass, and the outside of the slab is coated with acrylic. Due to the high cement content, the panel is quite hard. Some manufacturers add mica and quartz sand, which increases the strength and durability of products. And in order for them to be resistant to ultraviolet radiation and precipitation, they are coated with varnish coating. Also, the use of high-quality dyes and varnishes creates unique textures and colors of surfaces.
Video - Japanese fiber cement panels
Table 1. Main manufacturing companies of fiber cement panels.
| Company name | Peculiarities | Panel price/rub. |
|---|---|---|
| Kmew | A Japanese brand whose slabs are characterized by increased frost resistance due to the presence of special microgranules in the composition. | from 1500 |
| Zierer | The German company has been producing safe, durable panels for more than 30 years, which long years retain their original appearance. | from 1000 |
| Casa Verde | The Russian company has been producing panels and thermal panels since 2012, the warranty service life is 30 years, and the estimated service life is 100 years. | from 1000 |
| TechnoNIKOL Hauberk | The Russian manufacturer has been producing panels with an outer layer of natural basalt for more than two decades, which ensures a long service life. | from 500 |
Reference! Fiber cement panel is produced by pressing, which is carried out under pressure 600-650 H/cm 2 , and autoclaving at a temperature 175 degrees C. After production, each copy is tested to ensure compliance with the declared characteristics.
 Appearance of fiber cement panels
Advantages:
- strength is the main advantage, which corresponds to the quality of porcelain facade tiles;
- fire resistance;
- resistance to low temperatures and changes allows it to be used even in harsh climate conditions;
- equipped with ventilation slots, thereby allowing air to circulate freely between the panel and the heat-insulating layer;
- has a heat-insulating and sound-absorbing function;
- can be used both outside and inside the building;
- no preparation is required before finishing.
Flaws:
- not very presentable appearance, as a result of which the panels require painting after installation;
- high price.

Insulated panels
They are based on insulation, and the front side is a designer layer of polymer coating, consisting of polyvinyl chloride, resin, foam and stone dust, which allows you to clearly highlight the stone texture, emphasize slate rock, rubble and wild stone.
 Schematic composition of an insulated panel
Advantages:
- do not exert strong pressure on the foundation;
- the finishing process can be carried out in any climatic conditions;
- quick payback, due to the fact that a house covered with panels can be heated at half the cost;
- fireproof;
- do not allow mold and fungi to multiply;
- very durable.
Flaws:
- thorough surface preparation is required;
- high price.
Prices for thermal panels
Thermal panels
Stone or brick tiles, ceramic and clinker
This type includes thermal panels; they are a clinker facing material with polyurethane foam. Tiles are made from clay with mineral composition. Fireclay is added to clay for heat resistance.

Advantages:
- safe for the environment;
- moisture resistant;
- easily tolerates temperature changes;
- service life is several decades;
- great thermal insulation;
- not fussy to care for;
- easy to repair;
- due to its low weight, it does not put a load on the foundation;
- not afraid of exposure to ultraviolet rays.
Weak sides:
- high price;
- fragility of the decorative layer, and in some cases, the insulation.
Installation
Step-by-step instructions for finishing a house with fiber cement panels
We will need tools such as:
- Bulgarian;
- screwdriver;
- self-tapping screws;
- level.
Prices for angle grinders (grinders)
Angle grinders (grinders)

Panels come with a straight edge, and there are panels with tongue-and-groove locks. Kits for facades are completed with the same elements as siding: corners, extensions, platbands, starting and finishing strips.
Important point! Some brands already have special ones for fastening panels clamps, while others will have to drill holes for roofing screws during installation.
Finishing frame house with vertical posts
- We lay insulation between the studs.
- We fix the element base tide to protect our base. Almost every manufacturer offers this element complete with fiber cement panels.
- Then we install a hydro-wind protective membrane, making overlaps at the corners from 100 to 150 mm, we fasten them using a special stapler.
- We install clamps at the corner, onto the tongues of which we attach the corner element. As for the internal corner, there is a special internal seal that is placed directly into the corner, sealing on both sides.
- Then we place the first panel and attach it to the posts using clamps. If there is no tongue-and-groove system between the corner element and the panel, a seam seal is installed. There is an insulator on the panels. When there is a connection between panels and panels, the panels will be waterproofed through this insulator.
- Then we strengthen the second panel. Again, if there is no tongue-and-groove system, the beginning of the panel is strengthened using clamps, which are attached at the beginning and end of each panel, as well as to the vertical posts of the sheathing. A special seam seal is placed between each panel. If there is a tongue-and-groove system, then a clamp is installed on top in the center of the joint, which will hold two panels at once.
- As for the window opening, before installing the panel, a special strip is placed under the window, which is also necessary for air circulation. It should be the same in thickness as the clamps. We install a seam seal on the sides of the windows, and above the window - a seam seal and a ventilation strip, as well as under the window. A window sill seal with a tail is also attached to drain water if condensation gets in. The panel is installed.
- To finish the top of the wall, a vent strip is installed on top. The panel holder is placed on the ventilation strip and the finishing panels are installed.

Installation of panels on wooden sheathing.
Important! There must be a gap between the horizontal bar under the window and the vertical bar of at least 30 mm. This is done for better air movement.
- We install the basement drip.
- We install the sheathing. In the corners and at the joints of panels, the width of the strip should be about 90-100 mm, and the thickness is 25-40 mm. Intermediate strips: 45- 55 mm width and thickness are the same as the corner strips.
- The window opening is also covered with slats. There is a nuance here: first, the bottom bar is attached flush with window opening, and then the strips are attached to the left and right sides and last bar covers the top.
- After installing the sheathing, a starting plate is attached around the perimeter. The initial panel will be attached to it.
- Then a corner element with a clamp is attached, which is used here in a different shape and with two antennae.
- We also fasten the corner panels on top with conventional clamps, and install seam seals to the slats to connect the joints between the panels.
- Then the same procedure occurs as described above, using clamps and suture seals. A seal is also placed on the inner corners, one panel is installed, strengthened with a clamp, then a seam seal is placed in another plane and a panel is installed, which is also strengthened with a clamp.
- The processing of window openings is practically no different from the technology described above. We place a seal with a tail over the window to drain water if condensation accumulates. Three pieces are placed on a standard window. A ventilation strip is placed on top according to the thickness of the clamp, the remaining steps are the same.

Advice! In order to save on these elements, you can get out of the situation as follows: take a panel of one color at the corners, and use another color along the perimeter. The only thing is that you have to saw the panels on one side at an angle 45 degrees so that the joint at the corner is tight.
Step-by-step instructions for finishing facade panels with insulation
Let's consider the option when installation takes place on a bare wall without sheathing and a hydro-wind protective membrane.

To work you will need tools such as:
- hammer;
- rubber mallet;
- grinder for filing panels;
- perforator;
- dowels;
- pliers.
Prices for popular hammer drill models
Hammers
Work order:
- Installation occurs by fastening the slabs to special tendrils, for fastening which a hole is drilled in the wall with a hammer drill, and the tendril is attached to a dowel. The tendril is attached to one hole, the edge of the tendril remains unattached to connect to the next row of panels.
- The rows are attached to each other by the same tendrils: some tendrils extend behind the insulation of the other panel and hold the edge. The edges are tapped with a rubber mallet for leveling.
- To prevent heat loss, a special foam adhesive is applied to the insulation, which, during the expansion process, fills all the cracks between the tiles.
- The angle is made like this: the edge of the tile should protrude, the size of the protrusion is equal to the thickness of the tile. The insulation is removed from the edge, which makes the joint with the other tile.
- The window opening also does not cause difficulties: the tiles are filed along the window opening. If window hole goes deep, then sawn tiles are inserted into the recesses, which are attached to metal strips self-tapping screw. Above the window, two metal strips are attached with dowels, and a tile is attached to them, in which a hole is drilled for this purpose, a dowel is inserted there, and everything is also attached with a self-tapping screw, which is then painted over.
Advice! For beauty, you can use the following finishing process: use tiles of a different color in the corners and along the edges.
Step-by-step instructions for finishing clinker tiles to look like stone
Prices for Ceresit glue
Ceresit glue
To work you will need:
- special glue;
- tile cutter;
- putty knife;
- a thread;
- brush.

Important! You need to start work with window and door openings.
Step 1. Treat the surface with glue.

Step 2. Moisten the tiles with water, apply glue, make grooves.

Step 3. After laying the first row, stretch a thread along the wall, which will serve as a beacon for laying other rows.

Prices for popular models of laser levels
Laser level
Step 4. When gluing tiles, you must remember to leave the seams identical in size to the thickness of the tiles.

Step 5. Fill all seams with mortar and rub. Result
Houses covered with stone-like facade panels look not just elegant, but completely correspond to your ideas about the appearance of the building - it can be aged, conveying the style of your favorite era, or ultra-modern. Moreover, such cladding has a long service life, which will provide an attractive appearance for many years. If you want to update the design of the facade, then dismantling and new installation It happens very easily and can be implemented on your own. Another important factor is the absence of the need for maintenance of the panels - only occasionally they can be rinsed with water to remove dust.
Houses with façade panels made to look like wild stone look especially exclusive. In this case, their solidity and importance border on inaccessibility. Moreover, their owners live in comfortable conditions, because, like natural stone, these panels keep the interior cool in summer, and protect from piercing winds and severe frosts in winter.
Reference. Over the past decades, Russian products have also become competitive. Particularly noteworthy are companies Alta siding, the panels of which can withstand frosts down to -50 degrees Celsius and heat – up to +60°С, price 1 piece. from 124 RUR, And Nordside, which does not use harmful and toxic substances and guaranteeing 50 year service life, panel price from 105 RUR.
Table 3. Leading manufacturers of stone or brick tiles.
| Brand name | Peculiarities | Panel price/rub. |
|---|---|---|
| Nailite | The US brand produces tiles in 10 unique series, each of which can withstand a temperature range from -50 to +50 degrees C. Guarantee period 25 years of service. | from 890 |
| Dock-R | The German quality of the panels ensures their long service life, confirmed by a 50-year guarantee. | from 350 |
| Grand Line | The Russian manufacturer produces premium tiles, which are guaranteed for life. | from 260 |
And in conclusion, I would like to wish that no matter what type, design and texture the walls of your home are, the main thing is that an atmosphere of love and mutual understanding always reigns inside, filling the hearts and souls of household members with warmth, comfort, and light.
We will send the material to you by e-mail
Ventilated facade systems use façade panels for exterior finishing of a house from different materials with different formats and methods of fastening individual elements between themselves. They are hung on frames made of bars or galvanized profiles, imitating natural wood, natural stone or facing brick.
Exterior facade panels
Review of types, characteristics, brands
Facade panels for exterior decoration of a house are classified according to several criteria:
If it is necessary to simultaneously insulate + decorate the facade, the subsystem (profile or block) is attached to the wall with brackets after insulation of its outer surface. This is necessary to eliminate cold bridges.

Helpful information! Laying basalt wool or extruded polystyrene foam inside the sheathing cells is a violation of technology. If only improvements to the building's exterior are required, the sheathing can be fixed directly to the building envelope without brackets.
Metal
There are façade panels made of aluminum, stainless steel, and galvanized steel. Unlike budget linear panels used for finishing industrial buildings, sports complexes, siding, cassettes have a more noble appearance, lamination, 3D texture.

Even with double-sided coating polymer materials steel panels are subject to deformation, accumulate static electricity, and require thermal insulation. Aluminum does not have the last two disadvantages, but is much more expensive.

Polymer
Of all existing polymers for external cladding PVC (vinyl) is usually used. There are two types of façade vinyl panels for home exterior decoration:
- basement siding - rectangular modules measuring about 120 x 50 cm, imitating stone/brick;


Manufacturers provide a wide range of additional elements that allow high-quality decoration of abutments, cornices, ebbs, and slopes of cottage openings.

Composite
Range composite panels, used for decorating facades, are much wider:
- fiber cement – the filler is cellulose (up to 90%), which makes it possible to perform front surface decorative embossing;

- porcelain stoneware – slab sizes 1 x 1 m – 1.2 x 3.6 m, the material can be cut with a glass cutter, it is environmentally friendly, inert to solar ultraviolet radiation and household chemicals;

- aluminum composite – price square meter from 1000 rubles, fastened with rivets, can have a wave or flat surface front side;

- clinker - has a layer of insulation, has a maximum service life, but unnecessarily loads the load-bearing structures.

Composite material is always more expensive, however, it has a high service life and original design.
Glass panels
Original translucent panels are laminated, reinforced or hardened, obtaining high vandal resistance or dust resistance. This material has light/visual effects (opacity, haze) and is usually used for finishing ground floor half-timbered

Helpful information! Glass panels should not be confused with systems façade glazing. Finished enclosing structures are sheathed with these materials. They are not independent walls.
Sandwich
In private construction, prefabricated and monolithic sandwiches are used extremely rarely. This material is structural because when polyurethane foam/expanded polystyrene is pressed between two profiled sheets, the slabs obtain sufficient rigidity.

They build from them sport complexes, hangars, warehouses. Prefabricated sandwich buildings can be dismantled for transport to a new location.
Related article:
Installation features, advantages and disadvantages
Facade fiber cement panels for exterior finishing of a house, the photo of which is presented above, are attached to the subsystem sheathing with clamps, like most other claddings with a thickness of 16 - 25 mm.

For thin-walled decors, a riveter is used (only on steel profile) or self-tapping screws, nails on bar sheathings.

Helpful information! Rigid fixation is only allowed for materials with low linear expansion. In other cases, it is necessary to ensure one degree of freedom during horizontal movements.
Thermal panels have a layer of insulation that must be placed in close proximity to the wall. Therefore, they must be glued to the enclosing structures without air gap. In sandwiches, the heat insulator is located between metal sheets, so they are used as a wall material.

A budget option for decorating the exterior of a cottage is plastic facade panels for exterior decoration of the house with an outer layer that imitates natural material.

To increase the service life of the ventilation façade, they use composite materials and metals.
Today there is a wide variety of building materials that are used for facade finishing. Of course, everyone would like to have a facade made of natural stone. This is one of best options, however, is also the most expensive. Natural stone has a high price.
If you calculate the cost of cutting it during the installation process, then finishing the facade with natural stone increases several times. And the work itself on laying it is expensive, painstaking and lengthy. But if the thought of natural stone haunts you, then it will be the most suitable option its imitation.
For this purpose, engineers have developed special facade panels that imitate natural stone. Its structural features allow for quick installation. At the same time, it is possible to simultaneously insulate the facade. So, now let's take a closer look at what it is main feature and advantages, as well as how to correctly install facade panels.
Features of the material

TotalStone panels are made in Spain. Material composition: resin, fiberglass, and natural stone powder
Facade panels imitating natural stone can be divided into two types: having a homogeneous structure (made from PVC or its modifications) and combined panels. As for the combined panel, it has an advantage over a single-layer panel. For example, outer layer made of polymers, plastic, etc. Inner layer- made of sheet polystyrene foam.
This material is an excellent insulator. Thus, it turns out that decorative facade, supplemented with insulation. Sometimes polystyrene foam can be used instead of polystyrene. Without the use of glue, the foam is connected to a coating that imitates natural stone. Locks should not be used in this case.

The main feature of this material is its excellent resistance to changes in temperature and moisture. Moreover, it copes with sudden changes even within one day. Under its influence, its deformation is completely eliminated, since it has a low linear expansion coefficient. These panels can be made with a wide variety of textures and colors. This allows you to choose the option that suits you.
Instructions - how to clad a house with stone panels with your own hands
Before proceeding with installation, it is necessary to carry out the following preparatory work:
Calculation of the need for facing material and its components
- To calculate the number of panels, you need to know the area of the entire surface of the facade. From it you should subtract the sum of the area of doors and windows. Taking into account cuts and overlaps, it is necessary to add an average of 10% to the resulting area. If the panel has a complex configuration, then add 15%. As a result, divide the resulting amount by 4.55 (sq.m. in one package). Then you need to calculate the number of starting bars. To do this, the perimeter of the building should be divided into 3 meters, this is exactly the length of the bar.
- After calculating the doors, cuts and overlaps, you get the final result. External corners at full height will also be needed. The height of the finished element is 0.45 m. Therefore, divide the sum of the entire height of each corner by 0.45 m. Accordingly, add 5% with a margin.
- When installing panels, a special J-profile is used for internal corners. Its length is 3 m. Therefore, the sum of each internal angle must be multiplied by 2, and then divided by the length of the J-profile. If used for finishing, then divide the result of the length of all walls by 3 m. You can also use the J-profile to finish the door and window opening. The calculation is carried out using the same method.
- Divide the sum of all openings by 3m, as a rule, add 5% for margin. A special border is used to decorate the inner corner. Its length is 0.517 m. Therefore, we divide the sum of the height of each internal corner by the size of the curb. We do the same for door and window openings, and add 5% to the amount for cuts and overlaps.
- But the most important thing is fastening material. For one panel, the technology uses 5 fasteners. For corner elements– 4 pcs., and for the border – 2 pcs. For a starting bar, 10 pieces of fasteners are required for every 30 cm.
What tools will be needed for sheathing:
- Level.
- Hammer.
- Hacksaw with fine teeth.
- Drill.
- Roulette.
- Circular Saw.
- Screwdriver.
- Construction hair dryer if necessary.
- Self-tapping screw with countersunk head 30 mm (leg 4 mm, head diameter 7 mm).
Video instructions for installing German Holzplast Wandstein panels
In this video you will learn how to do your own cladding with Holzplast Wandstein panels - one of the most quality materials in your class. Automated German equipment, the best German raw materials, new optimal size, reinforced locking connection, automated system coloring - all this ensures very high quality products.
Step-by-step instructions for self-installation
Plastic facade panels imitating stone - their advantages
The main advantage of facade panels imitating stone is their price. It is much smaller than natural stone. Moreover, installation work take much less time compared to stone masonry. Work can be performed at any weather conditions. There is no large amount of dust during operation.

Thanks to the corner fasteners, the time required to draw corners is significantly reduced. Because of light weight the load on the wall and, accordingly, on the foundation of the house is reduced. There is no need to use adhesive solutions during the installation process.
Decorative
From all of the above, one simple conclusion suggests itself: this has never happened before. building material, which literally changed the appearance of the entire house in just a few days. Now thanks to your decorative properties your facade can take on a new look. Moreover, its installation does not require the use of expensive equipment. Moreover, panels that are attached to each other speed up the process, so there is no need to install special frames.

Facade finishing decorative panels imitating stone will be an excellent solution for country house. Any house dressed in such a look will come to life, and with it the entire composition of the local landscape will come to life. The different palette allows you to choose even the shade individually. A carefully thought-out composition will allow the house to become a part or even one whole in the surrounding landscape.
Insulated stone panels
By installing panels on the facade, in addition to beauty, another goal is achieved. The foam layer used is also good insulation. Expanded polystyrene in its own way thermal insulation characteristics significantly superior to polystyrene foam. Therefore, when covering a house with decorative panels, you can simultaneously achieve two goals: insulate and update.

On the left - thermal panel Trieste
(under natural dark slate), on the right - Corsica
(under gray climbing shoes)
Thus, there is no need to pay additionally for facade insulation. This technology will significantly reduce heat loss, which is noticeable in winter time of the year. Also, your home as a whole will be protected from the appearance of fungus, mold and dampness. This material completely prevents their appearance.
Approximate prices in Russia
Prices in the Russian Federation are quite affordable for such finishing materials. For example, the “Rocky Stone” collection can be purchased on average for 430 rubles. But there are more expensive options, for example, “ Natural stone» will cost within 580 rubles.
It is worth noting that this is the amount of one package. There are 10 pieces in it, and the total is 5.32 m^2. If the facade of your house is up to 100m^2, then as a result you will need to buy approximately 20 packages, taking into account the reserve for cuts. As a result, the panel itself will cost you about 12 thousand rubles. You will also need additional components. Considering that the service life of a finished facade is on average 50 years, the amount that will be spent on it is small.
Manufacturers
The leading manufacturers of facade panels imitating stone are the following companies: Döcke-R (Germany), Novika(Canada), Nailaite(USA) and domestic manufacturer Alta Profile(Russia).
Video about German-made Döcke-R products
Video on how to turn an ordinary country house in a reliable fortress - warm and beautiful.