Electrical wiring in the bathhouse: requirements, diagram, features and methods of cable installation. Wiring in the bathhouse: electrical appliances, cable selection, installation rules Electrical wiring in the steam room
As you understand, a bathhouse is a building with high humidity and temperature. In this regard, electrical installation in this room has its own characteristics, and most importantly, differences from. In this article we have provided step by step instructions about how electrical wiring in a bathhouse should be done with your own hands and what requirements are imposed on it.
Primary requirements
Among the main requirements for wiring in a bathhouse are:
- IN wooden bath The wiring must be carried out in an open manner in cable ducts, PVC corrugation, metal copper or steel pipes. You can make it in a bathhouse from non-combustible materials (cinder block, brick, etc.). A cable or wire with insulation resistant to high temperatures is laid in the steam room; in practice, it is most often used. In fact, here we only need to connect the lamps; if we place them in the corners, we can make the wiring in the adjacent room and make connections to them through the wall. In other rooms, they follow the shortest path to electrical appliances (for example, to a lamp).
- In the dressing room and shower (washing area), electricians recommend VVGng-LS, laid in pipes or hidden (if the walls are made of fireproof material).
- The electrical panel diagram must include circuit breakers and an RCD with a trip current of no more than 30 mA, preferably 10 mA.
- Do not install sockets and switches in a washing room or steam room. Place them in the waiting room. All electrical fittings must be mounted outside the room, at least at the entrance, the requirements are similar to the placement of sockets in the bathroom -.
- electrical outlets and switches must be no less than IP-44 (fittings with special protective covers). The protection class of bathhouse lamps must be no less than IP-54.
- It is prohibited to conduct electrical wiring above the stove.
- For the premises it is necessary, it is very good if lightning protection is also organized.
- can be terminal, welding, soldering or crimping with sleeves.
- Pass the cable through the walls in metal pipe.
The requirements for wiring in a wooden bathhouse are basically the same as what we talked about in the article we referred to.
We also present to your attention several useful tips for installing electrical wiring in a bathhouse with your own hands:
- Lay the cable to the bathhouse with a cross-section corresponding to the electrical appliances in it. Especially if you have powerful electric heaters installed, for example, an electric stove and other appliances.
- Be sure to install a protective plate made of wood between the wooden wall and the switch/socket. non-flammable material. However, disputes arise on this score, since modern electrical installation products are already made of plastic that does not support combustion and they have back wall, which is adjacent to the wall.
- When using cables with -ng-LS insulation when external laying In the cable channel, it is permissible not to place a non-flammable lining between the wall and the cable channel. In all other cases, be sure to separate the wires from the wall at a distance of 10 mm, or lay a strip of fireproof material.
- – allowed in accordance with clauses 2.1.4, 2.1.37, 2.1.39, 2.1.40, tables 2.1.2, 2.1.3.
Drawing up a diagram
We present to your attention a wiring diagram in the bathhouse:
By analogy, you can draw a diagram yourself, the main thing is to mark all the elements and indicate the exact locations of their placement.
Main process
In order to do the wiring in the bathhouse with your own hands, you need to carry out a set of measures, namely:
- Select electrical installation products.
- Lay wiring from the house to the bathhouse.
- Execute internal electric installation work.
Let us briefly consider each of the stages, after which we will provide you with visual video instructions for this event.
Calculation of a suitable section
On at this stage need to calculate correctly cross section lived so that in the future the electrical wiring in the bathhouse could withstand current loads.

It is best to consider the calculation technology using an example.
Let's say in the bathhouse we will have 5 100-watt lamps, an electric heater and a heater (for the relaxation room). The average power of the heater is 4 kW, the heater consumes another 2 kW. In total, we have 6.5 kW of power consumption from all electrical appliances. To this figure you must add minimum stock power, about 20%, which will ultimately amount to 8 kW. To determine the current value by which we can choose the appropriate cross-section, we need to divide our total power by voltage (usually 220 V). The result is that 8000/220 = 36 amperes. It is quite advisable to choose a bathhouse with a cross-section of 4-6 mm2, which is capable of withstanding such current loads.
Please note that the same principle is used to calculate a suitable circuit breaker. Only in this case, the power of not all devices is used, but the necessary circuit, for example, lighting or separately for the furnace. In this case, the rated current of the weak point, for example, for most sockets - 16A, as well as the cross-section of the laid cable, see PUE table 1.3.4.
Selection of accessories
Using the advice that we have provided you, you need to choose the electrical fittings and other components for the electrical wiring in the bathhouse yourself.

As we have already said, for sockets and switches in the bathhouse it is best to use the VVGng-LS cable, or an analogue -. The minimum cross-section for sockets should be 2.5 mm2, and for switches 1.5 mm2.

Still, our advice is to lay the electrical wiring to the bathhouse aerial, because... in this case you will save your money and do everything very quickly. Damage to the overhead line occurs extremely rarely, so there is no point in overpaying.
Internal wiring
At this stage, it is necessary to install electrical wiring from the inside in all rooms in the bathhouse. As we have already said, it is necessary to use open wire routing in a special corrugation made of non-flammable material, in a cable duct or on insulators.

When all the wiring is completely routed to the rooms and connected to fittings and lamps, you need to connect to the circuit breakers, RCDs and other protective equipment in the panel.
Important! Due to the danger and difficult conditions environment in bathhouses, it is better to entrust this work to a specialist, but now you can control the correctness of his actions during installation.
Video instruction
We provide wiring installation instructions for your attention. The video will help answer some of your questions and show you the whole technology more clearly!
Now you know how to do electrical wiring in a bathhouse and steam room with your own hands. We hope provided step by step guide, diagram and basic requirements helped you deal with this issue!
Also read:
Since ancient times, the baths had only natural light - through a small window. With the advent of affordable electricity, conditions have improved markedly. At the same time, wiring in a bathhouse requires a careful approach due to high humidity and temperature. It will be comfortable in the steam room if there are no unnecessary wires and switches, and each lamp has its own place.
Air supply to the electricity bath
The wiring in the bathhouse is connected from the home cable. The cable is laid underground or pulled through the air, which is much simpler. In this case, the following rules must be observed.
Electricity is laid over roads at least 6 m, and over areas where pedestrians pass - from 3.5 m or more.
Air entry into the building is made at a height of at least 2.7 m. For this, insulated wires of the SIP series with a cross-section of at least 16 mm 2 are used. They do not require a support cable. Its role is played by the neutral wire, which can be with or without insulation. The wires are mounted on brackets with anchor clamps. They are difficult to insert into the shield due to their high rigidity. Therefore, outside the building, the wires are connected to a copper cable of the VVGng or NUM type. It is introduced into the house through a metal pipe inclined towards the street by 5-10 0. The input cable cores are connected to the SIP using sealed piercing clamps.
Input via underground cable
Underground entry is made with armored cables of the VBBShV or VBBShVng type. They are not dangerous from soil shrinkage and rodents. The cross-section of the cores is from 10 mm 2. The cable is placed in a trench 70-100 cm deep, in a layer of sand. To eliminate the appearance of tension during soil shrinkage, laying is done in waves. It is not recommended to use metal pipes to protect the cable, since condensation accumulates in them. It is advisable to use them when leading the cable vertically from the ground to a wall or pole.
A shield is mounted in the dressing room into which the cable is inserted.
Methods for connecting electricity
The connection from the house to the bathhouse is usually made single-phase, but three-phase is also possible. In the first case, the current is supplied to the consumer through the phase wire, and back through the neutral wire. In a three-phase circuit, current flows to the load through 3 wires and returns one at a time. Some electrical appliances can only be connected using this scheme.
Advantages three-phase network the following.
- The power can exceed 30 kW, although this is not required for a bathhouse.
- Can connect electrical devices with both single- and three-phase power supply.
The disadvantage is the need to install in a panel special equipment. In addition, all phases must be evenly loaded for the network to operate correctly.
Wiring Requirements

Electrical requirements

How to calculate electrical wiring?
The calculation of any electrical wiring begins with determining the power of all devices. For lighting you will need 1-2 kW. About 3 kW will be needed for a washing machine. An electric stove consumes 5 kW or more.
The wire from the house to the input switch of the bathhouse panel takes the entire load and its cross-section will be maximum (usually 4 mm2). Then a separate cable will go to the electric furnace. Its cross section will be slightly smaller than the main one, since it is consumed maximum power(2.5 mm 2). Separate lines for lighting and sockets with smaller wire cross-sections are also connected. For each of them, its own permissible cross section is calculated.
Important! The wiring in the bathhouse should not overload the house. Before installing it, you need to determine how much power your home network will handle.
Electrical power
Determining power is not difficult, since it is indicated on the equipment. The first number means voltage (12 V, 24 V, 220 V), and the second number means power, kW. Depending on the magnitude of the total load, the cross-section of the cable cores is selected. As a rough estimate, there is 10 A load per 1 mm 2 section of copper wire. More precisely, you can determine it from the tables, which take into account the installation method. For example, underground will require more than air. 20% power reserve is added to the calculated values. Usually for a bath they take a wire with a cross section of 4 mm 2.
Selection of automatic machines and RCDs
Circuit breakers are used to protect wiring from short circuits and overloads. The machines are selected according to their operating current 10-15% below the maximum permissible value for the wire. They vary by class. For moderate loads to which the wiring of a house and bathhouse is subject, class C circuit breakers are usually used. Single-phase circuit breakers are installed at the input of a single-phase network, and single-pole lines are installed on the lines extending from the panel. It is important that the connection is made through a phase wire.
An important device in the panel, necessary for a room with high humidity, is an RCD. It is selected from the standard range, a step higher in denomination than that of the machine connected in front of it. If the latter is designed for 25 A, then the RCD is taken for 30 A.

Internal wiring device
The wires are laid at the bottom of the walls. A sealed socket with a cover or a switch has an input from the bottom or side. When entering from the side, the wires are bent in the form of an elbow so that moisture does not flow inside through them.

The wires enter the steam room through the wall, at the locations of the lamps. Their free ends should be with a small margin in order to conveniently connect to the terminals.
Electrical devices are grounded if they have metal parts of the housing. For this purpose, the supply cables are chosen to be three-core.
All wires from electrical appliances are collected in the panel.
Wiring installation

How to choose an electric oven?
Connecting an electric furnace. The stove is surrounded by a wooden fence with asbestos insulation inside. It is selected according to power, depending on the volume of the room and the required heating rate. In addition, when purchasing, you should choose the appropriate dimensions, as well as types: wall-mounted, floor-mounted, with a steam generator, etc. They cost from 5 thousand rubles. and higher. Electricity costs for heating are quite large and not all external power networks will be able to provide power of more than 5 kW, for example, for a summer house. The electric heater is installed with a direct cable from the switchboard.

Common mistakes when laying electrical wiring in a bathhouse
- The location of the wires to the heater and chimney is closer than 0.8 m.
- Laying wiring closer than 0.5 m to batteries or pipes.
- The use of lamps in the steam room and shower is below the IP44 protection level.
- Used for wiring at elevated temperatures plastic cable channel, which quickly deforms when heated.
- The wiring is located on the ceiling of the steam room. It is especially dangerous to lay it over the stove.
Conclusion
Works in special conditions operation. Increased temperature and humidity in the premises require compliance with all electrical safety requirements. With proper design, making the right choice cables with electrical equipment and in compliance with all installation rules, the power supply to the bathhouse will work reliably for many years.
Electricity is supplied to the bathhouse in strict accordance with the developed requirements for wet rooms.
Primary requirements:
- All furniture located in the hallway or leisure room.
- In the steam room There should be no sockets.
- For light bulbs and lamps Only sealed lampshades are installed.
Electrical wiring diagram in the bathhouse and operating instructions
 wiring diagram
 Before building a bathhouse, it is necessary to consider the exact location of all electrical outlets. An important point is to consider installing wires in places where the cable will be located in a place that will not interfere with construction and further long-term use.
There are 2 types of installation of electrical wires:
- external;
- interior;
If the bathhouse building is completely wooden, then it would be most preferable external installation wires
Advantages of this method:
- No longer needed the need to make a groove in the wall (groove).
- Always accessibility to the cable, since the wire installation is done using a special box.
- Always You can make changes to the layout and wiring.
- Much the level of fire safety increases.
Internal dilution is more often applicable in brick or concrete structures baths
The wire is laid in the made ditch (groove) and it is necessary to think through the conclusions of all connectors:
- Output for lamps(mainly in the middle of the ceiling, along the edges).
- Output for switch.
- Output for electric heater.
- Control panel output temperature.
- Output for sockets, being installed outside the steam room.
The most important condition for all electrically conductive devices in the bath– this ensures complete moisture protection. Corrosion can lead to failure of all devices; even plastic elements are vulnerable to corrosion resistance, as they have metal parts.
Which will be powered by a voltage of 220 V must be mounted in a completely dry place. It is allowed to “conduct” 12 V through the wall of the steam room. Installing sockets in the steam room is strictly prohibited.
If you plan to install a washing machine in a bathhouse, then it must be installed in a dry place, and an outlet must be installed not far from it. Do not forget about the heating tank, which requires a separate outlet.
Along the perimeter of the territory where the bathhouse building is located, a grounding loop should be installed, the shield should be equipped with an automatic device or device protective shutdown With rated current no more than 40 mA. As an alternative, you can install a Shtil T-220/12 step-down transformer in the panel.
If it becomes necessary to install a sensor on an electric stove (electric heater), it is recommended to install only the low-voltage version, approximately 1 meter from the floor and as far as possible from the electric heater. Often, an electric oven is connected via a cable leading from the panel through the wall to the steam room.
 Step-by-step instructions:
- A bath should be provided a separate power supply line leading from the main panel body.
- Calculate basic parameters of the machine.
- Section selection electrical cable.
- Choose one of two main methods laying the wire (underground/over the air). This choice is made taking into account all the features of the specific location of the shield, the bathhouse building and other nuances.
- Installation of sockets and light bulbs(these current-carrying devices are not recommended to be installed in the steam room). They should not be vulnerable to moisture.
- All wires it is necessary to lay at a rational distance, without leaving excessive sagging and twisting. When laying on walls, they must be tightly secured. (Cables must not be laid above heating elements).
Calculation of wiring power and selection of cables
To choose the right one, you will need to know the power of the wiring. There are various reference data where you can determine the expected power of all devices depending on the cable cross-section. All electrical appliances have a label indicating their power consumption.
Tips for calculating power and choosing electrical cables:
- When, if only lighting fixtures are installed in the bathhouse among electrical appliances, the total power will be about 1-3 kW.
- When used in addition to lighting devices– electric furnaces, the total power will be correspondingly higher and will be about 6-7 kW.
When installing wiring, you should take into account its total power, which is 20-25% higher than the calculated power of all devices located in the bathhouse.
Let's look at an example calculation:
- If the power of all devices in the bath is 6 kW, then it is recommended to calculate the wiring for 7 kW. For such values, it would be correct to choose the VVGng-LS cable, which has a cross-section of 3x4 (4 mm 2).
- When choosing electrical wires for lighting, it is recommended to choose a cross-section of 3x1.5 (1.5 mm2), and for sockets the best wire size is 3x2.5 (2.5 mm2).
Eyeliner electrical cables to the bathhouse is carried out using 2 basic methods:
- Underground connection ( earthen method) – installation is in progress electric wire underground, this procedure is considered an overhead, both in terms of financial and production components. (You need to dig trenches according to special rules and to a certain level; the cable used for this method is more expensive);
- Installation by air (air method)– carried out by laying the wire directly through the air, above the bathhouse building. Along with the previous one, it is more economical, but in turn also requires compliance with its necessary norms and rules.
Laying methods
"Earth"

Refers to the most the right ways, unfortunately, its choice is not always possible. First of all, it is necessary to complete all the “earth” work and make sure that the cable laying is convenient. It is expensive, has 4 copper wires with a cross section of 10 mm 2.
The cable is equipped with a protective coating and is laid underground, thereby being very durable and highly reliable. The steel protective sheath allows you to protect the electrical cable from all kinds of rodents (moles, rats, etc.). Also, the electrical wire is invulnerable to earth shrinkage.
When packing the cable, you should not use a steel pipe, since it collects condensation, which can affect the durability of the wire.
Steel pipes are suitable for vertical installation(note: mounting on a pole, on a wall). Pipes of no more than 2 meters are often used.
Stages of underground cable laying:
- A ditch is dug to a depth of 0.7 - 1 m. Sand or loose earth is poured into it, the layer height is about 10 - 15 cm. Then the cable is again covered with a layer of sand or loose earth.
- To provide cable into the structure, use a metal sleeve. Its purpose is to protect the wires when moving, as well as to finally seat wooden wall. All these procedures must be carried out with the greatest care and caution.
- Remove it from the cable protective covering right before connecting to the panel. Then you can connect the electrical wire to the machine, providing protection against lightning strikes.
Laying cables using the “aerial” method

If the consumer chooses a simpler and more economical method of laying wires through the air, then the following factors must be taken into account:
- If the distance from the house to the bathhouse is 20 30 m, you need to install a support, eliminating the sagging of the cable. To “lay” the wire through the air, a special stretcher or insulators made of porcelain are used.
- Electric cable b must be stretched at a specific height. Above the road, its height is not lower than 6 meters from ground level. Above pedestrian paths– not lower than 3.5 – 4 m. The cable is mounted to the bathhouse itself at a height of 2.75 – 2.90 m.
- The so-called “self-supporting” insulated wire is often used. Its operating life is approximately 25 years. Such cables have a strong weather-resistant coating and special load-bearing elements that are invulnerable to overloads. The cross-section of such a wire is about 16-20 m2 and the carrying capacity is no more than 63-65 A. In the case of a single-phase connection, the output power is 14 kW, and if 3-phase is 42 kW. The main disadvantage of this type of cable is its low ductility.
- SIP (self-supporting insulated wire)– designed for insertion into the bathhouse itself. It is forbidden to insert aluminum wires into the steam room itself; cables of the NYM, NG or VVG type are allowed.
Type VVG is often used for connecting lighting (cross section 3 x 1.5) and connecting sockets (3 x 2.5).
Internal wiring in the bathhouse: main stages
When designing electrical wiring, the following steps should be noted:
- installation of the shield;
- breeding from the shield;
- installation of lamps;
- installation of sockets;
- installation of an electronic stove;
Installation rules and cable routing from the electrical panel
 Must select right place for fastening the electrical panel, since all the electrification of the bathhouse will be powered from it.
It is worth canceling the most important requirements:
- shield should be located in a place where it can be easily accessed.
- Shield is not allowed install in the steam room and other fire hazardous areas.
- Room with installed shield must have good lighting.
As a rule, the shield is installed in the hallway or leisure room. Its upper part of the body should be located at a height from the floor of at least 1.5 - 2 m.
Single-phase wiring must have at least 3 wires. According to regulatory documents the phase conductor should be gray. It connects to the top connector of the injection machine. From the lower connector of the outgoing machine there is a movement to the upper outgoing machines.
The zero core (bluish color) is located on the zero block. Protective (greenish-yellow) – on protective.
The conductors of the cable phases that go to the load are connected to the lower contacts of the machine.
All electrical cables must be very carefully connected to the switchboard; circuit breakers are mounted taking into account the load on the wire.
For wiring, first of all, there must be a wiring diagram in the bathhouse. When forming it, you should be based on the following nuances:
- In the presence of brick walls – the wiring will be hidden under a layer of plaster.
- If there are wooden walls, the wiring can be open and run along the surface of the walls.
- All cables only required to be laid vertically or horizontally. There should be no fractures or twisting.
- All wires should be placed in less visible or visible places.
- Electrical sockets, switches, panel boxes It is prohibited to install in rooms with high temperature changes and varying humidity levels.
- Core connection must be welded or soldered.
- Installation prohibited electrical wires above the stove.
- Definitely necessary activate protective “zeroing”.
 Bathhouse wiring diagram
 Installation and connection of lamps
 Light lamps installed in bathhouses must have a shell protection rating of at least IP 44, and a power of no more than 75 W.
Shades for light bulbs should be used mainly glass, since plastic ones are more prone to deformation. The housings are chosen to be metal, connected to a protective conductor.
The most recommended location for installing lamps in steam rooms– this is on the walls, not on the ceilings, since the temperature level is considered to be highest under the ceilings. Steam rooms use voltage (12 V), therefore step-down transformers located outside the steam room are necessary.
It is recommended to install sockets exclusively on walls, outside the steam room. This could be a leisure room or hallway. The height above the floor is about 90 – 100 cm. For additional electrical safety, it is proposed to choose models of electrical socket housings with covers. Protection class no more than IP-44.
Electric furnace connection standards
To connect the oven you will need special wires that can withstand very high temperature(150 – 200 ⁰С), + high power consumption (4 – 6 kW). A cable measuring 3 x 2.5 mm can withstand this kind of load.
Installation heat-resistant wires should be routed to a mounting box installed away from a room with high temperatures, and ordinary VVG wires will be suitable from the box to the switchboard.
Main mistakes:
- Wrong choice of wire type and cross-section, is one of the most common mistakes. The electrical cable must be in accordance with the installed power (2kW / 1mm).
- Incorrect or insufficient wire insulation. Copper wires are of higher quality and are much more reliable than aluminum wires.
- Wrong attitude towards technical safety. Inept and careless handling of all electrification elements.

- Nuances of electrification. When a bathhouse is made of wood, sheet asbestos should be laid at the bottom of the tubes, and if the wires go through heating structures, then on all sides relative to the cable.
- Running wire through walls. One of common ways wire installations are open wiring. For greater convenience and safety, it is recommended to use metal sleeves when running cables through walls between rooms.
- Electrical wiring. Before you start installing branching wires and planning their connections, you should definitely think through the electrical diagram of the bathhouse. Cables should not be routed at oblique angles, only horizontally or vertically. It is necessary to eliminate all twists and bends.
- Electrical wiring technique. Since wooden baths can easily catch fire, open installation is often recommended in such baths. This installation method is more economical with less time and maintenance.
- Installation of machines. For more convenient maintenance, it is recommended that all machines be signed so that any breakdown can be easily corrected. It is also very useful to have electrical wiring diagrams near the machines.
All installation procedures should be entrusted to professionals, since ignorance and inability can entail large financial costs and precious time.
Did you like the video? Subscribe to our channel!
Sauna is the Finnish name for our bathhouse. In Russia and other countries, any steam room with dry steam is considered a sauna. But this is a mistaken opinion. The Finns don't understand this kind of sauna. However, as a rule, a bathhouse and a sauna are practically twin brothers. Both here and there they wave birch brooms, and here and there they add steam, pouring water from a ladle onto the heater.
The usual temperature in a sauna ranges from 70 to 110 degrees. In Finland, there are no less than 2 million saunas per 5 million population. In Russia, saunas are also very popular. Warming up in a sauna leads to an improvement in the functional state of the body's systems and organs, promotes the development of compensatory and defense mechanisms, improves metabolism, calms the nervous system, increases mental activity and activates vigor. This is due to the beneficial effects of sweating and heat on the respiratory, cardiovascular, endocrine and thermoregulatory systems of most people.
To prevent a trip to the sauna from being marred by troubles, the electrical wiring in the bathhouse/sauna must be installed very carefully and correctly. To ensure that the electrical wiring in the bathhouse with your own hands is efficient and of high quality, listen to our recommendations.
Saunas are fire-hazardous objects containing many harmful factors for electrical wiring, and, accordingly, for the life and health of people, as well as the integrity of the sauna itself. Therefore, if possible, use the help of professionals to install electrical wiring in the sauna. If for some reason you decide that installing electrical wiring in a bathhouse is quite feasible for you, pay close attention to fire safety requirements.
Electrical wiring in the bathhouse must be designed taking into account high humidity and high temperature. If your sauna is built of wood, then the installation of wiring in the bath should be of the highest quality and responsible due to the likelihood of fire. In sauna rooms that are not rooms with high temperature and humidity, it is recommended to install cable VVGng-LS( - for connecting sockets and cable - for connecting lighting). The insulation of this sauna cable is flame retardant and has low level smoke during smoldering. Wiring in the bathhouse/sauna is preferably in flame-retardant cable ducts. In those rooms where the temperature rises to high values, you need a cable (wire) that does not collapse at such temperatures. You can use installation of wiring in a bathhouse in corrugated pipe or a cable channel, inside of which single wires of the brands PMTK, PRKA, RKGM or PRKS are located. These wires can easily withstand temperatures of 170°C. Electrical wiring in the bath/sauna should not have metal sheaths or pipes.
Naturally, after installation it is necessary to check the sauna cable for the integrity of the insulation.
The entire electrical wiring process can be divided into stages:
1. cable entry into the sauna/bath
2. installing a shield in the sauna/bath
3. cable routing from the panel in the bathhouse/sauna
4. connecting lamps in the bath/sauna
5. connecting sockets in the bathhouse/sauna
6. connecting an electric furnace in a bathhouse/sauna
Cable entry into the sauna/bath
Our sauna can be located both outside the home and in a residential area. If the sauna is located outside the building, then we will need to lay power cable to the sauna building from the main switchboard.
The simplest and least labor-intensive way is overhead line. If there is a significant distance between the input panel and the sauna building, additional supports. It is recommended to use a self-supporting insulated self-supporting insulated cable. No cable is required for its installation; it is quite durable, strong and not afraid of ultraviolet radiation. We recommend entering buildings in insulating pipe through the wall.
The cable can be inserted into the sauna and into the ground, but this is more difficult. Underground entry into a house is much more expensive both in terms of installation and materials. Although it also has its advantages. This is primarily the design of the site itself; there are no hanging wires. This power supply, like all work related to the power supply of a building (house, cottage, cottage, plot), has certain installation rules. When entering underground, the cable is laid in the ground at a depth of 70 cm. For installation, it is customary to use an armored cable with copper conductors. It is allowed to lay an unarmored cable at a depth of half a meter if it is reliably protected from damage by pipes, for example. It is advisable to sprinkle fine river sand or soft soil, then place the cable and, having filled in 20 cm of soil, mark the location of the cable with signal tape or bricks. This will protect the cable from damage during excavation work on the site. After tape or brick, add soil to ground level. The cable must be introduced into the building in an insulating pipe. Laying cables under building foundations is not permitted. Underground input is preferable from an aesthetic point of view.
If the sauna is located in a residential building, then input is much easier. The cable can be inserted into the sauna panel openly in boxes and corrugated tubes, or hidden under a layer of plaster.
As mentioned above, a bathhouse is a place with high humidity and elevated temperature. Therefore, do-it-yourself wiring in a bathhouse should be done taking these factors into account.
Installation of a shield in a sauna/bath
The distribution panel in the sauna serves to transfer energy to consumers. Since the entire sauna energy system will be powered from the shield, its condition and proper functioning operational reliability and health safety will depend. So that the electrical wiring in a bathhouse built with your own hands is durable, great importance You need to pay attention to connecting the electrical panel.
The location for the shield must be chosen carefully. Firstly, there must be free access to it, which in no case should be cluttered. Secondly, the shield should not be placed in a poorly ventilated place. Thirdly, the shield should not be placed in fire hazardous areas with high temperatures (for example, a steam room).
Fourthly, it is desirable that the electrical panel be illuminated natural source light, which is important when working with the meter (if it is important to know the amount of energy consumed by the sauna) with the voltage turned off. Usually the shield is located in the presence of a vestibule in it, or in a rest room. As a rule, the panel consists of input and output circuit breakers and RCDs (residual current devices). The shield is hung in such a way that its upper part is located at a height of 1.4-1.8 m.
If the wiring in the bathhouse/sauna is single-phase, the power cable must consist of at least three cores. According to the latest GOST, the phase conductor must be gray, however, you can buy a cable from old stocks, where the phase core may be of other colors (white, brown). The phase conductor sits on the upper terminal of the input circuit breaker, and from the bottom terminal with jumpers it goes to the upper terminals of all outgoing circuit breakers or is routed to circuit breakers of more in a modern way distribution - through distribution buses. Accordingly, the neutral conductor (usually blue or light blue) sits on the neutral block, and the protective one (usually yellow-green) sits on the protective block or on the welded bolt of the shield itself. The phase conductors of the cables going to the load are connected to the lower contacts of the machines. We carefully lay the input and output cables in the shield and remove them from the shield using a corrugated pipe. Automatic devices and RCDs must be installed depending on the consumed load of the consumer.
Now a few words about choosing the cable cross-section. Depending on the wiring diagram in the bathhouse/sauna, you need to select the cable cross-section, for which you need to calculate the approximate load that the wiring in your sauna will carry. If you only have lighting fixtures in the sauna, then the total power will be no more than 1-2 kW.
If you need to operate any additional electrical appliances in the sauna, then you should calculate their approximate total power. If you do not have a particularly powerful consumer, such as an electric furnace, for example, then the total power of your sauna will not exceed 5-6 kW. Please note that electrical appliances usually have their power consumption written on them. Depending on the total power received, we select the cable cross-section. It is advisable to take a 20% power reserve. That is, if our total power is, for example, 5 kW, then we must calculate the wiring according to the value 5 * 1.2 = 6 kW. For this power, we need an input cable with a cross-section of 4 mm2 (). There are special tables for selecting the cross section based on the power of consumers. It is advisable to conduct the cables leaving for lighting with a wire with a cross-section of 1.5 mm2 (), to the socket group with a cross-section of 2.5 mm2 (). It is advisable to conduct all wiring with copper. Based on the total power, we calculate the current that needs to be known to select the input machine. The current is calculated using a formula known from school and is found by dividing our load by the network voltage. In our case, the current is 6000 / 220 = 27 A. The machine should be selected an order of magnitude greater than the obtained current value. You should choose a 32 A machine. Outgoing machines in groups should be selected according to the same principle.
It is advisable to sign in the panel which machine is responsible for which group of energy consumer, and it is also desirable that the panel contains a wiring diagram for the bathhouse/sauna.
In a sauna, RCDs (residual current devices) must be used. They will help save the lives of you and your loved ones, as well as the sauna itself from fire. To protect against fire, it is necessary to install an RCD with a cut-off current of 100 mA at the input in our panel, and an RCD with a cut-off current of 10 mA at the socket group.
We advise you to pay special attention to good fixation of the cores in the terminal block clamps. A bad clamp causes the area to heat up and can cause the contact to burn and the terminal to burn out.
Under no circumstances do any work when the wiring in the bathhouse/sauna is live, as this is very dangerous and can result in electric shock. Even qualified electricians rarely work under voltage! It is prohibited to store in the shield foreign objects, except for the circuit diagram!
Cable routing from the panel in the bathhouse/sauna
It is recommended that the cables extending from the panel be routed in one piece. Wire cross-sections are calculated depending on the expected load. It is recommended to use cables with copper conductors. If the walls of the sauna are wooden, then the electrical wiring in the bathhouse/sauna should be carried out in boxes or corrugated. If the walls are brick, then it is advisable to hide the cables under a layer of plaster. No twists, switches or sockets should be located in rooms with high humidity and high temperature. Thus, switches and sockets must be located in rest rooms or dressing rooms. Accordingly, mounting boxes are also prohibited in these rooms due to a certain likelihood of moisture accumulation with an unnamed short circuit.
The latest edition of the PUE generally prohibits any twisting in places indicated by the wiring diagram in the bathhouse/sauna. The PUE obliges the conductors of wires to be connected by welding or soldering, but twisting also has the right to life, subject to strict measures of protection from high temperatures and humidity.
It is recommended to use protective grounding in saunas. So, even at the construction stage, it would be useful to use a steel mesh for leveling the potential on top of the waterproofing under concrete base. The mesh, naturally, must be connected to the protective circuit.
Wires from junction boxes should only go at right angles, this is especially true for hidden wiring. This is necessary to easily locate the cable in the wall. Do not run cables above the stove. The wiring in the bath/sauna should not have metal sheaths or pipes.
Connecting lamps in a bath/sauna
Sauna lights should be selected based on the high temperature and high level humidity. They must be very reliably protected from water in the sauna. Lamps must be selected that are waterproof with a protection class of at least IP-44. The lampshades should be made of glass, and the body should preferably be metal. Plastic housing is not recommended due to possible deformation at high temperatures. The iron housings must be connected to the protective conductor of the cable. It is recommended to use lamps with a power limited to 75 W.
The wiring diagram in the bathhouse/sauna will tell you where to place the lighting fixtures. Placing luminaires on the ceiling is fraught with danger. The highest temperature builds up under the ceiling, negatively affecting both the lamp itself and those nearby. wooden structures. Widespread The lamps were placed on the walls, where the temperature is significantly lower. In the steam room and washing room, it is advisable to use low-voltage voltage (12V), for which step-down transformers are used, located outside these rooms. Lamps with lamps daylight It is prohibited to install in saunas.
In the rest room or dressing room, you can place lamps with fewer requirements.
The regulations prohibit the installation of light switches located directly in steam rooms and washing rooms.
Connecting sockets in the bath/sauna
Considering the aggressive conditions of saunas and baths, significant restrictions are imposed on sockets. Thus, sockets are prohibited from being located in steam rooms and washing rooms. They can only be used in the rest room and dressing room at a height of 90 cm. The protection class of the socket is selected to be at least IP-44. It is advisable to use sockets with covers. Sockets are installed on the walls depending on the wiring diagram in the bathhouse/sauna.
Connecting an electric furnace in a bath/sauna
Electric ovens- This is a modern version of wood-burning heaters. Electric ovens also heat up quickly, however, their undeniable advantage is their compactness, manufacturability and ease of use. Modern stoves make it possible to exhibit optimal temperature and are not clogged with coals and ash.
To connect an electric furnace, you need wires that can withstand, firstly, high temperatures (up to 170 °C) and, secondly, high power consumption (4 kW on average), which should be reflected in the wiring diagram in the bathhouse/sauna. Your choice for connecting an electric furnace may be wiring in a corrugated pipe or cable duct, inside of which there are single wires of the brands PMTK, PRKA, RKGM or PRKS. Copper cable for an electric furnace with a cross section of 3*2.5 mm, it can withstand about 5 kW of load. In order not to pull an expensive cable to the shield, it is acceptable to stretch the wires of PMTK, PRKA, RKGM or PRKS to installation box located outside the area of high humidity and temperature, and go from the box using a regular cable, for example to an electrical panel.
The PUE recommends concealed installation of electrical wiring in bathhouses, showers and steam rooms.
PUE (Electrical Installation Rules) - this can be said to be the “Bible” of an electrician. It is there that all the requirements and standards are described, applying which we will have high-quality and efficient electrical wiring in the bathhouse/sauna.
In bathrooms and showers, only electrical equipment that is specifically designed for use in the relevant areas of these premises should be used. The PUE does not allow the installation of plug sockets in bathrooms, steam rooms and soap rooms of saunas and baths. Any plug sockets and switches must be located at a distance of more than 60 cm from the shower door. In steam rooms, PUE insists on using wiring that can withstand high temperatures (up to 180°C). The PUE strongly recommends that all equipment not built into the electric heater be placed outside the saunas. The PUE insists on the presence of a temperature limiter in the steam room, which, when reaching 140°C, will disconnect the electric furnace from the voltage. Do-it-yourself wiring in a bathhouse is quite feasible when using high-quality installation, high-quality electrical equipment, which is the key to your safety!
Today everyone can afford to have their own steam room personal plot or dacha. But, in addition to the pleasant prospects provided by the bathhouse, a number of questions arise about how to organize the wiring in the bathhouse with your own hands. The main stumbling block in this issue is high humidity and the temperature in the room, classifying it as particularly dangerous according to clause 1.113 of the PUE.
With such unfavorable conditions electrical appliances and other items electrical network very quickly break down and fail, and dielectric materials become covered with a layer of conductive moisture. This creates a significant risk of electric shock in emergency situations. Therefore, in order to carry out electrical wiring and other electrical work in the bathhouse in accordance with current standards it is necessary to study the requirements of the PUE.
Requirements according to PUE 7
According to clause 2.1.4 of the PUE, installation of electrical wiring can be carried out open or in a hidden way. This separation of the wiring in the bathhouse is relevant for various types walls, when it is possible to develop grooves or in the absence of them.
Due to the fact that some premises are fire hazardous, and wet areas contain a large number of condensation, when laying wires in an open or hidden way, all lines must be protected from non-flammable material in accordance with clause 2.1.42 and from moisture in clause 2.1.43 of the PUE.
When wires are placed openly, for example, along wooden walls the non-combustible lining under them should protrude 10 mm in each direction. It is also necessary to maintain a 10 mm gap from the wire to flammable materials in accordance with clause 2.1.37 of the PUE. For hidden wiring the fireproof coating is located along the entire length in accordance with clause 2.1.38 of the PUE. But placing wiring in a metal pipe or corrugation is strictly prohibited in accordance with the requirements of 7.1.40 PUE.
In order to maintain safety, all metal constructions– housings of lamps, heating furnaces, household appliances etc. must be connected to the protective grounding in the bathhouse wiring, the conductors must be double insulated, the circuit elements must be inaccessible. To protect people from electric shock in electrical panel An RCD must be installed. These measures are specified by the requirements of clauses 1.7.50 and 1.7.51 of the PUE. It should be noted that when lighting devices and other devices are powered with low voltage in accordance with clause 1.7.53, the Electrical Installation Regulations can be carried out without equipment.
What mains voltage should I choose?
Due to the different needs for providing the required level of power, the wiring in the bathhouse can power both lighting fixtures, and then in small spaces, and powerful equipment. Because of this, the type and level of voltage used differs:
- Single-phase network e - used at an average level of load on the wiring in the bath from 1 to 14 kW. In this case, the entire bathhouse is powered from single-phase networks with a voltage of 220 V.
- Three-phase network– used for a wiring load in a bathhouse from 20 to 40 kW, when an electric stove, heated floor and other powerful electrical appliances (water heating boilers, pumps, etc.) are connected to the bathhouse.
- Single-phase reduced– allows you to power the sauna with a safe voltage of 12 V or 36 V, which can be used to illuminate the steam room in the sauna without threatening a person. Relevant for small baths with low ceilings, in which the only consumer for the leash is the lighting system.
After selecting the voltage level, a wiring diagram is drawn up taking into account the locations of all consumers.
Circuit design
To draw up a wiring diagram for a bathhouse, you need to decide on the number of connection points to it - lighting devices, sockets for specific equipment, switches, etc. It should be noted that switches, like distribution boxes It is strictly forbidden to install them in a steam room; they must be located in the locker room or dressing room. Washing is also not suitable for this due to the presence of moisture. The wiring in the steam room cannot be closer to the stove or chimney than 80 cm; these requirements must be taken into account at the design stage.
Picture 1: simple circuit wiring in the bathhouse
Look at the picture, here is one of the simple examples of electrifying a bathhouse. The wiring is connected to two independent terminals, each powering its own socket and a group of lighting lamps. This option will help you calmly leave the room if a short circuit occurs in one of the sections, since the sources natural light often absent.
If you plan to install specific equipment, for example, a water heating boiler or washing machine, you should provide a separate line for them in the wiring diagram with a larger cross-section than for a lamp. The washing machine and boiler must be installed in dry conditions. In this case, they should also be shown separately on the wiring diagram.
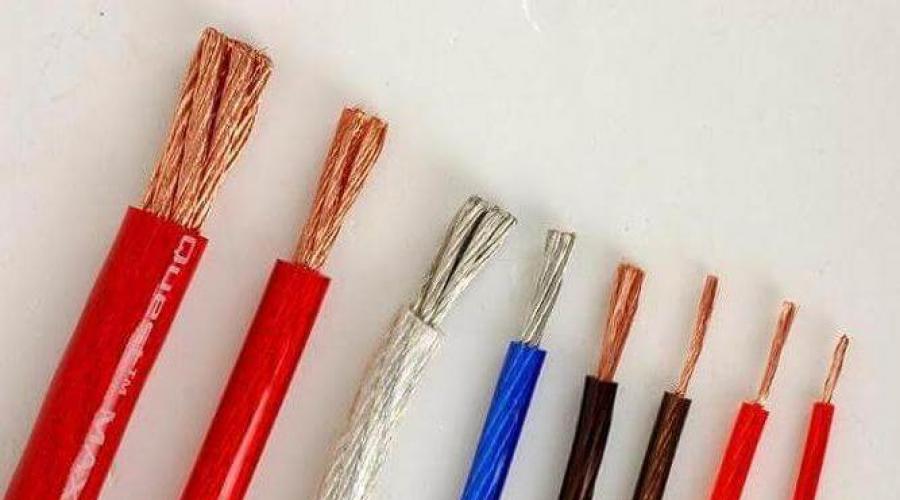
Selection of wires, switches, lamps
For the completed wiring diagram in the bathhouse, all its components are selected: wires, sockets, switches and lamps. The cable brand is selected in accordance with the conditions in each of the bathhouse rooms ( elevated temperature and humidity).
According to the material of the current-carrying core, the wiring in the bathhouse can be copper or aluminum, but due to the much better mechanical and electrical parameters, the choice should be made in favor copper wires. The main parameter for any cable brand is the wire cross-section. The cross-sectional area is selected based on the load connected to the corresponding section of the wiring.
How to choose wires and sockets based on load?
For example, you are going to connect two 100 W light bulbs, plug in a 1 kW electric kettle and a 4 kW electric heated floor. Thus, to calculate the cross-section, add up the power consumption of all consumers P = 0.1 + 0.1 + 1 + 4 = 5.2 kW. To the resulting power value it is necessary to add a 20 - 30% safety margin, for our example we get 6.24 kW. To select a specific cross-sectional size for wiring according to the consumer’s power or size electric current you need to use ours or table data:
Table 1: selection of wire cross-section

Look at the table; for a power of 6.24 kW, copper wiring with a core cross-section of 4 mm 2 or aluminum wiring of 6 mm 2 is suitable. If you have drawn up a power supply diagram with separation of wiring for different consumers, then it is advisable to perform the procedure for calculating the cross-section for each individual section, but the material of the conductor for the wiring must be the same.
The socket, like the wiring, has a certain size bandwidth by current. Therefore, the selection of connection points to the mains voltage should be made in accordance with the devices being connected. For example, for a refrigerator it is enough to install a 10 A socket, but for a boiler, depending on the power, you will need 16 or 24 A.
For the steam room
The requirements of GOST R 50571.12-96 establish the following division of the steam room into zones:
 Rice. 2: division of steam rooms into zones
 Look at the picture, all zones are built in accordance with the location of the stove, be it electric or solid fuel. In relation to laying wiring cables and installing other equipment, these areas have the following requirements:
- The first is intended exclusively for the stove, if it is an electric heater, then the wiring for connecting it;
- The second is considered the most loyal in terms of wiring requirements; no standards are provided for it;
- For the third zone, there are requirements for equipment that must normally withstand temperatures of 125°C or more, and wiring of 170°C or more;
- Only lamps, sensors and regulators can be installed in the fourth zone, but their wiring is selected as for the previous bath zone.
For internal wiring Heat-resistant cables should be used in the steam room, for example, PVKV, PRKS or PMTK.
Lamps in the steam room must have a metal body to which grounding is connected, a sealed glass shade with at least IP24. You should not choose models with a plastic body or parts to connect lamps, as they can melt and deform, causing moisture to penetrate inside.
 Rice. 3: steam room lamp
 For dressing room, locker room, rest room
These premises are characterized by much less stringent requirements for location and wiring characteristics. But they must also comply with all the requirements of the PUE for saunas.
It is also better to use lighting devices that are sealed with a degree of protection of at least IP24, but you can also use models with a polymer body or made of plexiglass, since the temperature in these rooms is much lower. They are quite suitable for wiring. Sockets must have protective locking device, preventing the free penetration of moisture from the environment.
Wiring entry into the bathhouse: overhead or underground?
According to the method of introducing the cable into the stone or wooden sauna a distinction is made between overhead or underground installation.
 Rice. 4: example of laying an overhead line
 The first option has a number of advantages - installation by air is carried out quite quickly and at lower cost, except in cases where you need to install supports before wooden building. For overhead installation, it is most important to use self-insulating wire (SIP), the number of cores in which is determined by the choice of three-phase or single-phase electrical wiring. The following distances must be observed:
- Between supports no more than 25 m;
- The height of the SIP cable entry into the building is at least 2.75 m;
- The sag distance of the boom to the ground is not less than 3.5 m.
Due to the fact that underground entry requires the development of a trench for laying the cable, this procedure takes much longer than aerial installation. But when laying the cable entry underground, the line itself is much less exposed to atmospheric factors and wind loads, and therefore lasts much longer.
 Rice. 5: example of laying cable underground
 When laying an underground input, the following requirements must be met:

In addition to the lengthy installation process, underground cable placement also requires additional measures protection from accidental damage during excavation work near its route.
Wiring method: open or hidden?
To the benefits open wiring in the bathhouse include simplicity and speed of installation, the absence of labor-intensive preparatory work, and accessibility for repairs. The disadvantages of the open method of laying wiring include its damage and interference with the interior of the bathhouse.
The advantages of hidden wiring include much higher reliability and security of the wires along their entire length. Among the disadvantages internal wiring allocate long-term preparatory work and wall gating, which is not always possible.
Installation and connection step by step
The entire process of installing wiring in a bathhouse can be divided into three main stages. Compliance with the given sequence will allow you to complete the work efficiently and without unnecessary loss of time. Get started with installation:
Distribution panel

Sockets and switches

Lighting devices

Before starting operation, be sure to check the functionality of all devices in dry conditions. Make sure that the automatic protection system is in working order, this will protect you from the consequences of mistakes even before you start using both the bathhouse itself and the wiring in it.