Bath screen made of plastic panels: do it yourself. We assemble a bath screen with our own hands. Self-installation options Make a bath screen from plastic panels
Read also
The screen is not a necessary part of the bathtub, but it can be used to block communications and other unsightly “views” under the bathtub. In our article we will look at how you can make this design yourself, because in some non-standard situations It is simply impossible to purchase a screen that is suitable in shape and size.
Why should you cover the bathtub with a screen?
WITH modern baths The kit usually comes with screens that are suitable for all parameters - installation of such a design will not take even an hour. But if we're talking about about steel or cast iron products, then there are no screens for them, so there are only three options left: buy it, leave the space open, or make a screen for the bath with your own hands.
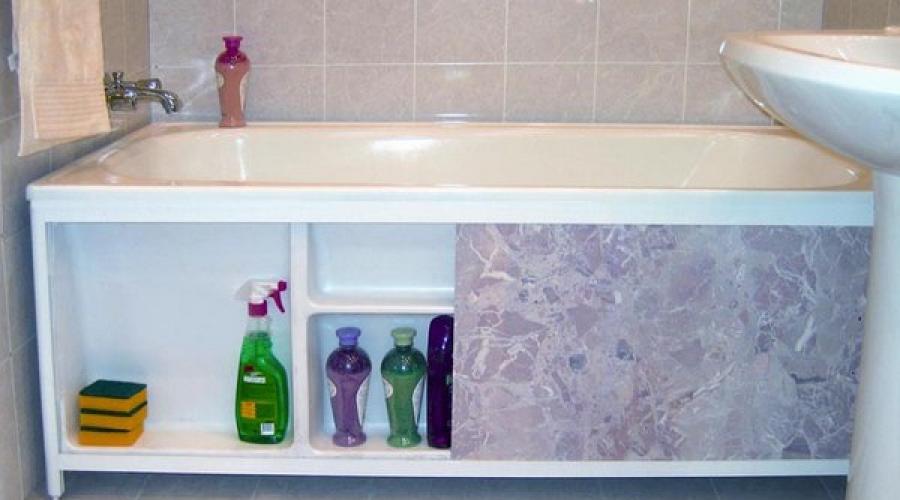
Whether or not to use such a screen for a bathtub is a decision that must be made by the apartment owner himself, but, most likely, everyone will want to have a beautiful and neat bathroom, because it is the cladding that allows you to give the room a complete and attractive appearance, covering unsightly communications. But aesthetics is not the only reason for installing such a product. So, you can make a screen, additionally equipping it with small containers for storing various containers, jars with household products, which means you can save a significant amount of space in the room.
In addition, when using a bathtub without a screen, water may get under it, dirt begins to accumulate - all this will soon lead to dangerous fungus. In addition, the floor in the room wears out faster, losing its attractiveness. It is the installation of the screen that will avoid such problems.
What are the design requirements?
Exist various options arrangement of such a design, however, when choosing material, shape, etc., the basic requirements for the screen should be taken into account. First of all, remember that this product is installed for the bathroom, which means it will be used in wet conditions, the manufacturing material must be moisture resistant and able to withstand sudden temperature fluctuations.
.jpg)
If this is not taken into account, then literally in a couple of months fungus will begin to appear on the material, it will begin to collapse under the influence external factors. It is also important to remember about tightness; water should not get into the space under the bathtub itself. But it is also impossible to completely close off air access - lack of ventilation will lead to the appearance of mold. That is why it is necessary to provide doors or windows in the design.
There are some other requirements:
- When arranging the screen, it is necessary to provide the possibility of quick access to basic communications.
- The product should not interfere with access to the bathroom, for which you can make a special recess for the feet, which is very important for small rooms.
The first thing you need to do is make a frame to install the screen. It can be made from brick, metal profiles, or a block of wood. Moreover, it is better to make brickwork to install a tile screen so that it can withstand the weight of the material; in the case of working with plastic panels or gypsum board sheets, other options can be used. But let's talk about everything in more detail.
- Brickwork
This option is rightfully considered the most reliable. Such a base will withstand any material. Erect brick wall you need to go from one wall to another, laying half a brick. In this case, you need to make a new row with a slight shift to the side. Between the top edge of the bathtub and the masonry we make a gap of 2-3 cm, and after it dries cement mortar, fill the gap with polyurethane foam. Also, when arranging the masonry, do not forget to make a comfortable recess for the feet.
- Wooden sheathing
Such a frame will also be quite strong, but the main disadvantage of wood is that it begins to rot when left in damp conditions for a long time. Therefore, it is better to use cedar, alder or larch to create a frame. To equip the structure, you will need beams with a cross section of 4*4 cm. When carrying out work, it is very important to correctly mark the places for installing the structure, skipping this stage, you will ensure that the frame begins to move to the side.

To obtain a smooth structure, make markings:
- 1. Draw vertical lines from the corners of the bathtub (which are adjacent to the walls) to the base, using a plumb line.
- 2. Step back 3 cm and make a second vertical line completely parallel to the first.
- 3. From the free corner of the bathroom, draw a vertical line and at the point of contact of the line with the base, draw a square with sides of 3 cm.
- 4. From internal corner square, draw horizontal lines to the walls of the bathtub.
This will be the perimeter along which we will install the wooden beams. We attach them to the base using self-tapping screws, and then mount them vertical racks and fasten it to the walls with self-tapping screws. We install a horizontal wooden beam on them and fasten it with a corner. From corner posts at a distance of about 0.5 m you need to install intermediate boards. To achieve maximum strength, coat all joints liquid nails.
- Metal carcass
When making such a frame, it is better to use the PN 27*28 profile, which is ideal for further installation of gypsum plasterboard, plastic and MDF panels. If you want to make a frame that can support tiles, it is better to use metal ones. profile pipes, however, in this case you will be faced with the need to carry out welding work. We carry out the markings in the same way as for wooden sheathing. We attach the lower guide to the floor using dowels, install the side racks on them, securing them to the walls.
To give the structure strength, make a plank at the middle of the height. We fix the top profile on the side supports, and to strengthen the top guide, fold the two profiles together and secure them together. All that remains is to mount the vertical racks at a distance of 30-40 cm from each other. After installing the frame, we coat the free space between the side of the bathtub and the structure with polyurethane foam.
What to do if the bathtub is of a non-standard shape?
The most important thing here is to repeat exactly all the bends of the structure. For the manufacture of the frame, you can use a galvanized metal profile, and for the cladding - extruded polystyrene foam of maximum density. Before starting work, it is worth measuring the length of the bathtub and cutting a profile of a similar size, trimming it every 3 cm.
In the future, follow the following instructions:
- 1. Attach the profile to the side of the bathtub and secure with tape. Gently bend it along the cuts you made and continue to secure it with tape at short distances. To hold the shape, also stick tape along its entire length.
- 2. Carefully unfasten the profile from the bathtub and fix it to the floor, carefully moving it inward to the thickness of the profile. If you use tiles to create a screen, then in addition to the thickness of the material itself, add about 5 mm for glue and putty.
- 3. Cut two sections of the profile (based on the height of the bathtub), attach to the walls with self-tapping screws. Cut the polystyrene foam into individual panels about 20 cm wide and insert each panel into the profile with the low end and the top under the side of the bathtub.

Immediately treat the inside with polyurethane foam. Install all panels, not forgetting to leave a small distance for the hatch. It can be installed after the foam has hardened. All that remains is to thoroughly putty the entire surface. After the mixture has dried, you can decorate the screen with tiles, plasterboard or other materials.
Making a screen with your own hands - step-by-step instructions
To create a high-quality screen, you need certain tools and materials that will allow you to do the job quickly and efficiently. The devices used in the work must be selected based on the material.
When working with plastic you will need:
- Bars for supports.
- Liquid Nails.
- Profiles with fastenings.
- The required number of plastic panels.
Among the tools you cannot do without a stapler, a puncher, a cutting knife, and a square. Before you start work, be sure to measure the marking line so that it completely follows the outline of the bathtub. After this, attach the profile to the covering, and the fastening should be done from the inner edge (where you will install the plastic panels).
The use of liquid nails will ensure that there is no damage both on the bathtub itself and on all surfaces. We also fasten the panels to the bars using liquid nails: we fasten a piece of material from below along the top of the profile, since we need to additionally leave free place for installing skirting boards. It is important to understand that to install last panel you need to have dexterity, try to combine the first and last detail so as not to carry out additional pruning.
How to install a tile screen? Ceramic tiles are a popular material for making screens, since this material is not only visually attractive, but also reliable and durable. We are also pleased with the huge variety of color and texture options. To install such a structure, prepare metal corners, drywall, tiles, metal profiles. Everything here is quite simple: after assembling the metal frame, it needs to be sewn up with gypsum board sheets, and tile adhesive is applied on top and mounted tile.

To install a screen made of gypsum board sheets, you will need similar tools as when working with tiles. After installing the frame and gypsum board sheets, simply apply on top decorative plaster, cover with moisture-repellent wallpaper, for example, vinyl to decorate the front side of the screen.
Features of arranging a screen for corner baths
At the corner bath non-standard shape, when creating a screen you will have to tinker a little, but the time spent will allow you to enjoy the result of your work for a long time.

It is best to make a curved product from plastic, since sheets of drywall are quite difficult to bend, much less install in this form on a rigid profile.
To mount the frame, install guides on the floor so that they follow the shape of the bathtub. Using liquid nails, we attach wooden blocks to the top panel to secure the top rail. A plastic panel of the required size is cut out and carefully inserted into the guide panel - the lower joints can be covered with a plinth.
It will look no less effective corner bath, made of brickwork and decorated with mosaics. After completing the work, all joints on the structure should be sealed with moisture-resistant sealant.
In family life. This is not just a room where hygiene procedures. For many people, it is a place of rest, relaxation and simply a secluded place where you can be alone. It is unlikely that you will be able to relax in a room where the rags of yourself hang on the pipes. for various purposes, and packs are placed in the corners detergents and bottles with household chemicals.
Therefore, most people strive to make their bathroom as comfortable, beautiful, and clean as possible. Some people are satisfied with simple painted walls and the ceiling, some people want to decorate everything with tiles and plastic, while others can afford it natural materials like marble and onyx.
But at the same time, everyone certainly wants to cover the space under the bathtub with some kind of screen (unless, of course, the bathtub itself is an exclusive product decorating the bathroom), since contemplating valves and plumbing siphons is an unattractive activity.
Why do you need a screen under the bathtub?
The screen covering the sides of the bathtub performs several functions:
- aesthetic, making the space more beautiful;
- functional – allows you to use the bathroom space more efficiently if all household products and tools like a plunger, brushes for cleaning the bathtub and even rags for cleaning the apartment;
- sanitary – does not allow water to flow under the bathtub and prevents dust from accumulating under it, which makes cleaning the room easier and makes it more hygienic.
Besides, independent construction screen allows you to design a bathroom not in a standard “like everyone else’s” way, but individually. For many craftsmen, this serves as a way of self-expression.
 According to the installation method, bath screens are divided into:
- solid;
- swing;
Each type has its own advantages and disadvantages, which are best known in advance.
Solid screen many will find it most attractive, as it allows the best way fit the bathtub into the interior of the room. It is the fixed screen that allows you to tile the bathtub in full accordance with, which gives it a uniform appearance.
The advantages of this method include the following:
- a successful solution for the bathroom interior;
- ease of care for such a screen - flat surface can be easily cleaned up with a damp cloth or sponge;
- The service life of such a screen is practically unlimited.
But there are also some disadvantages:
- difficult access to communications located under the bathroom (usually only a small window is left in the screen), which in the event of a breakdown may lead to the need to completely disassemble the screen;
- there is no way to wash the bathroom floor or check the space for mold;
- there is no place to store household chemicals, since it is impossible to get anything due to the static design;
- installing a screen is quite a labor-intensive task, especially if you have to cover not only one (long) side of the bathtub, but also the end ones;
- It is necessary to leave a small niche for feet under the bathtub, otherwise washing the bathtub will become quite inconvenient.
Hinged screen– used mainly where there is a lot of space to open doors, as well as in those bathrooms where furniture sets for bathrooms  rooms.
In this case, hinged doors make the screen part of this set, allowing you to decorate the room in a single key. But for this, most likely, you will have to make the screen to order, otherwise it will be difficult to achieve complete resemblance to the furniture.
Most often, such screens are made of MDF, similar in color to the shade of the furniture.
The advantages of such structures include:
- highly decorative;
- possibility to place with inside doors have quite voluminous shelves for various accessories and household chemicals(moreover, fully opening the doors makes their use as convenient as possible).
- can only be used in bathrooms significant size or with a small amount of equipment;
- the need to order a screen greatly increases its cost.
Sliding screens- Most Popular. When making it yourself, this type is most often used.
 Such a screen consists of two horizontal guides along which two doors move.
A ready-made screen of this type can be bought in a store or ordered if the dimensions of your bathtub are non-standard. Typically, the length of the screen varies from 150 to 180 cm. Its height also changes with the help of sliding legs, which allow you to fit it to a bathroom of any height.
The frames and doors of such screens (both factory-made and home-made) can be made of various materials. For frames most often used:
- - cheap, quite durable, not afraid of moisture and easy to care for, the most various colors and textures (the only drawback is that it can burst with a strong impact);
- aluminum is stronger than plastic, moisture resistant, can be painted in any color (but the paint can wear off over time from the surface of the profile;
- option with a roller mechanism, which allows you to make the frame invisible and facilitates the sliding of the doors (but their price is much higher and it is almost always necessary to order the mechanism individually).
The following materials are used to make doors:
- plastic – lightweight material, varied in appearance, is not afraid of moisture, but with an accidental strong impact it can collapse;
- MDF - very similar in appearance, available wide choose textures and colors, but moisture resistance is not too high;
- Chipboard is inexpensive, can be covered with film, but has low water resistance (the material is quite heavy and is more suitable for swing doors);
- plexiglass - a wide variety of textures, moisture resistant and durable, will look much smoother better than plastic, but is also fragile under mechanical stress.
Making your own screen
Most often for self-made choose the option with a fixed screen with a technological hole.
Such a screen can be made in several ways: 
- lay out of brick;
- make a wooden or steel frame and cover it with plasterboard or other board material.
Brick screen – a durable stationary structure that can only be removed by completely disassembling it. Therefore, before installing it, you need to make sure that all pipes, their connections, siphons and valves are in excellent condition And long years did not require repairs.
To build the screen wall, you can use well-fired brick (it does not absorb moisture well) or a partition block:
- First, you need to mark a masonry line on the floor in accordance with the size of the brick. More often the wall is made half a brick thick; it can be placed on an edge, but such a wall will be unstable.
- Laying is carried out in the usual manner - with bandaging of the seams. To make the masonry more stable, it is connected to the walls of the bathroom, attaching wires to them at the level of each row.
- When laying out the wall, leave a hole in it required size state of communications under the bathroom.
- Since the bathtub expands upward, bricks can be laid on edge in the upper rows.
- After the masonry has dried, it is tiled or tiled.
Never use masonry as a support for the edge of the bathtub. To prevent this from happening, a gap of about 1 cm high is left between the top row of bricks and the bathtub, which is then foamed.
this is the simplest and cheap look screen for self-production.
 To make it, you need to build a frame, which is then sheathed with sheets of plasterboard. The frame can be made of either wood or metal profile. Using wooden frame, it needs to be painted or treated by special means to reduce the likelihood of rot and mold.
For a wooden frame you will need:
- bars measuring 40*40 mm;
- screws;
- metal corners.
The operating procedure is as follows:
- Measurements are taken at the location of the screen and marking of the places where the bars are attached. It should be taken into account that the screen frame should be slightly recessed under the bathtub, taking into account the thickness of the finishing layer (). If you plan to finish the gypsum board with tiles, then you need to add an additional thickness of the tiles and the adhesive layer.
- The frame bars are prepared according to the measurements: 2 horizontal and vertical bars in required quantity. If the bathtub is short, then 2 vertical bars along the edges of the frame will be enough. If the bathtub is long, then it is better to add a couple more vertical bars at a distance of 50 - 60 cm from each other for structural rigidity.
- You need to drill holes in the outer side bars to attach the screen to the walls.
- Then the frame is connected with screws and corners.
- The frame is attached to the walls.
- If necessary, the lower beam of the frame can be secured to the floor.
 To make the screen you will need:
- moisture-resistant plasterboard;
- hinged hinges for hanging the inspection hatch door;
- metal latch.
Operating procedure:
- A sheet of drywall is marked so that it covers the entire frame.
- The intended panel is cut out using a construction knife.
- A hatch hole is cut out in the panel and the door is hung and secured with a latch.
- The screen panel is attached to the frame using screws.
- Check the stability of the screen and, if necessary, make additional fastenings.
The last stage is finishing the screen surface with the selected finishing material: film, tiles, mosaic.
When using a metal profile as a frame, the procedure is the same, only the drywall is fastened not with screws, but with self-tapping screws.
To make your own screens, you can use not only the materials listed above, but also many others: 
- Wood - you just need to choose wood that is not afraid of dampness. Such a screen can be made in the form wooden blinds- that is, with gaps that will facilitate ventilation of the wood and the space under the bathroom.
- Plastic lining - mounted vertically on the frame so that water does not linger in the seams. You can also make a screen with narrow apertures.
- Fabric – for such screens, quick-drying fabrics that are easy to care for are selected: polyester, nylon, membrane “breathable” fabrics. Such screens are obtained by upholstering or covering the frame with the selected material.
- As an inspection door, you can use a ready-made inspection hatch suitable color.
Sometimes they make screens whose walls are tilted outward using special fittings. On inner surface These screens feature narrow but long baskets for storing cleaning products, sponges and other bathroom accessories needed.
Often they come with a ready-made screen made of the same material. All components are supplied together with screen shields. 
It is more difficult to make a screen for a corner or curved bathtub. Here would be better suited bent metal profile covered with plastic.
If you don’t want to equip your bathroom with a boring purchased screen, then you can always make an inexpensive and beautiful homemade one. True, you will have to spend time and make efforts, but the product will be unique, and your bathroom will be exclusive.
Which will perform several functions at once. The easiest way is to buy a ready-made screen. However, if you strive for individuality, then it is worth considering options on how to make a screen under the bath with your own hands. In this case, you will be able to design the bathtub based on your needs, and not templates.
The screen under the bathtub is a special safety fence, behind which you can hide detergents and other important supplies. Behind it you can successfully disguise communications such as sewerage, water supply and heating pipes. That is, such a structure carries an aesthetic load.
Let's look at its positive aspects:
- Functionality. You can hide equipment, cosmetics, household chemicals and more from prying eyes.
- Practicality. Although plumbing and sewer pipes hidden, there is easy access to them, as there are inspection windows.
- Aesthetics. When decorating the interior of a bathroom, the screen under the bathtub will hide everything that spoils the appearance.
- Easy to install. If you buy a ready-made screen, it is very easy to assemble. It is also quite possible to make a screen yourself.
- Economical. Often, you can make a screen for a bathtub from leftover building materials. In this case, you won’t need to buy anything at all, except perhaps individual elements.
- Safety. If you have small children, it is important that household chemicals are hidden.

So, we can distinguish 3 main functions that the bathroom screen performs:
- Protective.
- Decorative.
- Utilitarian.

Fortunately, today you can use a variety of construction material for the manufacture of bath screens. For example it could be:
- plastic;
- drywall;
- brick;
- ceramic tiles and more.
In addition, screens may have different types, namely solid, with one door or with a special niche for feet and a sliding screen. Thanks to this choice, you can really make the lining of the bathtub beautiful and unusual.
Now let's look at a few original ideas How to make your own screen for a bathtub.

Due to the presence of a special coating, MDF panels are excellent material for finishing work in the bathroom. They have a fairly high resistance to moisture. The structure of the panels is dense, and the boards themselves are impregnated with high quality special composition which prevents the formation of mold and mildew. It is also worth noting that there is a wide variety of textures and colors of coatings.
As for making a screen for a bathtub, the assembly principle is based on kitchen furniture. So, the manufacturing process is as follows:
- It is necessary to mount a frame from wooden blocks. To do this, secure the timber to the wall and floor using dowels.
- The bars are connected to each other by corners.
- Be sure to take into account the availability of access to san technical units for their maintenance. Perhaps some part of the frame will be accessible for opening. To do this, you can install guides along which the doors will open.
- The finished frame is sheathed MDF boards. They must first be cut to size.
Design the frame itself so that when MDF installation the panels did not protrude beyond the bathtub. Otherwise, the finish will look ugly. Plus, splashes of water hitting the end of the panel will gradually destroy it. In this case, even no impregnation will help.

If you are a supporter of a permanent structure, then the bath screen can be made of brick. However, in this case further cladding will be required. First, install the bathtub in its “rightful” place. Then, under the bathtub along the perimeter, mark the location of the first row. In most cases, half-brick masonry is sufficient. Before starting masonry, you should immediately decide what material will cover the surface of the laid wall. If it is tile, then the laying should not be done flush with the edge of the bathtub, but should be slightly deeper - exactly the thickness of the tile and glue.
In the place where the siphon will be installed, it is necessary to build a small window. Later it can be covered with doors. You can buy them ready-made or make them yourself by attaching them to awnings. When laying bricks, you should not lay the bathtub at the very top. You should leave a gap of up to 2 cm between the last row of bricks and the bathtub itself. Then this seam is filled with polyurethane foam.

When the wall masonry is ready and the mortar has dried, you can begin finishing works. Alternatively, you can tile it with ceramic tiles. After laying it, the seams are rubbed with grout. The result is a durable and beautiful screen under the bath.

In terms of screen formation, drywall is the most suitable material. You can make a structure of any shape from it. Screen production begins with installation metal frame. Although for the frame you can use wooden block, but given the high humidity of this room, it is better to use a metal profile.
When installing the frame, please note that a layer of drywall will be fixed on top, as well as facing material, it could be tiles. Therefore, when installing the profile, be sure to take this thickness into account. Accordingly, the profile should be fixed with a slight recess from the edge of the bathtub.

This is quite easy to do. Mark a line from the edge of the bathtub rim on the floor. You can measure it with a level or plumb line. You can also mark this line along the wall to which the bath screen will adjoin. Having drawn a line along the entire bathtub, step back from it by the thickness of the drywall, glue and tiles. On average, this distance can be equal to 23.5 mm.
Afterwards the UD profile is fixed along the marked line. The profile is first coated with sealant. This will completely prevent moisture from penetrating under the bath. Now it's time to install the CD profile in increments of up to 600 mm. Where it is planned to manufacture a window, additional profiles are installed to secure the door. When the frame is completely ready, it should be covered with moisture-resistant plasterboard.
When choosing screws, be sure to consider their length. If they are too long, there is a risk that the screw will screw into the acrylic bathtub.
Once all the drywall is screwed in, it should be covered. The ideal option for this is ceramic tiles.
Scheme
In these diagrams you can see the sequence of making a screen for a plasterboard bathtub:


If your bathtub has a non-standard rectangular shape, then the screen can be made at an angle. You can also use drywall for this. The frame is made of metal profile. Cuts are made on it, and then it is given any shape. In this case, you should make 2 similar profiles. To strengthen the frame, vertical profiles must be installed. The frame is also installed with a small recess from the edge of the bathtub side. This will allow you to install the facing material (tiles) on the same level as the bathtub.

As for the drywall itself, when screwing it in, it is important to carefully give it a curved shape. There are two options on how to do this. The first is to make cuts at equal intervals on the drywall and carefully bend it. Also upper layer cardboard can be wetted and placed under small angle to Wall. Gradually, under its mass, it will acquire the desired shape.
The first option is more practical if the bending angle is too large.

This type of screen also has its own distinctive features. For example, ready-made sliding products are available for sale today. However, not in all cases they fit the size of the one already purchased and installed bath. Moreover, for acrylic bathtubs they are often included acrylic screens, which are suitable exclusively for a specific bathtub model. But in this case the screen turns out dull. Such products are not made as sliding ones. Therefore, we invite you to consider the option of manufacturing sliding screen based on the finished design.

To do this, you need to have a guide along which the door will move. You will also need to cut the panel into two parts. One of them can be stationary, and the second movable. However, both parts can be movable. In this case, the guide must have two lines for moving the doors. In this way, a frame is made onto which the guide should be secured under the side of the bathtub and on the floor. A guide is attached to it and the doors are installed. Handles must be attached to the door so that the door can be moved. In this case, you can make a sliding plastic screen.

To give the bath original look, then you can build a mirror screen. Its making is similar to the manufacturing process plastic screen. To move the sash, plastic or metal guides are used. They have small rollers, thanks to which the mirror screen will move smoothly.
The material is secured using special glass clamps. Pay attention to the quality of fastening. It must be reliable. Additionally, the mirror can be glued to liquid nails. In this case, it will not disappear.
Not recommended for use Double-sided tape. The bathroom has high humidity and often heat. This can have a negative impact on the tape, which will simply stop performing its main functions and the mirror will fall off.
This type of screen has its significant disadvantages. For example, there will always be droplets of water on the surface of the mirror, which form stains after drying. Therefore, after each bath, the mirror screen must be wiped.

Fabric materials can be used as a screen, for example, it can be artificial leather, waterproof nylon material, fabric with a membrane structure, polyester material, etc.
How to secure such a screen? It's quite simple. With help special glue Glue one side of the Velcro to the inside of the bathtub rim. If necessary, the edges of the curtain (screen) and the bottom need to be sheathed sewing machine. The other side of the Velcro is sewn to the top edge of the curtain. The curtain is then attached to the bathtub with Velcro. This cheap option screen under the bath, which is very important if you have a limited budget.

If you don’t want to make a screen yourself, but decide to buy one, then pay attention to some nuances of the right choice:
- If the bathroom is spacious, then almost any screen can be suitable.
- Provided that the bath room is small, for example, as in Khrushchev, the choice is limited. In this case, a sliding door or a removable and monolithic one would be better suited. As for the monolithic one, it is ideal for a narrow bathtub.
- Sliding screen models are much more convenient when they are immediately equipped with shelves. In this case, it is possible to hide all the necessary bath accessories, household chemicals, etc.
- If you have acrylic bathtub, then in most cases the screens are included. If not, then immediately pick it up in the store so that it is completely suitable.
- Pay attention to the quality of the handles. They must be made of a material that does not rust.
- If the selected screen has legs in its design, then they must be adjustable. Otherwise it will be difficult to install it under individual characteristics baths, especially when the floor is not completely level.
- It is best when the fittings are made of metal. Plastic ones can break quickly.
So, from this article we learned how to make a screen for a bathtub with your own efforts. We saw different options for arranging this important element. If you bought a ready-made screen, then we also looked at how to install it correctly. In addition to this article, you will be able to watch videos that clearly demonstrate some of the technologies. If you have your own experience or know of other possible arrangements for the space under the bathroom, then write about your experience and ideas at the end of this article.
Video
In the video provided, you can clearly see several options for making a screen for a bathtub:
Photo
In the photographs you can see many original ideas for making a screen for a bath:


Scheme
The diagrams show the details of installation and assembly of the screen:


The screen under the bathtub gives the bathroom a finished, well-groomed look; it’s not very pleasant to admire the pipes, legs of the bathtub, and there’s never a place in the apartment for storing small items, cleaning products and detergents. Of course, you can buy a bath screen ready-made, the inconvenience is that they are made according to standard sizes and not all bathtubs are suitable, you can invite a specialist, which will cost a lot of money. A DIY bath screen will cost much less, will fully meet all the functional and decorative requirements of the household and will undoubtedly become a source of pride for the owner.
The design of the screen is very simple, frame and panel. The frame is 2 guides and a frame. If desired, storage shelves are installed.
Types of screens
Bath screens can be solid, hinged or sliding.

Materials
Materials must meet following requirements– durability, withstand high humidity, not subject to deformation, and do not require special care.
For the frame, you can use wood that has been pre-treated with an antiseptic to prevent the appearance of mold, mildew and varnish to avoid rotting and splitting of the wood due to high humidity. Metal profiles are also used, which are treated with anti-corrosion agents; aluminum is most often used.
You can make a bathtub screen with your own hands using a variety of materials:
- moisture-resistant drywall, which after installation is finished with other types of materials (tiles, plastic, washable wallpaper, etc.);
- MDF, OSB;
- Chipboard, it can be covered self-adhesive film. Chipboard heavy material, more suitable for swing doors;
- polyvinyl chloride (PVC);
- plexiglass;
- brick, stone;
- specially treated wood;
- moisture-resistant mirror;
- plexiglass;
- polyester fabric, polyester, waterproof nylon fabric. The faux leather trim on the panels will look original;
- oilcloth and other materials.
How to make a screen from plasterboard, MDF, OSB
Working with drywall is easy and its cost is low. First, a frame is installed, optimally from a metal profile, it is also possible from wooden beam size 0.4 x 0.4 cm. The timber is pre-treated with an antiseptic; it is advisable to cover it with moisture-resistant varnish, so the frame will last longer for a long time. The frame should be slightly deeper towards the bathtub, because after installing the drywall, finishing material will be laid on it. When installing the frame, you must use building level and a plumb line. Moisture-resistant drywall is green in color.
Screen mounting:
- a sheet of drywall is marked;
- cut the blanks with a construction knife;
- outline and cut out the technical window. Screw the hinges and hang the door;
- the panels are connected at an angle of 90 degrees using self-tapping screws;
- attach the plates to the frame with self-tapping screws 10-15 cm apart;
- You need to leave a gap of about one centimeter from the floor and the edge of the bathtub, since if moisture gets on the drywall, it can expand a little and swell.
- The plasterboard is primed, and the selected finishing material is laid on top of the primer - ceramic tiles, sheathing made of plastic panels, etc.
Covering the frame with MDF or OSB boards is almost identical to installing a plasterboard screen, there is one caveat - before installation, the boards are treated with a special moisture-repellent compound and thoroughly primed on both sides.
How to make a screen from PVC panels
Making a bath screen with your own hands from PVC panels is not as difficult as it seems. When cutting panels, you should work sharp knife, very carefully, since the plastic material is very fragile.
The frame will require 2 metal or plastic guide profiles, square pipes diameter 0.1 x 0.1 cm, self-tapping screws. The frame is mounted using self-tapping screws and corners. The bottom rail is glued to the floor with liquid nails or sealant. The panels are inserted into the grooves of the side rails so that they cover a little more than half of the screen. Handles are screwed to the panels.
How to make a screen from plastic lining
Screen from plastic lining It looks very decorative and can be easily disassembled if necessary. In addition to the upper and lower guides, a profile is installed in the frame in the middle for greater reliability. The lower profile is glued to the floor. Panels are cut to the appropriate size. If the screen is blank, then you need to cut a viewing window and insert a plastic door. It is more difficult to make a sliding one than a “blind” one; the principle is the same as for PVC panels. The joints need to be processed silicone sealant, stick on the overhead plastic corners.
For corner bath
 Scheme of a curved screen for a bathtub.
 This is where a lot of patience and skill is required. A curved screen is better and easier to make from plastic; it bends easily and is moisture resistant. To install the frame, you need to attach guides to the floor, repeating the shape of the bathtub. Wooden blocks are attached to the top guide with “liquid nails” to secure the top guide. The panel is cut out and inserted into the guides. Disguise the lower joint using a plinth of the same color. A corner bathtub with a brick screen decorated with mosaic tiles looks impressive.
Options for original screen covering
- the bathtub can be decorated with a curtain made of quick-drying nylon or polyester fabrics; such curtains provide easy access to plumbing communications, allow you to ventilate the space under the bathtub, and, moreover, fix it easily and quickly;
- The screen made of specially treated wood looks cozy. The screen can be made under the blinds, with openings that will help dry the wood and ventilate it;
- Covering it with moisture-resistant mirrors will visually expand the space and make the room feel airier;
- can be sheathed with ordinary oilcloth, which is used in the kitchen. The option is not durable, but not expensive, easily replaceable and original;
- you will be pleasantly surprised by the cladding made of artificial leather. It looks very decorative, and if the trim is decorated with artificial leather applications of other colors, the bathtub will take on an exclusive look.
A self-assembled screen will cost less than a ready-made one. The best option– plastic sliding. Plastic is not afraid of moisture, it is easy to care for, sliding panels provide access to technical components, the free space under the bathroom can be equipped with shelves and store the necessary small items there. Plastic is easy to install and dismantle.
In order to qualitatively equip your bathroom, you should not forget about the aesthetic side of the finish. If you think that after renovation it is enough to install furniture and plumbing and that’s all, then you are deeply mistaken. In some cases, communications running under the bathroom remain visible, which, of course, do not add aesthetics to the room. Therefore, the free space under the bathtub should be covered with something, and a decorative screen is ideal for these purposes. Often after repairs there is practically no money left, but to buy ready-made panels is not possible or there are other reasons, so you can make a bath screen with your own hands.
Aesthetics above all
In Soviet times, the free space under the bathroom, as a rule, was not closed, and no one worried about the aesthetic side of the issue. But time passes, technology develops and makes it possible to make a screen for a bathtub of almost any shape and style. Now Special attention pays attention to small interior details, because they can radically affect the overall picture of the renovation.
Screens for the bathtub can be purchased together with the bathtub or separately from it, but it is not always possible to choose right size and the shape of the structure. Therefore you can create homemade screen for a bath, which will not differ from the factory one either in quality or appearance.
And in this article we will tell you how to make a screen for a bathtub with your own hands, what you will need for this, what material to choose and other useful things.
Selecting material for the screen

At the very beginning, before making a bathroom screen with your own hands, you need to decide what material will be used.
The most popular today are:
- plastic;
- acrylic;
- brickwork;
- tile.
Product requirements

Just like a factory product, a homemade bath screen must meet certain requirements:
- After installing the screen, there should be free access to communications. That is, the design must contain a door, window or canvas made in the form of sliding sections;
- Material or its protective covering must correspond to the special microclimate of the bathroom. In the bathroom there is almost always high humidity, and sudden temperature changes occur. Therefore the usual Decoration Materials cannot be used for the bathroom, because under the influence of these factors they will quickly collapse;
- After installing the screen, the bathtub should not rest on its plane.
Advice: Free space under the bathtub is often used as a niche for storing small items, household chemicals, detergents, etc. You can also install additional shelves on the inside and outside. This solution is especially relevant for small-sized baths.
Creating a brick screen

Brick is enough universal material. In general, making a screen for a bathtub from brick is a classic option.
Creating a brick screen under the bathroom with your own hands is quite simple, you just need to know and take into account the peculiarities of the work process:
- The laying is carried out in a quarter of a brick;
- The screen is placed from one wall to another along the border of the bath;
- To create the correct and robust construction of the screen, each row of brick is shifted by half of the previous one (“stitched”), that is, a “chessboard order” is obtained;
- The space between the floor and the bathtub is not completely filled; space must be left for a door or viewing window;
- The last row of bricks is not placed close to the bathtub. A gap of 1-2 cm is left between the brick and the bathtub; it can be blown out with foam or a decorative overlay can be installed.
When making a screen for a brick bathtub, you need to remember that this is not a completely finished structure. After the masonry mortar has completely dried, it is mounted on top of the brick. decorative finishing, it can be tiles, laminate or mosaic.
Important! It is highly undesirable to use wallpaper, because high humidity and the temperature of the lines of service will be very short.
Making a screen from MDF

Screens made from MDF panels are quite popular, because with careful use and high-quality processing surfaces they can last long time, which sometimes amounts to 10 or more years.
Before making a screen for a bathtub from MDF, a special frame is installed from a metal profile or wooden beams.
Important! If wood is used for the frame, it should be pre-treated with a special antiseptic.
When the frame is completely ready, you can begin MDF sheathing panels. To properly protect the material from moisture penetration, it is treated on all sides with a primer, and the points of contact with the floor are treated with silicone sealant.
The screen must contain technical and ventilation holes approximately 2x5 cm in size. To make such holes look harmonious, you can install decorative grilles or panels for ventilation ducts in them.
Manufacturing of plastic screens

Making bath screens from plastic panels is much simpler than structures made from MDF. Because there is no process pre-treatment surfaces and decorative cladding, installation time is reduced several times.
Note: The undoubted advantages of plastic screens include easy installation and dismantling of the canvas.
Before installing the structure, you need to build a frame; for this, you should use a profile for the screen under the bathtub. Its installation is mandatory because it will fix the panel under the bathtub in in the right position. Thanks to this design it is possible to create sliding structure. This solution will allow you to rationally use the space under the bathroom.
The frame is made of several parts. Mounted first starting profile, which serves as a support for subsequent structures. The reliability of the installation will determine whether the structure will warp or not. Subsequent elements are mounted on special slides, along which the canvases will move.
Just like in MDF screens, plastic structures must have ventilation and technological openings.
We must remember! When making a screen for a bathtub yourself, you need to take care of sealing the area adjacent to the floor. This procedure can be performed with sealant. Such actions will prevent water from entering the space under the bathtub.
Decorative tile panel

The process of creating a screen from tiles is very similar to the previous ones, only here the pre-prepared frame is sheathed with moisture-resistant plasterboard, after which ceramic tiles are laid.
Unlike previous designs, the tiled screen for the bathroom is made monolithic with your own hands. Therefore, before starting the installation, you need to think through the entire design of the screen, where the communication will take place, ventilation and technical openings will be located. Since access to the pipes will be limited, at the very beginning you will have to take care of creating a window or door for servicing the communications.
Before making a bathroom screen from ceramic tiles you need to decide on the material for the base. The best would be brickwork or plasterboard construction. The frame for plasterboard can be made of wooden blocks or a metal profile.
Ceramic tiles are laid using waterproof tile adhesive for kitchens and bathrooms, and the seams are sealed with a special grout.
Important! The grout must contain substances that prevent the formation of fungus and mold.
A few words in conclusion
So that the screen for the bathroom with your own hands is of high quality and creates cozy atmosphere indoors, use our tips on how to make a screen for the bathroom, and you can also study video tutorials and photo reports from masters.