Do-it-yourself two-level ceilings with plasterboard lighting is difficult, but we will do it. How to make a two-level ceiling with lighting from plasterboard - installation instructions Do-it-yourself two-level ceiling with lighting

Read also
What is the first thing that catches your eye when entering a room?
Without a doubt, this is the CEILING.
A straight white ceiling has long been out of date and, frankly speaking, brings boredom. A multi-level plasterboard ceiling is an excellent solution.
We have prepared for you everything you need to decide on the design of such a structure. And also choose the location of the built-in lighting.
175 photos of suspended plasterboard ceilings for the bedroom, living room and kitchen. Detailed help in choosing a ceiling for a small room. Laconic and convenient infographics on choosing a design style.
Plasterboard ceilings come in all sorts of shapes, colors, designs and easily fit into any style of room, be it classic or modern. Supporters of a simple interior can limit themselves to a one-level composition, but for those who want to create something unique and creative, the market offers several design options for plasterboard ceilings.
Two-level plasterboard ceilings
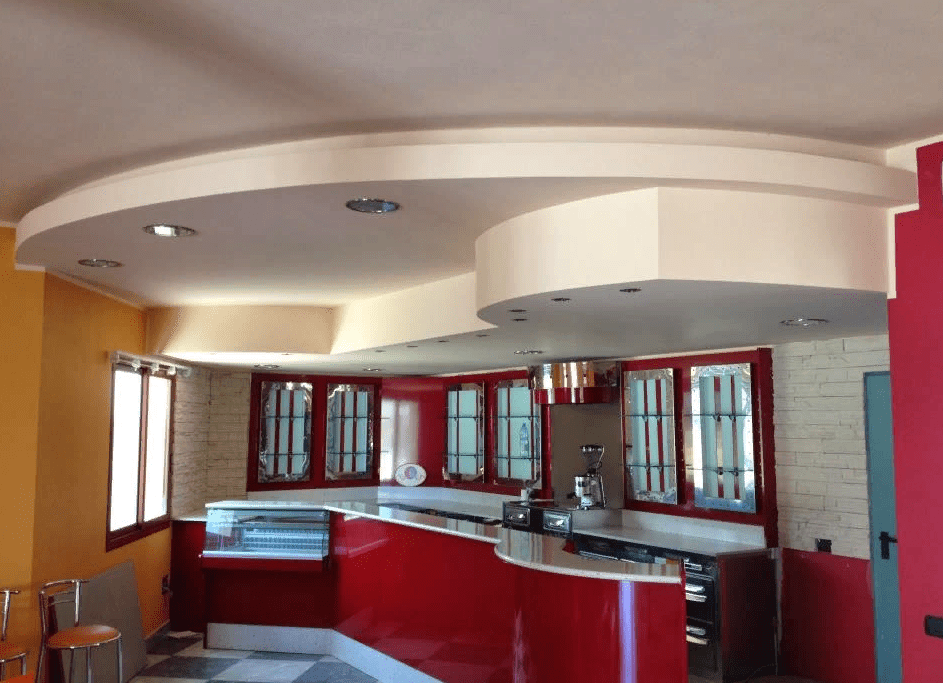
Two-level ceilings give the room additional volume and allow you to change the shape of the room literally beyond recognition, making the interior rich and sophisticated. The complexity and whimsicality of the ceiling design depends only on your imagination! Such ceilings are the first thing that catches the eye and attracts the attention of guests!
Sudden changes in height or smooth flexible lines, built-in lamps or unusual colors in the decoration - all these decorative features can be brought to life with the help of drywall. The geometry of the ceiling allows you to create any shape: angles, curves, bent and broken lines. Depending on the interior of the room, the ceilings can also be decorated with paintings or stucco.
With the help of height differences and proper lighting, they can be used as an additional technique for zoning the space of a room. Or you can highlight only certain interior items that you want to pay special attention to: a bed, a table.
Two-level ceilings will look great in. Drywall makes it possible to build any shapes on the ceiling: a flower, a sun, an alien ship, a soccer ball...


Lighting design for plasterboard ceilings
The main function of designer lighting is not even lighting, but rather creating a special mood and pleasant atmosphere in the room. There are a huge number of design options, but the most popular are LEDs and LED strips. They provide soft, uniform lighting, visually increasing the depth of the ceiling and creating the so-called “floating” effect. By combining models of different glow colors and shapes, you can come up with your own unique design.


Types of designer lighting:
Standard. This kind of lighting is easy to implement: simple ceiling bars for lamps and standard pendant lamps are enough for it.
Target. Suitable for zoning space, visually separating different parts of the room from one another. For example, in an active place, the light can be made brighter, and in a relaxation area, muted tones and soft light can be used.
Decorative. Bright contrasting colors or gentle light with tints: well-thought-out lighting, in harmony with the room’s furniture and decorative elements, will help create the desired atmosphere and festive mood in the interior.
Plasterboard ceilings for the kitchen: design choices
In the design of the ceiling in the kitchen, regular geometric shapes are most often used. A circular layout is good for highlighting the center of the room, and rectangular ceilings perfectly adjust the shape of the room. For example, a square shape is recommended, which visually expands the walls. For the kitchen, you can also select wavy shapes of unusual and bizarre configurations, starting with ordinary ovals and ending with unimaginable zigzags.
Attention! In a kitchen with low ceilings, you cannot place complex structures: choose one or two simple shapes! When designing the shape of the ceiling, always balance the dimensions of the decorative elements with the height of the room so that everything looks harmonious.
Designer ceilings made of plasterboard not only radically transform, but are also good from a practical point of view. Drywall has great moisture resistance, excellent sound insulation and fireproof protection, which will ensure the beauty and successful operation of your kitchen for many years.
Ceiling design in a small kitchen
It is recommended to place plasterboard ceilings only in kitchens with high ceilings or above average levels, as they take away the height of the room and do not reflect light well. For a small kitchen with low ceilings, you can make the structure two-level or simply place a small cornice around the perimeter: this will help visually “raise” the ceiling higher and make the space more airy and free. You can experiment with color and come up with a different color scheme for each level.
An interesting design technique is the so-called “floating” ceiling. The floating ceiling effect is achieved by installing the second level in the center without visible side walls. LEDs are placed inside this structure so that they are invisible, and only their light is visible.
Remember that the lamps built into the suspended ceiling must be evenly spaced across the entire kitchen area so that all functional areas are illuminated.


Ceiling in the kitchen-living room: proper zoning
What points need to be taken into account when choosing for such an unusual room as a combined kitchen-living room?
As we have already mentioned, it is important to provide a functional division into zones: a work area (kitchen) and a rest area (dining room-living room). Boundaries between rooms can be created using unusual ceiling architecture, building various geometric shapes or dividing lines. Decorative lighting and the use of different materials when decorating the ceiling in the kitchen and living room will help enhance the effect.
Divide not only the ceiling, but also the walls and floor into zones. Play with the design, duplicate different elements, emphasizing the overall style! This design will make your kitchen unusual, fashionable and will look much more interesting than the standard painting of the ceiling white.


How to decorate the ceiling in the bedroom?
The most popular among designer ceiling structures are wavy lines and irregular shapes: there are no restrictions here! Any of your decorative ideas, be it asymmetrical decoration, multi-tiered friezes, medallions, arches, columns and domes - all this will be relevant and will fit perfectly into the bedroom interior!
Multi-level ceilings are usually placed directly above the bed. Avoid bright and eye-catching colors: the design should be relaxing! Ceilings in warm, light and muted tones will best cope with this task.
Design for a small bedroom
Choosing the right color scheme will help enrich the interior of a small room and make it more spacious. Traditionally painted white. But you can come up with something more interesting: for example, a soft blue suspended ceiling will resemble the open sky. Another unusual option for a bedroom is to paint the middle of the ceiling with a deep warm color (for example, burgundy), and use lines from the center to make a systematic transition to the color scheme of the walls.
The use of glossy surfaces helps to expand small rooms... but this is not the case! In the bedroom, bright shine will only distract, so it is better to give preference to matte ceilings.
Avoid complex shapes and multi-level structures: a pile of different elements will visually narrow the space. Such finishing is permissible only if it is necessary to delimit the functional areas of the room or create an emphasis on any design element.


Adjusting a narrow bedroom
Unfortunately, square or narrow bedrooms in an apartment are far from uncommon! The main feature of such a bedroom is high ceilings, but this height can be easily adjusted using color. To visually increase the height, pale tones are suitable, and dark colors will help to “lower” the top. If you paint the walls two shades darker than the ceiling, this will also make it lower. Remember that the colors of the ceiling and floor should always be different!
Don’t be afraid to experiment and feel free to use such original colors as light tones of pink, purple, orange, and coffee for the ceiling of a narrow bedroom.
Be sure to build in a lot of spotlights into the ceiling structure. A large amount of light in the room will create the illusion of a spacious, open space.


Original design for a bedroom 12-14 sq m


Creative in a children's bedroom
A plasterboard ceiling is a great opportunity to realize all your original creative ideas in a children's room.
In addition to the incredible design of the ceiling, which can also be easily built independently, it also has other visible advantages:
- Single- and multi-level ceilings can combine chandeliers, lamps, and built-in lighting, which will provide sufficient light in the room and help divide it into zones. In addition to central lighting, the nursery must have additional lamps with different light intensities throughout the room. The study area should be best lit, the sleeping area should be darker, and in the center of the room, where there is a lot of light at any time of the day, there should be room for games.
- Using plasterboard, you can create interesting ceilings and lamps in the form of various shapes such as a butterfly, a flower, an airplane, birds, which you can come up with depending on the interests of the child.
A custom ceiling design can also be created using hand painting. This method is still little known and not widespread, but it allows you to realize any desire of your child and make the room truly special and dear to him.
- The choice of arsenal for renovation in a children's bedroom should always be approached with particular responsibility. Drywall is a natural and environmentally friendly material, so you don’t have to worry about the child’s health.


To decorate the ceiling in the living room, designers advise using designs of geometrically regular shapes: these will be all kinds of circles or shapes that emphasize the frame of the base ceiling of the room.
Plasterboard ceilings will help you solve the problem of several zones. Spotlights and various decorative inserts will create a special atmosphere and become the final touch when creating a unique room design.
The design of your ceiling should organically fit into the style of the room itself. For example, a glossy ceiling will look at least strange; this option is more suitable for high-tech or modern.

Decoration of the hall in Khrushchev
A hall in a Khrushchev building is, as a rule, a small room with ceilings up to 2.5 meters high and practically zero sound insulation. Therefore, when planning the room and ceilings, it is necessary to choose design solutions that will help correct these features for the better.
Say no to a large chandelier that will only clutter the living room and make it visually lower. The best option is a small suspended ceiling with built-in spot lighting: diffused lighting will visually increase the space. Sound insulation can be installed in the suspended structure, which will provide the necessary sound protection.
Another interesting design solution is to combine plasterboard and glossy ceilings, which will reflect light and visually “raise” the surface of the ceiling.
Choose colors in warm light tones. And if you make the ceiling and walls the same color, then the boundaries of the room will seem to blur, and this will also create the illusion of a large space.


Spacious living room 20 sq. m.
The area of the room may seem large at first glance, but its visual and actual size largely depends on the ceilings. If they are low, then you should not build complex two- or multi-level structures that will visually make the living room smaller: one level will be quite enough. For a low ceiling, choose tones that will be lighter than the walls or stick on ones that will visually “raise” the ceiling.
To illuminate a large room, it is recommended to use plasterboard structures with built-in spotlights that have a zonal adjustable lighting function. Then you can, if necessary, adjust the amount of light in each part of the room. For example, turn on only two light bulbs above the closet or three lamps above the bed.


Making a plasterboard ceiling with your own hands
If you have even the slightest skill, installing drywall will not be a difficult task for you. You just need to know some of the features of plasterboard sheets and what to do with them, how to design everything and successfully hide all the finishing flaws under the ceiling. We will tell you about all this now.
First of all, you will need to take an inventory of your tools and, if necessary, buy missing fixtures and materials such as, for example, hangers, screws, profiles and dowel nails. Take profiles of at least 4 meters in size so as not to encounter the need to join them.
- The first level of the frame is always mounted in the same way. Before the drywall becomes a full-fledged structure, you will need to install a simple single-level ceiling. To do this, we make markings on the ceiling using a laser level and place a wall profile at a distance of ten centimeters from the main ceiling.
- The size of the indentation will depend on how the lamps and engineering systems are located in the inter-ceiling area. To install the frame evenly, use the laser level again.
- Fasten the longitudinal profiles, placing them at a distance of about 500-600 mm. The size of the profiles, as a rule, is fixed, so when installing a ceiling in a large room, they will need to be joined together using special devices.
- Make hangers above the ceiling profile. Secure them with an anchor or using dowel nails. Attach the guides to the hangers and secure them with self-tapping screws.
All these actions will require extreme concentration and accuracy in your measurements. Now that the main ceiling frame has been made, we are again faced with the question: how can we construct a plasterboard ceiling ourselves?
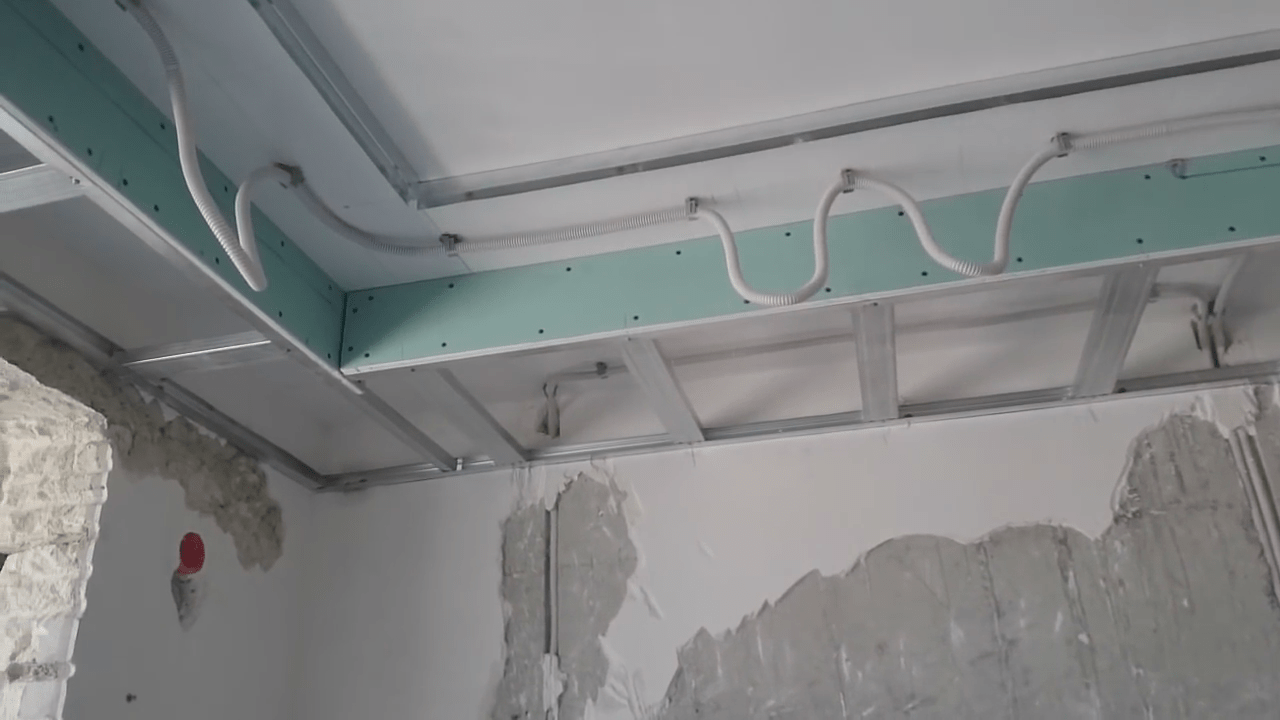
- First, do the electrical wiring, ventilation, and communications so that all the wires are hidden under the ceiling before the sheets are placed. You can make holes for installing lighting both before and after installation.
- If your room has not completely straight walls, then when placing sheets of plasterboard, sloppy joints may form. Therefore, before you make the ceiling and start laying out the sheets, you will need to first slightly trim the places of these joints with the wall or corner of the room so that your sheet lays beautifully and neatly. To begin, take and treat all the sheets with a special primer to ensure good waterproofing.
- Leave a distance of a few millimeters from the ceiling to the wall so that the plasterboard sheets can “breathe” freely and not deform later under the influence of high temperatures.
- Start fastening the sheets along the supporting profiles, strictly observing the staggered order: the first sheet must be fastened relative to the wall, and the next - from the longitudinal profile that comes first.
- The installation stage is over! Now you need to make holes for fixing lamps, laying pipes and other communications.
- Plastering the ceiling should only begin after the initial ground finishing has been completed. Use one that will penetrate deeply into the joints: this will help make the drywall stronger and at the same time treat the sheets themselves, preventing the appearance of mold, microorganisms and other fungi on the ceiling.
- The installation of plasterboard sheets is complete, all that remains is to add various decorations and decorative elements to them.
Multi-tiered ceilings with spot and hidden lighting provide designers with such a huge number of possibilities that they will definitely not go out of fashion any time soon. Today we will tell you how to make a two-level plasterboard ceiling with lighting with your own hands.
Formation and fastening of the profile frame
In ordinary cases, a two-tier ceiling only imitates a cascade. The highest tier is usually not formed by a plasterboard structure; instead, the surface of the rough ceiling is used. This plane can be covered with a stretch ceiling.

This design implies that all prefabricated elements are attached directly to the ceiling independently of each other. Adjacent profiles of adjacent tiers can, however, be fastened together, but not for the purpose of strengthening - rather, for faster and more convenient assembly and alignment of the structure. Such a frame is assembled really quickly, but does not behave very well with a high mass of the suspended structure. Due to the lack of a common base, the frame is subject to shifts and deformations.
There is another concept. For ceilings with three or more tiers, as well as for structures lowered from the draft ceiling by more than 30 cm, the frame has a real cascade device. In other words, each tier is independent in the horizontal plane and serves as the basis for the underlying one, and the structure itself resembles an inverted pyramid. This approach is very beneficial both from the point of view of saving profiles and from the point of view of reliability and general solidity.

However, today we will talk about two simpler designs that demonstrate the visual construction of tiers one after another according to any of the systems described above. In general, the lower tiers of the ceiling can be represented by an external figure adjacent to one or more walls, or an internal figure located at some distance from the ceiling corners.
In the first version, the frame is like a ceiling edging and has two lines of a guide profile for fastening to the walls and ceiling. The profile is nailed to the wall along a horizontal line cutting the room with a common plane in the horizon. The second profile is attached to the ceiling along the line marking the contour of the future figure. In both cases, you need to give an allowance for the thickness of the sheet and finishing.

The main plane of the tier is assembled like any other: rack-mount CD-60, whose length does not protrude beyond the line of projection of the figure. The rack elements of the frame are assembled perpendicular to each of the walls to which the tier adjoins, in increments of 45-60 cm. When working with external figures, one assumption can be made: do not continue the profile after the first intersection. It looks like this: the profiles of one wall, abutting the transversely directed profiles of the adjacent one, are limited to a T-shaped joint, for which it is possible to cut the cross (crab) in two diagonally.

For internal figures, the sheathing of the plane should be done with a frame mesh with a cell of 60 cm. But how to install rack profiles if there are no guides for them? The fact is that assembling the outer corners is a topic for a separate discussion; there are several options for execution.
Methods for setting a tier
We settled on the fact that along the contour of the figure, a profile with a guide function is nailed to the ceiling with metal anchor wedges or dowels. If the edge of the tier is straight, the profile is nailed behind the central shelf. Sections of a rack-mount CD-60 are inserted into it, the length corresponding to the height of the tier. The lower edge of the segments is cut into a “tongue”, to which a third guide profile is attached using two self-tapping screws, edging the rack profiles of the horizontal part of the frame.

If the edge of the figure has a bend, a flexible segmented profile is attached to the ceiling in this area. And this is the only way to attach the radius edge to the ceiling. A independently cut “Christmas tree” cannot serve as a suspension; its shelves will sag under the weight of the structure. Accordingly, after sewing the sheets, the edge of the figure will sag unevenly by several millimeters. This is not so important for thin cornices and vignettes, but we are considering larger figures.
The handicraft “herringbone” profile still finds its application in radius ceilings: it is used to edge the ends of the rack profiles of the horizontal plane. This edging is connected to the ceiling profile using sections of a rack profile, and if the bends are too steep, the CD-60 is replaced with a narrower guide.

If the side edge of the figure forms a niche with lighting, the jumpers from the ceiling profile are made of rack-mount CD-60 and are attached in such a way as to support the horizontal edge, that is, exactly above it. In this case, the frame of the plane is slightly extended beyond the contour of the figure and is framed in a “herringbone” pattern, to which a thin strip of drywall is then attached, forming a side. Inside, along the vertical posts, another wider strip is sewn, which acts as a reflective partition.

After assembling the frame and approving its final configuration, it is necessary to strengthen the sheathing of the horizontal planes. This is done with straight hangers, and with very low ceilings - with knitting needles.
 To assemble a soundproof ceiling, you should use special damping fasteners for the profile
 There are specialized fasteners for any type of profile connection
Electrical network installation
Before completely closing access to the internal cavities of the ceiling, communications are laid in them. These can be lighting cables, as well as transit wiring, communication lines and speaker wires built into the ceiling. Regardless of the type, these cables must be corrugated. Not only for fire safety reasons, but to protect against cuts when pulling. Another rule concerns fastening: power cables, including local lighting, should not be attached to the frame profiles, only to the ceiling. Unlike television and other low-voltage conductors, these can be tied with nylon clamps.


This explains why it would be a mistake to first hem the horizontal planes of the tiers, and then scatter the hidden electrical network. This is done under the pretext that wiring through the holes for spotlights is much easier, but the wires are supposed to be attached to the frame, which, we repeat, is not allowed by the rules for the safe operation of electrical installations (PBEEP 15.2.2). In this light, the transition to a low-voltage lighting network, for example, with LED strips, seems even more profitable, especially when the illuminated tiers are far removed from the draft ceiling.

In any case, marking of connection points is done along the ceiling, sometimes with strips of electrical tape on the profile. At this point, the cable should be folded into a loop with a margin sufficient for convenient connection of the lamp in weight, standing on a stepladder under the ceiling. In these places, the wires must first be cleaned and equipped with terminal blocks, but it is advisable not to break the wire. Separate lighting lines are connected into a common trunk through small boxes mounted on the ceiling. Those, in turn, are connected by a 4- or 5-wire wire to the junction box of the general network, where decoupling to switches is performed.
 1. Control unit. 2. LED strip. 3. Remote control. 4. Power supply
If electronic ballasts or voltage transformers are included in the lighting network, they should be installed at a minimum distance from the powered light sources. Most of such equipment is produced in a protected case, so they can be mounted directly to the ceiling on a non-flammable substrate. Moreover, enclosing the device in a box can cause rapid wear and tear due to insufficient cooling.
Headlining
When covering a gypsum board ceiling, you should start with flat horizontal planes, which facilitates a more rational use of scraps for fragmentary lining of the side edges. First, all the sheets are hemmed to the frame sheathing, and then to the edge. The distance between the attachment points is about 25-30 cm in the center of the sheet and 10-15 cm at the edges.

Hemming the bottom edges first makes it easier to work with radius parts. The trimmed herringbone on the outer edges is attached to every second or third petal, due to which the middle shelf acquires sufficient rigidity for attaching the sheets to the side edge. Afterwards, you can use a crown to cut holes for the lamps and bring out the wires for the hidden lighting: it is more convenient to do this while the side edges of the ceiling are still open.
The ends of the tiers are sewn up quite simply. Small fragments are screwed to the ceiling and edge profiles, as well as to the posts connecting them with a standard fastening pitch. In places where fragments join, scraps of a rack profile that are not directly attached to the frame are placed under the seam.

To cover curved surfaces, drywall is prepared in several ways. These can be transverse notches with a knife, or rolling with a needle roller with the sheet soaked in water to obtain flexibility. The second option is preferable due to the high speed of execution and minimal effort for subsequent alignment. However, the wet sheet must first be fixed, only after giving it the desired shape, and only on the main bends. The remaining screws are screwed in after drying, when the sheet becomes dense enough again.
 A strip of drywall moistened with water bends easily, and the resulting curved surface is regularly shaped and smooth.

Ceiling finishing
Do not forget that the finishing of multi-tiered ceilings involves the widespread use of corner and flat tapes to strengthen the seams. In the first case, these should be metallized paper tapes or corner profiles with perforations. Flat seams are covered with a special perforated tape.
 It is imperative to chamfer all ends of the drywall sheet, especially when forming external corners, so that after rough finishing with starting putty, you get a strong and reliable edge that will not crack over time


When strengthening the seams, it is recommended to use starting plaster, and initially use it to stretch all surfaces of the ceiling with laying fiberglass. This will create a uniform substrate, which means that the places where joints and screws are sealed will not be visible through the thin smoothing layer of finish.
When choosing a ceiling design, everyone wants it to be beautiful, original and functional at the same time. These qualities are combined by a two-level plasterboard ceiling with lighting, which looks unusual, divides the space into zones, and hides defects in the base base, wiring and communications under the rough ceiling.
Photo of a two-level gypsum board ceiling
Types of ceiling
If the base ceilings are flat, and you only need to zone the space in the room or hide the wiring, then a single-tier plasterboard box is mounted in the center of the ceiling surface or along the perimeter of the ceiling.
 Two-level plasterboard ceiling before finishing
 If the base is uneven, two-level plasterboard structures are used. In this case, the first tier is installed on the entire surface of the ceiling, and the second level is attached to it. Or, first, a decorative box is mounted, and guide profiles are already fixed to it for arranging the main ceiling structure.
Depending on the way the lamps are arranged, a two-level plasterboard ceiling with lighting can be:
- with open lighting, when the devices are built into the structure in pre-made holes and attached to the ceiling base with suspensions;
- with hidden lighting, when lamps are placed in specially equipped niches located between the tiers of a decorative structure. In this case, the light emitted by the devices is reflected from the surface of the ceiling, creating a comfortable and cozy atmosphere in the room.
 Ceiling lighting options
 Despite the impressive effect produced by such structures, it will not be difficult to do it yourself with lighting. Even without the necessary skills to work with power tools, you can always use the recommendations that will help you install two-tier ceilings in your apartment and install lighting.
 Making a sketch (sketch)
 To successfully implement the project, you need to draw a sketch of the future ceiling on a sheet of paper. Then it will be easier not only to apply markings to the base, but also to calculate the number of consumables and components that will be needed in the work.
Prepare the following materials and tools:
- perforator;
- drill;
- tape measure and marker;
- knife for cutting gypsum board sheets;
- upholstery cord;
- profiles;
- pendants;
- drywall;
- lamps or other devices depending on the chosen type of lighting;
- dowels, screws.
To finish the structure you will need: serpyanka mesh, wide and narrow spatula, primer, putty (starting and finishing), paint or other finishing materials.
Marking

The ceiling is marked as follows:
- The lower corner in the room is determined, and a mark is placed at the required distance from it, corresponding to the lower level of the future decorative ceiling. The distance depends on the size of the lighting fixtures and the height of the structure;
- using a water level, the point is projected onto the other corners in the room so that the four marks are located at the same level. The points are connected to each other by an even horizontal line, which will become the base of the second level of the gypsum plasterboard ceiling;
- Next, they determine in which direction the sheets of material will be attached, and draw the ceiling surface across the sheets every 50 cm.
Frame installation
First level installation

The algorithm of actions will be as follows:
- First, the UD guide profiles are attached to the horizontal line outlining the perimeter using dummy dowels with a diameter of 6 mm and self-tapping screws (4-5 mm). If there are no mounting holes on the profile, you can make them yourself every 40-50 cm;
- along the lines drawn on the ceiling, the attachment points of the suspensions are marked every 50-60 cm;
- the hangers are attached to the base surface using the same dowels and screws as the guides;
- Next, CD ceiling profiles are fixed to the hangers and UD profile with self-tapping screws. Self-tapping screws are also used to join profiles. To prevent sagging of the ceiling profile, each CD strip is tightened with middle hangers, the “ears” of which are bent under the profiles;
- The evenness of the structure is checked using a stretched nylon thread. The thread is secured with self-tapping screws on UD profiles. The height of the first level frame is adjusted using suspensions.
After the installation of the frame structure for the first tier is ready, it is sheathed with plasterboard. The sheets are attached to the profiles using a screwdriver using metal screws 2.5 cm long every 30-40 cm. The consumption of screws for a standard sheet will be about 60 pcs. The head of each screw is “recessed” into the sheet by 2-3 mm.
 Decorative box of unusual shape
 First, draw the contours of the box to which the lighting will be attached on the first tier. Next, cuts are made on the side walls of the guide profile every 5-10 cm for ease of bending. The profile is screwed to the first tier lined with gypsum board along the outlined line through the drywall.
The UD profile, which was used to install the first level frame, is attached to the wall with self-tapping screws, and the CD profile is attached between the wall and the bend. If the length of the ceiling profile exceeds 50 cm, additionally strengthen the fastening with hangers, screwing them to the first-level frame profile with self-tapping screws.
The rack elements are cut from the CD profile to the required length and fixed to the frame with self-tapping screws.
 Installation of ready-made segments cut to fit patterns
 At the final stage of installing a suspended two-tier ceiling, the second level of the frame is sheathed with gypsum plasterboard sheets. It is better to mount the material in whole sheets and do the cutting on the ceiling. Or you can make patterns on which to cut the sheets and attach the finished segments to the frame.
To cover a vertical plane with plasterboard, cut out a strip of the required width and screw it to the structure with self-tapping screws. In this case, the smaller the distance between adjacent fasteners, the more reliable the fixation will be.
 Lighting in the kitchen - dining room
 Decorative lighting is an additional source of room lighting. A chandelier or lamps with bright light bulbs are installed as the main lighting device on two-level gypsum board ceilings.
As for lighting, neon tubes, LED strips and duralight are considered common sources. The last two options are LEDs installed in a certain sequence, the advantage of which is their low power consumption (12 or 24 W). They can be monochrome or multi-colored. Colored ribbons are controlled using a controller and remote control.
 White LED strip lighting in the hall
 LED strips are:
- ordinary. Installed in rooms with low humidity;
- waterproof, on which a varnish coating is applied on top during manufacture. Used for bathrooms;
- moisture-resistant LEDs are sealed in polymer pipes or housings. Such tapes are used for lighting aquariums, swimming pools, etc.
Neon tubes are filled with a mixture of gases (inert and luminous). The brightness of the devices is determined by the current strength, which is regulated by the convector. The convector power is more than 100 W, and they are mounted in increments of 5 meters. Transformers that are installed for neon tubes will also consume a large amount of energy.
 Lighting the box using colored neon tubes
 Instead of neon tubes, neon cords powered by AA batteries are used to illuminate a suspended two-level plasterboard ceiling. In this case, the controller does not need to be purchased separately, since it is already included in the kit. The only negative is the low power, so this lighting option is best combined with hidden LED lighting or used to highlight individual interior items.
When working with LED strip, observe the following rules:
- cut the tape only in specially designated places;
- Connect individual elements of the tape to each other using LED connectors or using a soldering iron;
- Attach the tape to the metal base of the plasterboard box through a layer of insulating material;
- When installing the lighting, de-energize the wiring.
To secure the tape to the surface of the box, remove the protective layer from the back of the tape and press the product to the base of the box with the adhesive surface. To ensure reliable fixation, the surface where the LEDs are mounted must first be degreased.

The backlight is connected as follows:
- Direct one end of the wire from the power supply to the current source, the other to the tape;
- if you install multi-colored backlights, observe the polarity (red wire is positive, black and blue are negative);
- Before installing the tape, check the operation of the device.
If spotlights are to be installed, then holes are made at regular intervals in the gypsum board sheets before covering the frame. In this case, wires are connected to the devices at the preparation stage.
At the final stage of work, the two-level ceiling is finished. The joints and recesses from the self-tapping screws are puttied, and the surface of the structure is coated with a primer. Such a ceiling can be painted, covered with wallpaper, decorated with decorative plaster or plaster stucco.
Video on how to make a two-level plasterboard ceiling with lighting in the hallway
Anton Tsugunov
Reading time: 4 minutes
The ceiling is the most noticeable part of the interior of the room. Its slightest shortcomings immediately catch the eye, so you should approach the decoration of this part of the room with particular care. The originality of the design will help in creating a unique ambience for the room, which is why two-level plasterboard ceilings with lighting have recently become increasingly popular.
At first glance, such designs can only be done by a team of professionals working under the guidance of an experienced designer. But two-tier ceilings created using plasterboard, photos of which you can see below, can be done with your own hands. To install them, you don’t need any special skills or tools; you just need to be very careful and use a few general recommendations.
Price
The average cost of installation of a two-level ceiling without finishing is 600–700 rubles/m2 in Moscow and St. Petersburg, and for St. Petersburg this is rather the lower price level; in the capital there are chances to find more budget offers.
The cost of lighting will depend on the type and number of lamps used; the approximate cost of installing and connecting one device is 400 rubles.
Materials and tools used
When making a double ceiling, we will use the standard list of materials used when installing gypsum boards:
- Metal profiles UD and CD. Of course, you can use wooden slats as a frame, but a structure made from profiles is much easier. In addition, if there are curved surfaces, it will be very difficult to make a frame from slats.
- Plasterboard for the ceiling with a thickness of 8 to 9.5 mm. can also be made from ordinary gypsum board with a thickness of 12.5 mm, but this will only lead to unnecessary difficulties. The ceiling practically does not bear any serious load, and thin plasterboard is much easier to work with, especially to bend.
- Fastening elements: direct hangers, various profile connectors, metal screws, dowels for attaching profiles to the wall.
The tools you will need are the simplest:
- Hammer.
- Screwdriver.
- Metal hacksaw for cutting drywall.
- Metal scissors - they will be used to cut or cut profiles.
- Painting knife.
- Measuring tools: level (preferably laser or water), tape measure, plumb line, tapping cord.
Options for two-level ceilings
Before you figure out how to make a two-level plasterboard ceiling, you need to decide on its design. And this is very difficult. Just look at the photo to see how many options you can consider. In technical terms, depending on the location of the levels, two can be distinguished:
- If the ceiling in the room is perfectly flat, then it can be taken as the first level. The frame of level No. 2 will be attached to it.
- If the base surface is far from ideal, then you can level it with the first layer of drywall. In this case, the second level will be attached to the first level profiles.
The second option is preferable when the ceiling layer must hide various communications underneath. It also frees you from many labor-intensive operations, reducing work on preparing the base area to a minimum.
The most common are two-level ceilings in the form of borders or projections located around the perimeter of the room. In this design, it is convenient to place lighting in them, various options of which are presented in the photo.
Installation of the second level of ceiling
Marking
Having measured the height of the second level, a line for attaching the guide profile is drawn on the wall around the perimeter of the room. It is better to use a spirit level or laser level. A drawing of future borders is transferred to the ceiling surface, and the location of future lintels and places for attaching hangers are marked in 600 mm increments.
Frame installation
- It is necessary to construct hangers from the CD profile. Their length should be 1 cm less than the height of the second level. At their ends, the sidewalls are cut to a depth of 2.5 cm.
You can do it even simpler and screw the strips of drywall that form the end of the border directly to the ceiling profile. Then the bottom guide will be attached to the drywall. But it’s better to make jumpers anyway - they will give the frame the necessary rigidity.
- Homemade hangers are attached with metal screws to the ceiling profile. On straight sections, the pitch of their fastening must coincide with the pitch of the jumpers and be 60 cm. They must also be installed in places where the drywall bends.
- If necessary, holes are drilled in pre-marked places for attaching direct hangers.
At the stage of assembling the frame, before installing the horizontal jumpers, it is most convenient to carry out all the work related to the installation and connection of lamps. Fiddling with wiring when the frame is fully assembled is not always convenient, and there is a high probability of “knocking down” the level ceiling with a careless movement.
- Horizontal elements from the CD profile are cut to size. They are inserted into the guide profiles perpendicular to the wall, after which they are secured using self-tapping screws and direct hangers. Using a level, you should periodically check that they are all in the same plane.
It is advisable that the places where the horizontal and vertical jumpers are attached do not coincide. After all, it is along these profiles that the pieces of drywall will be joined. Spaced connections will reduce the gaps between individual elements.
The result should be a fairly strong frame for the future second level of the ceiling, for example, as in the photo.
Working with drywall
After completing the installation of the frame, all that remains is to cut the sheets of drywall to size and attach them to the profiles with self-tapping screws. The fastening step is 15–25 cm.
Drywall often needs to be bent to create curved surfaces. To do this, one of its sides is moistened with water using a sponge and rolled with a needle roller, after which it is carefully bent. If it is necessary to create a strong bend, in addition to wetting, shallow cuts can be made on one side at regular intervals. They will help to achieve the required radius of curvature.

An attractive and effective interior of a room consists not only of beautiful things and decorative elements, but also of a properly selected lighting system. Two-level plasterboard ceilings will not only help to give design ideas a certain “zest”, but will also create the right composition in combination with lighting.
Advantages and disadvantages of two-level plasterboard ceilings with lighting
A two-level ceiling is made of plasterboard and stretch fabric. Designs of this type are extremely popular among consumers, as they allow you to create extraordinary compositions that not only highlight the interior of the room, but also become its main detail.
Among the advantages of a multi-tiered ceiling are:
- Curly structures are lightweight, which prevents excessive load on wall and ceiling floors.
- It is characterized by simple installation; drywall is easy to cut and give it the required shape.
- Sheets of plasterboard reliably mask all flaws in the ceiling. When deciding to install a two-level structure, the consumer may not care about carefully leveling the surface.
- Thanks to the free space between the base of the ceiling and the levels of the plasterboard structure, the user has the opportunity to install volumetric structures (ventilation cabinet) and lay utility lines.
- The two-level design has many configurations, which allows you to visually divide the room into separate zones. In combination with properly selected lighting, this will be especially impressive.
- In its finished form, a two-level ceiling has a magnificent appearance, certainly attracts attention and can become a central element in the interior of the room.
- The presence of several levels allows you to play with lighting options. Many designers use this design feature of a plasterboard ceiling to create beautiful and harmonious lighting in a room.
- Thanks to the special technological properties of plasterboard, its use as a ceiling covering helps improve the heat and sound insulation properties of a room.
Along with the advantages, experts highlight a number of negative points that need to be taken into account when deciding to install a 2-level plasterboard ceiling with lighting:
- This design is quite large and significantly reduces the height of the ceilings in the room. Due to the profile on which the base rests, the room loses about 5 cm of space. Installing a second tier will also remove about 10 cm.
- Over time, cracks and other deformations may form in the area of \u200b\u200bthe joints of drywall sheets. This can be avoided by installing special protective tapes or decorative framing at the points of contact.
- It is almost impossible to cope with the installation alone. If the user plans to do everything with his own hands, he needs to enlist the support of friends and acquaintances who will help him.
- Installation of a two-level ceiling structure is considered a rather labor-intensive process. The consumer must not only have certain construction skills, but also have a fairly large assortment of construction equipment at hand, be able to draw up drawings and design.
Construction of a two-level plasterboard ceiling with lighting
One of the key reasons for the popularity of two-level plasterboard structures is the wide range of design possibilities. The design features allow you to create real masterpieces that will become the central element of any design plan. The two-level plasterboard ceiling with lighting in the photo looks especially impressive.
The first level has a fairly large mass; it must be firmly fixed to the base of the ceiling. The second level is lighter; it is the one that forms the geometric shapes in which the structure is made.
Important! If the plasterboard is installed in a room with high humidity, it is necessary to initially select drywall with protection from water. This will prevent deformation of the structure.

Types of two-level plasterboard ceilings with lighting
Experts distinguish between two main types of ceilings - single-level and multi-tiered. The first option is suitable for almost all rooms, regardless of their size and functional purpose. As for two-tier structures, everything is much more complicated here.
When deciding on arranging a two-level ceiling, you need to remember that such a design can significantly reduce the height of the room by at least 10-15 cm. The loss of free space will be catastrophic for rooms with low ceilings. That is why structures of this type are not installed in them.
Two-level ceilings can be classified in several ways:
- Depending on the type of backlight. There are ceilings with spot or contour light, with external and internal lighting, etc.
- Tier material. The two-level design allows you to combine different types of flooring. Both tiers can be made of plasterboard sheets. The most popular option is a combination of gypsum board and tension fabric. This option will significantly improve the decorative functions of the installation and give the structure a more aesthetic appearance.
There are also several types of design depending on the installation:
- Frame.

- It goes around the perimeter of the room, leaving an uncovered ceiling base in the middle. This option is equipped with spotlights, and a pendant chandelier is often placed in the center, with a style that is as close as possible to the interior.

- Diagonal. Crosses the space of the room diagonally, can be straight or curved. The first level is as even as possible, the second protrudes above the base a short distance. The most successful option for zoning a room.
Zonal. Used for furnishing studios and large rooms. Allows you to visually divide the space into several autonomous zones.
- Depending on the shape of the structure, there are three variations:

- abstract. Here there is a combination of different forms, which can be arranged either in a strictly defined sequence or chaotically. To make the overall composition stand out, the forms are given different colors;

- soaring. This option is suitable for rooms with high ceilings. Thanks to the fastening of fitting sleeves and metal pins, the composition takes on a slightly fairy-tale appearance. Visually, it seems that the ceiling is floating in the air. This effect can be especially emphasized by properly selected lighting.

Dimensions of a two-level plasterboard ceiling with lighting
The dimensions of a two-level ceiling structure can be very diverse. One of the advantages of this option is a large selection of architectural forms and design solutions.
When deciding to install a two-level plasterboard ceiling with lighting, the user needs to think about the concept of the project in advance. The specific size of the structure will directly depend on the features of the interior, the chosen style and the area of the room. If the room is spacious enough, you can install a volumetric overall composition.
Types of lighting for a two-level plasterboard ceiling
For two-level ceilings, there are two lighting options:

You can use any lighting options, from spotlights and contour lamps to large hanging chandeliers and LED strips.
The only thing you need to pay attention to when creating lighting is the dimensions of the suspended structure. If the ceiling is small, a massive chandelier on it will look ridiculous, and it will also visually reduce the free space, which will negatively affect the overall exterior of the room.
Important! When installing the backlight, you need to ensure that the electrical wiring does not come into contact with the metal elements of the frame.
Schemes of a two-level plasterboard ceiling with lighting


How to make a two-level ceiling frame from plasterboard with lighting
Since the two-level illuminated ceiling has quite large dimensions, for this structure it is necessary to install two frame bases. To install the first level frame, you must perform the following steps:
- Install guide UD profiles along the surface of the concrete (brick) ceiling base. They must be firmly fixed with an optimal fastening step of 60-70 cm.

- Ceiling hangers are attached to predetermined points and secured to the guide elements using “fleas.”
Important! Ceiling suspensions must be fixed with an optimal fastening step, which corresponds to the installation of guide profiles. According to experts, the distance between them should be within 60-70 cm.
- Insert the ceiling profile CD, after which it must be firmly fixed with a suspension.

- If the structure is large enough, it is necessary to prevent possible deformation of the base. For this purpose, special “crab” type connectors are used. They will give the structure stability and prevent subsidence.

After installing the frame, it is sheathed with plasterboard. This will be the first tier of the ceiling. To form the next level, it is necessary to install a second frame:

DIY installation of a two-level plasterboard ceiling with lighting
The process of installing a two-level ceiling structure with lighting begins with preparation. First you need to collect all the materials and tools:
- plasterboard sheets. In order not to buy extra material, you must first calculate the ceiling model and find out how much drywall will be required for installation;
- UD and CD profiles;
- ceiling suspensions. If the design provides for fairly large dimensions, it is better to use a spring rod; if the dimensions are small, use direct hangers;
- soundproofing materials;
- extension cord (if the width of the room exceeds the length of the profile);
- fastening elements (dowels, fleas, etc.);
- self-tapping screws;
- finishing material.
After preparing the necessary equipment, you can begin installing the structure. The first stage includes preparing the frame parts of the future ceiling. How to mount the frame is described above.
As practice shows, it is not difficult to make a two-level plasterboard ceiling with lighting. Problems often arise during the process of covering the frame with plasterboard sheets. Therefore, you need to consider the following points:
- if a sheet of drywall is cut, a chamfer is made on the edge using a knife or plane;
- to ensure the most reliable fastening, gypsum boards need to be joined in the middle of the profile;
- in order not to complicate subsequent finishing, the heads of the screws are slightly recessed in the plaster;
- when fastening, the distance between the screws should be 30-35 cm, while there should be at least 2 cm to the edge of the sheet;
- You need to leave a small gap (no more than 2 mm) between the gypsum board sheets. This is necessary to prevent deformation due to sudden temperature changes and high humidity in the room.
Options for finishing a suspended two-level plasterboard ceiling with lighting
In order for the two-level ceiling structure to be as smooth and beautiful as possible, after completing the installation work, the joints and seams of the drywall need to be primed. It is recommended to use a special putty composition for seams.
After the primer has dried, the application areas are covered with a thin layer of plaster. A special tape is applied to the wet layer, which needs to be slightly embedded in the primer. Particular attention should be paid to the screw heads; they are also puttied. After this, holes for lamps are cut out in places specially marked on the plasterboard.
The finishing depends on the chosen material. Often, GKD is covered with several layers of putty, after which it is cleaned with special tools to obtain a perfectly flat surface. You can proceed to painting the ceiling with water-based compositions with the addition of colored pigments.
You can also use fabrics, wallpaper, 3D paintings and other materials as finishing materials.
Tips for caring for a two-level plasterboard ceiling with lighting
Plasterboard multi-tiered structures have a long service life. In order for them to continue to delight the eye with their ideal appearance, they need to be carefully looked after.
Caring for KHF is quite simple. They should be wiped regularly with a dry cloth to remove any accumulation of dust and dirt. You can also use a vacuum cleaner. If the consumer plans wet cleaning, non-aggressive detergents should be used. Before you start cleaning, the rag should be thoroughly wrung out, it should be barely damp.
Particular attention is paid to the location of lamps. Often, under the influence of lamps, GKO changes its color. This negatively affects the overall appearance. You can get rid of plaque and faded parts using special felt-tip pens, which can be easily found in any hardware store.
Photos of two-tier ceilings with backlit plasterboard


Conclusion
Two-level plasterboard ceilings have a very impressive appearance, are characterized by simple installation and a long service life. However, when installing such large structures, you need to remember important nuances and follow the installation technology.