Tree trunk paths. Path made from wood cuts: pros and cons, do-it-yourself installation, maintenance features. Path design
Read also
Do you remember how in childhood, adults sang to us a song: little legs run along the path? And what a delight the tangled webs of these same paths, paths and curbs evoked in us. We have grown up. Many of the former kids have acquired personal gardens and summer cottages, and the intricate paths continue to attract us with their intricacy, some kind of reckless meaning and... It's just convenient and beautiful. So, it's time to make a path from a cut tree with your own hands. We will tell you about this now so that your dream comes true in full.
Path from a cut tree. Why do we choose this material?
Firstly, this is a pricing decision. The cost of sawing wood is lower than the cost of paving slabs or stone paths. And, in addition, in order to make a path from a cut tree, you can use a sawn solid wood from your site, which will cost you absolutely free.
Secondly, the natural beauty of wood texture, which does not limit your imagination and makes it possible to create any options for paths in the garden without involving additional funds and building materials.

Thirdly, environmental friendliness. Considering the mainstream of ethnic style in the field of landscape design, you can match the fashion trend without much effort and with benefit for the environment and your own health.
Fourthly, laying a path in the garden from a cut tree does not require certain professional skills, abilities and a set of tools of a certain complexity.
However, there are also “buts” that you need to know about in advance - a path made from cut wood is susceptible to rot, mold and damaged by insects. If you are ready for such costs, then we will begin arranging paths from cut wood with our own hands immediately. Moreover, we will tell you how to mitigate such disadvantages.

Making a path from cut wood with your own hands. Preparing the foundation.
Owners of garden and personal plots, who have not yet managed to make a path from a cut tree, but make do with other options, often face problems of sinking or, on the contrary, bulging, uncontrolled growth of weeds and destruction of existing garden paths. These troubles do not always depend on the material from which the path on the site is made, but always on compliance with the instructions for creating a path in the garden.

First stage:
An outline of future paths should be drawn on the site plan for better visualization, so that the result of the work pleases you and does not bring discoveries in the form of inaccuracies and imperfections. Then, using pegs and a cord, we transfer the outline of the future path directly to the surface of the earth.
If there is a flat landscape, it is enough to drive in stakes every two to two and a half meters. If there are hills or uneven surfaces, or if the path you have planned is very winding, the travel of the pegs is about forty centimeters. If pegs with twine seem like a very difficult option to you, then you can mark the directions with grated chalk, sand or lime - just pour the silhouette in full width and along the entire length. The option for a path with a curb should also take into account the need for indentations.

Second phase:
We dig a trench, the depth of which should be approximately twenty-five centimeters. Such work should be carried out exclusively in dry weather so that the quality of the base and subsequently the path itself are not damaged or deformed.
When a curb is provided, we pour compacted sand along the edges and install and level it, guided by a building level.
Third stage:
We compact, compact the base of the future path and cover it with geotextiles. But you can go for a more budget-friendly option and use polyethylene. This step will not give weeds a single chance to encroach on your path, and will also protect the path from subsidence after rainfalls and melting snow.

Fifth stage:
At the bottom of the dug ditch we lay a layer of drainage to a height of five to eleven centimeters. It can be expanded clay, crushed stone, gravel or a mixture. And, of course, this layer must be thoroughly compacted.
Cutting down a tree. Where do we get it?
There are several options. One of them is to use wood from your site if you are planning to cut something down.
If this option does not work, we turn to specialized building materials stores, where you can purchase wood cuts of any species.

Many manufacturers offer ready-made material, processed and coated with all special solutions and oils, so all you have to do is make a path from a cut of wood with your own hands. However, it should be noted that this option is the most wasteful and not everyone can afford it.
Therefore, we will dwell in detail on the most accessible option for everyone - cutting a tree with your own hands.
Making wood cuts for a walkway with your own hands
If, as we have already mentioned, you do not have the opportunity to use trees from your site, in this case, we purchase round timber.
In principle, to create a garden path from a cut tree with your own hands, an array of any type will do. But the ideal wood for such work is larch. Pine, oak, alder, hornbeam and even acacia will also fully justify themselves and will serve faithfully for a long time. Here it is worth clarifying that larch and oak, for all their reliability, are quite complex for making saw cuts yourself.
Dry wood is another nuance that is worth focusing on. Wet wood deforms the cuts quickly enough, causing the path to warp, crack and eventually become unusable.

After you have purchased a cut of wood, we prepare the tools: sandpaper for sanding, tape measure, chainsaw, pencils for markings, approximate templates. We can proceed to the next stage of creating garden paths from cut wood.
- We clean the trunk from twigs and branches.
- Sand with a scraper, coarse sandpaper or planer. (ready-made cuts can also be sanded).
- Using a template, we mark the tree evenly. Approximately twenty centimeters. Experts do not recommend saving and making cuts less than fifteen centimeters. The path will not be durable or stable.
- We cut down a tree.
Processing the cut for the path
This section can be skipped for those who bought a ready-made and already processed saw cut.
And the rest proceed to the next stage of arranging a path in the garden with their own hands.
To protect your product from mold, mildew and harmful insects, we treat the saw cut with special solutions. These can be ordinary antiseptics, impregnations (necessarily with deep penetration). You can make the solution yourself. To do this, you need copper sulfate and water in a ratio of two to eight, which must sit for at least two days. A word of caution here is that copper sulfate gives the wood a darker hue. If you don’t like the aged effect, this option is not suitable for you. If you are satisfied, then the soaked saw cuts should lie for two days in the shade after treatment to dry completely.

Another option for a solution that you can prepare yourself is from drying oil. We bring it to an almost full boil and process the cuts, letting them dry, as in the version with copper sulfate.
We have one more in stock - the old-fashioned method. It is quite labor-intensive, but quite effective - brew larch bark, which is famous for its antiseptic properties, and saturate wooden cuts, at the same time giving them a beautiful reddish tint.
But that’s not all in preparing the blanks to make a path from wood cuts. The lower part of the wooden templates must be covered with a waterproofing layer. And this work is not easy. To do this, melt the bitumen and dip the saw cuts into it. You need to know right away that the boiling point of bitumen is two hundred degrees, which in itself is not safe and such an operation must be carried out in compliance with all fire safety standards.
Making a path from wood cuts with your own hands. Photo.
So we have come to the last, but most enjoyable stage of our work in the marathon: how to create a garden path from a cut tree with your own hands.
So that you don’t worry about the final look of the cut track, we present options in the photo that will not only dispel your fears and doubts, but also give you options for designing the laying pattern.
- Let's start paving.
- We place each part in its rightful place, pressing it into the sand bed, leveling it by lightly tapping it with a wooden hammer with a rubber striker.
- Do not forget to control the evenness of the cuts to create one level.
- We get rid of voids between the cuts using sand or decorative crushed stone.
- We decorate the garden path with your favorite plants or moss.

Caring for a garden path made from cut wood
Periodically clean off dirt using a metal brush or scraper, followed by treating the cuts with an antiseptic or drying oil.
Immediately remove weeds that have powerful destructive power.
Monitor the level of the path after rainfall or melting snow to prevent erosion of the base coating. To do this, you can dig moisture-wicking channels or grooves on the sides.
In winter, be sure to clear away snow and prevent the formation of ice.
Under no circumstances should you use aggressive chemical solutions and salt to combat frost if you do not want the wood to be destroyed.
A garden path made from cut wood, made by yourself, is not only a decoration for your site, but also a reason for pride. And maybe someday a photo of your path will also please the eye of a novice master.
Traditional wooden garden paths in the country are natural, stylish and durable. In addition, such paths can be made even without the involvement of specialists. Before you start work, familiarize yourself with the structure and technology of laying paths from wooden saw cuts, boards, pallets and modern decking boards. In some ways, their construction is similar, but each wood material has its own characteristics.
Tree cuts in garden design
Paths made from wood cuts - stages of construction
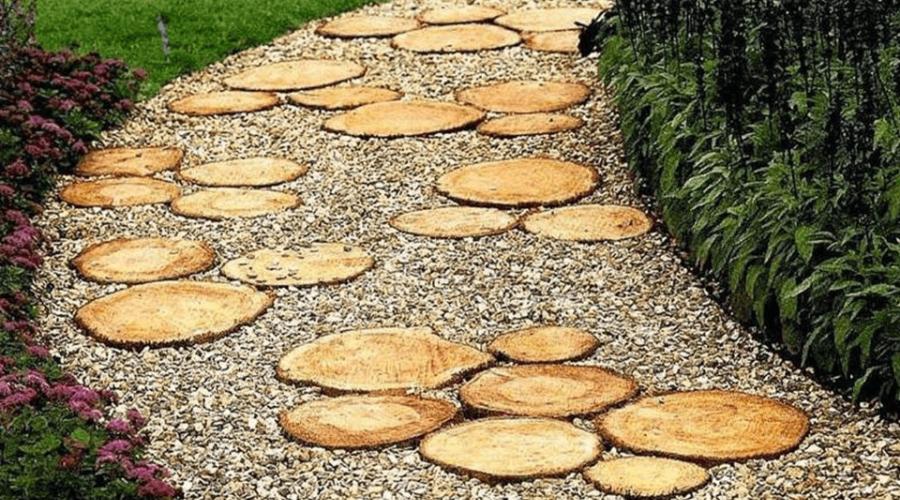
Ordinary stumps or tree slices make nice winding paths. If you are interested in this idea and you decide to make a garden path from wood cuts with your own hands in the garden or at the dacha, you need to choose the right material and understand the installation technique.

Wood cuts can be combined
Construction of a round timber path
The construction of a garden path from wooden saw cuts resembles paving stones. Instead of stones, flat wooden dies of the same height are laid. To make the path from tree cuts as dense as possible, use both large cuts and stumps of small diameter, for example, from large branches. They are convenient to fill the space between the main elements.

Garden path without borders
If we are talking about a decorative path that will serve not so much as a path but as a garden decoration, you can get by with a narrow passage one element wide. Such a path will only indicate the direction. The technology in this case is much simpler. The prepared stumps are placed directly into the ground, allowing free space between them.

Curbs protect against soil contamination
Material preparation and processing
Preparing the wood is an extremely important step. Poorly selected and not properly processed wood will very soon become unusable, and the path made of tree rings in the country will have to be redone. The first step is to decide on the type of wood. Suitable:
- pine;
- larch;
- birch;
In principle, any raw material that is available can be used. The difference between hardwood (larch, beech, oak) and other types is the service life. In terms of durability, larch is unrivaled. You can count on 25 years of operation, while pine will last 5-7 years.

Maximum naturalness
The tree must be dry, without traces of pests. The logs need to be cut into dies of equal height. The optimal size is 15 cm. For convenience, you can use a template. If you do the harvesting yourself, make sure that the cut is made strictly perpendicular to the log.
When all the pancakes are cut, sort them by size. It is better to remove cracked specimens immediately. Clean all the rings from the bark. Next, you need to choose how to treat the wood cuts for the paths in order to protect them from rotting and destruction.
An elementary method is treatment with drying oil. The drying oil is brought to a boil and each die is dipped into hot oil one at a time. The boiling substance seals the pores of the wood and prevents moisture from entering, the first enemy of wooden products. Disadvantages of this method: long and dangerous. Hot drying oil can burn you.
A more expensive option, but much more practical, is special formulations. You can treat wood with an antifungal agent yourself using a brush or spray bottle. After preventive treatment, the tree should dry out.

You need a lot of these rings
If you don't like the natural color of the wood, the garden path can be aged. Painting logs with copper sulfate will give them a dark, noble shade. Then the lower part of the dies (as a rule, the cuts are placed with the more attractive side up) is treated with hot bitumen and allowed to dry.
Preparing the base for paving
When all the material has been prepared and sorted, you can proceed directly to constructing a country or garden path. Before laying a path from wood cuts, preparatory and excavation work is carried out:
- Marking the future path in the garden.
- Remove the top layer of soil.
- They dig a trench.
- Arrange waterproofing.
- The foundation is being prepared.

Preparing the trench
When you have planned how the country path will be placed from wood cuts, transfer its image to the area - use pegs and thread to mark it. Do not forget that passages with complex, intricate shapes will not always be convenient. After marking, try walking along the garden path and make sure that it is functional enough and planned correctly.
Now you can safely take up the shovels. The trench should not be too deep. Add 10 cm to the height of the dies - this depth will be optimal. Then proceed like this:
- Level the bottom.
- A waterproofing layer is laid in the trench. Some people use film or roofing felt, but in such cases it is better to use geotextiles. This material does not allow water to stagnate and weeds to grow.
- Place a layer of gravel on the waterproofing - this is drainage. It is needed for rapid drainage of water. The gravel layer should be 10 cm thick. It is compacted and covered with sand. 5-10 cm of sand is enough.
- To better compact and level the base for a garden path made of stumps with your own hands, it should be wetted. When wet, sand is compacted by hand.

After the geotextile, crushed stone and sand are poured and compacted
Laying wood cuts
The preparatory stage is completed, installation can begin. If the base is well prepared, this will not be difficult. You will need this tool:
- building level;
- mallet;
- manual rammer.

Lay dies only by hand
Laying can be carried out in compliance with some pattern or done in any order. The logs are placed on a sand cushion, then they need to be compacted a little and leveled. Sand or crushed stone is poured into the gaps. The seams on top can be sealed with other material. Mulch, sawdust, pebbles, and moss are suitable.

It is important to tamp well
Here are some simple tips that will tell you how to properly lay out a path from wood cuts with your own hands:
- Start with large elements. Distribute all the largest circles evenly along the entire length of the trail, then lay the middle ones. Small pancakes made from branches are ideal for filling voids between elements.
- Use borders. The fencing will make the outline clearer and neater, and sand from the seams will spread less throughout the area. The curbs are placed on a layer of gravel and covered with sand.
- If the cuts are not placed too close and the seams are filled with soil, in spring and summer the path will blend seamlessly into the lawn and look very natural.
Video: Do-it-yourself paving of a wooden path
How to make paths from boards
Ordinary boards are great for making garden paths in the country. You will have to fuss with them less than with the piece-by-piece laying of individual cuts. The advantage of such wooden paths is the speed of installation and neat appearance. The manufacturing process begins with the selection of materials and tools.


Garden path made of boards
Selection and preparation of material
The most inexpensive and widespread lumber is softwood boards. It is best, of course, to choose larch, but the cost in this case will be quite high. Use an edged board with a thickness of at least 5 cm.

Edged board of the required thickness
The wood is treated according to the standard procedure: with an antiseptic, and then covered with varnish or paint for further protection. Clear varnish will highlight the wood texture, and colored paint will help create accents. The boards are cut into pieces of equal length. If you are planning a path of complex shape, the length of each plank is selected individually.

Imitation sleepers
Wood is not the most durable and practical material. Modern industry offers a worthy analogue to plank wooden paths in the country - laying terrace boards. Decking is a mixture of wood (dried and ground into powder) and polypropylene. Together they form a strong, plastic substance from which products of any shape and size can be formed.
One of the advantages of a material based on wood flour and plastic is that it is completely ready for use. This means that you will not have to additionally process the tracks or open them with varnish.

Terrace board
Working with natural wood and working with wood-polymer material requires certain tools. So the boards can be connected with nails, leveled with a plane and cleaned with a sander. At the same time, decking requires a much more careful attitude.
You will need:
- drill;
- screwdriver;
- level;
- self-tapping screws;
- hacksaw.

Deking is not afraid of water
Laying a boardwalk at the dacha
Laying plank wooden paths is carried out in a certain sequence:
- Preparing the base.
- Installation of the frame.
- Laying the flooring.
The base for paths made of larch or other natural wood is a sand-crushed stone cushion of the same structure as for a wooden path made from saw cuts. Preparatory work is carried out in the same sequence: marking, foundation pit, geotextiles, crushed stone layer, sand layer, compaction.

Pit for a path at the dacha
Then the boards can be laid directly on the base, by analogy with a path made from slices of wood, or they can be placed on an elevated platform - a specially constructed frame. Boards laid directly into the ground look more natural and relaxed, but such a wooden path also deteriorates much faster. The structure on the frame will be stronger and more durable, in a word - capital. However, to implement such an idea, more effort is needed.

Path level with the ground
The frame is usually built from timber or boards. Its shape follows the contour of the path; a transverse stiffener is installed every 50 cm so that the flooring does not fall through. Metal corners or the same wooden beam can act as connecting elements. When the frame is completely installed, begin laying the plank flooring. The boards are laid tightly across the path to create a continuous surface.
If the site has relief features, you can try to level the slope at the stage of constructing the sand cushion, and if this is not possible, you will have to make steps. The frame for the steps is mounted with extreme precision, checking the level and plumb line so that the steps are level.

Combined path made of wood and crushed stone
Laying deck boards on joists
Laying garden paths from decking boards with your own hands is done a little differently. The difference between decking is that if the load is distributed incorrectly, the board may burst. Therefore, it is extremely important to achieve a perfectly level and solid base for decking.

The decking board looks impressive
To prevent the frame from deforming as a result of soil subsidence over time, use a cement screed. It will provide the decking board with the required rigidity. The base can be a concrete slab or single concrete blocks installed at the support points of the frame.

Logs are laid on concrete slabs
The supporting parts of the structure are made of the same material as the flooring. The elements used for installation are logs and beams. They are placed at a distance of 20-30 cm from each other. The frame is slightly raised above the concrete surface to ensure water drainage. For the same purposes, small gaps are left between the boards.
Decking is laid in two ways:
- deck laying;
- at an angle.

Laying scheme
The choice depends on the wishes of the customer. Garden paths made from deck boards are laid perpendicular to the joists. When installing at an angle, the decking is laid at 45 degrees.
All components for installation can be purchased along with the decking, these are:
- plugs;
- connecting brackets;
- self-tapping screws;
- strips for decorating the ends;
- corners.

Installation of decking end strips
The boards are attached to the frame using self-tapping screws and special clips. The caps are covered with caps or painted over. Another option is a hidden connection. In this case, no traces of screws are visible on the surface.
Features of laying decking boards for garden paths:
- work cannot be carried out at temperatures below 5 degrees;
- the film in which the decking is packaged should be removed the day before work begins so that the material can “breathe”;
- It is important to tighten the screws sufficiently tightly, but not to pinch them, otherwise deformations of the flooring or internal stresses in the material may occur.

Decking does not require repair or treatment
Cheap country paths made from pallets
If you like the “cheap and cheerful” option, make paths in your dacha from pallets - wooden pallets. Typically, pallets can be found in large quantities on a construction site or in warehouses. They are used for temporary storage of building materials.
Advantages of this material:
- natural wood;
- low price;
- environmentally friendly material;
- the boards are already cut and selected in width.

Pallets are reused for garden decoration
There are two options: you can lay the pallets as is, or you can disassemble them and put them in order, clean, sand, and sort them out. For the first option, pallets with small gaps between the boards are suitable. If you still have to disassemble the pallets, any will do.

The simplest option is to simply lay out the pallets

Disassembled pallets in a new role
Laying a path from entire pallets with your own hands takes very little time. Installation is carried out in large blocks, rather than one element at a time. The length of a standard pallet is 1.2 m, the width can be 1 or 0.8 m, and the height is 145 mm. Both narrow and wide pallets are suitable for a path in the country.

Euro pallet dimensions
If you need to achieve more decorative wood, the pallets can be sanded, varnished or painted with a tinting compound. It is imperative to treat not only the top part of the flooring, but also pay attention to the ends so that the wood does not become limp from moisture.

Design idea

Grass between tree cuts
Natural wood is an excellent choice for a summer house. You can safely walk on such paths barefoot; they are warm and pleasant to the touch. If you approach the issue responsibly and correctly plan the placement of paths, their size, process the material and prepare the base for the structure, wooden paths in the garden will serve faithfully for many years.
This article contains step-by-step instructions on how to make a beautiful and durable path from wood cuts with your own hands. Paths are an integral part of the dacha exterior. The functional purpose they serve is to combine individual zones on the site. Such a simple and original solution will decorate the garden and will delight the owners for many years.
Stages of arranging a path from saw cuts
There are many materials that can be used to realize the idea of a wooden walkway. However, the most attractive of them, of course, are log cuts. They have visual appeal and are more reliable when properly processed than artificial materials.
Before laying the sections, it is necessary to carry out appropriate preparation. To begin with, it is worth completing a sufficient number of elements, which is calculated taking into account the length of the garden path, as well as its width. It is recommended to prepare the material with a small reserve, since during laying the path some sections may become unusable. Let's consider what other materials are necessary to implement such an idea:

- sand;
- pebbles, gravel;
- geotextiles or thick polyethylene film;
- chainsaw;
- building level.

You will also need to prepare auxiliary tools used when laying sections. In addition to a rubber mallet, you will need a shovel, as well as buckets and brushes. After preparing the material, you can begin making wooden sections.

Preparation of cuts
The main building material for a wooden path is sections made from stumps. Wooden material must undergo careful preparation. The service life of the path depends on this. The production of saw cuts is carried out in several stages, however, before this it is necessary to select the source material.
Important!Any wood is not suitable for this purpose. Experienced craftsmen recommend using hardwood. The leaders in this case are oak and larch. The shelf life of oak cuts is about 10, and larch - more than 25 years.
Some people prefer pine material as it is very common and quite cheap. However, such a path will not last more than 5-6 years. Under the influence of unfavorable weather conditions and in the absence of proper care, this period can be reduced to 3-4 years.

So how do you make the cuts yourself? This work begins with cutting logs. The corresponding photos will help you understand the technology for making saw cuts. The height of the cuts should be approximately 20 cm. You should adhere to this indicator. You should also remember one important rule - the larger the width of the hemp, the higher the workpiece should be. Compliance with this rule will allow you to make a durable path.

Finished sections must be treated with special antiseptic agents. This will protect the workpieces from temperature changes and pests. Drying oil is also suitable for this purpose. Oil paint needs to be boiled, and then each piece must be immersed in it. An effective method to protect wood parts is the use of bitumen. It must be applied to the bottom of the cut.

Laying the path
The dimensions and location of the track must be calculated in advance, since without this it is impossible to calculate the number of cuts. The first thing to do when laying a path is to remove the top layer of soil in the garden. The depth of the trench is calculated very simply. It is necessary to add 5-10 cm to the height of the cut. The width of the trench entirely depends on the dimensions of the path itself.

The next step is laying waterproofing material. Geotextiles are the most suitable material. It must be placed at the bottom of the trench. Next, you will need to install a drainage system. Sand, gravel and crushed stone are suitable for this.
Note!When creating a sand and gravel cushion, it is recommended to use a building level. This will avoid changes in height of drainage materials.
At the next stage of creating a spectacular path on a site from wooden cuts, you will need to make curbs. This is not a mandatory event, but if you wish, it is best to use wooden posts or decorative bricks for this.

Next, you need to install the cuts and fill the gaps between them with sand. The distance between cuts should not be too large, as this will negatively affect the integrity of the coating. Once the work is completed, you can begin decorating the garden path.

Path design
The space that remains between the individual round elements can be filled with more than just sand. There are many different ideas that are quite easy to implement on your own. A fairly popular option for filling cavities is crushed stone or pebbles. The material is poured into the spaces located between the cuts, after which it is carefully compacted.

Another popular decoration method is to plant grass between the elements of the path. Also, paint and varnish materials are often used to decorate the upper part of the cuts.

The ends of the cuts can be painted in one color or made multi-colored. The second option looks especially impressive and unusual. Such a path will become a real decoration of the exterior of the summer cottage. However, it is worth remembering that for this purpose it is recommended to use special coloring compounds that have good resistance to moisture.

How to properly fill cavities with grass? To do this, it is necessary not to fill them to the top line of the ground with screenings. It is worth leaving a small margin (about 5 cm). Next, the cavities are filled with soil containing grass seeds. Experts recommend using low-growing grass that will not spoil the appearance or reduce the functionality of the path. A special video will help answer the question of how to make a beautiful and original path from wood cuts, which is recommended for viewing by everyone who wants to decorate their site with their own hands.

The last method is to use multi-colored pebbles. It also needs to be carefully compacted so that it fits as tightly as possible into the empty spaces between the wooden sections.

Path care
A path made using this method requires proper care. If you close your eyes to this fact, then the wear of the track will significantly accelerate, which will shorten its service life. Proper care includes several activities.

For example, it is very important to clean the path every year. To do this, use a thick brush or a metal scraper. After cleaning, you will also need to treat with special antiseptic substances.


In this article, we figured out how to make a beautiful path from natural wood cuts, following step-by-step instructions. We should not forget that proper decoration will significantly increase the attractiveness of this project and decorate your summer cottage.

Write in the comments:
How else can you decorate a path made from saw cuts at your dacha?
All buildings on a summer cottage require the creation of comfortable hard paths that will function at any time, without interfering with free movement and without losing their appearance. Since the design of dachas consists of trees, flowers and other plantings, a wooden path will fit best into the landscape.
Garden paths made of wood can look different, but those paved with closely spaced saw cuts look most beautiful. Rings made of wood of different diameters allow you to create the most unusual shapes and compositions on the ground. As a result, even a straight path of this type will look stylish and original. Let's figure out how to make garden paths from wood cuts with your own hands and what to pay attention to in the preparation process.
General Features
What is so attractive about garden paths made from saw cuts? First of all, it is an extraordinary harmony with nature. Whatever shade you choose, whatever design you choose, the wooden elements of your path will set the rhythm of the picture of your site.
If desired, the tracks can be decorated with additional materials. For example, combine it with stones of unusual shape, fill the cracks with sand or gravel. Grass sprouted inside the structure of the path will make it bright and contrasting. The color of the wood can also be changed using high-quality paint. An effective path design can be obtained by alternating wide and narrow cuts.
Tip: by placing the rings in even, ordered rows, you will emphasize the rigor and restraint of the design of your summer cottage.
While winding paths with disproportionate shapes will be perceived as elements of light and playful design.
 Along such a path you can plant flowers or bushes, arrange flower beds or borders, and also create an interesting design from stones. Often the edges of wooden paths are decorated with cuts of greater height.
The naturalness of paths made from saw cuts successfully complements the carpets of flower beds.
Pros and cons of wooden walkways
There are many advantages to using saw-cut paths in your summer cottage. Let's look at the main ones:
- For such a design, you can choose cheap tree species, saving on materials;
- It won’t be difficult to design a path: just cut a log and lay out a strip of them, like a puzzle. A simple preparation technique is available to everyone, so you can do it yourself;
- there are almost no puddles in such paths;
- the spectacular appearance allows you to decorate with such paths not only traditional, but also modern houses and cottages;
- if one of the cuts is damaged, you can always replace it, and repairing the entire path will not require significant effort;
- wooden materials are safe and environmentally friendly.
In addition, creating a path from wooden saw cuts has decorative advantages, since you can create your own design. Look at the photos of garden paths made of wood: each of them looks harmonious and special.
Disadvantages include the natural properties of the materials used. Trees can rot, crack, and pests can infest them. In addition, wooden paths will require careful maintenance, and after rain they can slip a lot, be careful.
Attention! You can get rid of some problems (for example, pests or the risk of slipping) using special wood impregnations.
However, even with such shortcomings, wooden paths will last quite a long time. The service life will depend on the type of wood chosen and the correct processing. So what wooden materials are best suited for constructing such paths?
Choosing materials for paths

Of course, the choice of breed will also depend on cost. Poplar is considered one of the most reliable materials with a low price. The approximate cost of logs of different species is indicated below (data for 2015):
- one cubic meter of oak will cost you from 4 thousand rubles;
- the cost of pine is from 6.2 thousand rubles per cubic meter;
- larch costs from 7.5 thousand per cubic meter;
- cedar is estimated at 7-8 thousand rubles;
- poplar can be purchased at a cost of 1.5 thousand rubles.
In order for the result of your expenses and efforts to be preserved for a long time, it is not enough to purchase a high-quality type of wood; it is necessary to use it correctly.
Making the path yourself
The preparatory stage of the process of independently creating garden paths from wood consists of choosing a tree and making cuts (the log is sawn into rings with a width of 15 cm, depending on your preferences).
Attention! The height of the cut should depend not only on the required strength of the rings, but also on the diameter of the tree. The larger and wider the ring, the stronger its structure should be. Thin saw cuts will not be able to maintain stability in the ground and will deteriorate faster under the influence of external factors.
In order for your path to serve you as long as possible, first clear each cut of bark. Then you won’t have to deal with the problem of peeling after installation is complete. Remove saw cuts with cracks immediately. Do not forget that each element of the future path must be treated with protective agents.
 Individual cuts can be tinted, which will make the path brighter and more interesting.
 Drying oil heated to a boil is considered the most reliable. Such treatment can be dangerous, so if you wish, you can purchase an antiseptic solution (in which the cut will lie for 2 hours to 2 days) or bitumen. After treatment, wait until the wood is completely dry.
When the cuts are ready, you can begin installation. Creating garden paths from wooden saw cuts involves several successive stages. Let's describe the process step by step:
1. Create markup. Find out the dimensions of the future path (its width should be 35 cm or more), shape and intended design. Mark the route on the ground, set boundaries with pegs and connect them with fishing line.
2. Ensure that the track base is secured. Dig a trench at the site where the cuts will be installed. The depth of the trench should be sufficient for installing stumps, and also have a reserve of 5-10 cm. The width of the trench corresponds to the future path. After creating it, lay a waterproofing film or durable polyethylene, and cover the base with a 2.5-5-centimeter layer of crushed stone or gravel. Such a base will protect the tree from moisture and displacement. Using a level, the layer is leveled for subsequent processing.
 An example of making a path from wood cuts without borders (first part).
 3. Install curbs if your design calls for them. To do this, use beams, stones, concrete posts or whole logs of similar species.
4. Create another protective layer. This time sand is poured along the entire path. The layer height should be about 5-10 cm. Fill the sand with water for better compaction.
 Laying out the cuts and forming a path without a border (second part).
 5. You can start installing the cuts. It is advisable to provide a minimum of free space between each of them, since a dense path will be more stable. Be sure to compact each cut and ensure that the top of the path is even.
6. When the path is ready, you can start decorating. Paint the wooden parts, pour sand, earth, stones or seeds into the niches.
Tip: your path will last much longer with careful care, so clean the surface annually with a metal scraper and also treat it with special products.
Look at another set of photos of step-by-step production of an original garden path from saw cuts.


Consumption of materials
The required amount of material will depend on what kind of future path you see: straight or winding, with dense laying of cuts or the presence of large distances between individual elements. Sketch out a sketch of the path and calculate how many cuts will be enough to realize your idea. As a rule, 1 square meter of track takes from 8 to 11 circles, depending on the diameter of the log.
Do not forget that each element of the path must have sufficient width and strength, otherwise during operation cracks may appear along the entire path in your dacha. By comparing the required thickness of each cut and the height of the existing tree, you can figure out how many parts you can divide it into. It is advisable to leave a few cuts in reserve, since in the future you will have to replace damaged track rings.
Making a path from saw cuts is a simple process, but, nevertheless, it is better not to undertake it without a lack of experience. Entrust the installation to specialists - and your path will last much longer, allowing you to save on subsequent landscaping work. We learn from reviews about what else you might encounter when deciding to create such paths.
Maria, St. Petersburg: On the dacha plot they laid just such a path. It has been holding up for a year without any special treatment, has not lost its appearance or rotted. I admit, I settled on this option not because of the advantages and useful properties; I didn’t even think about them. There were several logs - and we decided to decorate our dacha. Now I understand that this was the right decision, since the path made from saw cuts not only meets all my quality requirements, but also looks very cozy against the backdrop of trees and flowers. It turned out to be a very harmonious site, and the costs were low.
Nikolay, Lipetsk: I really love working with wood, so creating the original path was even satisfying: I quickly sawed the log into separate pieces, prepared the base, installed all the elements - and for six months now I can’t be happier with the result. It turned out very beautiful, harmonious and high quality, and also inexpensive. I have heard that the path can deteriorate and rot, but I have not yet noticed such shortcomings, so I will continue to watch. So far there are no complaints.
Olga, Tver: I was thinking about how to design a garden at the dacha with a wooden house - and I didn’t find anything better than saw cuts: such a path would fit perfectly into the design of my site. Since wood is a finicky material, I decided not to rely on my own strength, I called specialists who prepared the beams, treated them with protective agents, and laid them out, focusing on my ideas. Now my dacha has become even more comfortable! I plan to somehow modify the design using paint, but even so everything looks very original.
Every owner or housewife dreams of a cozy summer cottage where they can relax and enjoy nature. Therefore, it is not surprising that maximum attention is paid to landscape design. Decorate your dacha with paths made from wooden saw cuts - and you will be convinced of their beauty, strength and durability.
When designing a summer cottage, it is often worth choosing the material for laying the paths. For these purposes, improvised means are mainly used, such as layers of wild stone or cobblestone paving stones, but in this article we will talk about how a path from wood cuts can be made with your own hands, without the involvement of specialists and the purchase of expensive materials.
The use of wood for the design of any summer cottage or private house is almost always appropriate, since it harmonizes perfectly with the greenery, without which no yard can do. As for wood cuts, this material can be a good solution if there is a small forest near your dacha, or you have already cut down trees on your site.
The main advantages and disadvantages of wood cuts
Before moving on to the characteristics of the material, you should understand for what purposes a path made from wooden cuts is suitable, and where asphalt or tiles should be used.
For walking around the yard or between the beds, wooden cuts will perfectly fulfill their role, because the load on them will be insignificant, but a platform for a car or garden equipment is a completely different matter. Even the weight of a passenger car is enough to damage the surface of a wooden walkway.
The undoubted advantages of wooden saw cuts include:
- Appearance– despite the availability of the material, you don’t often see such paths among neighbors or friends, this is explained by the usual stereotypes inherent in people who prefer traditional coatings. Therefore, your path made from saw cuts will look original;
- Price– as mentioned above, having access to wood, you will provide yourself with all the necessary material for laying this path;
- Ease of installation– for this you will not need any extensive knowledge (what is in the article will be enough), the tool you need is also the most primitive, basic skills in handling wood will be enough;
- Ecological cleanliness– and really, what could be harmful about paths made from cut wood, add to this the pleasant walking with bare feet on the wood.
There are also disadvantages to saw cuts, which it is better to know about in advance and be prepared for them:
- Fragility– wooden saw cuts deteriorate under the influence of the environment, this fact is aggravated by the fact that rain and snow penetrate freely into the structure of the cross cut, in this position it is least protected. It is worth noting that saw-cut workpieces made too thin will be the first to suffer mechanical damage, because they are not able to withstand serious loads and impacts;
- Insect dominance– this problem can spoil only certain parts of your path from tree cuts, but you need to be prepared for it.
Here, perhaps, are all the main pros and cons inherent in this material. It should be noted that a garden path made of wood can be made in several ways; this will be discussed further.
Path laying options

Wooden paths differ in their cross-section; it can be truncated or solid. If the diameters of the saw cuts are too large, they can be cut in half, this will make installation easier. The standard cutting thickness for wooden paths is 100 mm; it will provide sufficient strength and it will not be difficult to work with such workpieces.
Among the options for laying paths, there are several types, the most popular of which are:
- Classic path - smooth along the edges or laid between curbs;
- Arbitrary shape - differs from the classics only in the blurring of its external boundaries, a very good option for a summer cottage with narrow and wide passages;
- Paths with wide seams - paving in this way does not require high skill, all flaws will be hidden by the distance between the wooden cuts. The gaps are usually filled with sand, although fine gravel works much better as a filler;
- With a figured design - you can make such a path with your own hands if you have wood carving skills. Cut cuts can be decorated figuratively, at least some of them;
To complete the picture, quite often paths made from sawn wood are decorated with additional elements, such as bridges or steps, although the space for creativity is not limited.
Step-by-step instructions for laying saw-cut paths
A DIY garden path made from wood cuts has clear installation regulations; by following the exact instructions, the process can be significantly speeded up.

Preparatory operations
- Material selection– for these purposes, wood of various types can serve, most often the one that is at hand is used, but for more reliable service, hard varieties are used. The best option would be saw cuts from larch; they have the highest strength, and rotting processes are not typical for this wood. When exposed to moisture, it only gets stronger; such a path will last for a very long time. Oak or pine can be a good material, although their service life will not be as long. Most often, poplar or any other currently available wood is used; its advantages are considered to be low cost and ease of replacement of individual track elements;
- Preparation of cuts– initially the log is dissolved into logs from 10 to 20 cm long. The thicker the cut, the more securely it will be fixed to the surface of the earth. The bark must be removed from the cut, otherwise it will begin to rot, and this process will transfer to the rest of the wood.
It is important to know! If the diameter of the workpiece is too large, then its thickness should also be increased; a direct pattern is observed. If this is not done, the strength of the cut will decrease.
- It is better to eliminate cracked workpieces during the preparation process, otherwise they will be the first to fail during operation.

- Processing of cuts– for this, drying oil or other oils are used, which, when absorbed, will extend the life of the wooden path made from wood cuts. In order for it to penetrate as deeply as possible, the saw cut should be treated with oil heated to a boil. If this process causes you concern, then you can use specialized antiseptic agents; they are applied to the surface of the wood without preheating. For more reliable protection from moisture, the lower part of the cut can be treated with bitumen. After which the cut is dried for 4 days;
- Marking– decide on the required width for your path, for this you need to understand what purposes it serves, 35 centimeters will be enough for a person to pass through, if you plan to move carts or garden equipment along it, then the path should be wider. Next, set marks along the entire perimeter in the form of pegs, and stretch the lace between them, and after the fact, adjust it as you like;
Working with the base

Laying cuts
Laying options can be very different, as described above, it is important to remember only that the height of all elements must be the same. If “steps” are observed on a path made of wooden saw cuts, the protruding saw cuts should be seated more reliably using a wooden or rubber mallet;
Decoration – you can decorate both the cuts themselves and the spaces between them. Small pebbles are often used as a material for jointing; they harmonize perfectly with the wood. Although you can fill the gaps between the bars with a mixture of earth and sand saturated with lawn grass seeds, which, after growing, will give the path a fabulous look. The saw cuts themselves can be decorated with wood carvings or simply covered with oil paints of different colors.
Caring for a path made from saw cuts
The appearance of wood deteriorates from frequent precipitation, sunlight and temperature changes; you can update the cuts yourself with a special metal scraper or a sharp knife, removing the darkened top layer, after which antiseptic and oil are applied.
Video: DIY garden path